S is the nineteenth letter in the alphabet, and it’s a relatively common letter in English. We associate it as a soft letter, and if you say an S sound slowly it even sounds like a soft hiss.
It’s a letter that’s easy enough to learn when you start out, as the capital and lowercase versions look almost identical. While it may be easy to learn to write it, we’re here to take it to the next level!
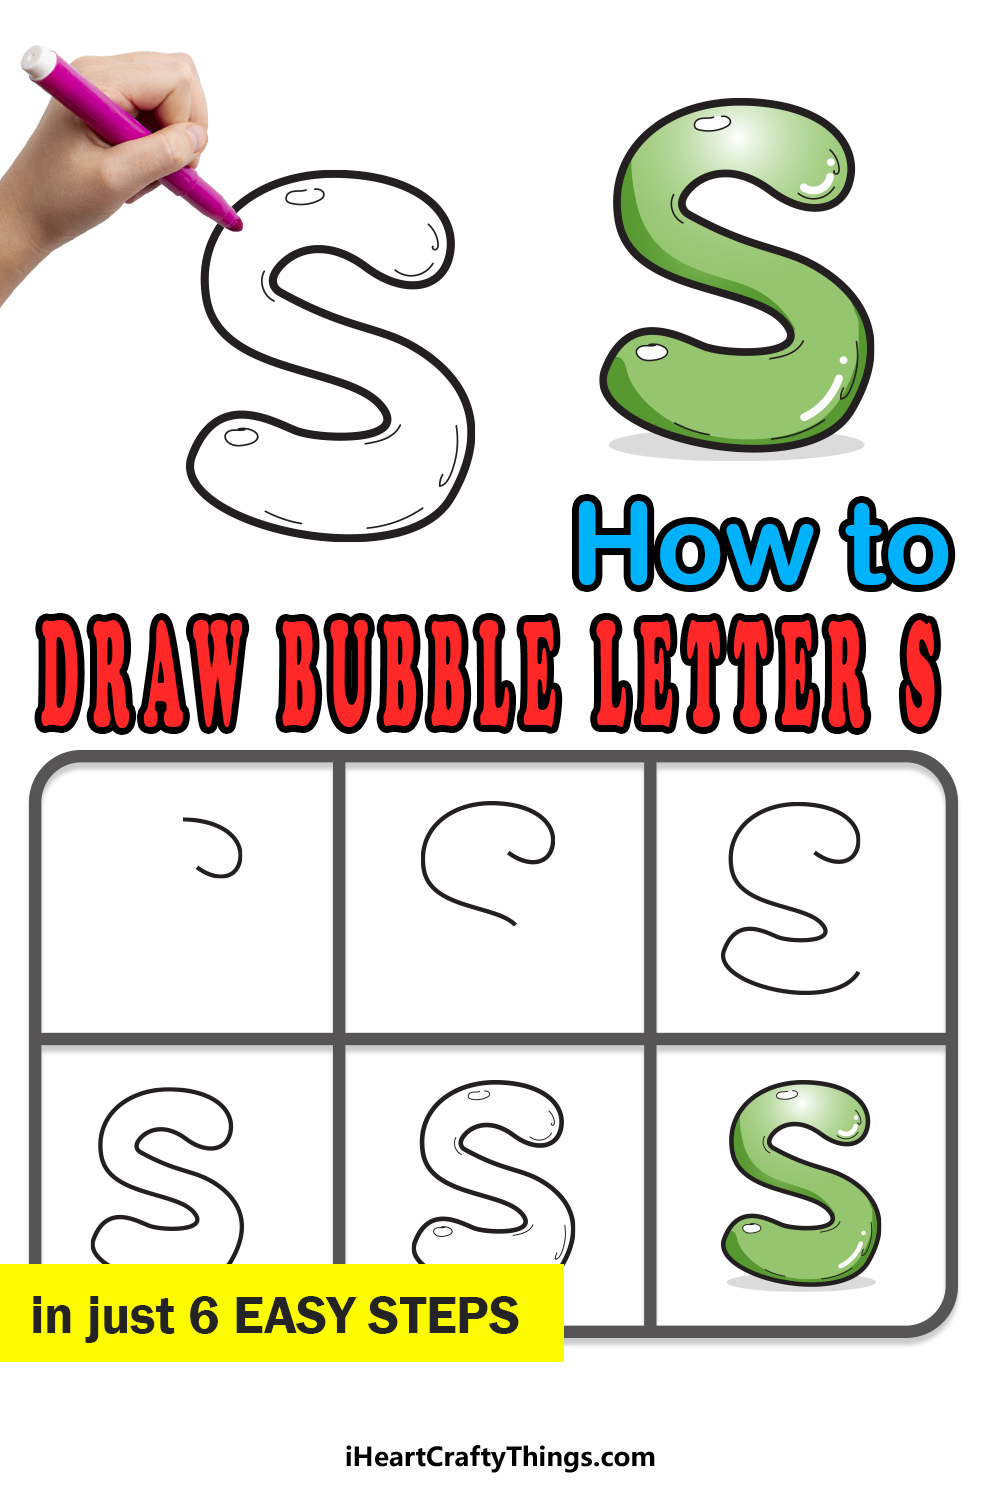
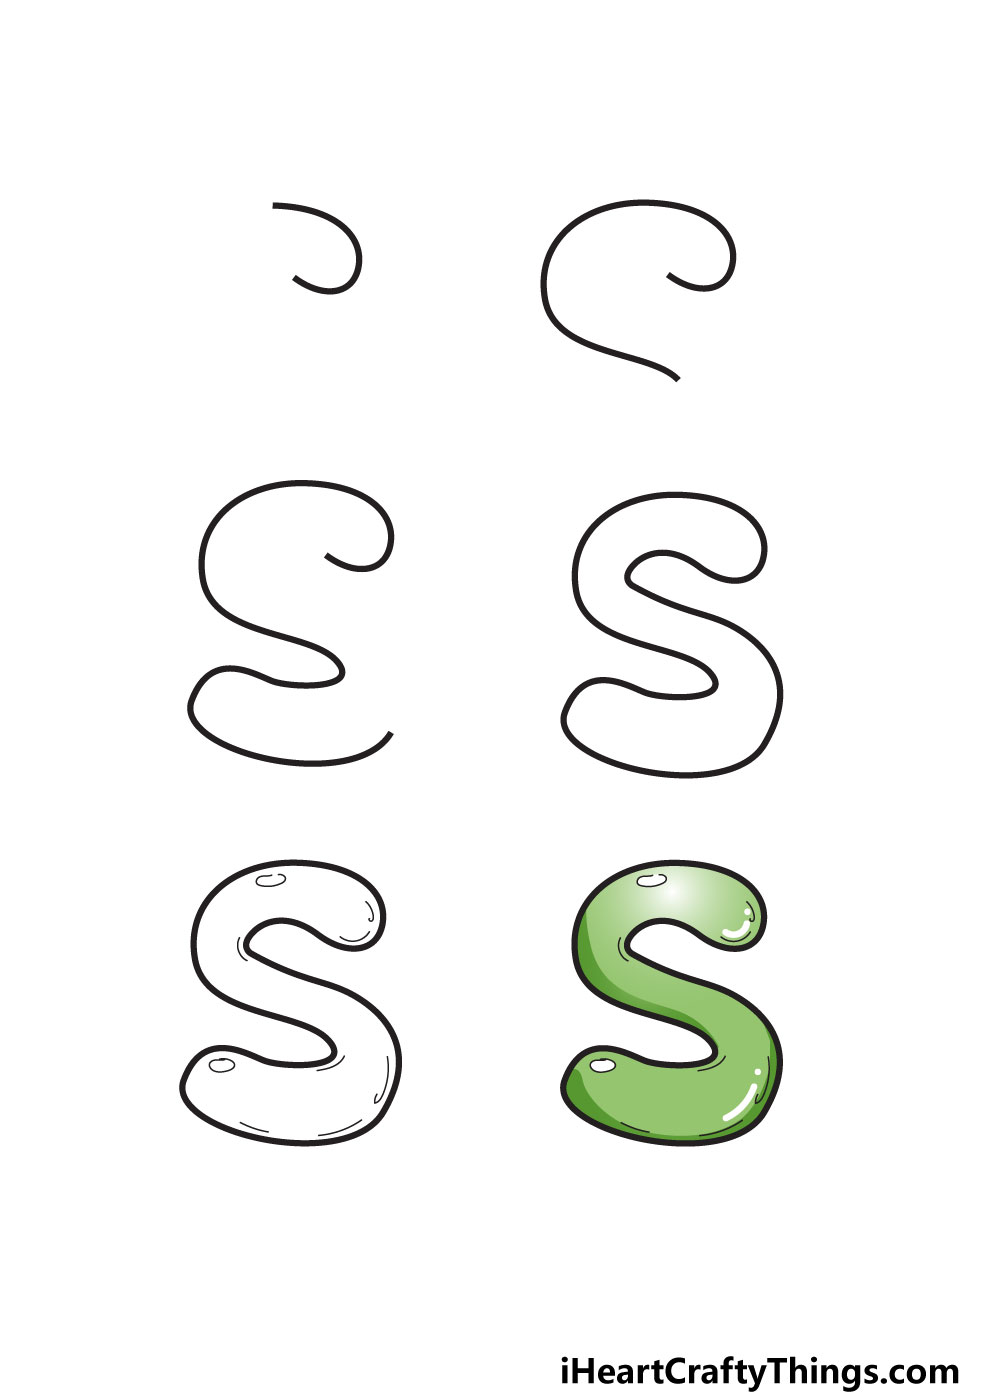
This guide will be all about learning how to draw a bubble letter S so that you can make all kinds of cool designs! We will cover some ways you can color it in along with other fun ideas to try.
By the end of this guide, you will be able to not only draw this letter in a fun way but make all sorts of cool designs.
So let’s begin the fun by starting with the first of 6 steps we have prepared for you!
Let’s Get Started
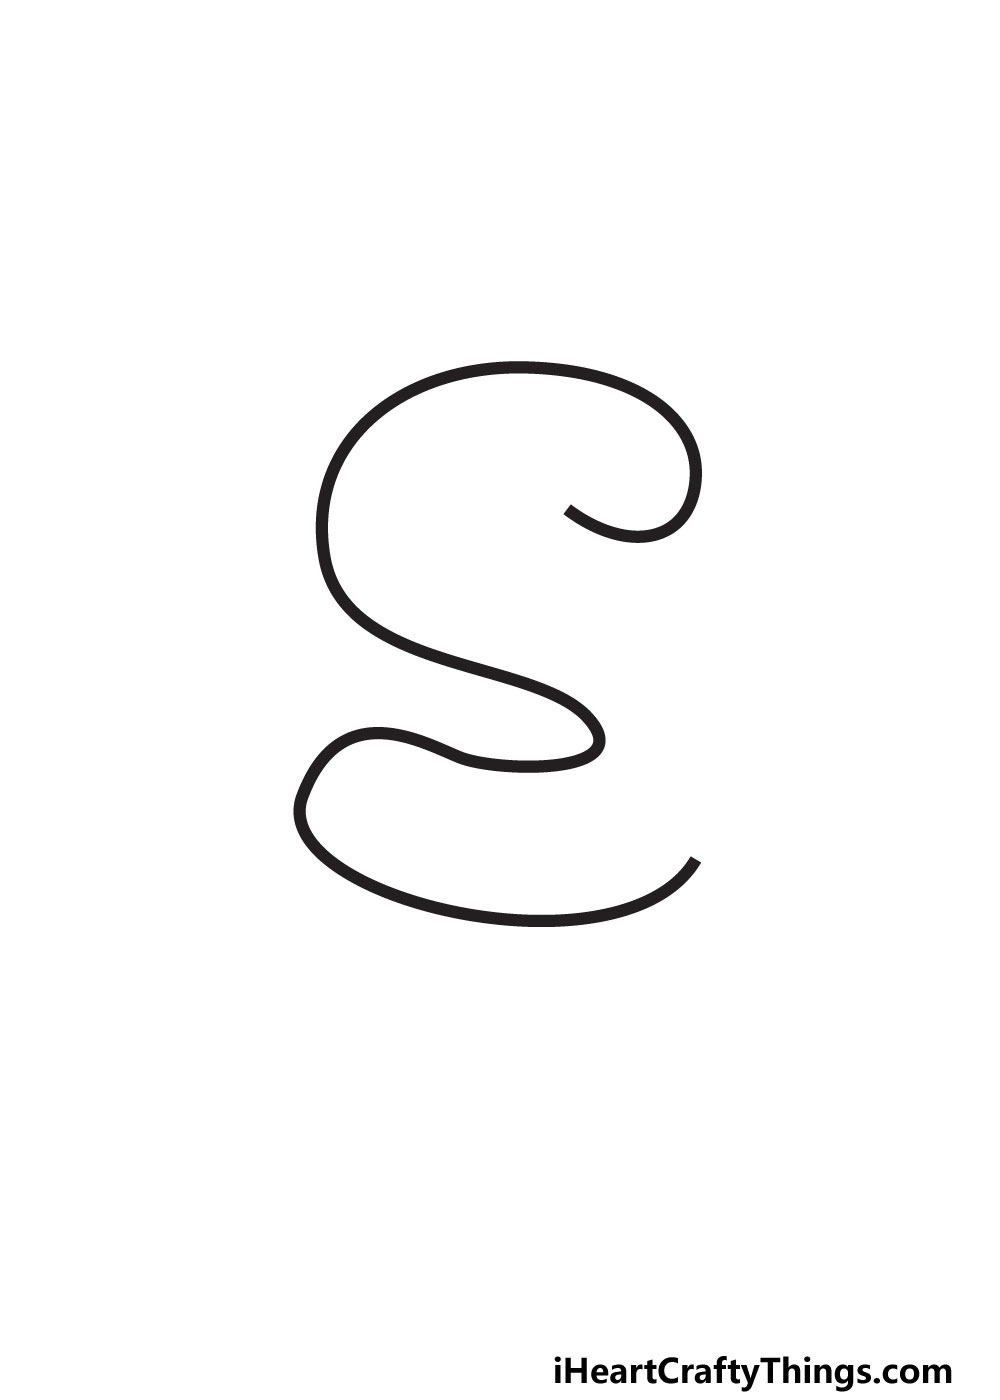
STEP 1:
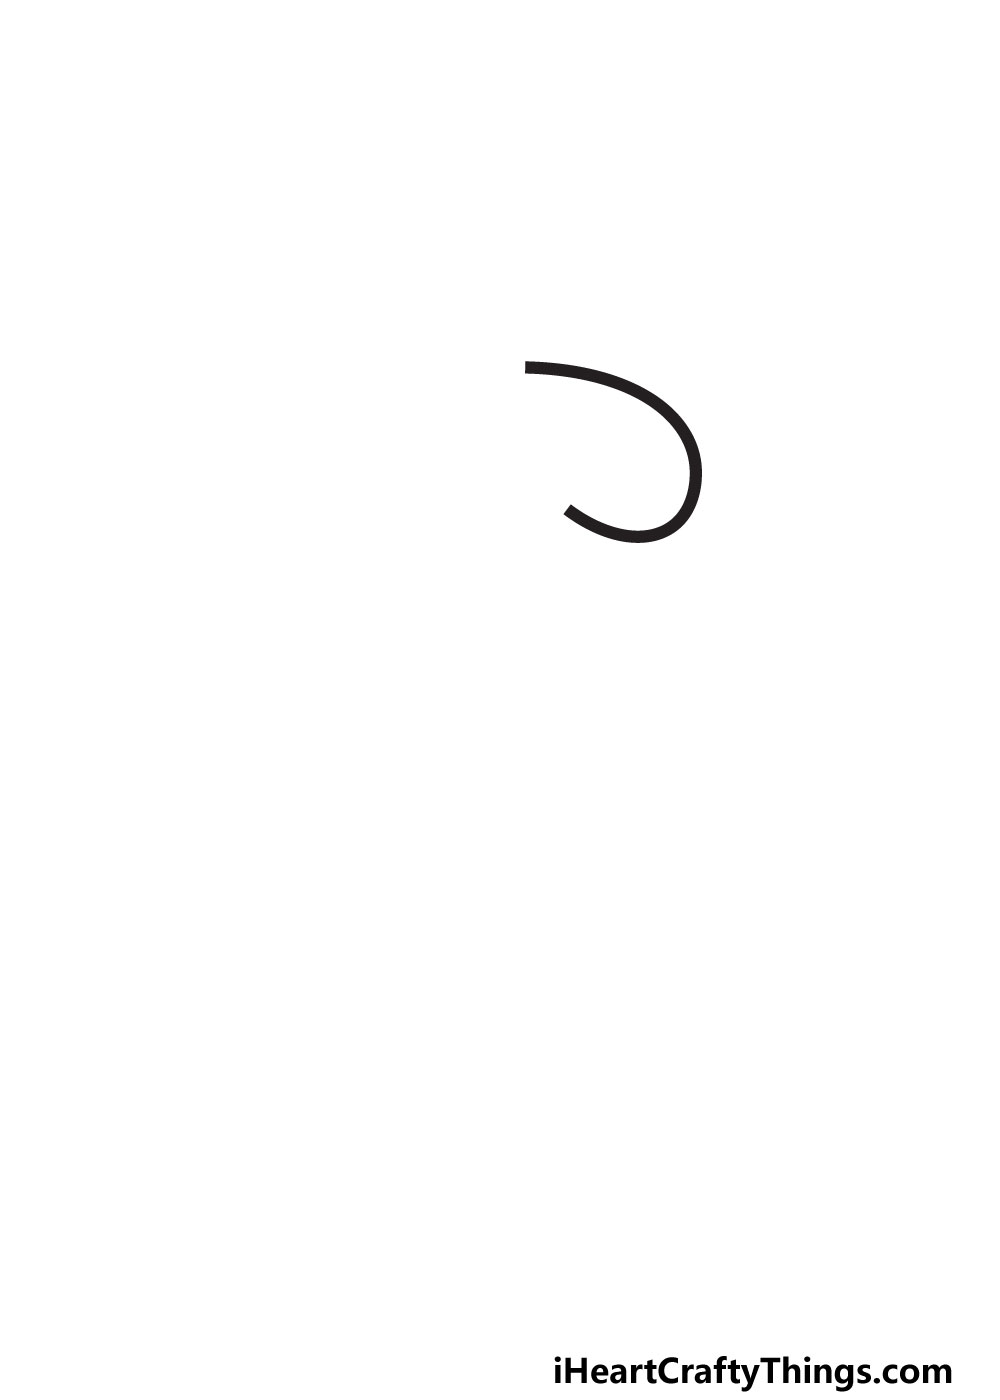
The letter S is a simple, wavy letter. Even so, it couldn’t hurt to map it out with a pencil before you begin. Look closely at the reference image and then write out a large S as you normally would.
This will help you to keep the shape of the letter consistent, as we will be breaking it down into smaller chunks.
When you’re ready, we can then draw the first line of the drawing. This will be the very top tip of the letter, as shown in the reference image.
As you can see, it looks a bit like a horseshow shape that has been twisted around to face the left. Once you have drawn it as it appears in our example, we can keep adding to it in the next step.
STEP 2:
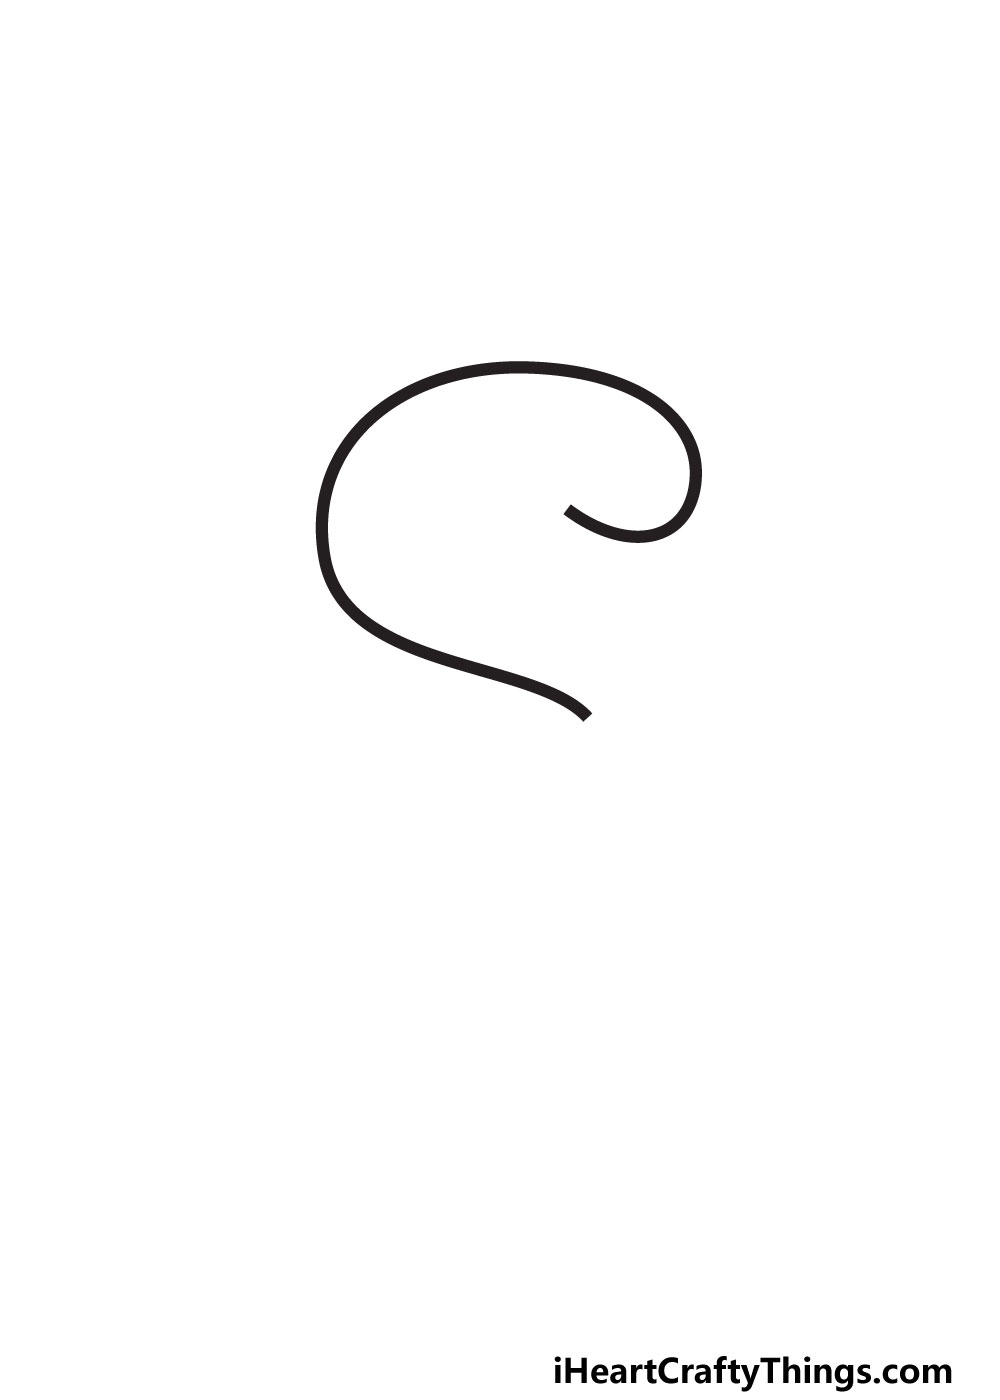
In this second step of the guide, we will continue the line that you began in the first step. If you can do the first and second steps in one go, then that would help make it smoother.
This second portion will extend from the top portion of the shape we drew in step one. It will curl gradually around and down to form the back of the S.
We’re aiming to make the shape as smooth and wavy as possible, so try to keep your drawing strokes as loose as you can while maintaining the shape.
Then, it will be on to step 3 of the guide where we will continue building on what you have drawn so far.
STEP 3:
We will be adding quite a lot to your bubble letter S in this third step, but you can definitely do it! In this step, we will be drawing the base section of the letter.
The line will extend from where the other line ended and then will curve around again. Then, you will need to draw a slightly curved line to the right to form the base of the letter.
If you drew the letter S with your pencil first, then you will see how this will all come together when we finish off the outline in the next step.
Once again, try to keep your drawing strokes smooth and consistent to make sure that the outline has a nice flow to it.
In the next step, we will then finish off the outline so that you can start adding some interior details. When you’re ready, let’s move on and finish that outline!
STEP 4:
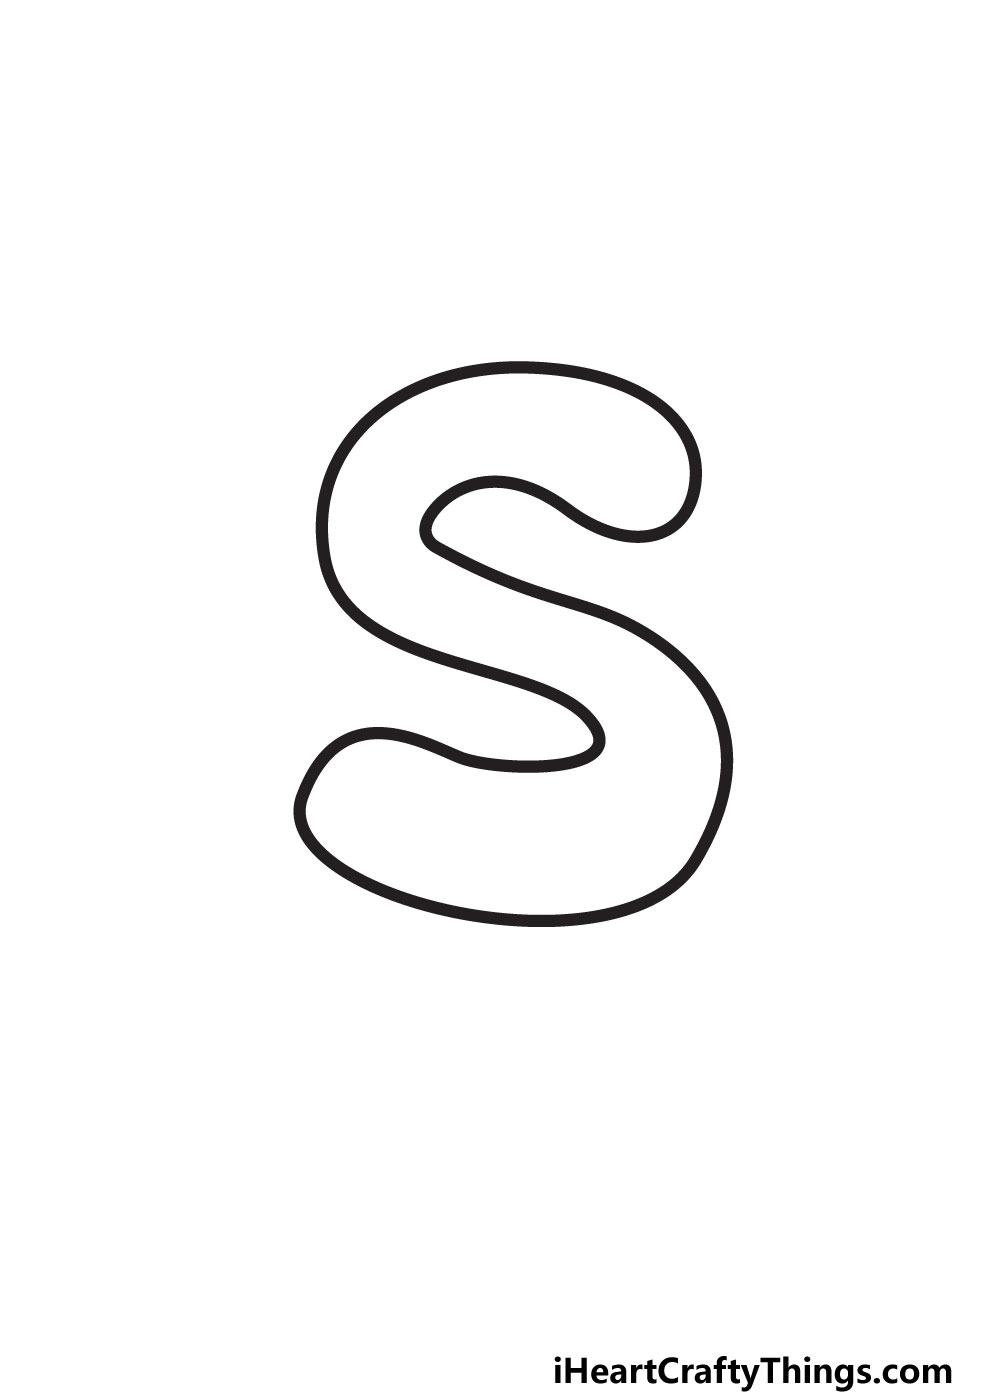
This is where it all comes together, as now we will finish off the outline of the S. Now you will see how all these lines will work together to make this bubble letter!
This could also be the trickiest part of the drawing, so let’s take it slowly. We recommend starting from the end of the line at the base of the S.
It will curl up and then inwards towards the center of the S, as shown in our reference image. Then, it will bend outward until it reaches the end of the line that ended near the top.
Once you have done these new lines, your S outline is complete! Now would be a good time to smooth out the outlines if anything is looking a bit off.
Also, we would recommend erasing any pencil lines that you may have drawn in the first step, as from this point on we won’t be needing them.
Be careful not to accidentally erase any of the final lines or smudge ink as you do! In the fifth step, we will then start drawing some interior details.
STEP 5:
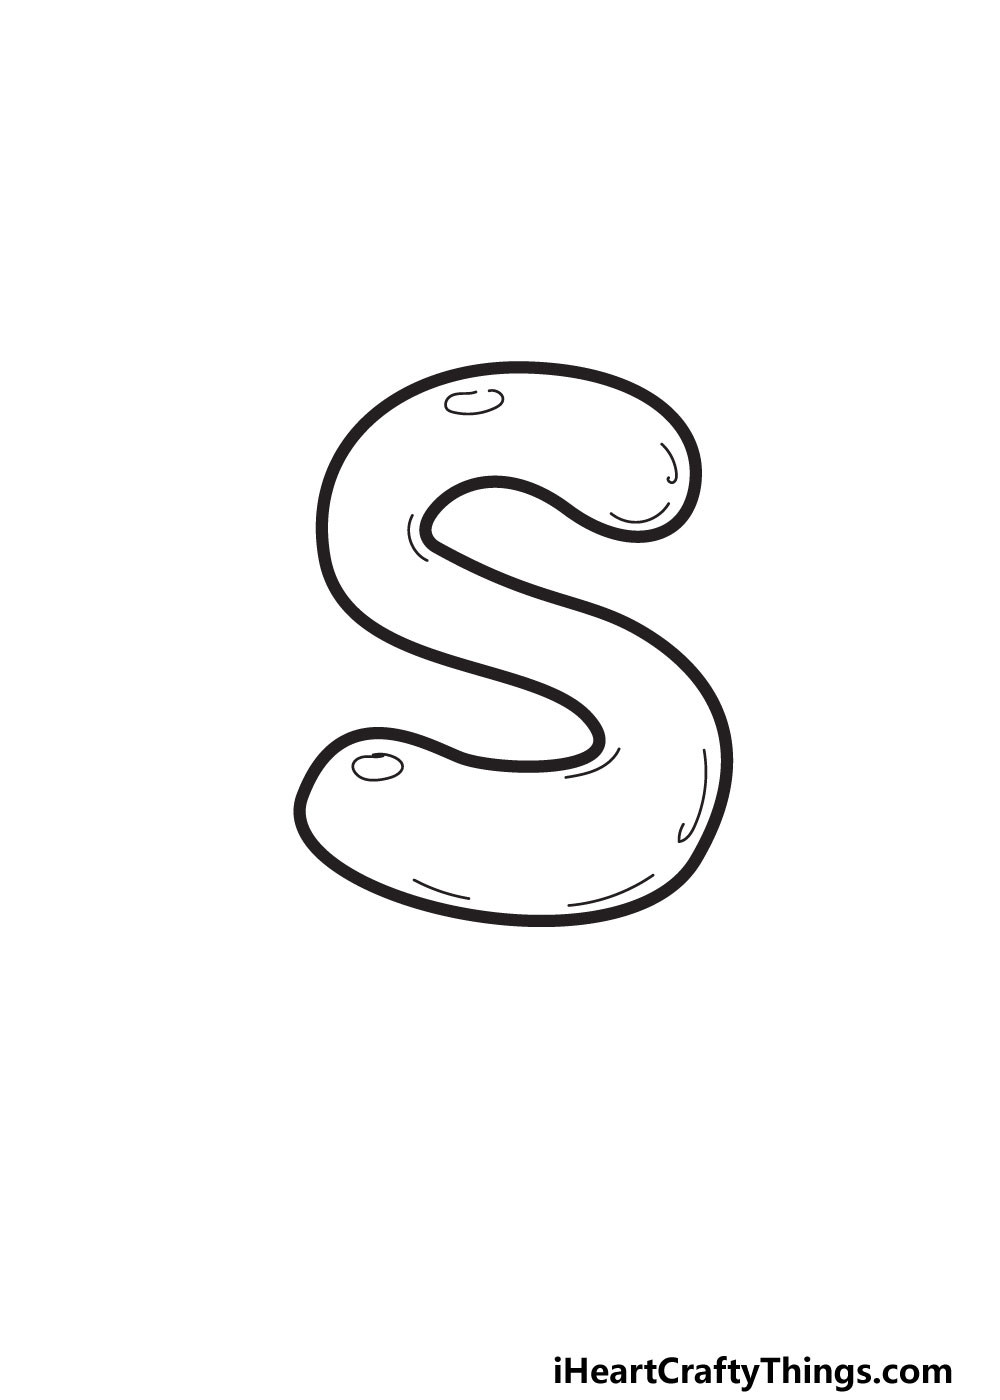
As good as this letter S looks now, it’s not quite looking like a bubble letter just yet. We will be changing that with just a few small details, however.
One way we will do this will be by adding some reflective spots to the letter. When doing this, we will be imagining a light source on the top left-hand side of the drawing.
To show that, these shapes will be drawn on the upper sections of the curls of the S. The reference image will show you how it should look if you wish to recreate how it looks.
If you want the light source to be in a different place, then you can draw these oval shapes elsewhere on the letter.
Just try to keep them placed in a consistent way to make it look more realistic. Then, we will add some simple line details inside the S.
These line details, while simple, will help a lot in making the S look like it has volume. They will go near the insides of the outlines and make it look like the letter is made out of a balloon.
These are also details that you could draw in different places if you want the letter to look more unique. Before you start coloring the picture in the next step, be sure to add any details you want!
These could be on the letter itself or surrounding it. We will also go over some fun ways you can personalize the letter after step 6.
STEP 6:
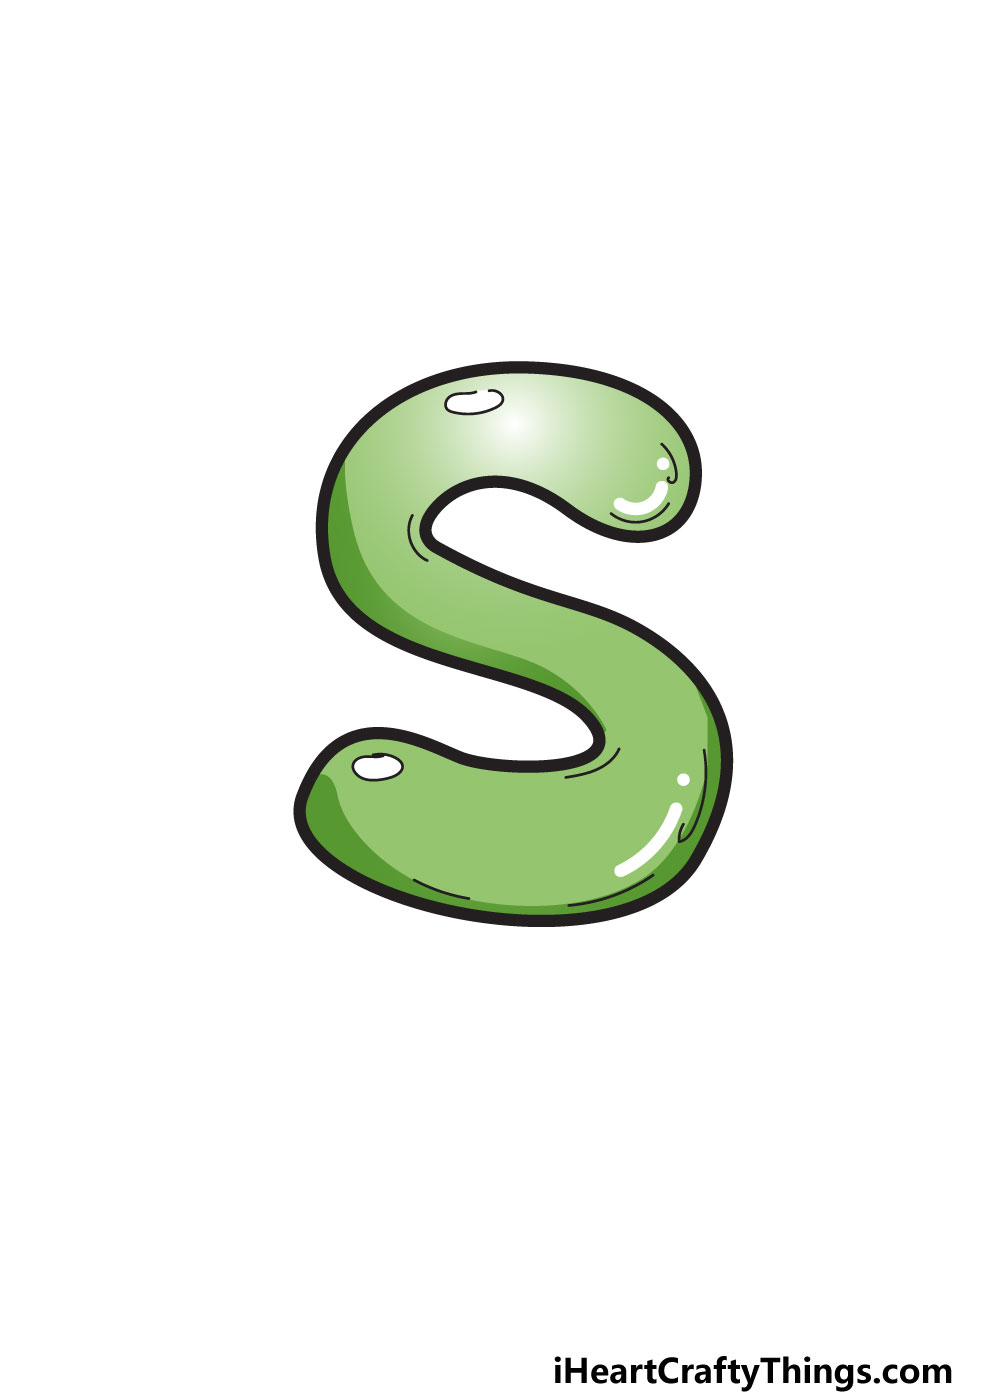
This is the final step of this guide, and it will be all about bringing some color to your bubble letter S! There are so many ways to color it in, so you can really get creative with it.
In our reference image, we showed you just one of the many ways you can color your picture. You could choose any colors you like, but for now we will be using green as an example.
If you pick a color and use just one shade of it, you will make the letter look too flat. That’s why we recommend using a gradient of colors.
The green is darker the further away from the light reflections we get, and it gets lighter closer. That makes it look like an actual object that is reflecting light.
It’s a simple trick, but it helps to make the letter look more 3D. Using paint is a great way to make the colors fade into a gradient like this, so it would be our top recommendation for coloring it.
What colors and art mediums will you choose?
My Final Tips To Make Your Bubble Letter S Drawing Even More Special!
The 6 steps of this guide may be complete, but we aren’t done yet! Now it’s time to relax and have some more fun bringing your own flair and ideas to the drawing.
Let’s start by thinking of some words that begin with S. Luckily, there are many! We can think of some like snake, spade, sled or stapler.
We shall use snake as an example of how you can theme the drawing to your chosen word.
The letter S actually looks a bit like a snake, so you could turn your bubble letter into a snake by adding some eyes and a forked tongue!
You could then write out the rest of the word in similar bubble letters, or they could be shaped like snakes too.
This is just one example of how you can create a theme by choosing a word. You could also use someone’s name as a theme.
For example, if you have a friend named Steve who loves skateboards, you could write out his name and then draw some skateboards to make a cool card.
You can also add backgrounds or even use some fun and creative crafts to make the colors and textures really pop!
These are a few ideas you can try, but what are some other ideas you can think of to make it even more special?