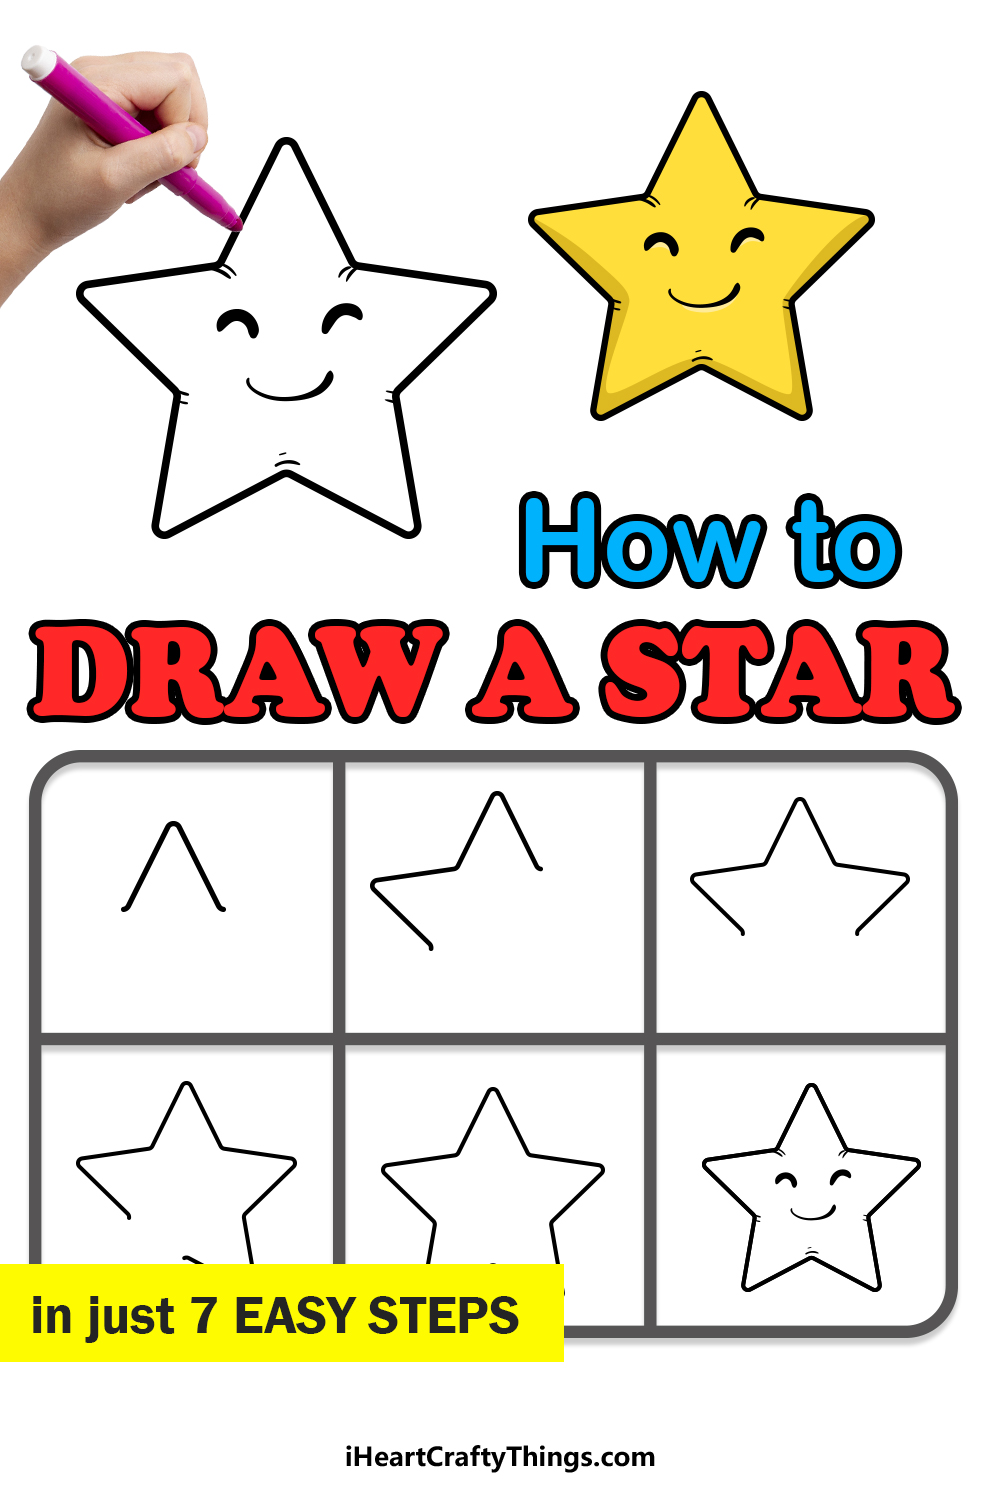
If you want to know how to draw a star, this is the right place! Get ready to learn the steps to creating a cute star character that you can customize and decorate.
We all look up at the stars with a sense of wonder, and that’s why they have so much symbolism in so many important stories, legends and religions.
Stars also bring more brightness to our world, and the drawing you are about to create will do the same thing. Once you have finished the steps of this guide, you could even add glitter and other crafts to make your drawing even more magical.
You can also add a background with more stars and perhaps a landscape beneath the night sky. The sky is the limit here, literally!
Get ready to create an artwork that sparkles and shines as we take on the first step of this fun guide for kids.
Watch These Easy Steps On Creating Your Star Drawing
How to Draw a Star – Let’s get Started!
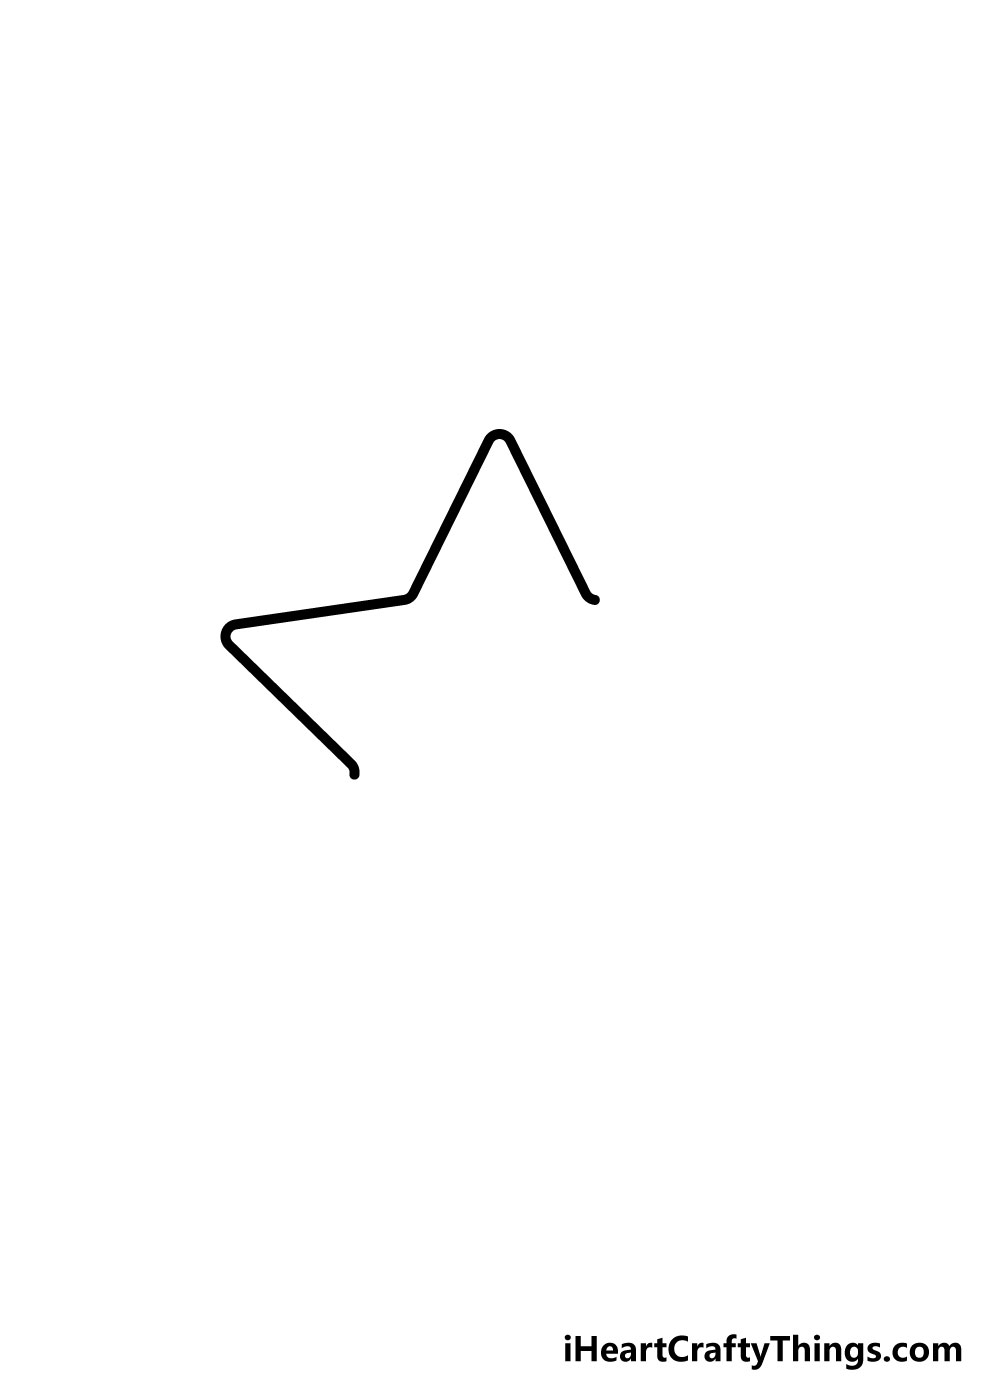
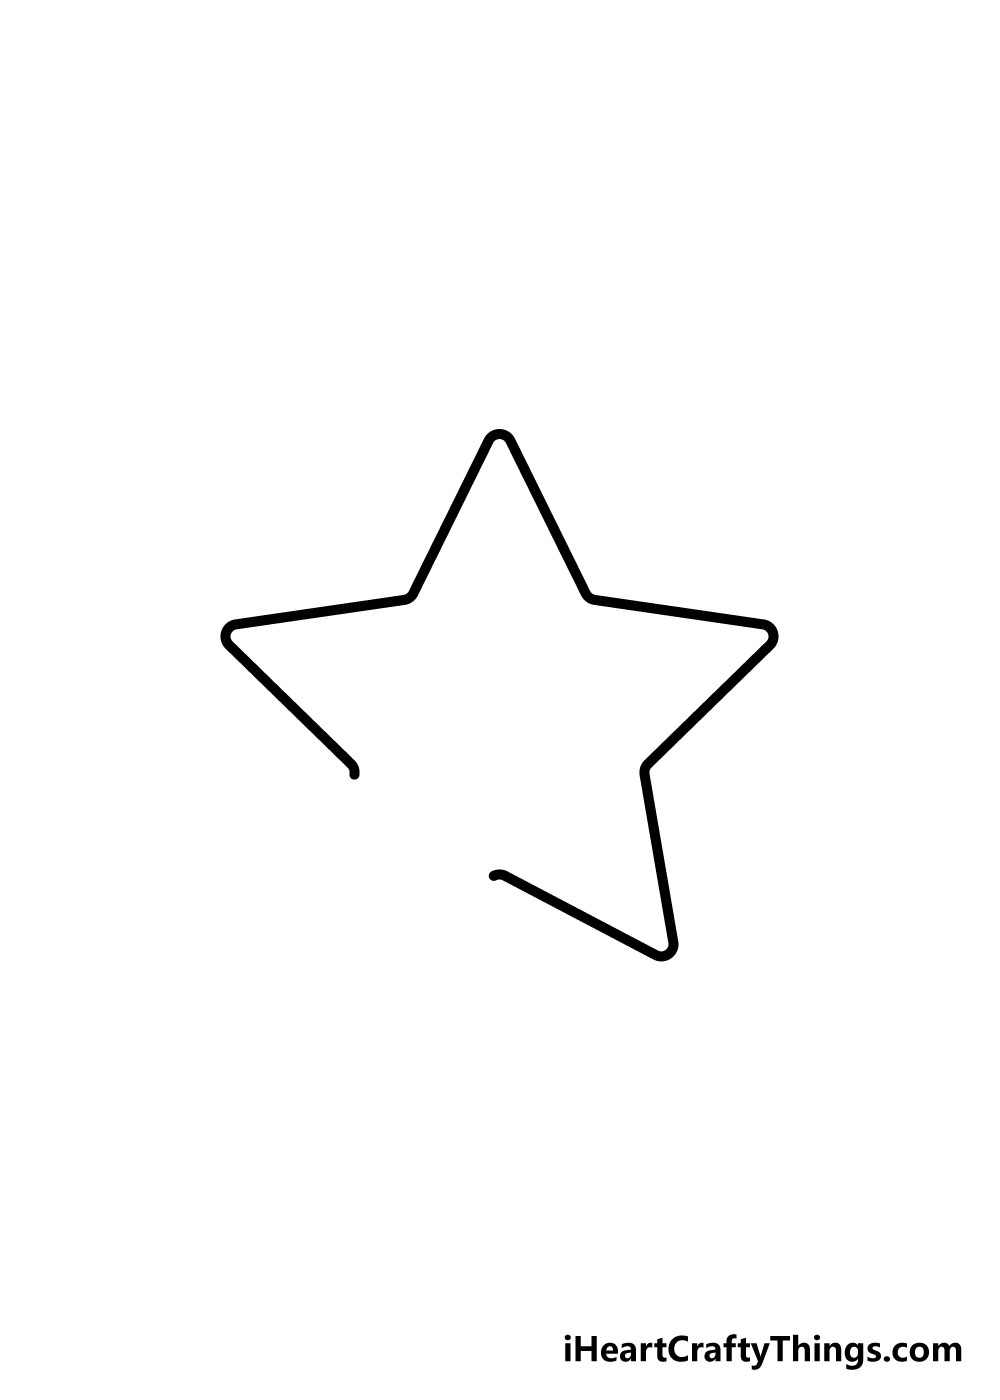
Step 1

For our first step in this guide on how to draw a star, we will be starting with something simple yet important.
I would highly recommend using a ruler while working on the outline of your star as well, to make sure that the sizes are consistent.
We will be drawing in the first part of your star drawing, and to do that we will start by drawing what looks like a triangle with no bottom.
To make things easier, we will refer to each part of the star as an arm.
Where the lines end, try to leave a bit of a curve as you can see in the reference image, as that is where you will be connecting the other sides.
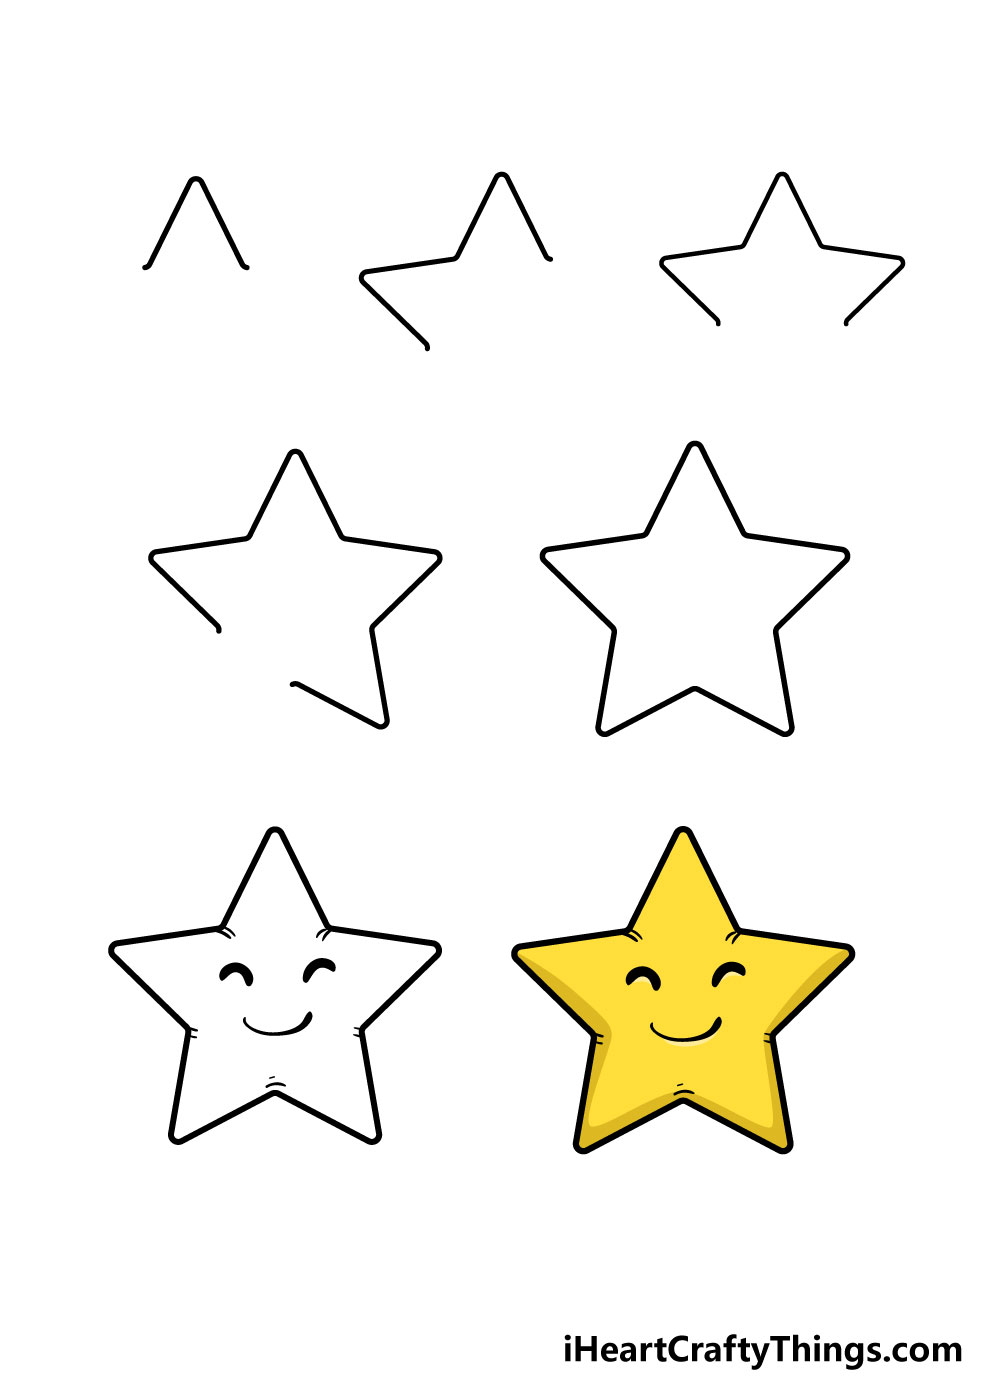
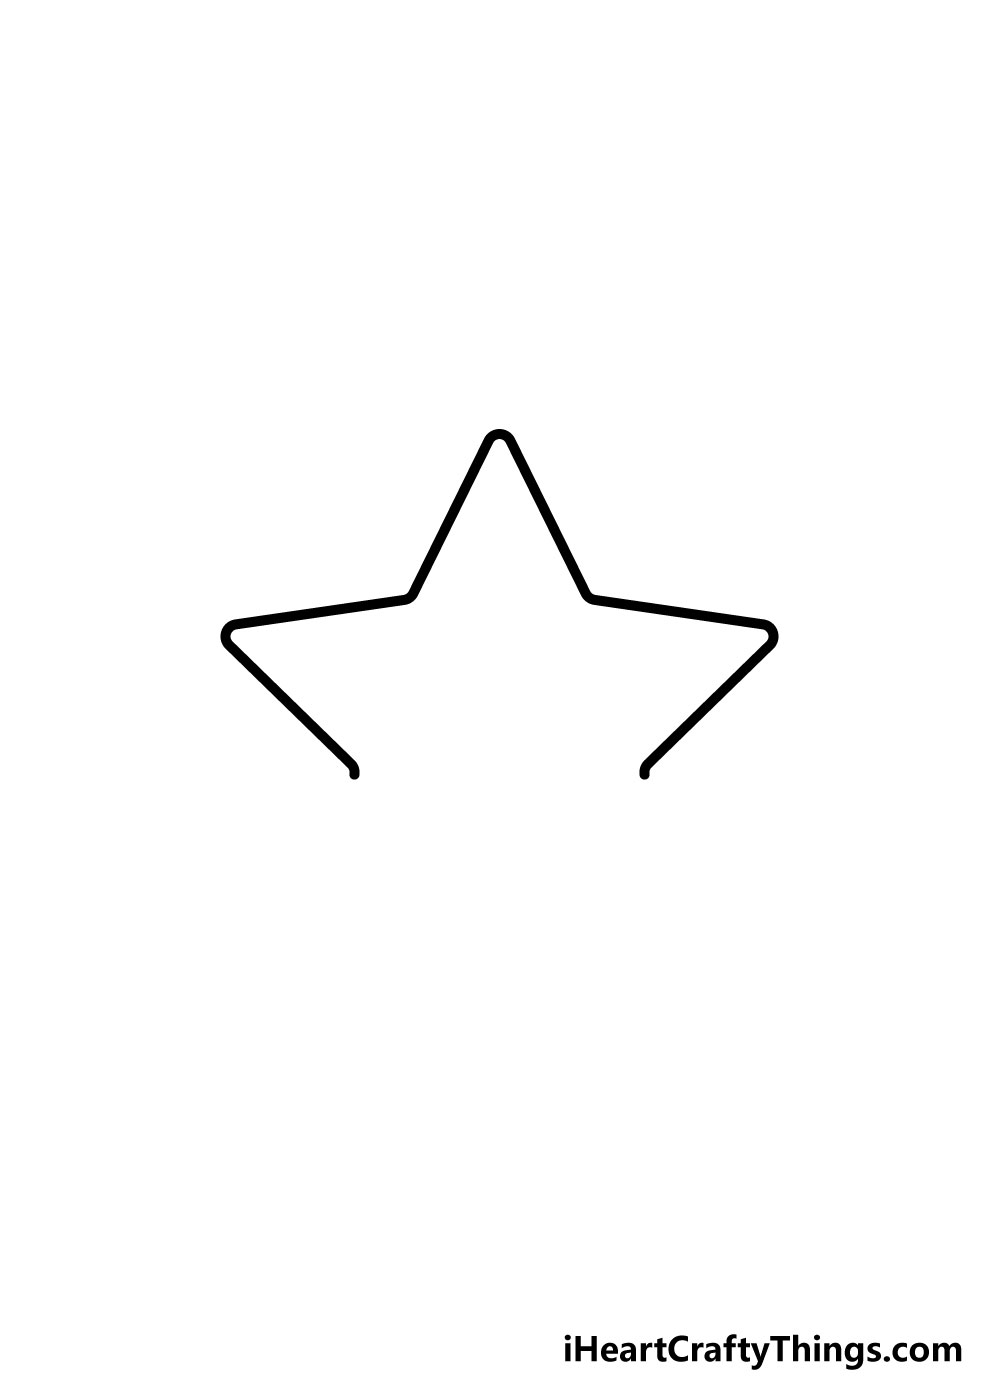
Step 2 – Next, draw in the left arm of the star
For the next few steps, we will be replicating the first arm of the starfish that you drew in step 1.
To keep the arms close to the same length, it can help to measure how long the lines of the first star arm are and then make sure that the lines that will form the other arms are of the same length.
Step 3 – Next, draw in the next arm of the star
For the third step of your star drawing, we will be drawing in the right arm of the star.
This one should be a bit easier, as you will be creating a mirror image of the left arm, so you have an idea of the angle it should be at.
Remember that measuring how long the other arm is will help to make the length of this one consistent with the rest.
Step 4 – Now draw in the lower right arm
In step 4 of this guide on how to draw a star, we will be adding in the lower right arm of the star. Taking everything you’ve learned from drawing the other three, this one should be much easier!
The trickiest part is getting the angle right, but if you keep your measurements consistent and refer to the reference image it can be a lot easier!
With a bit of preparation and practice I’m sure you’ll get the hang of it.
Step 5 – Next you will be adding in the final arm of the star

You’ve come this far, and you’re almost there! This should be the easiest arm of the star to draw in, as you have the other arms to use as your guide.
Getting the angle of the arms right can be a bit tricky, so you could draw your star in pencil first and then go over in pen when you’re happy with it.
If you do use pencil first, make sure that the pen ink you draw over it with is dry before you erase the pencil! If you erase too soon, that can make the ink smudge, so it’s important to take this step slowly.
Step 6 – Now draw in a face and final details
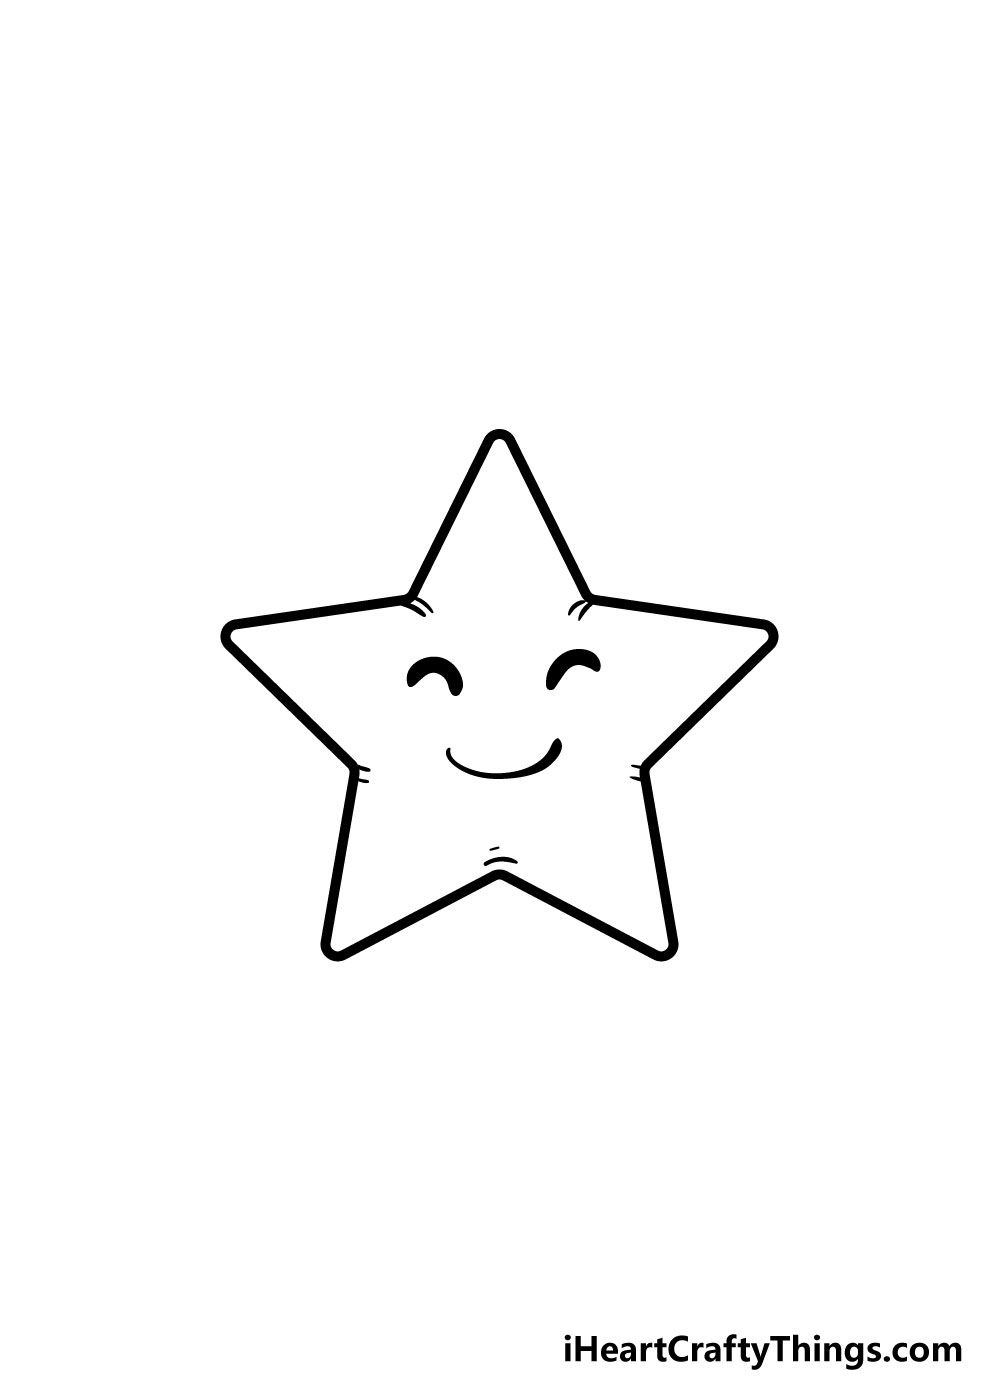
Now that your star shape is complete, you can personalize it and make it your own!
We’ve shown one way you could personalize your star with a smiley face, so you could go with that or draw in some faces of your own!
You could also draw in some fun patterns or even leave it blank, and at this point it’s up to you! We can’t wait to see how you finish off your star drawing.
Step 7 – Now finish it off with some color
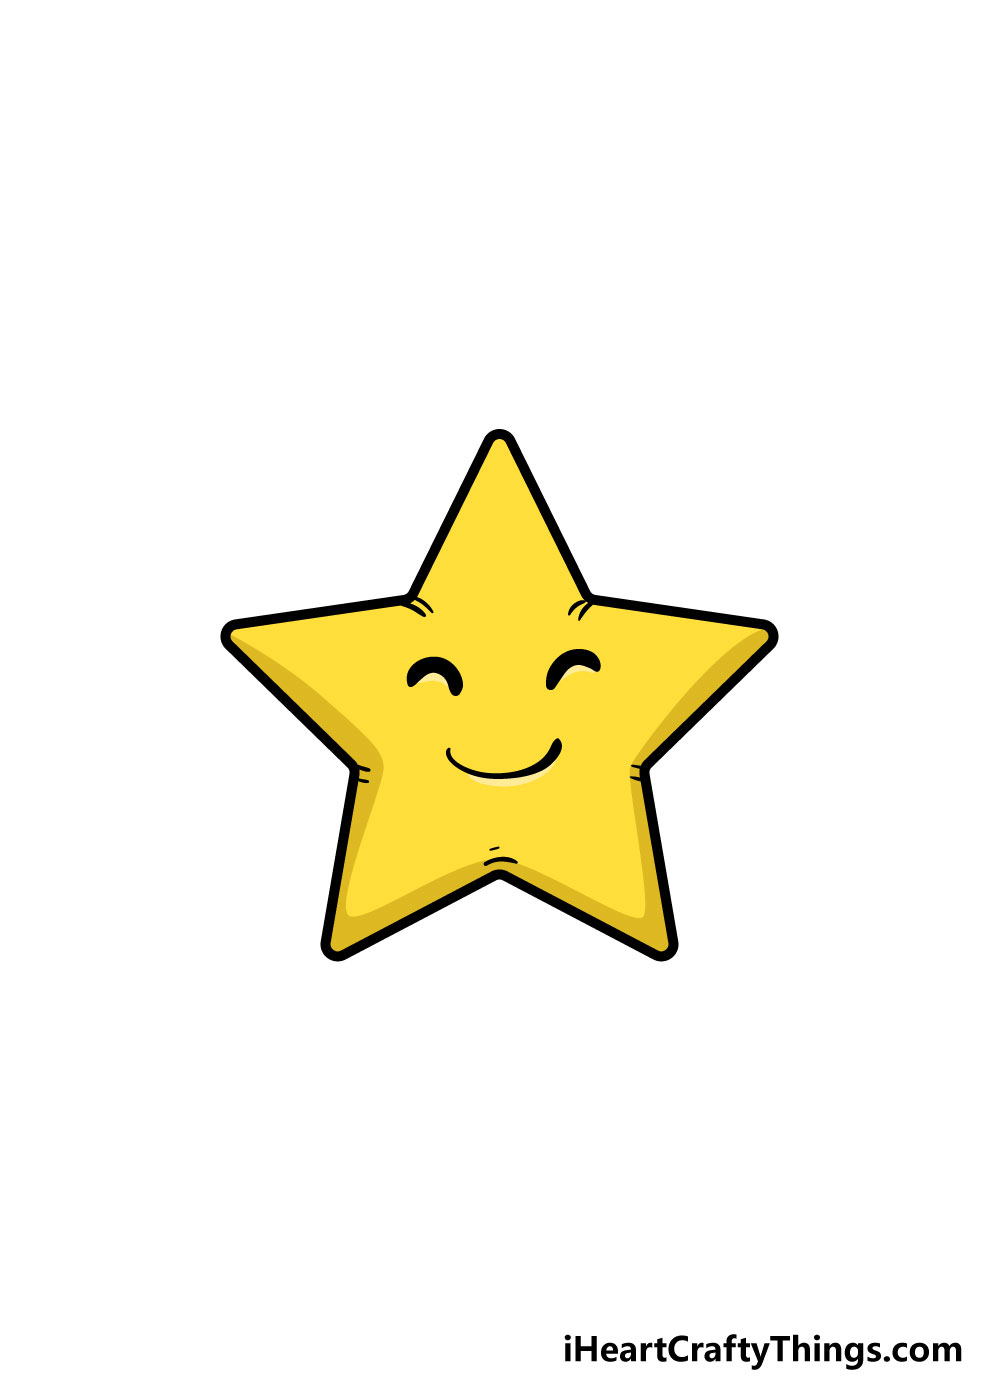
Your star drawing is now complete, and all that remains now is to bring it to life with some beautiful colors!
We’ve shown one way that you could color in your star drawing, but you should let your creativity run wild for this step!
Will you go for a traditional glowing yellow or bring your drawing to life with some bright and brilliant colors?
You could also experiment with different art mediums for some amazing color variations.
Using mediums such as acrylic paints, watercolors, colored pens and pencils can help you to achieve any look or mood that you can imagine!
We can’t wait to see what colors, art mediums and styles you choose to finish off your awesome star drawings!
Create Some Characters Out Of Other Shapes
In this guide on how to draw a star, we focused on creating a character out of this shape, but it feels like there is more that can be done! We thought it would be fun to add some more characters made of other classic shapes.
First, you could try and come up with some shapes that you like. It could be as simple as a circle or something a bit more complex like a hexagon.
Once you have chosen your shape, carefully draw the outline near to the star. It could be more or less the same size if you want to keep the perspective the same.
If you make them smaller, then it could look like they’re further back than the star drawing you created. Once you have the outline in whatever size you like, you can then add a face.
It could be smiling like the star, angry or maybe surprised. These are just a few options, but you could portray a whole lot of different facial expressions, perhaps drawn in different styles.
It could be fun to draw a whole page filled with these shapes to create a shape party! Adding limbs and clothing like hats and bowties would also bring these characters to life.
If you really feel like taking it further, then you could even draw a background setting for them to hang out in. They could have props that all fit the theme and the background you have chosen.
Don’t forget to also use colors, art mediums and crafts to make the characters more unique. There is so much you could do for this drawing!
We have a few more ideas that bring the focus back to the drawing of a star, so let’s take a look at those.
Here’s how you can make your star drawing even better…
Make this star drawing even more stunning with these fun artistic tips!
Our night skies are filled with countless stars that are a true wonder to behold. This also ties into our first tip for making this star sketch even greater than it already is.
You already know how to draw a star after finishing this guide, and one fun thing to do would be to draw many more around it.
These could be bigger or smaller than the one you have already drawn, and you could even try and give each one a unique facial expression!
Speaking of facial expressions, we showed you just one that you could draw in this guide. There are so many more that you could draw instead, though, and you could have a lot of fun creating different variations!
You could draw a cartoony face, one that is more realistic or convey happy or sad emotions. It’s the kind of picture that you could get really creative with, so we hope you will show us what fun facial expressions you can come up with!
Your star drawing looks like it could be the head of a body, and that could be another fun way to change up this design.
By adding some legs and arms you would land up with a little character! It could be dancing, running or performing any other fun activity you can think of.
What kinds of scenarios can you think of that you could place such a character into? You could also add some accessories for the character to interact with!
We covered colors in the guide, and now we will share a few ways you can enhance them further for this drawing of a star.
In the guide, we suggested using bright yellows for the star. Once you have chosen your colors, you also have different crafts and mediums you can use to take it to the next level.
For example, using some glitter would make the star glint like real ones do in the night sky.
Your Star Drawing is Complete
With your final details and colors added, you have successfully learned how to draw a star!
We created this guide on how to draw a star in 7 easy steps to make this drawing challenge not only easier to tackle but also a lot more fun!
We really hope that this step-by-step guide was helpful and fun for you to use.
Remember that even the most challenging drawing tasks can be made so much easier if you break it down into manageable steps!
We’re confident that if you follow this guide and try your best you will be drawing awesome stars in no time.
There is also a lot of room for you to get really creative and put your own spin on your star drawing!
Whether you do this by drawing on faces, patterns and styles or with different color choices and mediums, you can really put your own spin on your drawing.
We will be uploading lots of new drawing guides such as this one, so be sure to check our site out frequently to never miss out on the fun!
Once you’ve finished drawing and coloring in your star drawing, we hope that you will share it to our Facebook page for us to admire!
We always love to see how brilliantly creative you all get with your amazing artworks, and we can’t wait to see your incredible star drawing artworks!
Here Is A Star Drawing To Inspire You!
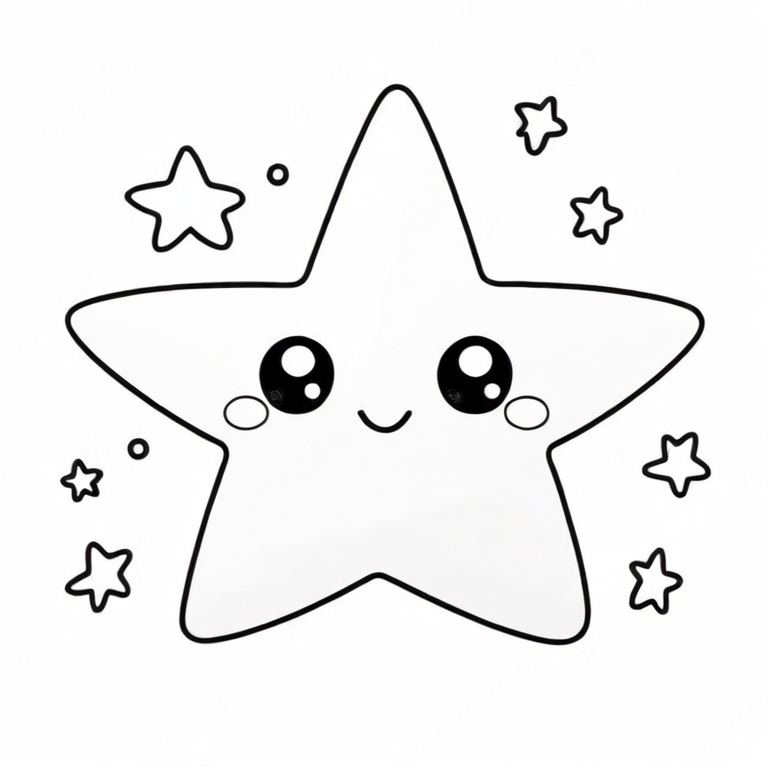
Looking up at the stars always fills you with wonder and inspiration, and this star drawing for kids aims to do the same! It was drawn by our artist Amanda to help you with your amazing artwork.
She has turned this star into a cartoon character that is so cute and expressive. The face that she used for the design is so simple and yet so cute, and it would be easy to customize it.
You could change the face of this star sketch if you want to make a different facial expression. It could also be fun to add a background to make this drawing even more distinct.
Adding little effects like sparkles and smaller stars can also be really cool and will add a lot of character to the drawing. What else could you add to this cute star drawing?