Bamboo is a rather unusual plant. It grows tall with leaves and has a hard, brittle stalk that is separated into sections.
Because Bamboo tends to grow in more tropical climates, it has an association with exotic places as well as wildlife such as pandas that feed on the leaves of bamboo.
This unusual look that bamboo is famous for can make it difficult to draw, especially due to the fact that bamboo tends to grow in thickets or forests, meaning there is a lot to draw.
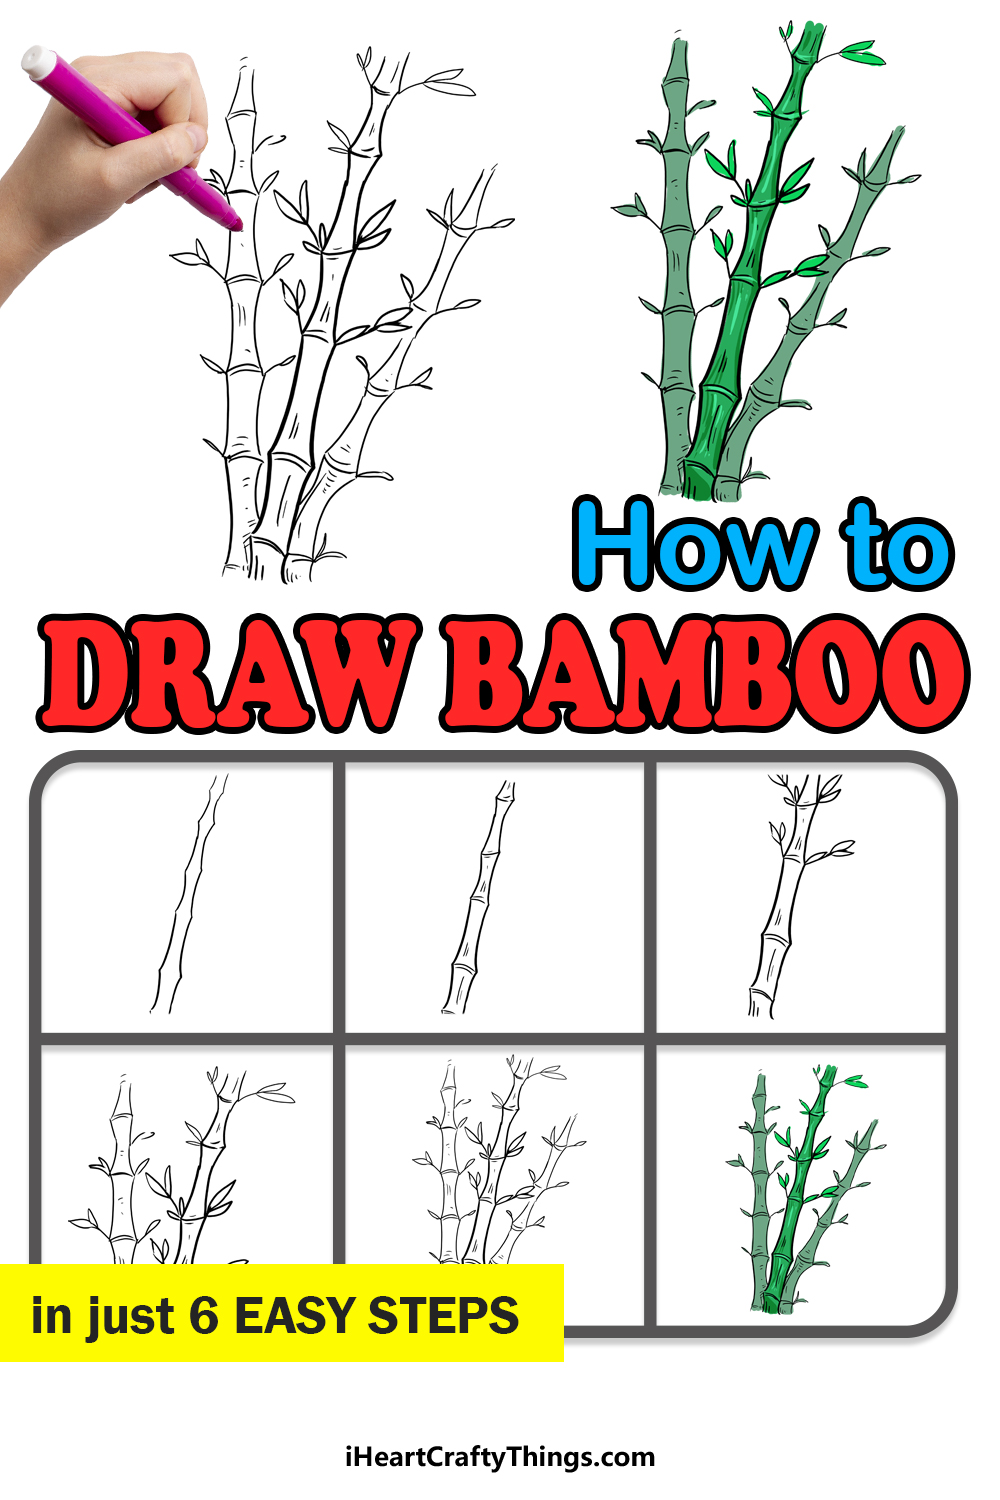
In this guide, we will show you how to draw bamboo in 6 steps that will make it easy to do. This way, you will be able to draw single bamboo stalks or a whole forest.
We will even go over a few ways that you could add to the composition by adding extra details such as a cute panda hanging out amongst the bamboo.
So let’s begin and see how you can create your own bamboo drawing.
How to Draw Bamboo – Let’s Get Started!
Step 1
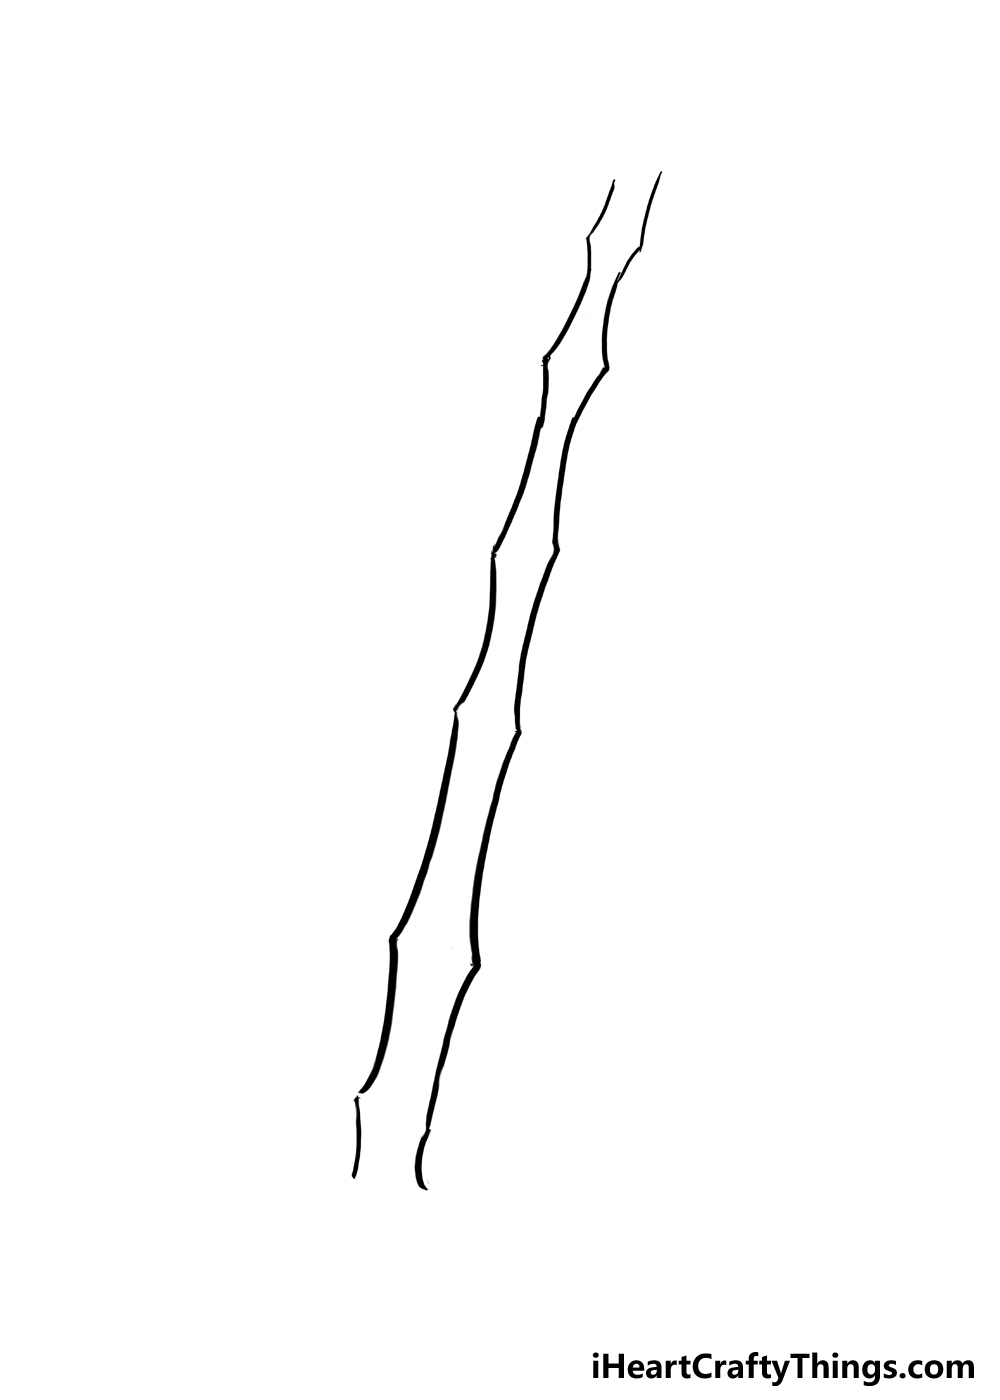
In this guide, we will be drawing a clump of bamboo stalks. We will only draw a small section of the bamboo, but once you have mastered the steps to drawing bamboo you will be able to draw as much as you like.
For now, we will focus on one stalk of bamboo, and we will draw the outline in this first step. Bamboo has a brittle, hard surface that allows it to stand pretty straight and tall.
Despite this, it is prone to bending a little, especially when it stands tall. When drawing bamboo, you want to strike a balance between having it mostly straight and slightly curved.
This can be trickier than you may think, so you can prepare your drawing before you begin. We would recommend using a light pencil line to map out the course the bamboo will take.
Try to keep this line as smooth as possible and be sure to incorporate a slight curve to it. We will then draw the actual outline of the bamboo around this pencil line.
It may seem like an unnecessary step, but it will help you to maintain a consistent trajectory for the bamboo. When you draw the bamboo itself, remember that it grows in segments.
You can reflect this by making the outline jagged with small pointy tips all along it. Once it matches the shape we show in our example, you can continue to the second step of the guide.
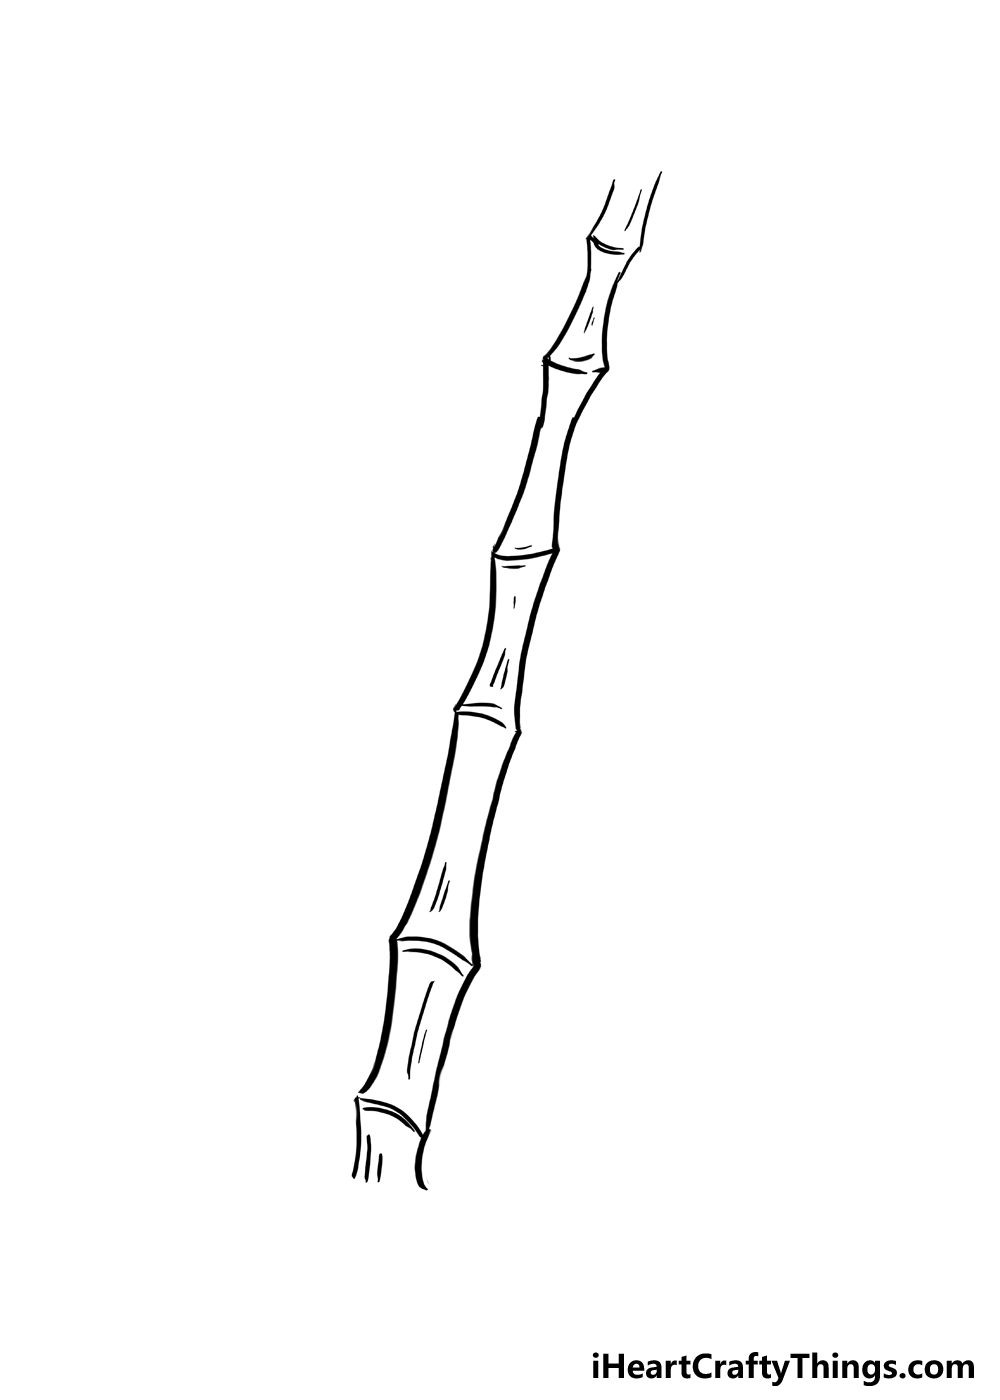
Step 2: Draw some detailing for the bamboo
Now that we have the outline for the first stalk of bamboo, we can start adding some details. Before drawing these details, you can erase the pencil line we suggested drawing as the guide.
When doing this, be sure to wait for the pen ink of the outline to dry if you used a pen. If you used a darker pencil for the outlines, then try not to accidentally erase any of the final lines.
Now, we will draw some details that showcase the different segments of the bamboo stalk. You can do this with a series of curved lines across the stalk.
Each curved line will go in the pointy sections of the outline, and each one will be a bit different.
Some will be curving up while others will be curving downward, as you will see in the reference image.
The ones in the top half will tend to curve up while the ones in the lower half will curve downward.
Some will touch both of the outlines while some will only touch one side or none at all.
This is something that you can experiment with, as it doesn’t have to match our example exactly.
You should avoid making all of these details identical, as it will ultimately make it less realistic.
Finally, you can finish off this step with a few smaller vertical line details throughout the segments of the bamboo. Once these have been drawn, the bamboo will have a bit more form and texture.
With the stalk of the bamboo complete, we will add the leaves and other small details in the next step of the guide.
Step 3: Add the leaves and other small details
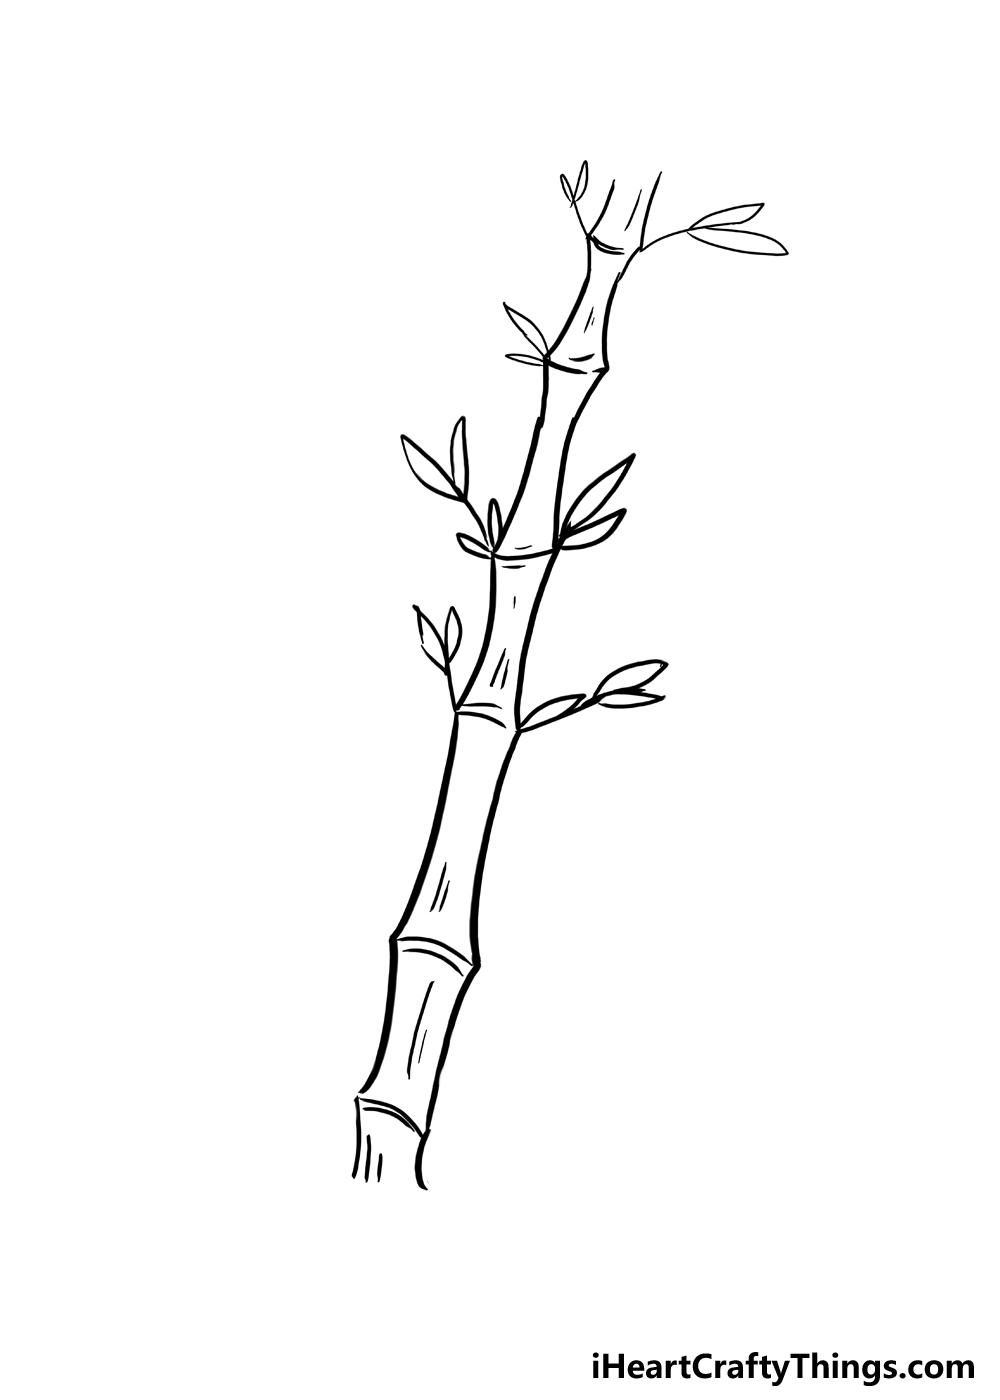
The leaves on bamboo may not be as noticeable as the distinctive stalks of the plant, but they’re still an important part of the plant. These leaves are characterized by their small size and thin structure.
They tend to grow in fairly erratic clumps, and that is how we will portray them on this drawing of bamboo.
This is also another detail where you don’t have to replicate our example exactly as it appears and can play around with it.
We have kept these leaves to the upper half of the bamboo stalk, and they will go on both sides of the plant. When drawing each clump, you can start with a simple line poking off the bamboo.
Then, you can add at least one leaf to each of these lines and as many as three or four if you want to. Each leaf is thin and pointy, connecting directly to these lines.
Some of the lines these leaves are connected to will be longer than others, and there is no right or wrong way to draw these leaves. You could also add more to the stalk than we did or add less.
It’s up to you, but either way, once you have added these leaves the first stalk of bamboo is complete!
In the next step, we will add another stalk before adding some other fun ideas and details in the step following that one.
Step 4: Now draw another bamboo stalk
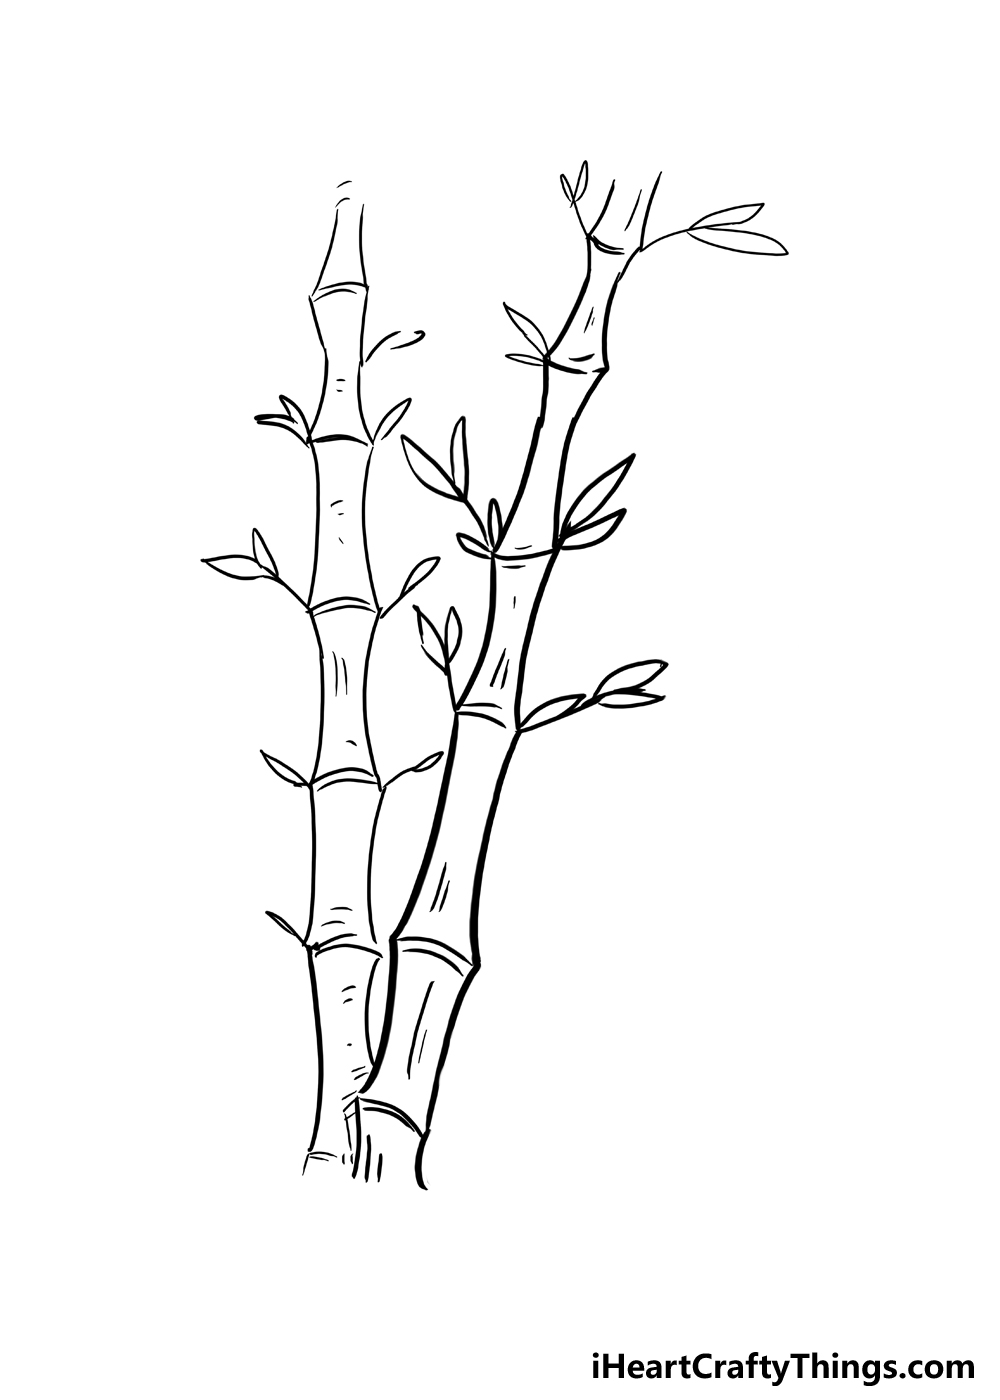
You did such a great job drawing that first bamboo stalk, so now you can add another one with ease! Bamboo will almost always grow in large thickets, so the more stalks you can add, the better.
While you can essentially follow the first three steps again to draw this one, there are a few subtle differences. First, you will notice that we used slightly thinner, lighter lines for the outlines.
This helps to make the second stalk look like it’s fading into the background, as if we’re focusing on the foreground bamboo.
If you were to make the outlines even lighter, then it could look like it’s obscured by mist.
Or, you may even want to use the same kinds of lines that you used for the first stalk! It’s up to you and depends on what you want this to look like.
We also made the details on this second one slightly less sharp than the ones on the first one to serve this effect nicely.
Otherwise, as we mentioned, this will be drawn using the same steps from before.
To summarize, we suggested drawing a pencil line to map it out. Then, you can draw the outlines with some pointy lines connecting to one another.
Add some horizontal curved lines and small line details for texture to finish off the bark of the stalk.
Then, you can draw some lines with small, thin leaves attached to them to finish off this second stalk.
Once you are happy with this second stalk, we can move on to some final details for this drawing!
Step 5: Draw a third bamboo stalk and any other final details
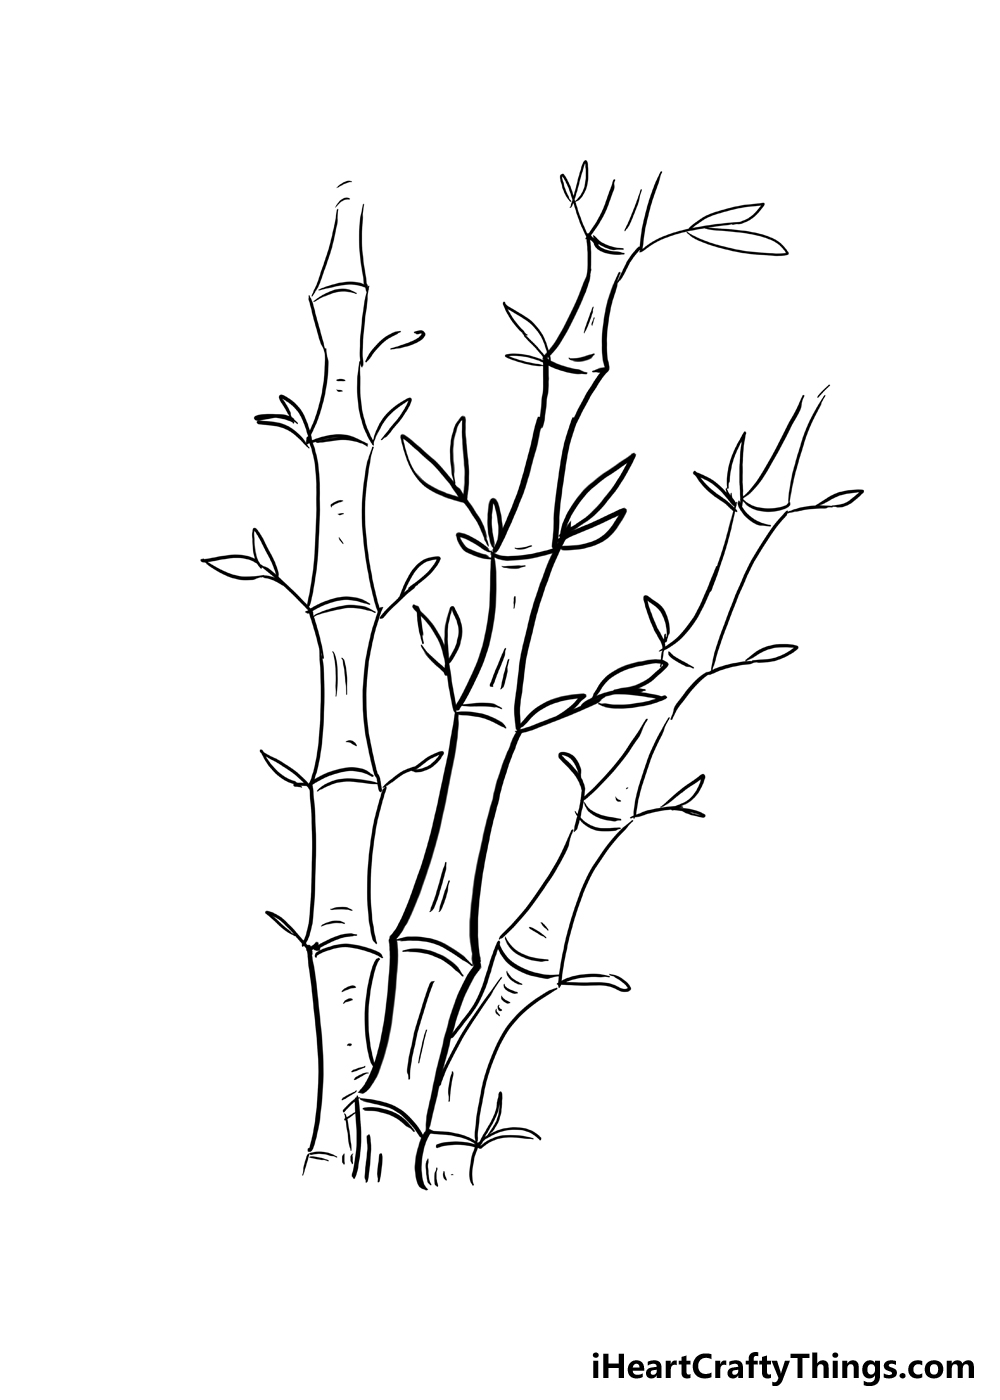
This fifth step of our guide on how to draw bamboo should be fun, because we will not only finish the design but open things up for you to add your own details!
First, let’s focus on the design we have in this guide. The way we will finish off this design will be to add one more stalk of bamboo.
This one will go on the right hand side, and it will be drawn similarly to the previous one. It will also have slightly lighter outlines to keep the focus on the central stalk.
Now that you’ve drawn three of these stalks, you should have the method down nicely! That means that you can add to this drawing in all sorts of interesting ways.
You could fill the page with more bamboo stalks, for one idea. This would allow you to make a lush bamboo forest! The only limit would be how many you can fit on the page.
We also mentioned how bamboo is often associated with pandas, as pandas feed on the leaves of bamboo. For that reason, adding a panda to this drawing would be a great way to add some life.
It could be a simple cartoon panda if you find the idea a bit too intimidating, and it could be really simple. Or you could make it realistic if you wanted to!
This is just one idea, but you could add any other characters, animals, plants or humans that you would like in this picture. Then, we can finish off with some colors.
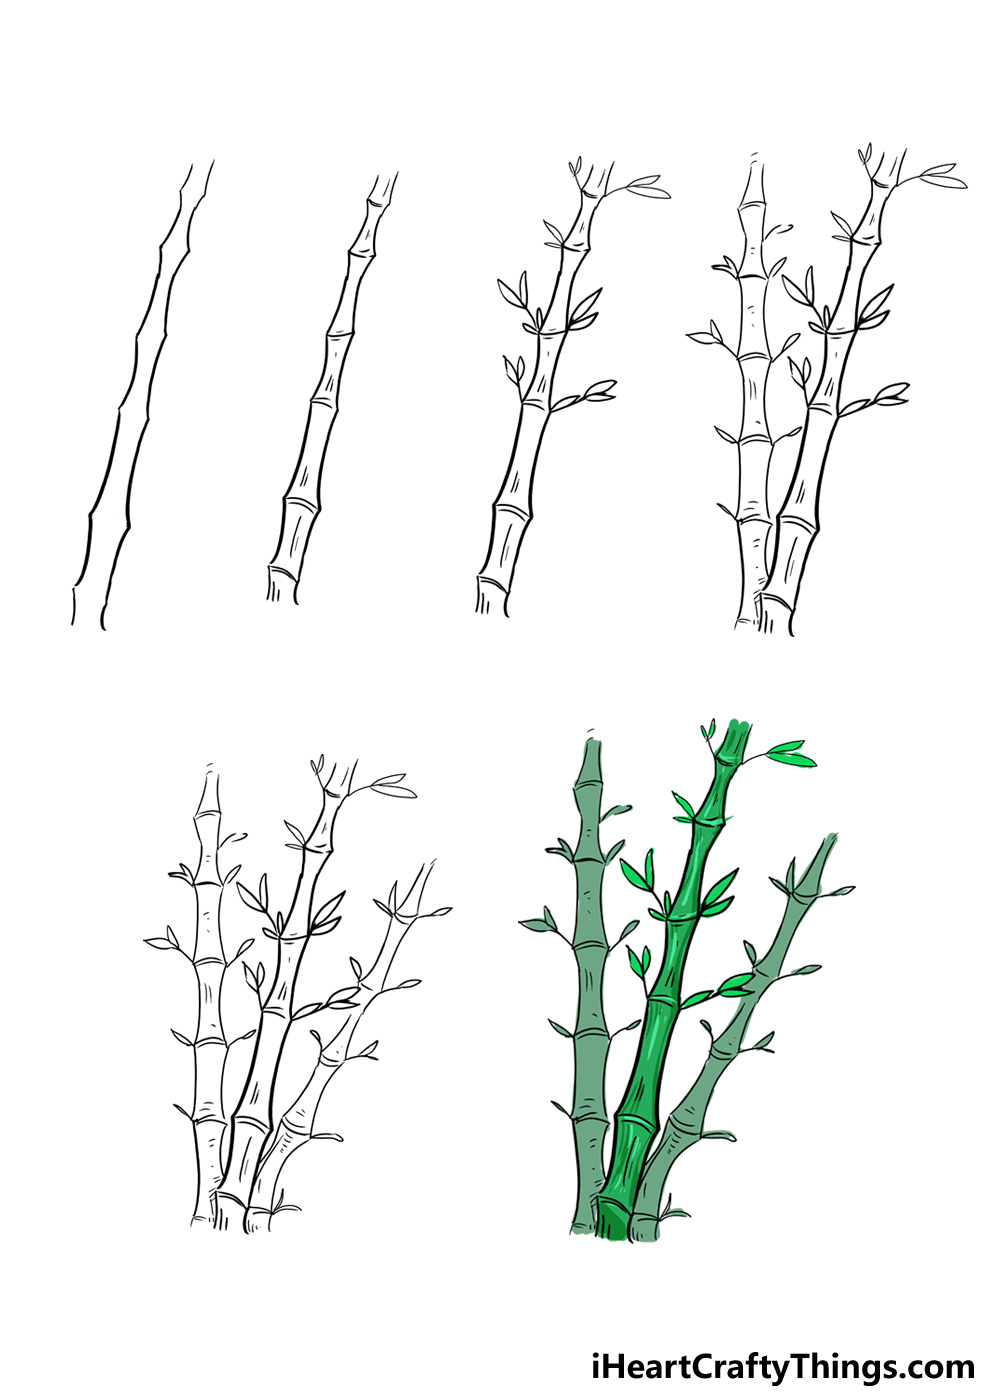
Step 6: Now, finish off with some color for this bamboo
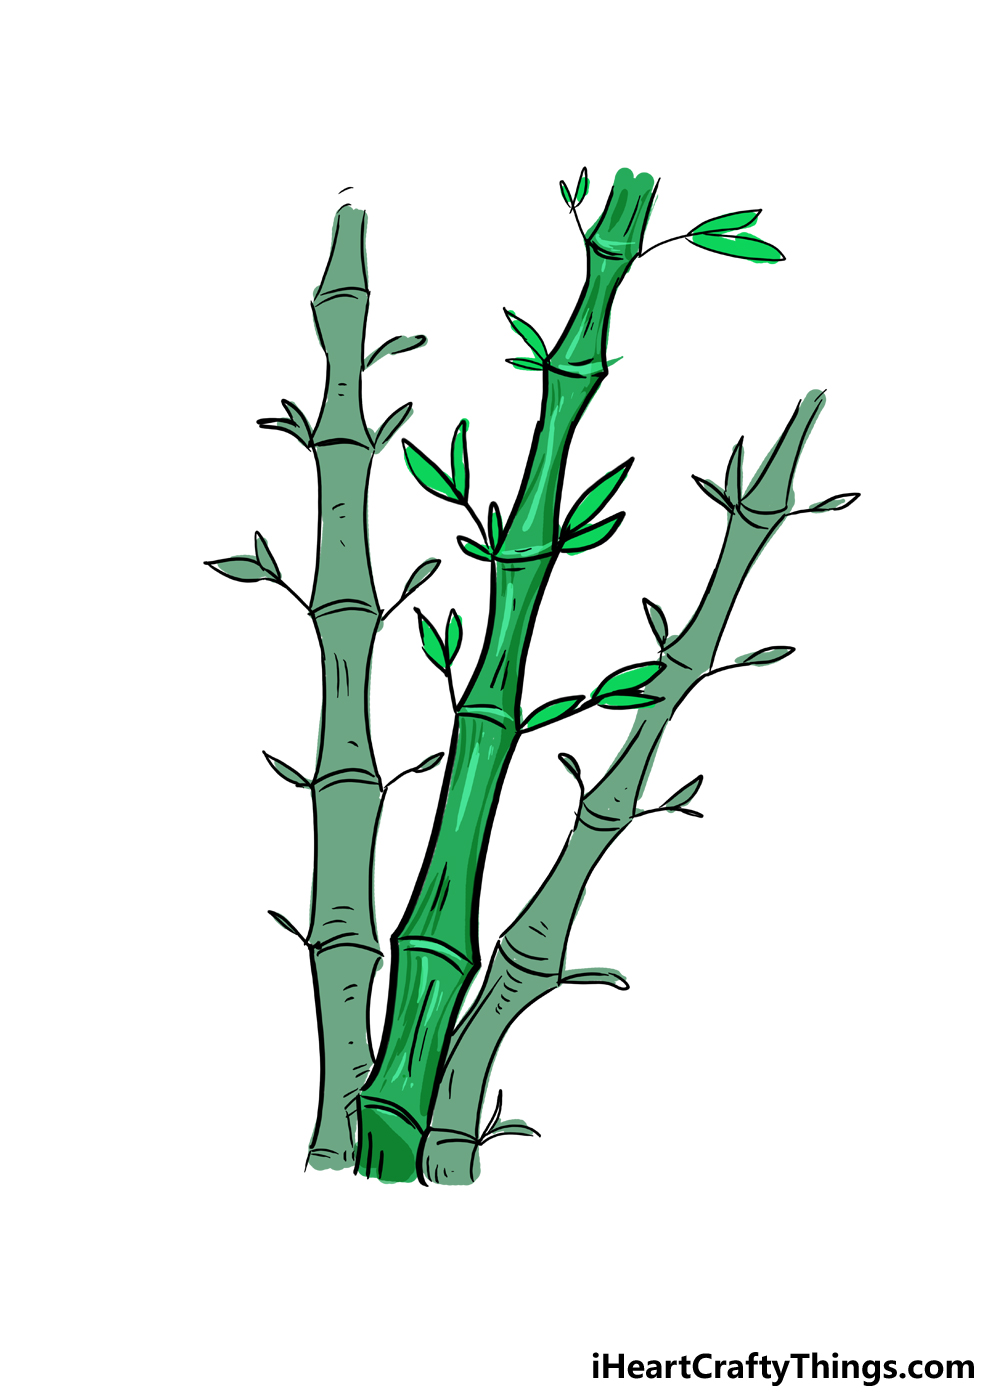
We have arrived at the final step of this guide, and now you can have some fun coloring in your artwork! In our reference image, we show you one way that you can go about coloring this drawing.
To make the bamboo look nice and ripe, we used some bright green tones for the bamboo. Instead of just using one tone of green, we mixed in some light and dark tones to make it look more realistic.
You will also notice that we used a similar technique for the two outer ones that we used with the outlines. Much like those outlines, we kept the colors lighter for these ones.
This again keeps the focus on the central one, and it makes the image look a bit more dynamic. Of course, this is just one way that you could color this drawing.
Bamboo will take on different colors depending on how old it is. For instance, some older bamboo can look more yellow than green.
It can even start going brown when it gets really old. These are a few examples you can use, but you could use any colors you like.
You don’t even need to keep the colors realistic if you want a more stylized image. It’s all up to you, and you can also play around with different art tools and mediums.
We would recommend art tools that allow for precision such as colored pens, pencils or thin tipped paintbrushes, as some of the areas you will color are quite small and fiddly.
Your Bamboo Drawing is Complete!
Bamboo is an incredible plant, and we hope that you enjoyed creating some art featuring this plant in this guide on how to draw bamboo!
Bamboo can be a deceptively simple plant to draw. When you see it, it looks pretty simple in structure, but it can be tricky when you get down to the smaller details.
That’s why we wanted to break it down into smaller steps so that you could get the hang of each part and master them. Now that you know how to do it, you could fill the page with bamboo!
We also went over a few ways that you can add your own details and ideas, so you can really show off your creativity as you create your own unique artwork.
With all this hard work, we are sure you will want to show it off when it’s done. Luckily, there is a way to do that!
You can share your finished artwork on our Facebook and Pinterest pages for us to see. We can’t wait to see how you did with this guide, as we’re sure you did an amazing job!