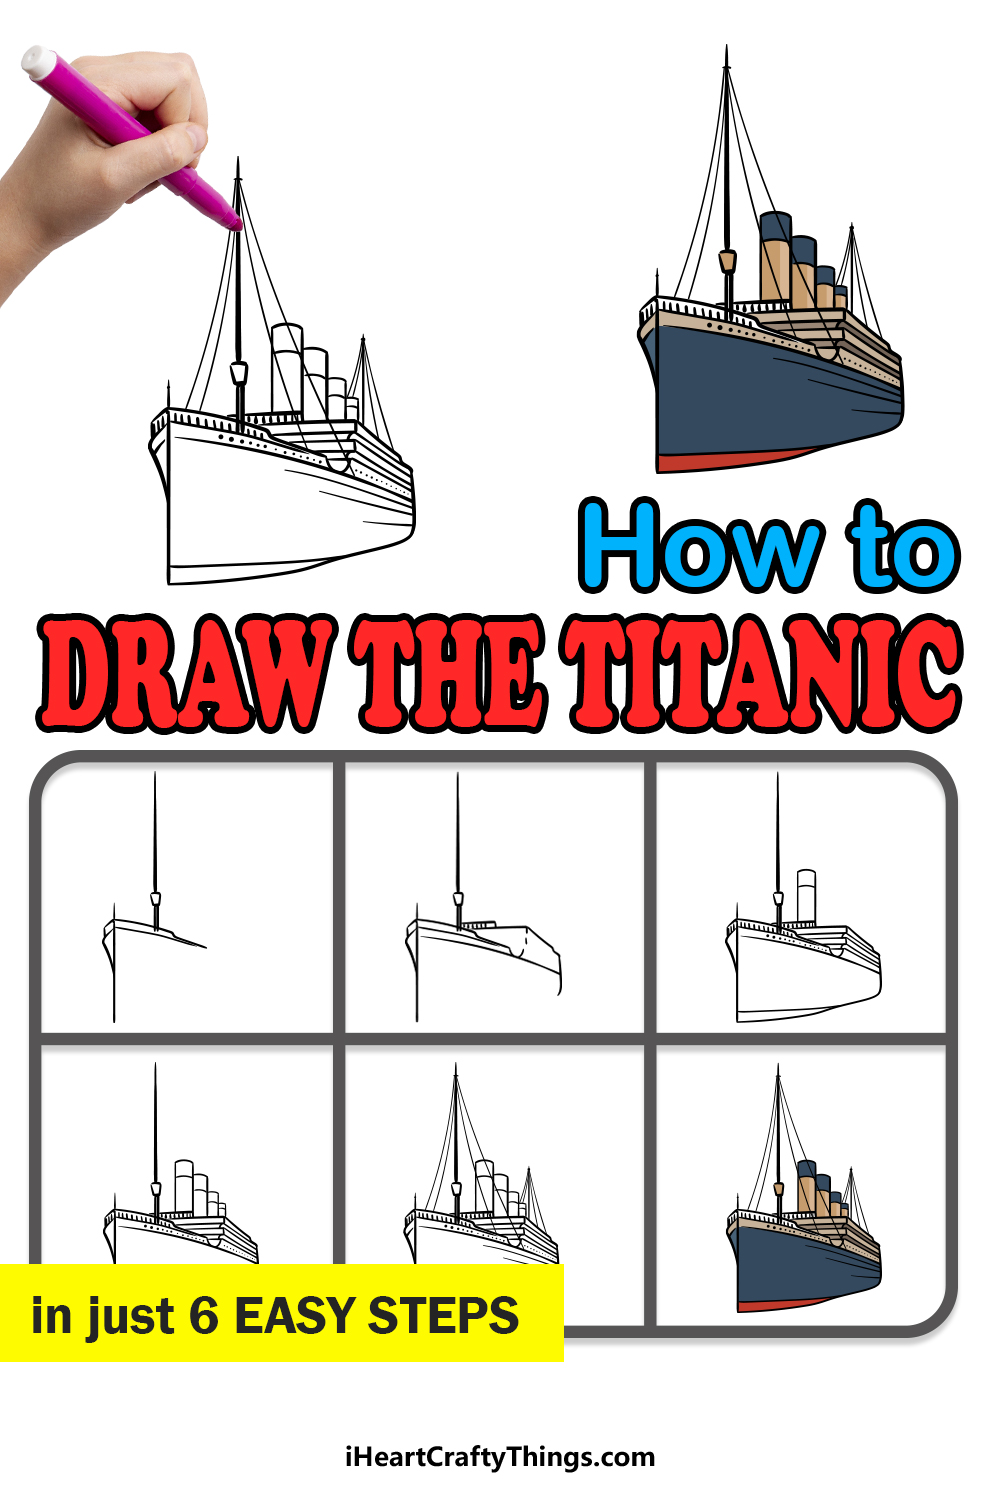
Anyone who wants to learn how to draw the Titanic is in the right place. This guide for kids will make it simple and fun to recreate this iconic ship.
The Titanic is possibly the most famous ship of all time, but unfortunately it’s for tragic reasons. On its maiden voyage, the Titanic was regarded as a marvel that represented the future of sailing.
Of course, we all know it for the fact that the ship tragically sank on that maiden voyage after striking an iceberg. It also gained a lot of interest after James Cameron’s classic film Titanic in 1997.
It may have been a tragedy, but the ship will never be forgotten. Whatever your connection to the Titanic, you will be able to create your own version of it with all of the details you expect, and I will talk you through each and every step.
Watch How To Make Your Titanic Drawing
How to Draw The Titanic – Let’s Get Started!
Step 1
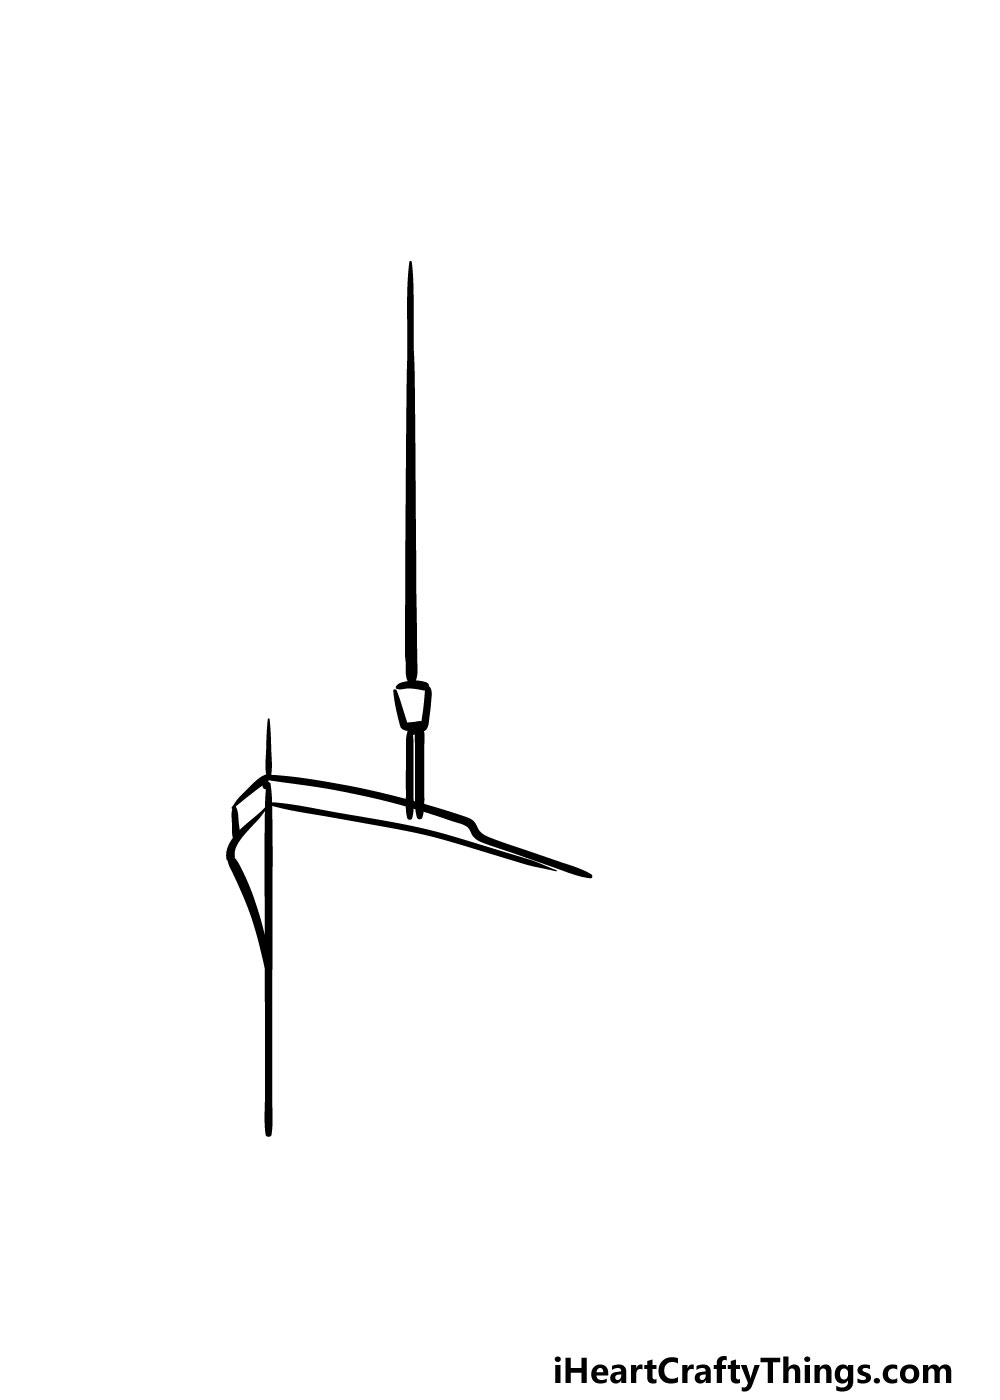
There will be lots of small details to draw in this guide on how to draw the Titanic, worry not though, as we will take it slowly throughout these steps.
For this first step, we will start on the front of the ship. The front of a ship is called the bow, so we shall call it by that from now on to keep the maritime theme going!
You can draw a straight vertical line for the very front of the bow, and then draw a small triangular shape on the upper left-hand side of it.
Then, we will be drawing a horizontal line going to the right from the top of this line. There will also be a thick line poking high from the outline of the bow.
This will be the first of the ship’s masts, and we will complete them later in this guide.
Step 2 – Next, draw the hull and top of the ship
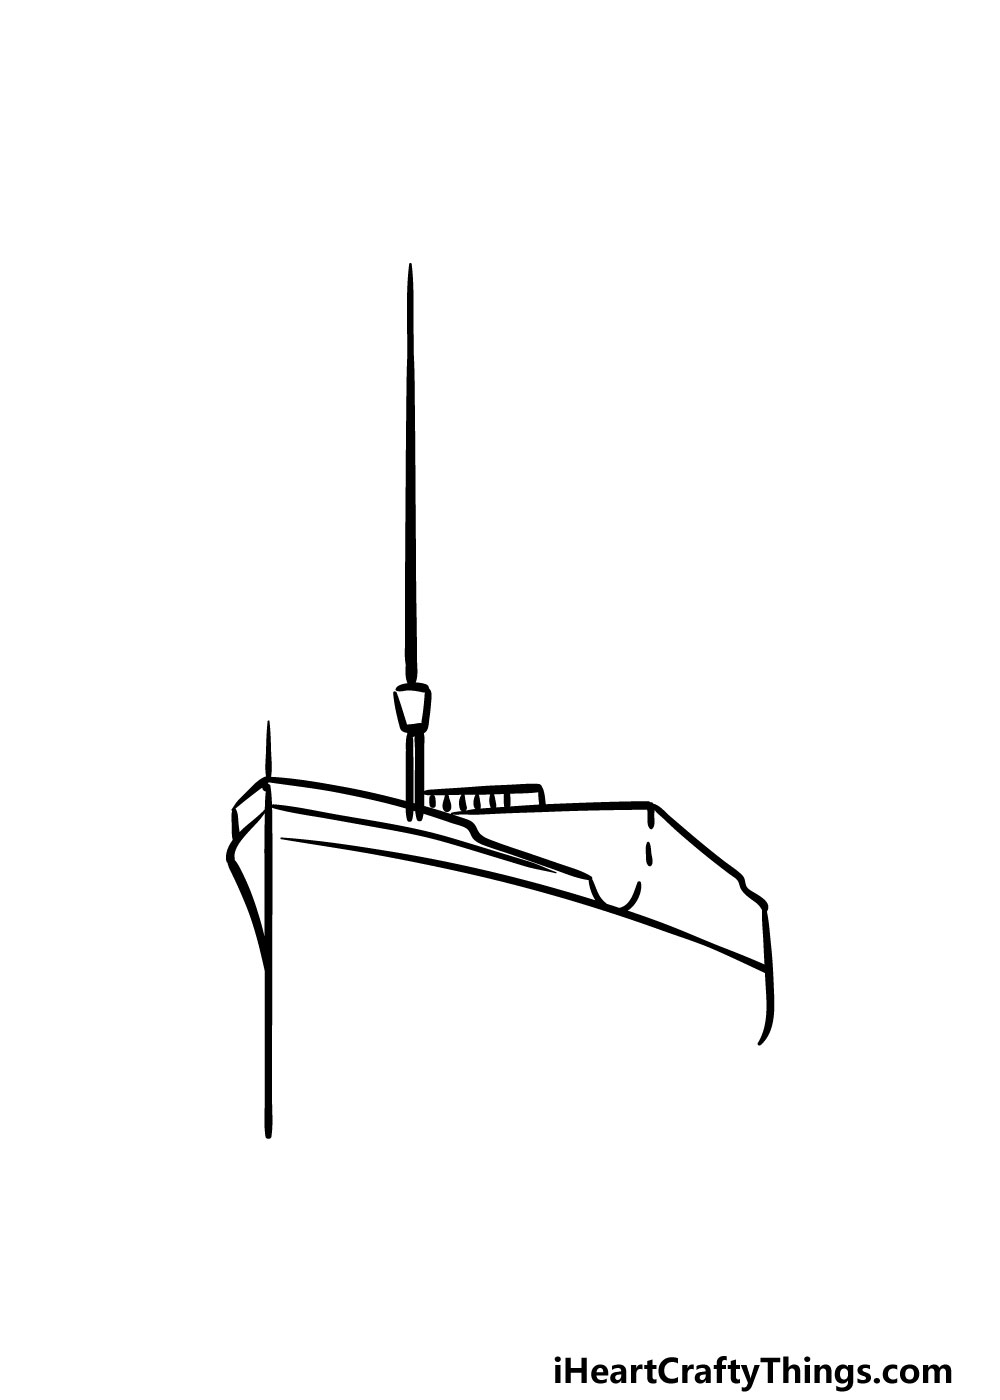
In this second part of your Titanic drawing, we will be creating the side of the ship, called the hull, as well as the section on top that housed the bridge and other areas.
To do this, keep the lines at the front of the ship going backward, and then draw some vertical lines to give the bridge of the ship some height.
Once you have it looking as it does in our reference image, we’re ready to keep sailing through this guide!
Step 3 – Now, finish off the outline of the Titanic
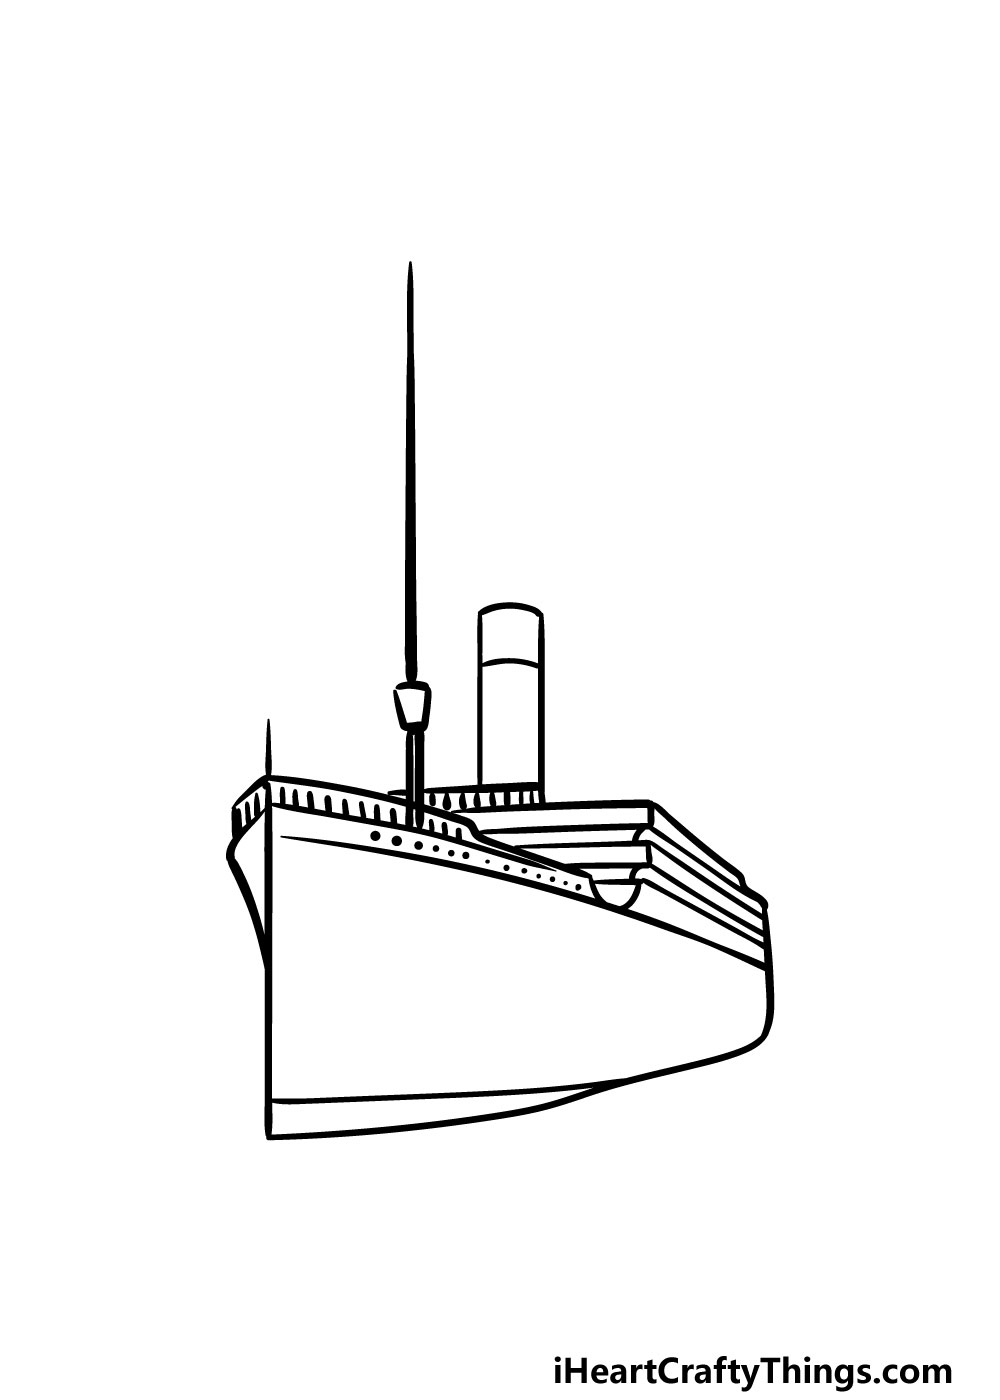
We will be finishing off the outline for the vessel in this third part of our guide on how to draw the Titanic.
First, you can draw a series of vertical lines along the front and sides of the bridge section that you drew previously. Then, you can draw some dots and small details leading up to the bow of the ship.
Then you can draw a cylindrical shape on top of the ship for the first of the smokestacks. This smokestack will also have a line across it near the top of it.
Finally for this step, draw the bottom of the ship using some curved lines. This will complete the main outline of the ship!
Step 4 – Next, draw some more smokestacks
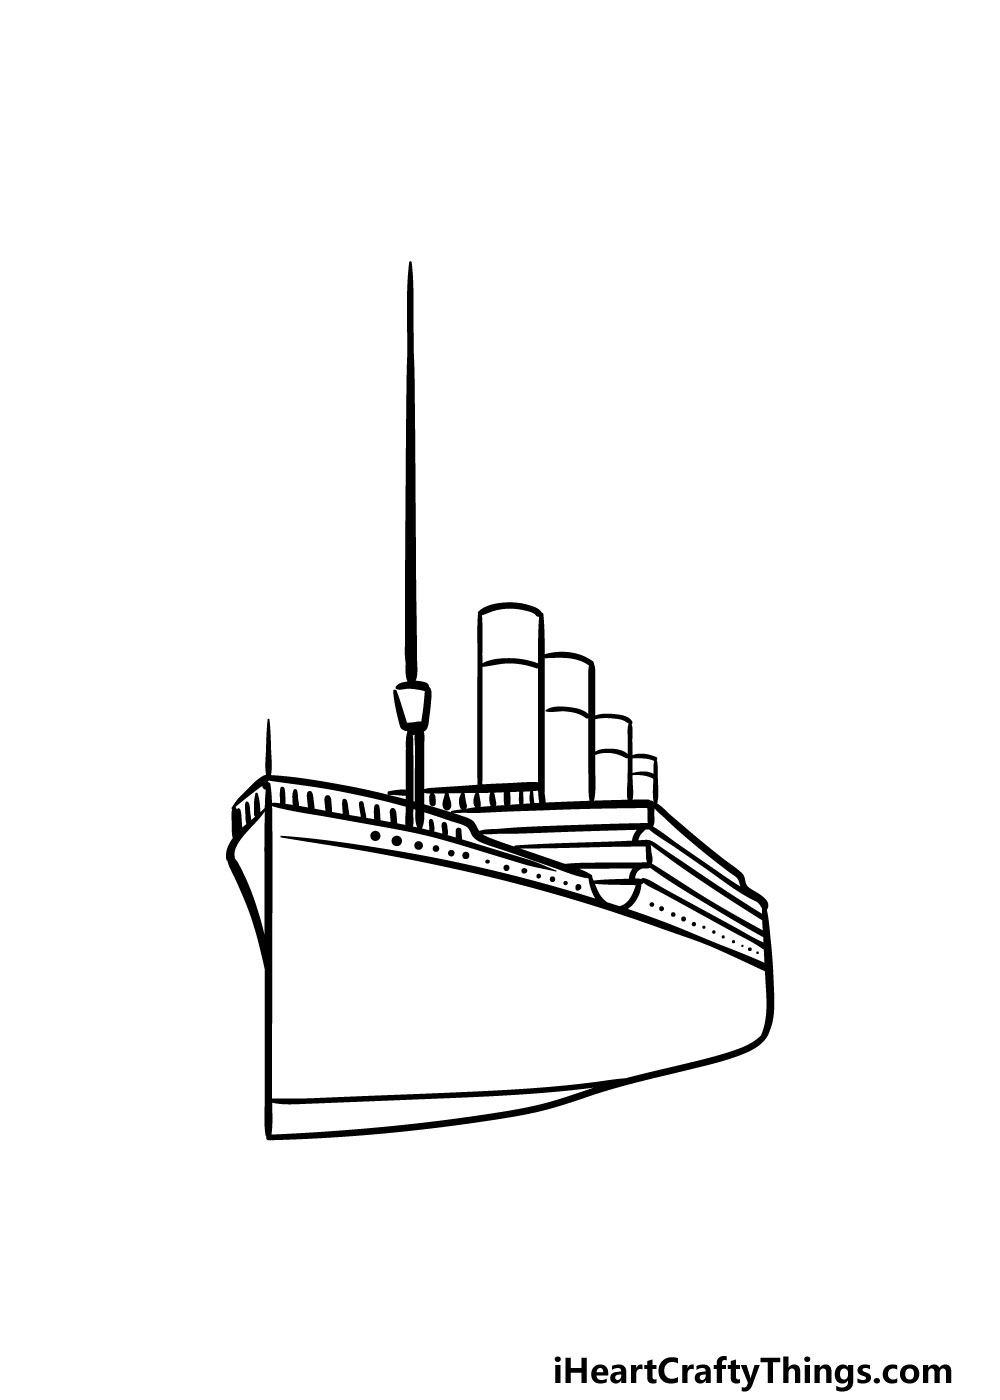
You drew one smokestack for the ship already, and we shall be adding three more.
They will look very similar to the one that you drew already, but as you can see in the reference image they will get progressively shorter as they go.
Then, we will draw some small dots along the hull of the ship for some extra details. Your Titanic drawing is looking great already, and in the next step we will finish off with some final details!
Step 5 – Now, you can finish off the details of your Titanic drawing
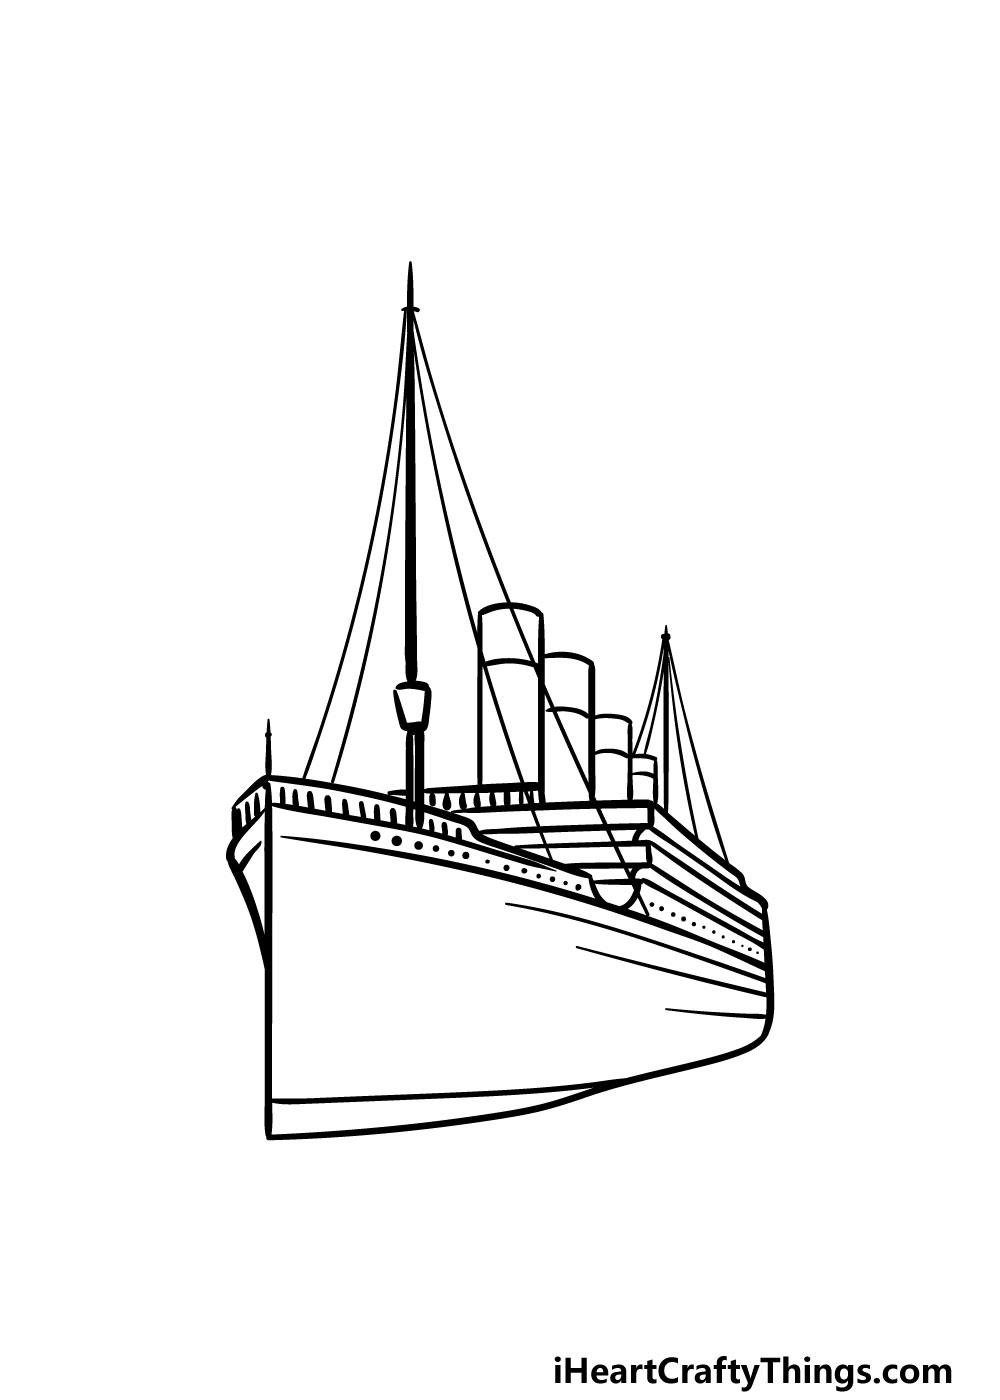
It’s almost time to add some colors to your picture, but first we have some final details to add. One of the main aspects we will be drawing will be cables dropping from the tops of the two masts.
To do this, simply extend some curved lines from near the tips of the masts down towards the deck. We will be doing this for both masts, as shown in the reference image.
Then, you can finish off by adding some horizontal lines along the side of the ship to finish off the details. That will finish off this drawing, but there are some extra details that you could draw!
Some examples could be drawing the ocean breaking in front of the vessel or some extra background details.
For a somewhat foreboding touch, you could draw some icebergs in the background to suggest what will be happening soon.
These are just a few ideas, so how will you finish off this drawing before the final step?
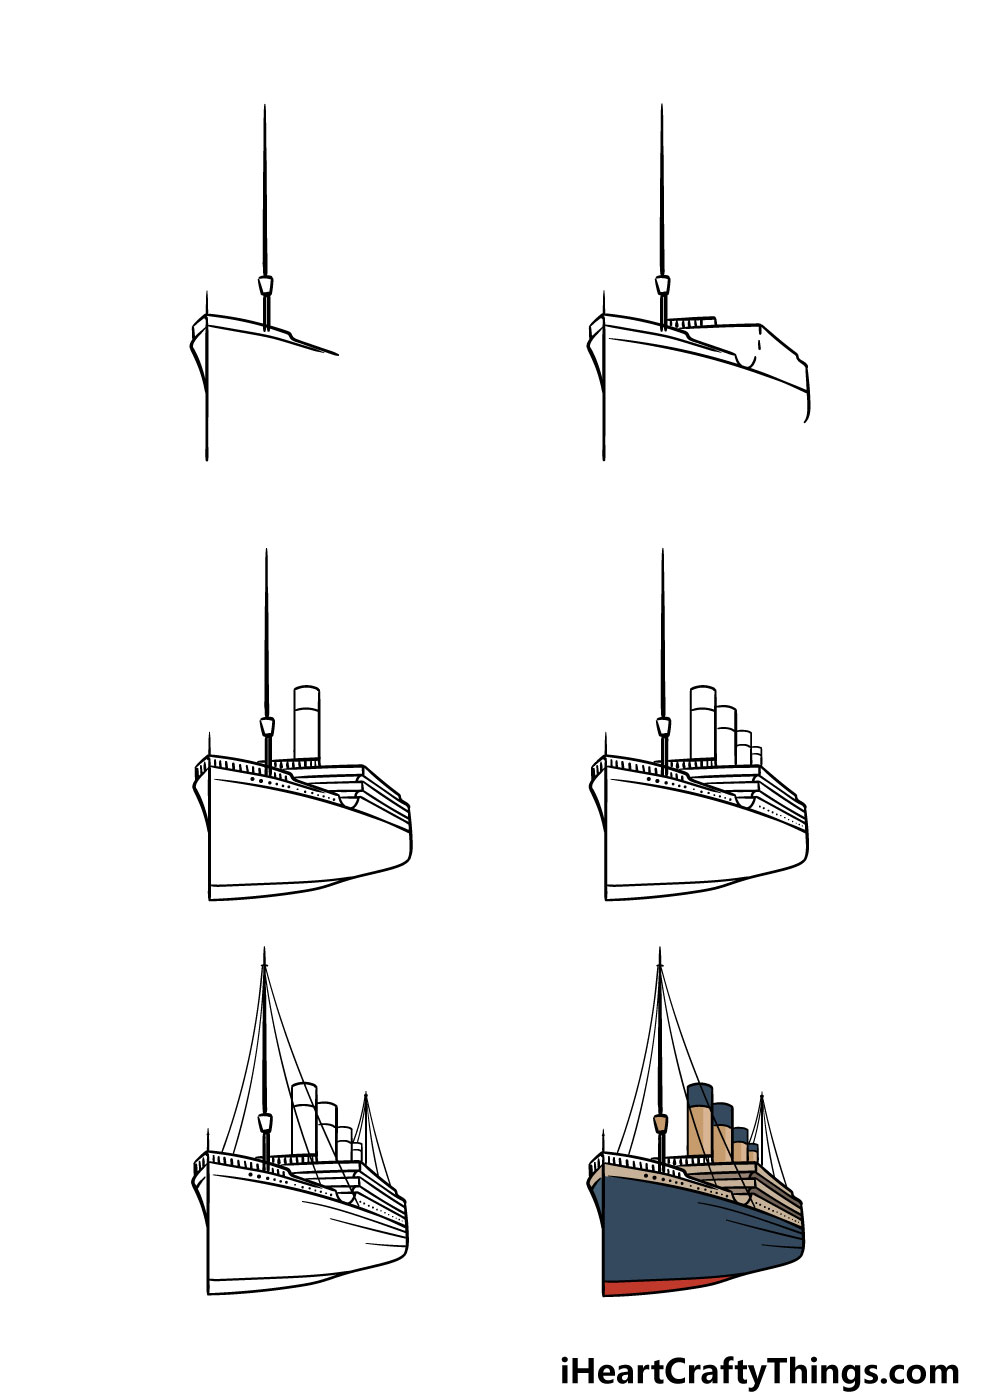
Step 6 – Finish off your Titanic drawing with some color
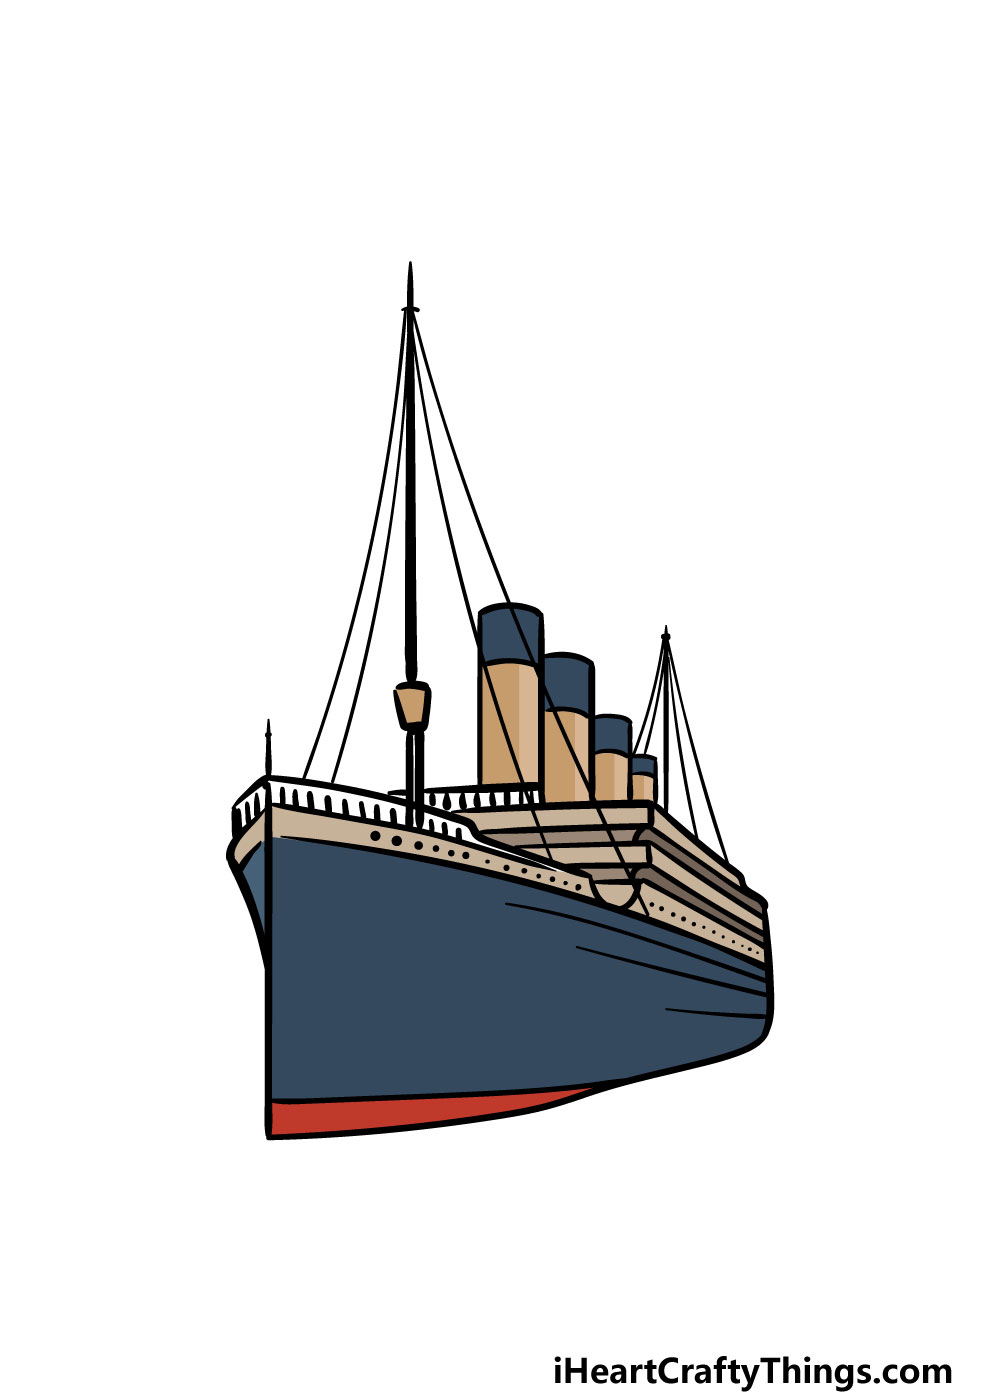
The Titanic was distinctive with her black and red color scheme, and that’s what we will be replicating in this step of your Titanic drawing.
As shown in the reference image, we used some blacks, dark greys and red, but we also incorporated some brown and beige shades.
This will give you a reference point if you choose to keep the color scheme accurate to the real ship.
When coloring in an image with lots of intricate details, it can be helpful to use mediums that give you lots of precision.
Some examples could be colored pens or pencils or paintbrushes with thin tips. There are plenty of colors and mediums that will look amazing, so what will you use to color in your picture?
4 More Ways To Make Your Titanic Drawing Unique
Keep this Titanic sketch afloat with these fun tips we have for your artwork!
Before it reached its untimely end, the Titanic traveled many miles and through different weather conditions.
We think it would take this Titanic drawing to the next level if you were to add a background!
This could be simple, such as having a straight horizon line to show the calm ocean. Or, you could incorporate more intricate details into the water to make it look like there are some waves around the Titanic.
These are just a few ideas, but how else could you add a background?
Next, you could also add some details on and around your drawing of the Titanic to make it look even greater. These could be subtle, such as having some weathering on the hull or some tiny people on the deck.
It could also be more drastic, such as having smoke coming from the smokestacks. Then, you could add details such as dolphins in the water nearby or maybe even a whale leaping from the water.
What other details could you add?
Another way to make your Titanic sketch look great would be by turning it into a poster. There are many ways you could do this!
First, you would want to draw the ship on a larger piece of paper so that it will look more impressive. Then, you could add some text around it such as the ship’s name and maybe some fun facts about the ship.
Once done, it would look great on a bedroom wall!
As we all know, the Titanic unfortunately sunk before it reached its final destination. You could create a somber alternative to this Titanic drawing by drawing it at the bottom of the ocean.
This would be quite a challenge, as photos show us that the ship is mangled and rusted below the waters. While it would be challenging, it would be well worth the effort!
Speaking of photos, you can find many photos of the Titanic in its current state online. These would help a lot for this drawing!
Your Titanic Drawing is Complete!
This was a tricky drawing to take on, so you should be very proud of completing this guide on how to draw the Titanic!
Our aim with this tutorial was to show you how easy and fun it can be to recreate this famous and tragic vessel. Hopefully we achieved both those goals for you!
Now you can take it even further by adding details such as a background or some ocean details.
You could even reverse the image and draw the gash that sunk the ship for a more morbid take on the picture. We can’t wait to see how creative you can be with it!
Then, for more drawing fun we hope you will visit our website! We have tons of great guides for you there and have many more coming soon.
Once your Titanic drawing is complete, we would love to see your take on this famous ship! You can show us by sharing it on our Facebook and Pinterest pages.