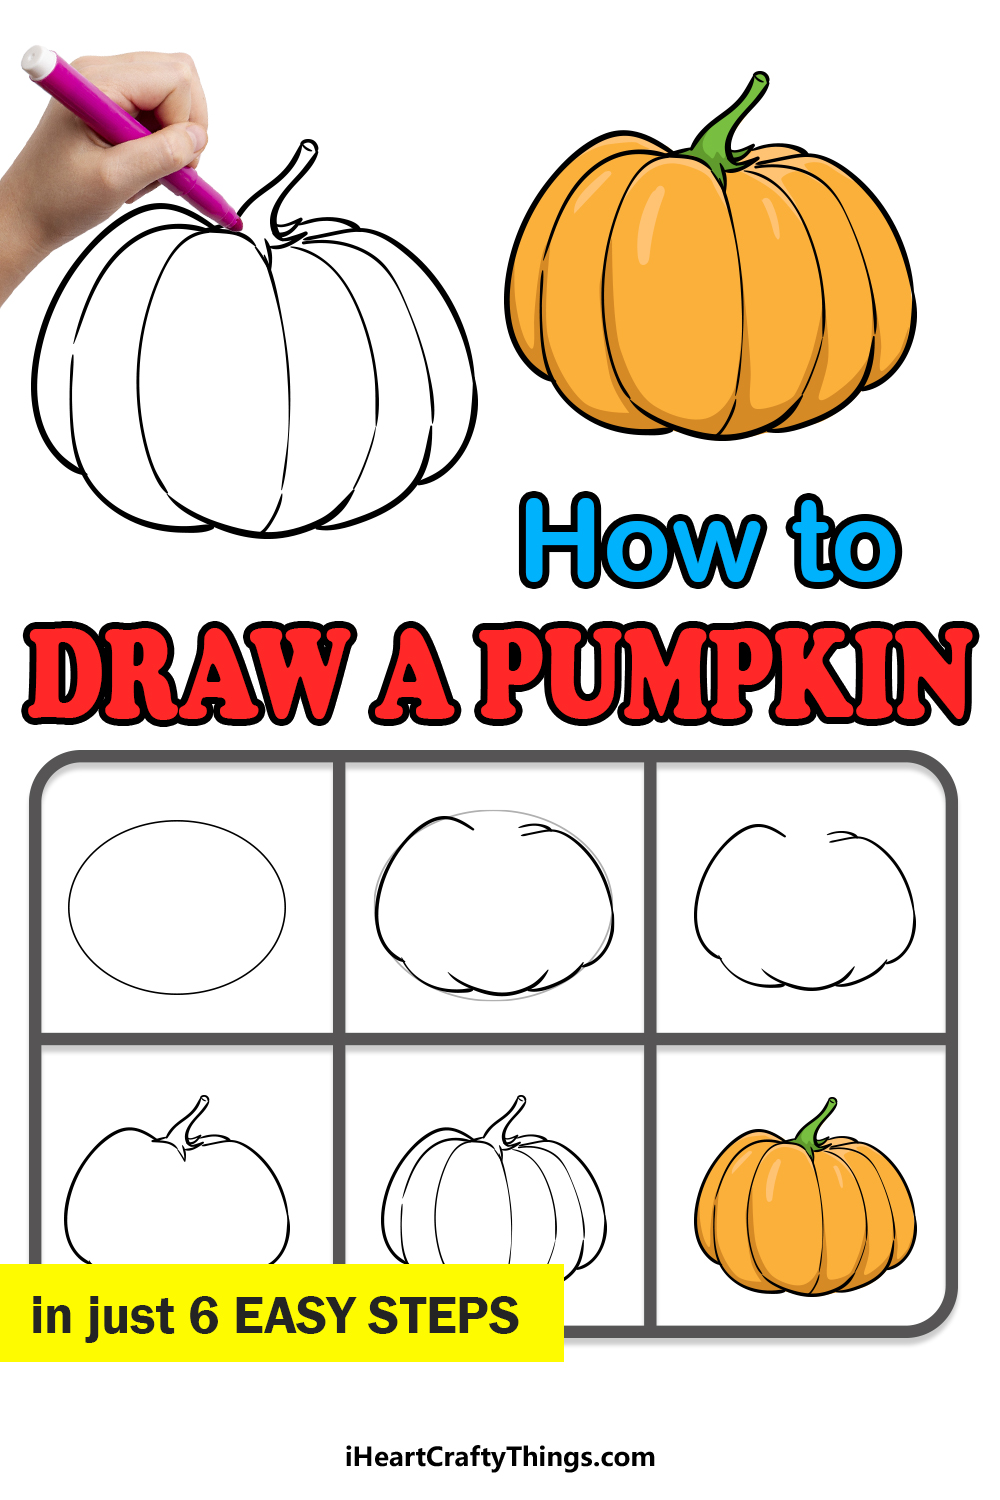
Get ready to learn how to draw a pumpkin in some easy-to-follow steps. All ages and skill levels will love this simple step-by-step guide.
Pumpkins are popular to feature in different kinds of artwork thanks to their distinctive look and bright orange color. They are, of course, also very popular around Halloween.
Whatever reason you may have for wanting to create a pumpkin drawing, you will find it so much easier when you follow these steps.
I’ll show you how to prepare the pumpkin shape with your pencil and then add the curved lines that will make up the final outline. You’ll also see how to add the stem of the pumpkin and add some great color.
Whether you want to turn this into a jack-o-lantern or create a Fall celebration, you’ll have everything you need when you have reached the end of this guide.
Watch And Follow These Simple Steps To Draw A Pumpkin
How to Draw a Pumpkin – Let’s get Started!
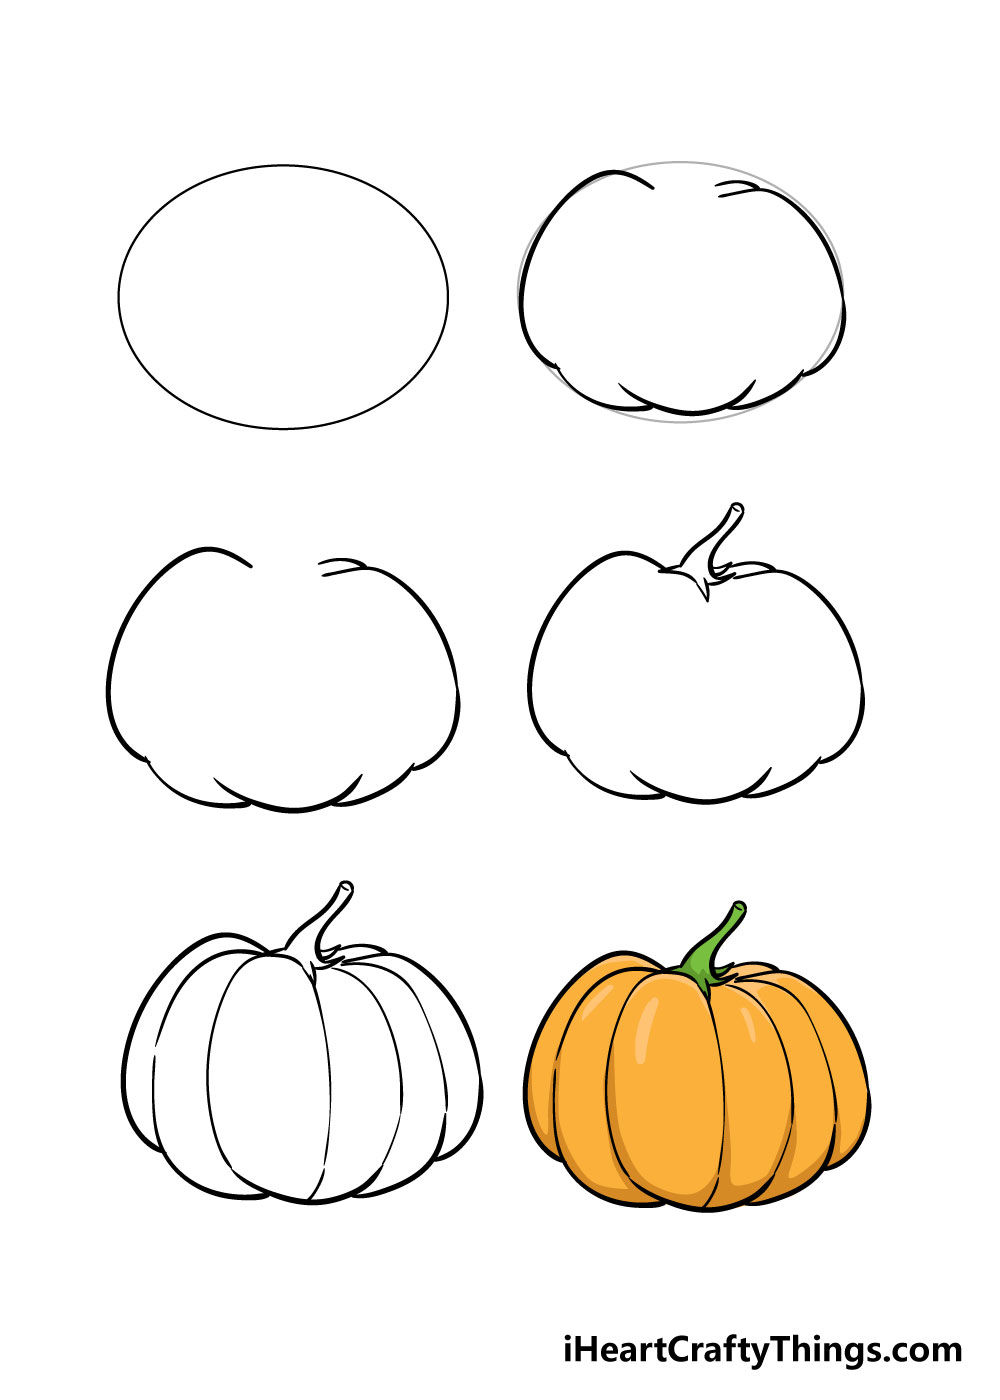
Step 1

To start the process of learning how to draw a pumpkin, the first thing that you should start with is drawing an oval shape using a pencil.
We’re using a pencil for now, as this will be a guide for drawing in the rest of the pumpkin and you’ll be erasing the pencil a bit later.
You can use a tool like a drawing compass to make the oval, but if you do it freehand it’s not a problem if the oval isn’t perfect.
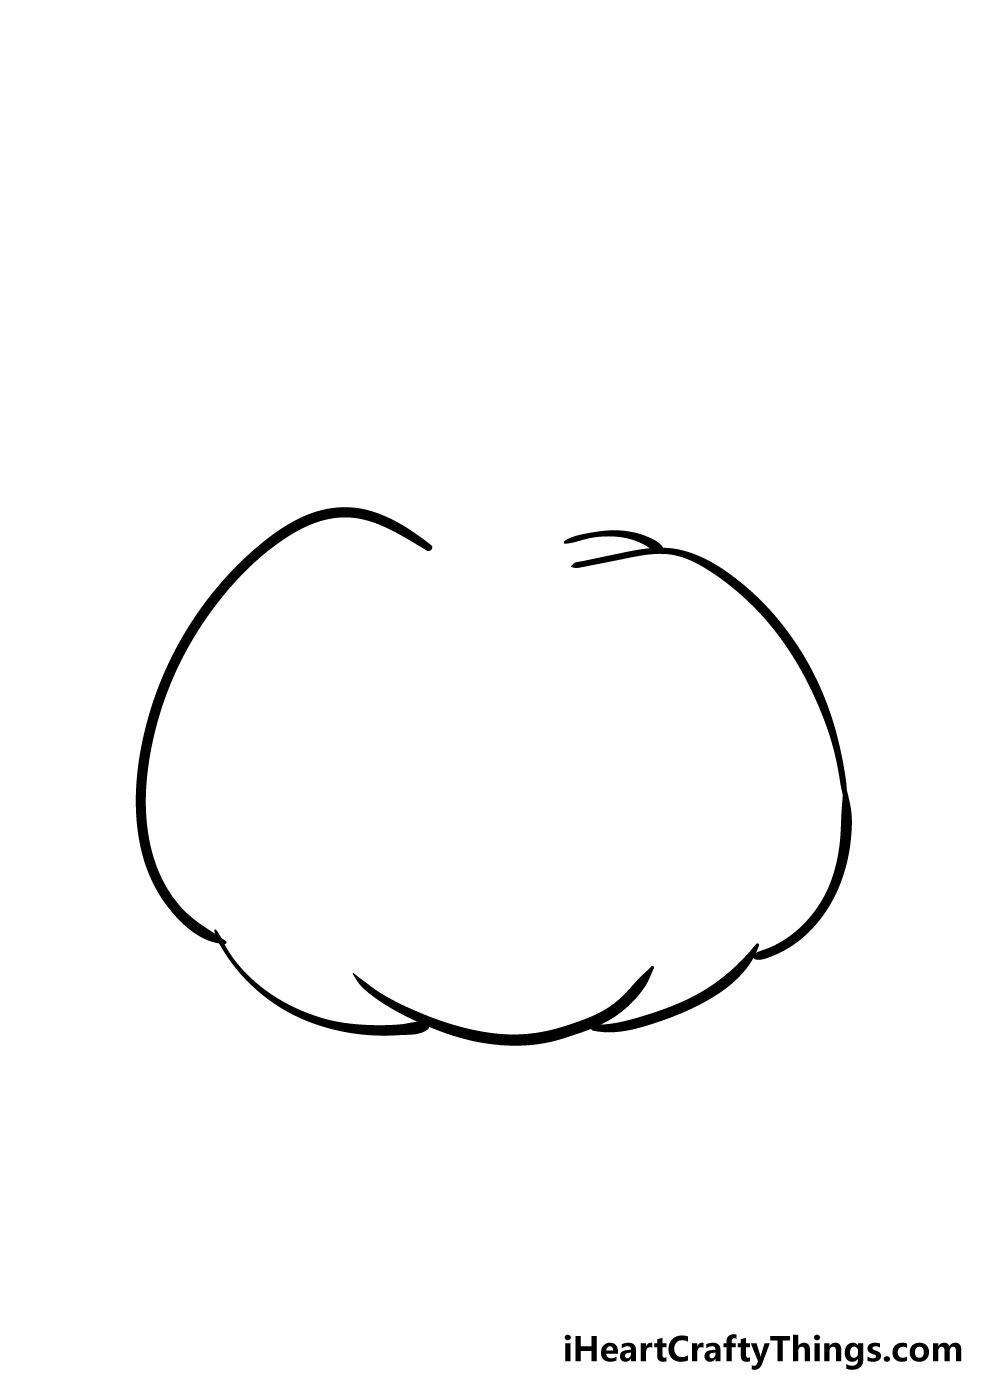
Step 2 – Draw in the start of the pumpkin
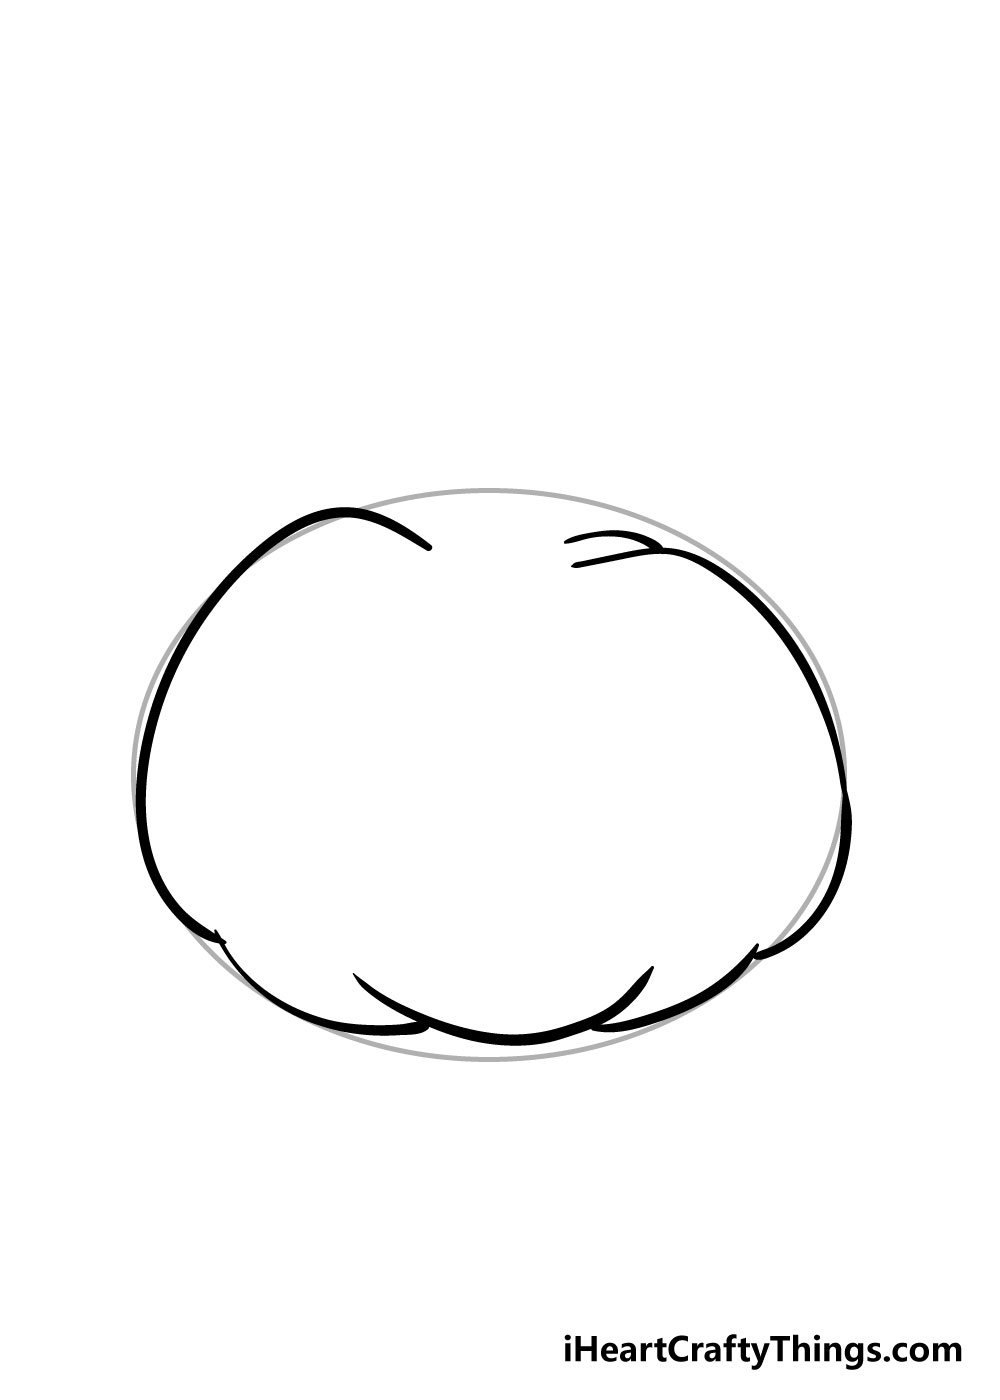
Now that we have the penciled oval as a guide, we can start to draw in the beginning of the pumpkin drawing.
Using both your pencil oval and the reference picture as a guide, you can start to draw in the outline of the pumpkin using some curved lines.
It should be much easier to do if you start from left to right and copy the lines that you see in the picture closely as you draw.
This part could take a bit of practice, so you could always use a light pencil to draw in the outlines and then go over them in pen when you’re happy with how it looks.
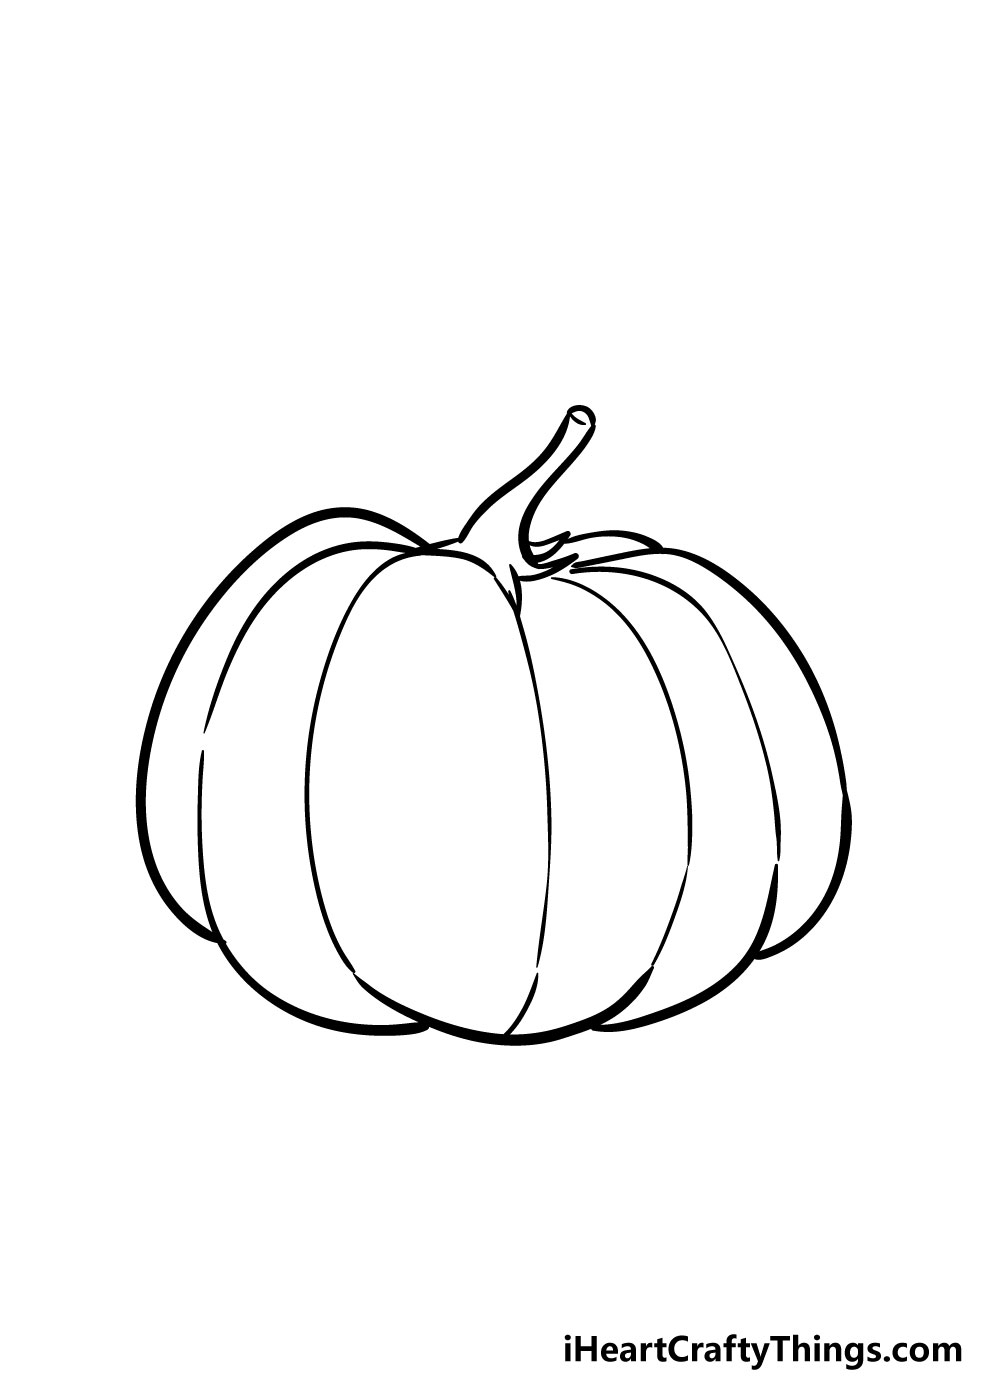
Step 3 – Next, erase the guide lines
Once you’re happy with what you drew in step 2, you can go over the pumpkin outline in pen or darker pencil if you used a lighter pencil at first.
Once you have it drawn in, you can erase the guiding oval from step 1 as we won’t be needing it anymore.
Before you erase, make sure that the ink for the rest of the drawing is dry if you used a pen. If you erase too early, you may smudge the wet ink. For this reason, patience is key at this stage!
Step 4 – Now draw in the stalk of the pumpkin
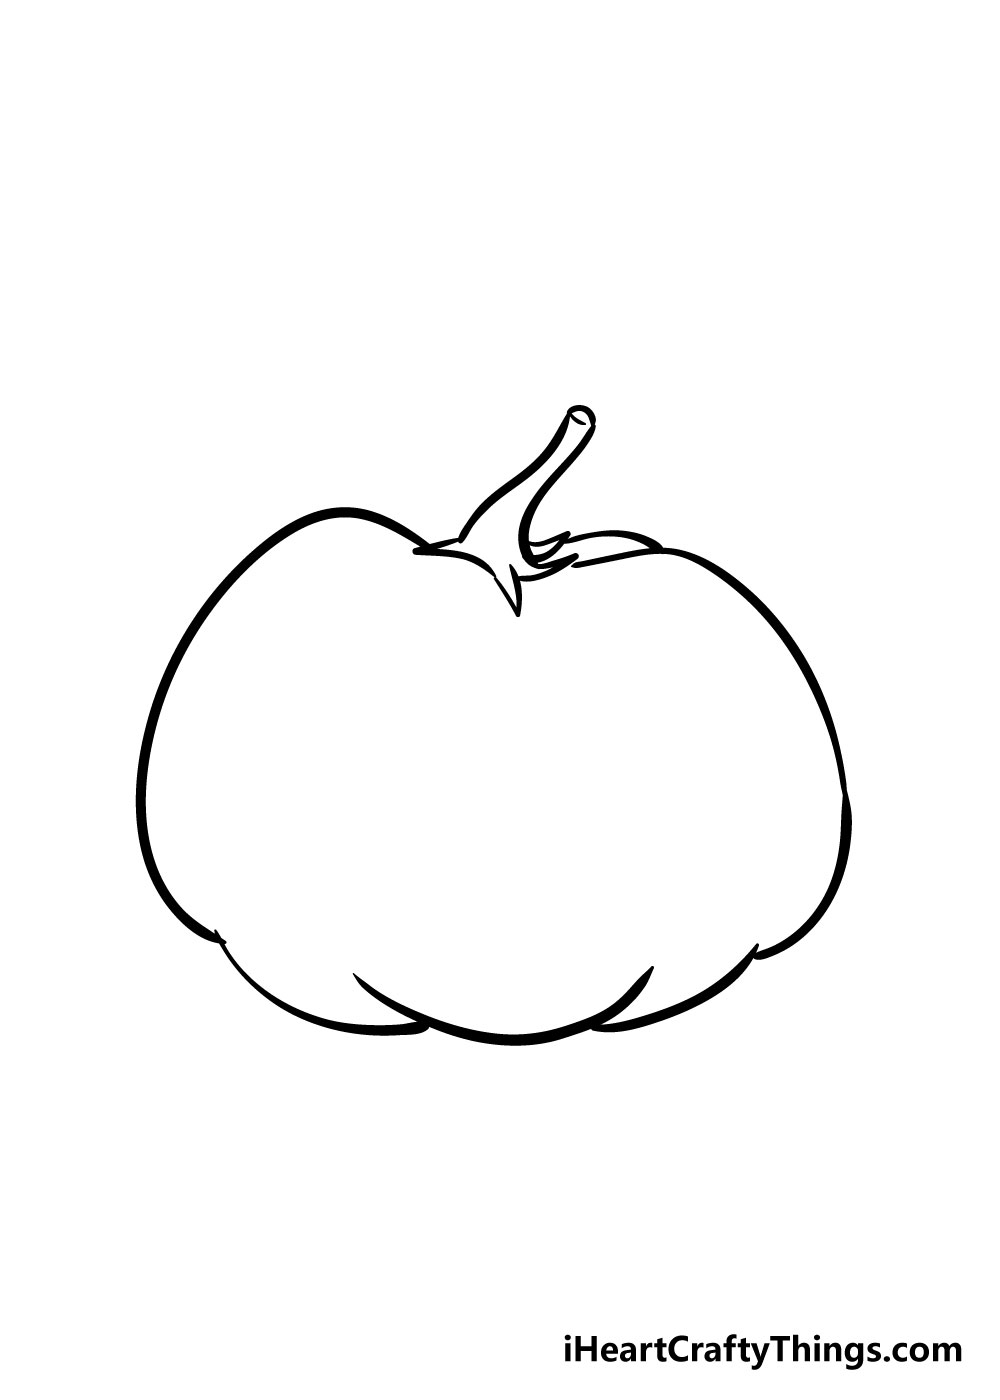
Now that the outline of your pumpkin drawing is complete, you can add in the stalk of the pumpkin.
You can draw in this aspect with some curved and pointy lines as you can see in the reference picture. If you follow the picture closely, you can replicate the shape of the stalk to fit nicely atop the pumpkin.
You could also change the shape and position of the stalk a bit once you have the hang of it to give your pumpkin drawing more unique looks.
Step 5 – Next you will be adding the final details
At this point, your pumpkin drawing is almost done! All that remains is to add in some lines to show the sections of the pumpkin.
Using the points of the interior of the pumpkin outline, carefully draw in a line from the upper point to the corresponding lower point.
As you can see in the reference image, they don’t necessarily have to be solid lines, and some can have a break in the middle.
If you take care to make sure that the lines match up correctly, your pumpkin will be finished in no time!
Bonus: Show Some Of Your Favorite Pumpkin Related Food!
As we mentioned earlier in this guide on how to draw a pumpkin, they are perhaps most commonly associated with Halloween. We will be covering a few ways to give this picture a Halloween spin shortly, too.
For now, we thought it would be fun to focus on another aspect of pumpkins: the various kinds of food they can be used for. We will go over a few options, and then you can add them to the drawing!
If you have a favorite pumpkin related food, then you could add just that one next to this pumpkin drawing. Or, you could fit in as many as you can in order to create a pumpkin extravaganza!
So let’s take a look at some of the options you could go for. One common treat to have around Fall is pumpkin pie. You could portray this by drawing a regular pie and then showing the orange innards inside.
Another way to show this pumpkin would be to have it roasted. This could be drawn by drawing segments of the pumpkin that are colored darker than the rest of it.
There could be some wisps of steam above it as well to show that it has been freshly cooked. Pumpkin soup is another tasty treat perfect for chilly Winter nights!
The last example we have is pumpkin juice, something that is enjoyed by many characters in the Harry Potter series. We gave you a few examples, but there are many ways to enjoy pumpkins.
If you want to portray pumpkin in the ways you most like to eat it, then you could also add other food and beverages you would like to enjoy with it.
Will you go with our ideas, or do you have some of your own to add to this pumpkin drawing?
Step 6 – Next you will be coloring in your drawing
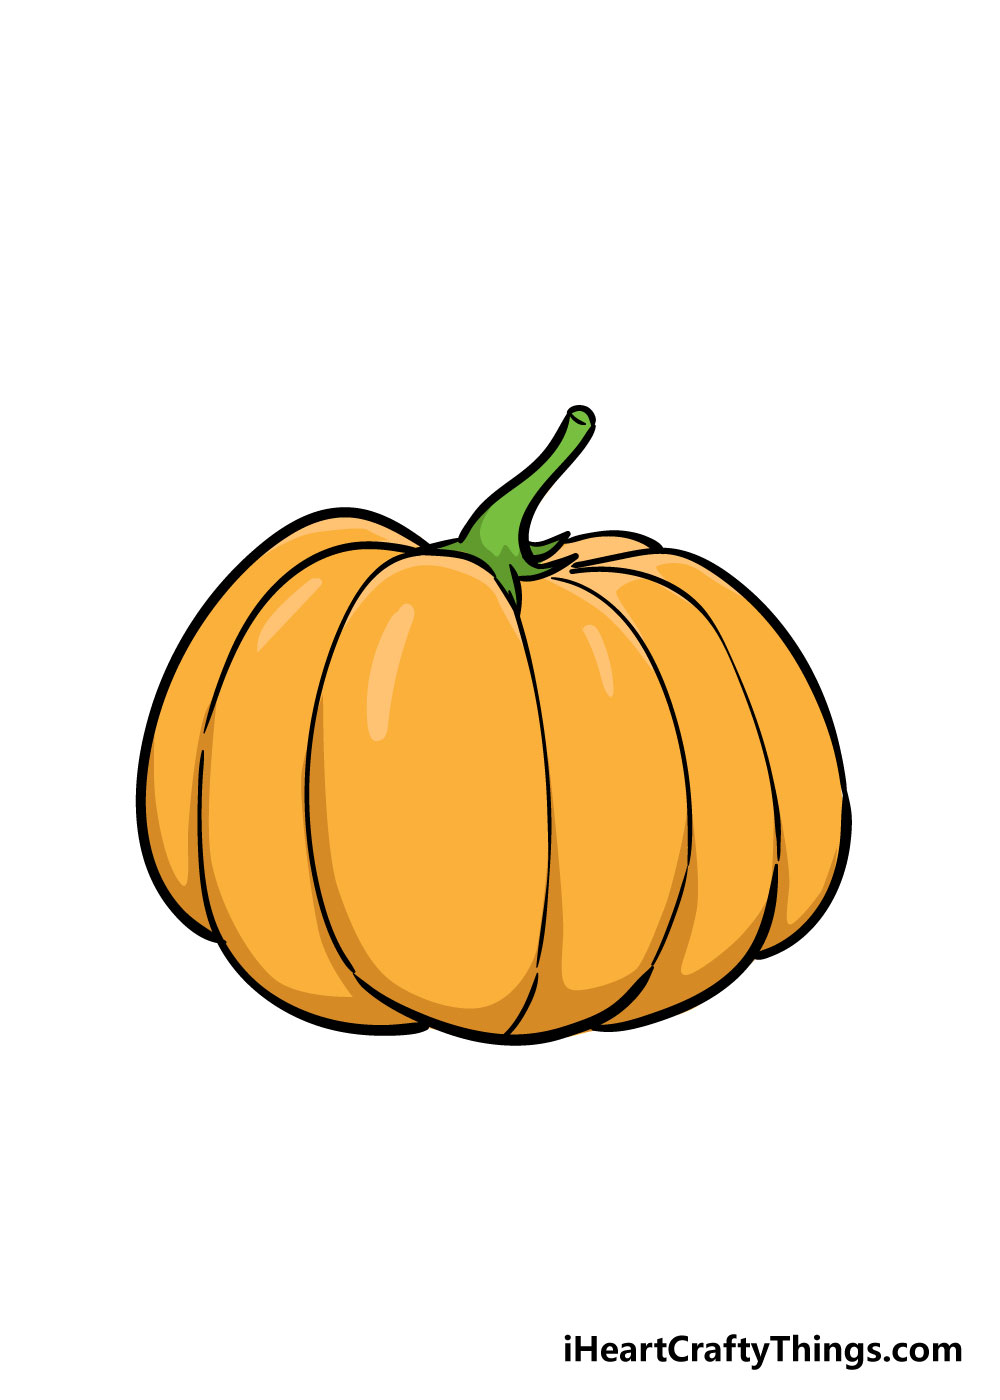
Now that your drawing is complete, you have successfully learned how to draw a pumpkin!
There’s one more step, though, and it’s a fun one! It’s time to let your creativity flow as you color in your amazing pumpkin drawing.
There are many ways you could go about this, and you should really let your creativity run wild!
You could color in the pumpkin a bright and beautiful orange, but you could also use your favorite bright colors for a more stylistic image.
Another fun touch that you could add would be to draw on a jack-o-lantern face and color it in so that it looks like candles are lit inside the pumpkin.
There is also a great variety of different art tools you can use, such as acrylic paints, watercolors, colored pens and pencils to name a few!
You can use your favorite art mediums to have a practically unlimited range of color styles for your drawing.
4 More Ways To Make Your Pumpkin Drawing Unique
Make your pumpkin drawing even better with these 4 handy and fun tips!
Earlier in the guide, we spoke about how pumpkins are closely associated with Halloween and that you can draw a jack o lantern face onto it.
If you decide to go for this Halloween theme, you could make this pumpkin sketch look even spookier by making a whole scene!
You could make a background with spooky bats, skeletons and any other decorations you associate with the season. What else could you add to turn this into a spooky Halloween artwork?
We created a whole pumpkin in this guide, but you could also remove portions of it for a more interesting display.
By drawing a large slice out of the pumpkin, we would also get to see the innards and the seeds inside.
If you don’t have a pumpkin to cut open, we’re sure you could find pictures online of pumpkins that have been cut open.
That would be a great way to make this drawing of a pumpkin more unique, but what other alterations could you make to it?
Pumpkins are known for their beautiful orange coloring, and we recommended going for that earlier in the guide.
We still think that would look amazing, but you don’t necessarily have to stick to these realistic colors!
If you wanted to make each segment a different bright color, for example, that would look really cool as well. It’s all up to you, and you can decide what kind of look you want for this pretty pumpkin
We covered creating a Halloween scene earlier, but you could also make a much less spooky background! This pumpkin drawing would also look great if you created a garden scene for instance.
That way you would also be able to draw any other fun vegetables alongside it and add plants and flowers as well.
A garden would be one scene you could create, but we’re sure you could think of many more background ideas as well! What other scenes can you think of?
Your Pumpkin Drawing is Complete!
We hope that this guide on how to draw a pumpkin was not only helpful but also fun for you to use!
Drawing a pumpkin probably seemed like quite a challenging task at first because of the unusual shape and proportions of it, but if you follow the steps in this guide it doesn’t have to be difficult at all!
Drawing can certainly provide some challenges to overcome, but breaking it down into manageable sections with a guide like this can make it so much easier.
The journey doesn’t end when you’ve finished your drawing, however, as there are tons of ways you can put your own spin on your pumpkin drawing!
You could add in some different backgrounds, use some different art mediums or add in an element like a jack-o-lantern face. We really can’t wait to see how you bring your drawings to life!
We will be uploading lots of new drawing guides such as this one, so be sure to check our site out frequently to never miss out on the fun!
Once you’ve drawn and colored in your pumpkin drawings, we hope that you’ll share them on our Facebook and Pinterest pages for us to admire!
We always love to see your creativity on display, and we’ll be looking forward to seeing some awesome, colorful pumpkin drawings from you.
Here Is A Cartoon Pumpkin Drawing To Inspire You!
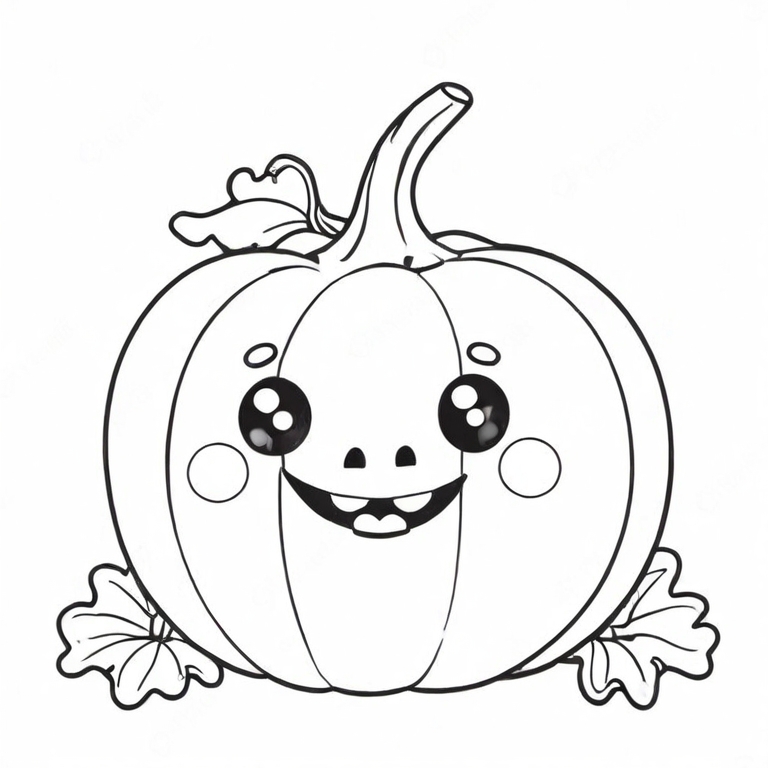
Creating jack-o-lanterns is an honored tradition around Halloween, and there are so many amazing designs to behold. Our artist Amanda has created this cartoon pumpkin sketch for you to reference.
When you create your own version of this drawing, you can look at this finished one as you see what to aim for.
She kept the design of the pumpkin rather simple, but it really shows off the distinctive shape of the vegetable.
Then, she added an equally simple yet cute face to the pumpkin, and this makes it look even more like a jack-o-lantern.
Once you have mastered this drawing, you could even make your own faces on it.
This would be a great way for you to prepare for Halloweeen as you imagine what your own jack-o-lantern may look like. What sort of face would you like on this pumpkin drawing?