The Care Bears have been around since the 1980s, and they’re still popular to this day. They have appeared in cartoons, movies, as toys and more.
For decades, fans have loved these adorable bears for their cute designs and for the lessons they teach about friendship and caring for others.
There are established Care Bear characters, but some fans like to learn how to draw a Care Bear. this way, they can create their very own Care Bear characters.
This can be done by changing just a few details and using some unique colors, and these simple changes can result in a completely unique Care Bear.
In this guide, we will be showing you how to create your very own Care Bear drawing. We will guide you through all of the steps, and we will also go over some ways you can color your drawing.
Once that’s done, we will also go over some of the ways you can add to or change the design.
All of this and more is ahead in the 6 steps we have prepared for you, so get ready to feel the love as we begin this guide and create a Care Bear of your very own.
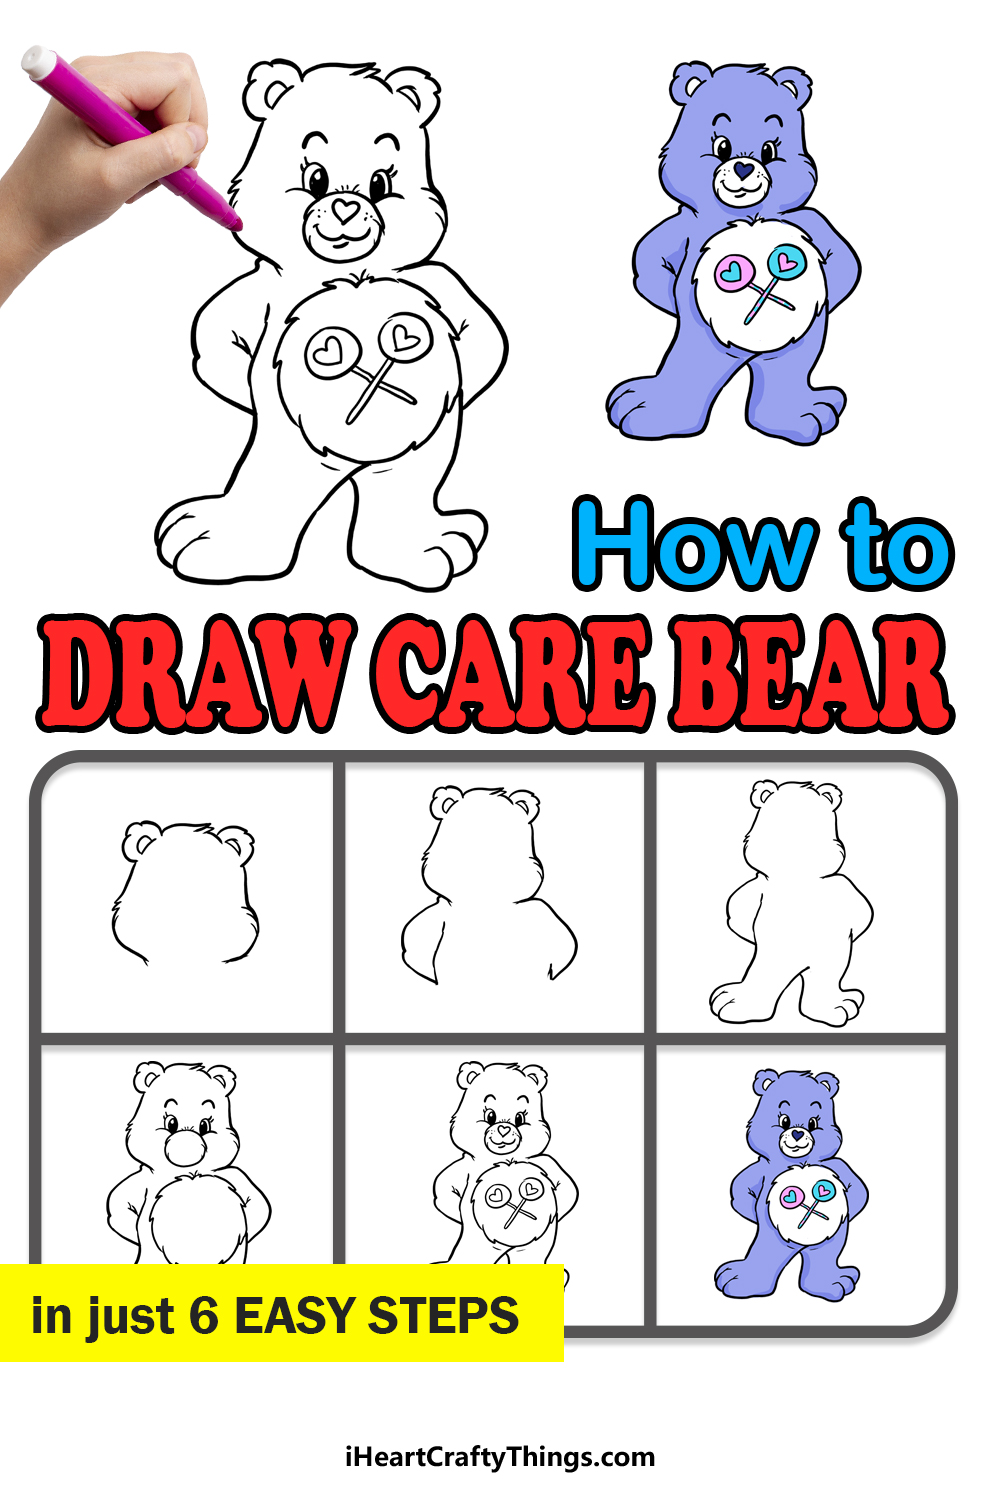
How to Draw A Care Bear – Let’s Get Started!
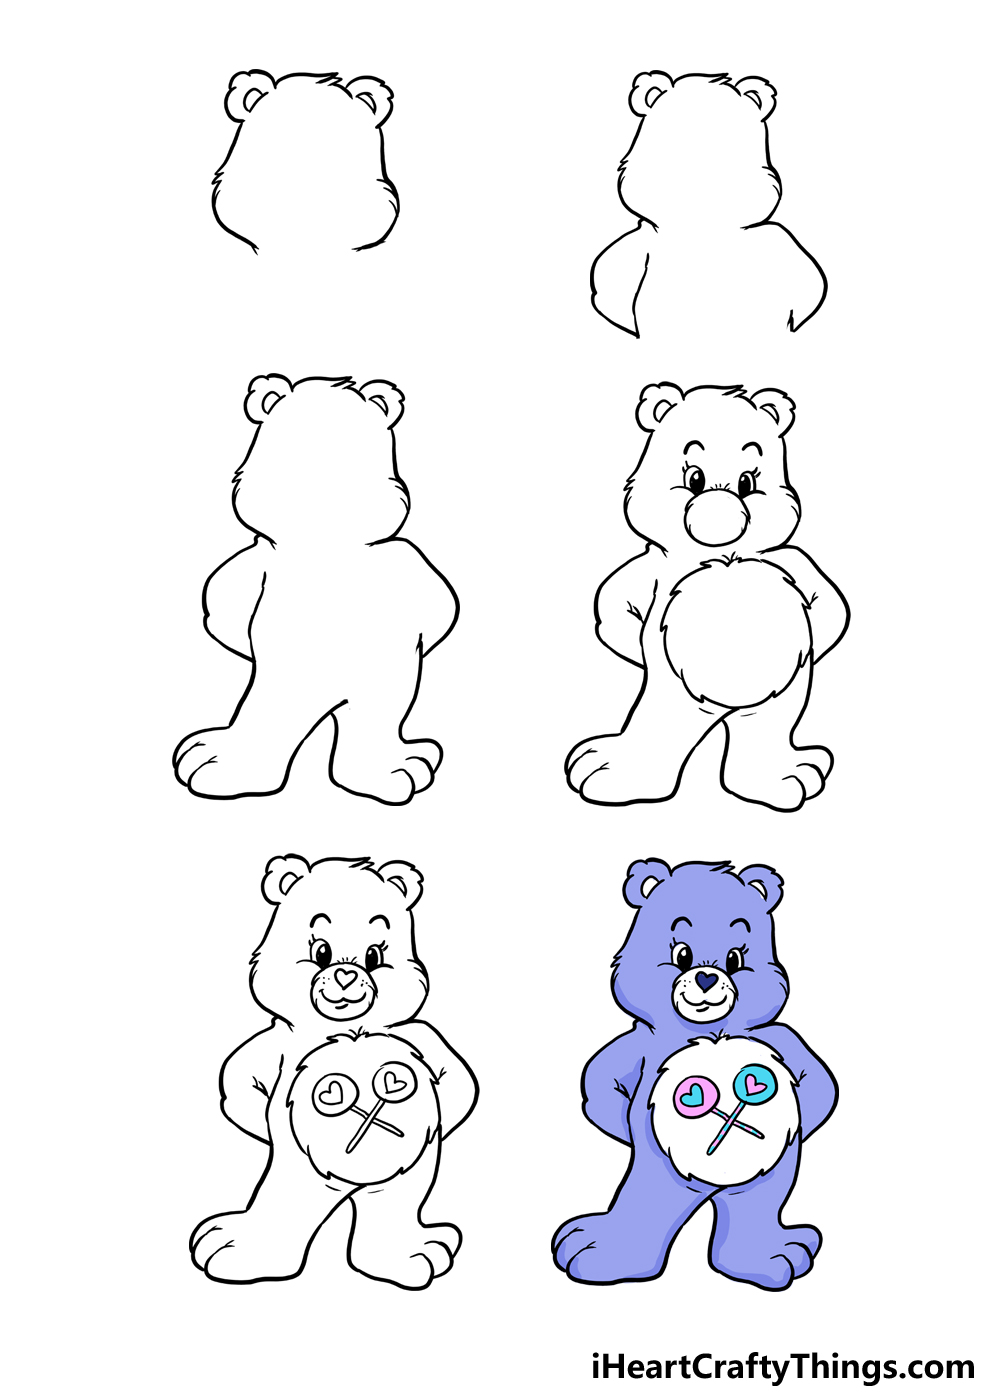
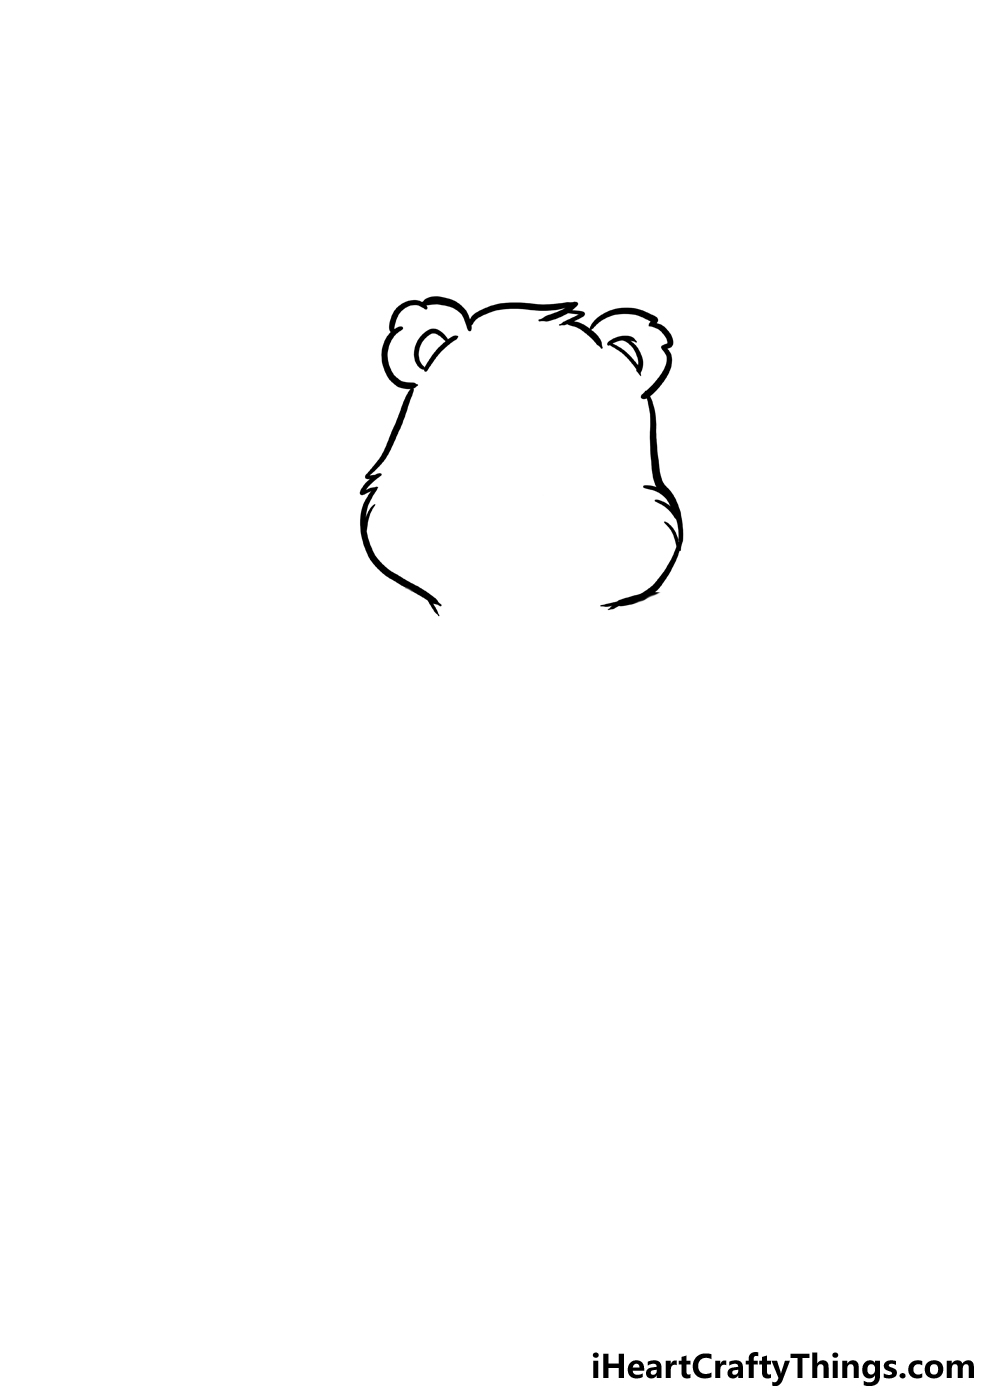
Step 1
Care bears are very rounded little characters, so we will be using a lot of curved and rounded lines for this drawing. There are also lots of little details in the linework to represent details like fur.
There is a trick that you can use whenever you’re drawing something that needs realistic proportions, and that’s to take a pencil to map out the rough shapes of the drawing.
For this drawing, you could use some rough circle shapes for the head and body of this Care Bear and then some thinner shapes for the limbs of the bear.
The shapes can be very rough, but try to make them correspond to the proportions we’re working towards. With that in mind, we can begin drawing the head outline for this Care Bear.
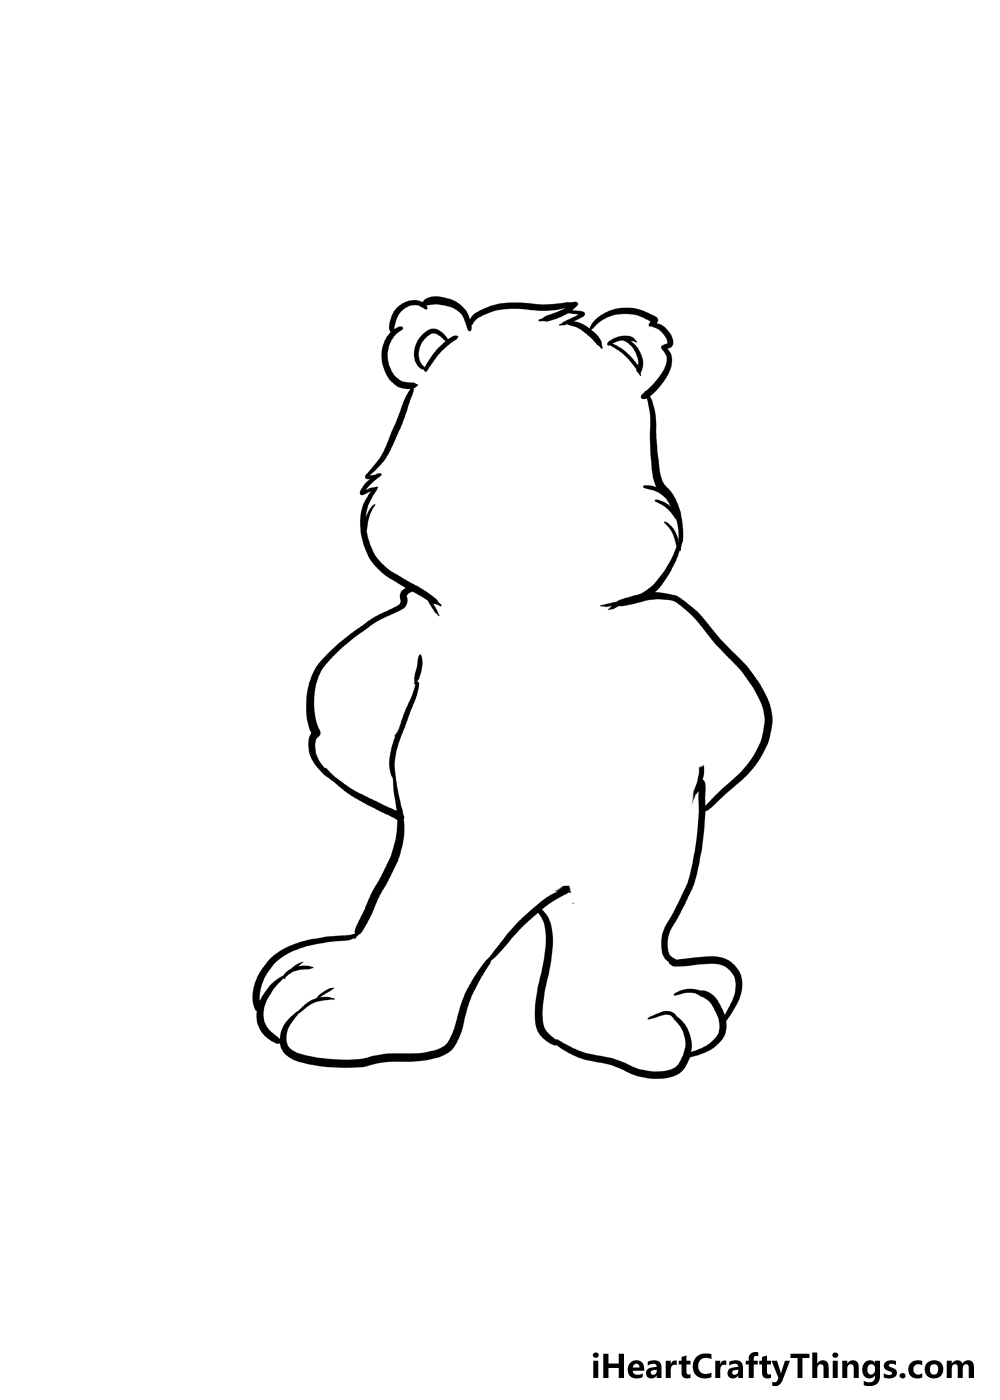
The head is quite rounded, but not completely circular. The face is a bit wider at the base because of the rounded cheeks, and then it gets a bit thinner the further up you go.
The ears are very small and rounded, drawn with a bumpy line that makes them look furry. On the sides of the face, we will also use a few little pointy lines that will make the bear look furry.
There’s a very specific shape we’re aiming for here to get that classic Care Bear look, so try to closely adhere to the reference image.
Once you’re happy with how the head outline is looking, we can move on to the second step of the guide!
Step 2: Draw the arms for this Care Bear
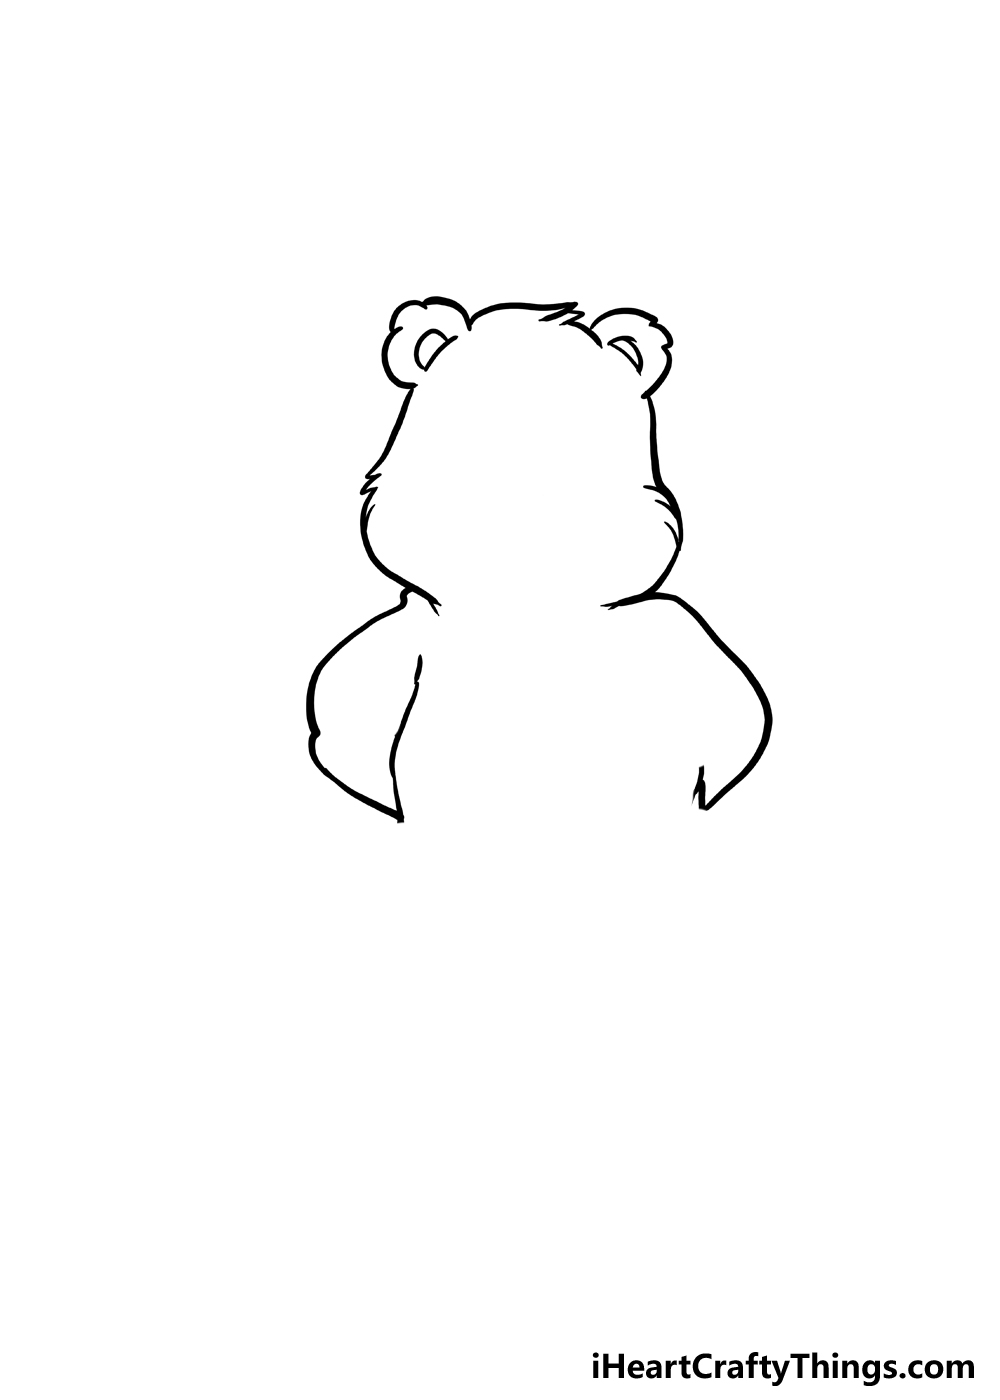
We’ll come back to the face later on in the guide, but for now we will start drawing the body for this Care Bear drawing. Specifically, we will be drawing the arms of the bear.
Luckily, the pose we’re drawing should be easy to represent, as its arms are behind its back. While this is the design that we chose, you could go for other poses if you liked.
Maybe the arms could be extended out to make this Care Bear look even more excited, or it could be giving a wave.
This is up to you, but for now we will stick to the design we have in the reference image.
Even though the hands are mostly behind the back, you could still prepare for drawing them by drawing rough shapes with your pencil.
This way, you could draw what they may look like behind its back.
It could make it easier to visualize them as you draw them. Then, we can draw the actual arm outlines. These will be drawn using some rounded lines that will form the outer edges of the arms.
There will be a large empty space at the center where we will draw the belly of this Care Bear. for now, we will only draw the outline of the belly on the left using a vertical, slightly curved line.
That’s all we need to do for this step! Once you’re happy with how it looks, we can move on to the third step of the guide.
Step 3: Add the legs for this Care Bear
Now that we have the upper part of the body drawn, we can finish off the lower part of the outline in this step of our guide on how to draw a Care Bear.
The legs of the Care Bear are quite wide with large feet, and we will be using the same curved lines to give this Care Bear a more rounded form.
As you will see in our reference image, the leg on the left is extended out a bit, whereas the one on the right is standing straight. This helps to finish off the pose of this Care Bear.
The legs will start directly where the drawing ended in the last step, which will result in the bear looking small and cuddly.
Use some very slightly curved lines for the legs themselves, and then you can curl these more drastically for the toes.
As mentioned, this should result in some wide legs with big feet, but it should still be proportionate to the rest of the body.
You could once again use a pencil to plan out these legs first if that will make it easier.
Once the drawing is complete, you can go ahead and erase any of these pencil lines as we won’t be needing them anymore.
In the next few steps, we will be focusing on some of the interior details.
Step 4: Now draw the first interior details for this Care Bear
The outline of this drawing of a Care Bear is complete now, so we can focus on some of the inner details now.
While it may not look like it at first glance, we will be adding quite a few details in this step.
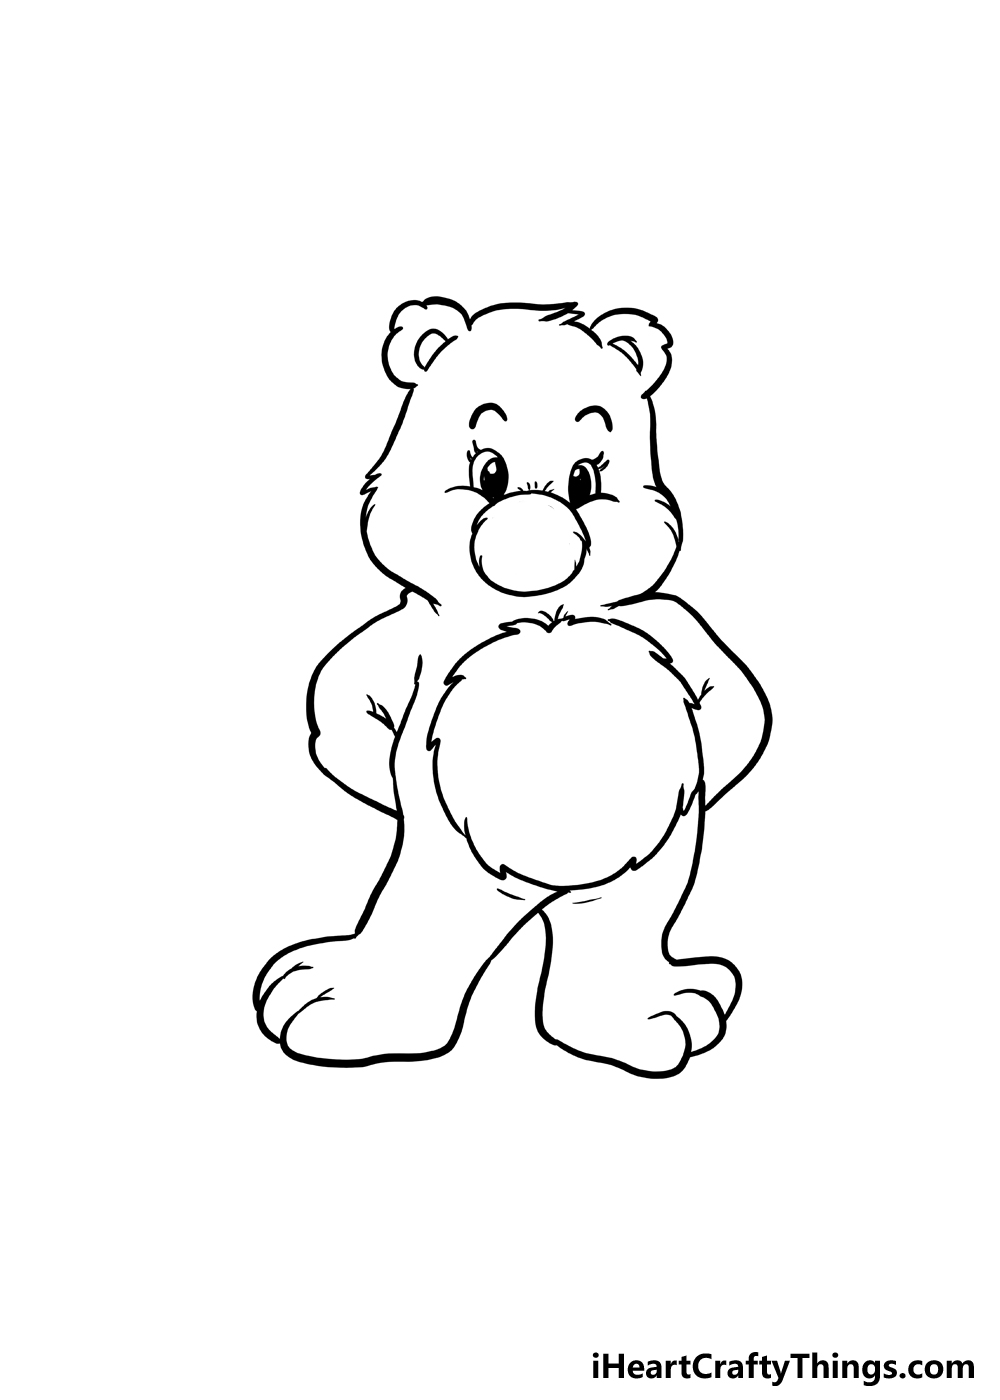
We will start with the little shapes that are inside the ear outlines. These have curved bases and rounded upper lines.
The shapes that you drew in the ears will represent the openings in the ears. Next, we will draw a circular shape for the mouth outline.
This will be a fairly standard circle, but it won’t be drawn with a solid, smooth line. There will be a few small, pointy lines poking off to make this section furrier.
We won’t actually draw the mouth for now, as that will come in the next step. Next, you can extend two horizontal curved lines off of this mouth outline, as these will go beneath the eyes.
Speaking of the eyes, you can also add them in this step. Each eye will be a thin oval shape with a smaller solid black oval within for the pupils. Then, finish off with some eyebrows above the eyes.
Finally for this step, we will draw an outline inside the belly. This will be a larger version of the round outline that you drew in the face, but will be large enough to fill most of this area.
Once these are drawn, we can move on to some final details in the next step of the guide.
Step 5: Draw the final details for this Care Bear
We have the outline for this Care Bear completed now, so it’s time to finish off with some final details.
Once we have finished those details, we will also go over a few ways you can bring your own ideas to the drawing.
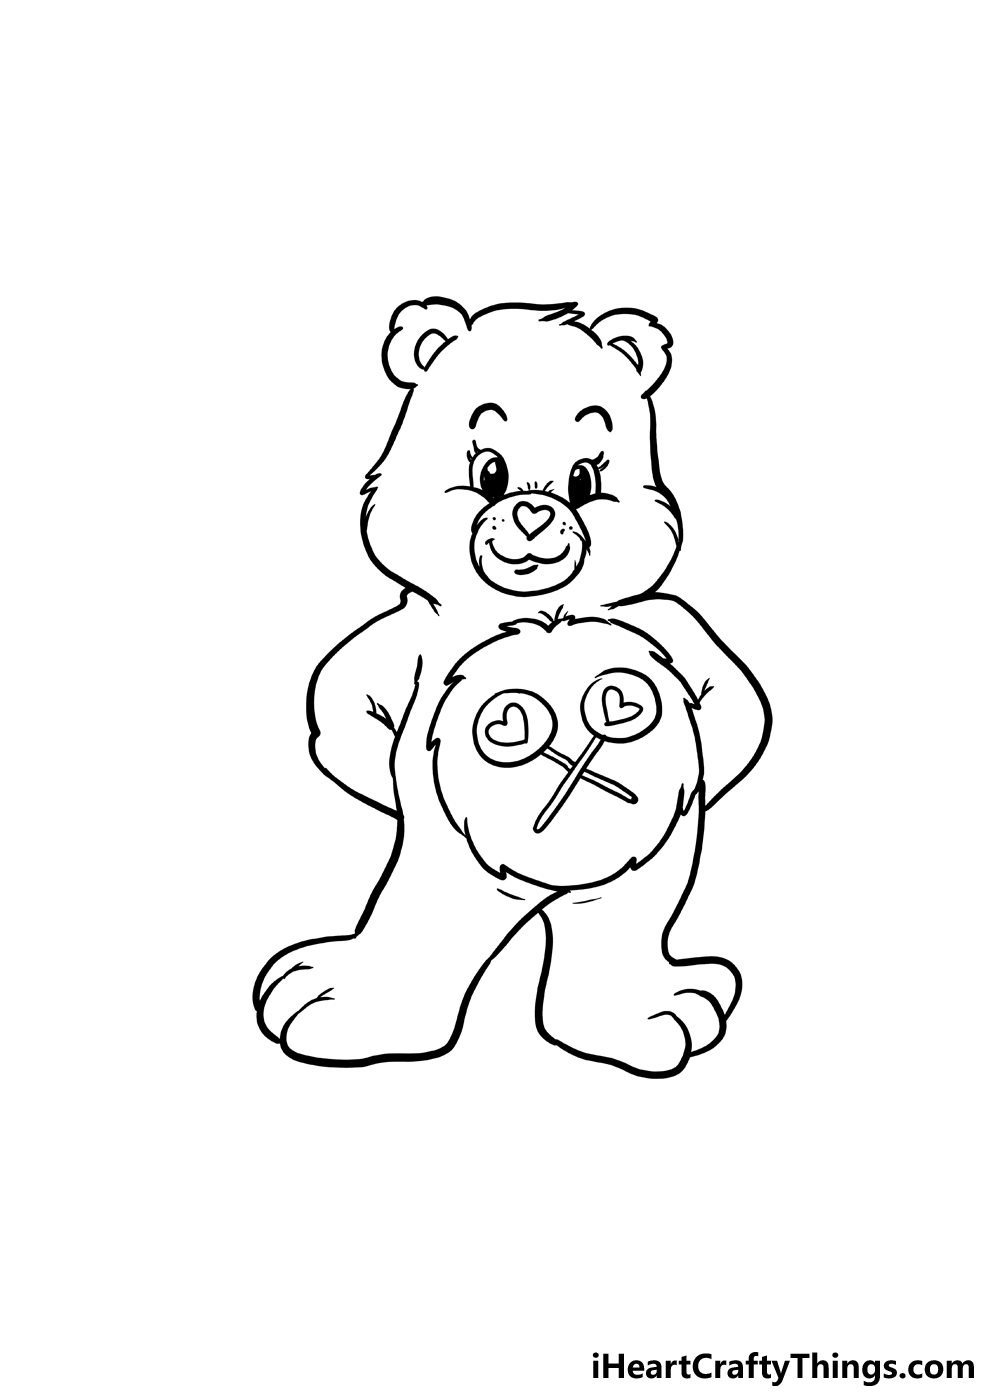
For now, let’s focus on the details in our reference image, starting with the face. Inside that furry circle on the face, we will first draw a little heart shape for the Care Bear’s nose.
Then, we will use some curved lines for the mouth. You can finish off with some dots on the cheeks to show where the whiskers would be.
Once you have finished the facial details, we can then add some details to the belly.
This is an important part of any Care Bear design, as the images on their bellies are an iconic aspect of the design.
For this Care Bear, we have two lollipops with hearts on them crossed over one another. It should be fairly simple to draw these details on the belly.
If you have a favorite Care Bear that has a different symbol on its belly, then you could draw that instead. It’s up to you, and then you can draw any other details you would like.
If you wanted to add some props or maybe even other characters, then you could definitely do that.
Drawing a background could also be a great way to make it even more unique.
It’s all up to you to add any extra details you would like! Then we can finish off with some coloring fun in the next step.
Step 6: Now, finish off with some color for this Care Bear
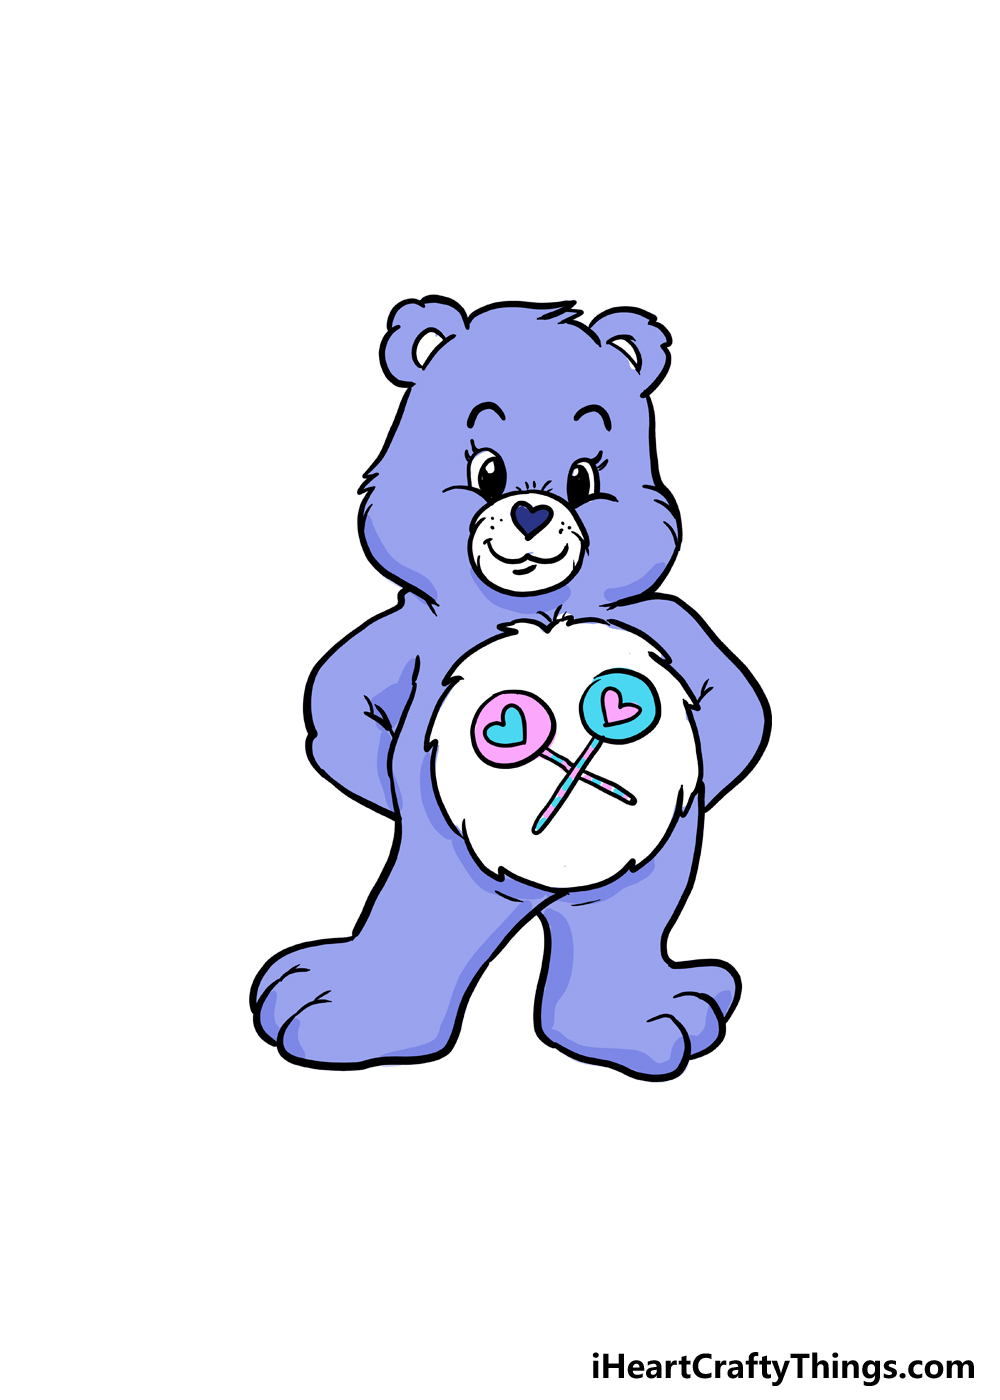
The final step of this guide is all about bringing some color to this Care Bear! In our example, we show you just one of the many color schemes you could go for when coloring your own one.
A Care Bear can be pretty much any color you can think of, so you have many options.
You could go for a color that represents an existing Care Bear, or you could create your very own Care Bear variant.
It’s up to you, but no matter what color scheme you use, you can incorporate different tones to add shading to the drawing.
You will see that even though we used mostly light blue for the Care Bear, we used some darker blues on the edges.
You could do this no matter what color you choose for your own Care Bear. Not only can you color it any colors you like, but you could also use some fun and interesting art mediums.
If you want the Care Bear to be bright and colorful, for example, you could use some colored pens, markers or paints that will make the colors pop.
Using glitter, stickers or special craft glues would be a few examples of crafts that can bring a bit of extra magic to the drawing.
Mixing different mediums and crafts together can also make the colors pop in unique ways.
There are so many different ways to bring color to this drawing, and we can’t wait to see what you decide on! Be sure to let your creativity take over and see what happens.
Your Care Bear Drawing is Complete!
You have finished this adorable drawing of a Care Bear, and you should be very proud of the artwork you’ve accomplished!
There were definitely some tricky aspects to this drawing, and it was possibly harder than it looked.
If you follow all of the steps and also allow yourself to make mistakes and try again, you will have the hang of how to draw a Care Bear before you know it.
Once you have really gotten the hang of it, you can then experiment with making some of your own variations and interpretations.
Maybe you could even have a picture with a group of Care Bears hanging out!
There is a lot of fun to be had, and now it’s up to you. When your Care Bear is complete, you can share the drawing on our Facebook and Pinterest pages for us to check out.
We would love to see how this drawing turned out!