Many people are scared of spiders, but many times this can be an irrational fear that is more psychological than anything else.
When it comes to the black widow spider, however, this fear is justified.
The female black widow spider is one of the most dangerous spiders in the world, and their bites can be deadly.
Not only this, but they also have a distinctive black and red look that is strangely beautiful.
Because of this mix of beauty and deadliness, these spiders have become popular, and many people like to learn how to draw a black widow.
This way, they can make some incredible portrayals of this famous spider.
In this guide, we will be showing you how you can create your own portrayal of this deadly arachnid.
Not only will we show you how to draw it, but we will also cover some creative ways that you can color it.
Then, we will go over some ways that you can add to the drawing with additional details for the background.
There is a lot to go over, so we hope you’re not scared of spiders, as we will be taking a very close look at one of the deadliest there is.
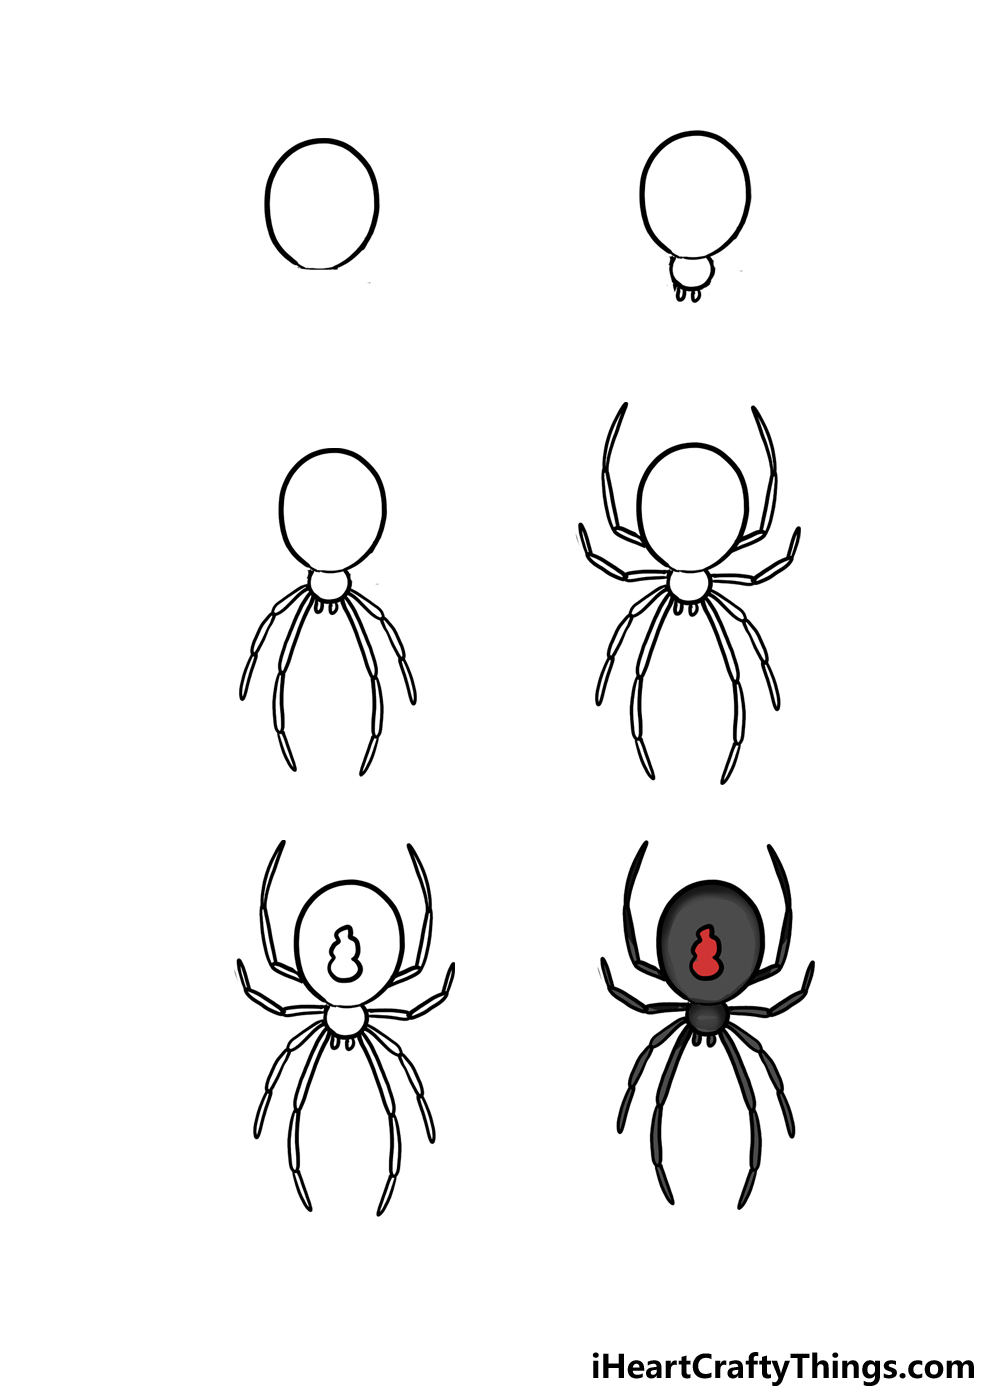
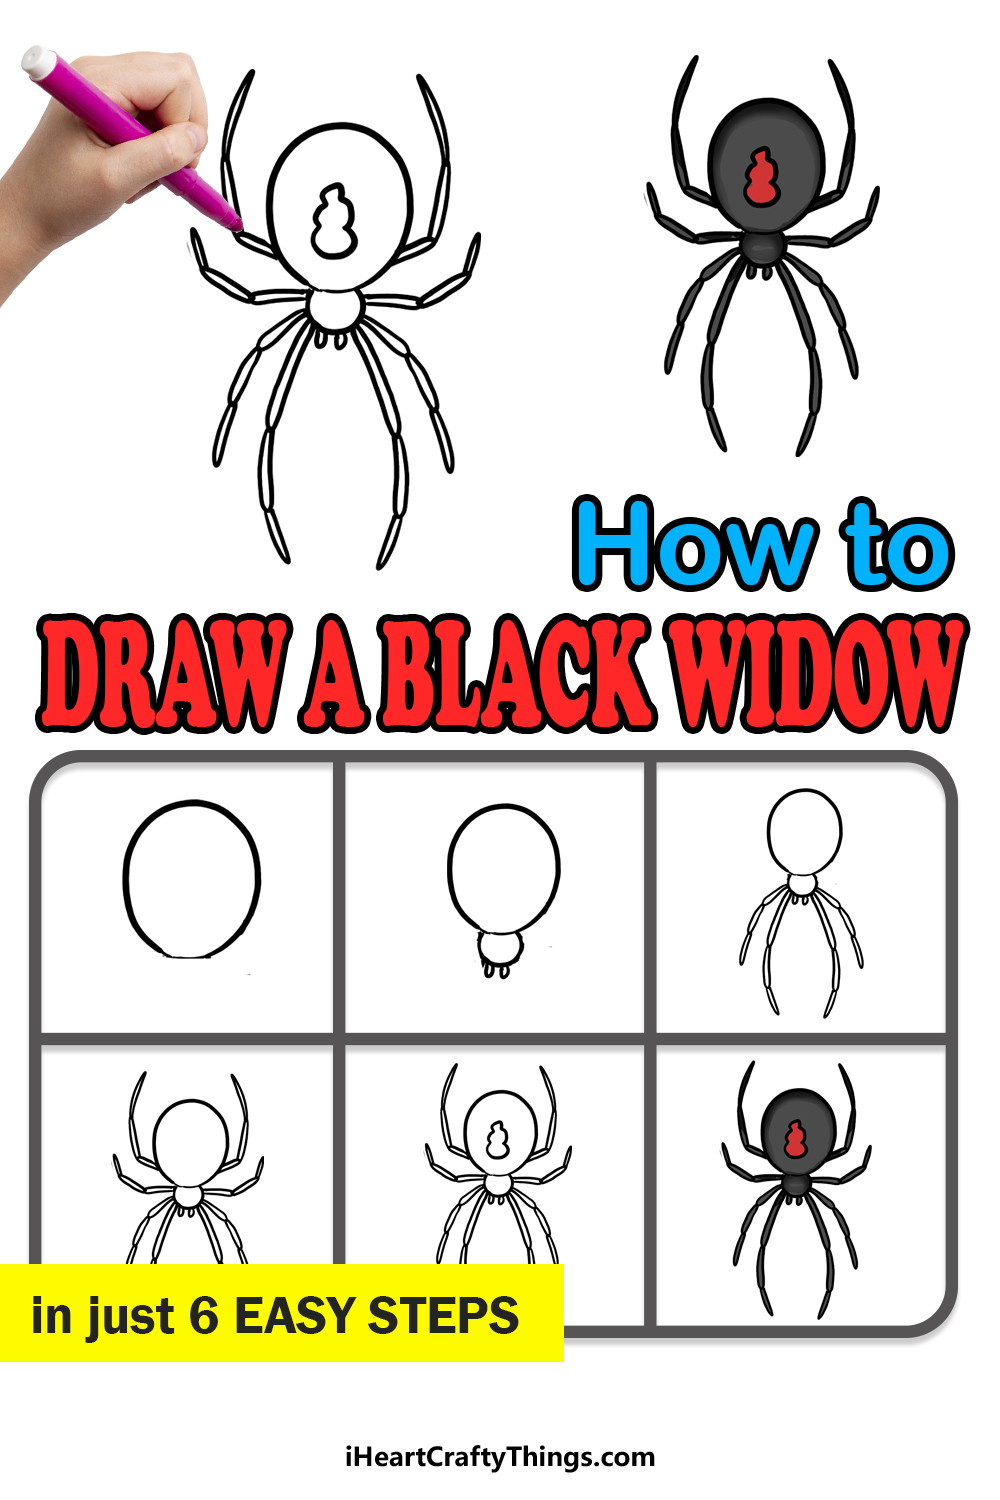
How to Draw A Black Widow – Let’s Get Started!
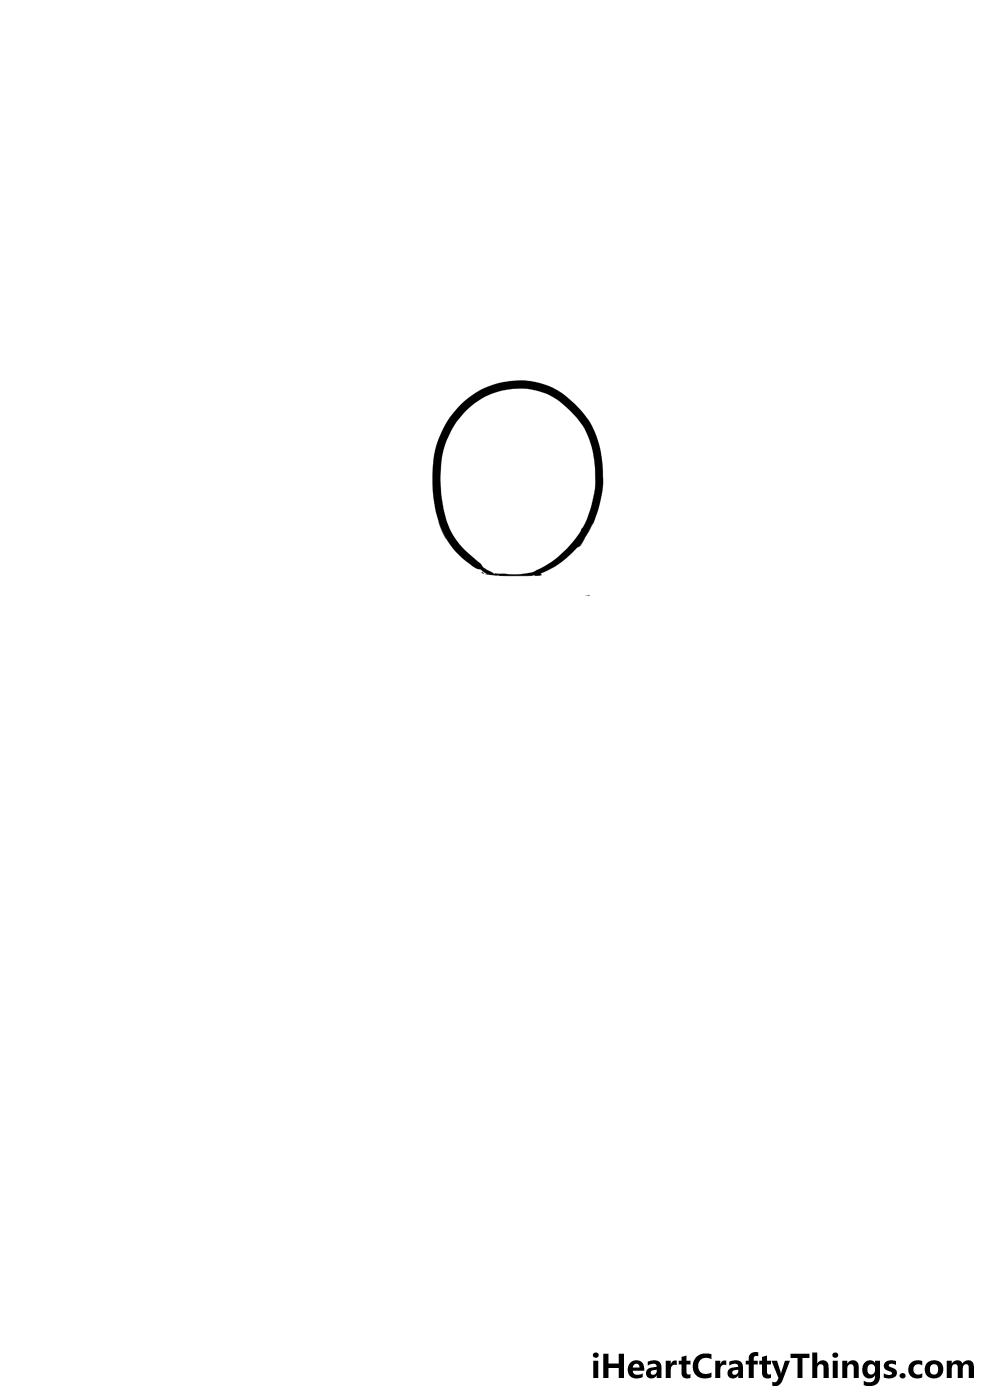
Step 1
Spiders come in many different shapes, sizes and variations. One species of spider can look very different from another, and it can be interesting to see how different they can be.
Despite this, spiders will always have the same basic body structure, usually composed of the head, middle and abdomen.
These may come in different shapes and sizes, but these parts will always be there, and that will be true for this drawing as well.
To begin with, we will draw the abdomen of this black widow. This is the back of the spider, and it is also the largest part of the body.
Even though it is at the back of the black widow, it will be at the top of the image as the head will be pointed towards the bottom of the page.
Before you draw this first section of the black widow, you can begin by drawing a rough version of the spider as it will appear.
This could be done with a light pencil so that the lines can be erased later.
You could keep it to an oval shape for the abdomen and then a smaller circle for the head. Once you have these, we can draw the abdomen.
As you will see in the reference image, this will be an oval with a thinner portion at the bottom where it will connect to the head. Once this is drawn, we can move on to the next step.
Step 2: Draw the head for this black widow
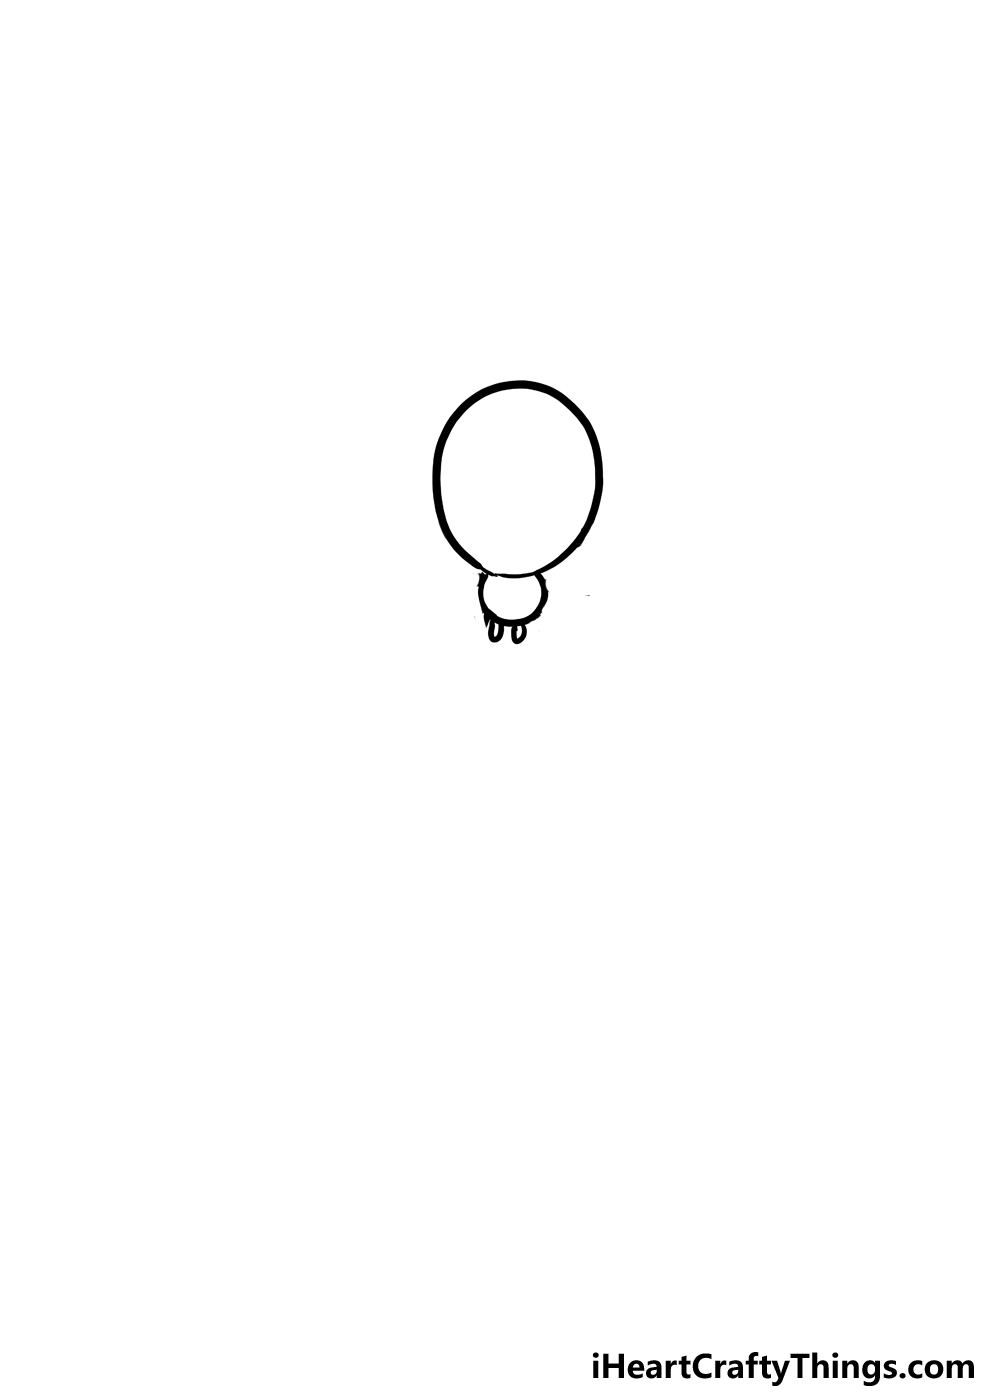
The abdomen for this black widow drawing was oval, but the head will be more circular in shape. It will attach to the body at the point where the line was thinnest.
There is a small waist between the head and the abdomen, but it’s so small that we won’t be showing it in this drawing.
As you will also see in the reference image, the head is much smaller than the abdomen.
Carefully draw a small circle for the head, as it appears in our reference image. It doesn’t have to be a perfect circle, but it should be pretty smooth.
If you drew some shapes to prepare for this drawing, then this part should be easy enough, as you already know the proportions and placement for this head.
Before we move on, there is one more detail we need to add in this section. That would be the small but deadly fangs of the black widow.
They may not look like much, as they are pretty small on the head, but you wouldn’t want to come into contact with these little fangs. Simply draw them by adding two small rounded shapes at the base of the head.
They should be so small that they’re barely noticeable, but you should still be able to see them.
Once you have drawn the head, you can erase your planning shapes if you used them and can still see them.
Then, we can move on to step 3 to continue this drawing.
Step 3: Add the first four legs
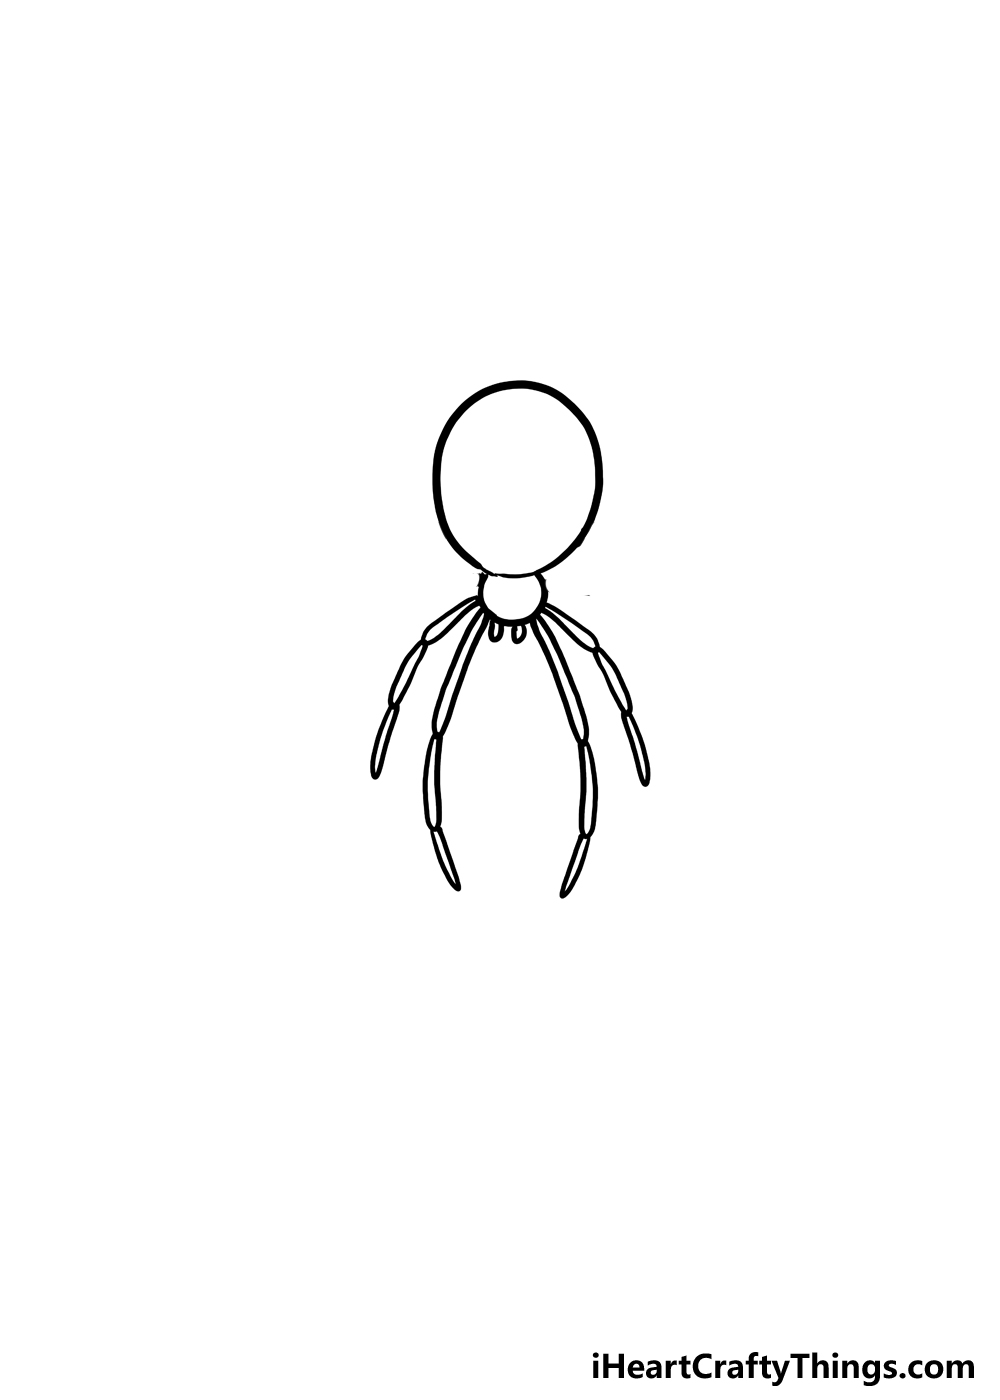
Spiders famously have eight legs, it’s one of their defining characteristics. In this third step of our guide, we will be adding the first four of these eight legs.
These will be on the lower half of the spider, as shown in our reference image. Even on a real black widow, you will see that the legs are separated into various sections.
You will see that we will be doing this for the legs of this black widow as well. Each leg will be separated into three thin sections, and they will be bent in specific ways that are shown in our reference.
The first two will start very close to the fangs that you just drew, and they will also be the longest of the four that we will be drawing in this step.
They will have longer sections to begin with, and then two shorter sections attached to these. Each leg should curl inwards slightly with each section.
Then, we will draw two outer legs that will begin close to the starting points of both the inner legs that we just drew. These legs will be quite a bit shorter than the first two legs that you drew.
Other than the shorter length, they will be very similar to the first two in how they’re drawn. That means each will have three sections, and they will also curl inwards.
For these legs, each section will be more or less the same length. If you’re having a hard time drawing these legs, then you could use that pencil you used earlier to plan them out before you draw with your pen.
When you’re happy with how these first legs look, we can proceed to step 4 and add the remaining 4 legs, so let’s do that when you’re ready to proceed!
Step 4: Now draw the remaining 4 legs
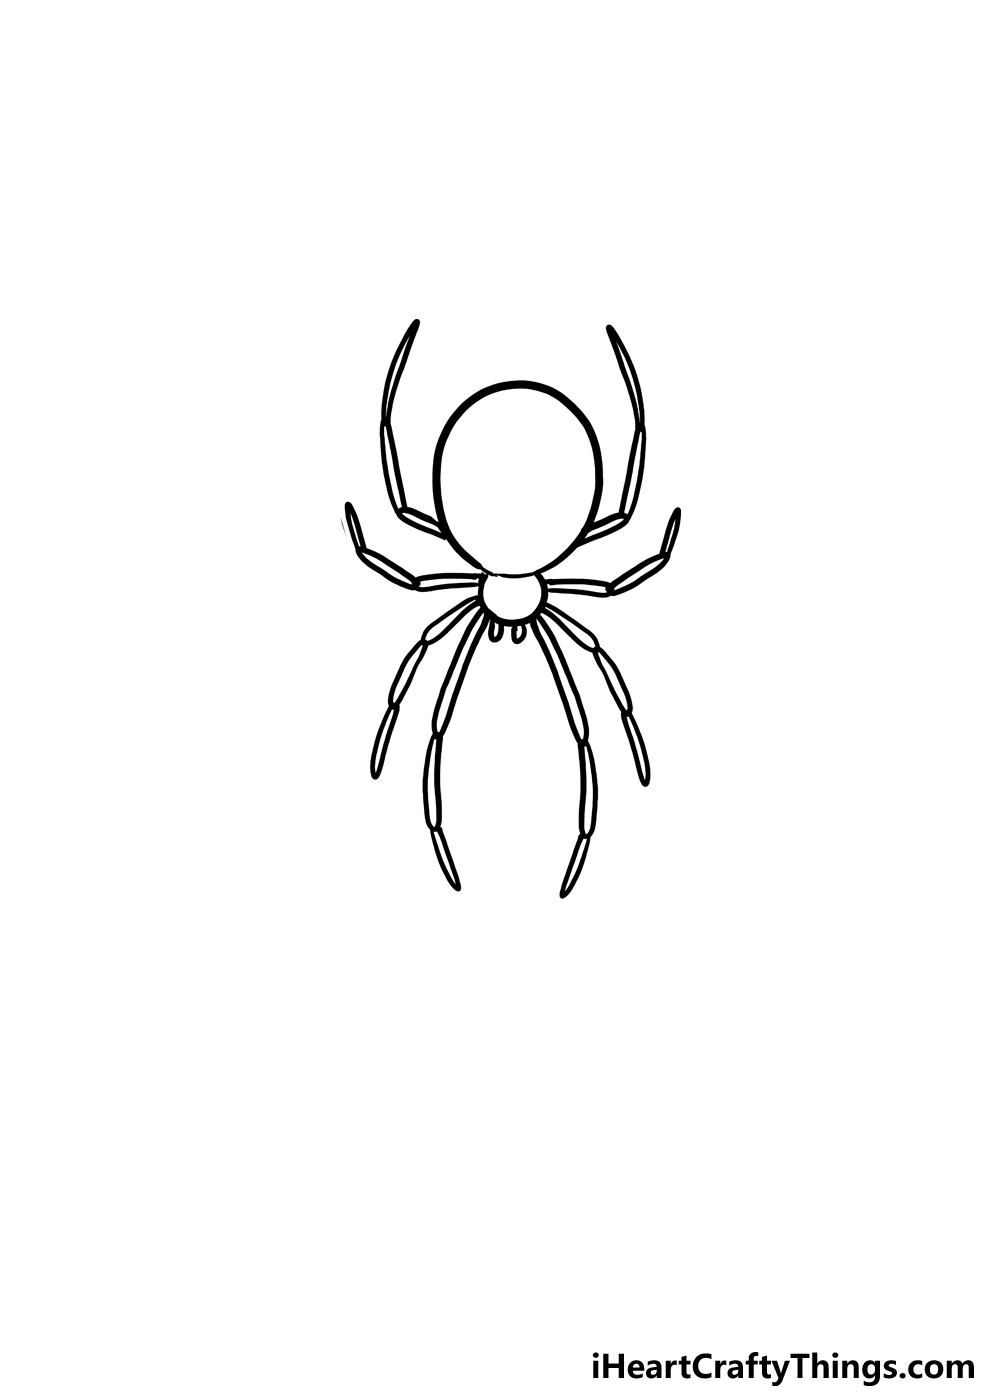
Now, we’re ready to add the remaining 4 legs to this drawing of a black widow. These legs will follow some of the same ideas as the previous ones, but these will be positioned differently to those ones.
As you will see in the reference image, these legs will point in the opposite direction to the previous legs. They will also bend differently from the previous ones.
For these reasons, we would recommend closely looking at the reference image as you draw them, as they may look off if positioned incorrectly.
With that in mind, let’s draw the middle two legs. These will extend from higher up on the head section of the black widow, and they will be mostly horizontal.
They shouldn’t be completely straight out, though, as they will still be bending upwards. Other than that, they will also have three sections of varying sizes, just like the other ones.
There will then be two final legs to add, and these will angle upward quite sharply. As always, there will be three sections, but these legs will be much longer than the legs that you just drew.
The first sections of these will be quite short, but then the middle sections will be much longer. If positioned correctly, you will see that the black widow has that distinctive look that these spiders have.
Once these legs have been drawn, we have just a few final details to add in the next step, and you will also be able to add some ideas of your own.
Step 5: Draw the final details for this black widow
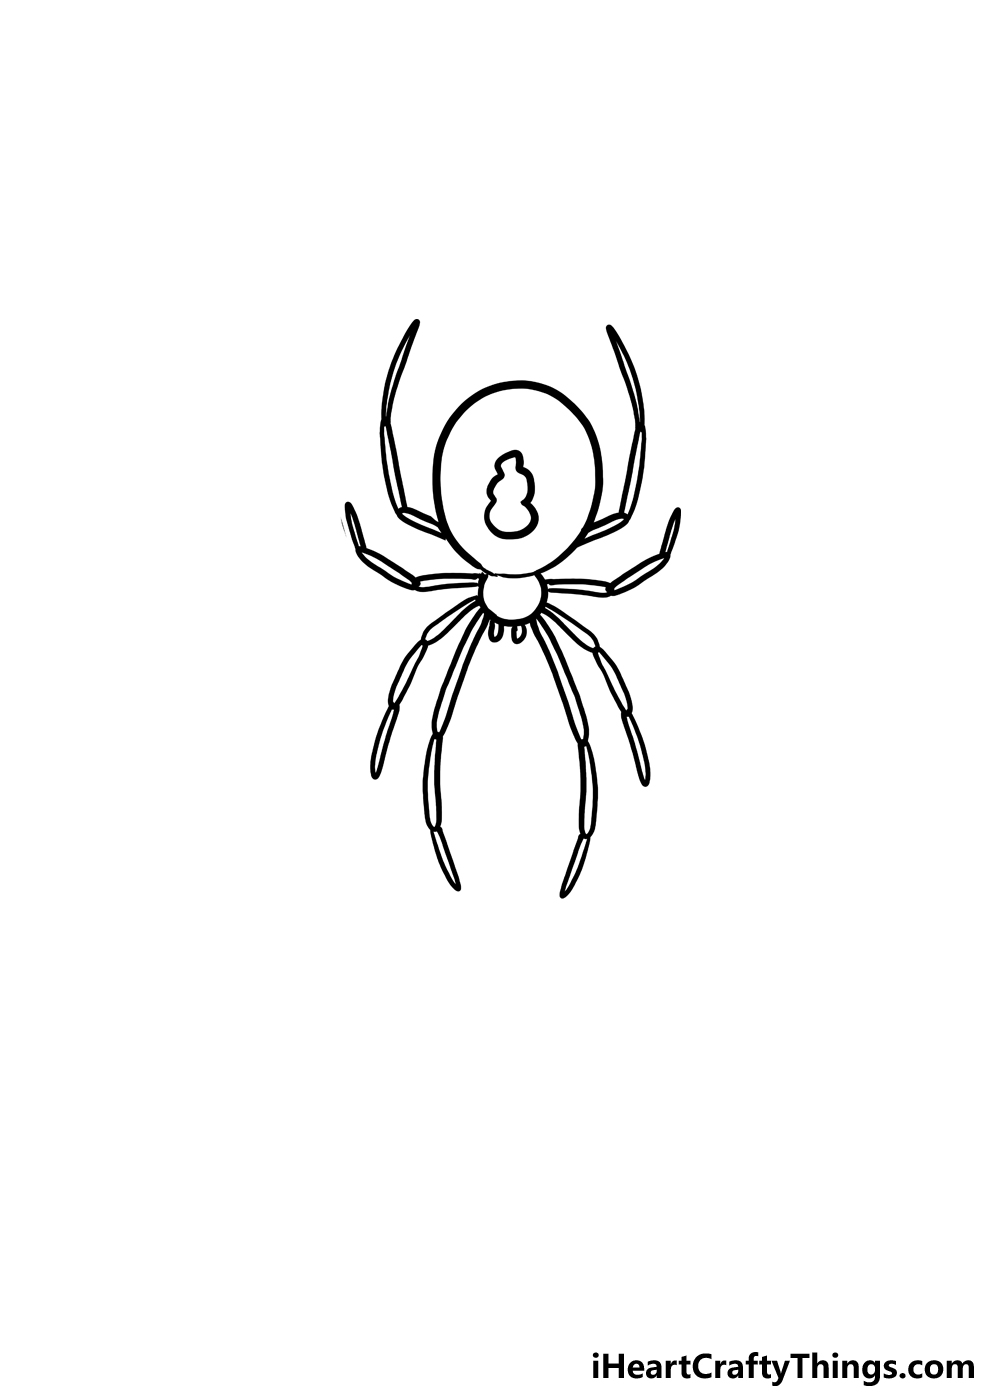
Before we get to the final step of this guide on how to draw a black widow, we have a few final details to draw. The main one is one of the most important parts of this design.
One of the defining features of a black widow is the red hourglass marking on its abdomen. Some people may assume it’s on their back, but it’s actually visible on the underside of the abdomen.
Sometimes it’s portrayed as a more distinct hourglass shape, and you could go for that approach with your own drawing.
In our example, we made it less distinct, which is often how it looks in real life.
Once you have drawn this final detail, you can finish off any other final touches that you think this drawing could use. Then, you’re ready for the final step where we will color it in.
Before we do this, you can also add any additional details of your own to personalize this drawing even further. What you add would be up to you, and there are so many possibilities!
One obvious yet effective idea would be to draw a spiderweb that the black widow could be sitting on. You could also add other details such as some flies wrapped in webbing, for example.
If you draw a background, try to keep the fact that we’re viewing the base of the black widow in mind.
We’ve given you a few ideas, but now you can show off how creative you are by adding your own ideas and additions.
Step 6: Now, finish off with some color for this black widow
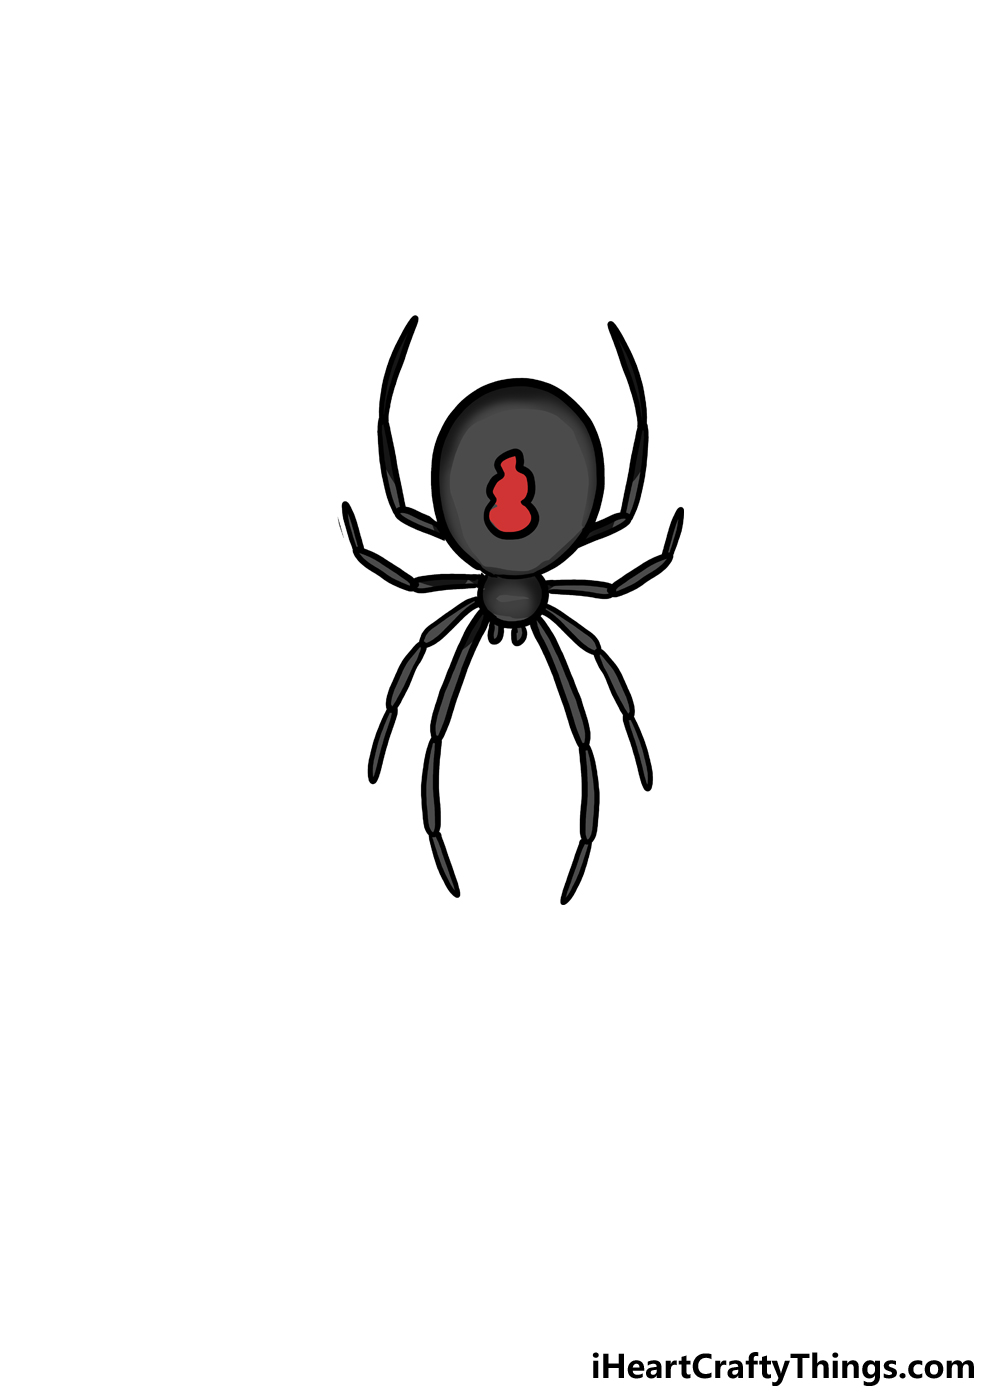
It’s time to finish off this drawing with some color! As you may imagine, there will be plenty of black in this design, given the name of the spider.
Despite this, if you use just one tone of a color then you will end up with a flatter image, and that’s why we have used multiple tones for the body of the black widow.
You will see that we used some regular black tones, but then these gradually merge into lighter grey tones.
This helps to give the black widow some shading and makes it look like there is some shape to the body.
You can easily use similar tones no matter which mediums and art tools you may be using. Then, you can add some bright red for the spot on the abdomen for a splash of color.
This would give the black widow a realistic look, but you can also go for other colors if you want a more stylistic image. The art tools and mediums you use are also up to you.
You could go for paints, coloring pens, pencils or a mixture of whatever you have. The art tools you use can bring the colors to life in all sorts of interesting ways, so feel free to experiment!
It’s up to you now, so what colors, art tools and mediums will you use?
Your Black Widow Drawing is Complete!
That brings us to the end of this guide on how to draw a black widow!
This is possibly the most recognizable type of spider, so we hope that learning how to draw it was a fun and rewarding experience.
Now that you have drawn this spider, you can add any of your own colors and ideas to make it more unique than ever.
There are so many ways to make this drawing your own, and it will be awesome to see how it turns out!
Speaking of which, we would love to see your finished black widow drawing. The best way to do this is by sharing your drawing on our Facebook and Pinterest pages.
This way we can see how your drawing turned out, so we hope you will share it so we can see this fearsome black widow.