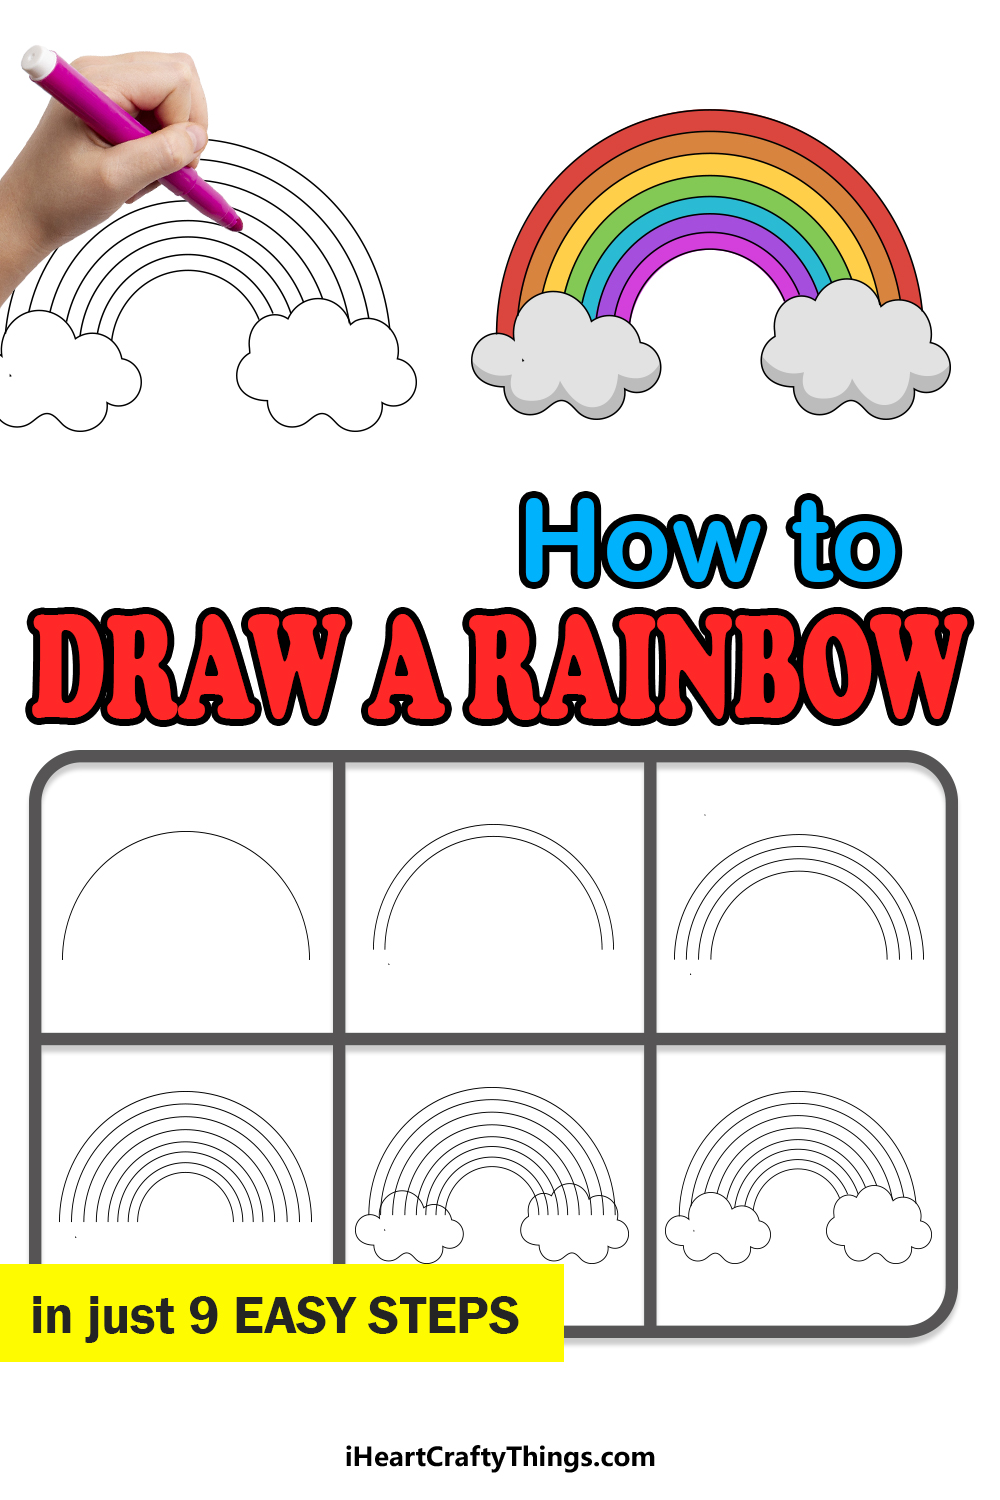
It’s so fun and easy to learn how to draw a rainbow when you follow this guide I have for you! You will be able to recreate this beautiful natural phenomenon by following through.
Rainbows are always a magical sight when they appear after the rain. They showcase stunning colors and forms that can be admired high up in the sky.
It’s no wonder that Irish legends claimed that you would find a pot of gold at the end of each rainbow! That may not be the case in reality, but they certainly are a treasure to behold.
When you set out to draw a rainbow, you may run into some difficulties as getting the colors and shape right can be surprisingly hard. That’s why this guide will break down everything for you.
You will see the colors you need as well as some techniques on how to make the distinctive shape of the rainbow, so let’s begin and see how it’s done!
See How To Make Your Rainbow Drawing By Watching This
How to Draw A Rainbow – Let’s get Started!
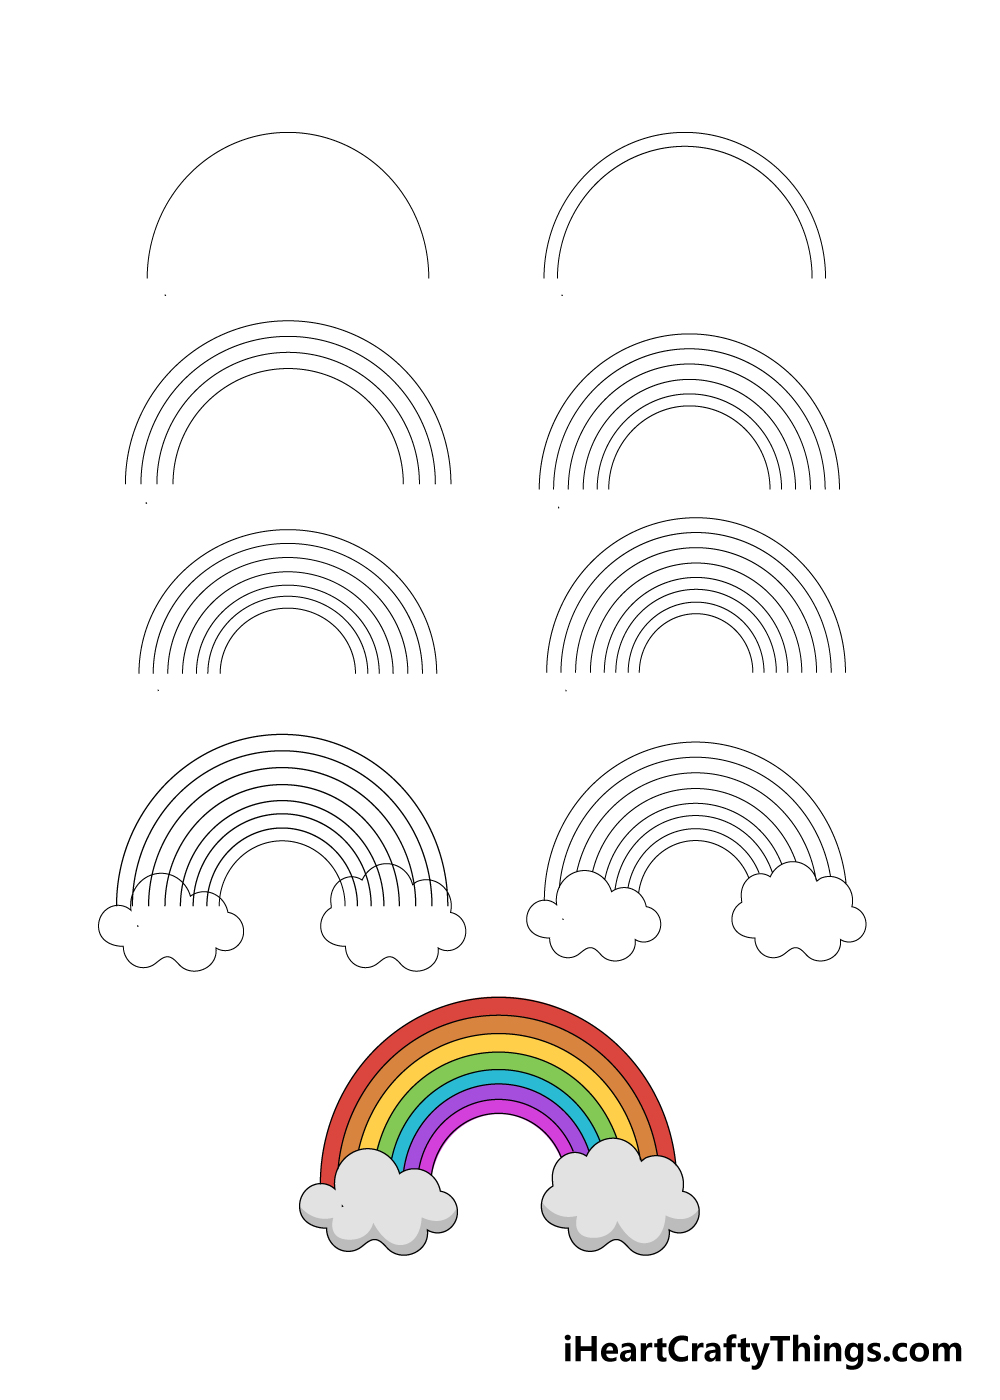
Step 1
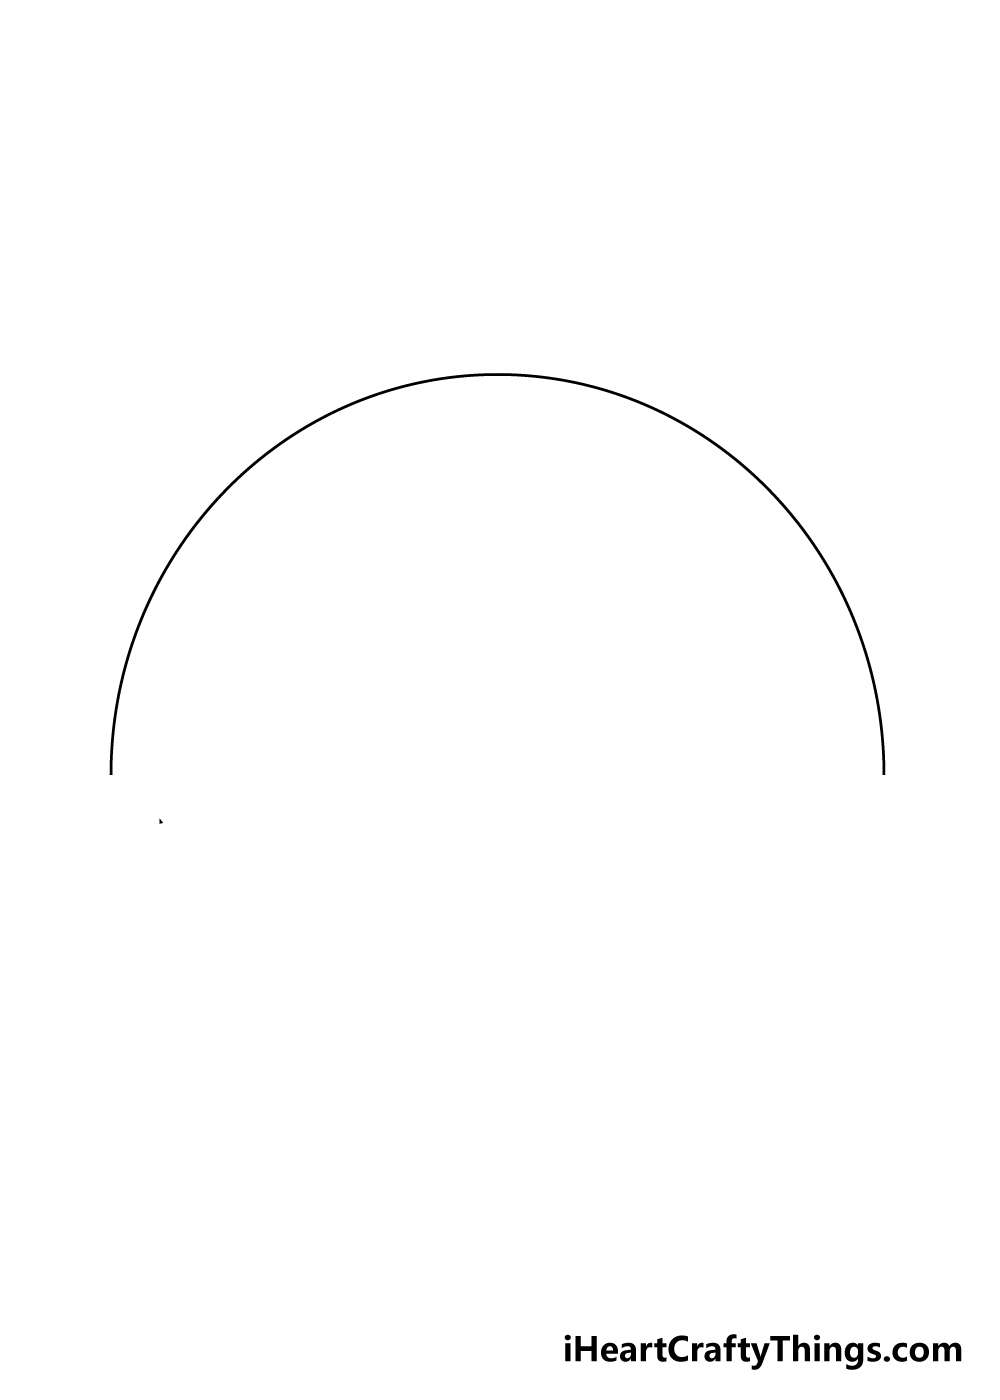
To begin this guide on how to draw a rainbow, you will be starting with some pencil lines to guide you in the next steps.
These lines will be so curved and rounded that they will appear almost as half circles. For this reason, you can make it much easier if you use a tool such as a drawing compass.
Using this compass, you can draw as if you were going to be creating a large circle, but only do half of that circle.
Once you have the outer line of the rainbow, you can then move on to the next steps!
Step 2 – Next, draw another line of the rainbow
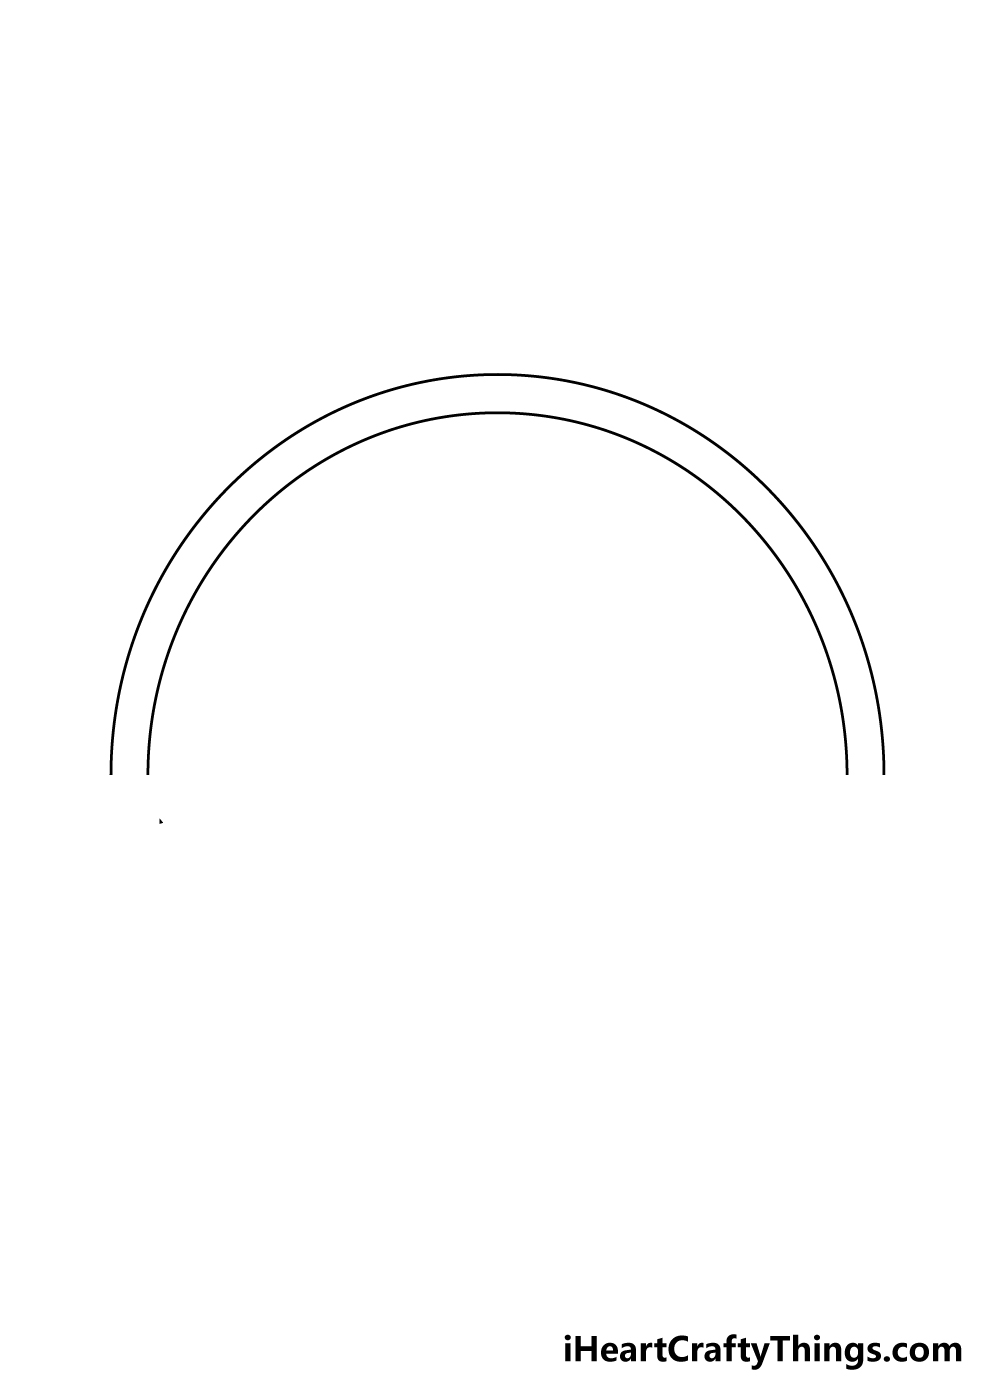
For this second part of your rainbow drawing, you will be replicating what you did in the first step.
You will be drawing another curved line running parallel closely under the first one, once again, you could use a drawing compass to add this second line closely underneath that first one.
That’s all there is to it for this step, and you can move on to the next one.
Step 3 – Now, draw two more lines for your rainbow

You’re getting the hang of it now! In this part of our guide on how to draw a rainbow you will be adding two more curved lines for your rainbow.
Simply keep doing exactly what you did for the previous steps and draw two more lines for the rainbow
Step 4 – Next, draw some more lines for your rainbow
We will be continuing on with the methods we have been using for the previous parts of your rainbow drawing.
You can use your compass to add two more lines to the rainbow, and these ones will be slightly closer together than the other ones were.
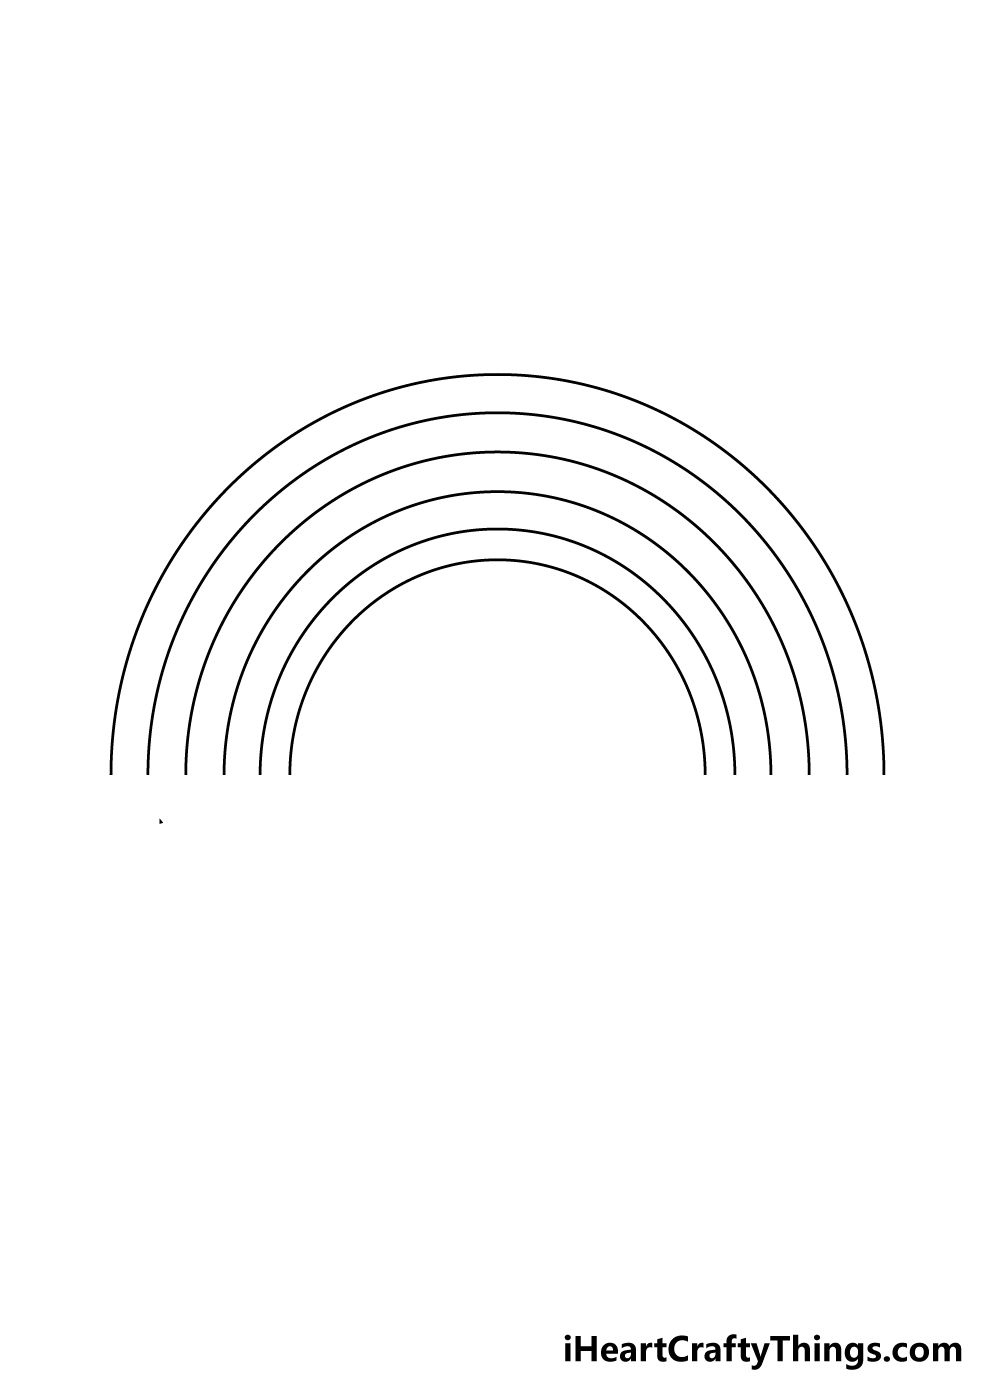
Step 5 – Now, draw another curved line for your rainbow

There are just a few more lines to draw before you move on to the final details of your rainbow drawing.
For this step of our guide on how to draw a rainbow you can use your compass to add another line for your rainbow.
Step 6 – Next, draw the final line of the rainbow

It’s time to add the final line of your rainbow drawing in this sixth step. Simply do what you have been doing for the other steps of this guide to add the final line.
Now that the rainbow is finished, you can start adding the final touches in the next few steps.
Step 7 – Draw some clouds for your rainbow
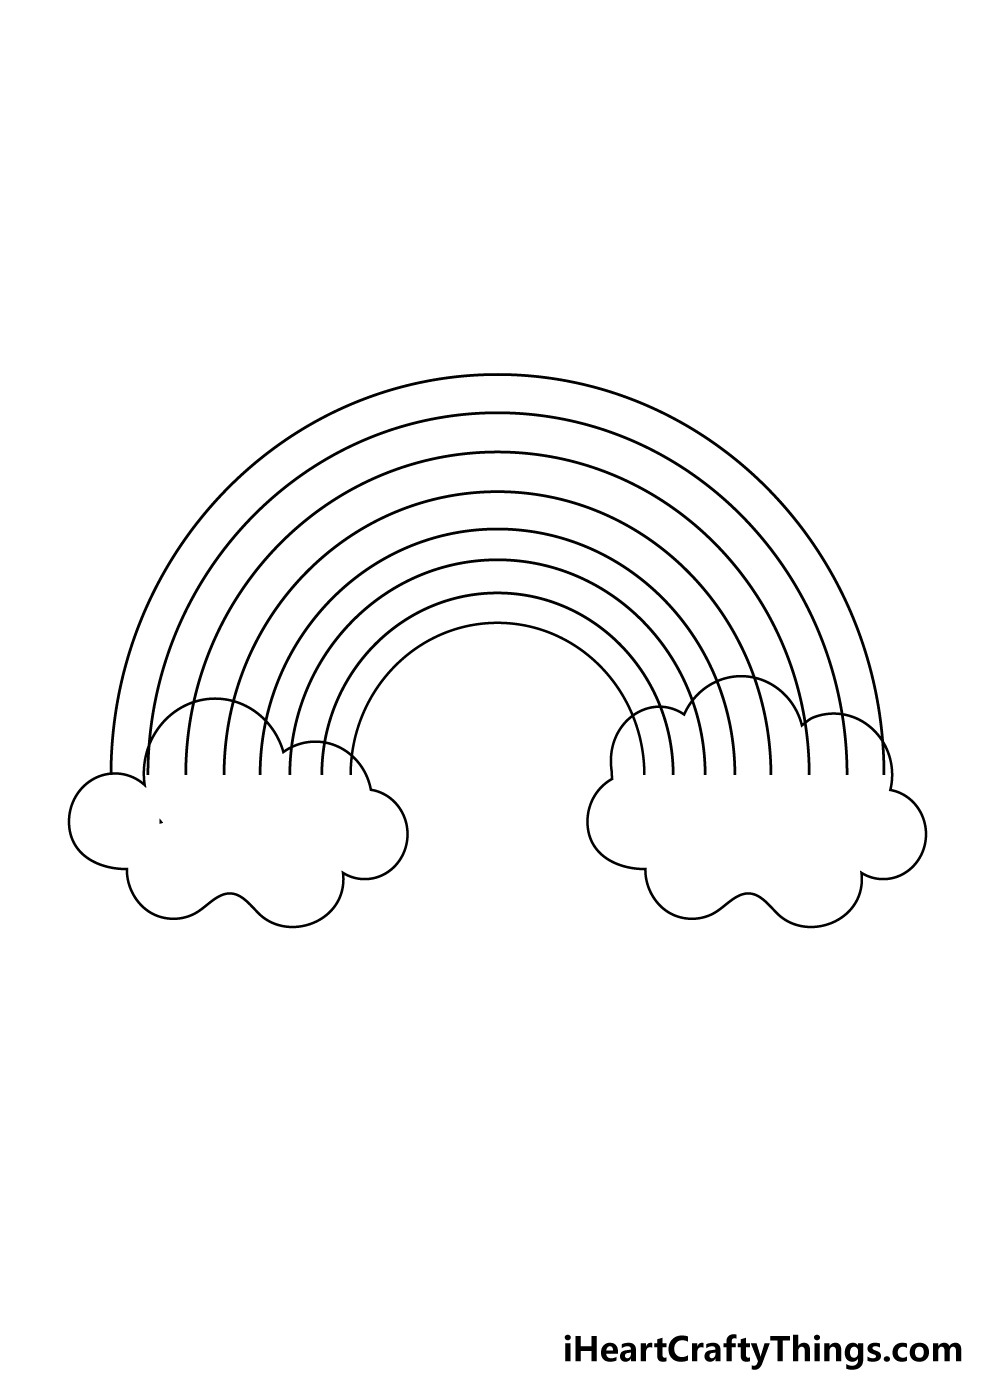
In this part of our guide on how to draw a rainbow, we will be adding some clouds to your rainbow.
To do this, simply use your pencil to draw the cloud shapes with some rounded lines.
These clouds will go over the ends of the rainbow, as shown in the reference image. Then, we will be finishing up the drawing so that you can add some color to it.
Step 8 – Next, draw the final details
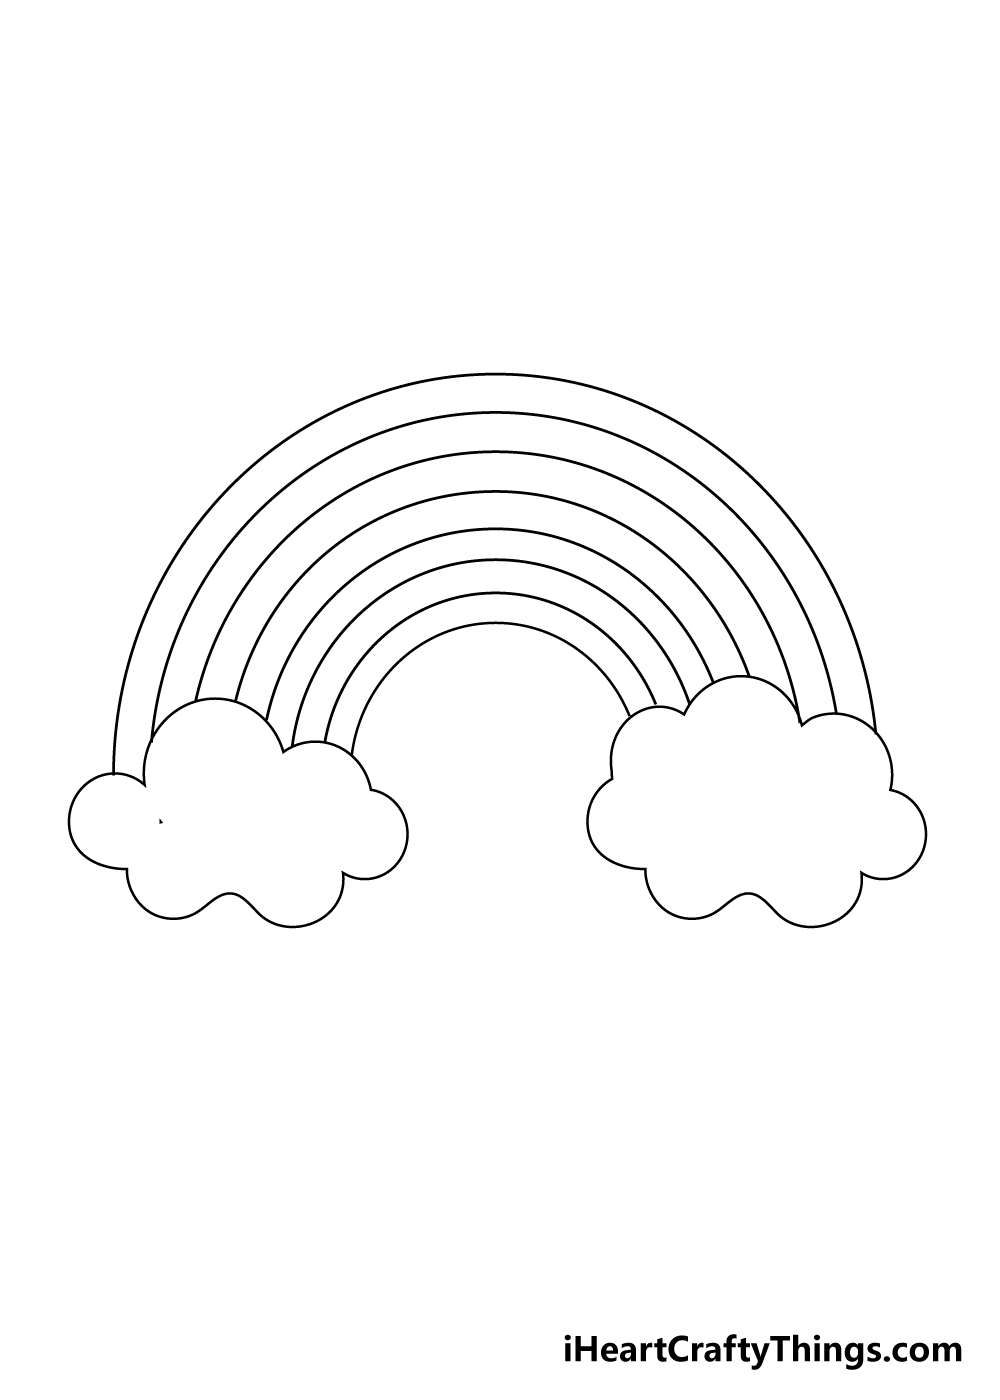
Before you finish up all the details in this guide on how to draw a rainbow, you can first erase any lines from the rainbow that are inside of the two cloud shapes.
Once you have these lines erased, you have some options available. You could use a pen to go over all of the lines of your rainbow drawing to have more of a strong outline look for it.
Or you could leave them in pencil and then color in the segments of the rainbow to erase the pencil later to have the rainbow be made up of just color. It’s up to you, and either way will look great!
Step 9 – Now finish off your rainbow drawing with some color
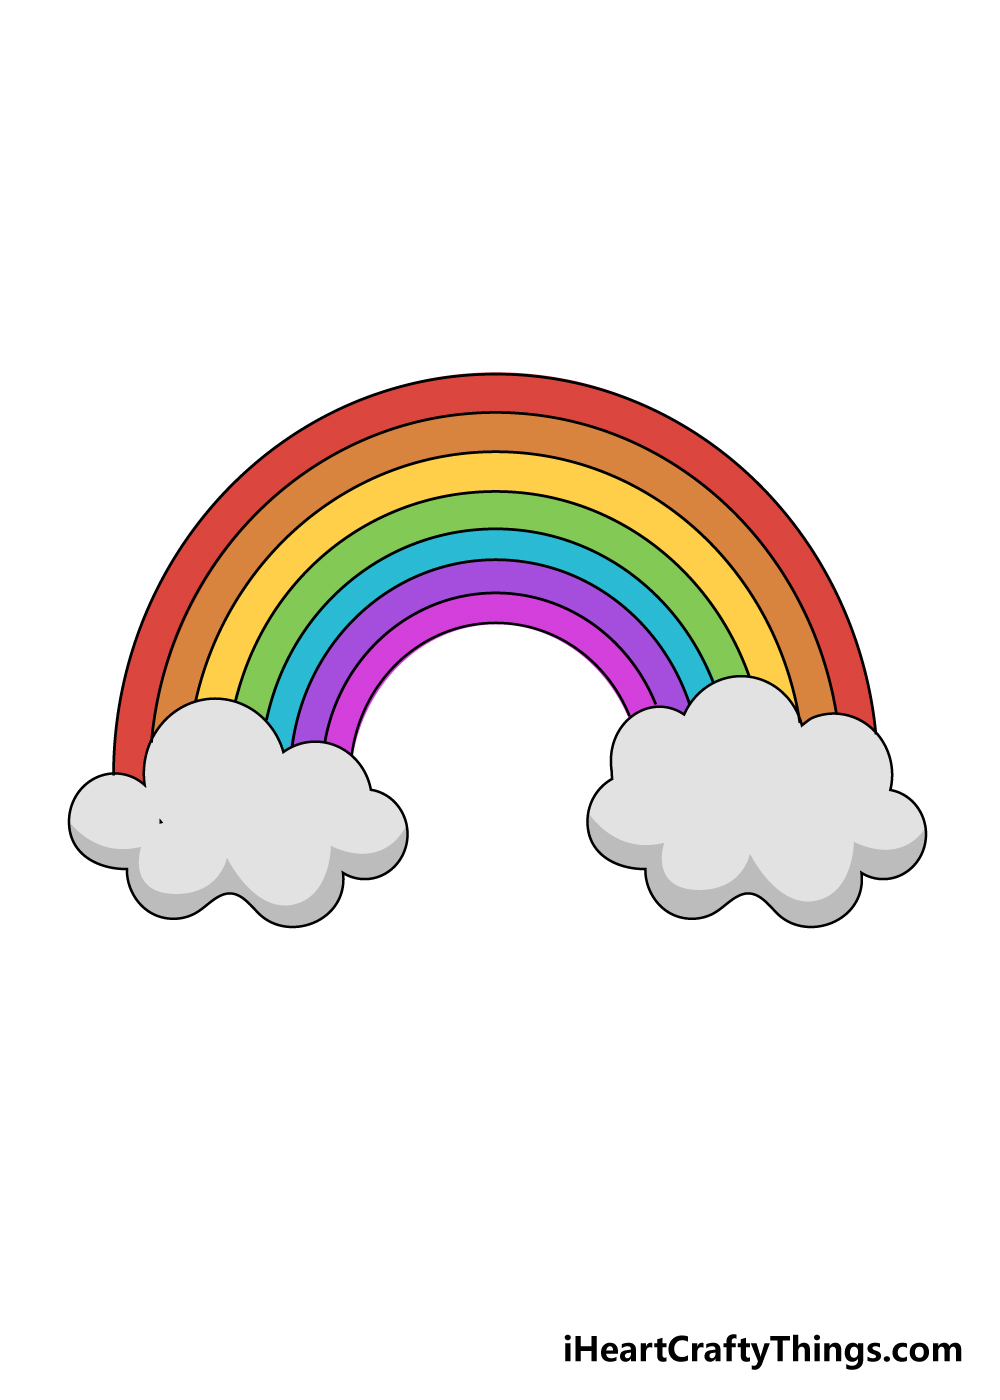
The most recognizable aspect of a rainbow is its beautiful colors, so we will finish off the drawing with some colors in this final step!
Our reference image will show you the order in which the different colors will be added. These colors will be red, orange, yellow, green, blue, indigo and violet, in that order.
You could stick to this order of coloring for your drawing if you would like, but you can also use some of your own color variations!
As we mentioned earlier, you can also choose between having lines between each segment of the rainbow or whether each section will be separated by color.
You could also draw some background details, and maybe even add a creative touch like pots of gold at the ends of the rainbow! How will you finish off your colorful artwork?
Here’s how you can make your rainbow drawing even better…
Create a colorful rainbow masterpiece with these fun and helpful tips.
Rainbows are common in many myths and stories, and you could incorporate some of these into your rainbow drawing! For example, Irish legends contain stories of pots of gold and leprechauns at the end of a rainbow.
Norse legends also speak of a rainbow bridge, and these are just two ideas that you could use to take this picture to a whole new level.
Can you think of any other famous stories or legends involving rainbows?
Another way to make this rainbow sketch even more stunning would be to add a background setting for it. The rainbow could be over a beautiful mountain or a deep valley for a few ideas.
There are so many different locations that you could use for this page as well. If you want some inspiration, you could look up various landscape photos online in order to get some inspiration.
What kinds of settings do you think you would like to incorporate this rainbow into?
This rainbow looks so pretty, but it would also be fun to turn it into something else. For example, you could create a stunning rainbow character.
This could be as easy as adding a smiling face to the rainbow, and you could also add an accessory such as a hat. You could also make it look like this rainbow is actually a pin on someone’s jacket.
These are just a few ideas, but there are many ways that you can put a spin on this beautiful design.
Rainbows are famous for their beautiful colors, so it will be an important part of this drawing of a rainbow. They come in a certain order of colors in real life, but you don’t have to stick to these!
The full spectrum of color is there for you to play with, and you can use all of your favorites. We would also highly recommend using a combination of different art mediums. Colored pens and markers would be great as they produce wonderful colors while allowing you precision.
Your Rainbow Drawing is Complete!
That brings you to the end of our guide on how to draw a rainbow! We hope that you had a colorfully fun time creating a beautiful rainbow alongside us!
This drawing may have looked intricate and tricky with all of the curved lines so closely together, but by breaking it down into more manageable steps it can be made so much easier and more fun!
Now you can take this drawing even further by adding your own fun elements, details and backgrounds.
There are so many ways you can get creative with it so have fun with it and see what happens!
When you’re ready to take on more drawing challenges, we have plenty of guides for you to enjoy on our website! We add new ones often as well, so be sure to check in frequently to never miss out!
Once your rainbow drawing is complete, we hope that you will share it on our Facebook and Pinterest pages for us to enjoy! We can’t wait to see your colorful artwork!
Here Is A Rainbow Drawing To Inspire You!
Seeing a rainbow in real life is always a magical experience and one of the most beautiful things you can find in nature.
This colorful phenomenon has been captured by our artist Amanda with this rainbow drawing for kids.
She has not only shown the rainbow itself but also a character looking up at it with wonder.
The style is very simple and easy to adapt, and you could even make it look like it’s you that’s under the rainbow!
Then, color is a big part of any rainbow, and you can get creative with that. You could stick with the regular colors you would expect to see on a rainbow.
Or, you could go for some of your own unique color choices as well. It’s up to you to let your creativity take over! What will you choose?