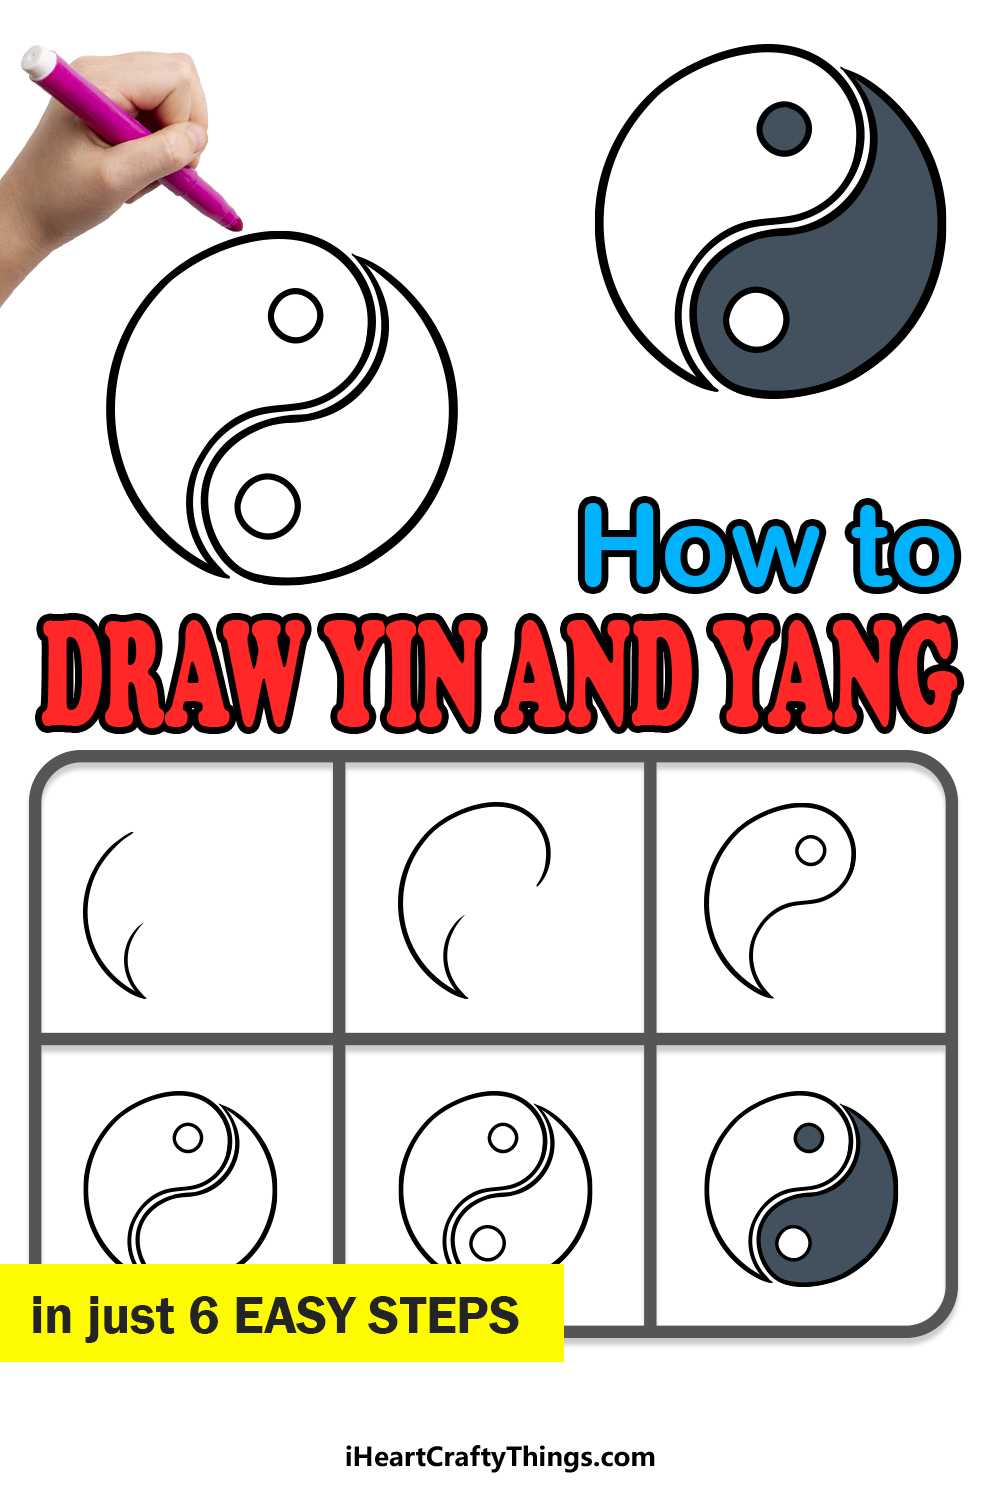
The yin and yang symbol has become one of the most recognizable symbols in the world.
Originating from Chinese philosophy, this symbol has become popular not only because of its simple yet effective design but also because of what it represents.
The symbol is meant to represent the light and dark that each person has balanced in perfect harmony. With how simple this design is, it can be surprisingly difficult to learn how to draw yin and yang.
It will be made much easier by the end of the guide you have in front of you, though!
Our step-by-step guide on how to draw yin and yang will show you how to recreate this iconic symbol with ease.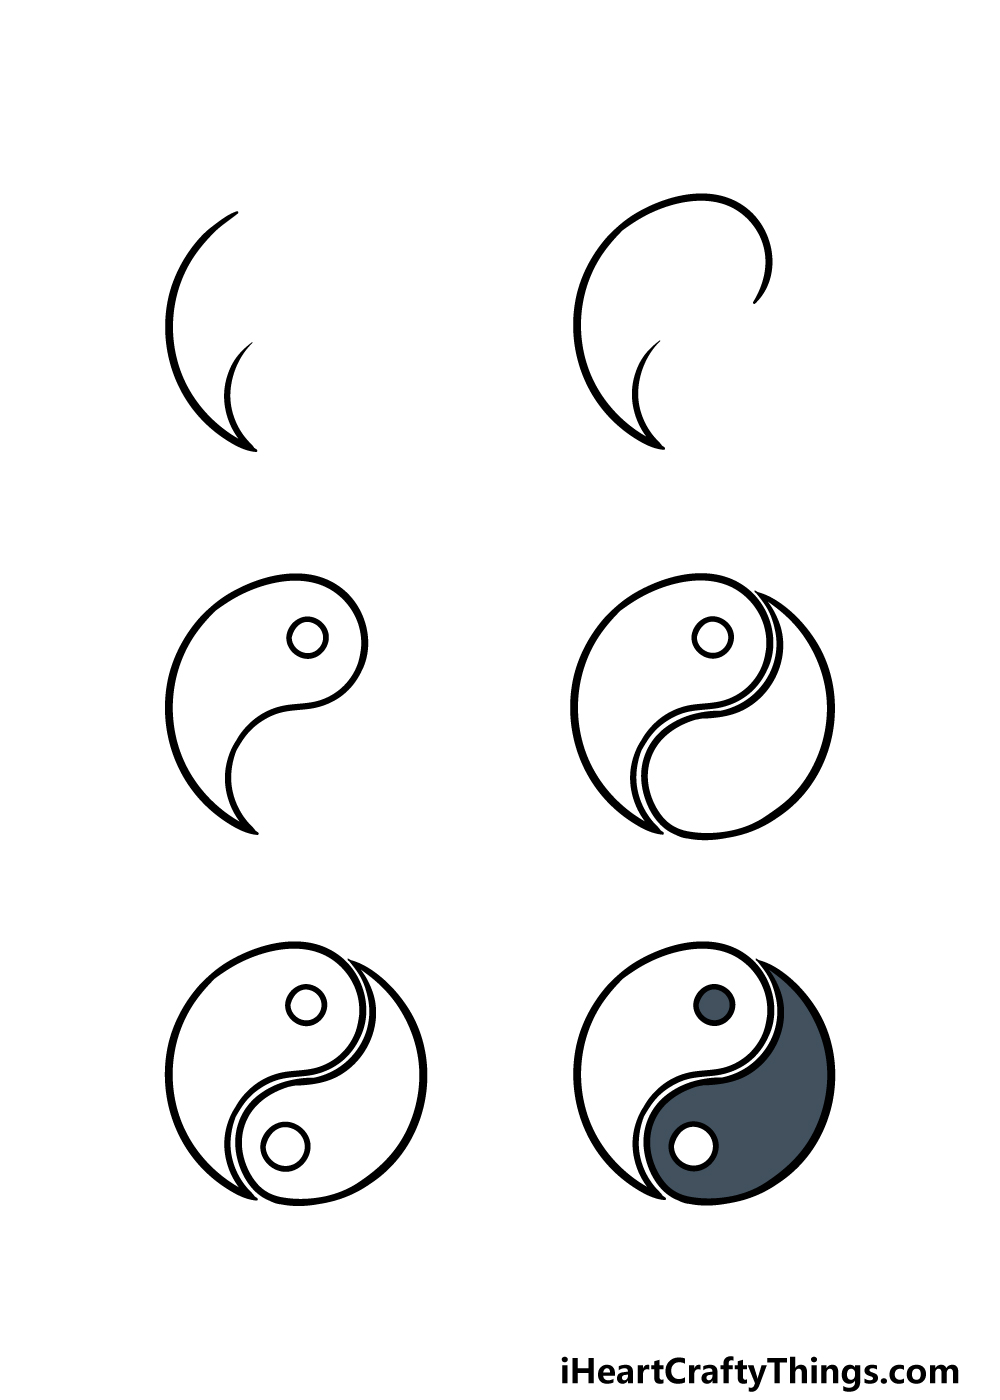
How to Draw Yin And Yang – Let’s Get Started!
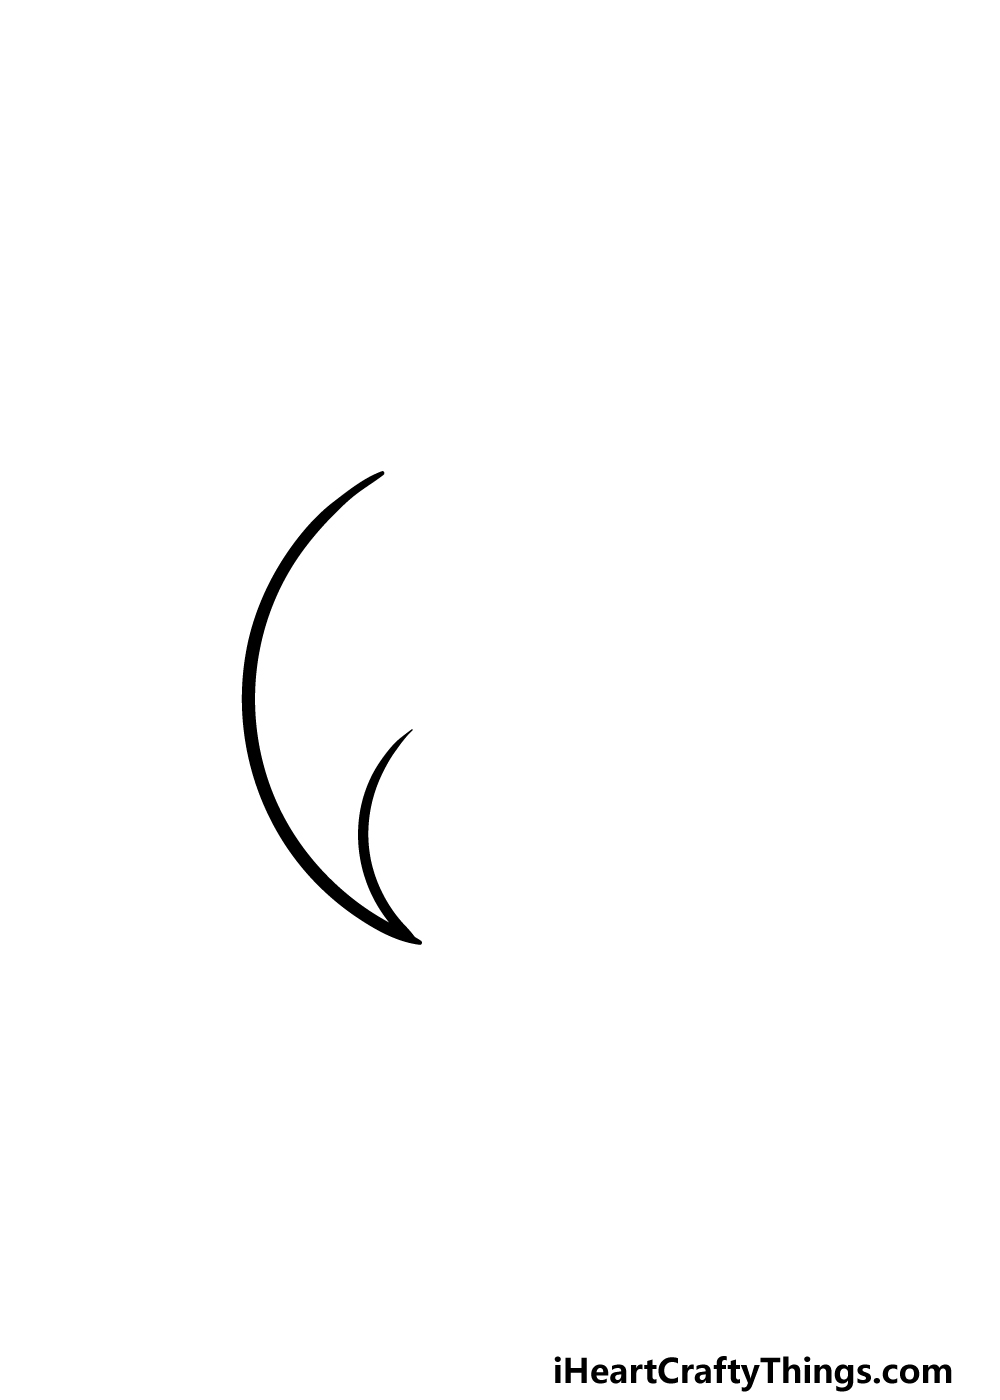
Step 1
As mentioned in the introduction, learning how to draw yin and yang can be a bit challenging, despite the simplicity of the design.
There’s nothing to fear, however, as we will take it nice and slowly as we work through this guide.
One way that you could make things easier on yourself would be to use a pencil and a drawing compass to draw a light circle to guide you as you draw the final lines.
Once you’re ready, we shall start to draw the first half of the symbol. To do this, you can draw a curved line with a point at the bottom of it.
If you drew that pencil circle we mentioned earlier, it will help you as you draw the outer edge of this line.
There will be an empty space at the top of it where we will be adding some lines later, so let’s move on to the next part.
Step 2 – Next, draw some more of this first half
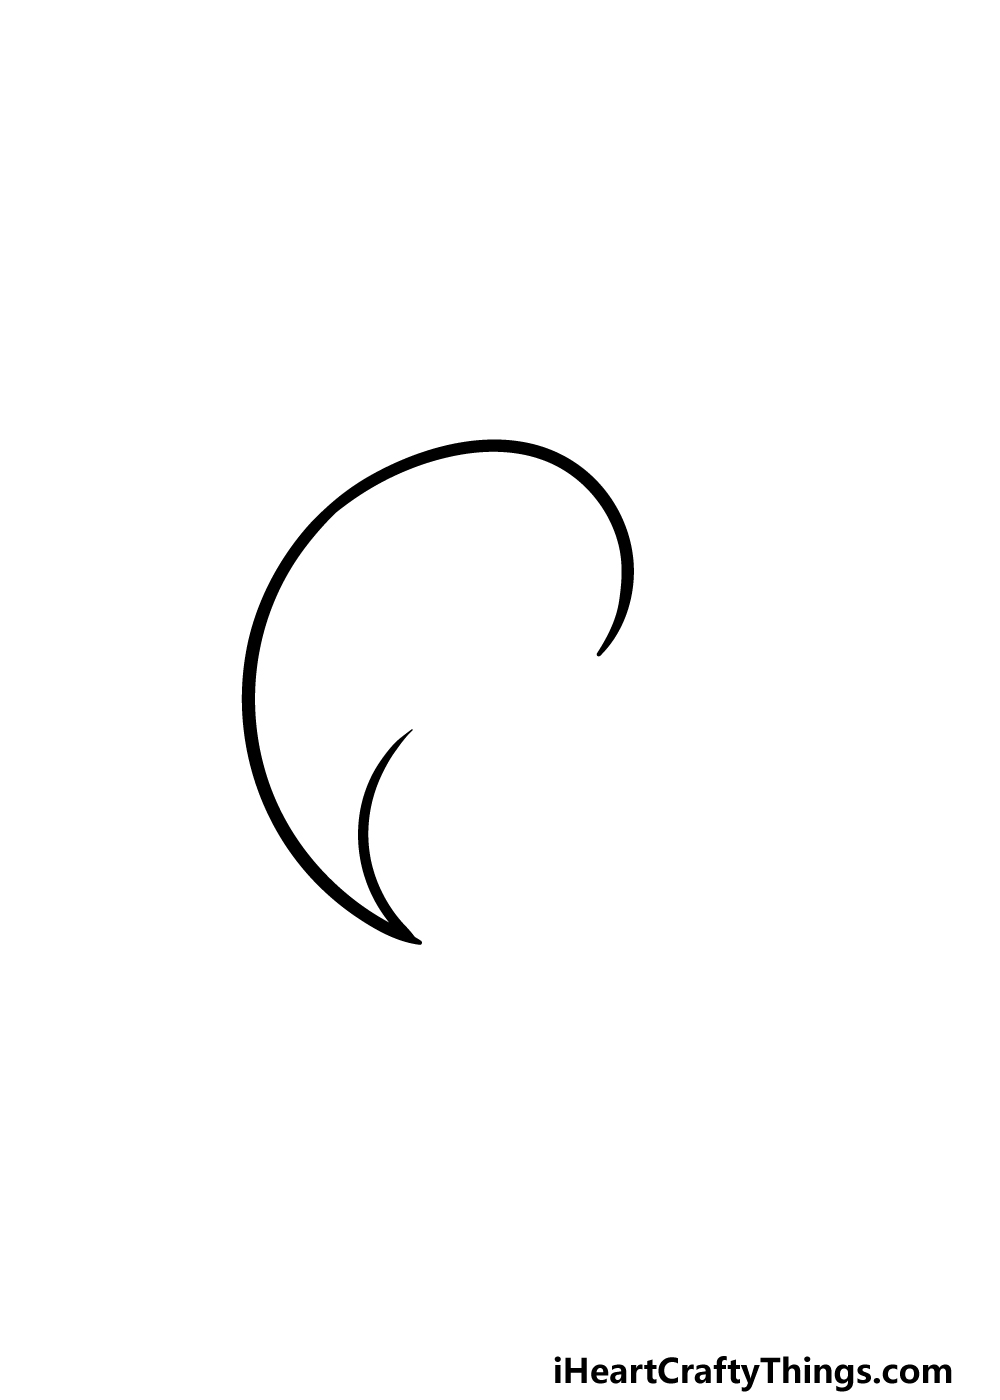
For the second part of your yin and yang drawing, we will be adding some more to this first half of the symbol that you started in the prior step.
For now, you can extend the top of the line out and curved inward a little bit. Once you have drawn that line, we will be ready to finish the outline of this shape in the next step.
Step 3 – Draw the rest of the first shape
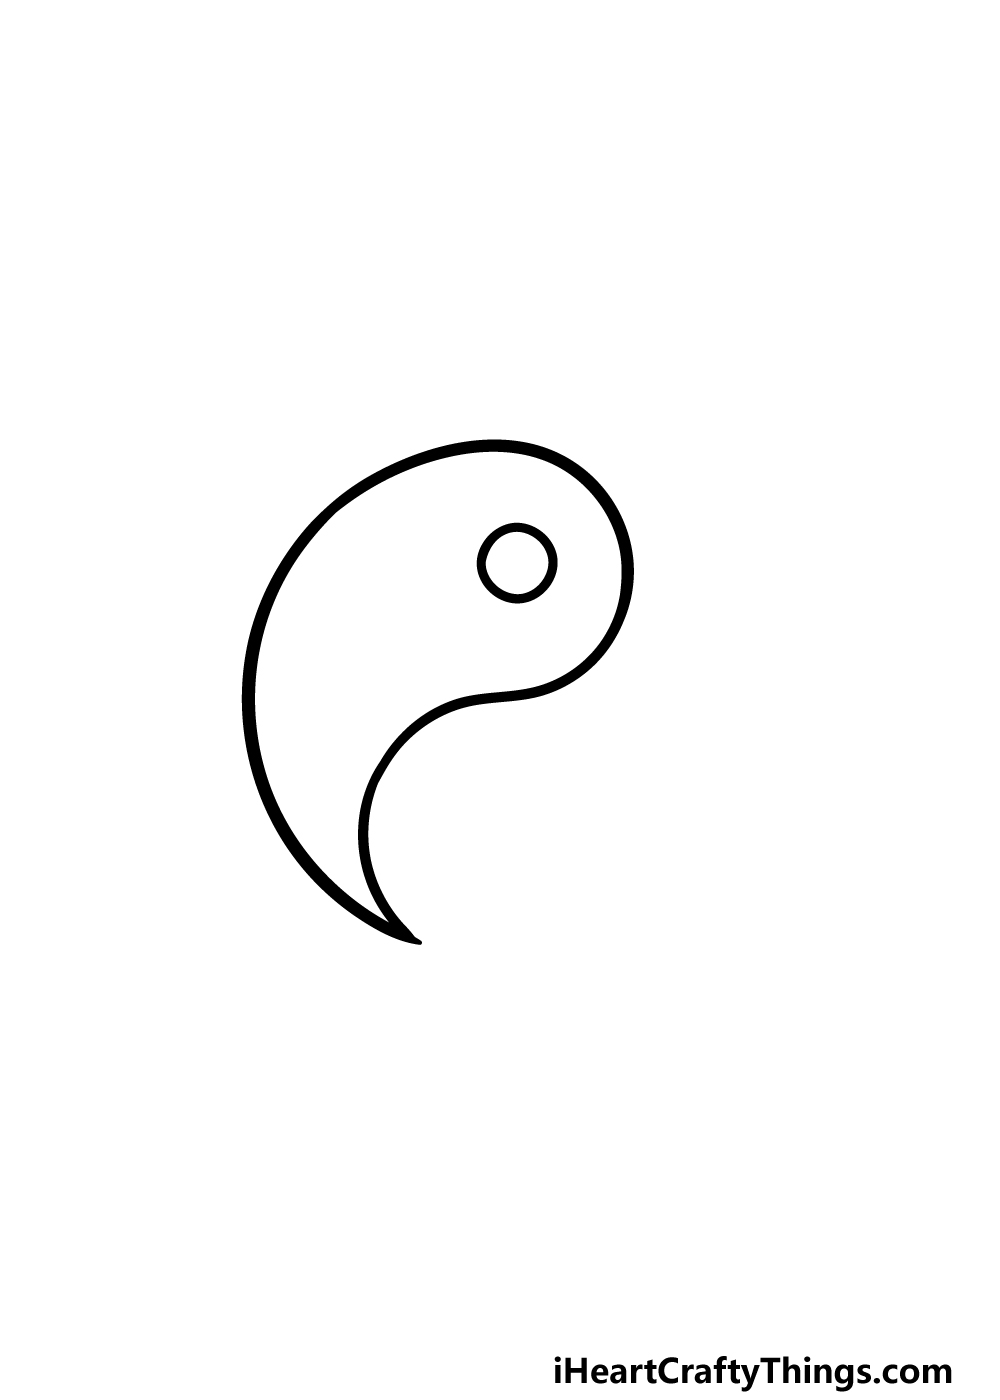
Now you are ready to finish off this first half of the symbol in this step of our guide on how to draw yin and yang. Simply extend another line to fill the empty space left in the shape outline to finish it off.
Once you have done that, you can then draw a small circle in the upper right of the shape. This circle will be an integral part of the symbolism of this design, and you could use a drawing compass again if you would like it to be perfect.
Then we can start drawing the other half of the symbol in the next step.
Step 4 – Now, draw the other half of the shape
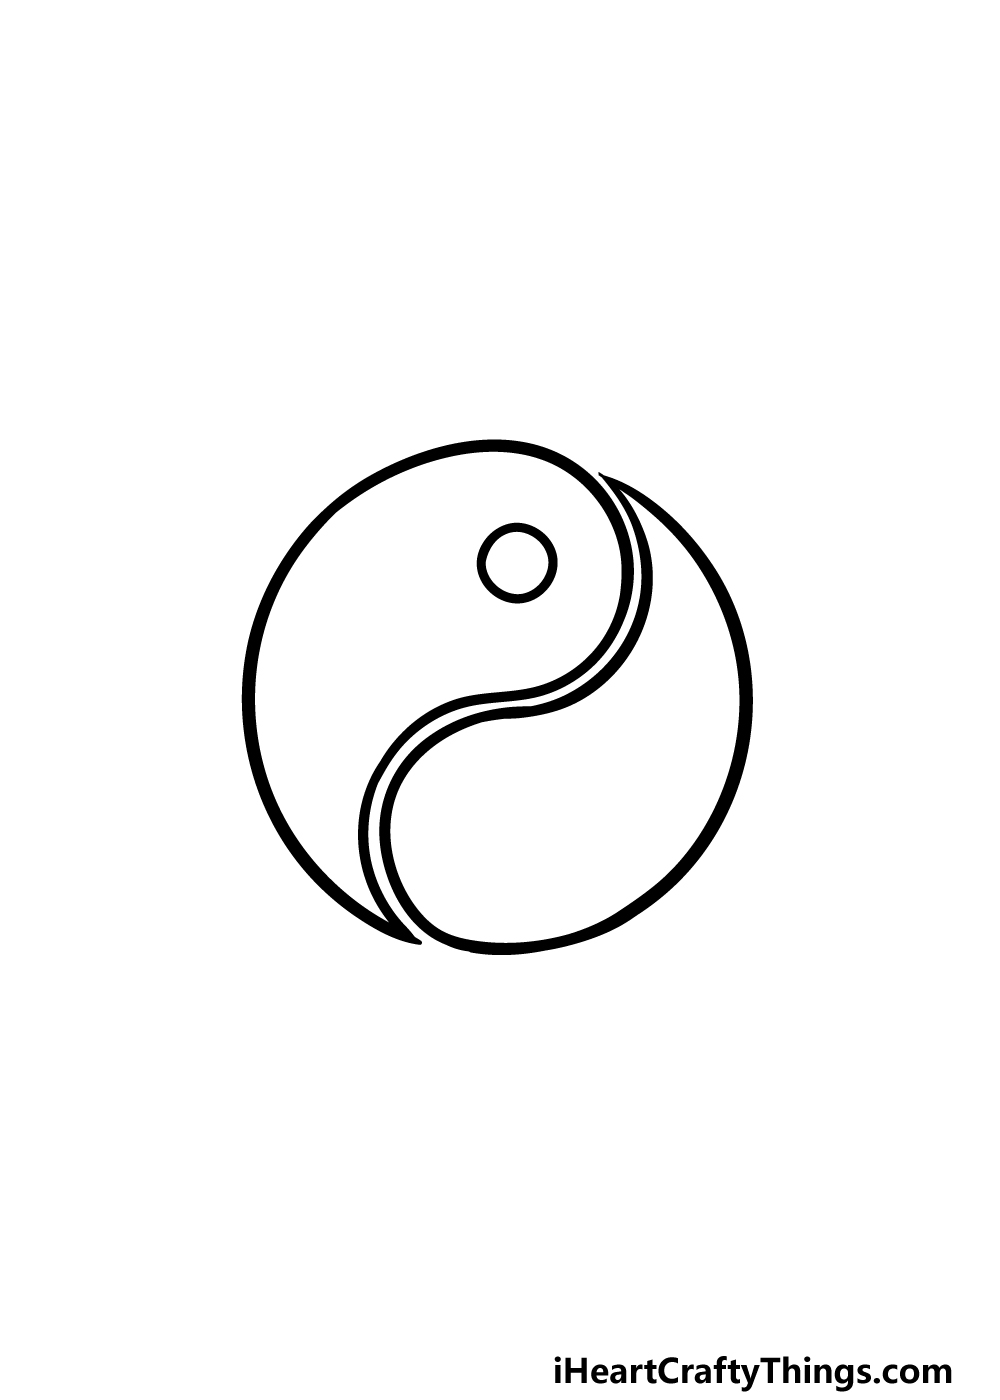
For the next two parts of your yin and yang drawing, we will be replicating pretty much exactly what you have been doing so far, except mirrored.
You can basically redo all of the previous steps as you build up this second shape to slot nicely into the first one.
In some iterations of this design, the two halves will be touching one another, but in this one there will be a slight space between them.
Then, once this shape outline is complete you will be ready to draw the final touches in the next step.
Step 5 – Finish off your yin and yang drawing
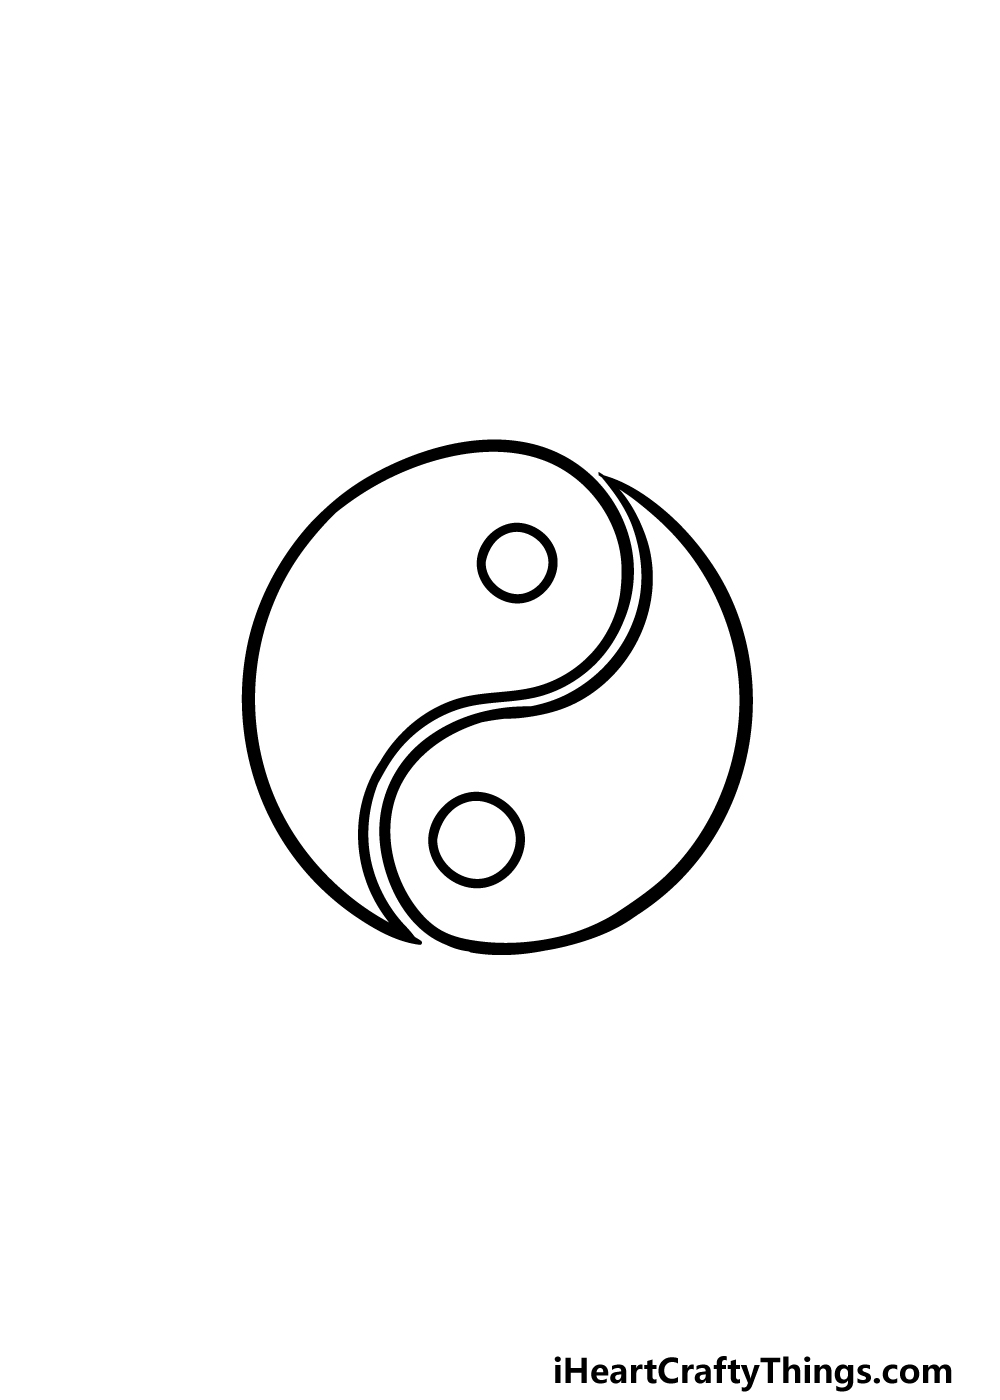
Before you color in your image, we will finish off the final details in this fifth step of our guide on how to draw yin and yang.
The main thing to add is another circle near the bottom of the shape, as shown in our reference image. We mentioned earlier how these small circles have symbolic meaning.
The two halves of the symbol represent light and dark, and the circle in each half will have the opposite color to whichever half it is contained in.
This is to show that there is always a bit of light in darkness and vice versa. Once you have drawn this final detail, you could add some touches of your own!
Sometimes people like to incorporate images of the sun and moon into the picture to further drive home the symbolism.
You could also draw a background for it or add some detail elements to make it look even better. These are just a few ideas you could go for, but what else can you think of to finish off this picture?
Step 6 – Finish off your yin and yang drawing with some color
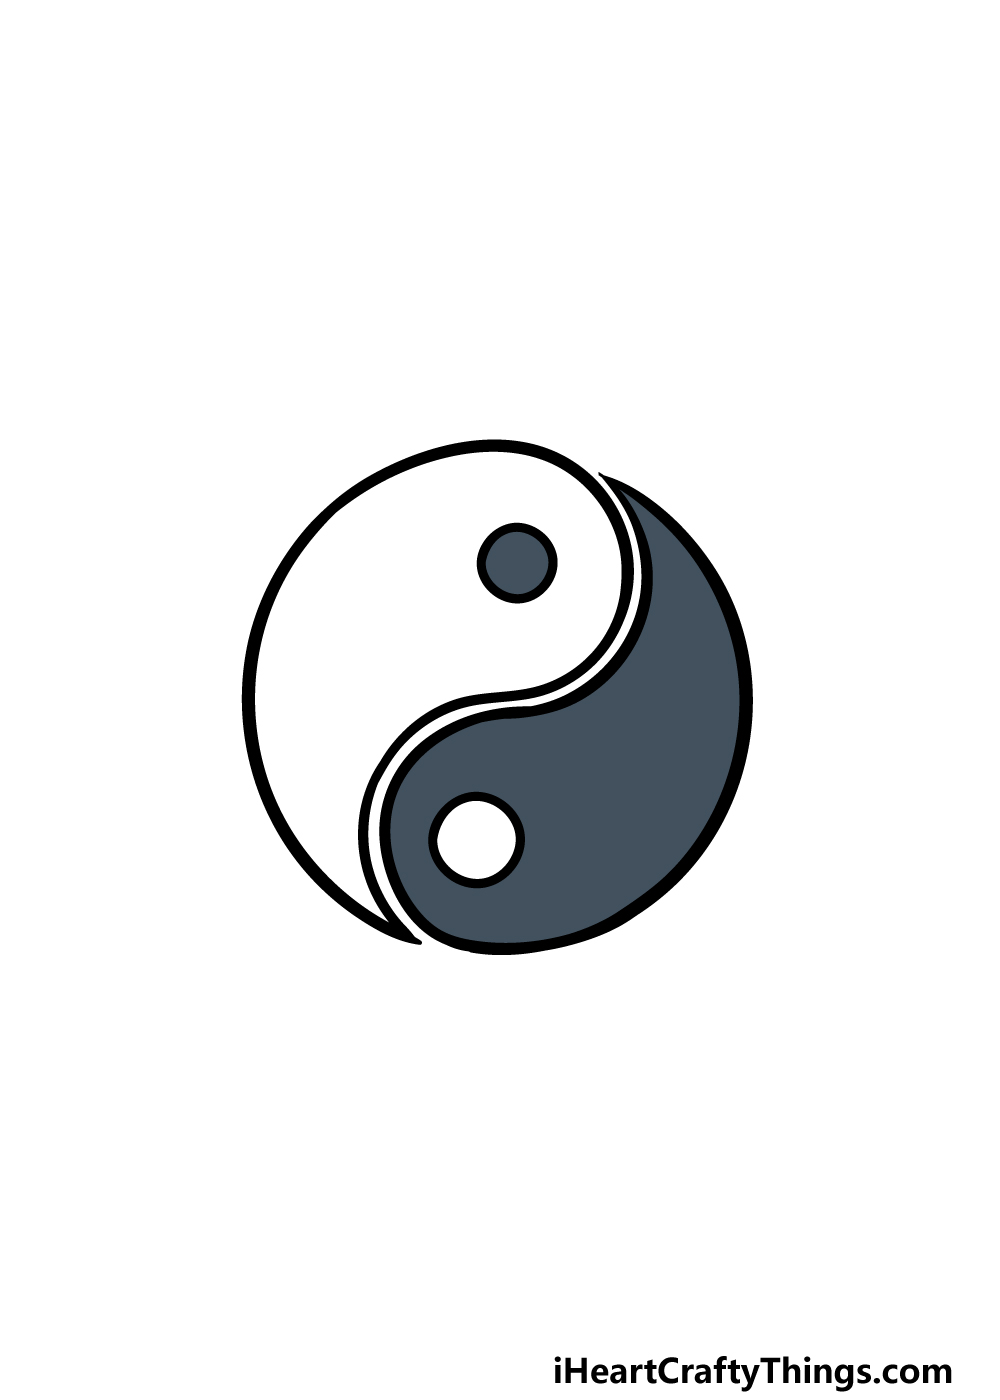
Now it’s time for the final step of this yin and yang drawing of yours. In our image, we went with the classic black and white color most often associated with this symbol.
As mentioned previously, each circle will also be the opposite color to the section it is in. This is the classic look for this symbol, but sometimes you will see it with brighter, more vibrant colors.
You could also play around with different art mediums for some vibrancy or make a brightly colored background to contrast the black and white.
Which colors and mediums will you use to finish off this symbol?
3 More tips to make your yin and yang drawing easy!
Have some harmonious drawing fun as we make this easy to draw yin and yang even easier!
The yin and yang symbol is deceptively simple. We made the design a little more complicated for this particular yin and yang drawing.
This looks great, but you may want to simplify it while you get the hang of drawing it. In our design, we made the white and black shapes completely separate.
This is how the symbol is often displayed, but sometimes it will be drawn as a solid circle with a divide down the middle. This would probably be easier to draw than the two separate shapes.
This next tip we have for your drawing of yin and yang will follow on from the previous one. If you would like to take our suggestion of making the outline a solid circle, there are a few ways to do that.
The easiest way to do it would be by using a drawing compass. That way you can easily draw the circular shape.
If you want to stick to the original design, you can still use your compass to draw a pencil circle. This will guide you as you draw the shapes inside of the circle.
If you don’t have a drawing compass, you could trace around any round objects you may have available. There are tons of tools to make your life easier, so you should take advantage of them!
With any drawing, the more the focus is on the image the more pressure there is. That’s why we think it could be helpful to incorporate this yin and yang sketch into a larger design.
For example, this symbol will often be embroidered into clothing and other surfaces. You could draw one of these surfaces and then have the symbol incorporated into it.
That way, you would not only be able to make the yin and yang symbol a smaller part of the design but you would also have a cool background.
What are some ways you can incorporate this symbol into a larger design?
Your Yin And Yang Drawing is Complete!
We mentioned a few times how this symbol, while seemingly simple, can actually be quite difficult to get right when you try to draw it.
We hope that this guide got rid of all of the frustration that can come with a drawing like this, leaving room for just fun and creativity!
Now you can keep going by adding details to it or with creating a background. We went through a few of the ways that you could go about this during the guide, but you should definitely let your creativity flow as you finish it off.
Don’t forget to keep coming back to our website, as we have tons of awesome guides for you to enjoy with many more on the way as well!
We would also love to see how you finish off this yin and yang drawing, so please do share it on our Facebook and Pinterest pages for us to admire.