This guide on how to draw a trophy for kids will help you to create a picture to be proud of! Follow along to create some art that you can customize and add to as you like.
Trophies are always great to receive, as they serve as a physical commemoration of an accomplishment. It could be for a sports feat or perhaps an academic achievement.
Whatever it may be for, you can always display it proudly to show everyone what you were able to do. We can’t always win all of the trophies we would like to have, but drawing them is just as good!
This guide will walk you through everything you need to know to make an incredible trophy design. Once it’s finished, you could even add some details to show what the trophy was for!

Find Out How To Make Your Trophy Drawing Here
How to Draw A Trophy – Let’s Get Started!
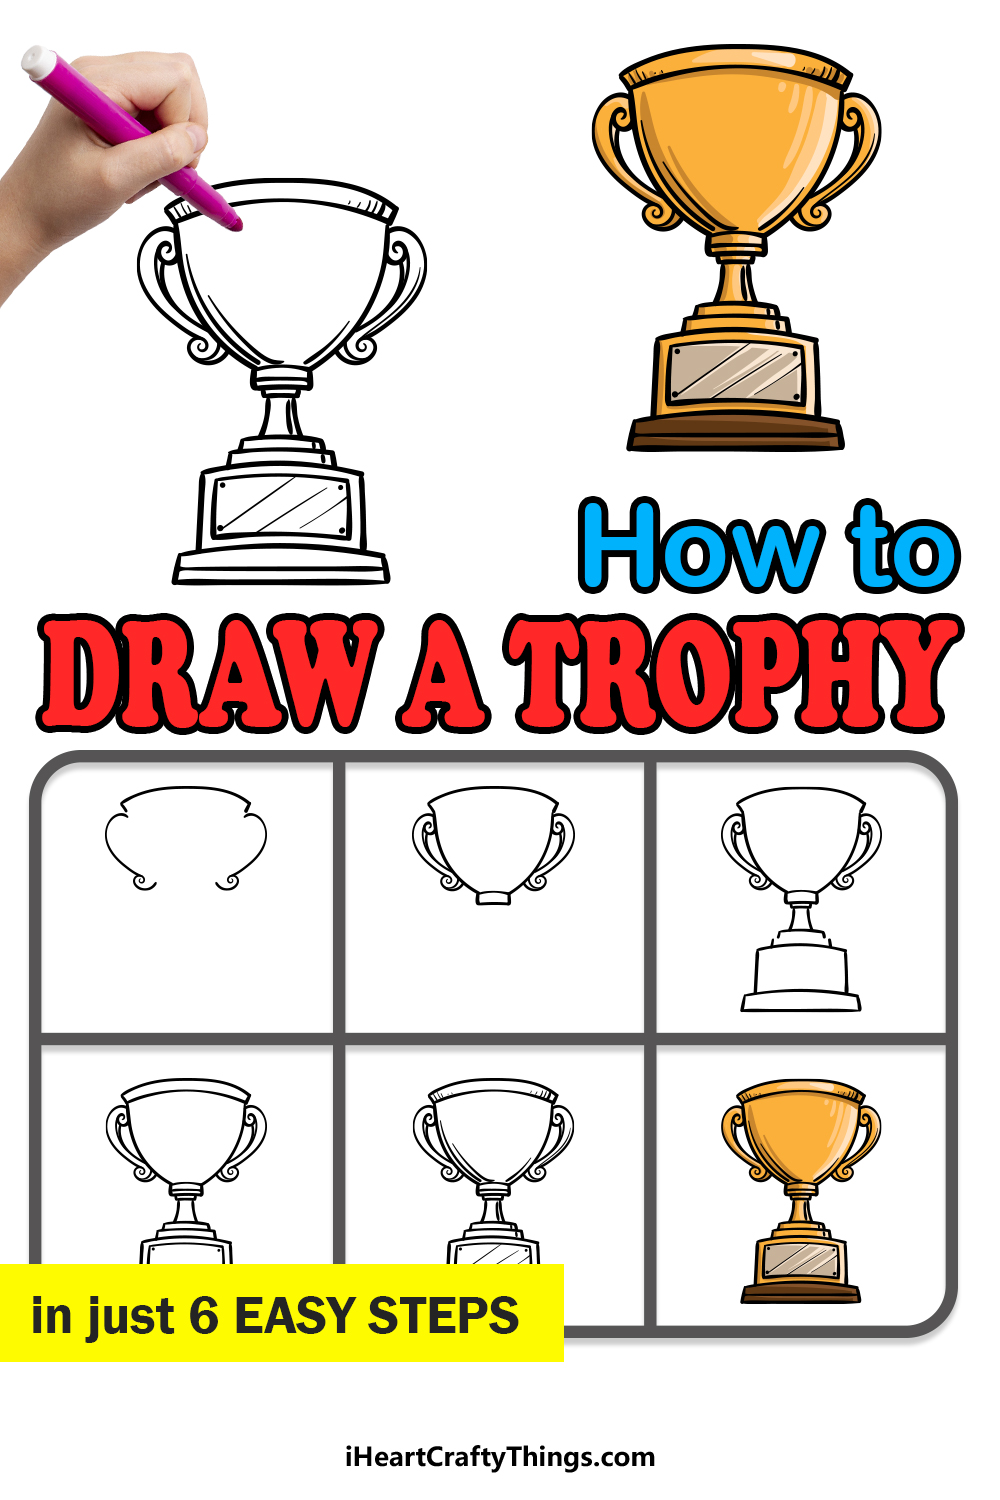
Step 1

To start off this guide on how to draw a trophy, we shall be starting with the outline for the award.
You can start this by drawing two curved lines opposite one another. Each of these curved lines will have a little spiral section at the base.
These lines will form the handles of the trophy, and we will add some more to them later on. For now, you can finish off this step by drawing another curved line above the handles.
This line will be horizontal and will curve inward a bit. Once you have drawn all of these aspects, we shall move on to step 2.
Step 2 – Now, draw the rest of the handles and add more of the outline

We shall continue what you started in the previous step of your trophy drawing in this second part.
First, as praised we shall be finishing off those handles. Add another spiral to the top of each one, and then use another curved line for the inner edge of each handle.
Then, we will be drawing the outline of the body of the trophy. Extend some more rounded lines down from the rim of the trophy, and then add a small rectangular shape at the base of this body.
That’s all there is to it for now, so when you’re ready then let’s move on!
Step 3 – Next, start drawing the base for the trophy

For step 3 of this guide on how to draw a trophy, we will begin drawing the base of the trophy. The base will come in several different sections and levels, as shown in our reference image.
The first section will be a sort of stem connecting the body of the trophy to the rest of the base that we will be drawing.
Draw another thin rectangular shape underneath the larger one that you added to the base, and then draw two curved lines going down from it. We will then use some curved lines with pointy edges for each new section of the trophy.
The reference image will guide you as to the size and shape for each level, but the concept is the same for each one.
Step 4 – Now, draw even more detail for the trophy

In this part of your trophy drawing, we shall start adding some details to it. First, start by drawing another curved line close underneath the rim of the trophy.
Then, we shall be drawing some more line details for the base and stem of the trophy to finish off those aspects. The last thing we shall be adding to the trophy is arguably one of the most important parts.
We need a space to add the names of the recipients of the trophy, so we shall be drawing a metal plate onto the base.
Simply draw a rectangle for this part, and then add a small circle to each corner for the screws holding it on.
Then you will be ready for some final details as we move to step 5!
Step 5 – Add the final details to the drawing

You’re now ready to add some final details before we move on to the final step of this guide on how to draw a trophy.
These details will be pretty small for the most part, but they will help a lot in creating a more dynamic image. Simply add some curved lines throughout the various sections of the trophy to give it a bit more texture and shine.
Once you have added these details, you can then add some of your own! One fun idea would be to draw a name and achievement onto the plate on the trophy.
If you did this, you could turn this into a congratulatory card for someone! How will you finish off this trophy?
Step 6 – Finish off your trophy drawing with some color

In this final step of your trophy drawing, you can finish it off by adding some colors to bring it to life. In our reference image, we went with some yellows and golds to give it a nice bronze look.
By changing up the shades of the colors that you use, you can help to create a shinier look for the metal.
Finally, we finished up by adding some browns for the wooden base of the trophy. These are the colors that we chose, but which colors and art mediums will you use for your own image?
4 More Ways To Make Your Trophy Drawing Unique
Seeing how awesome your trophy sketch looks after these tips will be quite an award!
A trophy is almost always awarded for some kind of achievement. You could show what that achievement was by adding it to this trophy drawing!
This text could go on the body of the trophy or maybe at the base. It could be for a sport or maybe a science or educational achievement.
It’s up to you to decide, and you could also add more text such as the name of the recipient. Who do you think this trophy could be awarded to?
When a trophy is given out, there will usually be other prizes for runner-ups. Now that you have completed this drawing of a trophy, you could take what you learned to draw these other trophies!
The trophy we created here definitely looks like a first prize, so you would probably want to make the additional trophies a bit smaller than this one. Once again, you could also add some text to the smaller trophies.
This way, everyone gets a prize!
Once you have added your customization and additional trophies, you could finish this trophy sketch off with a background. Adding a background is a great way to add a unique touch to your artwork!
The background could be themed to match the award you chose this trophy to be. So that means it could be at a sporting event or maybe a school prize ceremony.
These are a few suggestions, but what other backgrounds could you use?
Finally, you could actually turn this trophy drawing you have created into a prize or a gift for someone! One way you could do this would be by turning it into a greeting card.
To do this, you would want to draw the trophy on some hard cardboard. Then, add any extras and text you may want on it to personalize the drawing for the recipient.
This would be a wonderful way to congratulate someone on an achievement! Who would you give this card to?
Your Trophy Drawing is Complete!
You have reached the finish line of this guide on how to draw a trophy, and as promised there is indeed a finished trophy as an award for completing this guide!
Objects such as this can prove quite tricky to draw, so hopefully this guide made it fun and easy for you to work through.
Once you have mastered the guide, you can then take it even further by adding your own personal touches.
We mentioned an idea of drawing a name and achievement onto the trophy to turn it into a card, so will you go for an idea like that or do you have something else in mind?
There are many more awesome guides for you to take on when you visit our website. Be sure to check in as often as you can, as we have more coming soon!
Please also share your trophy drawing on our Facebook and Pinterest pages, as we would love to see your drawing achievement!