There is an incredible amount of variety and diversity in the animal kingdom. From the tiniest of insects to the mighty blue whale, animals come in all manner of different shapes and sizes.
Some manage to be more popular than others, and the fearsome tiger is one of those animals. This incredible predator turns heads with its mighty roar and beautiful coloring. This leads many fans of the animal to wonder how they can learn how to draw a tiger.
If you have been wondering that as well, then you’re on the right guide!
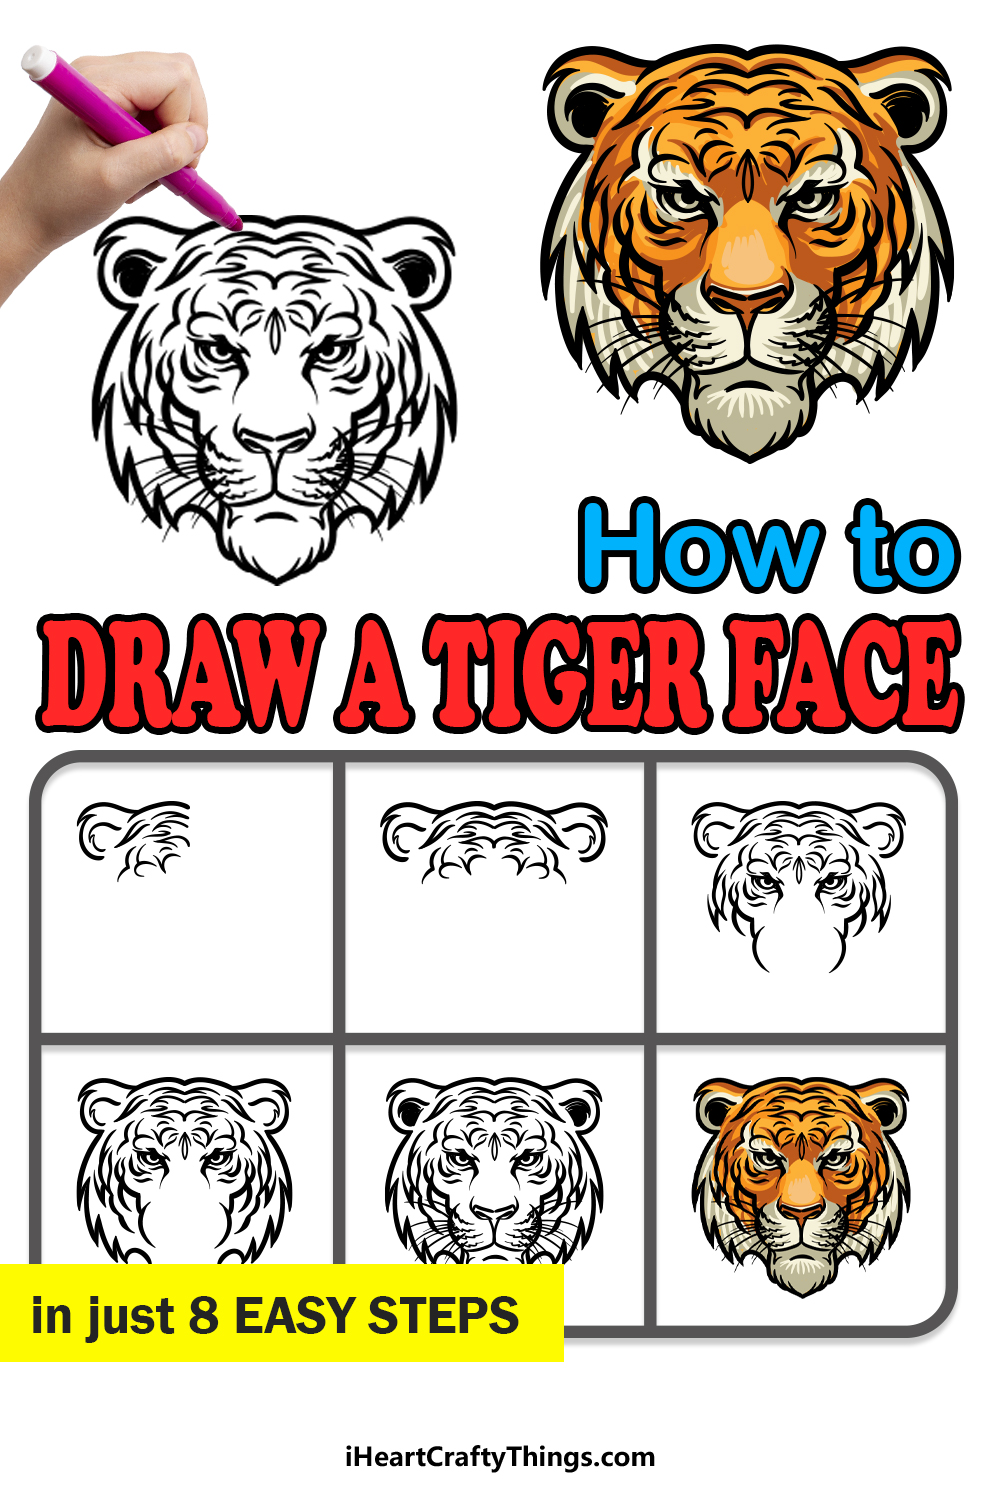
This step-by-step guide on how to draw a tiger will show you how easy and fun it can be!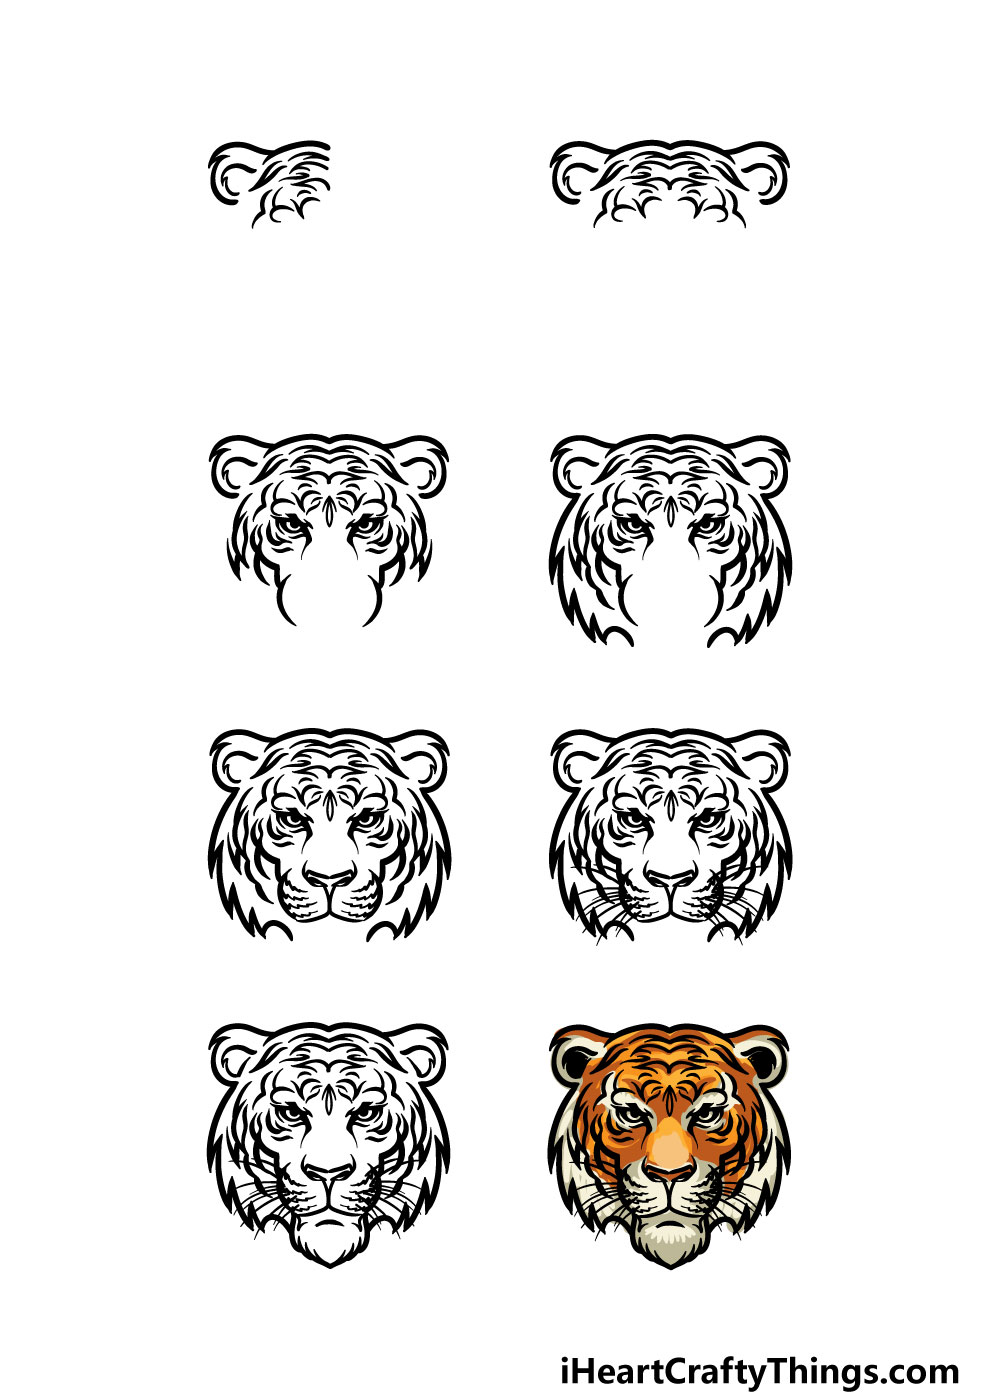
How to Draw A Tiger – Let’s get Started!
Step 1

For this first step of our guide on how to draw a tiger, we will start with the first ear and side of the head.
To start with the ear, you can draw it with a curved line that has a sharp point in it to suggest that the ear is quite furry. There will then be another sharply curved line inside of the ear for more detail.
Finally, you will be using a combination of more sharp and curved lines to build the top of the head along with some of the stripes.
It may seem complicated, but if you follow the guide and take it slowly then you should have no problems!
Step 2 – Create a mirror image for the other side of the head

This second part of your tiger drawing should be a simple one for you to do, as you will simply be mirroring everything that you did in the previous step.
Using the reference image and your own drawing, you can try your best to make this right-hand side of the head look exactly how the other side did.
Step 3 – Now, continue the rest of the face
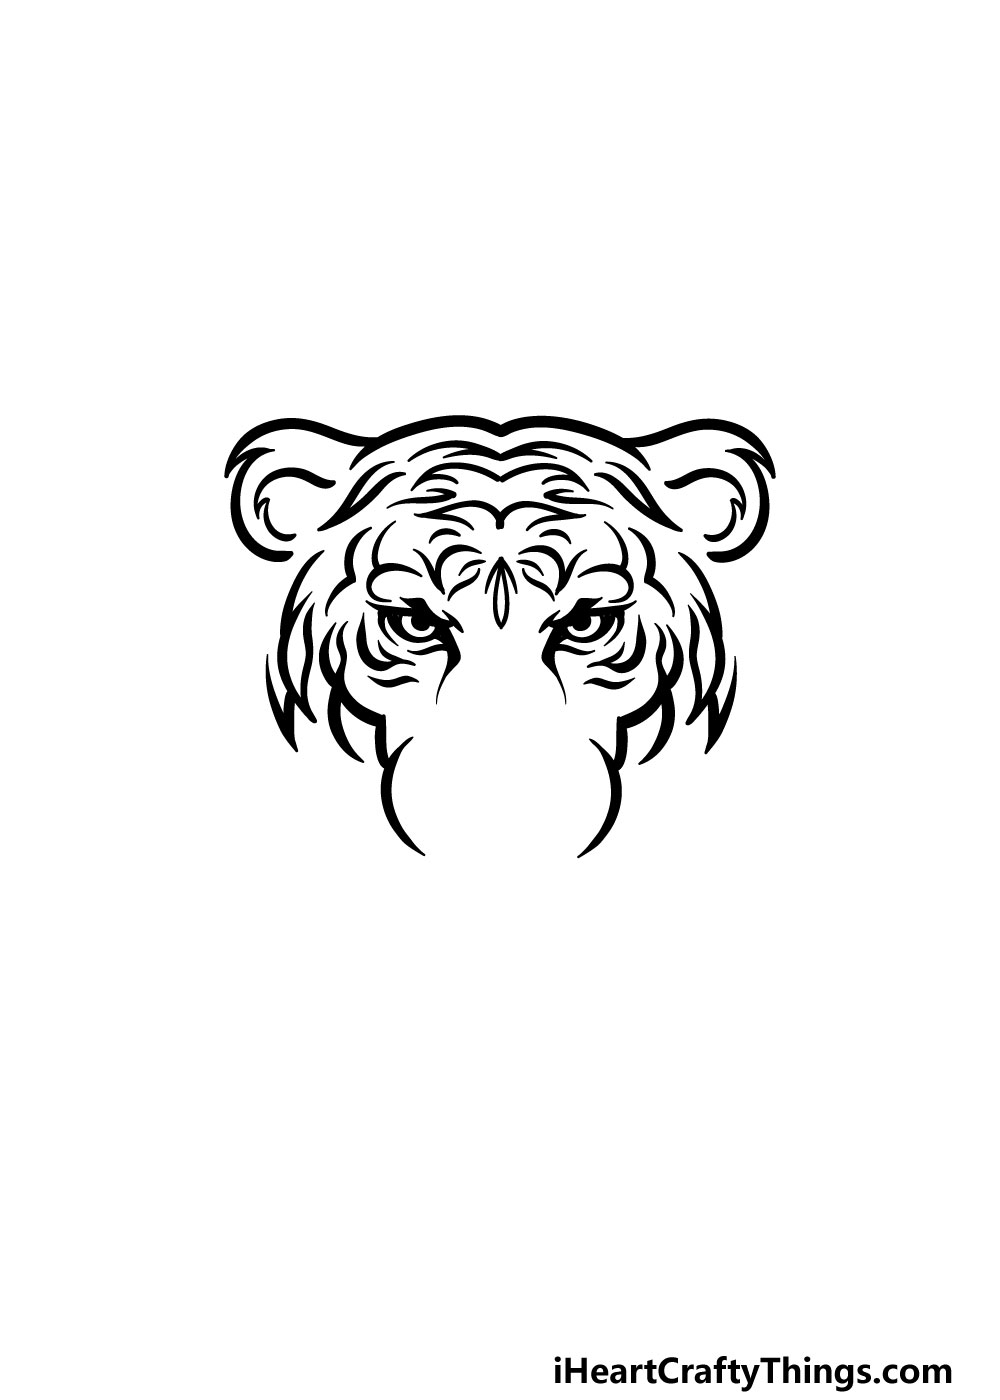
With the top of the tiger’s head drawn, you can now start to draw the lower portion of the face.
There are a lot of intricate details to this portion of the face, so for this part of our guide on how to draw a tiger you could take a similar approach to the previous step.
You could start with one side and then mirror it to create that symmetry. Don’t forget to add the tiger’s fearsome eyes in this step as well!
Step 4 – Next, draw the sides of the tiger’s head

The previous few steps of this tiger drawing have been quite tricky, so let’s dial it back just a bit for this part!
For this step, you will be using some jagged lines on the sides of the face to create the furry sides of the head. That’s all there is to it for this step, and you’re ready to move on!
Step 5 – Now, you can draw the nose and muzzle

This step of our guide on how to draw a tiger is also a bit simpler than the first few were.
You can use some curved lines for the thin nose of the tiger, and then use some small, jagged ones for the detailing on the muzzle.
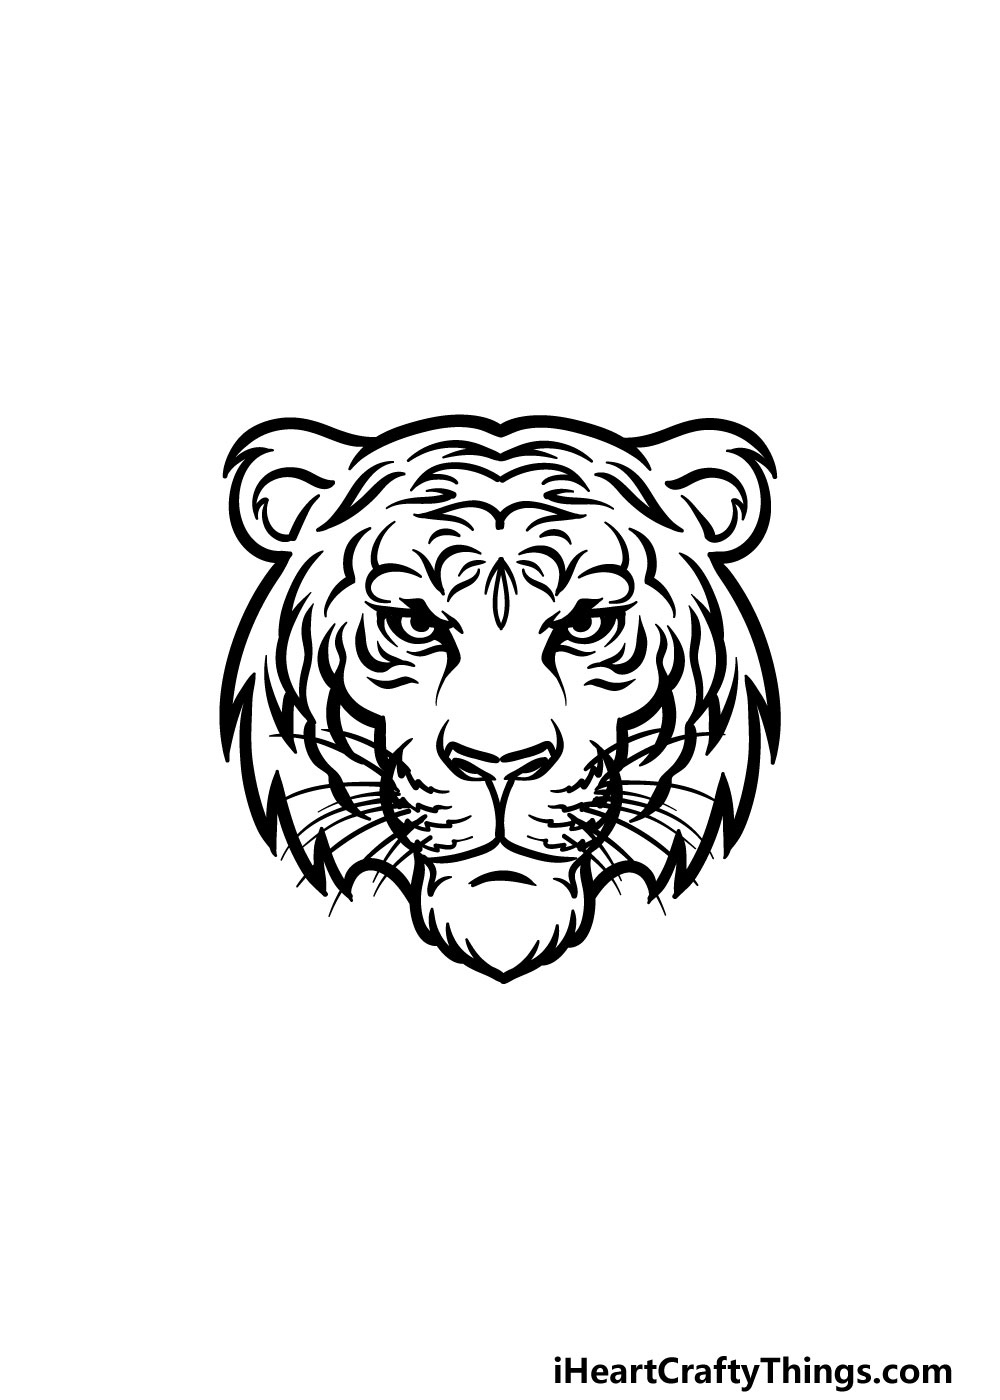
Step 6 – Draw the whiskers for the tiger

We have another simpler step for your tiger drawing in this next part. This step will be all about adding some whiskers to the muzzle of the tiger.
You can do this by extending several simple, curved lines from the lines in the muzzle. Once you have these done, we have just a few more details to add before you color in your picture.
Step 7 – Draw the last details
It’s almost time to start adding some amazing colors in this guide on how to draw a tiger, but first we have some final details and elements to add.
First, you can draw the bottom of the face using some more jagged lines to form the furry base of the tiger’s face. Then, you can finish off by adding some small details inside of the tiger’s ears.
That will do it for the details in this guide, but this is your drawing and you can take it further with your own details if you wish!
You could draw a background, draw more of the tiger’s body or add any other style elements that you may want for it.
What can you think of to finish this incredible drawing of yours?
Bonus: Try Out These Tips If You Struggled With This Drawing
The next step of the guide will be the final one, and it will deal with adding some color to this tiger face drawing. However, there may be some people working on this guide who are sitting there frustrated at not being able to do the image.
It’s easy to feel frustrated and even annoyed if you’re struggling with a drawing, but there is no shame in it! We can assure you that even experienced artists will run into roadblocks with their art sometimes.
When that happens, you may need to stand up from the page and take a walk to gather your head and let the frustration go away. When you feel a bit better, you can sit down at the page again.
The first step to getting past this block is to make some sketches. Get your pencil out and practice the various stages of the drawing to get the hang of it.
Using a pencil can allow you to erase your errors and parts you’re not happy with. Keep it slow and follow the reference images closely as you draw.
If you feel that frustration bubbling up again, maybe go and do something else for a little while and then come back to it. If this doesn’t help, then you can make some alterations to the drawing.
For example, you could simplify the drawing or use a style that you like to draw in. if you’re a cartoonist, then you could make this tiger face drawing more cartoony.
This would not only result in a unique image, but it would also make it easier and more fun, as it’s something you feel more comfortable with. We hope these tips help as you move to the final step of the guide!
Step 8 – Finish off your tiger drawing with some color

Tigers are well known for their stunning color scheme, and you can replicate this color scheme in this part of your tiger drawing!
As you know, tigers have a coloring of bright orange, black and white primarily, and this is the color scheme that we went with in the reference image. Even if you stick to these more realistic colors, there are plenty of ways that you can add some variety.
You can use different tones and shades of these colors to build up some color texture, and you can also experiment with different art mediums depending on the style that you want.
We can’t wait to see how you use your colors and art tools to bring this image to life!
Do this to take your tiger face drawing to the next level
Make this incredible tiger face sketch even better with these fun and easy tips!
We love how this tiger face drawing focuses on the face, but you could make it even better by adding more of the tiger.
This could just be the neck, but you could include as much of the body as you like!
If you want to try this idea, you can get some inspiration by looking up some photos of tigers online. These can help you as you draw some more of the tiger’s body.
What kind of pose would you portray this tiger in if you were to add more to the design?
If you want to keep this drawing of a tiger face to just the head of the tiger, there are other ways you can make it look cool. One way would be to draw the heads of different animals around it!
You could stick to some big cats and show heads of animals like lions, leopards or maybe jaguars. These are a few big cat ideas, but you could really add any animals you like!
What are some animals you would like to add to this image?
Drawing a background is another great way to take this tiger face sketch to the next level. You would have so many options for backgrounds you could add!
For instance, maybe the tiger could be peeking out of some grass. This would make for a really dramatic portrayal, but it would also allow you to hide parts of the tiger you may find hard to draw.
What other background ideas do you have?
Finally, you can also have a lot of fun when it comes to coloring this tiger face drawing. We showed you how you could color the picture in our guide, but you don’t have to stick to that.
Tigers have famously beautiful coloring, but you may want to do something more expressive and use some amazing colors you love to make it more stylistic.
Your Tiger Drawing is Complete!
This was a fairly tricky drawing to take on, so you should be very proud of yourself for completing this guide on how to draw a tiger!
Even when you take on a drawing that has lots of intricate details, you can make it so much easier on yourself when you take it slow and have some easy steps to follow.
We hope that this guide made it much easier and more fun to work on this picture!
Now that you have drawn this amazing tiger, you can take it even further by adding your own details, elements and touches!
Whether you draw a background, change up the design or use some incredible colors and art mediums we know that you will do an incredible job.
When you have finished this guide, we hope to see you on our website! We have many amazing guides for you there with many more uploaded all the time.
Once you have finished this tiger drawing, we would also love to see it! You can show us your amazing artwork by sharing it on our Facebook and Pinterest pages.