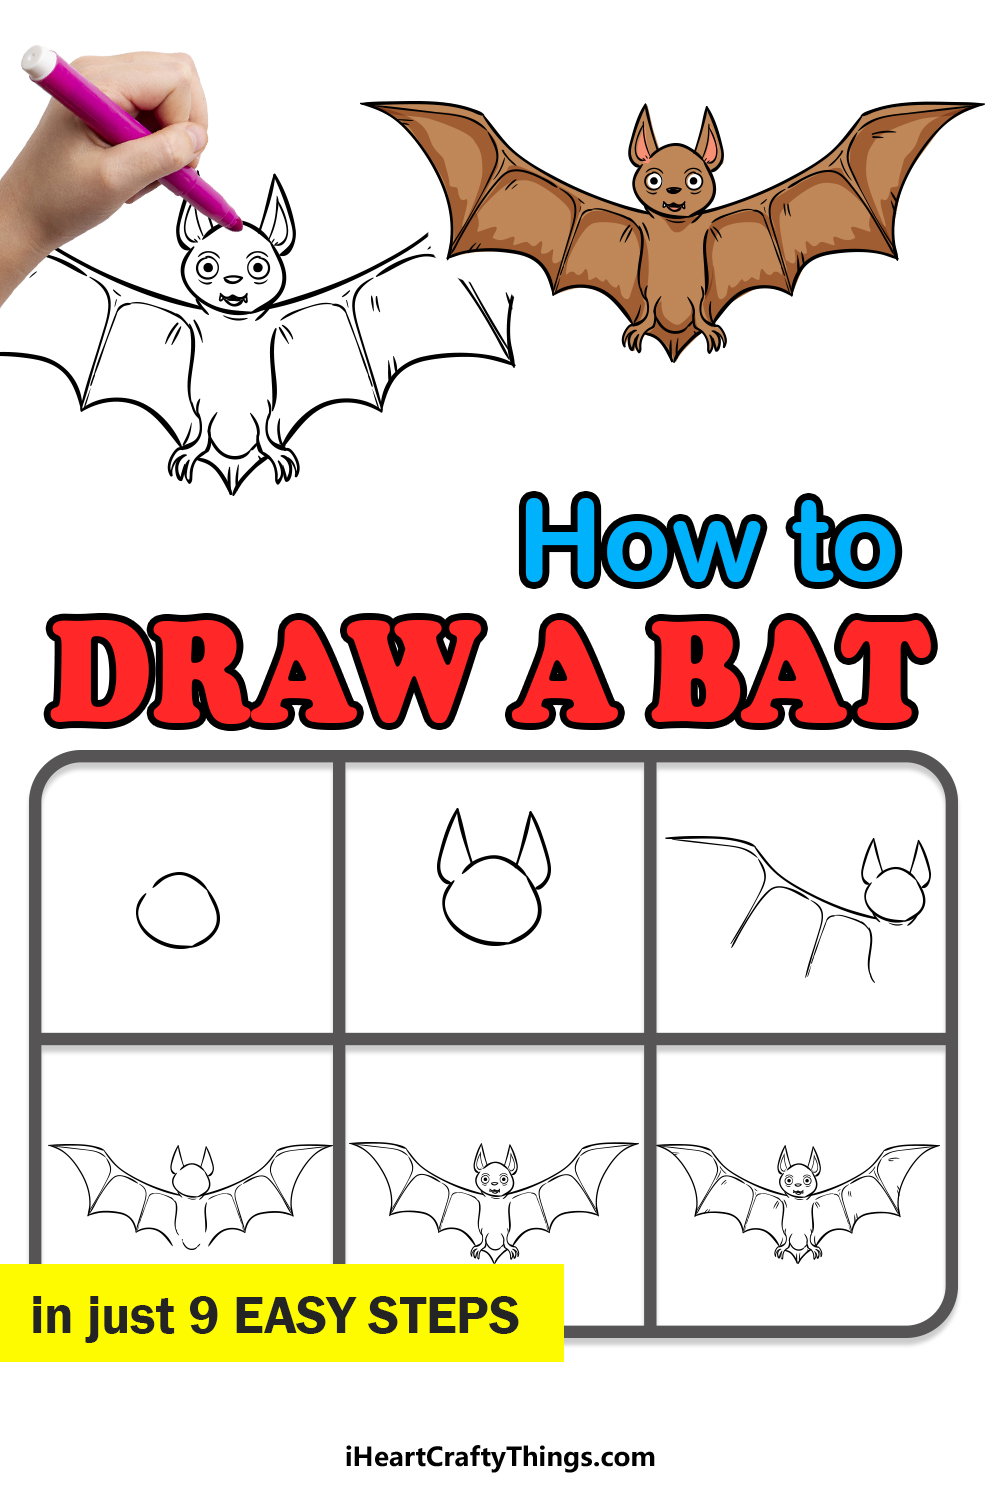
You’re moments away from learning how to draw a bat with this step-by-step guide for kids! Follow along with me to see just how fun and easy it can be.
Some people think that bats are scary, but I think they’re cute! I aimed to make the bat drawing we’re going to work on now cute as well, as it not only makes the picture more pleasing but also makes it easier to work on.
The trick to any drawing is to break it down into smaller steps, and that’s what this guide is here to do. Details such as the leathery wings, big ears and mousy face of a bat are all included in a sweet cartoon style.
Once you have finished your bat, you could use it in some Halloween artwork or perhaps just in its natural habitat. It’s all up to you, so let’s begin the guide together and see how it’s done!
Watch And Follow Along To See How To Draw A Cartoon Bat
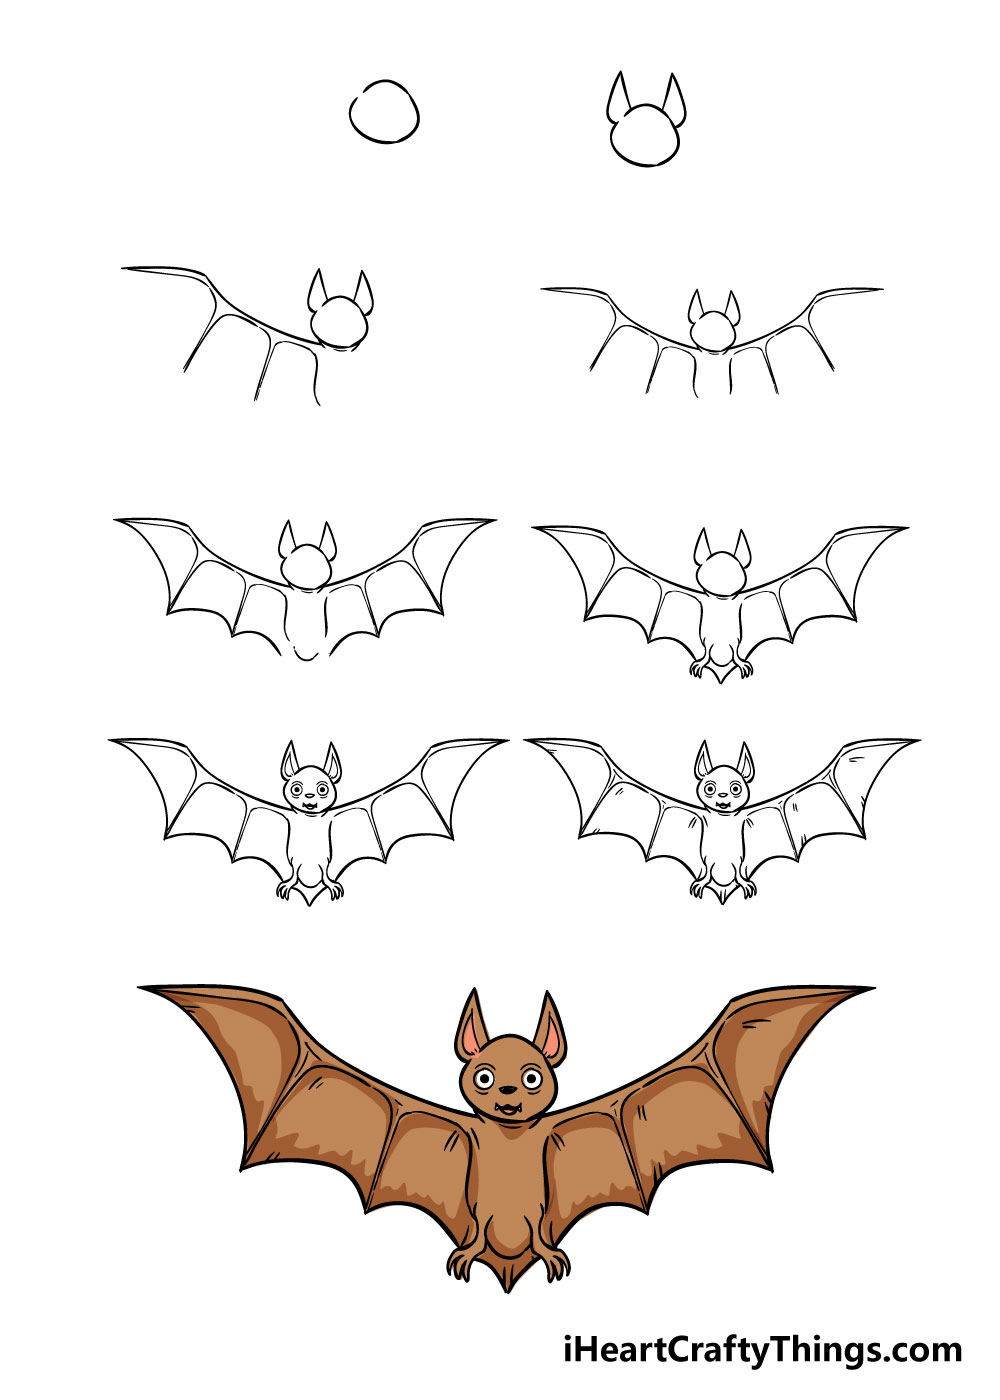
How to Draw a Bat – Let’s get Started!
Step 1

For the first step in learning how to draw a bat, we will be starting off with a small circle.
The circle doesn’t have to be perfect, and using a slightly ragged line for your circle will make your bat look a little furry.
Be sure to leave a small gap in the circle in the same place as in the reference image!
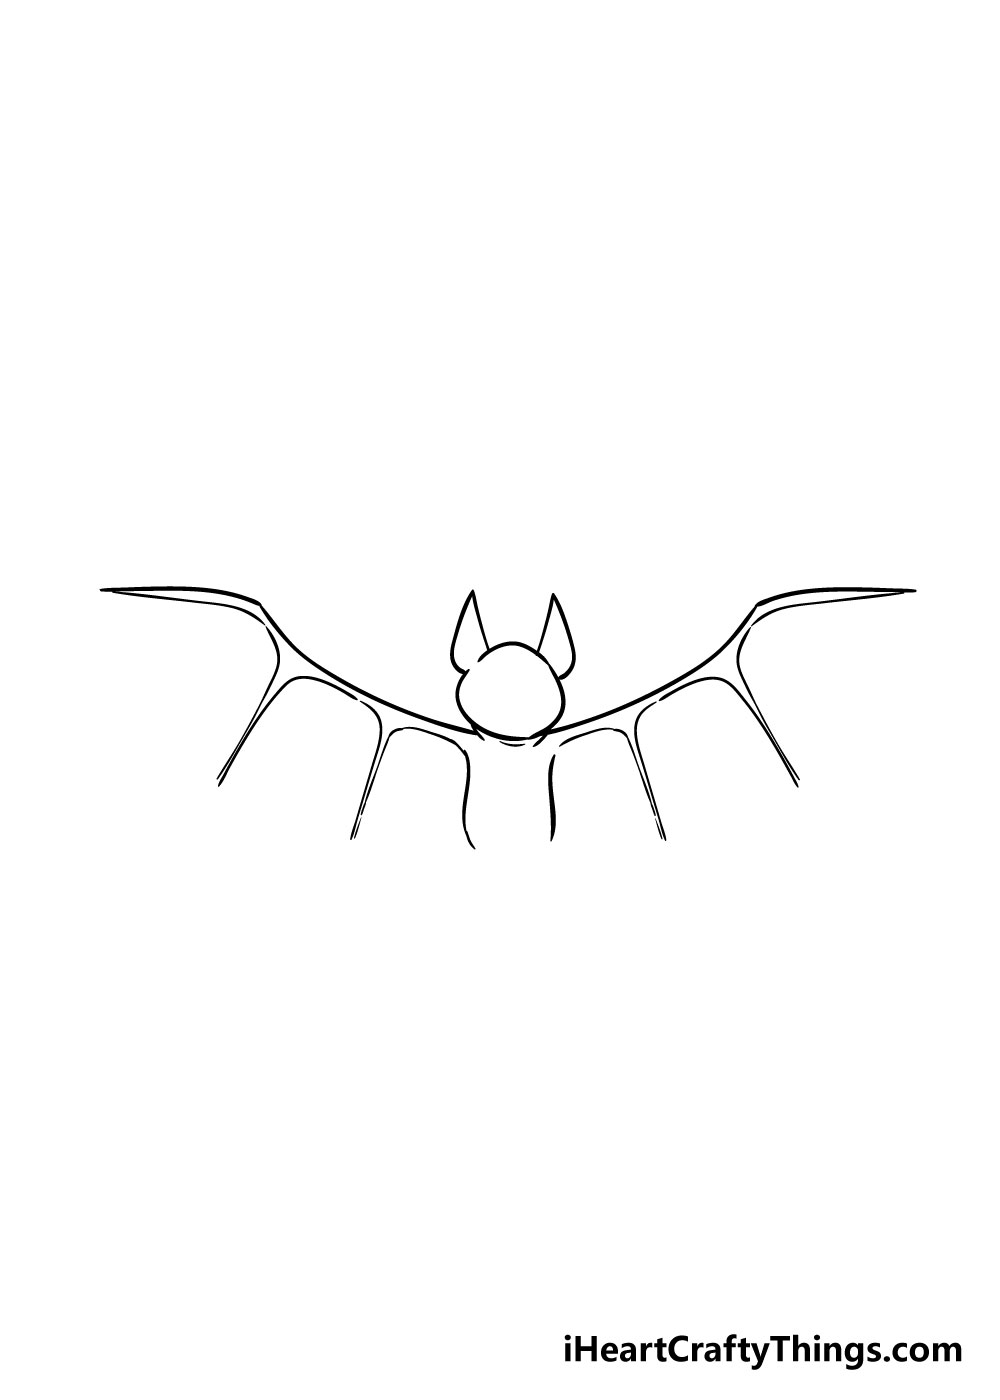
Step 2 – Draw in the bat’s ears
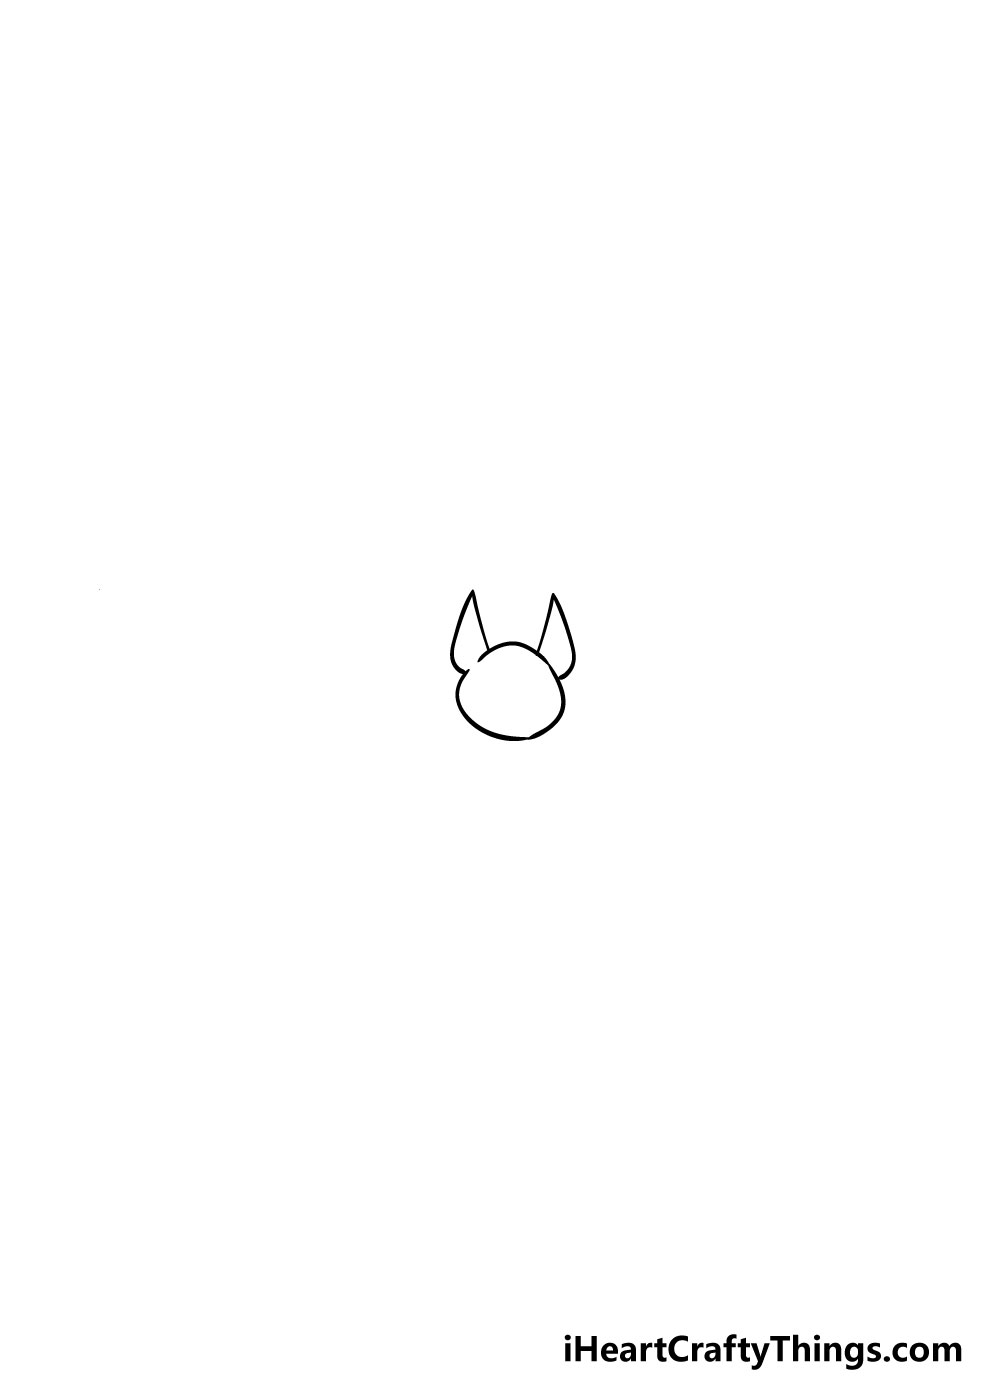
Once you have the head of your bat drawing, you can add the pointy bat ears to it.
To do this, simply draw in two straight lines with two curved ones coming down from them as you can see in the image.
Step 3 – Next, draw in the top of the left wing
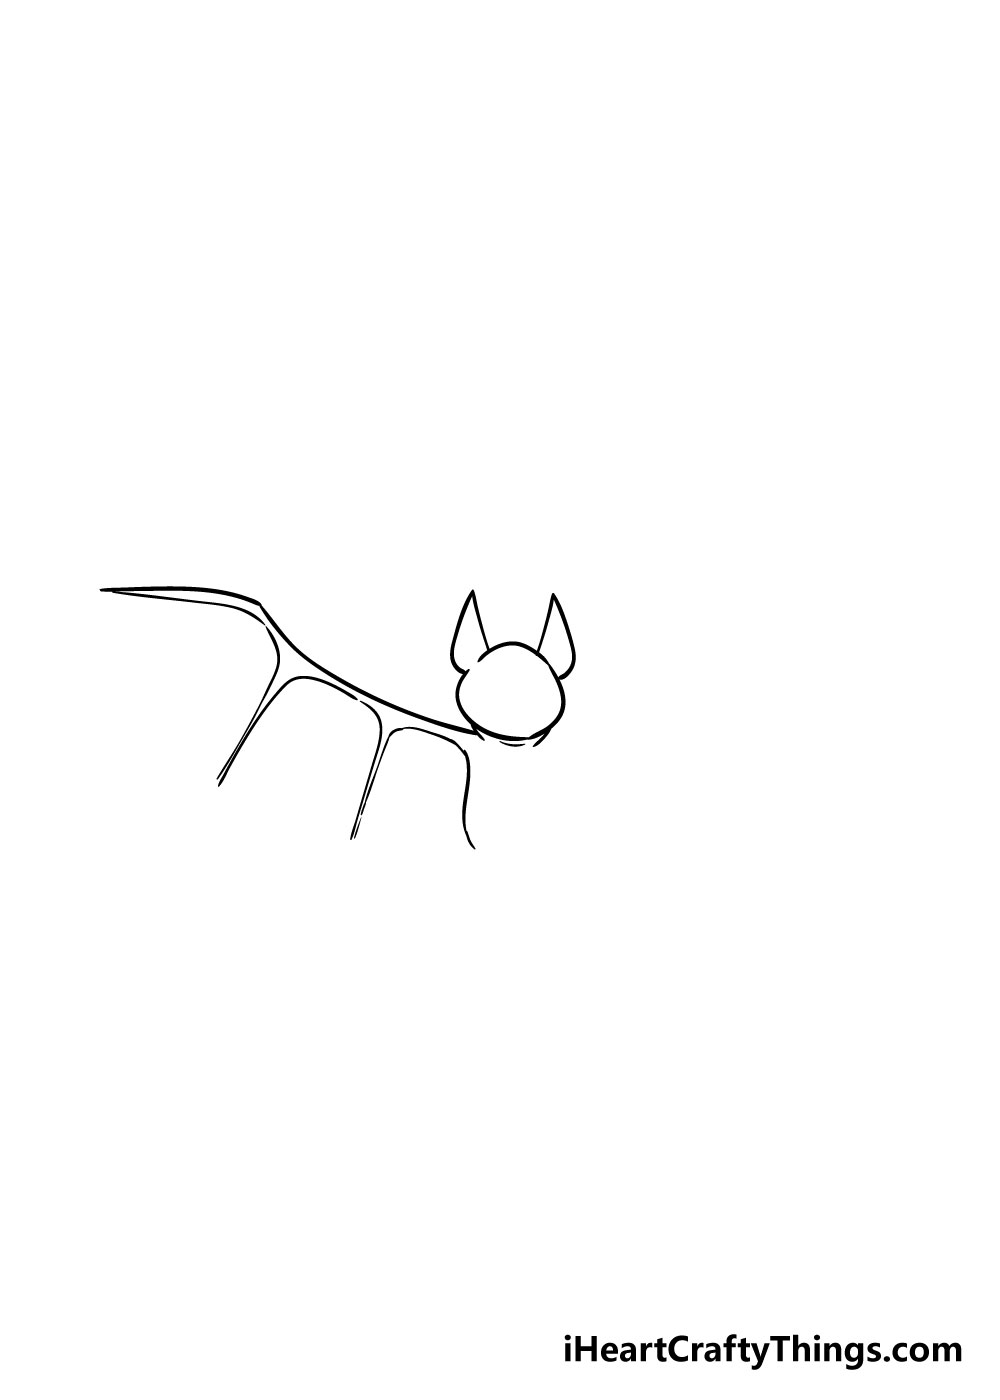
Now that you have the head and ears of your bat drawing, you can start to draw in the first wing. Following the reference picture will be very helpful for this stage!
Going slowly and carefully, draw in the frame of the wing as you can see it in the picture. You will be using a combination of straight and curved lines to do this.
It can be a bit tricky, so there’s no need to rush it!
If you’re having a hard time with this step, you could draw with a light pencil first before going over it in pen.
Step 4 – Now draw in the opposite wing
You’ve drawn in the first wing of your bat drawing, so now all you need to do is create a mirror image of the wing on the opposite side.
Simply copy exactly what you did in step 3 but reversed and you’ll have both wing frames in no time!
Step 5 – Next you will be adding the bottoms of the wings
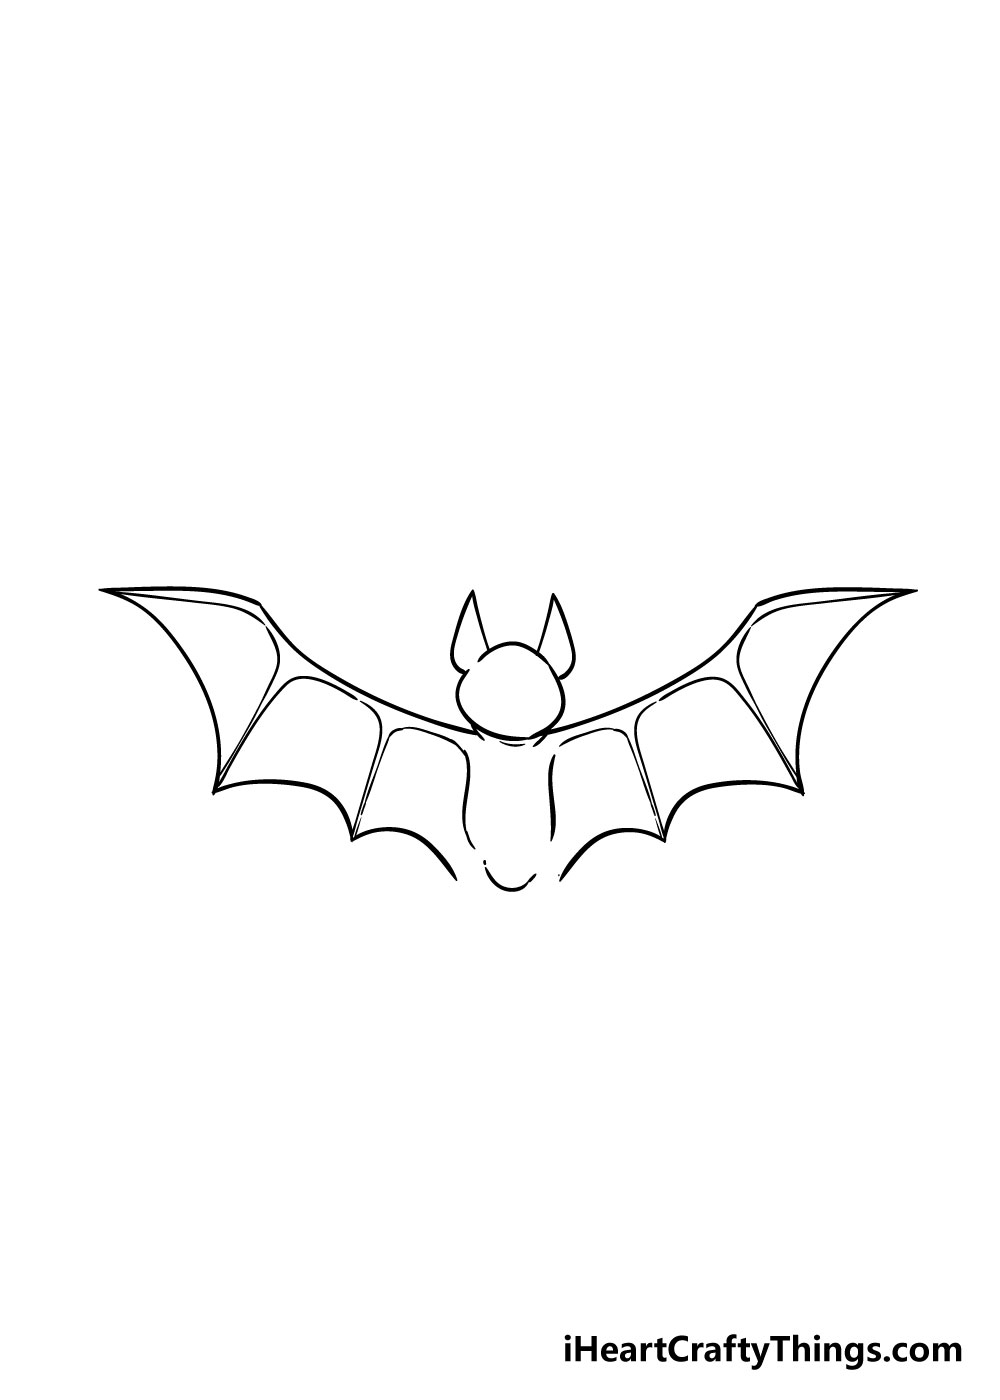
With the frames of the wings drawn in, you can now add in the webbed bottoms of the wings.
To do this, simply add in some curved lines between the points of the wing frames as you can see in the picture.
Once you have the webbed parts of the wings added, you can add in a small line for the bottom of your bat’s body.
Step 6 – Next you will be adding in some legs

You’ve almost finished your bat drawing at this stage, so for the next few steps we will be adding in the finishing touches and a few final elements.
For the sixth step in this guide on how to draw a bat, we will be adding in the legs of the bat.
Using some curvy lines and points simply draw in the small legs with little sharp claws at the end of them like you can see in the picture.
Once the legs are done, you can draw in a pointy line underneath them to represent the bottom of the wing.
Step 7 – Now draw in the bat’s face

For this next step, we will be adding in a cute face for your bat drawing. Using circles and some smaller lines, you can first add in some eyes for your bat along with a little nose and mouth.
You can closely adhere to the picture and try to draw it that way, but you could also get creative with the look and change the facial expression of your bat drawing.
Once the face is drawn in, you can draw in the inner ear section of your bat’s ears.
Step 8 – Add in the final details

Your bat drawing is almost finished now! All that’s needed now is to add in some small lines to the leathery soft parts of the wings to make it look like the skin is stretched between the frames of the wings.
With that final set of details, we will be finishing off your awesome bat drawing in the next step!
Bonus: Try Out These Different Approaches To This Bat Drawing
It’s almost time to add some amazing colors to this drawing of a bat! Before we get to that final step of this guide, we wanted to go over a few ways you could change this drawing in big and small ways.
Why would you want to change the drawing, though? Isn’t it fine the way it is? Well, there are a few reasons for why you may want to alter the drawing.
One reason would be to simplify the drawing. This would be a good thing to do if you’re perhaps struggling with some of the finer details of the drawing.
If you would find it easier to draw a simple cartoon bat drawing, then you could follow the steps and adapt the design to fit that simpler style. Or, maybe you like getting stuck into realistic details.
If that’s the case, then you could use some photos of real bats and then change the details in each step to match the photo in order to create something unique.
Changing the drawing isn’t just about doing something that plays more to your strengths. It can also be a way to extend your fun once you have finished the guide!
The guide on how to draw a bat that we just did was designed to get you started, but now you can take over with your own creativity. You don’t have to make just one bat drawing and then call it a day.
You could make various interpretations of the drawing in different styles and scenarios and see how they all compare to one another. Whether it’s to make it easier or just to have more fun, we would be interested to see how you change this drawing!
For now, we will cover how you can color your artwork in the next step.
Step 9 – Now finish it off with some color
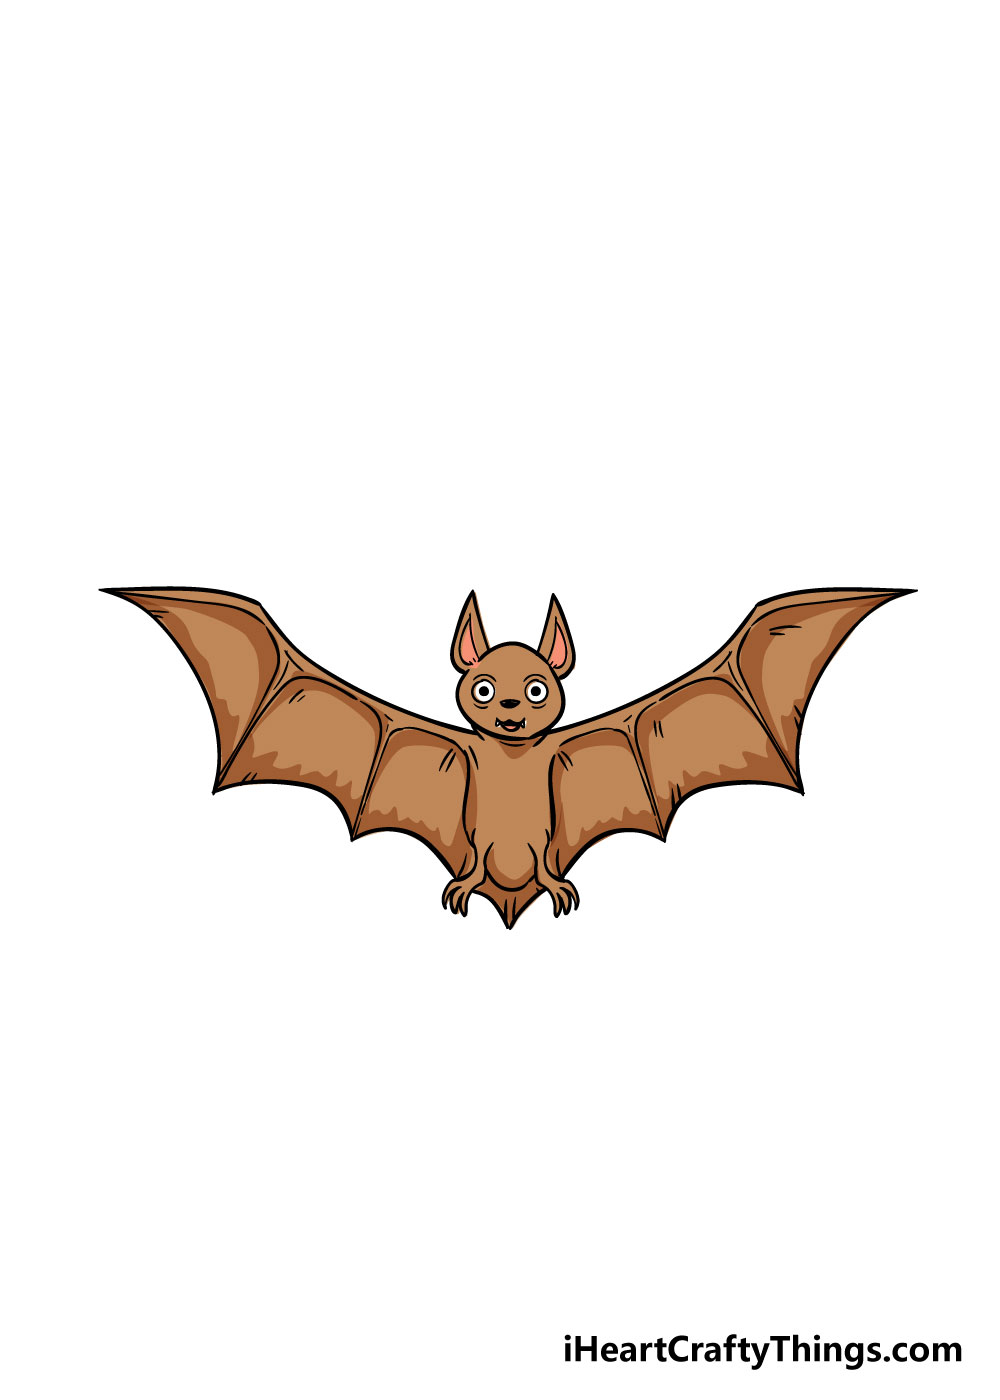
To finish off your amazing bat drawing, all it needs now is some color! This is where you can really show off your artistic skills and let your imagination run wild.
We’ve shown one way you can color it in with our reference picture, but you should let your inspiration take over and use all of your favorite colors!
You can further personalize your drawing by giving it a cool background as well.
Maybe you could color in the background a dark blue with a bright yellow moon to make it look like your bat is flying through the night sky!
You could also have some fun with different art mediums at this stage. Mediums such as watercolors, acrylic paints, colored pens and pencils can be lots of fun to use for some great color variations!
4 More Ways To Make Your Bat Drawing Unique
Find out how to make your bat sketch even more amazing with these fun tips and tricks!
The design of this bat drawing was done in a cartoony style, but you could also make it more realistic. You can do this with just a few small and subtle details!
For example, if you were to add some small lines onto the body of the bat, you would make it look like it’s a bit hairy.
You could also add some subtle lines onto the wings to make them look a bit more leathery.
What are some other details you could add?
Bats are often depicted flying in groups, so you could add more bats to be with this one. This would be easy, as you know how to create a drawing of a bat after completing this guide.
Simply follow the steps and change a few details and you will have a bat party in no time! You could fill the page with bats or you could just stick to two or three depending on how you feel.
A great way to make this bat sketch more unique would be to draw a background. This could be a simple background that you would find a real bat in, but you could also get creative with it.
For example, bats are often seen in spooky movies, and you could create that kind of setting. The bat could be in an old scary castle or maybe a haunted house for just a few ideas.
What are some other scary settings you could put this bat into?
We would also again encourage you to use all of your favorite colors and art tools for this picture. We showed you one way to do that in our guide, but you have so many options to try out.
You can also use different mediums for different effects. For example, the skin on a bat’s wing is quite thin.
You could show this by using lighter colors, and they could look lighter still if you used some watercolor paints or colored pencils.
Your Bat Drawing is Complete!
We hope that this simple step-by-step guide on how to draw a bat in 9 easy steps was helpful and fun for you to use!
Drawing a bat may seem like a tricky picture to take on, but by breaking it down into manageable steps, we hope that it was fun and easy for you to learn.
Now that you can draw a beautiful bat, you can add your own touches to your drawings by adding in new backgrounds, colors and art mediums. The only limit is your imagination, so let it run wild!
Once you’ve drawn and colored in your bat drawings, we hope that you will share them to our Facebook and Pinterest pages for us to see!
We always love to see your colorful creativity and can’t wait to see your awesome bats!
Here Is A Bat Drawing To Inspire You!
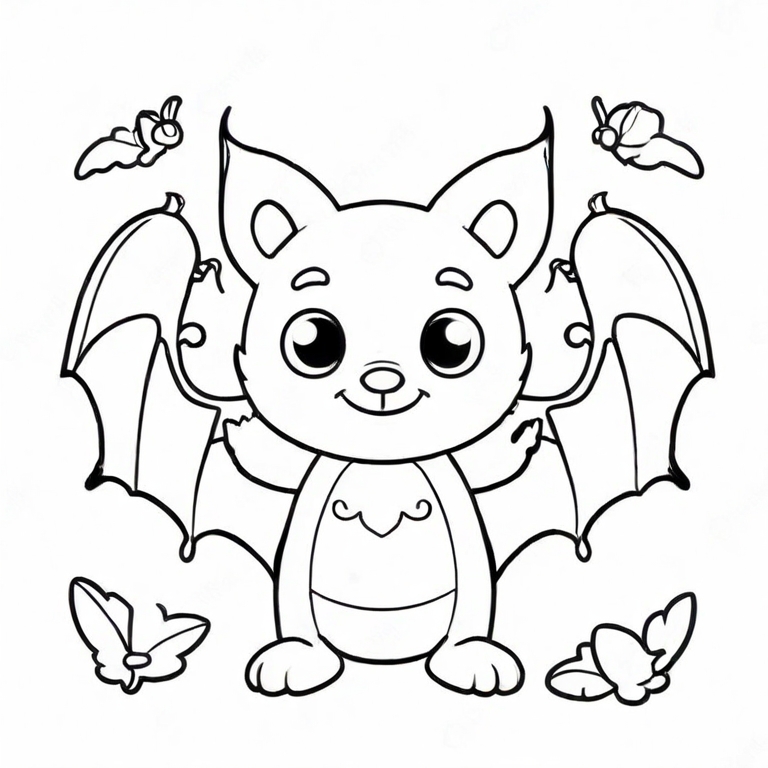
Bats can sometimes have a reputation for being creepy, but our wonderful artist Amanda has drawn an example of one that is just adorable!
This bat drawing for kids shows one of the ways you can draw one of these cute rodents. The focus is on the bat, but she also added additional little details such as butterflies around it.
These extra details are simple, but they add a lot of life to the drawing. You could even add some more details such as these to your own version of the drawing.
Once you have the hang of it, you may even want to draw additional bats into the image! You have everything you need to easily make a bat sketch now, so you could create a really batty scene.
Or, drawing a spooky background for this bat could also be a fun challenge!