Life can get pretty busy and hectic sometimes, and one of the best ways to calm down and relax a bit is by enjoying a nice hot cup of tea.
When making some delicious tea, the most common method is to use a teapot.
Tea can come in many different flavors and varieties, and teapots have an equally impressive variety in their designs and decorations.
It can be fun to imagine what your own personal teapot may look like, and learning how to draw a teapot is a great way to do just that.
If that sounds like something you would like to earn, then look no further than this tutorial in front of you!
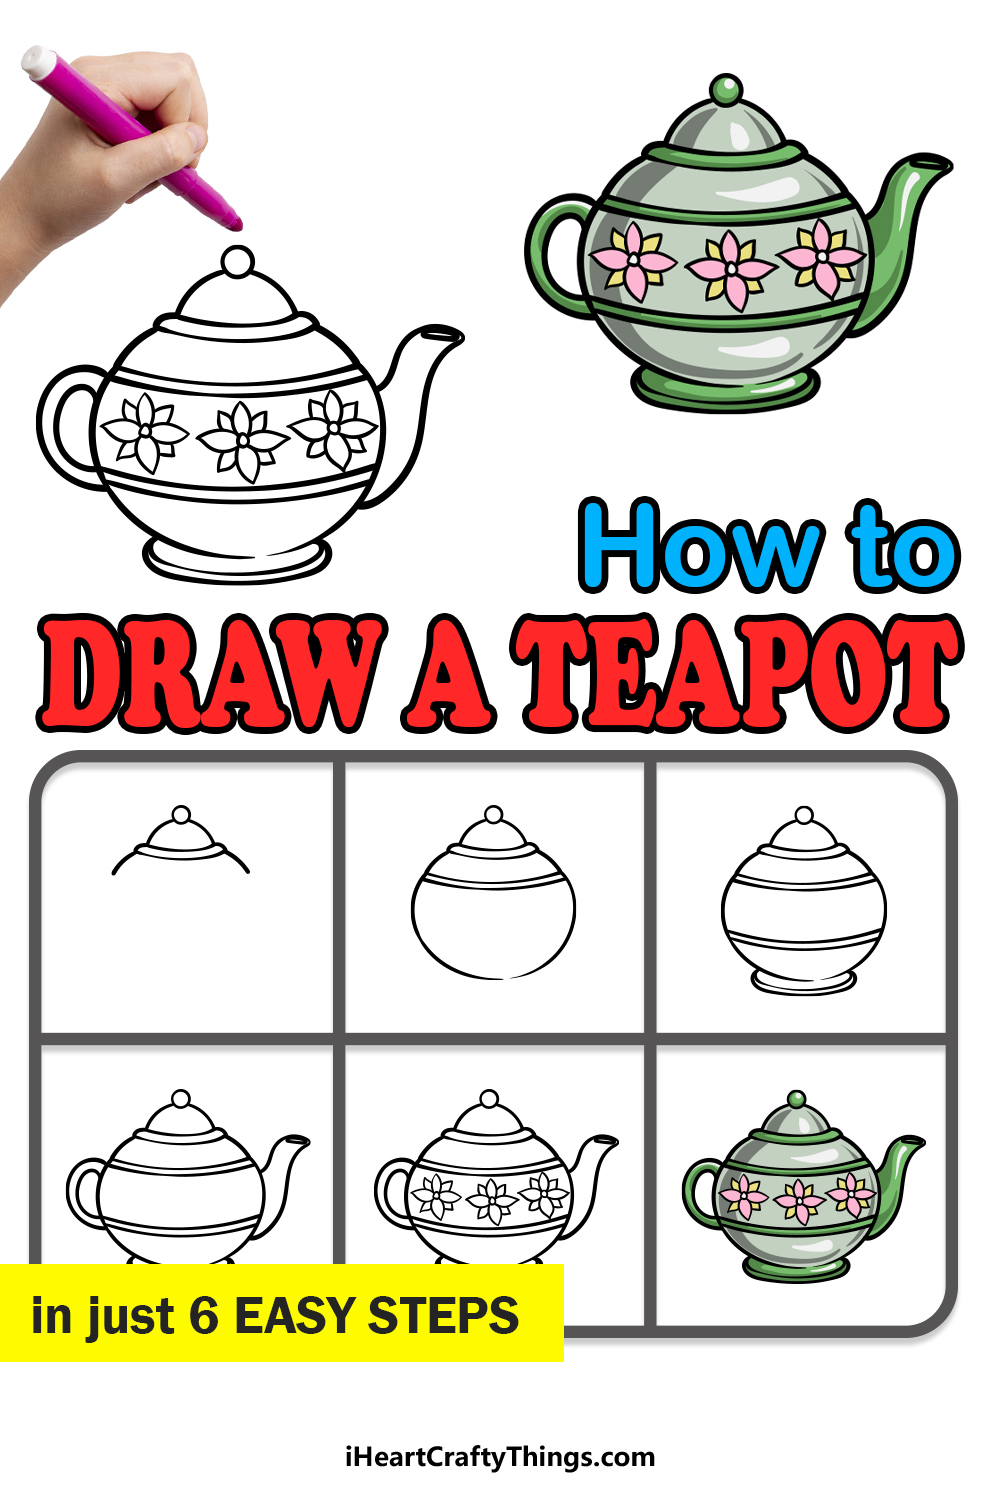
Our step-by-step guide on how to draw a teapot will show you how fun and easy it can be to design your own one.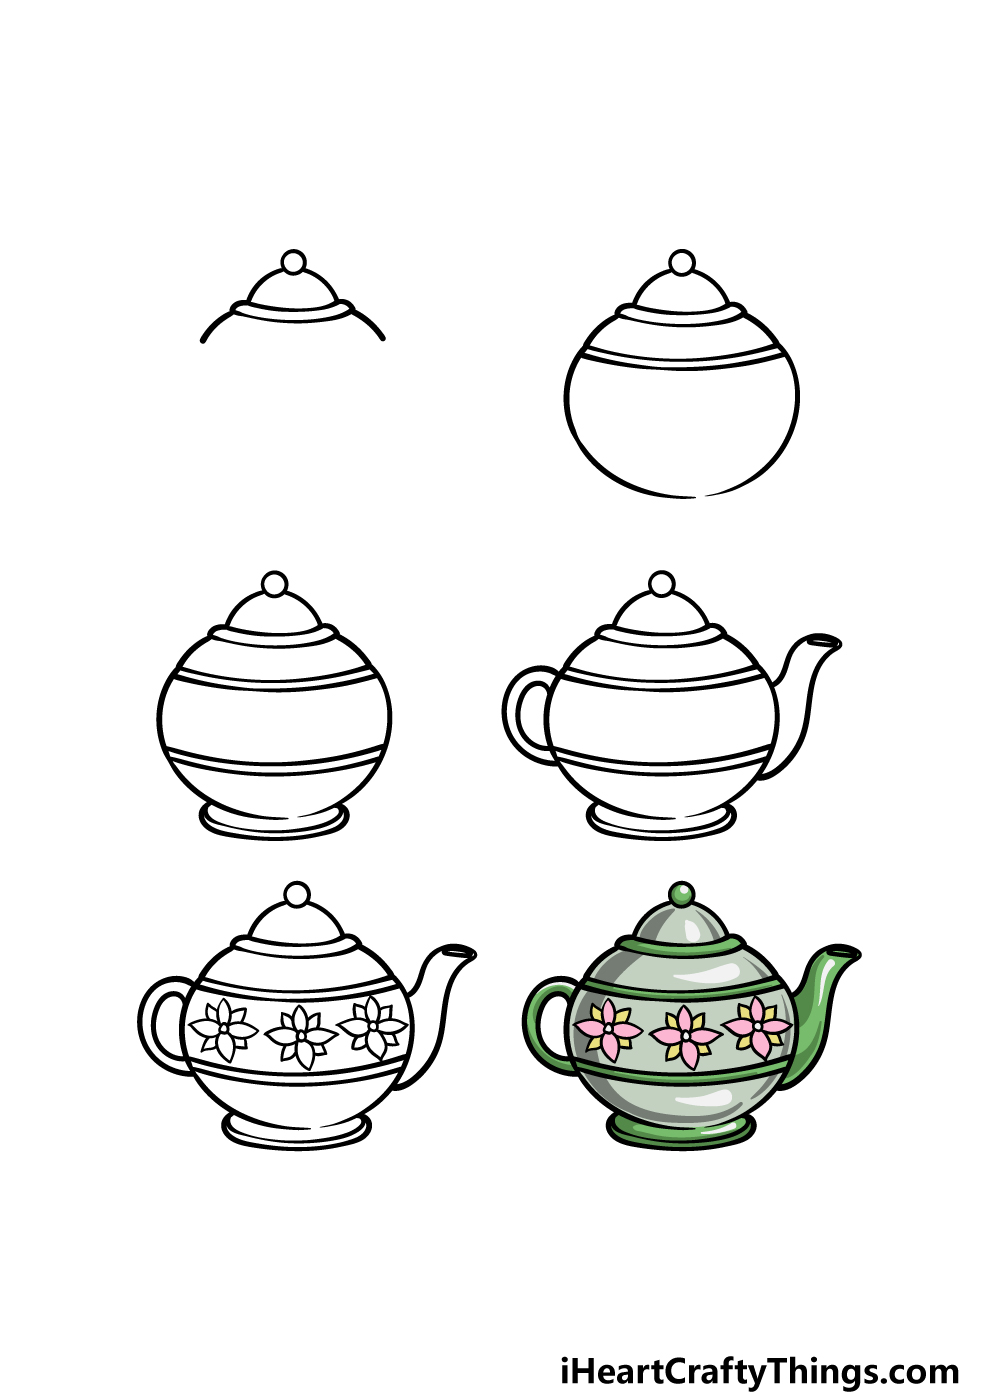
How to Draw A Teapot – Let’s Get Started!
Step 1
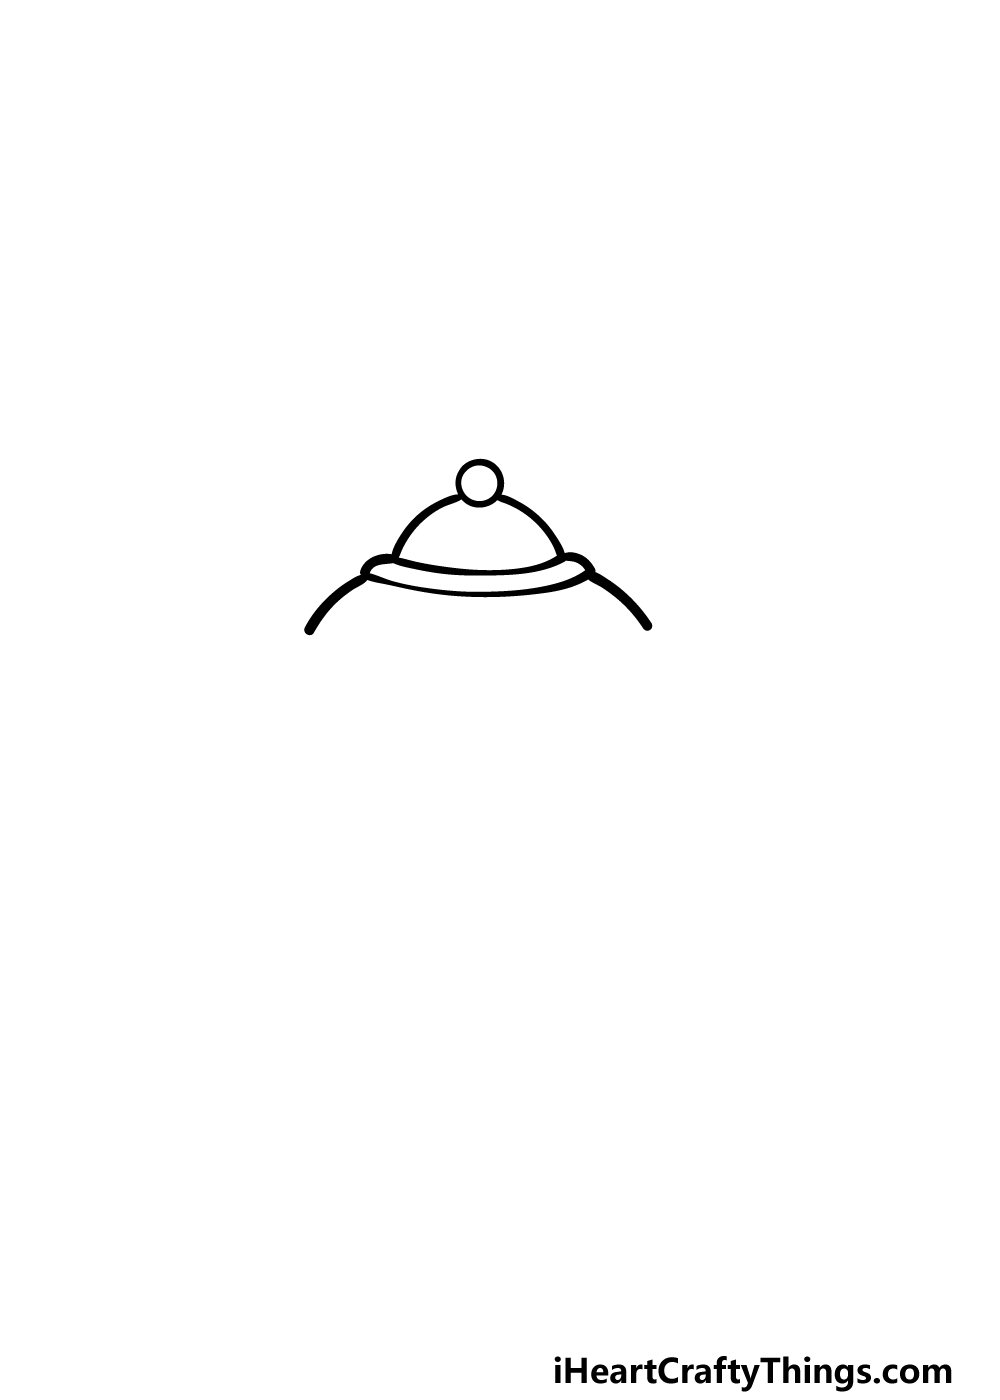
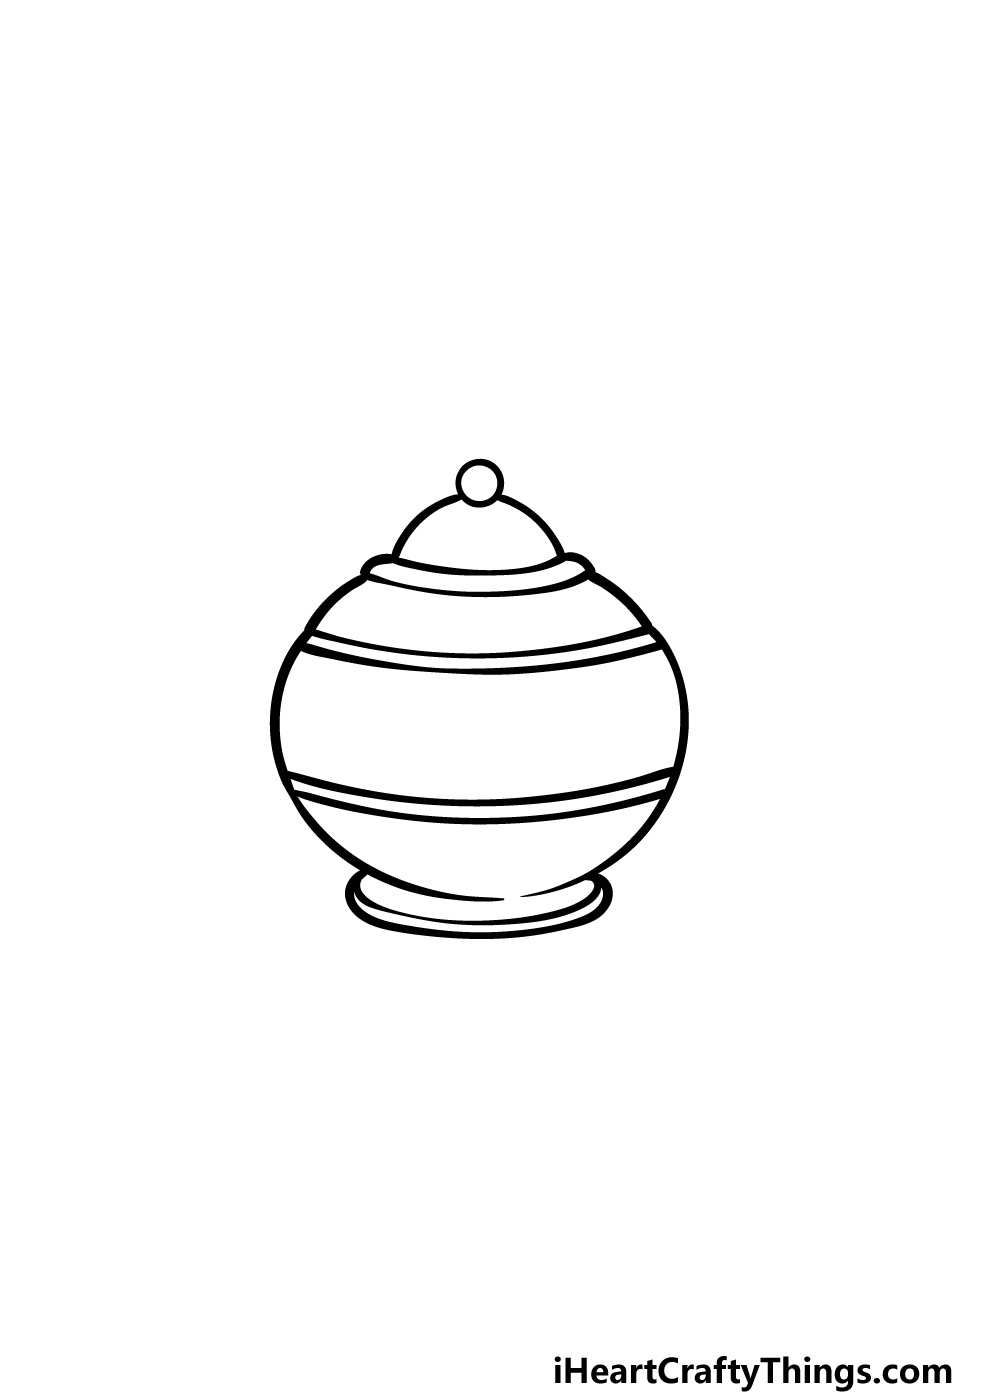
To get this guide on how to draw a teapot started, we shall start with the lid of the teapot. You can start this by drawing a small circle at the very top of the teapot.
Then, you can extend two curved lines down from this circle, and once you have drawn that then you can draw a rim at the base of the lid.
Once this lid is complete, all you need to do is draw two curved lines coming down from the rim, as these will form the start of the sides of the teapot itself.
That’s all there is to it for this step, so now you can proceed to step 2 of the guide!
Step 2 – Now, draw the outline for the body of the teapot
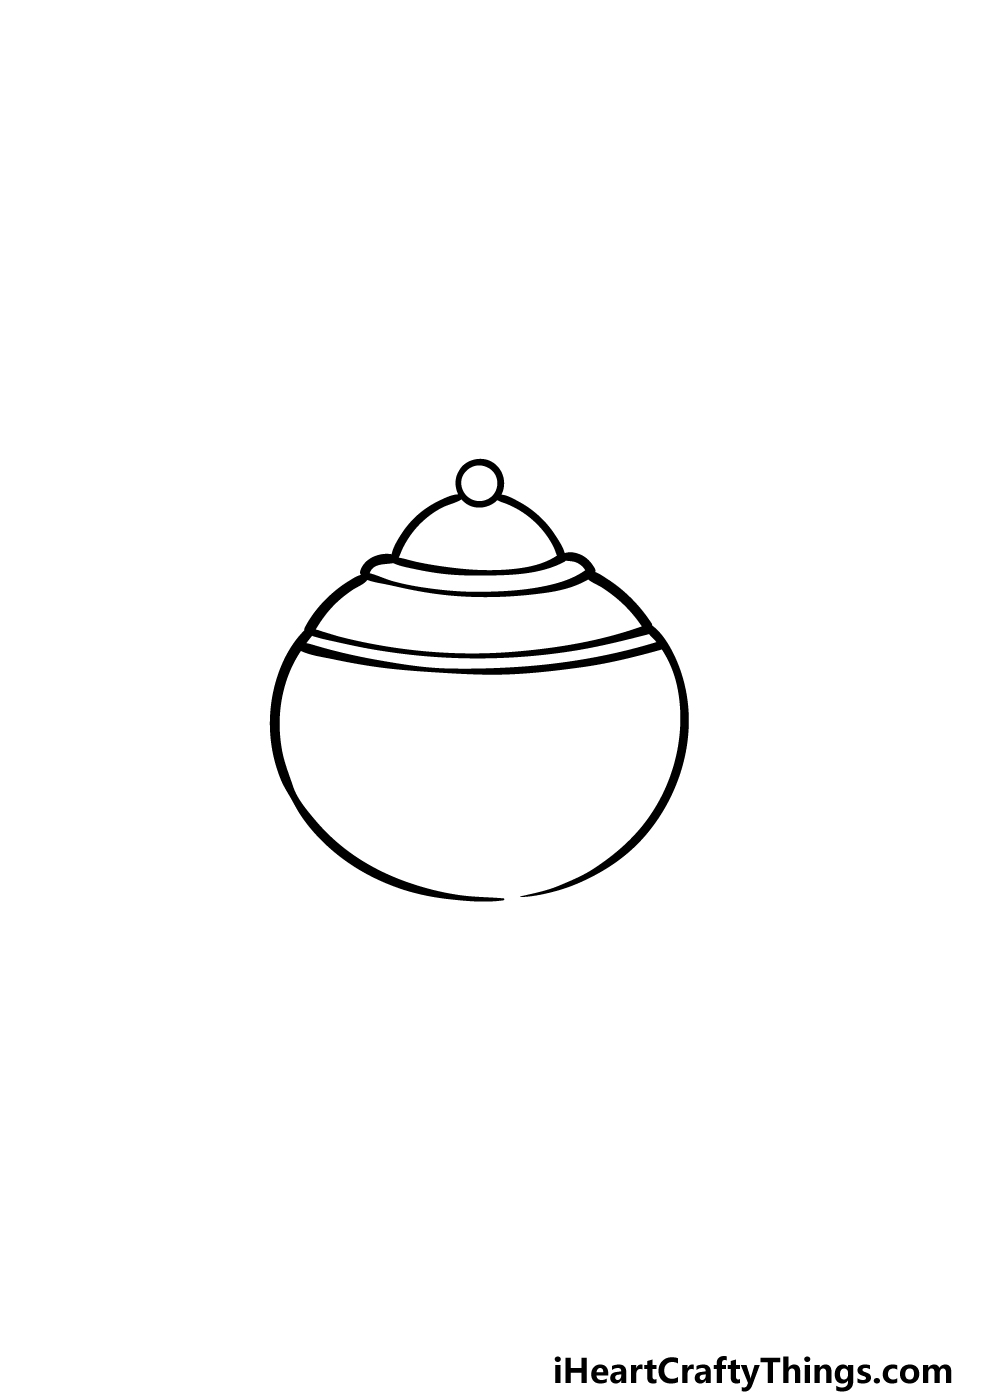
For the next part of this teapot drawing, we will be drawing the outline for the rounded body of the teapot.
First, draw another thin rim using two curved lines connecting the two lines that you drew coming down from the lid in the previous step.
Once this new rim has been drawn, the next thing we will do will be to draw two more long curved lines coming down from the sides of the rim.
These lines will almost connect near the bottom, but there will be a small gap left near the right-hand side of the base.
Step 3 – Draw the rest of the base and some decorative elements
To continue this guide on how to draw a teapot, we will be drawing the rest of the base of the teapot. Before you draw the base, we will be adding another decorative element to the body of the teapot.
All you need to do is draw two more curved lines close to one another and spanning the entire width of the center of the teapot body.
Then, you will be ready to draw the rest of the base. To do this, draw a curved line from one side of the base exterior to the other, and then draw another one under this.
The reference image will show you how this should look, and when it’s done we can move to step 4!
Step 4 – Next, start drawing the handle and spout
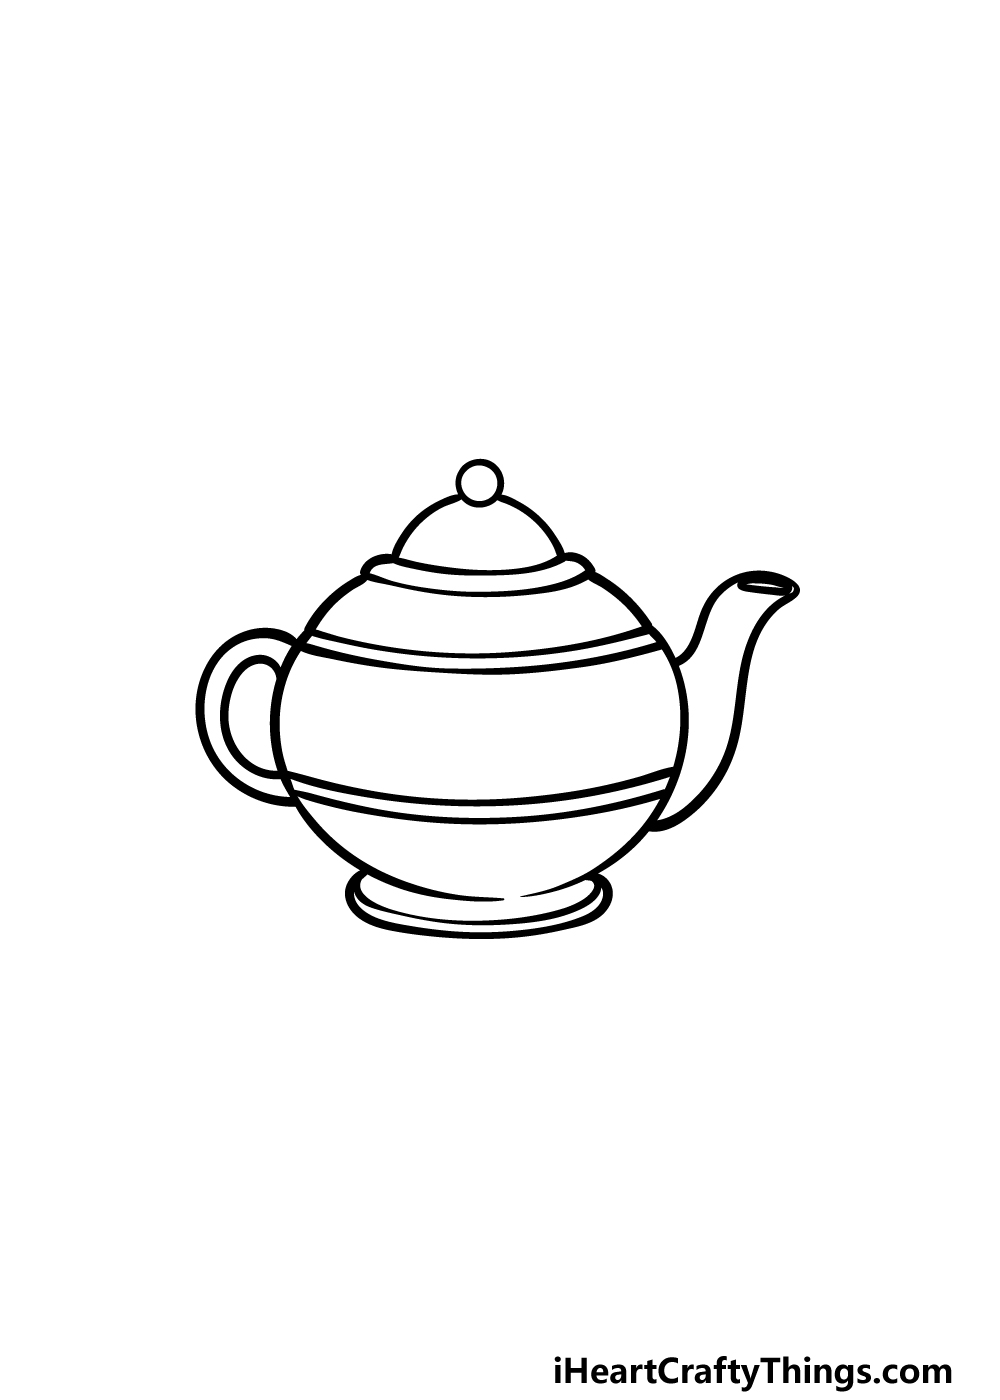
This teapot drawing of yours may look a bit short and stout, so for this step we shall be drawing the handle and the spout.
The handle will go on the left-hand side of the teapot, and it should be pretty easy to draw. All you need to do is draw a rounded line coming off the side, and then draw another one over it.
Then, you will be ready to draw the spout. This will again be drawn with some curved lines to create the spout extending off the right-hand side and reaching upward.
Once the handle and spout are complete, you will be ready to decorate this teapot in the next step.
Step 5 – Add the final details to your teapot drawing
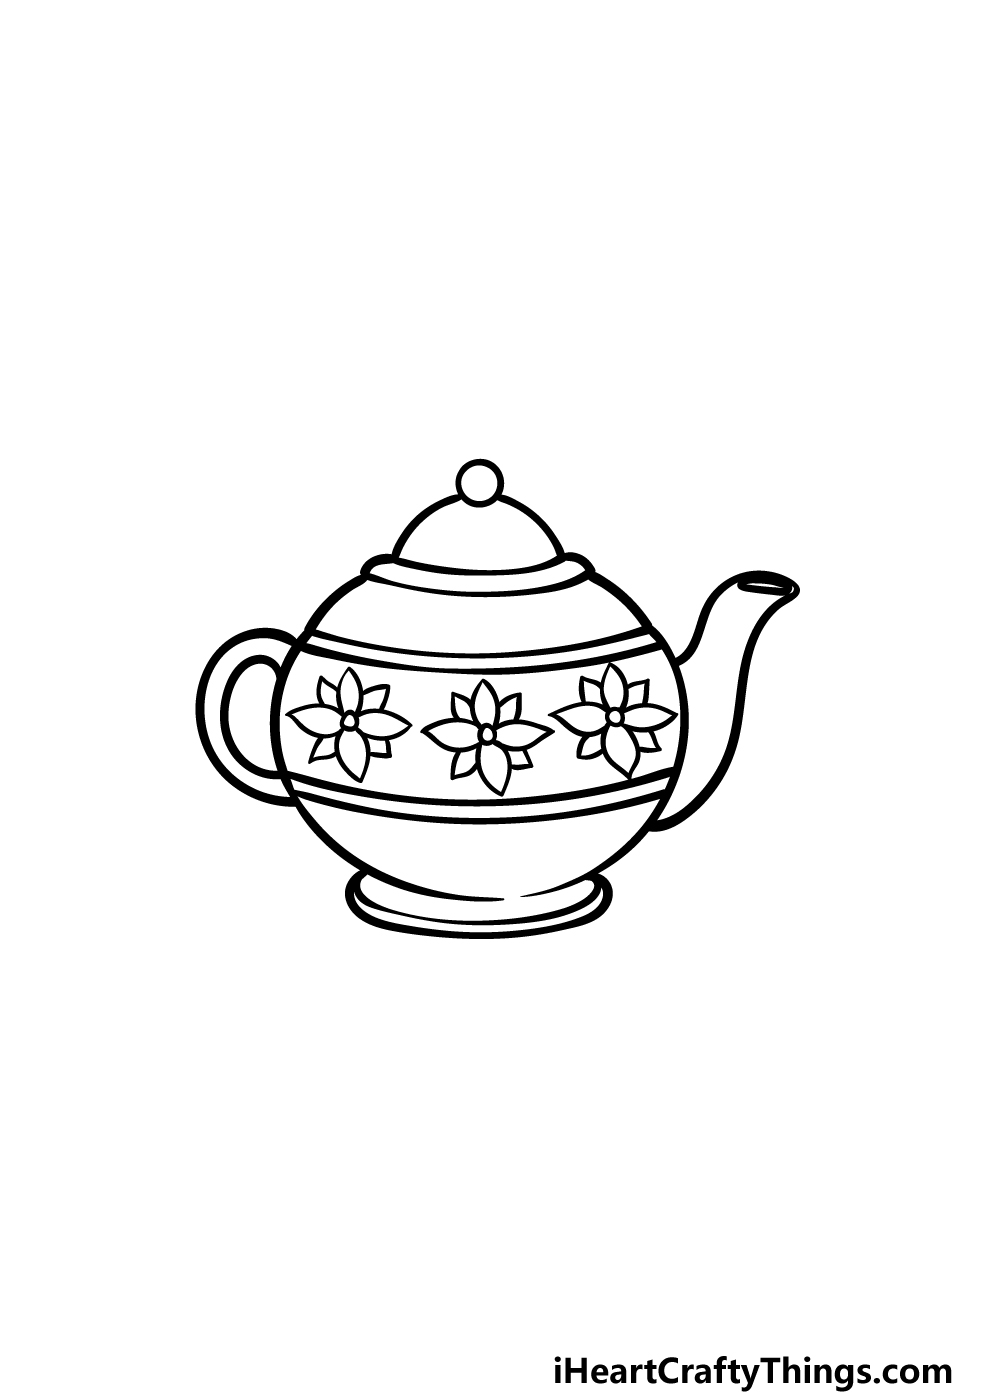
Now you’re ready to add some decoration and final details in this step of our guide on how to draw a teapot. In our reference image, we went with a pretty floral design for the teapot.
Each flower on the body has a small circle at the center of it with some curved lines with sharp points on it for each petal.
You could replicate this same design for your own drawing, but you should also feel free to make your own pattern design if you wish!
You could also add to the image by drawing a background for it, and this would be a great way to show what you would enjoy with this pot of tea.
Step 6 – Finish off your teapot drawing with color
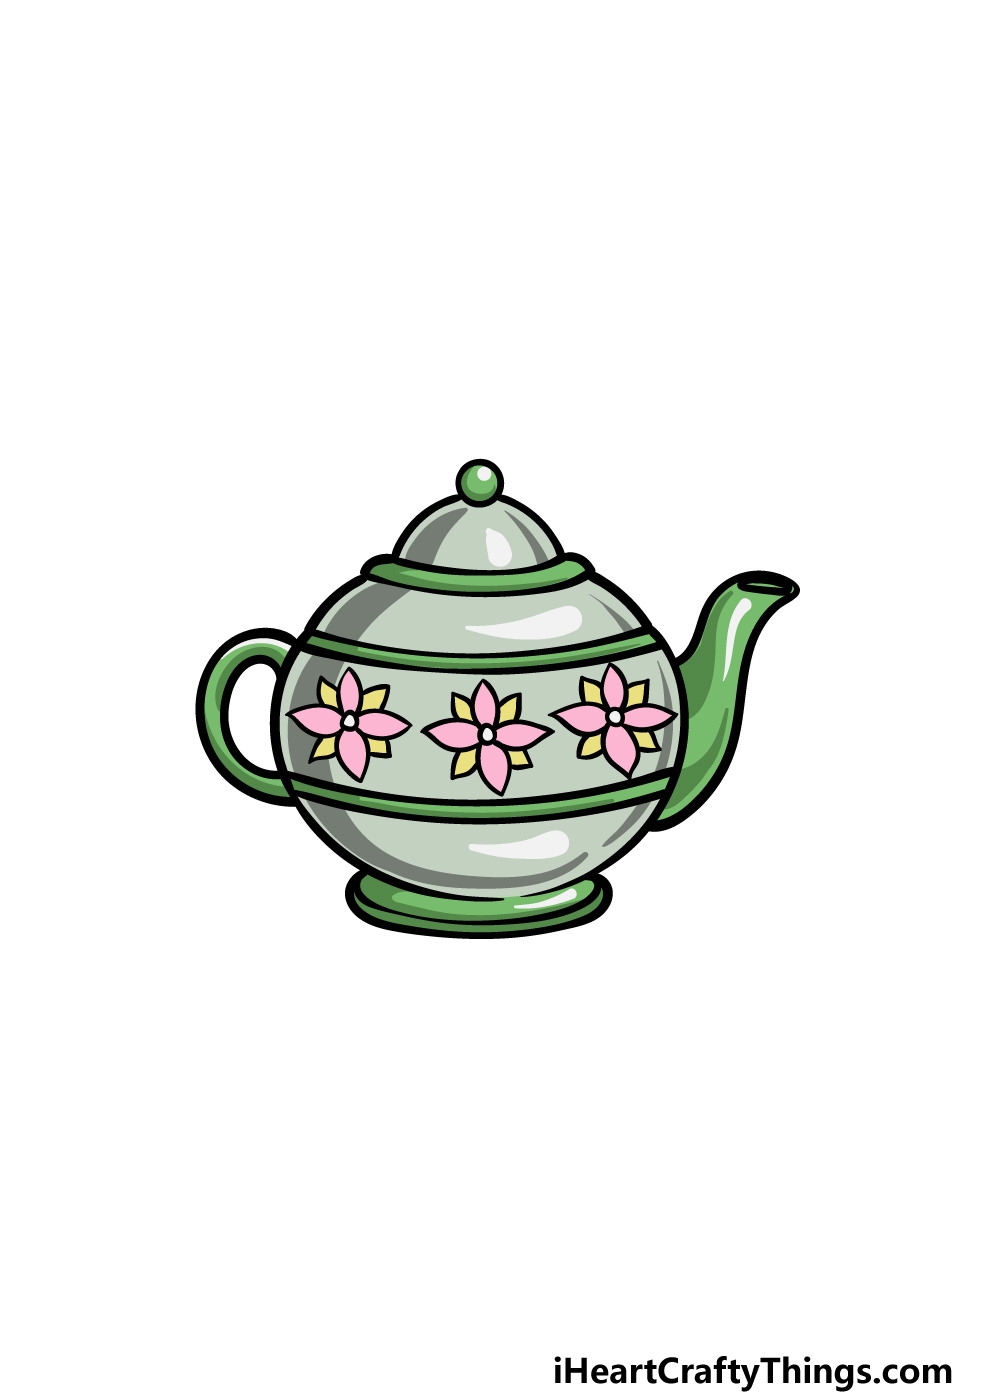
In this final step of your teapot drawing, you will be able to finish it off with some colors! In our reference image, we went for some shades of greens for the body of the teapot.
Then, for the flower decorations we went with some light pinks and yellows to make them pop off the green body of the teapot.
This is another great chance for you to show off your creativity as you choose the art mediums and color shades that you think would best suit your creation.
Be sure to have fun getting creative with it and see what happens!
Do this to take your teapot drawing to the next level
Put on some tea and enjoy these tips for your teapot sketch to make it even better!
This drawing of a teapot has a simple green color scheme with some floral patterns. This looks great, but a teapot can come in many styles!
You could easily give this teapot a brand-new look with some color changes and minor details! Just by changing the color to your favorite would be a good way to start.
Then, maybe you could add a new pattern or image to the teapot to personalize it even more. What are some changes you could make to make this your own perfect teapot?
Having a great teapot is one thing, but you need some extra accessories to get the full effect. These could also be added to the drawing to complete the set!
The most obvious choice would be some teacups and saucers, and these could be drawn in the same style as the teapot. Then, you could also add a sugar bowl or maybe a milk jug.
What other accessories could this teapot use?
When it comes to enjoying tea, it’s often best when joined with some tasty snacks. These could make a great addition to this teapot drawing!
Everyone has their favorite tea snacks, so you could show some of yours in this image. Some classics would include some biscuits, cookies and maybe some small cupcakes.
These are just a few, but you could show off any other treats you would like to enjoy with a cup of tea!
You can create the perfect tea party, but it’s a bit of a waste with no one to enjoy it. For that reason, it could be fun to add some humans to this teapot sketch!
They could be drawn in a simple cartoon style if you’re not that used to drawing people. To make it even easier and even more fun, you could base these characters on people you know!
Who do you think you would want to invite to a tea party?
Your Teapot Drawing is Complete!
That will bring you to the end of this guide on how to draw a teapot. We hope that designing your very own teapot was a fun and enjoyable experience for you to take part in!
By following the steps we have laid out for you and taking it slow, you will know everything you need to know about drawing a lovely teapot.
When you have mastered this drawing, you can then express your creativity by changing up the details, adding some background elements or using some beautiful colors.
This is your chance to really show off what you can do, so have fun expressing your creativity!
You can then visit our website when you’re ready for your next drawing challenge. We have tons of guides to enjoy, and we have many more on the way soon. Keep checking in to make sure you never miss out!
Please also be sure to go ahead and share your finished teapot drawing on our Facebook and Pinterest pages for us to admire. We can’t wait to see how it turned out!