The many species of reptiles that we have walking the earth are the closest things we have to living dinosaurs in the modern age.
Some are big and ferocious like giant alligators while others can be small and fragile like tiny geckos.
The iguana sits somewhere between these extremes, and it definitely has a rather prehistoric look to it.
It’s popular as an exotic pet as well, and learning how to draw an iguana is a great way to show that you love this curious animal!
There are many details and proportions to get right with this creature, making a tutorial like the one in front of you very helpful.
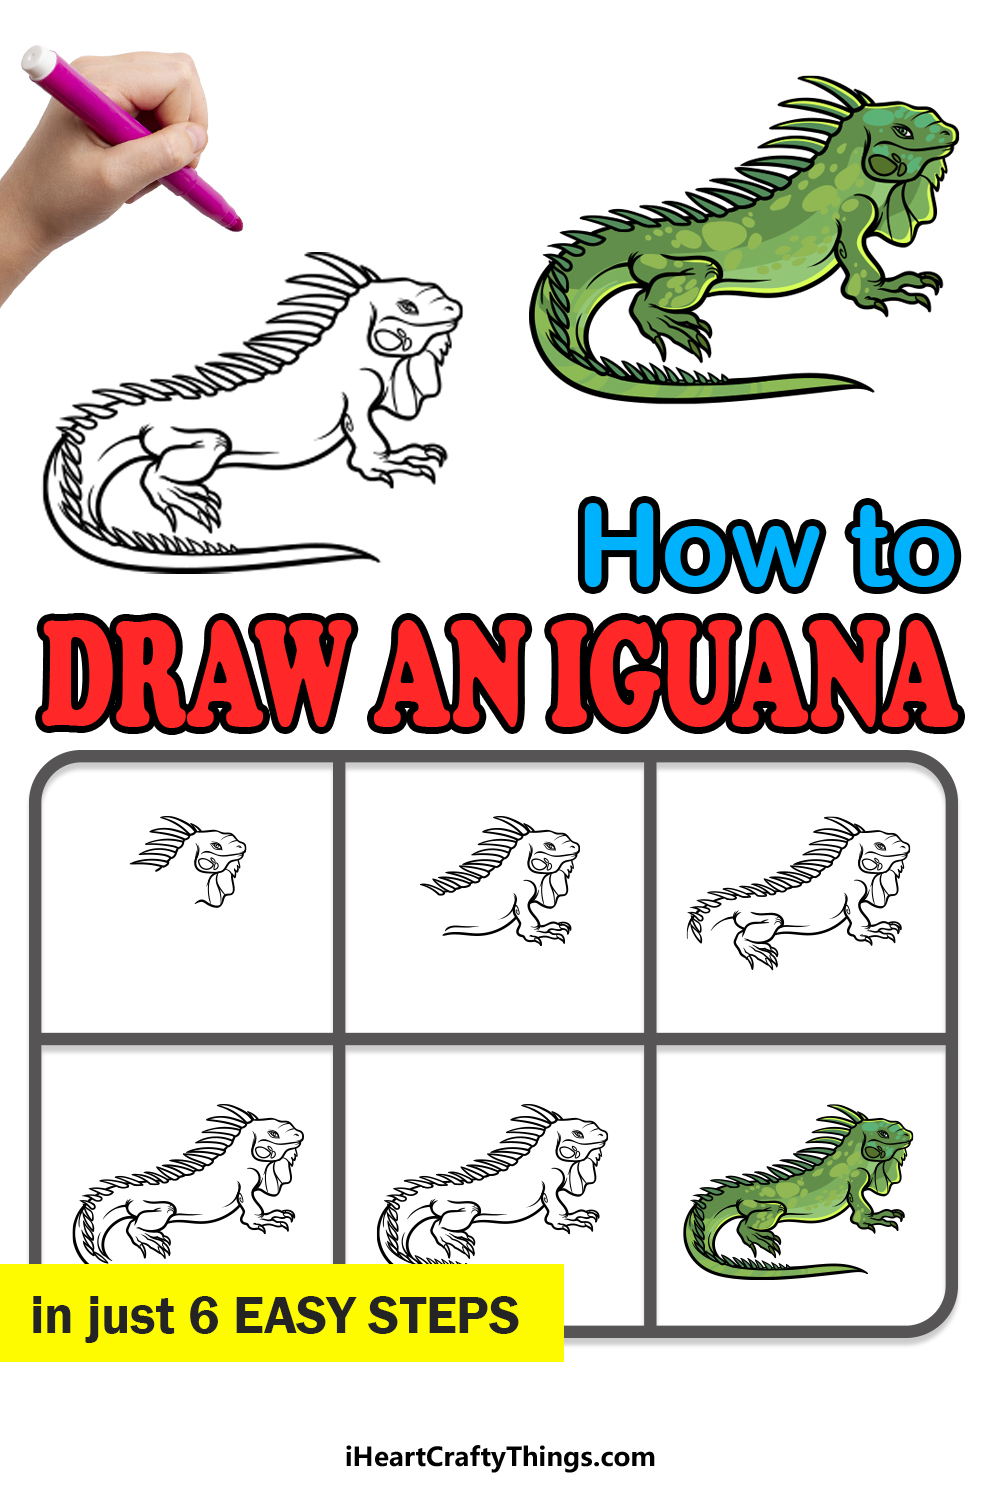
This step by step guide on how to draw an iguana will show you how you can draw one of these incredible reptiles.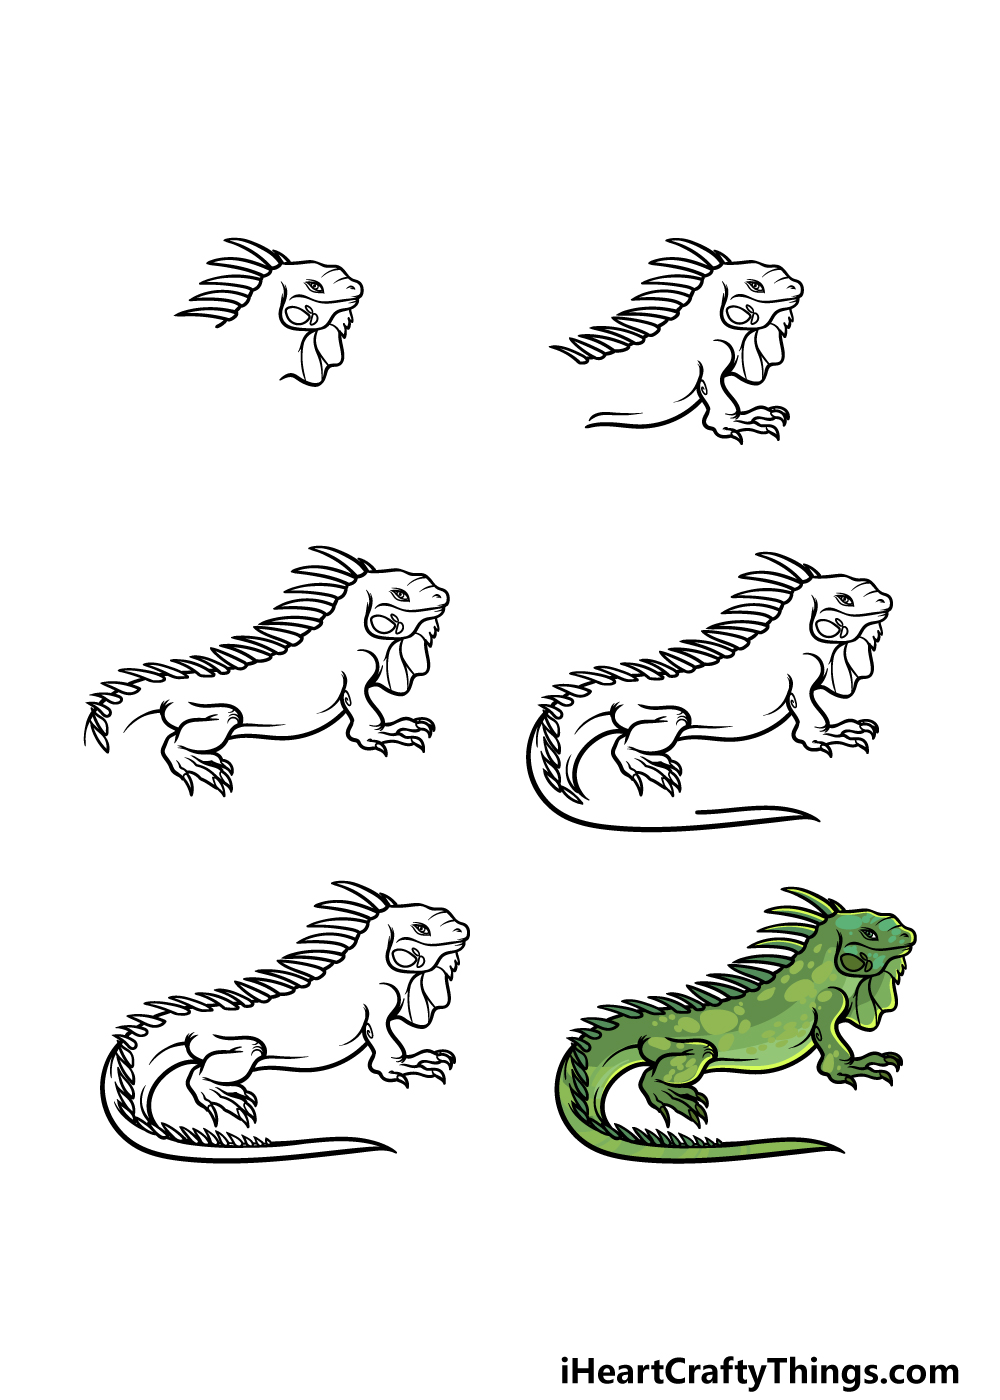
How to Draw An Iguana – Let’s Get Started!
Step 1
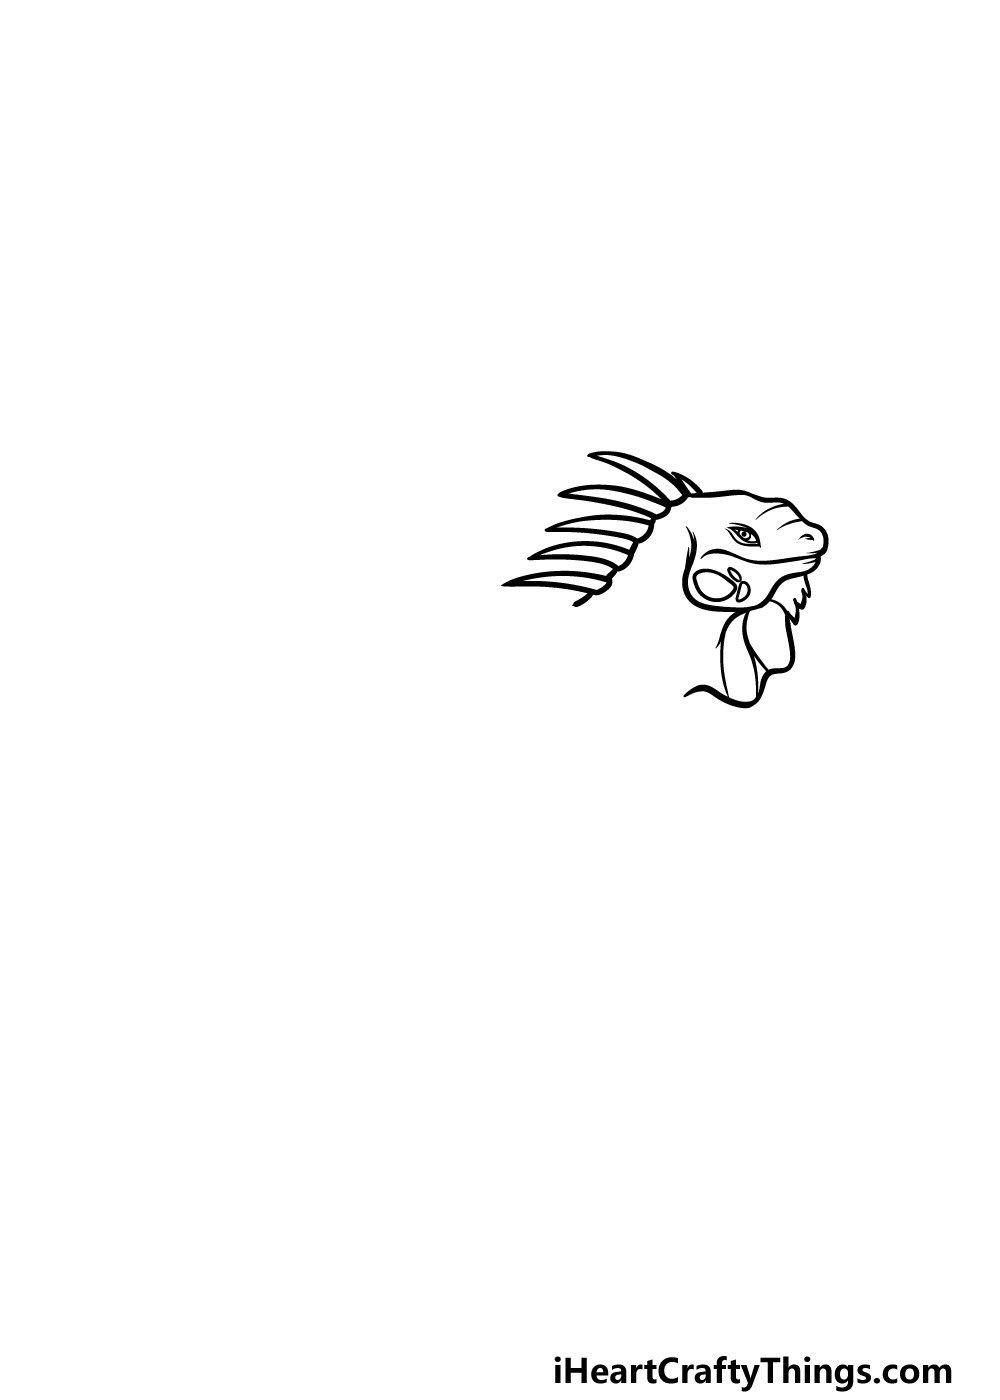
To begin this guide on how to draw an iguana, we will start with the head of the lizard.
Use some curved lines to create the reptilian face of the iguana, and then extend the line inward to give it a large chin. You can also draw a small eye and some other facial details.
Extend some more wavy lines beneath the head for the chest of the iguana, and then we will finish off by starting to draw the back and by adding some large spikes to it.
Once all of these elements have been drawn we shall move on to step 2!
Step 2 – Now, add some more to the back and draw the first leg
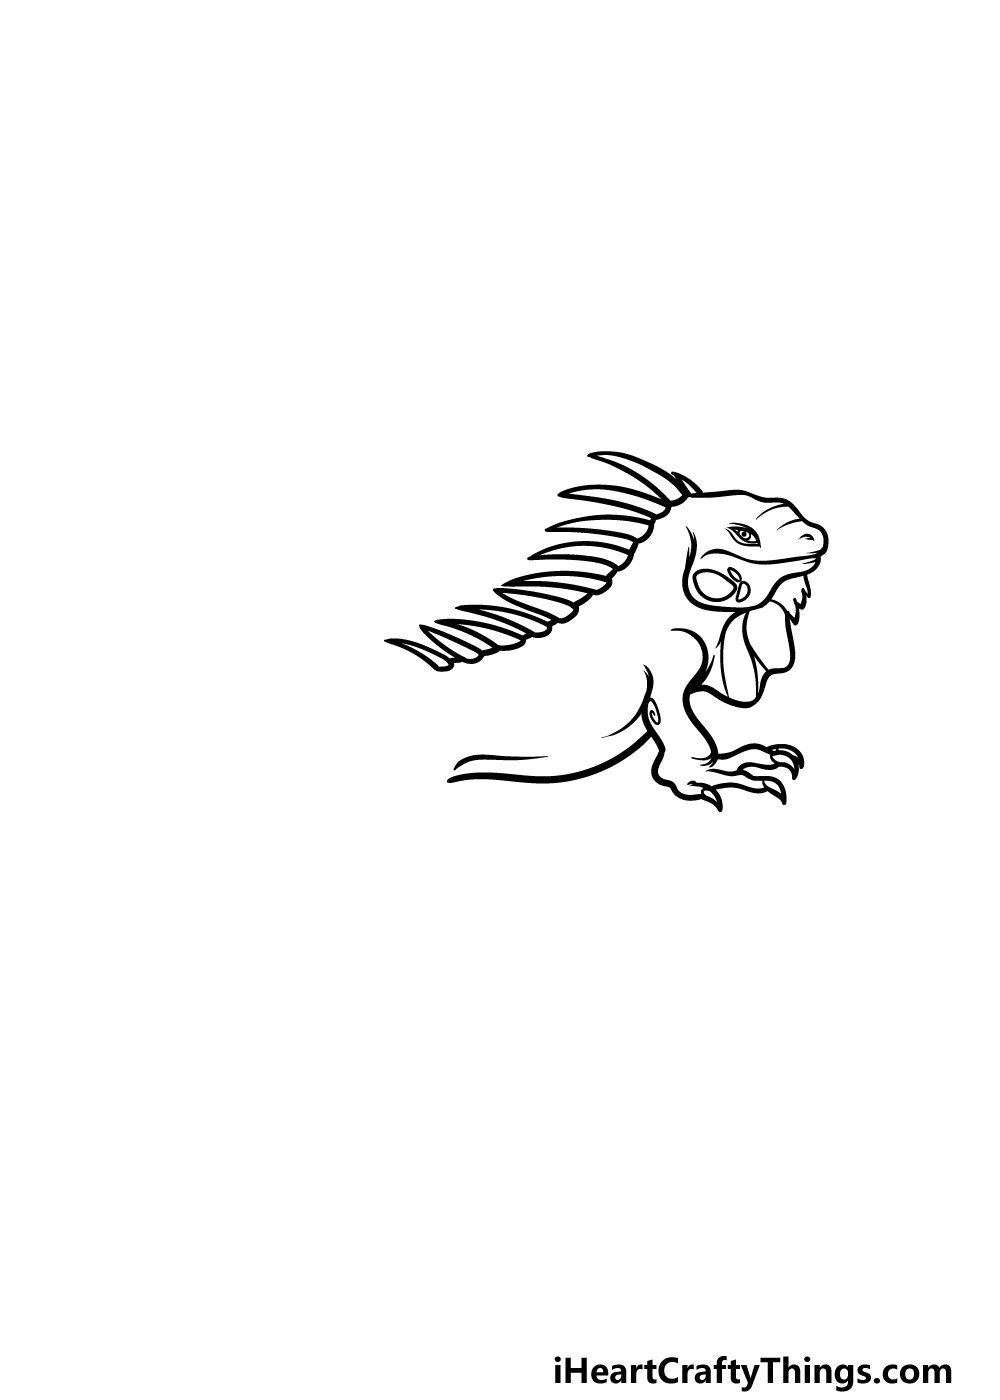
In this second step, we will draw more of the back and add the first leg of your iguana drawing.
For the back, continue what you started in the previous step by drawing more of that curved line along with some more large spikes. Then we will be drawing the first leg.
The legs on an iguana are quite short and squat with large clawed feet, so you can draw these using some similar curved lines to the ones that we drew in our example.
Add some more curved lines for the belly of the iguana, and then you can proceed to step 3.
Step 3 – Next, start the tail and draw another leg
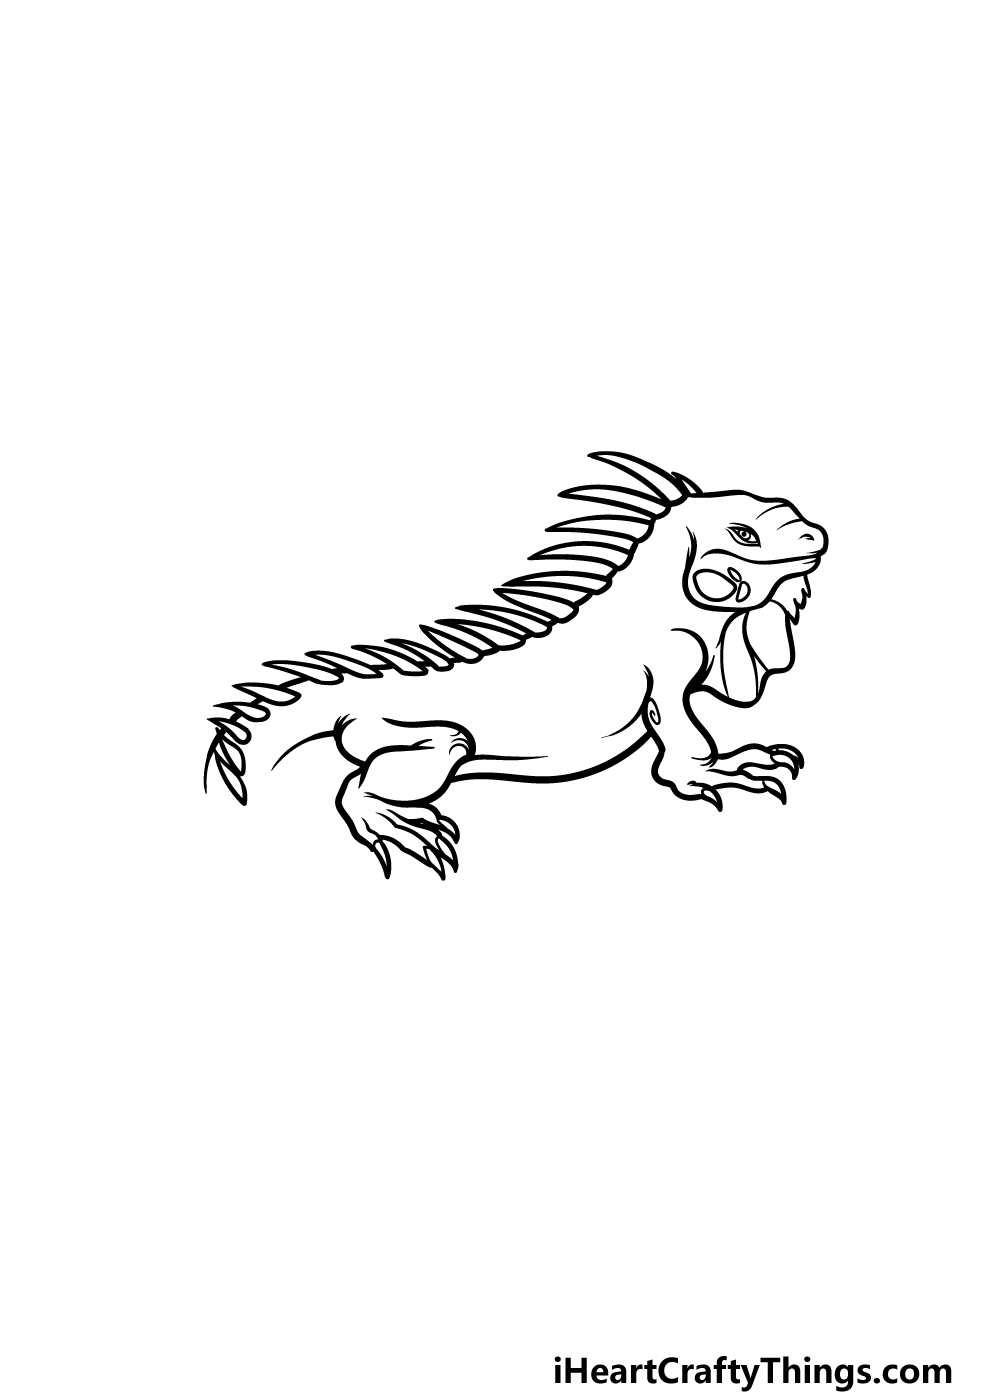
Continuing on with this guide on how to draw an iguana, we will start drawing the tail while also adding another leg.
For the start of the tail, we will continue extending the back, but now it will start curling to the side. We will also add some more spikes, but they will get a bit smaller as they move down the tail.
We will finish off the tail in the next few steps, but for now we shall finish off this step by drawing another leg at the back.
This leg will be longer than the other one that you drew, but it will still look fairly squat as it will be bent over.
Step 4 – Now, draw some more of the tail outline for the iguana
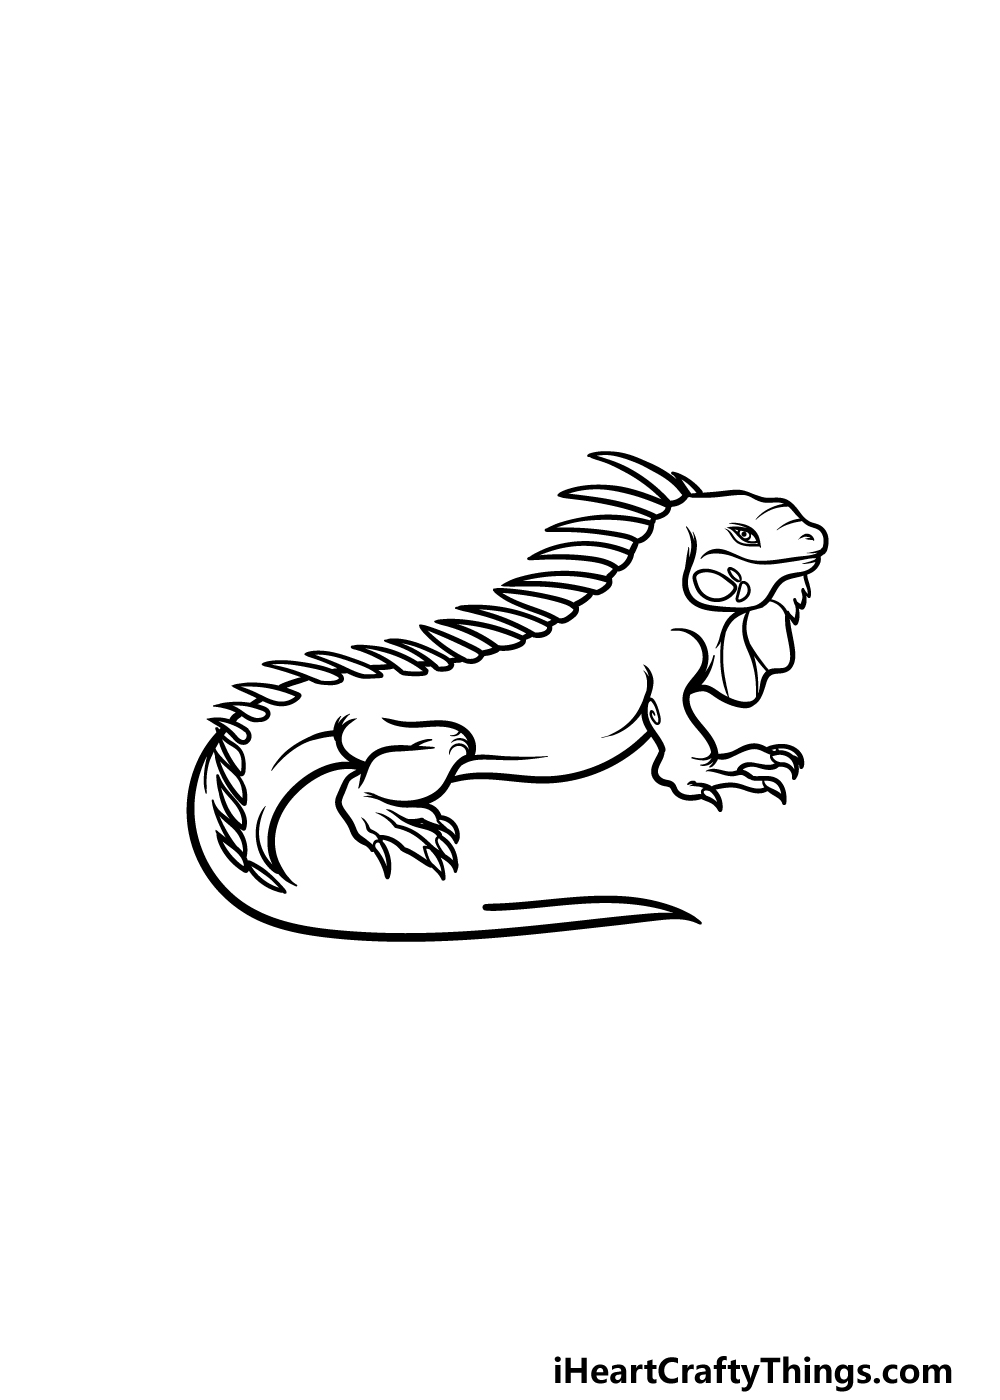
We’re moving on to the final details for this iguana drawing in the next few steps. This fourth part will see you extending the tail a bit further.
The spikes will start moving to the center of the tail instead of being on top, as this will show that it is curling over.
You can also keep extending the smooth outline of the tail until it culminates in a pointy tip. The tail will also get thinner as it moves further to the tip.
There will just be a small gap left over, but we will fill that in along with some final details in the next step!
Step 5 – Add the final details to your iguana drawing
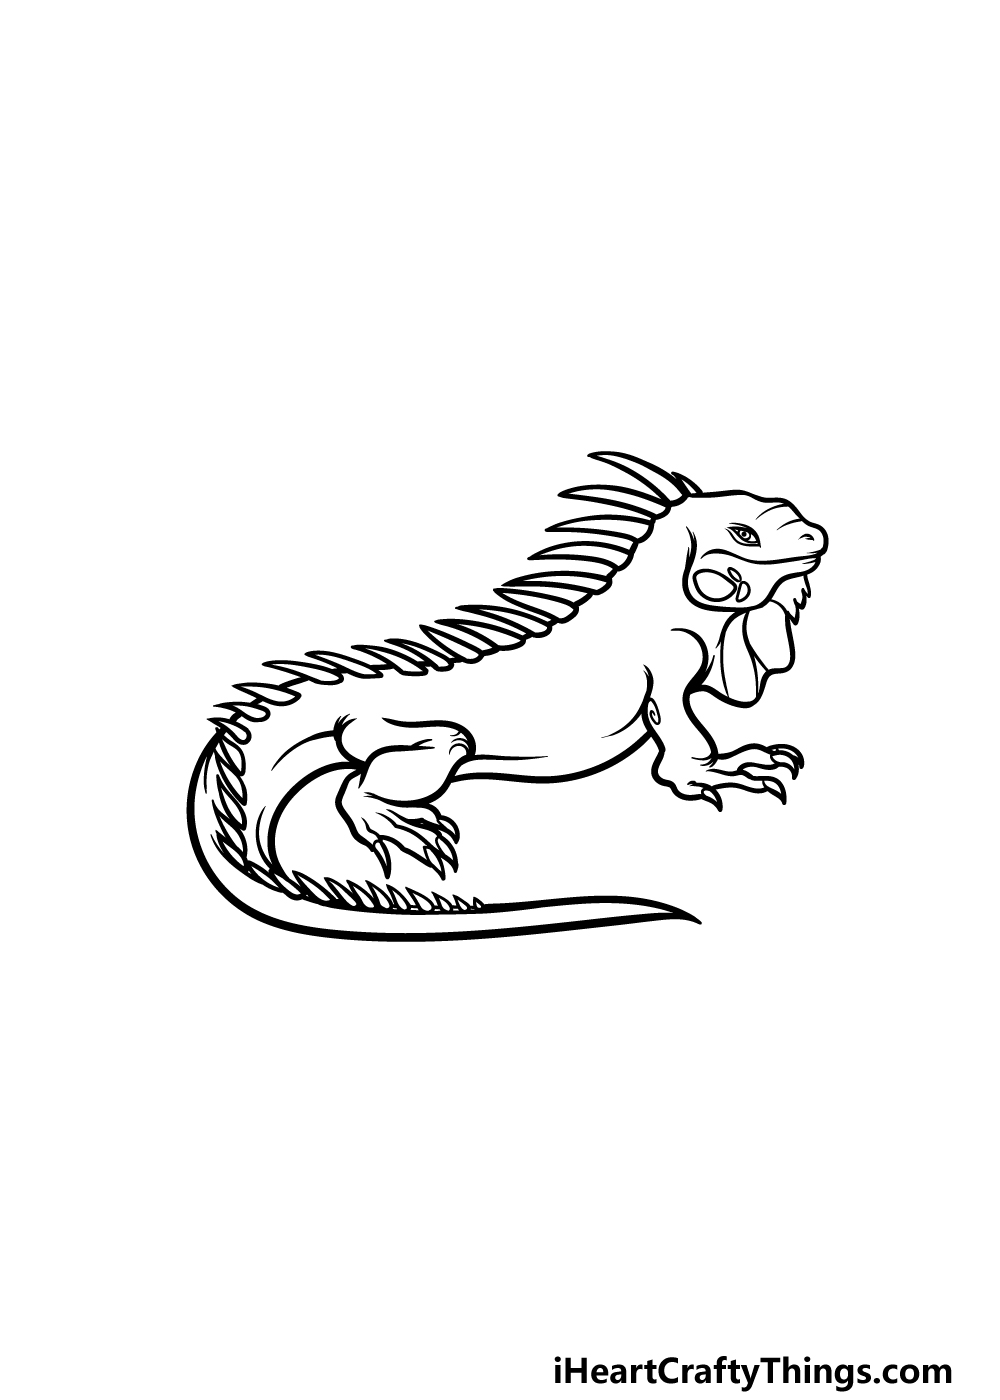
Now you’re ready to add the finishing touches and details to your image in this step of our guide on how to draw an iguana!
We mentioned a small empty space on the tail in the previous step, and you can go ahead and fill that space in now. Much like the rest of the tail and the back, this portion will have some small spikes drawn onto a curved outline.
Once you have finished off this tail, you will be ready for the final step of the guide! Before you proceed, be sure to add any additional details of your own.
One idea would be to draw a background, and you could go for something like a terrarium or a jungle setting for two options.
These are just a few ideas, so what else can you think of to add to this drawing?
Step 6 – Finish off your iguana drawing with color
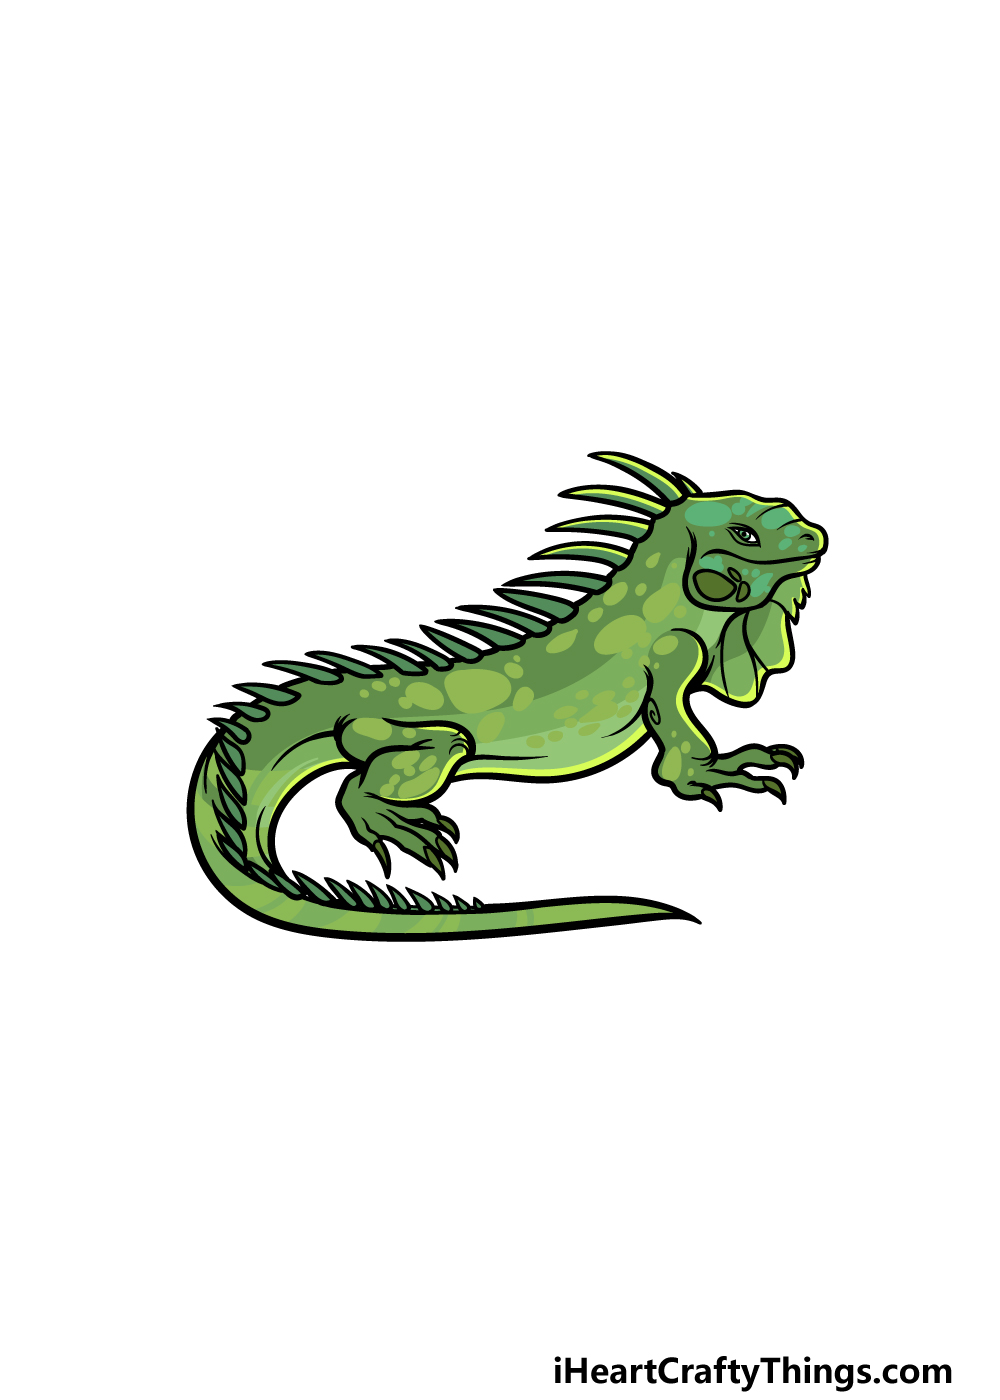
This is the final step of your iguana drawing, and in it we will be coloring your creation in.
Iguanas come in a variety of different breeds, and that means that they also have various different color schemes that they can come in.
For our reference image, we went with some bright green shades to create a striking portrayal of an iguana.
You could use similarly bright green tones for your own iguana, but there are many other options that you could go for!
If you go for bright colors, art mediums such as acrylic paints and colored markers would be great for that look.
For more muted tones, colored pencils and watercolors would be a great bet. What colors and mediums will you choose?
Here’s how you can make your iguana drawing even better…
Check out some fun tips for making your iguana sketch even better than it already is!
You did a great job learning how to create this drawing of an iguana, and now you have everything you need to add a second one for this iguana to hang out with.
All you would need to do is follow through the guide again and change a few small details, and then this little guy will have a friend! What kind of pose would you like to create for a second iguana?
If there are other small animals that you love as much as the iguana, then you could also add them to the drawing.
Even if you would not be able to keep them with an iguana in real life, they could be added!
These could include other reptiles, some amphibians, arachnids or even some small mammals.
Those are a few very general examples, but there are no wrong answers for creatures to add to the picture!
If you’ve ever owned an iguana or would like to, then you could add yourself to this iguana drawing!
This way, you could show yourself hanging out with your iguana friend or show what it would look like to do so.
The portrayal of yourself could be drawn in any style you like, and you could also base the character on someone else if you would prefer to not draw yourself.
There are all sorts of cool poses and situations you could create by adding a human character!
Every iguana needs somewhere to live, and you could show this one’s home by drawing a background for your iguana sketch! There are quite a few ways you could draw a background.
One would be to design a natural environment for the iguana in the wild. Or, you could show a setup with a tank, sand and other objects for the iguana to interact with.
The iguana would probably not say no to some insects for it to snack on, too!
Your Iguana Drawing is Complete!
You have completed all 6 steps of this guide on how to draw an iguana, and you have a great drawing of this modern prehistoric creature to show for it!
Animals like this one can sometimes prove a bit tricky to draw, so we hope that this guide showed you how easy it can be when you have some steps to follow.
When you have completed the drawing, be sure to keep it going by adding your own extra details and elements.
We gave you a few ideas that you can try, but don’t be shy to use your own ideas as well!
Please remember to check out our website for more drawing guides to enjoy! We upload new ones often, so keep checking in to never miss out.
We would be thrilled to see how your iguana drawing came out, so please share it on our Facebook and Pinterest pages for us to check out.