Without the sun burning at the center of our galaxy, we wouldn’t be here right now! Thanks to the sun, plant life can grow and our bodies are enriched by the healthy rays it gives off.
The sun is also a source of great beauty and wonder, with sunrise and sunset being the most beautiful times of the day.
Because of how useful and beautiful the sun is, it has featured in many cultures and countless artworks, leaving many to wonder how to draw a sun themselves.
This step-by-step guide on how to draw the sun will show you how it’s done!
This Sun Drawing Video Guide Should Make it Easy for You!
Pick Your Drawing Tools Before You Begin
It’s almost time to begin this awesome guide on how to draw the sun, but first we wanted to go over some of the tools you can use for this guide.
When you begin, you may have the basic tools that you’re used to ready to go. These would probably include some pencils and maybe some drawing pens, but there are others you could use.
Before we get to those, we would also recommend using a variety of pens and pencils when you draw. This could include ones of different shades and sizes.
The more varied you keep your drawing tools, the more dynamic it will look! You can also use different pens and pencils for different jobs.
For example, you may prefer darker, thicker pens and pencils for the main outlines and then lighter ones for the finer details. There are other things you can use as well.
For example, you shouldn’t feel limited to using black outlines for your drawings. You could also use colored pens to draw yellow, orange or other colors for the outlines of this sun drawing.
Using a mixture of colored and black lines can also be done to great effect, and you could be surprised with the results you end up with.
Some drawings can even be drawn using charcoal pens, but that would probably not be the best medium for this drawing. Pastels could work, however, and you could use them while still following the reference images we have for you.
As you can see, many different mediums can be used in order to make your picture even more dynamic and interesting to look at! What other drawing tools and mediums could you use to make this picture even better?
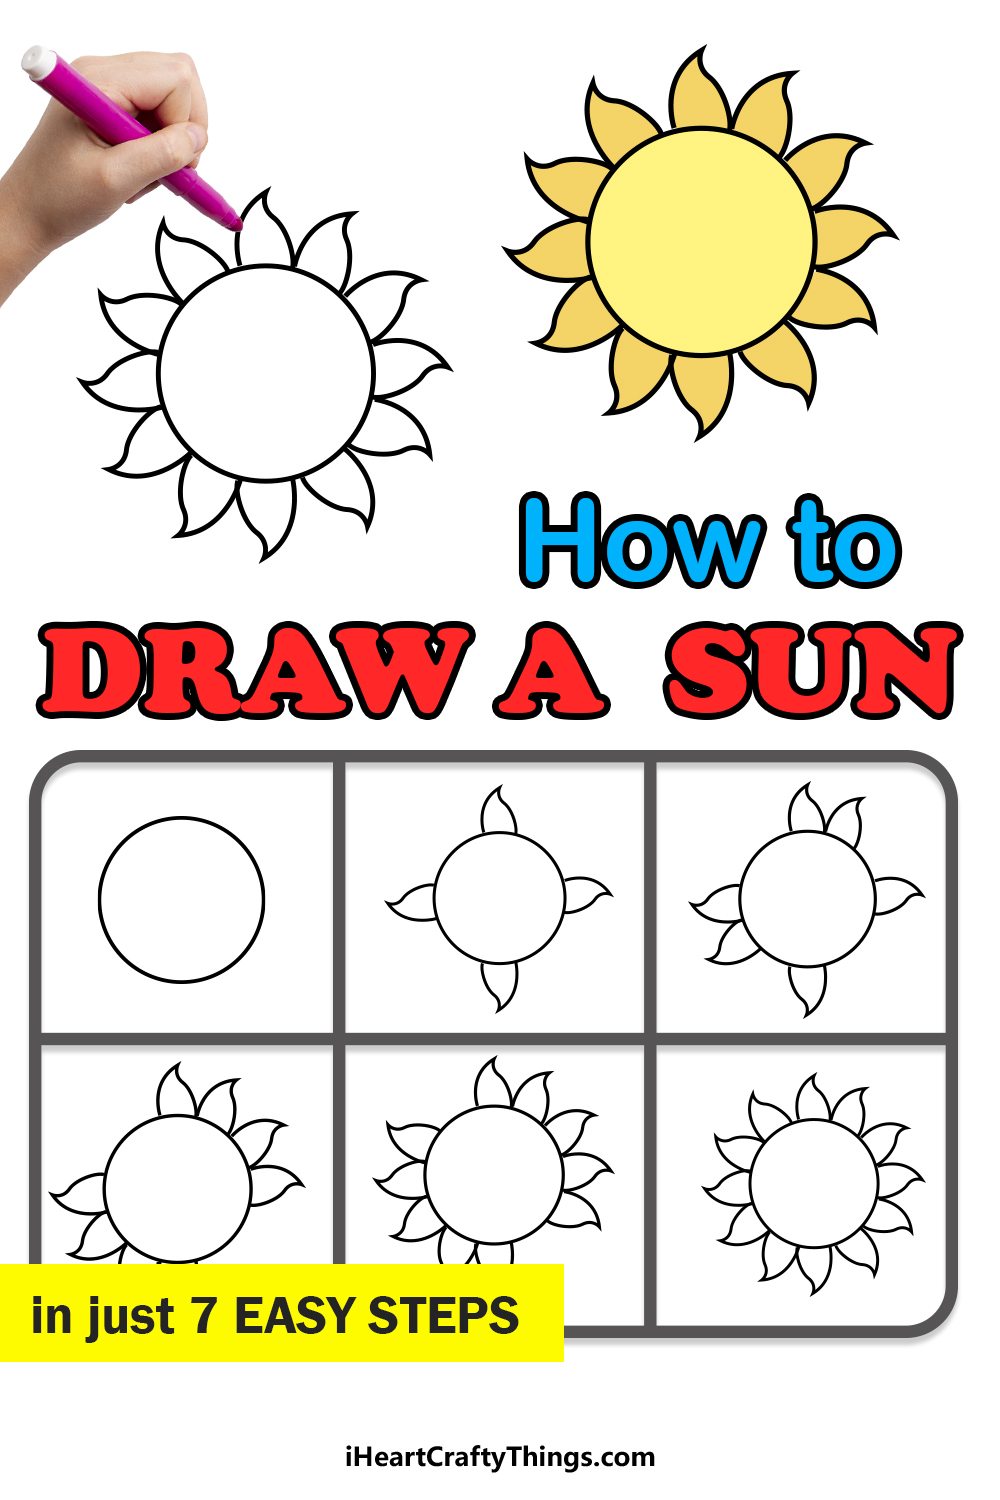
How to Draw The Sun – Let’s Get Started!
Step 1

The first step of this guide on how to draw the sun should be an easy one! All you need for this step is to draw a circle that will form the center of your sun.
For this circle, you’ll want to try and make sure that it is as close to a perfect circle as possible.
The easiest way to do this is to use a tool such as a drawing compass, as that allows you to easily create a perfect circle.
If you don’t have a drawing compass handy, you could trace around something round and flat as the next best option.
Step 2 – Start to draw the sun’s rays
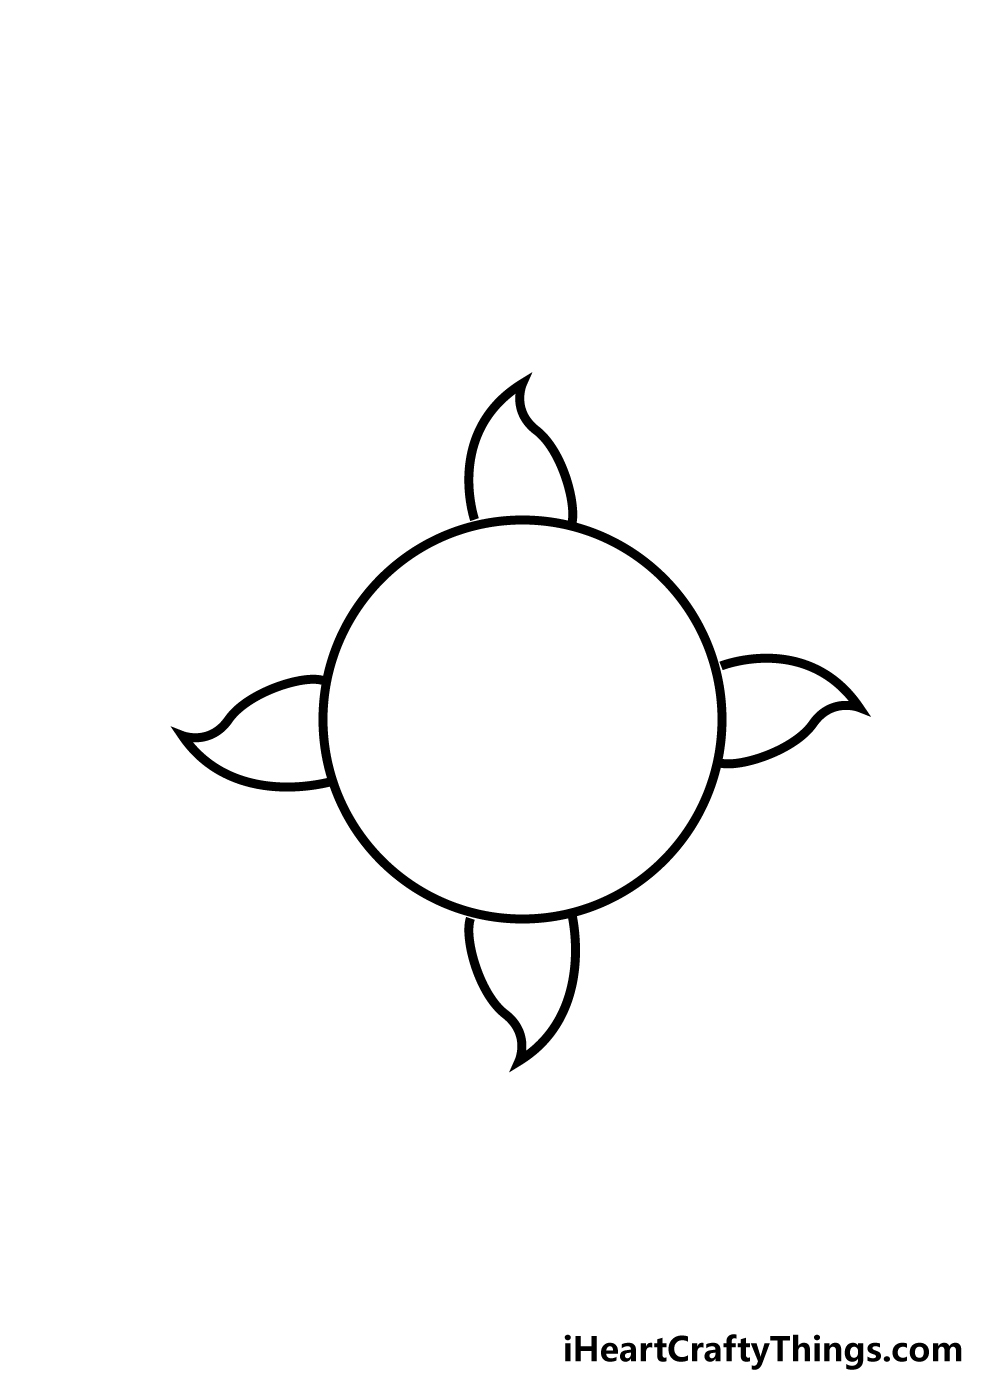
In this second part of your sun drawing, we shall start to draw the sun’s rays coming out from the center.
If you can get the hang out of drawing these rays now, you’ll be set for the rest of this guide! To draw these rays, create a shape that has curved lines on the sides that meet at a sharp point.
That sharp point should point to the right each time. For this step, simply draw four rays: one on the top, one on the bottom and one for both the left and right sides.
If it makes it easier, you can think of it as each ray at each point of a compass. Once you have those drawn, we’re ready to add more!
Step 3 – Continue adding rays to your sun drawing
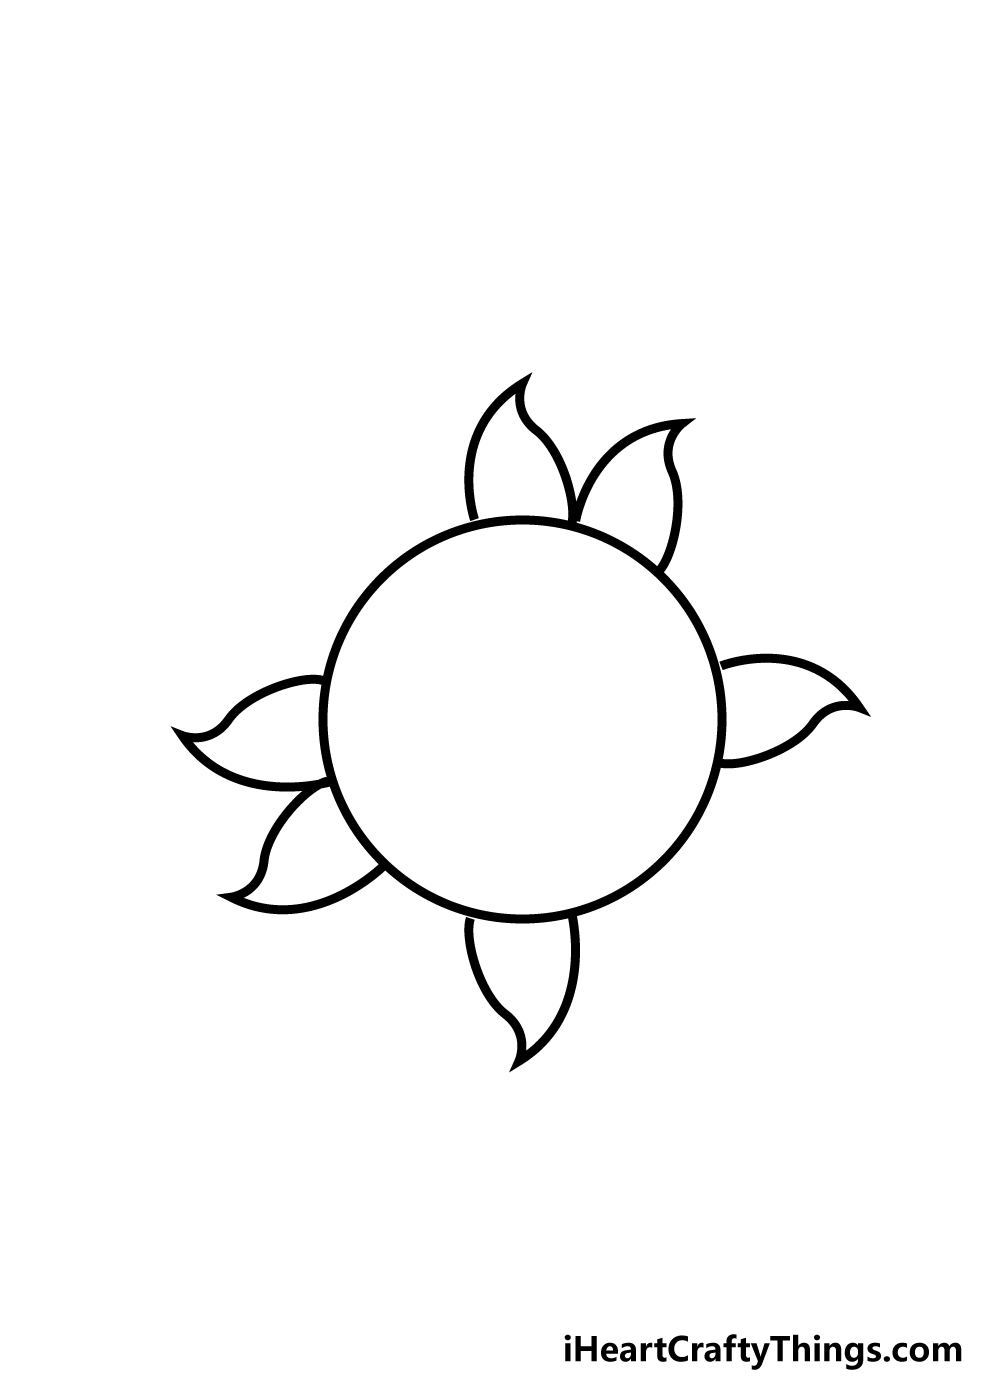
We will be adding more rays for the next few steps of this guide on how to draw a sun. after the previous step, you should have no problem drawing these rays!
Remember to have them pointing to the right as you draw them.
For this step, draw one ray to the right of the North ray. Then, simply add one under the ray on the West side of your sun drawing.
Step 4 – Keep building on your sun
You know what to do for your sun drawing now! We will continue to add rays to the sun for now.
We shall just add two for now, and they will fill in the gap between the bottom ray and the one that you drew on the left last time.
The other will fill in the gap between the top rays and the one on the right.
Be sure to refer to the reference image if you get stuck!
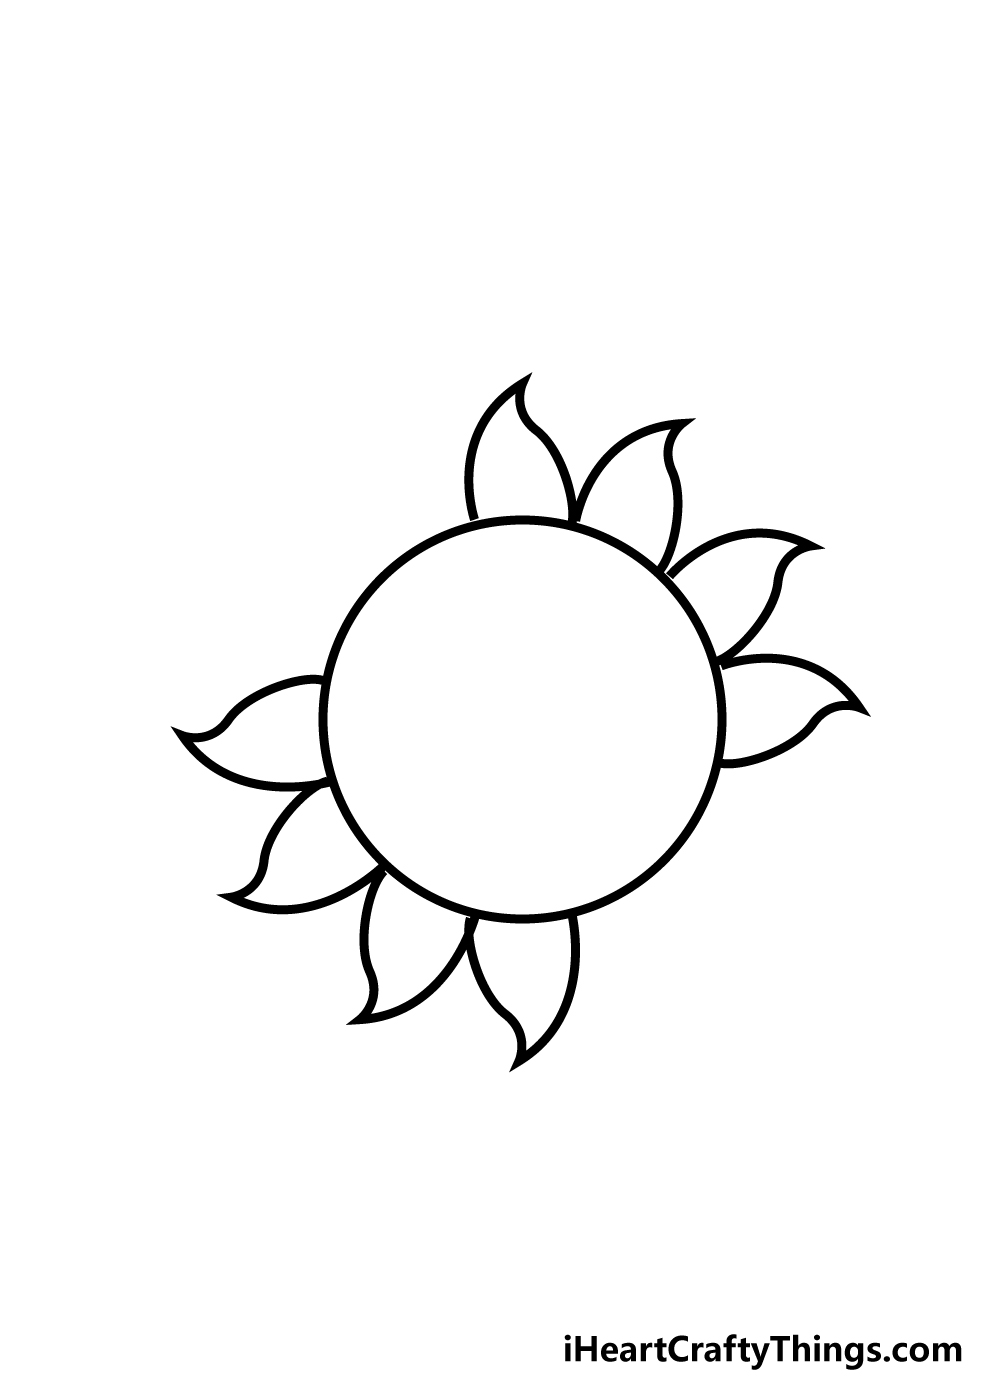
Step 5 – Draw some more sun rays

This fifth step of our guide on how to draw the sun is no exception to the last few steps, as we will continue to add two more rays.
These rays will go into the space on the upper left side of the sun, with the other going into the lower right section. That just leaves a small gap on each side, but we will be filling that in shortly!
Step 6 – Finish off the final sun rays

You probably know where this is going by now! For this part of your sun drawing you can finally add the last rays to your sun.
As you may imagine, they will go into the last two spaces left on your sun.
Once you have filled in these final rays, you should be sure to add any extra details that you would like before you move on to the final step!
This could be a background, such as a nice beach below the sun, or something fun like sunglasses and a face onto the sun.
These are just two out of many ideas that you could go for, so how do you think you will finish up this drawing before the final step?
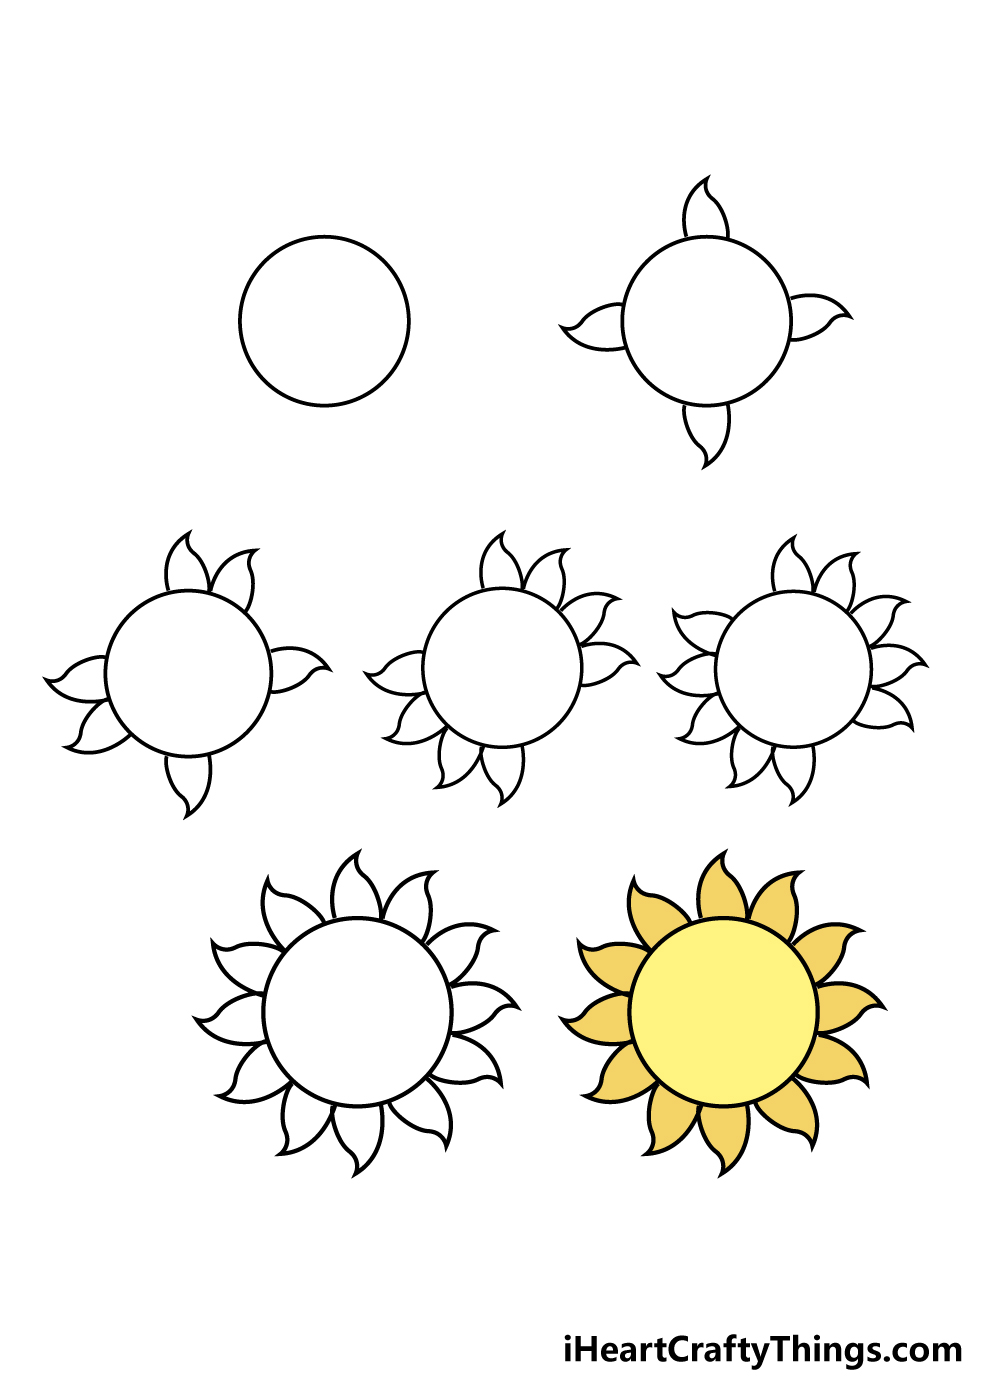
Step 7 – Finish off your sun drawing with some color

The sun is the brightest thing in our galaxy, so it seems fitting to use some lovely bright colors for the final step of this guide on how to draw the sun!
This is a step where you can really let your creativity run wild as you color in. You can create a wonderful explosion of color for your sun, and you can make it even more dynamic by using mixtures of reds, oranges and yellows.
For a picture such as this, it can look really great to use paints to color in. These could be anything from acrylic paints for a brighter finish to watercolors for a more muted look.
Paints would be especially great for this image, as you can mix colors together and smudge them into each other to create a color mix for your sun. Pastels would also be great for this image, but anything you use will be amazing!
Which art mediums will you use for your sun drawing?
Here’s how you can make your sun drawing even better…
Let’s shed some light on how you can make your sun drawing shine even brighter!
This sun sketch you have created is already looking bright and beautiful, but there is always a way to make a drawing even better!
The first way that we will cover in these tips will be to use some smaller details for the sun itself.
In the guide, we recommended that you could draw some sunglasses and a face, but there are other details you could go for as well. These could include clouds or some wavy rays coming down from the sun!
We also briefly touched on adding a background in the guide, but we always love to recommend adding backgrounds to any scene.
You could have this sun over any kind of environment you like, and the setting you choose will also give you the opportunity to use any other colors you like. What are some scenes you can think of?
In this guide on how to create a drawing of a sun, we chose a pleasing, cartoony style for the sun.
We think that this style looks great, but there are many other styles you could choose for this picture.
You could go for a more realistic style, or you could make it even more exaggerated and stylistic! It’s really up to you, and you can also create multiple different drawings that explore different ideas and styles that you can think of. What other styles can you draw this sun in?
Lastly, playing around with colors and art mediums is a great way for you to make a drawing look even more incredible.
We mentioned using paints in our guide, but you can also try out colored pens, markers or other mediums you may have at hand.
Different mediums are good for different textures, moods and styles, so it really depends on you and what you want for this picture.
Don’t be afraid to experiment with mediums you are not as familiar with as you figure out how you want this one to look.
Your Sun Drawing is Complete!
You have reached the end of this guide on how to draw a sun, and you have a great drawing to prove it!
We really hope that this guide showed you how you can create a wonderful sun image by breaking it down into steps and slowly adding on to it.
Now that you have finished this drawing, you should let your creativity flow as you finish it off! Will you draw a background or extra elements for it?
Perhaps you could experiment with awesome art mediums as well! We can’t wait to see what you do.
Please remember to check out our website often, as we will be uploading more awesome guides constantly.
We would also love to see your finished sun drawing, so please share your amazing artwork on our Facebook and Pinterest pages for us to admire!
We look forward to seeing your incredible creativity on display.
Here Is A Cute Sun Drawing To Inspire You!

We all see the sun every day, so it’s easy to take it for granted. Our artist Freddy has made this cute sun drawing for kids to give the sun its spotlight!
This drawing is to help to get your creative juices flowing with some extra inspiration.
You can see that Freddy added a lot of small details to the drawing as well, and these make it more visually interesting.
He didn’t keep the focus on just the sun, as he also added some minor background elements beneath the sun. This makes it look as if the sun is shining down on some kind of landscape.
You could change and add to this part of the drawing to make it look like the sun is shining on a specific place. Where would you choose as the setting of this drawing?