The time that the dinosaurs ruled the earth is a fascinating time of history that we still know relatively little about.
Dinosaurs have really managed to capture our imaginations, and there are many different interpretations about how they may have looked and acted.
Many people have a favorite dinosaur, and the stegosaurus is a common favorite thanks to the unique look this dino sports. For this reason, many people like to learn how to draw a stegosaurus.
For people who love this unique dinosaur, this will be a tutorial they will definitely want to see all the way through!
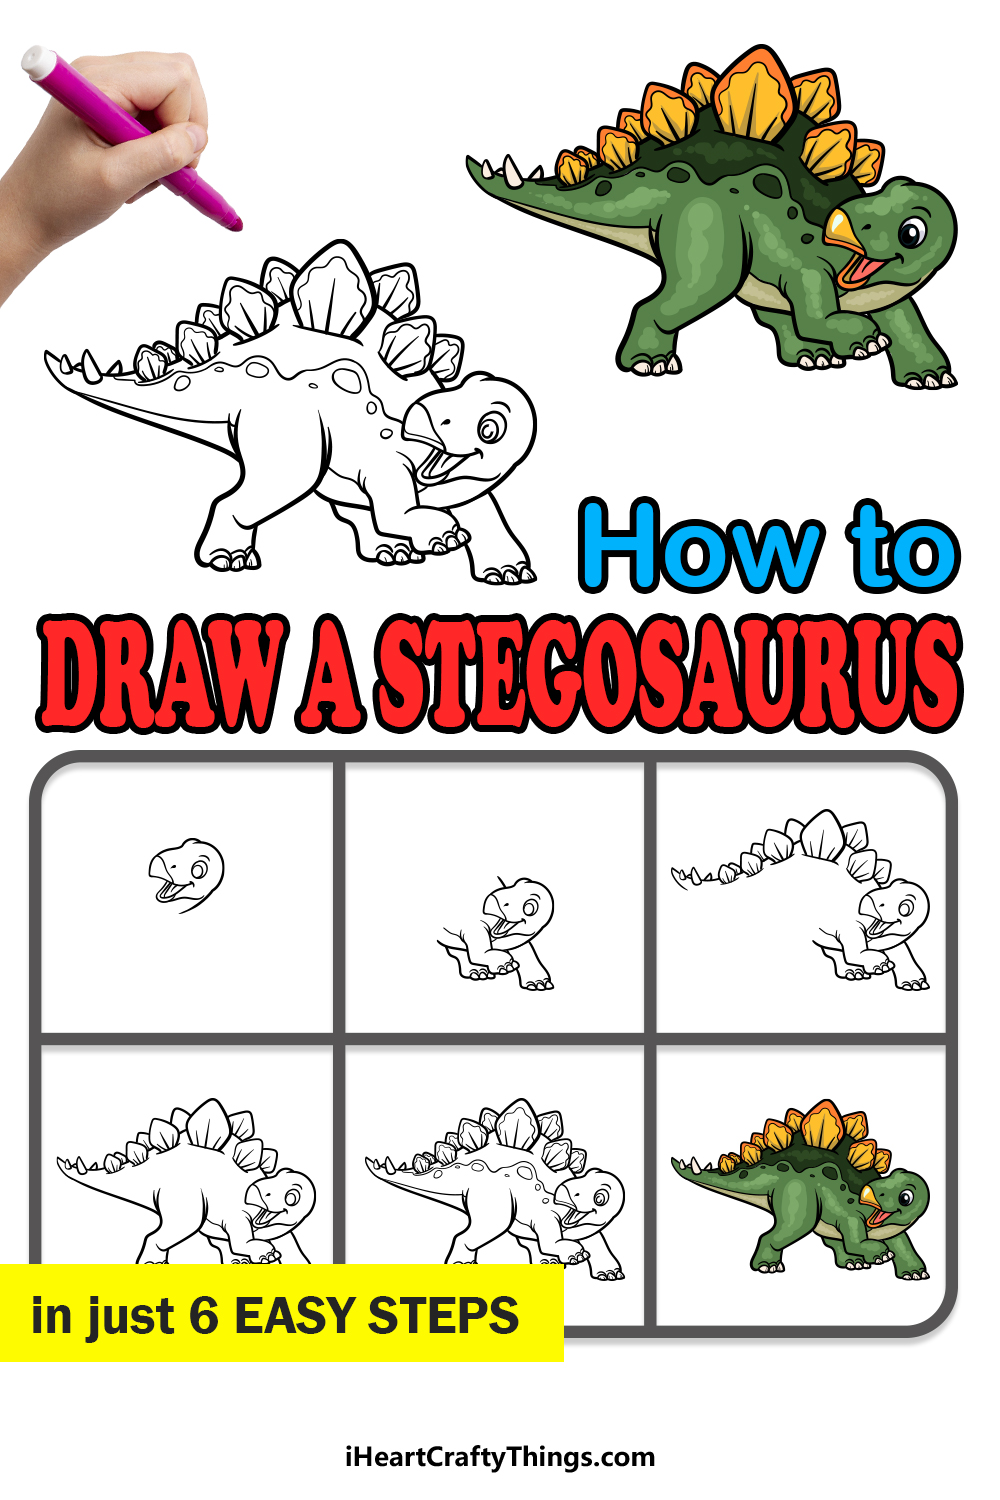
Our step-by-step guide on how to draw a stegosaurus that we have prepared will show you how you can create an adorable representation of this awesome dinosaur!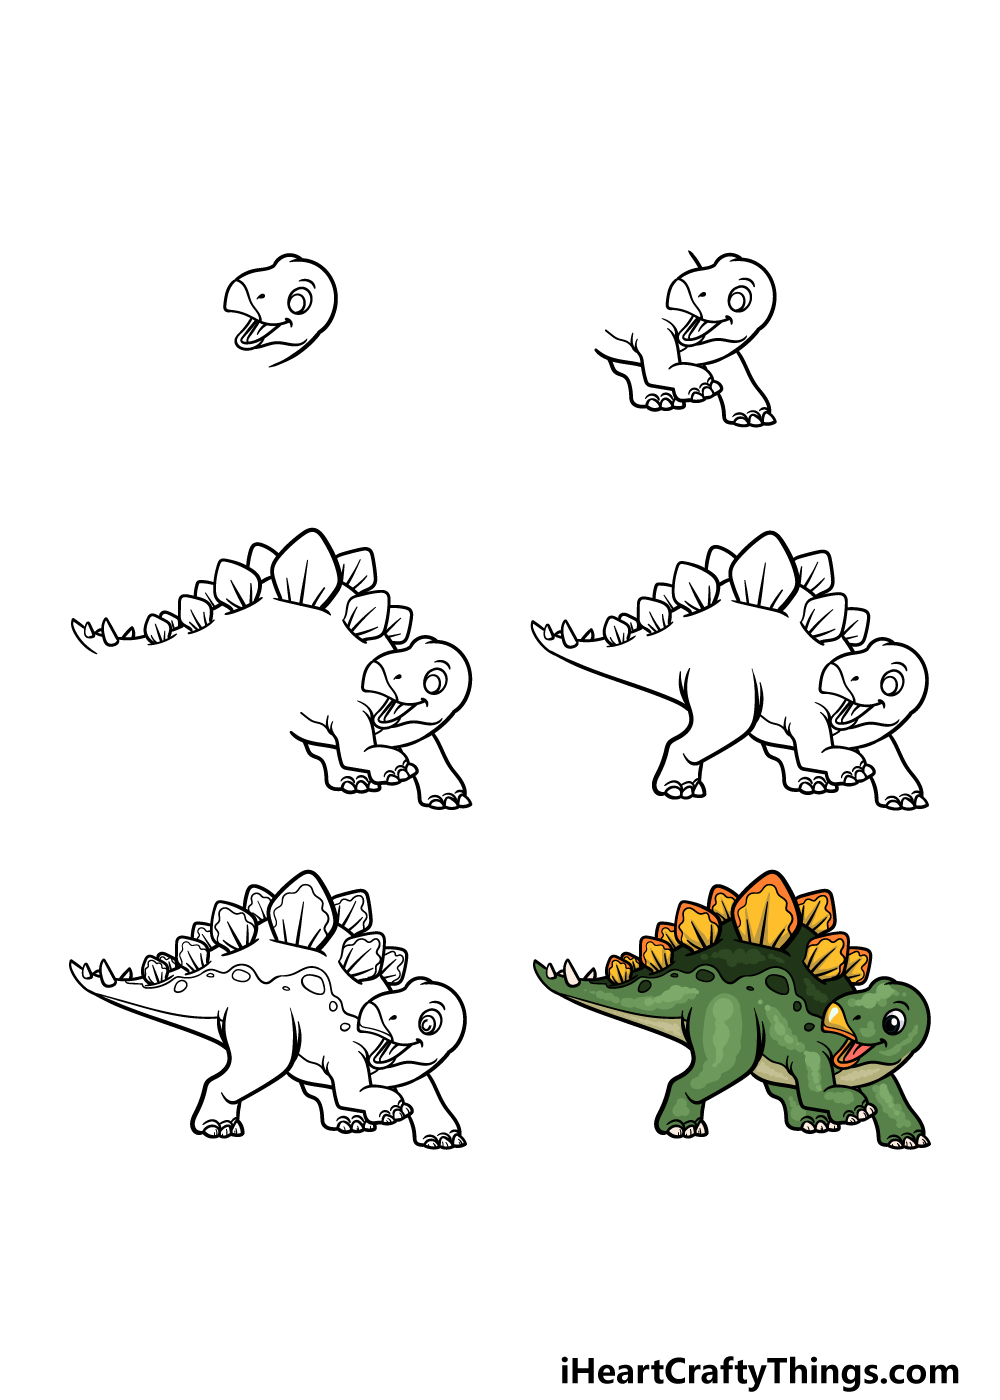
How to Draw A Stegosaurus – Let’s Get Started!
Step 1

In this first step of our guide on how to draw a stegosaurus, we will begin with the head and the neck of the dinosaur in this first step.
First, draw a circular shape for the eye of the stegosaurus, and then draw another smaller circle inside of it.
Then, we will be using some curved and rounded lines for the rest of the head and face outline. The top and back of the head will be rather smooth, whereas the mouth will have a pointy tip at the end.
The portrayal we’re making in this guide will be cartoony and cute, and for that reason we will give this stegosaurus an adorable smiling mouth before moving on to step 2!
Step 2 – Now, draw the first legs for the stegosaurus

The stegosaurus walked on four legs, and for this reason all four of its legs were quite short and stocky.
We will be drawing the first three of these legs in this second step of the guide.
The legs are not very long, and they will be bent in certain ways to make it look like this stegosaurus is running and playing.
At the end of each foot there will be some large, rounded toenails. Then you will be ready for step 3 of the guide!
Step 3 – Draw the blades on the back of the stegosaurus

Perhaps the most recognizable physical trait of the stegosaurus is the rows of sharp blades that lined its back.
These are what we will be adding in this step of our guide on how to draw a stegosaurus. They will each be drawn with a rounded line that had a curved tip at the top.
Each one will be a different size, so try your best to copy them as they appear in our reference image! Try to position them so that the back of the stegosaurus is somewhat curved as well.
Step 4 – Next, draw the rest of the outline for the legs and tail
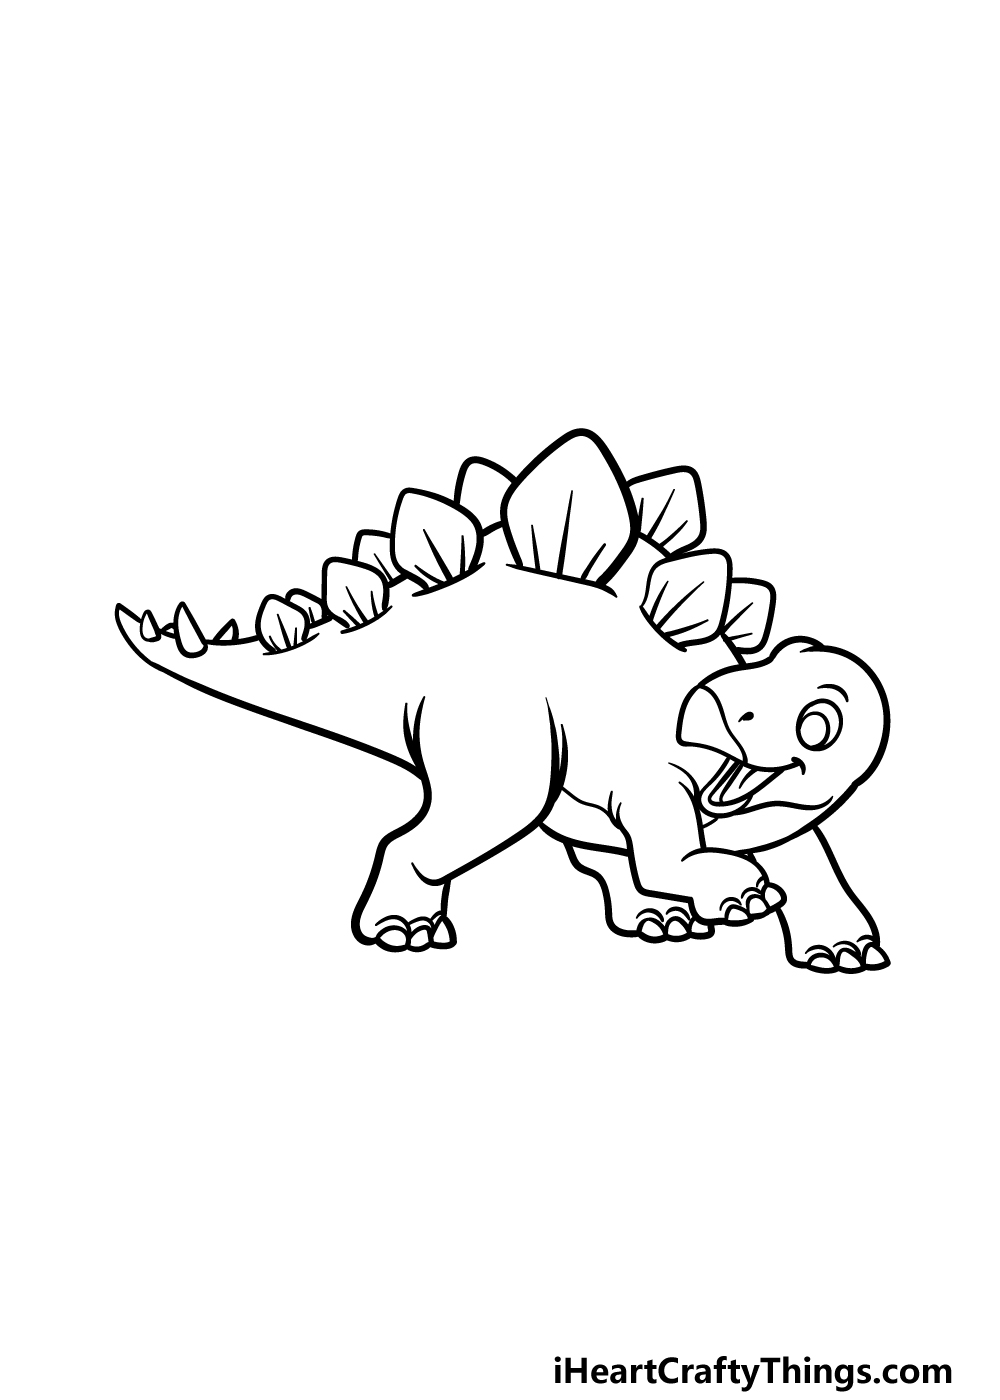
This step of your stegosaurus drawing will see you adding the rest of the outlines for the final leg and the tail. First, use a fairly straight line for the underside of the tail.
We will then be drawing the back leg, and this leg will have a wide, rounded base that gets thinner as it goes down.
It will also be bent slightly, and it will have similarly rounded toenails to the ones on the other legs that you have drawn.
Once all of these outlines are complete, you will be ready for some final details in the next step!
Step 5 – Add the final details to your stegosaurus drawing
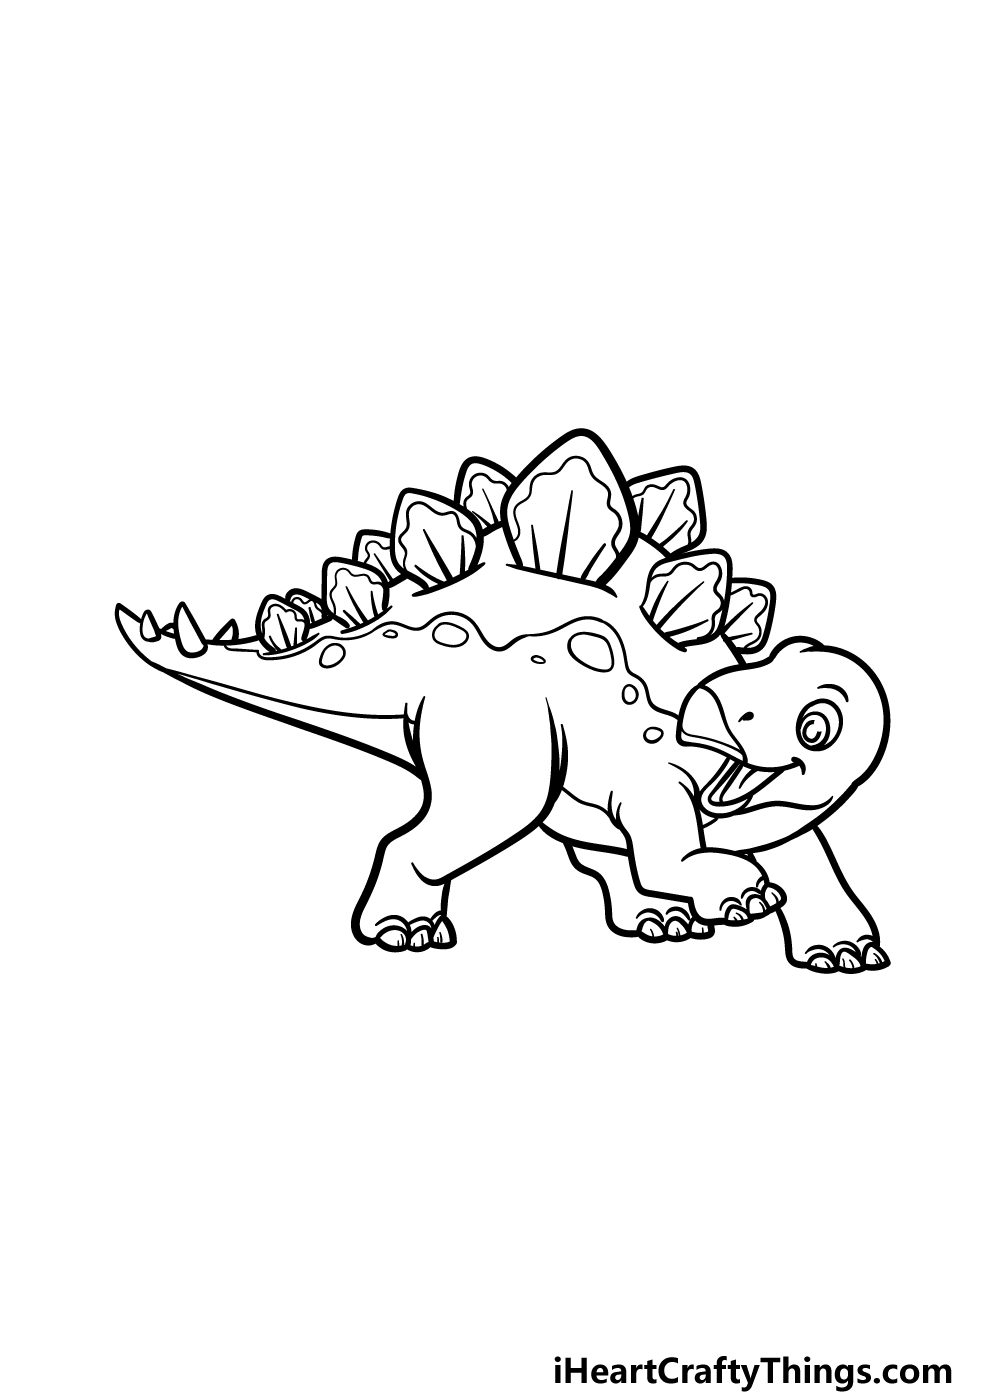
Now you’re ready to finish up some final details and elements before the final step of this guide on how to draw a stegosaurus!
First, we added some wavy lines to the inner outlines of each blade on the back to give them some more definition.
Then, we draw another wavy line across the back, and then we added some small circular shapes along this line.
Finally, we finished off the design by adding some small line details to areas such as the eyes, mouth and toenails.
When finishing off your own stegosaurus, you could also add some additional elements as well!
Drawing a background would be a fun way to do this, as you could design an awesome pre-historic background. What cool details will you add to make this picture even better?
Step 6 – Finish off your stegosaurus drawing with color

This is the final step of this stegosaurus drawing, and in it we shall finish up with some colors!
Scientists have tried to determine what dinosaurs may have looked like exactly, but the truth is we won’t know for sure unless someone invents a time machine!
For that reason, you have many different options for how you could go about coloring this image.
In our reference image, we used various shades of green for the body while incorporating some lovely yellows for the blades on its back.
These colors look great and you could use similar ones for your own drawing, but you should also feel free to use any of your favorite colors when completing this adorable stegosaurus!
What colors, art mediums and techniques will you use to finish up this picture?
3 More tips to make your stegosaurus drawing easy!
Find out how you can make this stegosaurus sketch much easier with these tips.
As you can see, this drawing of a stegosaurus that we created together was drawn in a fairly cartoony style. Despite this, it is still rather detailed, and it can be easy to get lost in these details.
If you find these details to be hard to draw, then you could make it easier by removing or simplifying some of these details.
This could include osme of the pattern details on the stegosaurus’s back or the texture details on the spikes. Any details that are causing you hassles could easily be removed or changed, however.
You should probably try to limit the amount of details you remove, but a few removed will still maintain the look and design of the drawing.
Another way you could make this stegosaurus drawing easy to complete would be by altering the style it appears in. As we mentioned, the current design is very cartoony yet detailed.
There are a few ways that you could alter the design a bit. One would be to make it even more cartoony and simple in design.
You may actually find drawing more detailed and realistic drawings to be easier, so you could go that route if it’s something you would find easier to do.
The final way we have to make your stegosaurus sketch easier would be to consult other drawings and references of the stegosaurus. This could be done no matter which style you chose for the stegosaurus.
If you searche online, you will find many different depictions of the stegosaurus done in all kinds of styles.
If you search hard enough, you may even find some images showing a stegosaurus in a similar pose to the one we showed in our example.
Not only could this make the drawing easier, but it could also help if you wish to draw this stegosaurus in a different art style as we suggested prior.
Using these extra images can make the details and proportions much easier to draw!
Your Stegosaurus Drawing is Complete!
The stegosaurus is one of the most incredible dinosaurs ever discovered, and we hope that it was fun for you to recreate one in this guide on how to draw a stegosaurus!
Even though this design was a bit more stylized, we wanted to ensure that it would be easy and fun for you to work through.
As long as you follow all of the steps we laid out and try your best then we know you will get the hang of it!
Then you can take over and show us how it’s done as you finish up with your own incredible details and ideas!
There are so many cool ways that you could personalize this image, and we can’t wait to see how you go about finishing up the picture with your own touches.
This amazing drawing guide is one of many more that we have waiting for you on our website! Be sure to visit us there, and make sure to check in often to make sure you never miss out.
Then, we hope you will go ahead and share your finished stegosaurus drawing on our Facebook and Pinterest pages for us to see!