Starbucks is one of the most recognizable and popular companies in the world.
Known primarily for their chains of coffeehouses, they have also branched out into food, sweet treats and other delectable beverages.
Starbucks products and branches can be found worldwide and feature many products to enjoy.
Learning how to draw a Starbucks can be a great way to imagine what your very own beverage from the company may look like!
If you would like to know how you can design your own Starbucks product, then this should be the perfect guide for you.
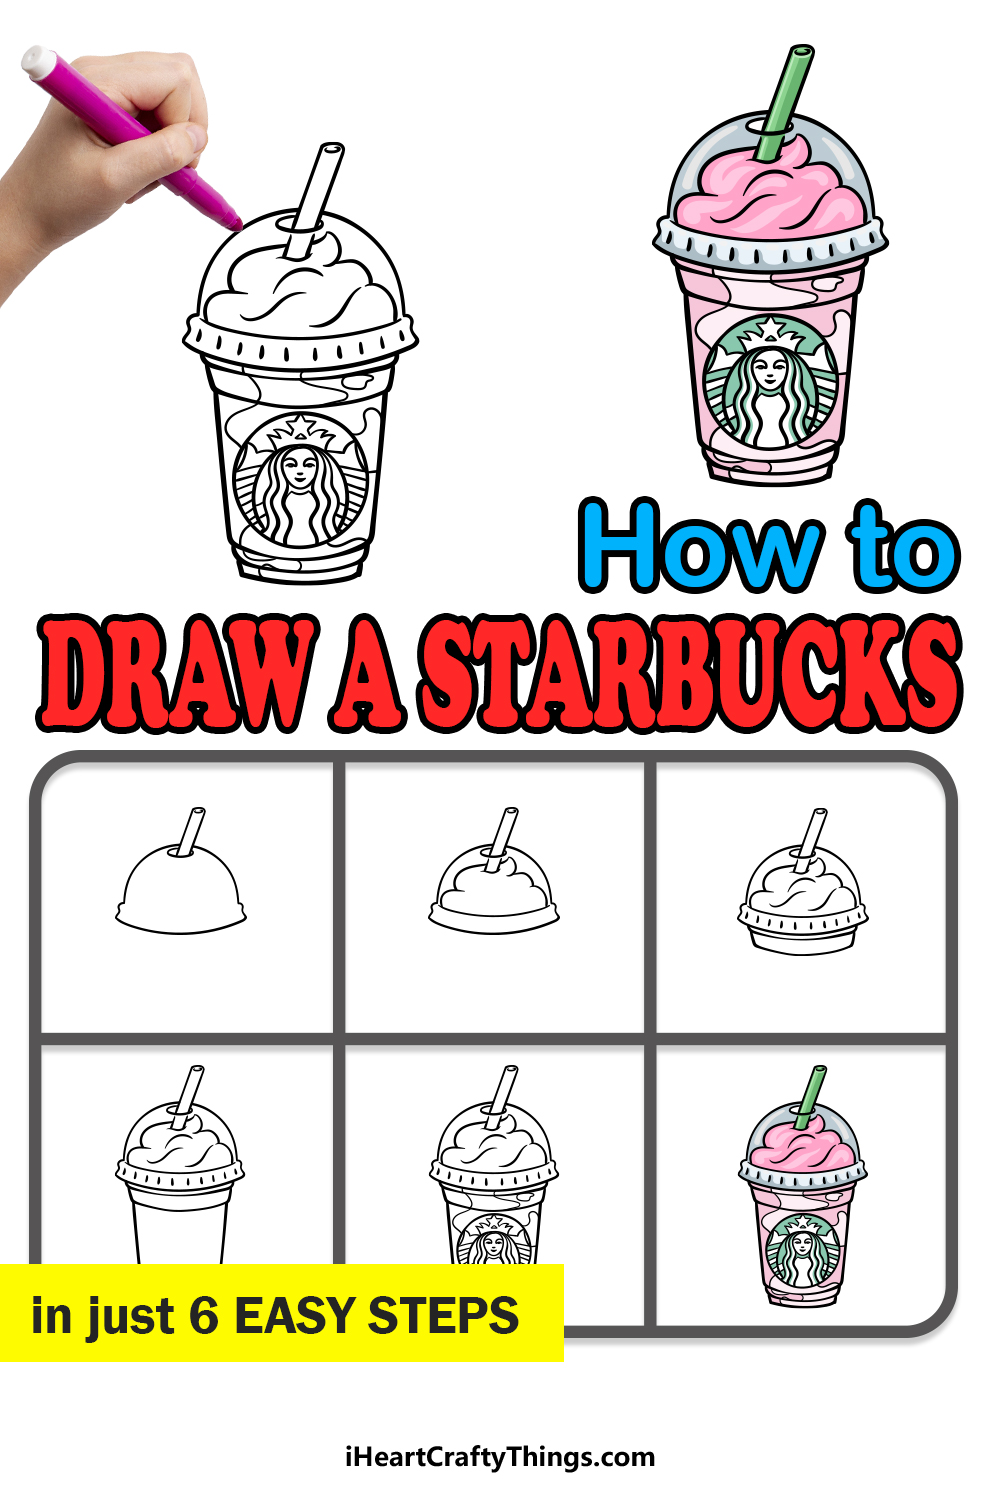
This step-by-step guide on how to draw a Starbucks will show you how to go about doing this so you can end up with your very own beverage design!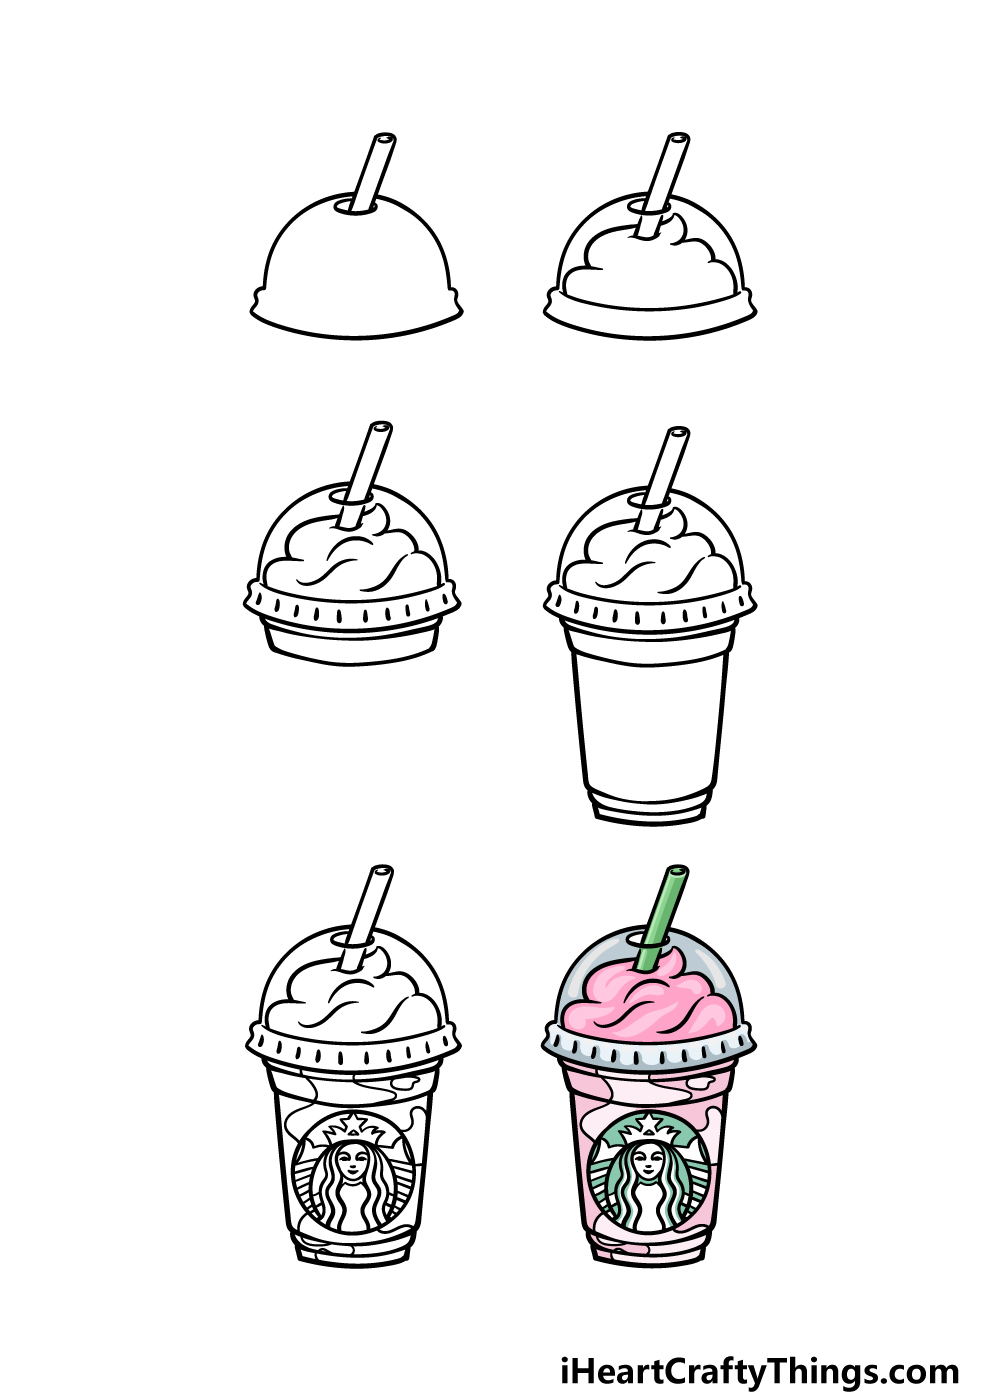
How to Draw A Starbucks – Let’s Get Started!
Step 1
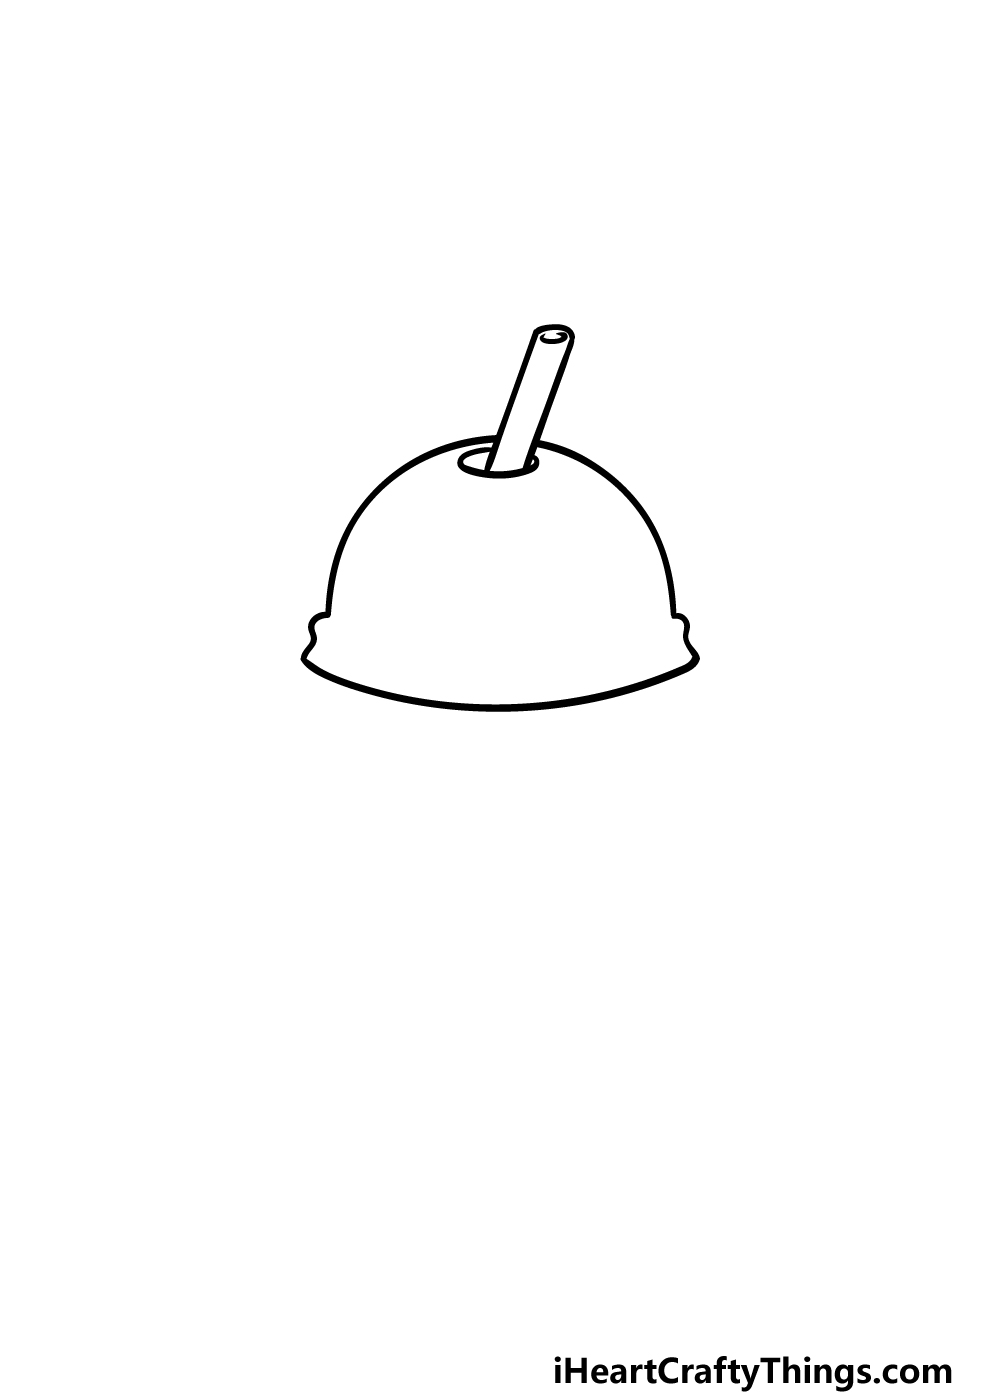
In this guide on how to draw a Starbucks, we will be creating one of their delicious smoothie products. These smoothies come in a clear, plastic cups that have a dome over the top of them.
You can follow this guide exactly as it appears if this is the kind of product you would like to create. If you would like to draw, for example, a coffee cup from Starbucks instead then you can skip to step three and not draw the domed top.
If you would like to do this then we will talk more in that step about how you could draw a coffee cup instead.
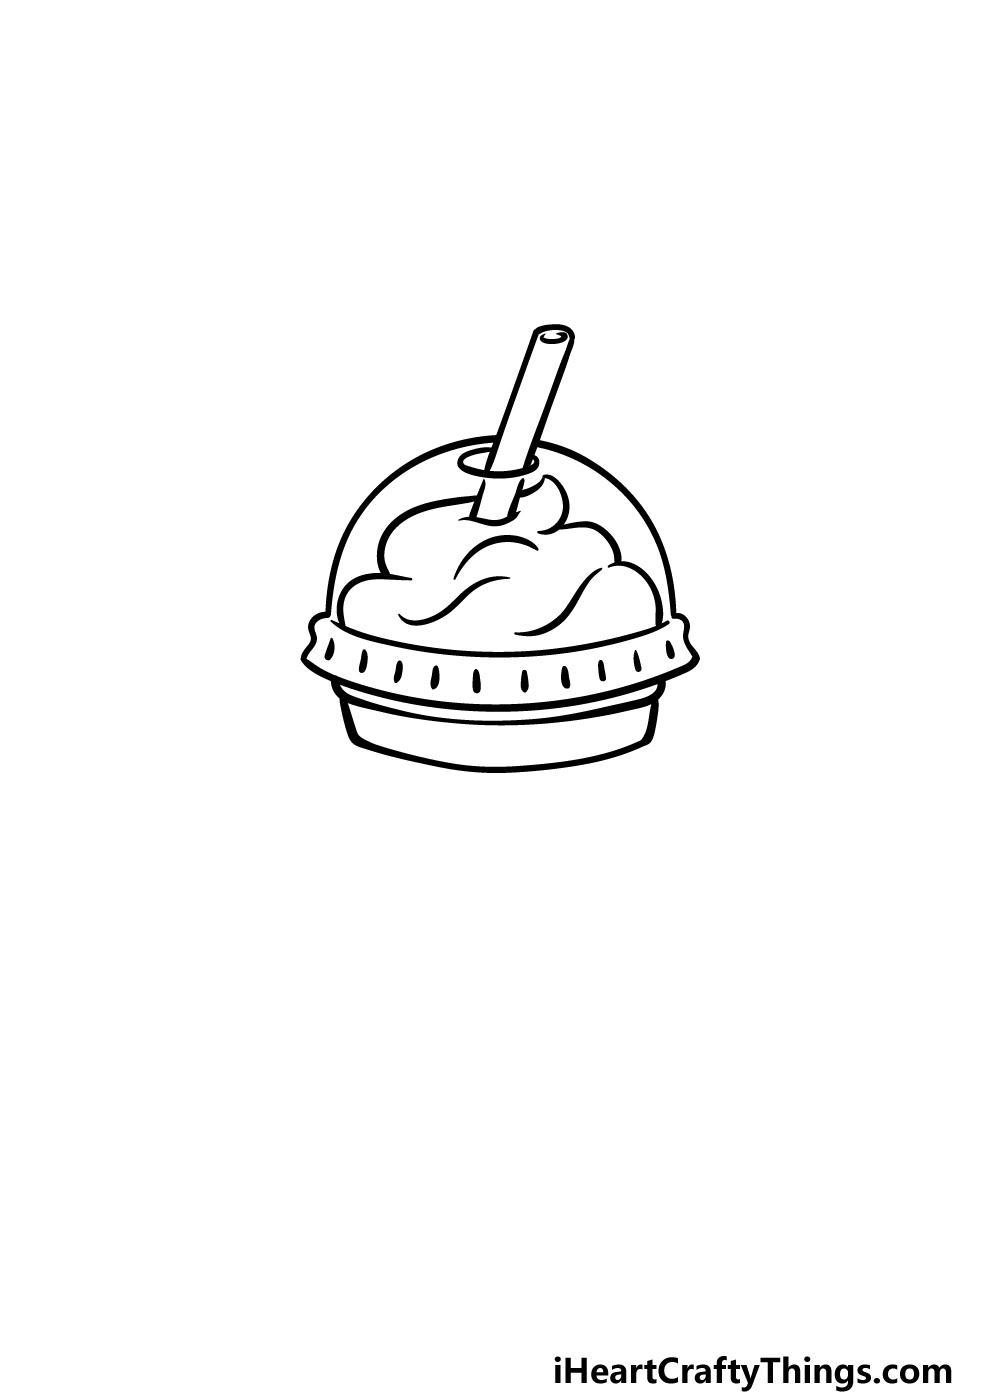
For now, use some curved lines to draw the domed lid of the cup. There will be a small hole at the center-top of the lid, and you can then use some straight lines to draw a straw poking out of it.
Finish off by drawing a rounded base to the lid, and then we can move on to step 2.
Step 2 – Now, draw the smoothie inside of the cup
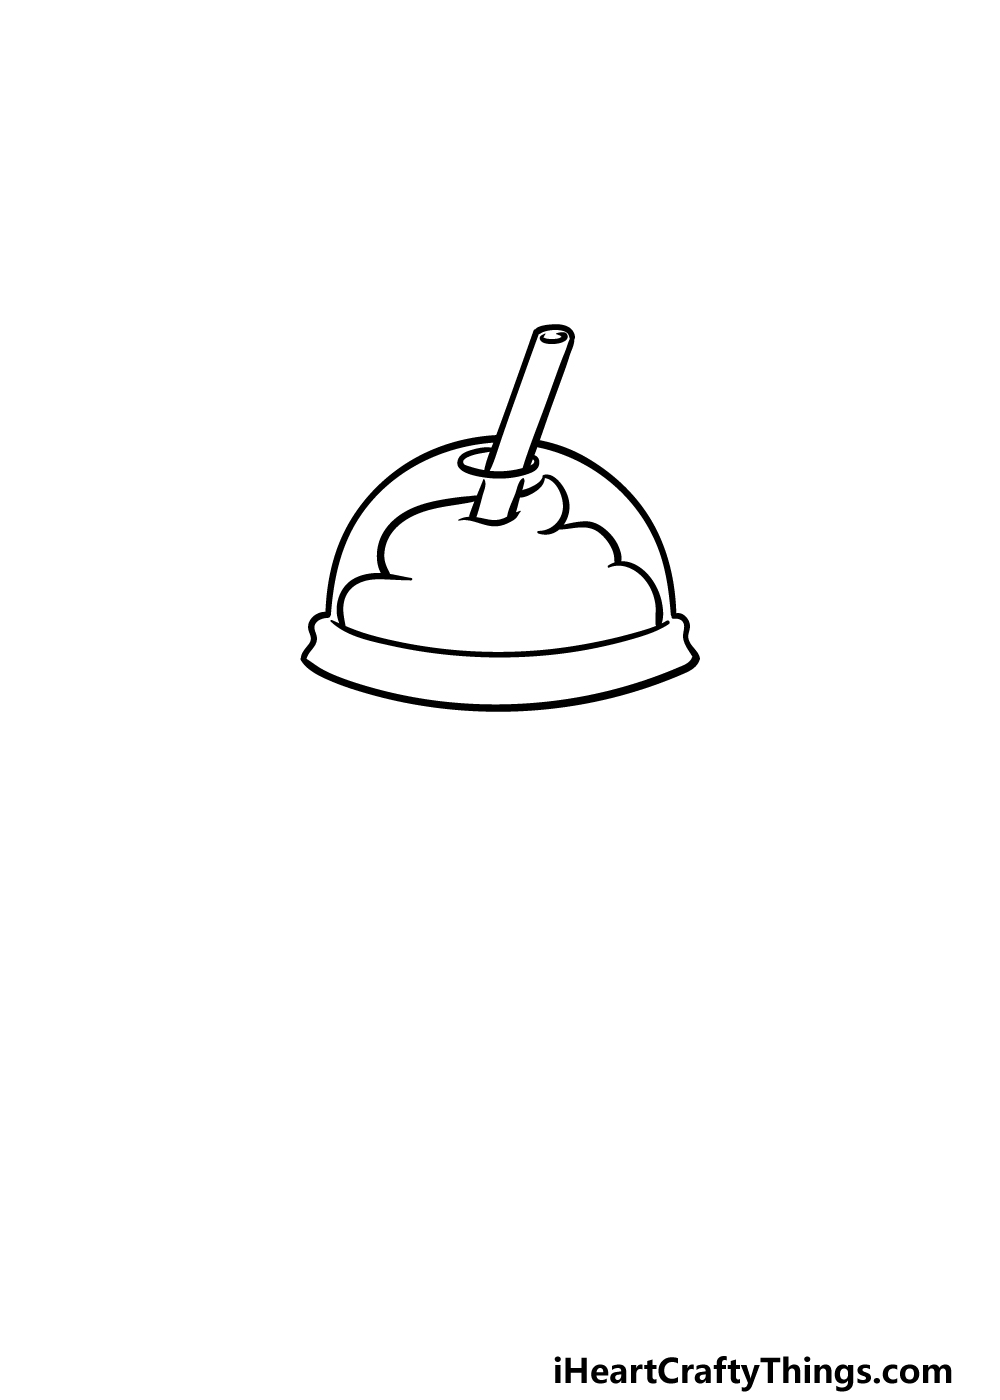
No one likes to find an empty smoothie cup instead of a full one, so we shall draw some of the delicious treat inside of the cup for this part of your Starbucks drawing.
First, use two short, straight lines to extend the straw a bit further down. Then draw a wavy line across the base of the straw where it would be poking into the smoothie.
The smoothie itself will be drawn inside the clear dome and will be created using several rounded lines connecting to one another. Be sure to add a little tip at the top of the smoothie!
Step 3 – Next, draw the base of the lid for the cup
In this step of our guide on how to draw a Starbucks, we will be drawing the base of the clear lid.
As we mentioned in the first step of the guide, you could also start at this step and ignore the domed top of the lid if you would like to portray a coffee cup instead.
Regardless of which approach you are taking, you can start by drawing some small dots along the rim of the cup.
If you’re drawing a coffee cup instead, at this point you can also add a slightly curved line on top of the rim for the other side of it.
Then, simply add another very thin rim beneath the main one, and you can finish off this step by adding one more thin section underneath.
Step 4 – Now, draw the base of the cup
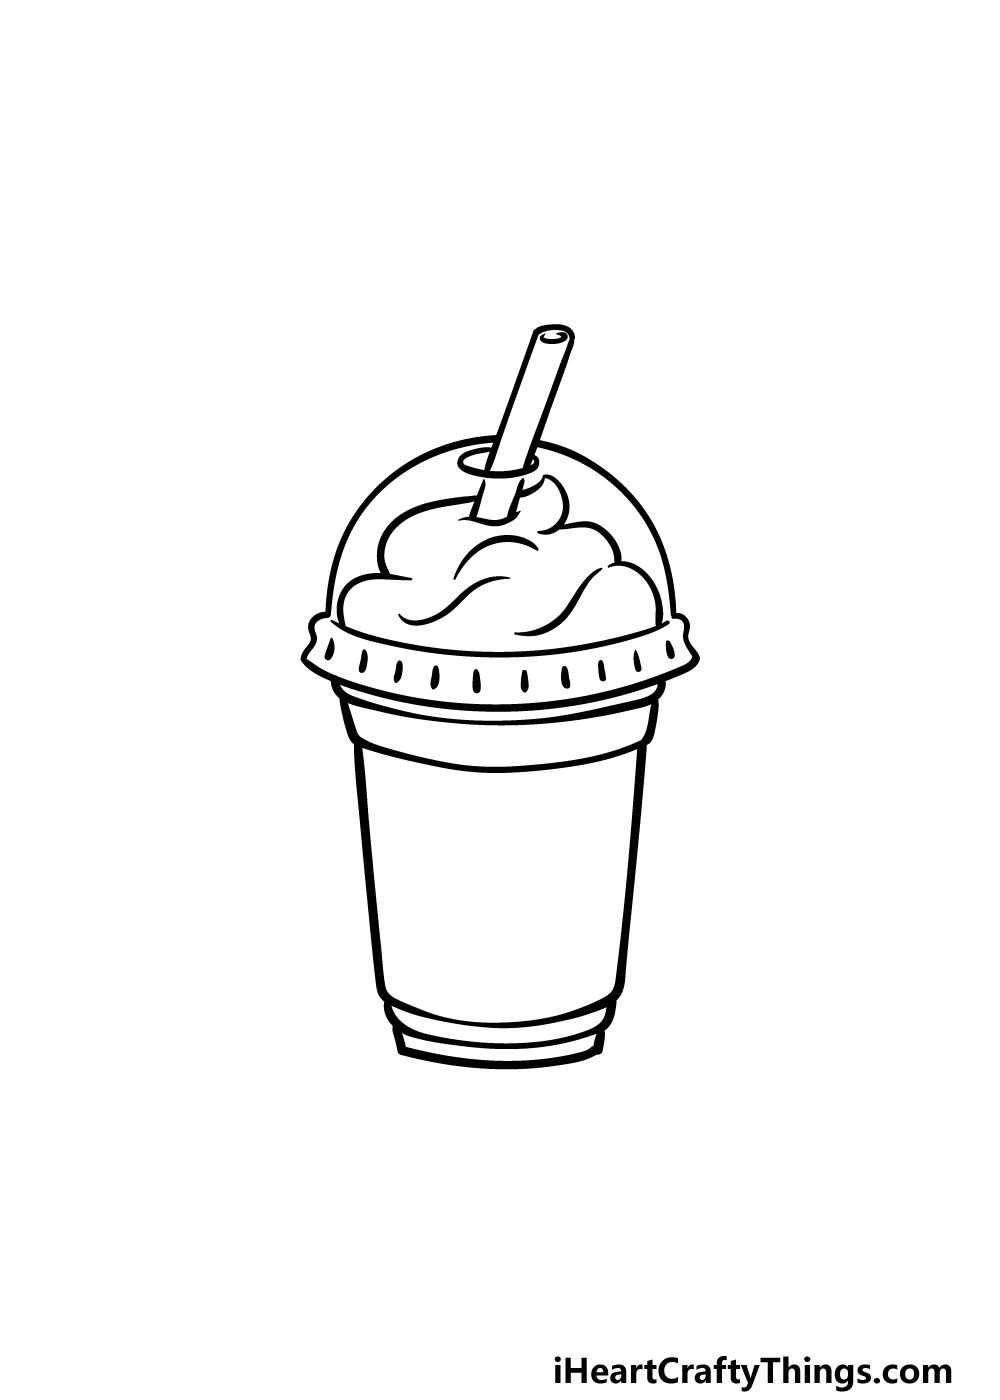
Having the lid of this cup is all well and good, but we also need the bottom part of the cup to contain that precious smoothie liquid!
That’s why we shall be drawing the base of the cup for your Starbucks drawing in this next step.
This is a part of the cup that will look the same regardless of whether you are drawing this as a smoothie cup or a coffee cup.
Simply extend two straight lines at a bit of an angle for the sides of the cup. There will be two thin rims at the base of the cup as shown in the reference image.
Then you will be ready to add some final details in the next step!
Step 5 – Add some final details to your Starbucks drawing
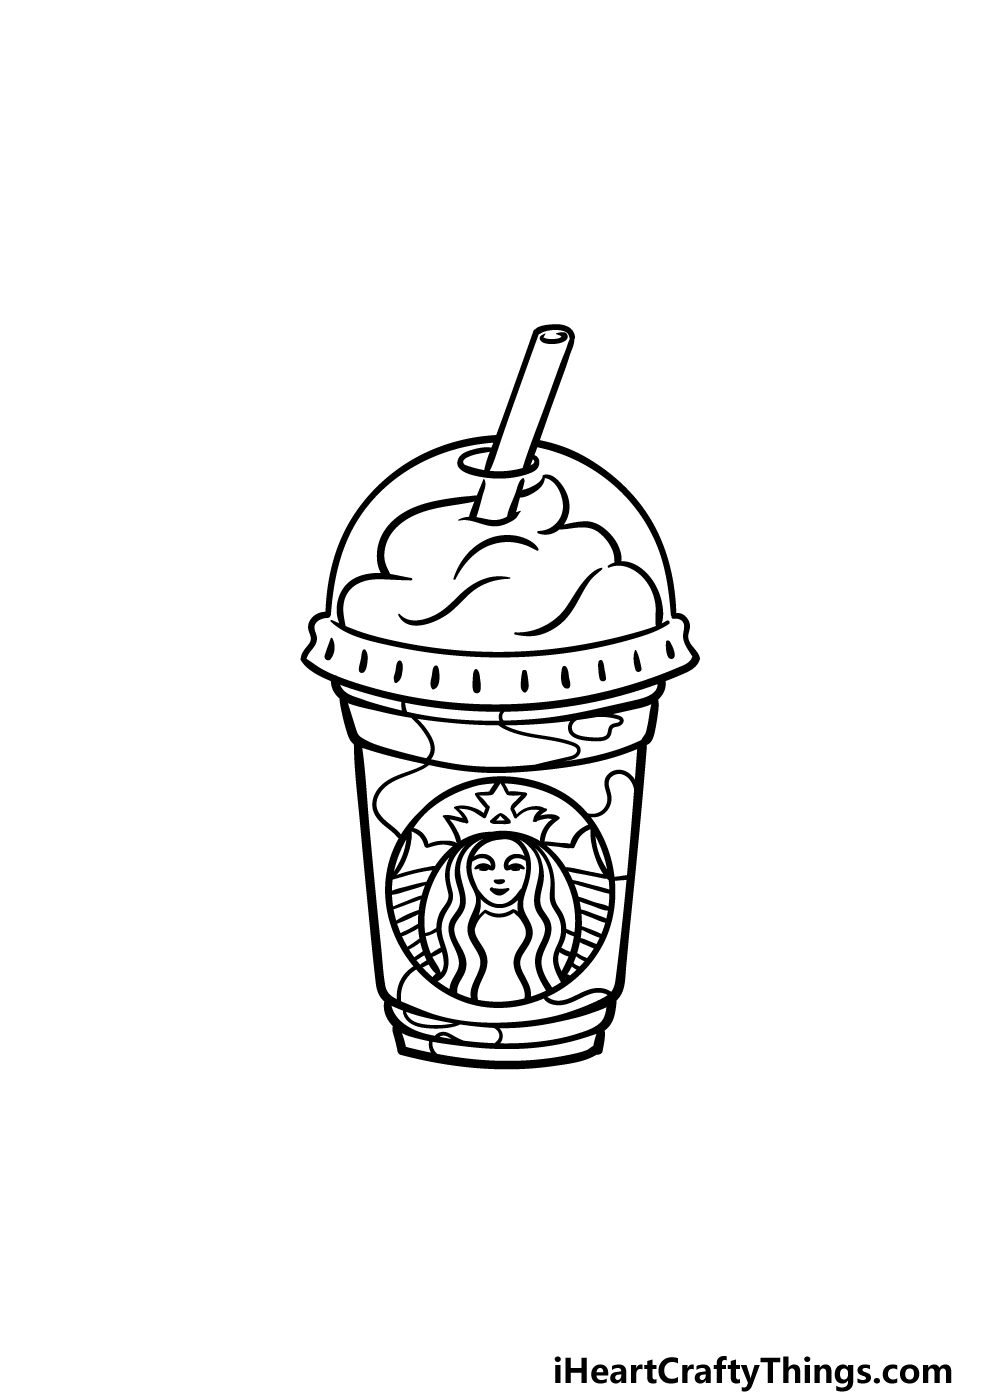
Now you’re ready to finish off this picture in this step of our guide on how to draw a Starbucks. To start this, we will be drawing the famous Starbucks logo onto the center of the cup.
The logo will be drawn in a large circle, and then inside of it you can use our reference image to copy the lady in the logo into the circle.
If you’re drawing a smoothie cup as we did, you can also draw some wavy lines inside of the cup to show that it is transparent, but you can leave these out if drawing a coffee cup instead.
Step 6 – Finish off your Starbucks drawing with some color
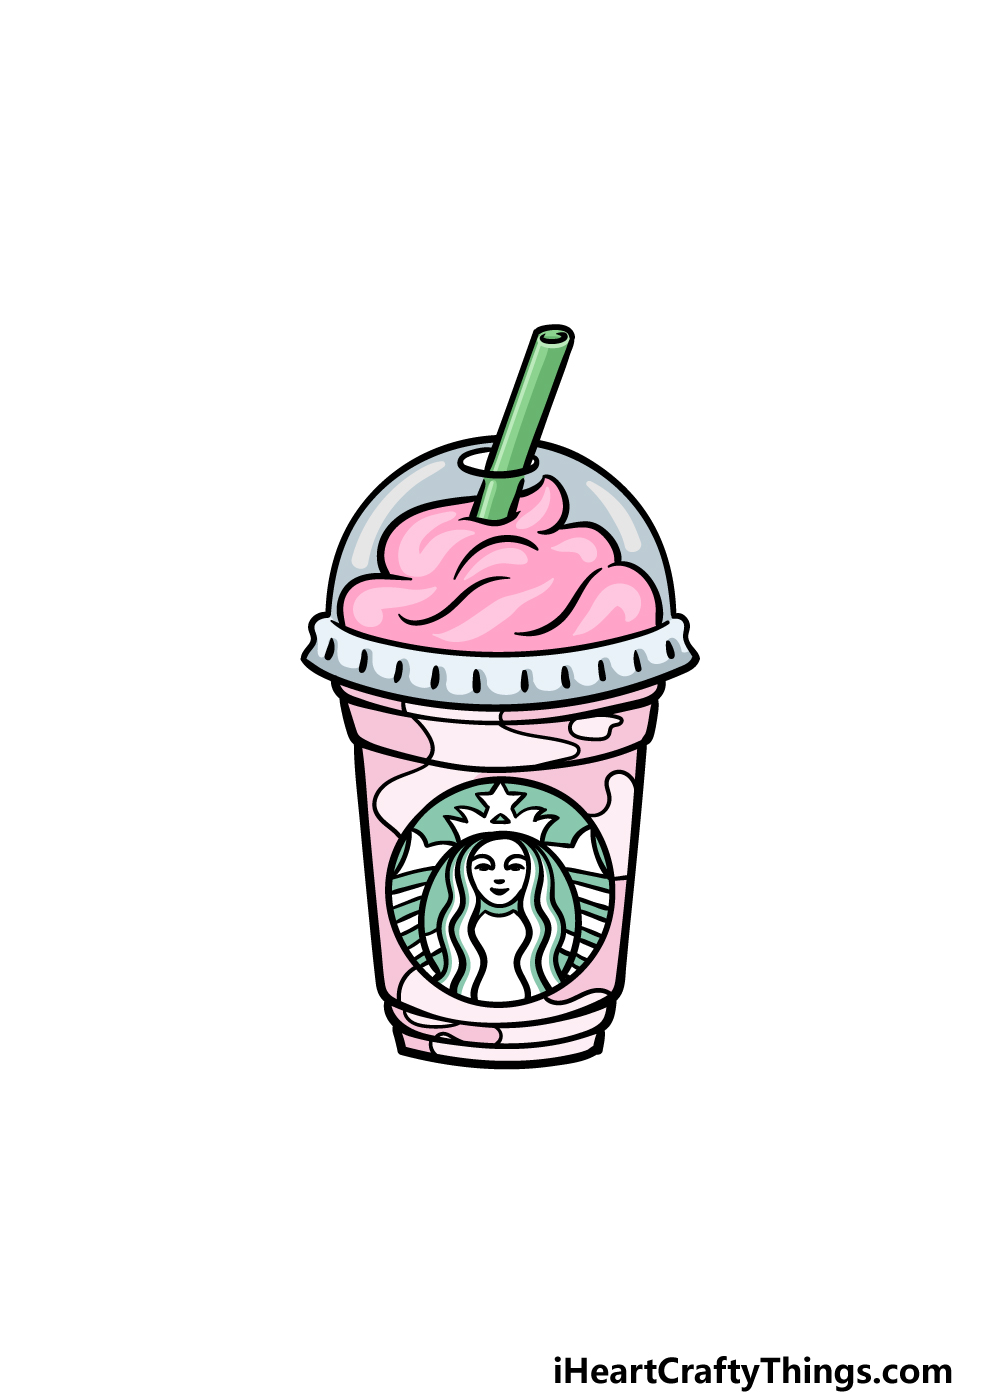
You’ve worked really hard on this Starbucks drawing, and now you can relax with some coloring fun!
For our image, we used some shades of pink to create a wonderful, tasty-looking fruit smoothie. There are so many other colors that you could draw, and you could even add little bits of ingredients into it.
If you decided to draw this as a coffee cup, you can keep the colors to white and light greys along with greens for the logo, as well as using brown for the coffee inside the cup.
Here’s how you can make your Starbucks drawing even better…
Make your Starbucks drawing even tastier with these fun tips to try out.
This drawing of Starbucks that we created shows a pink smoothie, but you could change it to any other flavor you like!
This could be as simple as changing the color from pink to whatever color best suits your favorite flavor.
You could also make the current one more interesting by adding details such as small bits of strawberry in the strawberry. What flavors would you choose for this picture to show your favorite?
Of course, Starbucks is most well known for its coffee. Now that you know how to draw the logo, you could draw a cup of coffee next to this smoothie.
The Starbucks cups are fairly simple, and you could use a real one to help you as you draw. This would be a chance to show off what size you normally get when you go to Starbucks!
What other beverages from Starbucks would you like to enjoy with this smoothie that you have drawn here?
Beverages aren’t the only things you can enjoy at Starbucks! You could also add some of the food options that are available to your Starbucks drawing.
These could range from muffins, cakes and even sandwiches. If you have enjoyed any food at Starbucks before, then you can replicate what you ordered in this picture.
What are some sides that you could add to make this drawing even more inviting and delicious than it already is?
Finally, you could finish off this Starbucks sketch by adding a background setting. The obvious choice would be to draw your favorite Starbucks branch to show where you may have bought this smoothie.
Of course, items from Starbucks can be taken out to be enjoyed anywhere. That means that you have plenty of options available for backgrounds.
This would be a great chance for you to show off where you would most like to enjoy some items bought from Starbucks! Where would you like to set this picture?
Your Starbucks Drawing is Complete!
We hope that you had an incredible time working on this tasty treat alongside us in this guide on how to draw a Starbucks!
It can be a lot of fun to design your own unique beverage products, so we aimed to make this guide open enough for you to add your own details and touches.
We also wanted it to be fun and easy for you to work on, so hopefully we succeeded in that as well!
When you’re ready to find your next awesome drawing challenge, you’ll want to check out our website! We have tons of drawing guides for you there, and we have many more on the way soon.
Please also share your completed Starbucks drawing on our website for us to see! We can’t wait to see what kind of beverage you designed using this guide.