Christmas is definitely one of the most magical times of the year! It’s a wondrous time where children the world over eagerly anticipate the arrival of Santa with his reindeer.
Of all these reindeer, Rudolph the red-nosed reindeer is possibly the most well known, with his bright nose shining the way for Santa on his travels.
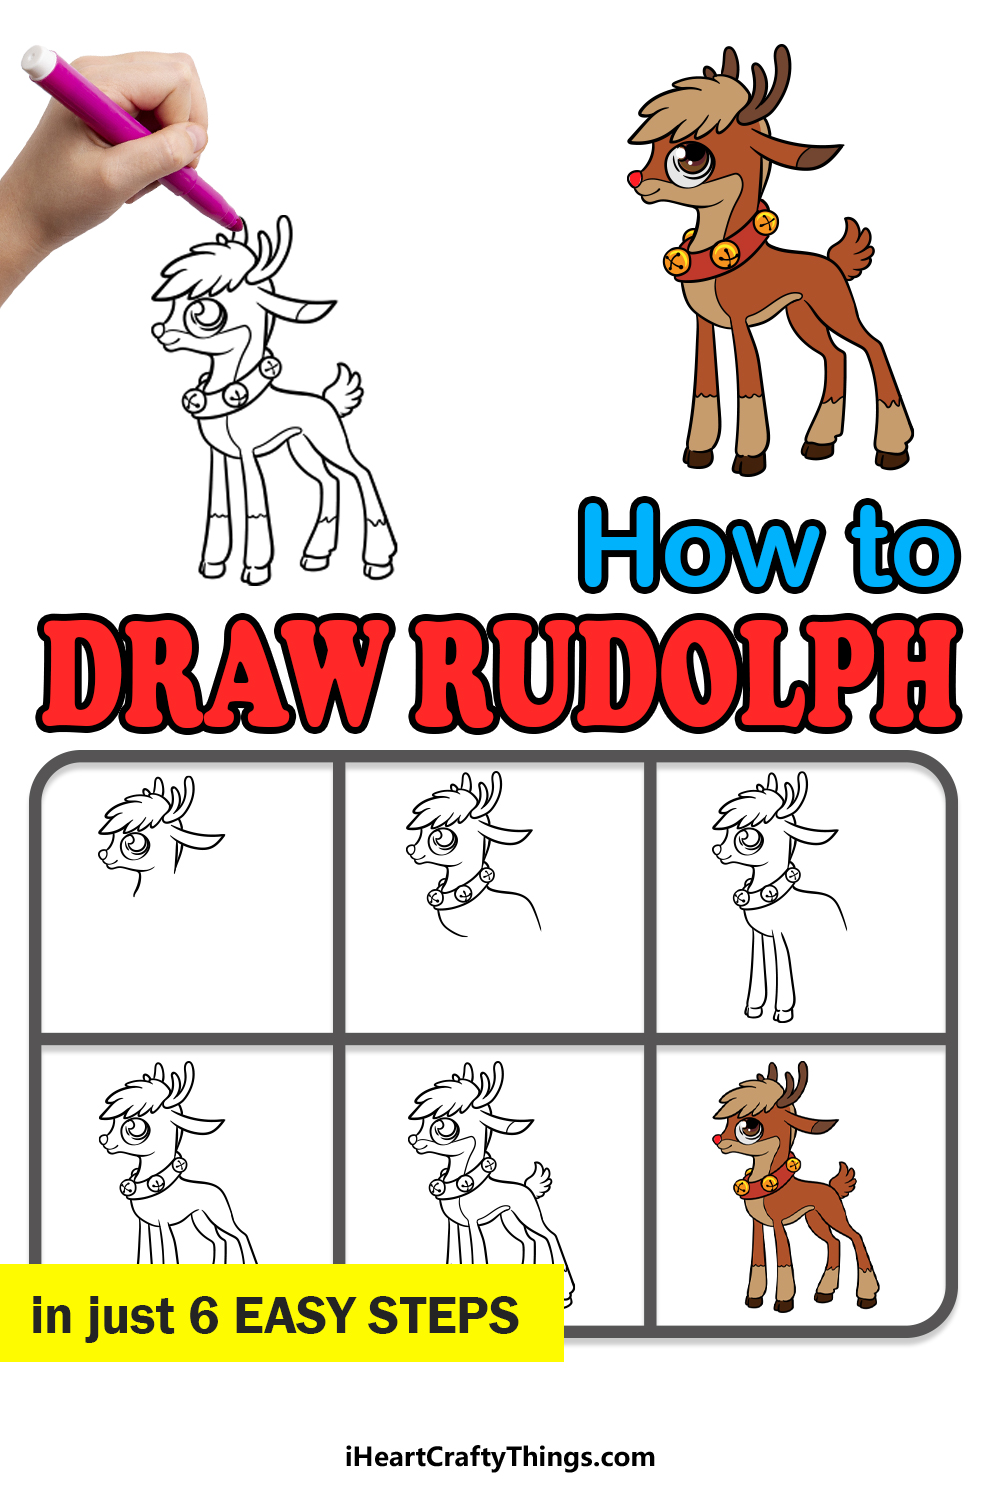
If you want to get into the Christmas spirit then learning how to draw Rudolph can be a great way to do that!
If you would like to find out how to do it then this is the guide for you!
This step-by-step guide on how to draw Rudolph will let you have fun as you work on this beloved Christmas character.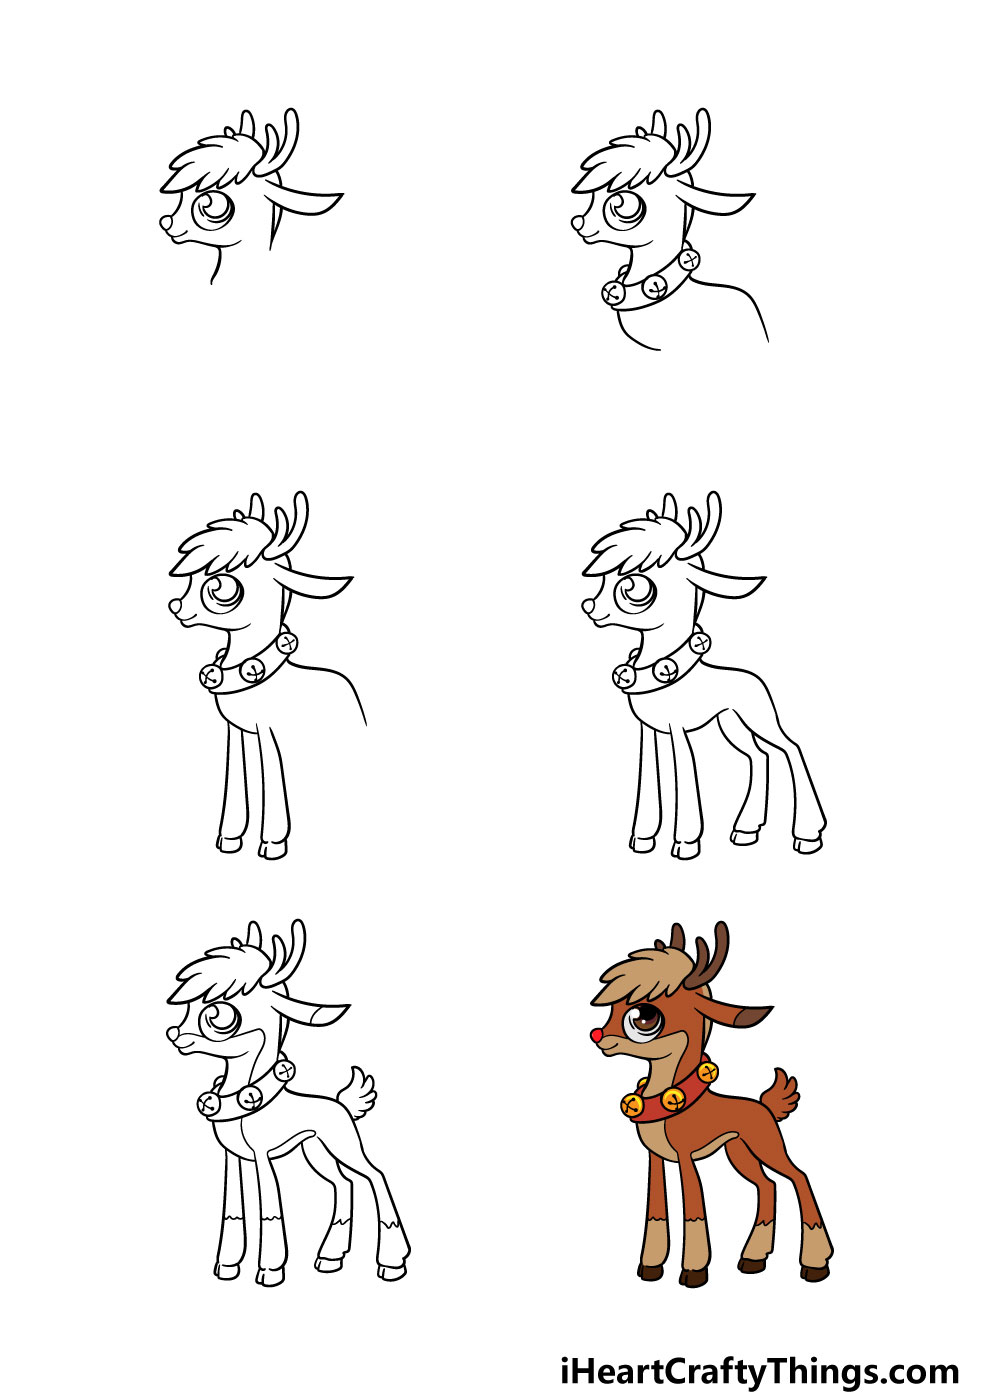
How to Draw Rudolph – Let’s get Started!
Step 1
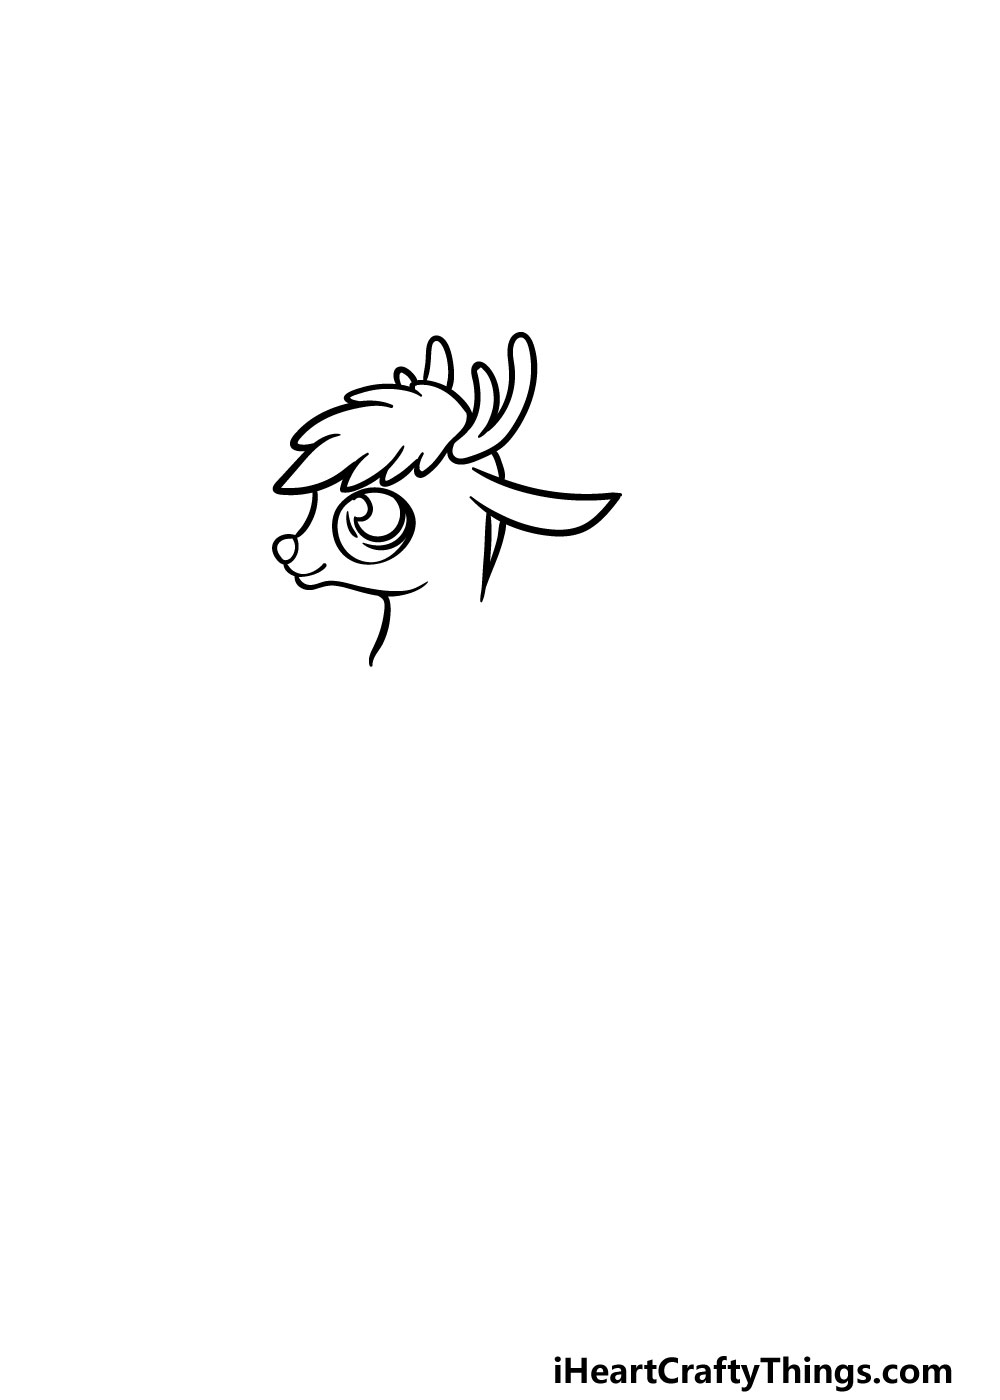
To start this guide on how to draw Rudolph, we will begin with his head. There are a lot of details to work with here, so while it may seem intimidating if you take it slow then you will easily be able to do it!
We will be giving Rudolph a big round eye to make him look extra cute. Then, you can add a curved moon-like shape inside of the eye for the big pupil. Then, you can use some jagged rounded lines to create the hair above his eye. Then, you can use more curved lines for the antlers and ears.
Finally, you can use some pointy shapes for the front of his pointy, smiling face and neck. That’s all there is to it for this step and you’re ready to proceed!
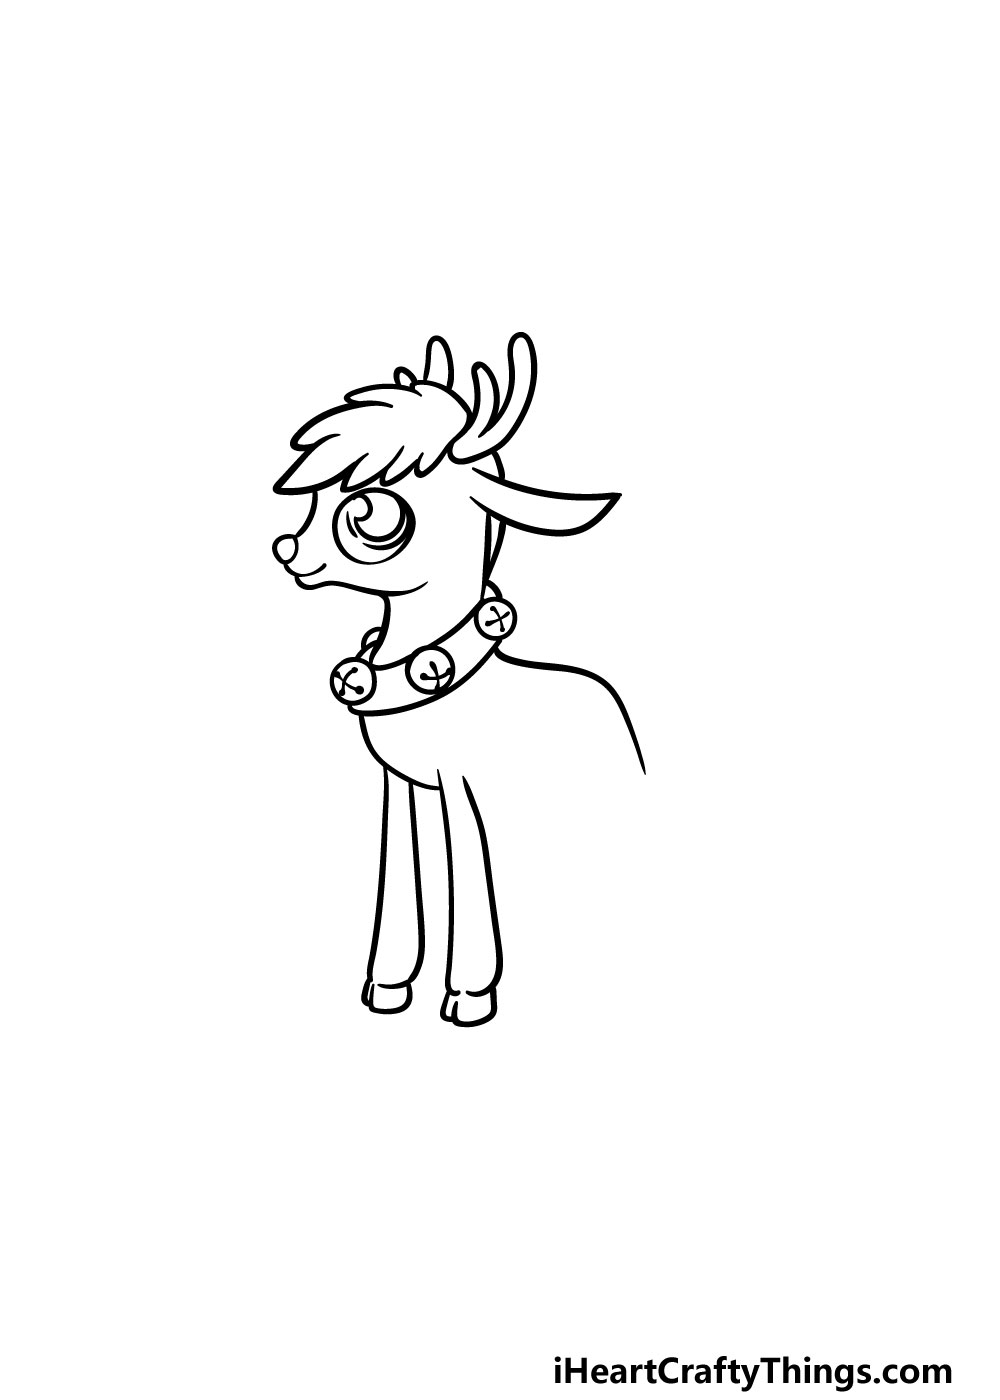
Step 2 – Draw a collar and start his back
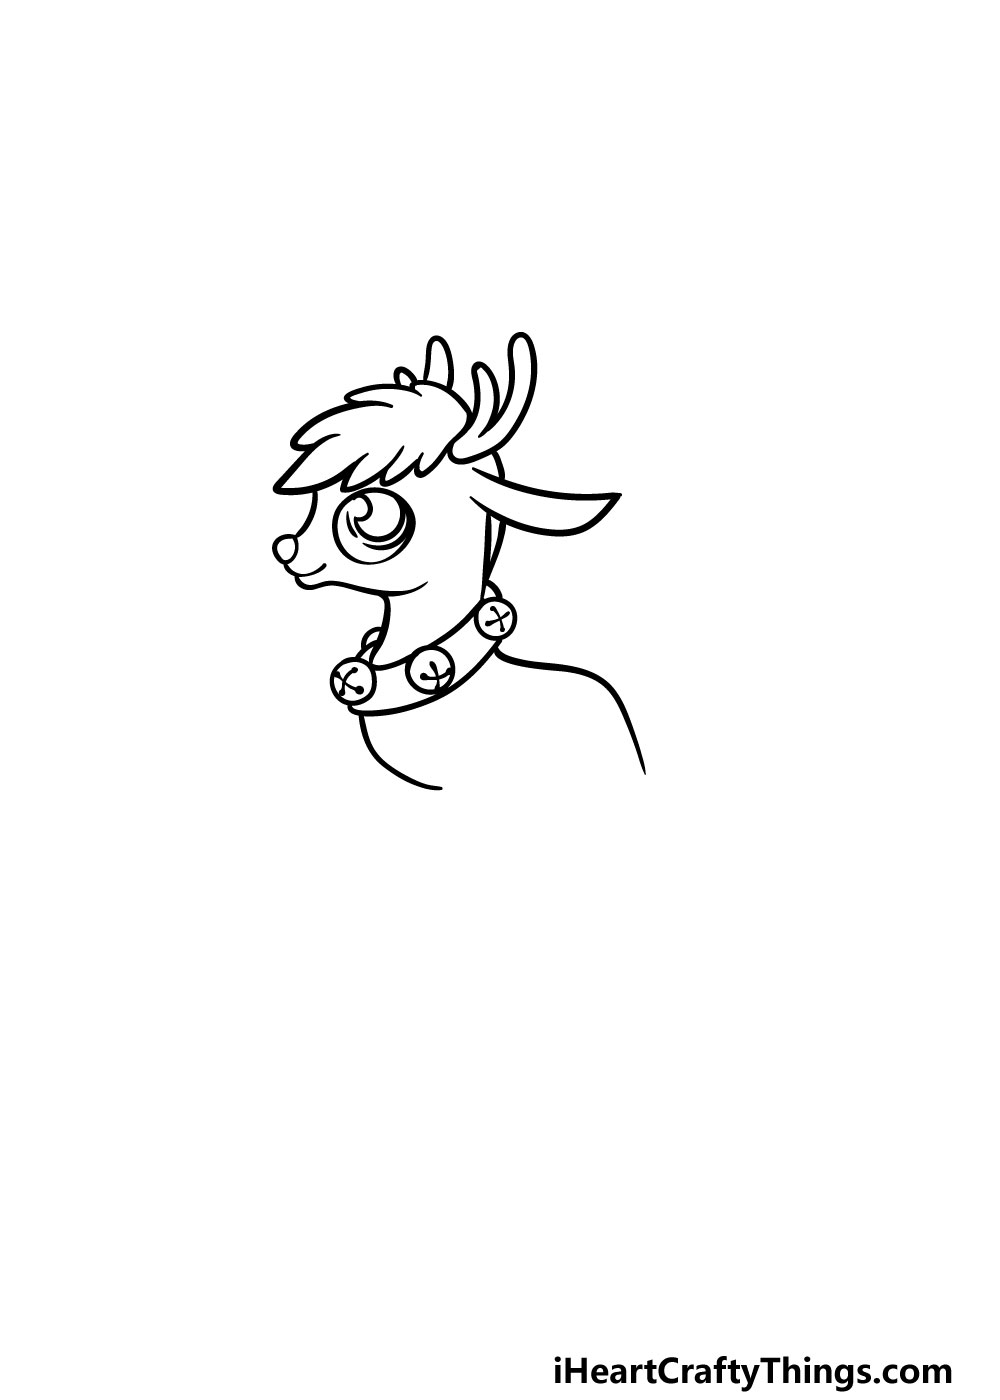
This second part of your Rudolph drawing will see you adding the bell-covered collar for the little guy.
You can start off this element by drawing three small circles around his neck. Then, you can add a small cross shape into each bell, as shown in the reference image. Then, you can use two curved lines for the collar itself.
Finally, use two more curved lines coming from the collar for the chest and the back of Rudolph.
Step 3 – Now, start the legs for Rudolph
For the third step of our guide on how to draw Rudolph we will be starting with his legs. His legs will be thin and quite simple-looking.
You can draw them with some fairly simple curved lines, and then add his little hooves at the end of them. Once you’re happy with how they look you will be ready to add the other legs in the next step.
Step 4 – Next, draw the other legs for Rudolph
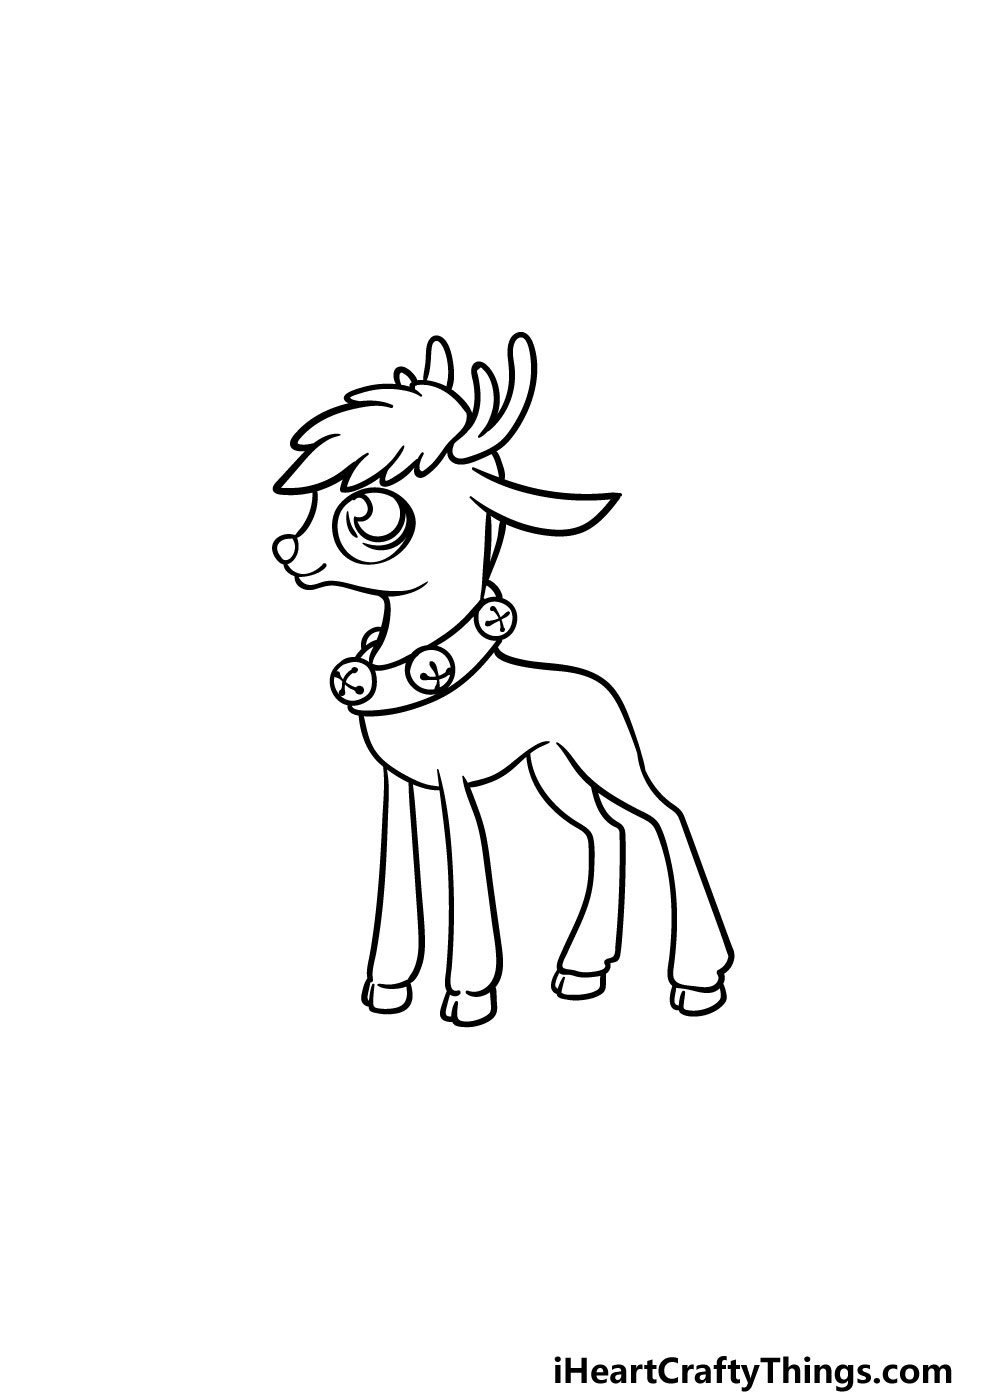
You’ve already done two legs for your Rudolph drawing, and now you can add the next two! These will look a bit different from the first two as they will have a sharper bend to them than the front two which were very straight.
Apart from this difference, they will look structurally similar to the first two and also have two small hooves at the ends of them.
Step 5 – Now, you can draw the tail and final details
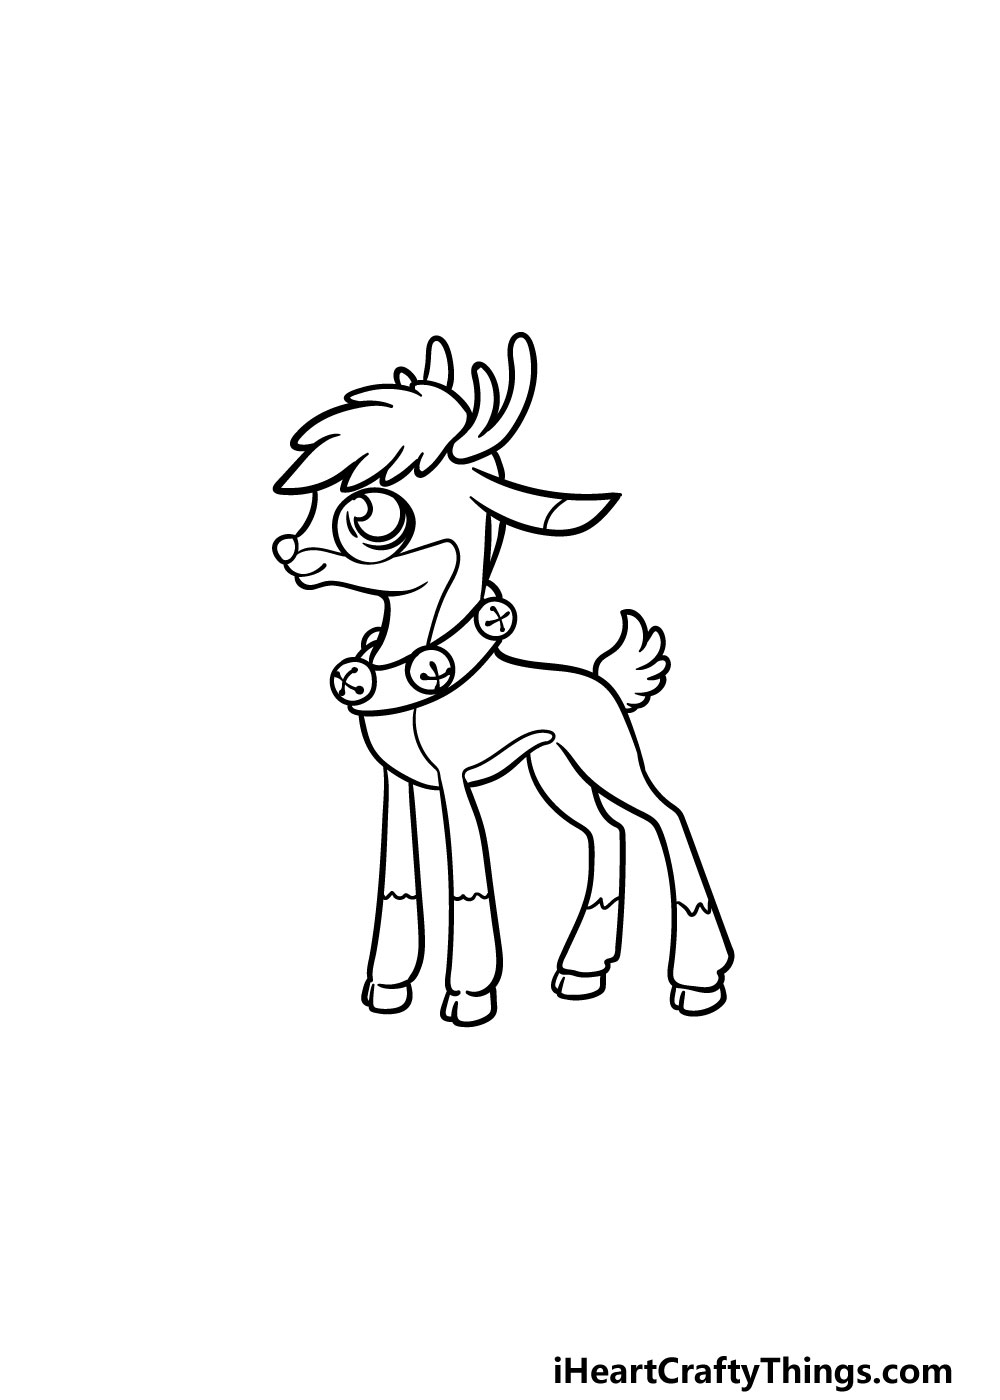
It’s almost time to add some amazing colors in this guide on how to draw Rudolph! Before you do, however, we have just a few more details and elements to add to your drawing.
You will also be able to add some details of your own as well. First, use some curved and rounded lines for the tail behind him. Once you have drawn that, there are just a few final details to add before we move on to the final step.
First, you can add some small, jagged lines around the midway point of each leg. Then, you can draw some lines extending from his nose and through his face, down his neck and across his belly.
You can also add a line near the tip of his ear for some detail there as well.
That will do it for the details in this guide, but as we mentioned you could also add some details of your own! Perhaps you could draw a beautiful background to show what kind of Christmas setting Rudolph and his friends are in!
What kind of background would you use for this image? We can’t wait to see what creative touches you can think of!
Step 6 – Finish off your Rudolph drawing with some color
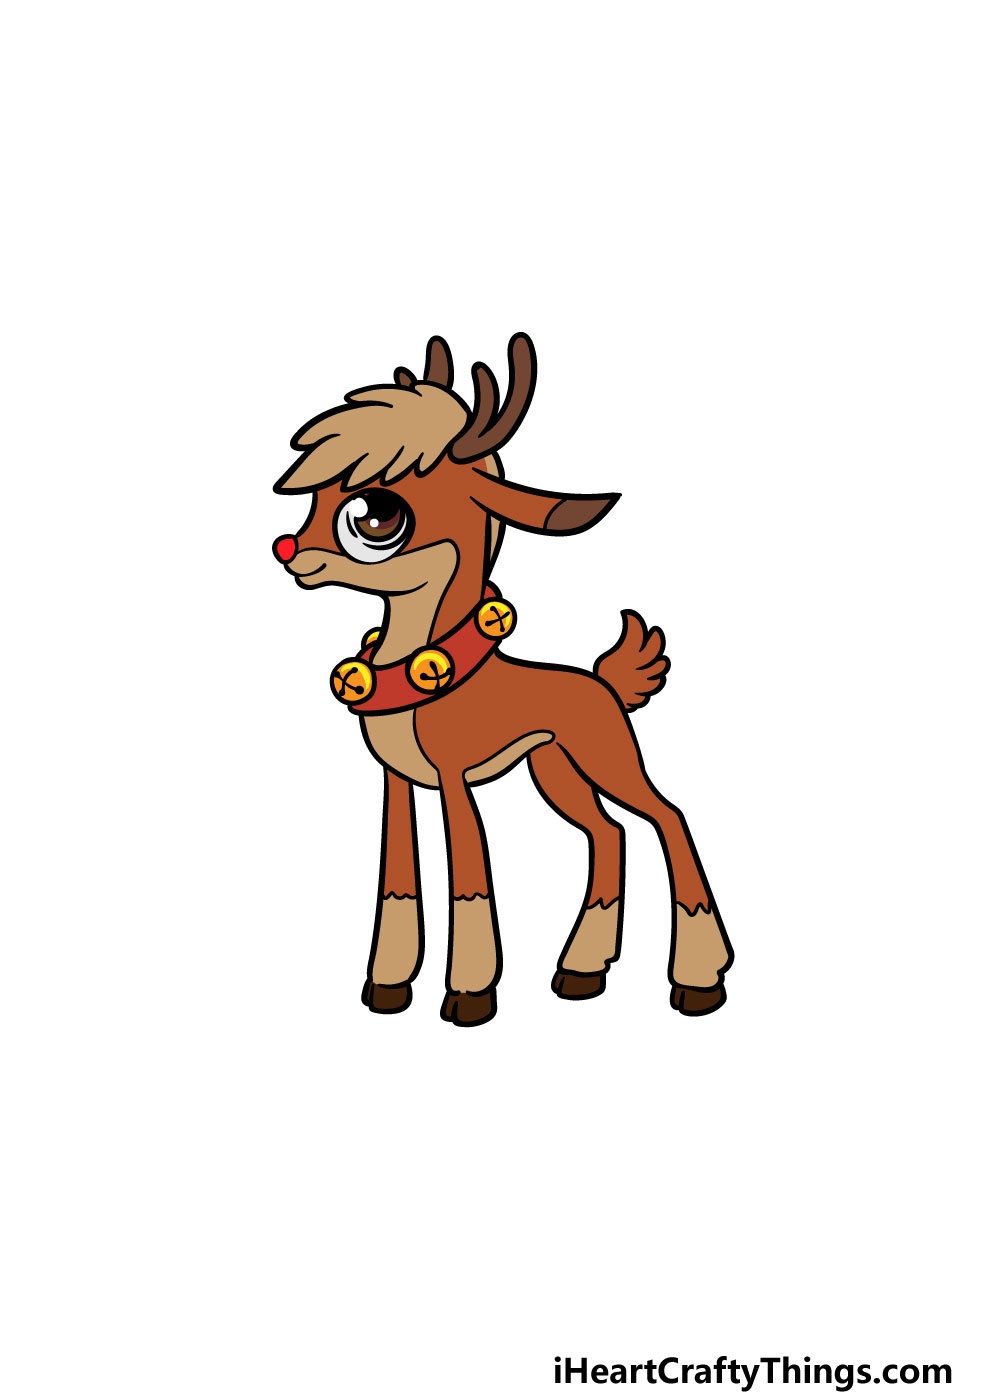
That brings you to the final part of your Rudolph drawing, and this is the one where you get to have lots of fun coloring it in! In our reference image, we used various shades of brown for the different areas of Rudolph’s body, and then we used red and yellow for the collar and bells.
This is just one way that you could go about it, however, and you should feel free to color it in any way that you choose! If you drew any background elements or added any other details then you can color those in as well.
Choosing your colors is just a part of it, however! You can also have fun using your favorite art mediums to bring the colors to life.
Using watercolors would be a great way to bring a classic feel to this Christmas image. If you did go for that, perhaps you could use a brighter medium such as colored pens or acrylic paint to show a cone of red light coming from his nose.
That’s also just a suggestion, so how will you color in this Rudolph drawing?
Do this to take your Rudolph drawing to the next level
Let’s look over a few ways you can make your Rudolph drawing even better than it already is!
The most famous attribute of this character is his bright red nose that shines out into the night sky. You could emphasize this aspect for your drawing of Rudolph!
The easiest way would be to use some red colors to create a cone of light shining from his nose. You could also draw attention to the nose by making it bigger on his face.
Making the background dark in contrast to the light from his nose would also help a lot in highlighting this aspect of his character.
Rudolph is one of a few different reindeer that guide Santa’s sleigh. You could add all 8 of the established reindeer, or you could stick to one or two.
In order to draw them, you could follow through the guide again and draw more reindeer that look similar to Rudolph.
You would want to change a few details and not give them the same red nose that Rudolph has in order to make them unique.
Speaking of Santa’s sleigh, that would be another fun thing to add to this Rudolph drawing! This could be based on an existing interpretation of his sleigh, or you could design one of your own.
You don’t have to stop at his sleigh, as you could also add Santa himself! You might even want to squeeze in a few elves for good measure.
Finally, we would also recommend drawing a background to finish off this Rudolph sketch. There are so many different locations and settings you could use for this background!
If you drew the sleigh and other reindeer, you could show them flying high above a sleepy village. That is one possibility but it is far from the only one.
Rudolph could be hanging out with his reindeer pals in front of the North Pole, for instance. These are just a few ideas, but what else could you use as the background?
Your Rudolph Drawing is Complete!
You have reached the end of this guide on how to draw Rudolph, and you should be very proud of your amazing drawing!
This picture had a lot of detail and may have seemed intimidating, but hopefully this guide made it not only easier but also even more fun than you expected!
Don’t forget that you can also put your own fun touches on this image. You could add a background or some other details and objects to finish the scene, and you can also experiment with various colors and art mediums.
You can visit our website when you’re ready for more, as we have tons of amazing guides for you to enjoy there! We upload new guides frequently as well, so be sure to visit us often!
We would love to see your amazing Rudolph drawing once it’s done, so we hope that you will share it on our Facebook and Pinterest pages for us to see!