Pistols come in many different variations in order to serve different purposes. No matter what kind of pistol you are dealing with, they are always quite a feat of engineering precision.
There are many small parts and details to these firearms, and that can make learning how to draw a pistol a bit challenging.
Just because it is challenging doesn’t make it impossible, however, and you can make it much easier on yourself when you know what to do. Luckily, this is the guide to be on if you would like to do just that!
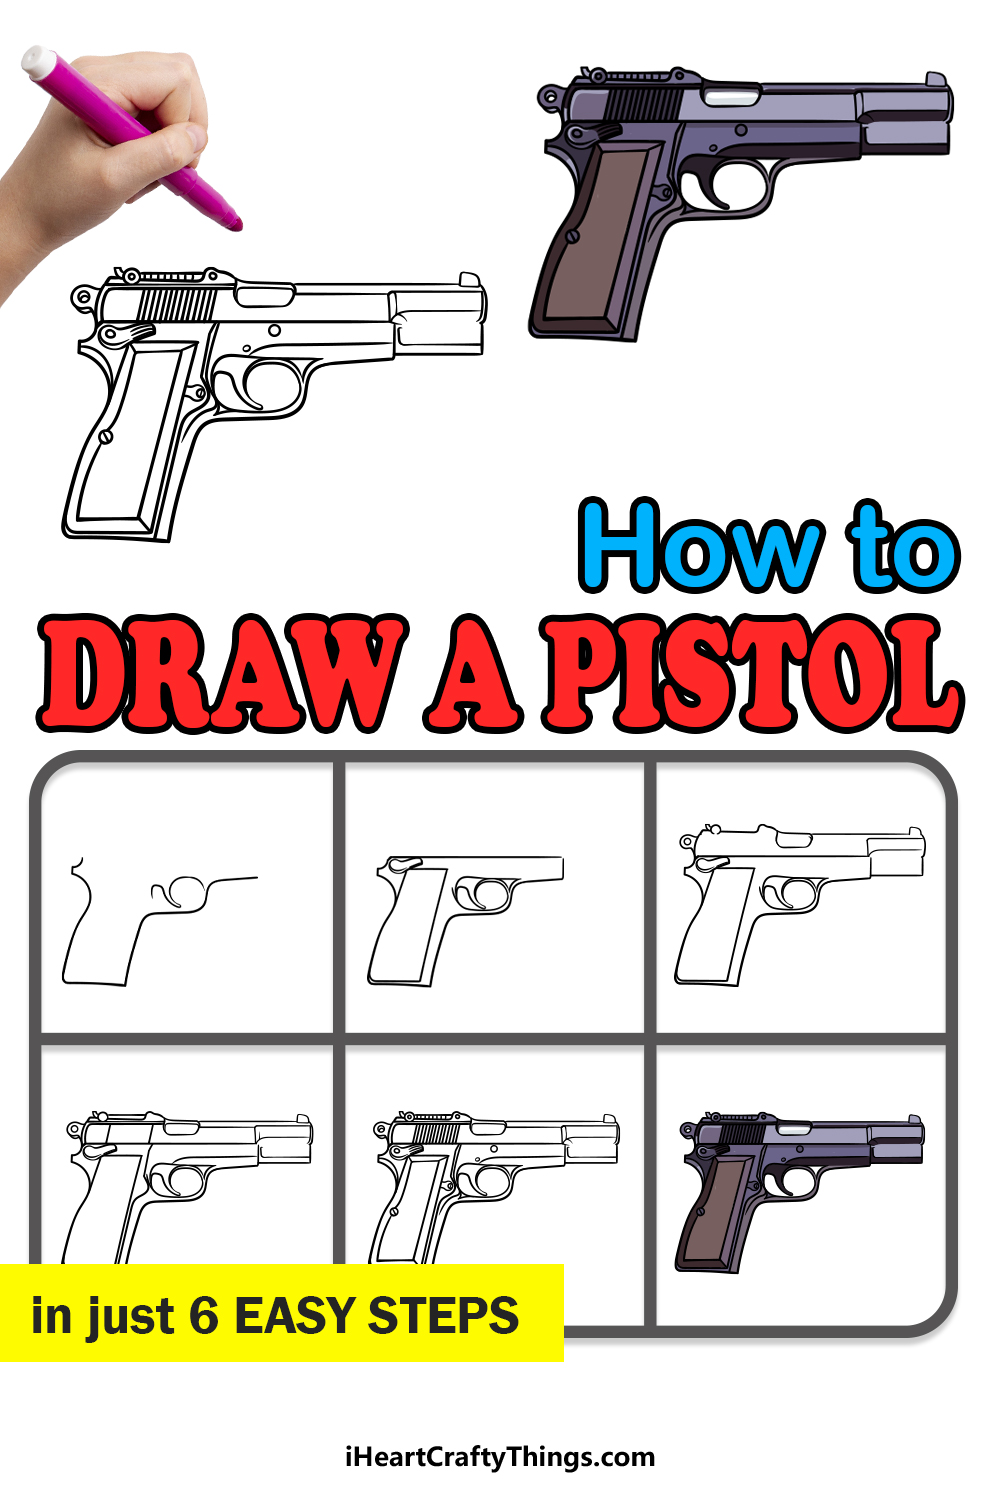
Our step-by-step guide on how to draw a pistol in 6 steps will show you how to create some artwork featuring one of these incredible guns.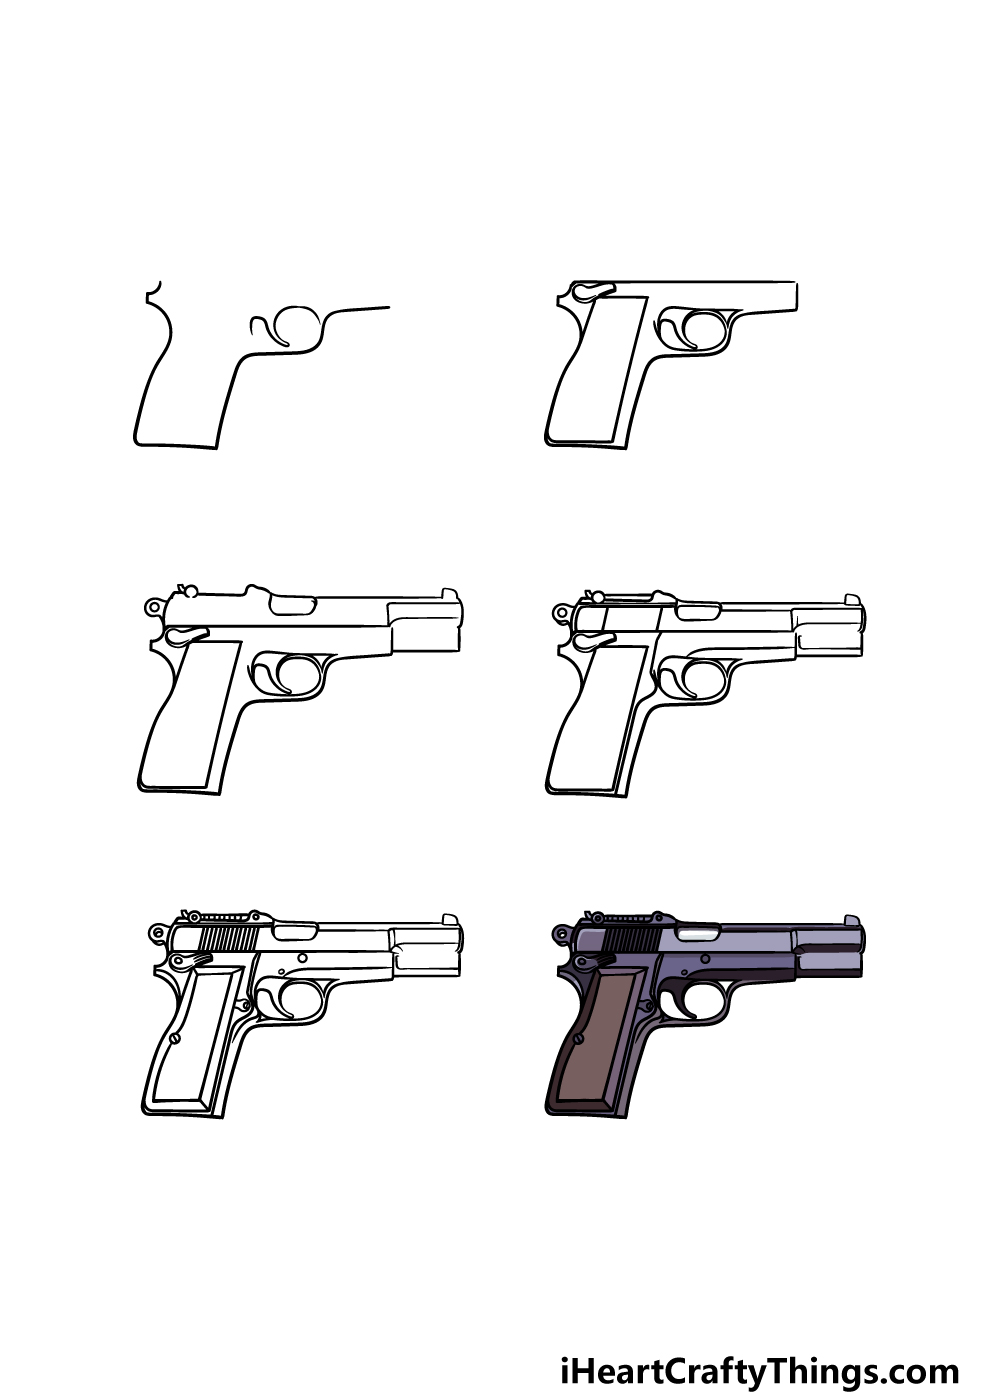
How to Draw A Pistol – Let’s Get Started!
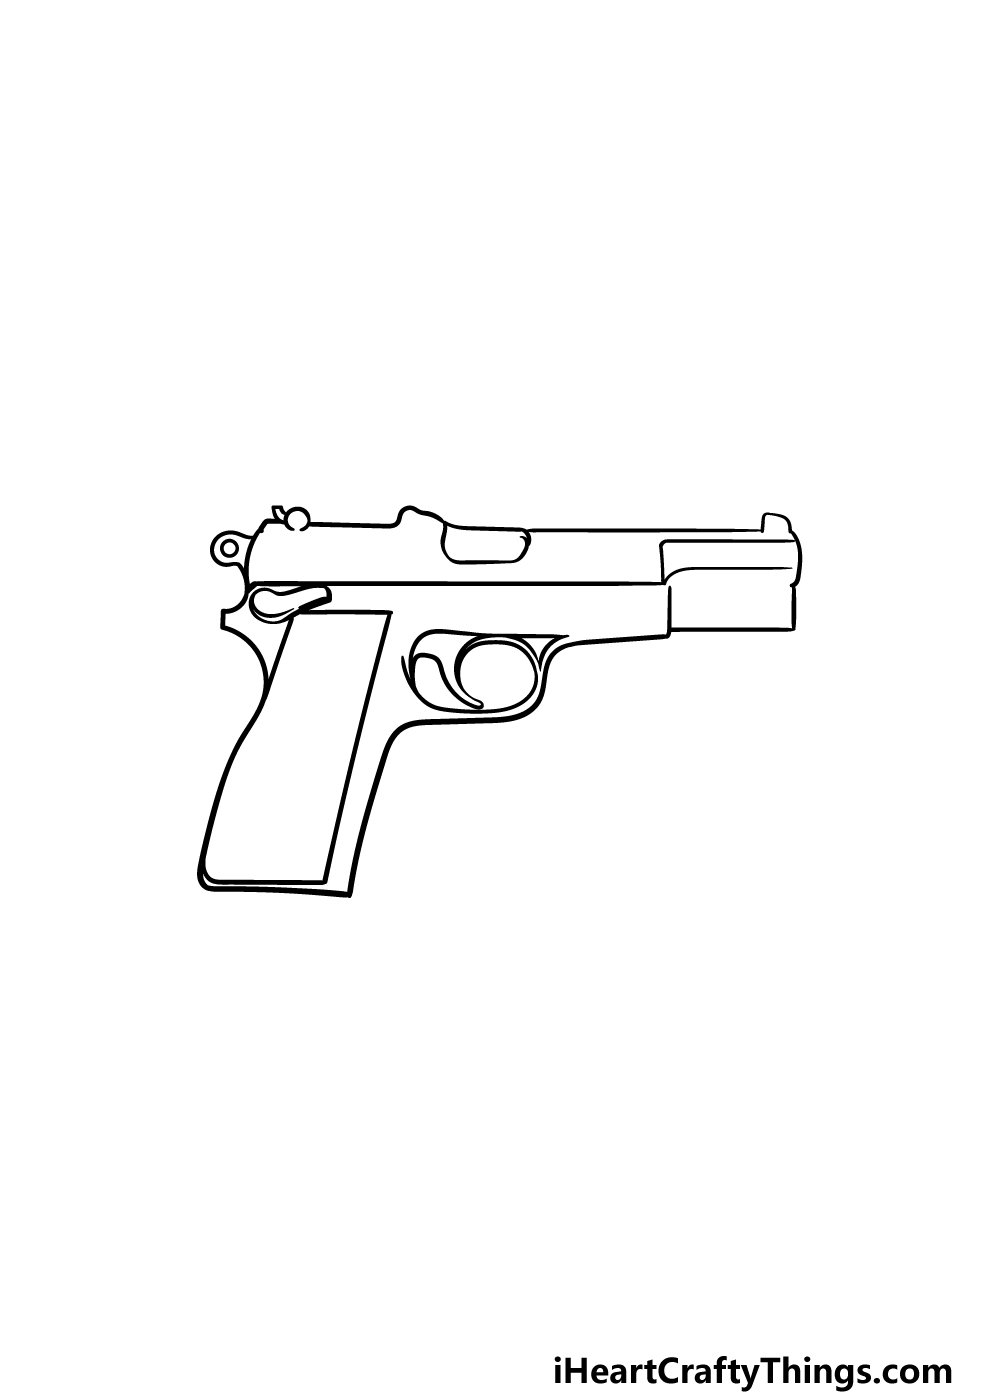
Step 1
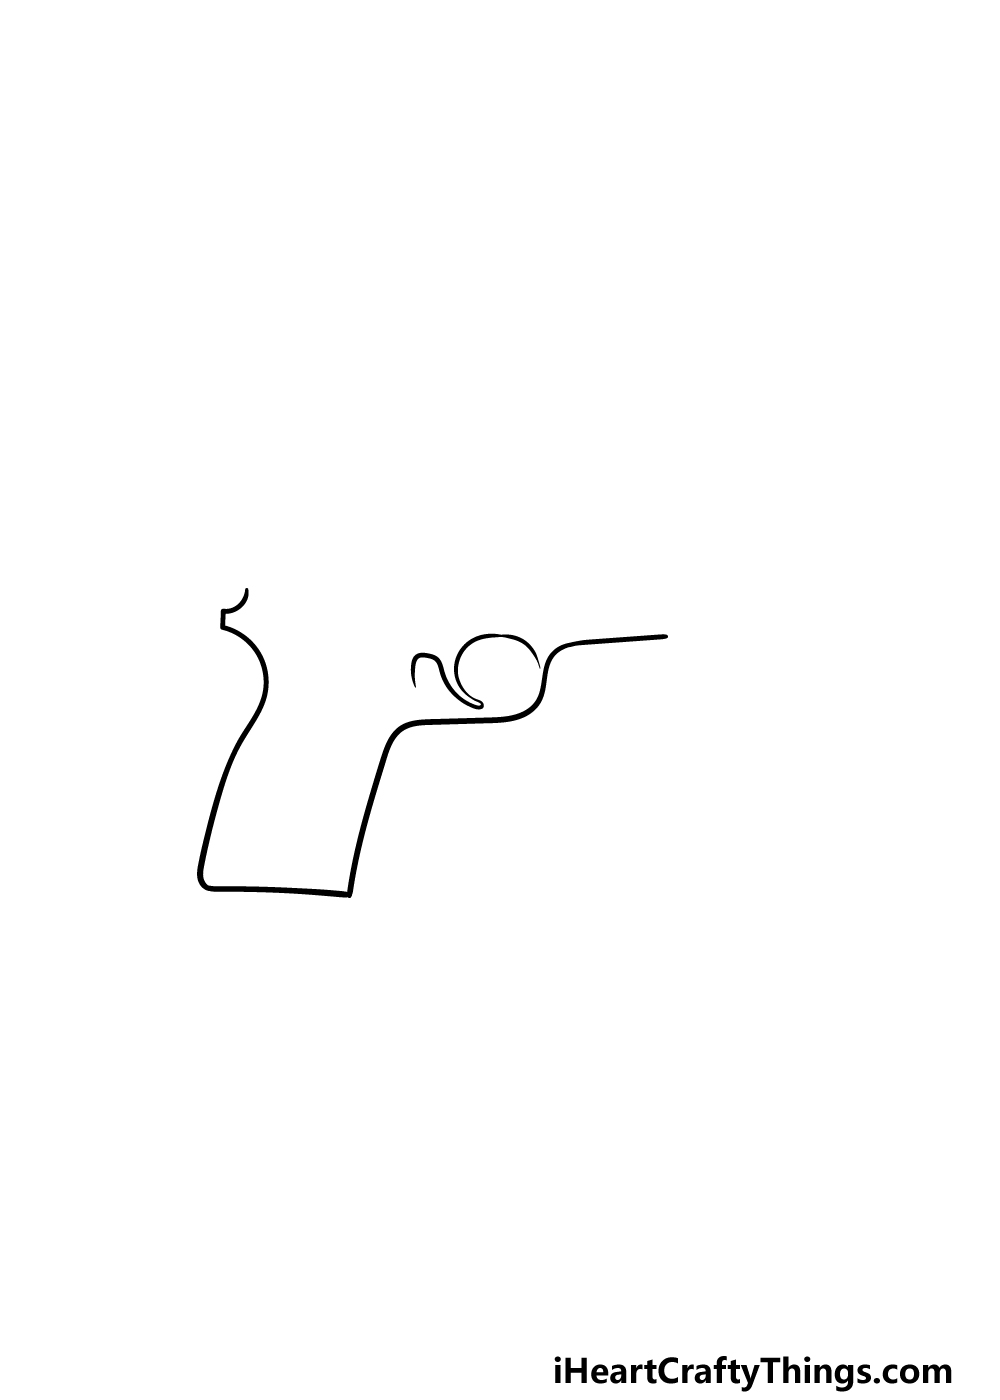
To begin this guide on how to draw a pistol, we will begin by drawing the outline for the trigger guard and grip of the pistol.
For this first step, you may want to refer quite closely to the reference image provided and replicate the shape as it appears there.
Using some curved lines, we will be drawing the back of the grip outline along with the base and front of it. Then, the outline of the trigger guard will be drawn with another curved and rounded line.
Then, we will be drawing the trigger itself by drawing a thin, curved shape inside of the outline for the trigger guard.
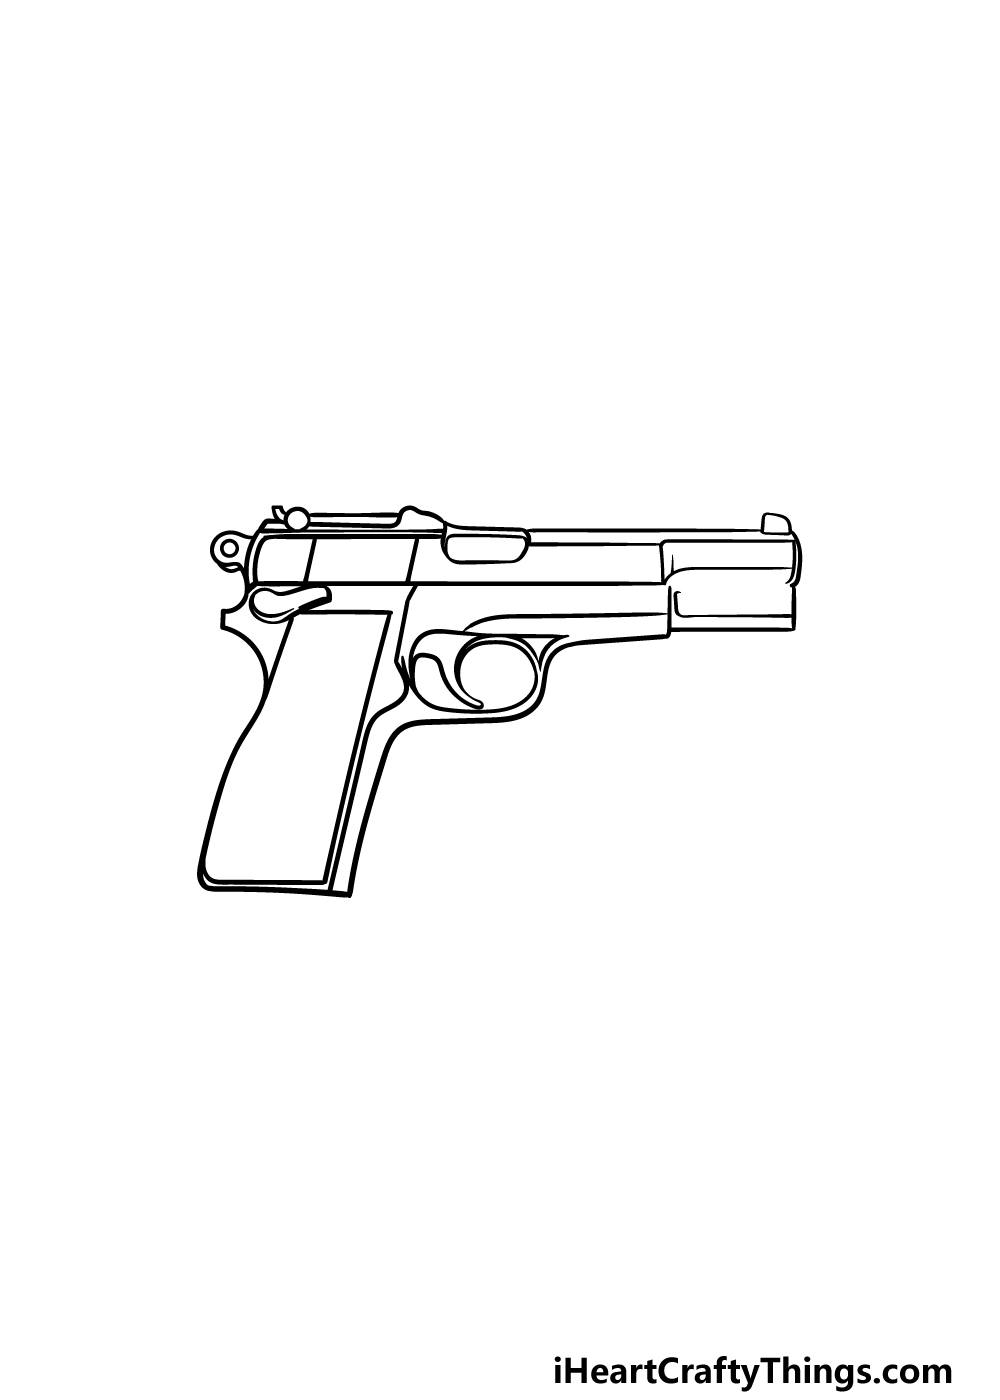
Step 2 – Next, start drawing more of the pistol outline in this step
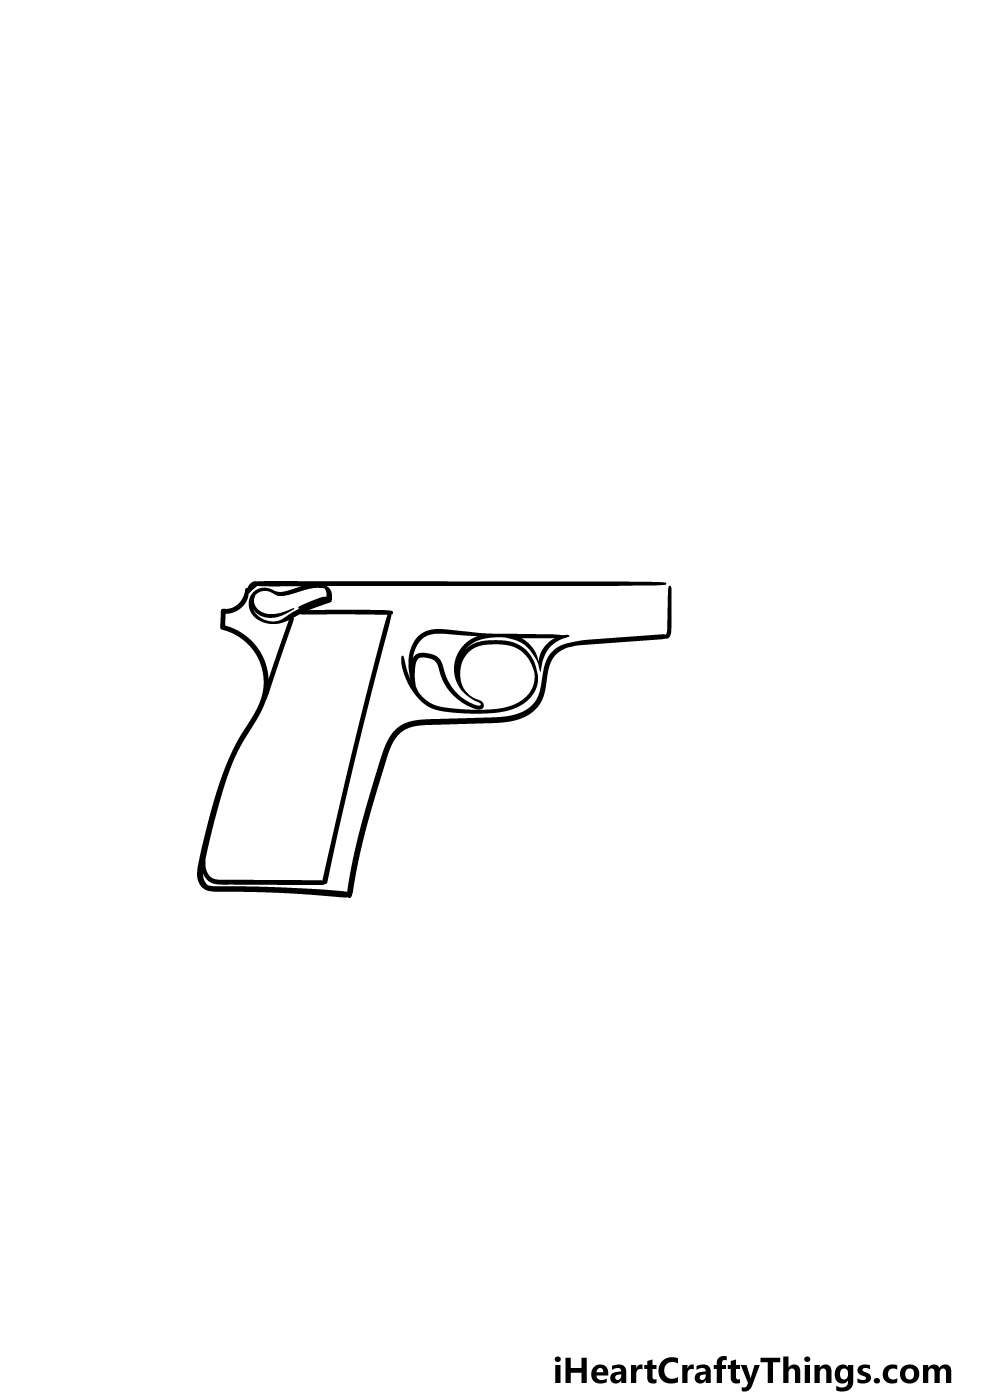
For this second part of your pistol drawing, we will be adding even more to the outline for the pistol. First, use a straight line over the top of the parts of the outline that you have drawn already.
Then, use a shorter straight line at the very front of the outline to finish off this part of the gun.
Once that part of the outline is complete, we will then draw a rectangular vertical shape inside the grip of the pistol.
You can then draw a small rounded shape with a straight edge near the top of the outline for the safety of the gun.
Finally, you can finish the outline of the trigger guard as shown in the reference image.
Step 3 – Draw some more of the outline in this step
We will continue to add to the outline and detailing of the image in this step of our guide on how to draw a pistol. To do this, we will be drawing the upper section, or barrel, of the pistol.
To do this, we will be using some slightly curved lines along with some longer, straighter ones.
This is another part where you may want to closely copy the reference image provided, as there are a few parts that stick out from the gun outline.
You can also draw the hammer of the gun at the back of it by drawing a rounded shape with a small circle in it. Once you’re happy with how it looks, we will be ready for step 4!
Step 4 – Now, add some more details to the pistol
The next few parts of your pistol drawing will be based on adding some finer details to your picture to make it look even more realistic.
Most of the lines that we will be adding in this fourth step will be quite straight, so you may find it a bit easier if you use a ruler to draw most of them.
Some smaller portions of the lines will be a bit more curved and rounded for some more realism.
Try your best to draw these details exactly as they appear in the example picture, and then we can move on to some final details in the next part.
Step 5 – Draw the final details of your pistol drawing
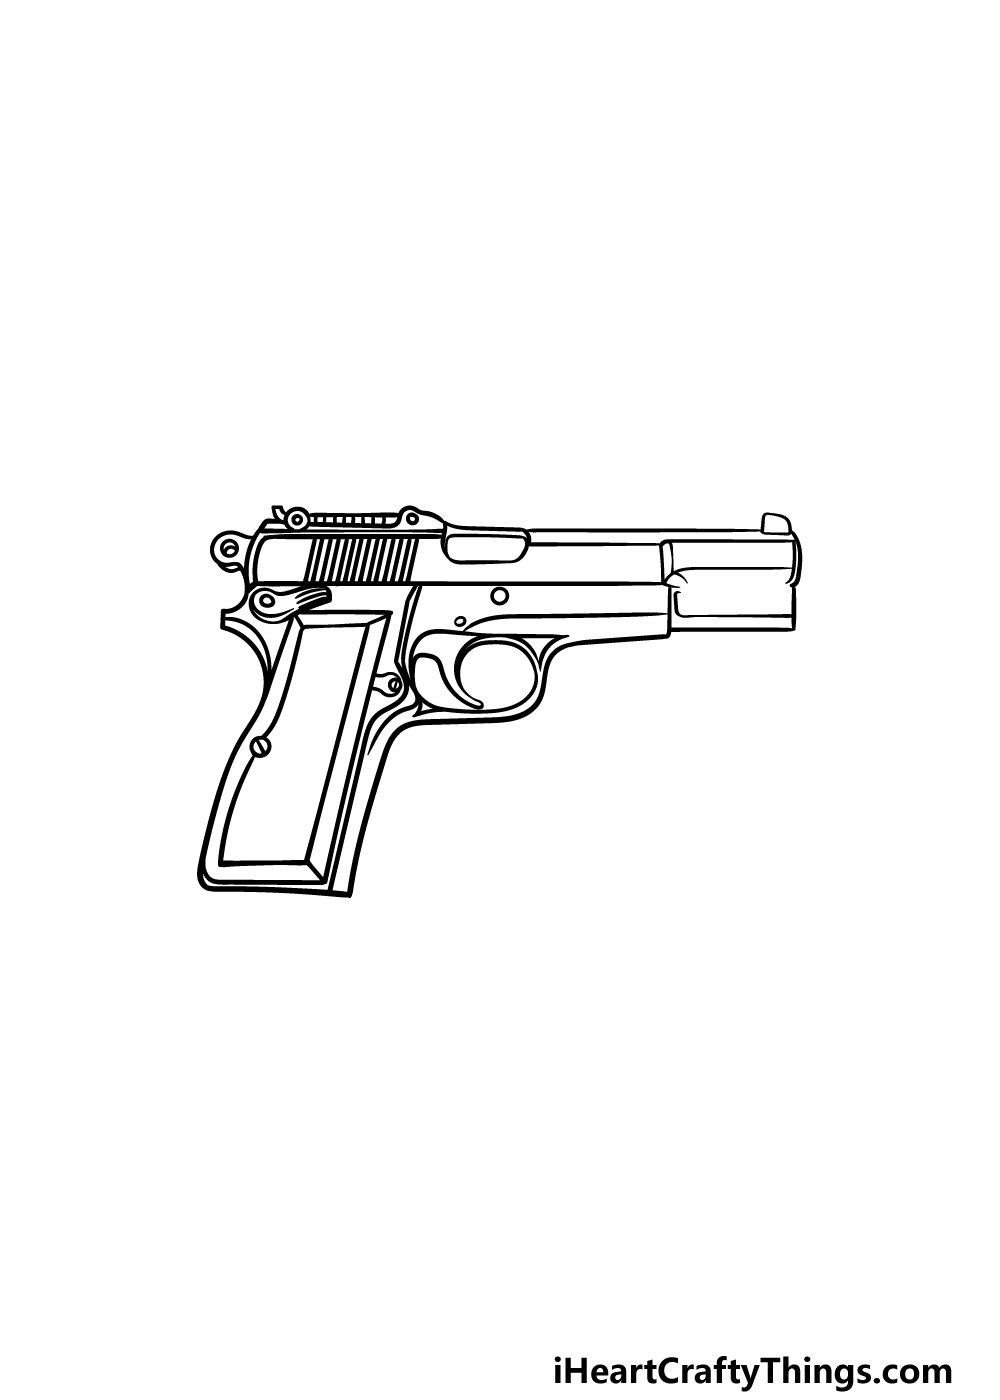
Before you bring some color to your picture, we have a few final touches and details to add in this fifth step of our guide on how to draw a pistol.
We will start by adding lots of straight lines next to each other near the end of the barrel of the pistol. Then, you can add some small circles to certain areas of the pistol for some bolts holding it together.
Once you have added these various details, you will be ready for the final step! There are also some details of your own that you could add to really finish it off.
One idea would be to draw a hand holding the gun, or you could draw a background to show where this gun is being used.
How would you like to finish off this picture?
Step 6 – Finish off your pistol drawing with some color
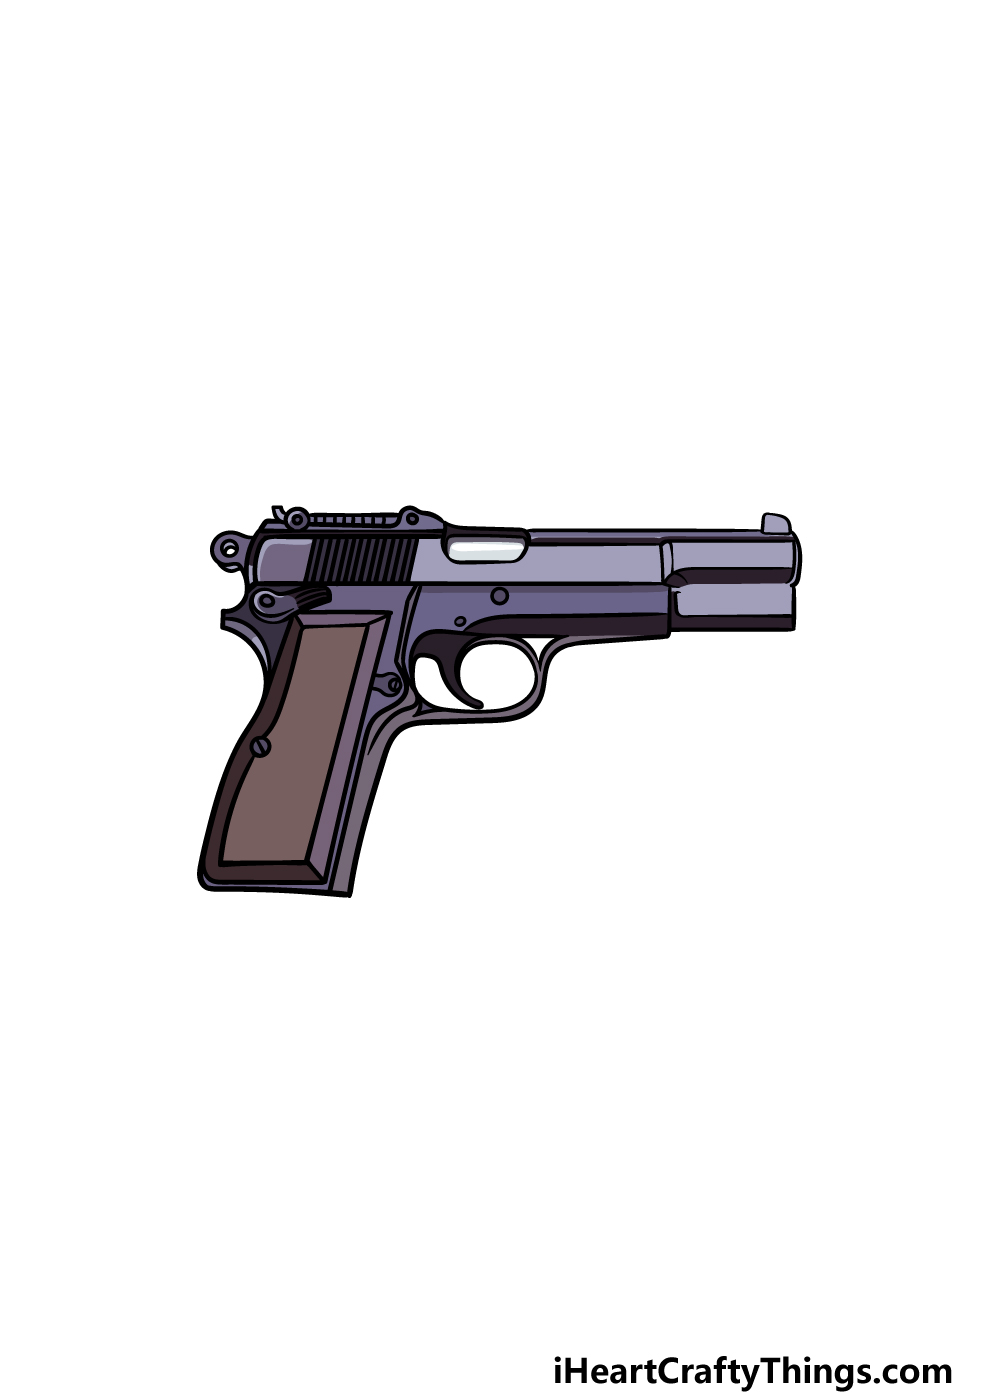
Pistols aren’t exactly known for their bright color schemes, so we went with some more muted, realistic colors for our version of this pistol drawing.
We used some browns for the grip of the pistol, and then we went with a variety of greys for the metallic parts of the gun.
You could try to replicate these colors or change up the shades a bit if you prefer.
Once you know the colors that you would like for it, you can then decide which art mediums you feel would best suit this drawing. We cant wait to see what you choose!
A Few More Ideas To Make This Pistol Drawing Even Better
This guide on how to draw a pistol certainly presented its challenges, as pistols are very highly detailed. If you struggled with it, we have an upcoming section on how you can make it even easier.
For now, we wanted to cover a few ways that you could make the drawing even better by adding to or changing it. These could be changes to the drawing as it appeared in the guide, or you could make alternate versions.
One way that you could add to the drawing would be to add some smaller objects you would associate with a pistol. Bullets would be one idea, or you could draw the clip you would insert into the pistol.
You could even draw the holster that you would keep a pistol like this in. If you need some help with your chosen additions, you could look up some images online and use them to help you.
Adding additional weapons could be a fun idea as well! You could add other cool pistols or revolvers and compare them to this one.
If you would like to add larger guns, then that could be done as well. Once again, you could use reference images to draw these additional weapons if you need some extra help.
If you’re a gun expert who knows all of the different parts of a pistol, then you could draw lines to the various parts of the gun and then label them. That would be a great way to add an educational element!
Adding a background such as a shooting range would also be great to finish off this drawing. These are just a few ideas, but how else could you go about adding to or changing this pistol drawing?
3 More tips to make your pistol drawing easy!
Make sure you’re on target with these handy tips for your pistol sketch!
With this pistol drawing, we went for a really realistic and detailed portrayal. This can definitely make the picture quite tricky and frustrating to draw, and we don’t want that!
If you find yourself unable to overcome certain details and elements, you should feel free to change some elements. Removing details that are nice extras but not essential can be a great way to do this.
There is a fine line to this, however, as you want to avoid taking out anything vital to the design. When changing or removing details, make sure to stick to parts that you are specifically struggling with.
What are some problem areas you could change?
Next, you can use some pictures of real pistols to aid you as you create this drawing of a pistol. If you’re lucky, you may find some photos that are very close to the one that we drew in this guide.
Even if the picture you find is a bit different, it could still prove helpful! You may even prefer the design of the photo you find, in which case you should feel free to alter the design to look like it.
If you have a favorite pistol design already, then you could make a point of altering our design to look like it. What kind of pistol would you use as a model?
Most artists shudder at the thought of drawing a hand, but adding one could actually make this pistol sketch a bit easier! This would especially be the case if you prefer to draw hands over more mechanical structures like the pistol.
For instance, maybe you struggle with drawing the handle. If that is the case, then you could make this pistol drawing easy by covering it with a hand.
The hand doesn’t even need to be super details and realistic. You could even make it cartoony or just portray the outline.
Not only could it make it easier, but it would also add new life to the image!
Your Pistol Drawing is Complete!
Pictures such as this one can often turn into a frustrating experience when you try to draw them, as there are loads of details and angles to get right.
Our aim in this guide on how to draw a pistol was to break it down into smaller steps so that the frustration would be greatly lessened. We hope that this guide succeeded in this endeavor for you!
We also left it open for you to add some details of your own to finish it off. There were a few ideas we went over that you could try, but be sure to add some of your own as well!
Your drawing fun doesn’t have to end here, as you can keep it going on our website. We have tons of great drawing guides to enjoy there with more on the way soon.
It’s always great when we get to see your finished artwork, so please share your finished pistol drawing on our Facebook and Pinterest pages for us to admire!