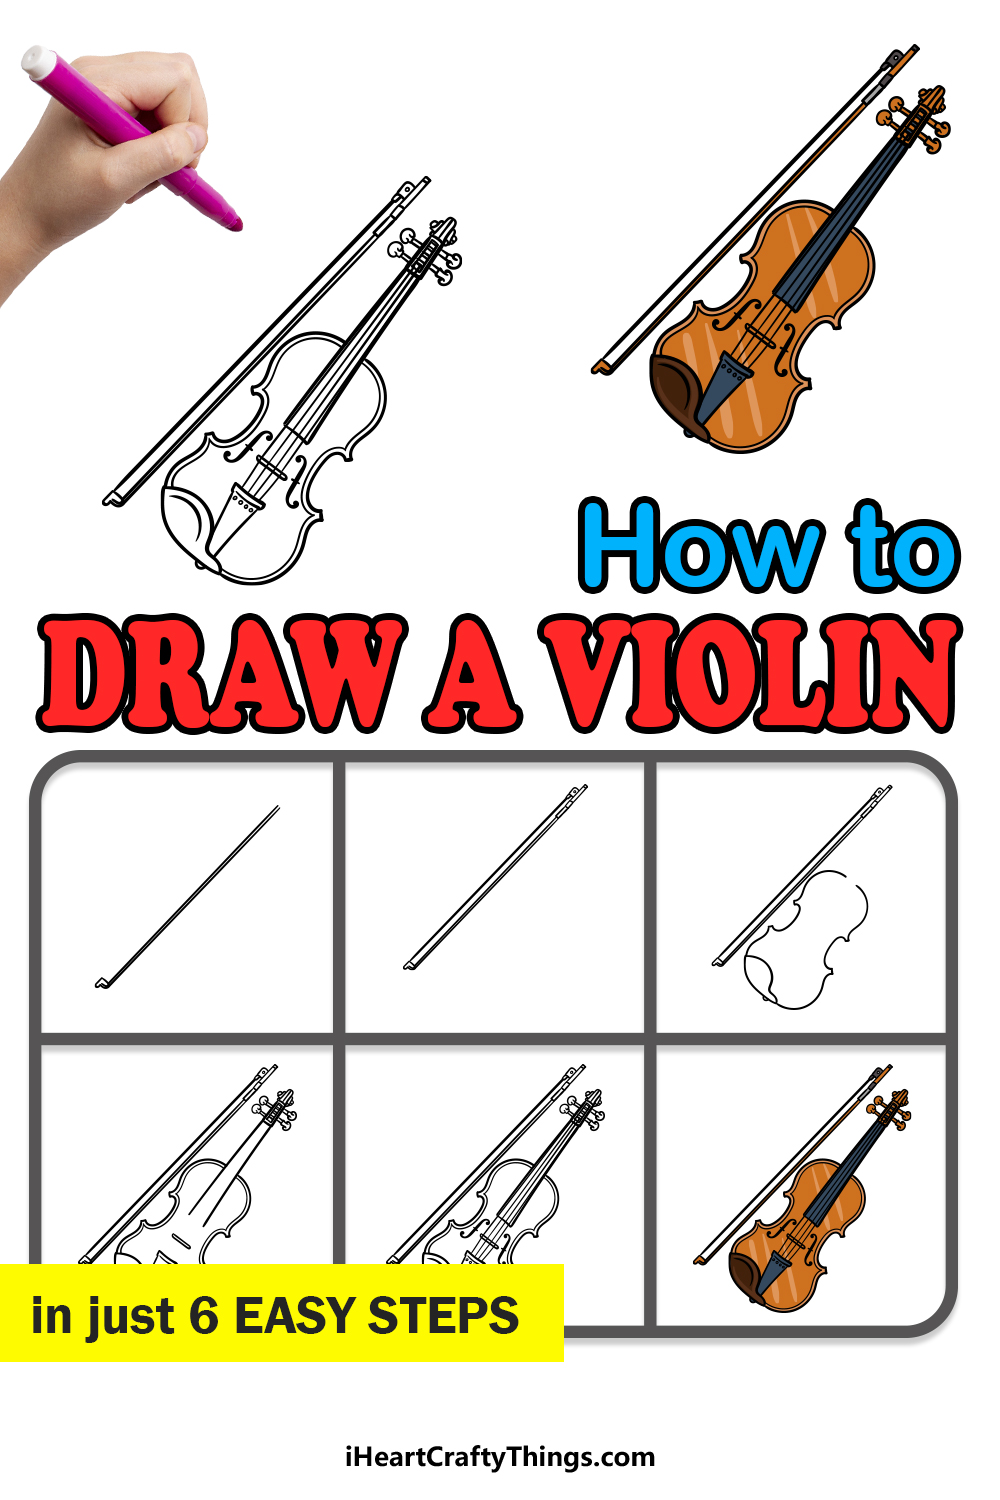
This guide on how to draw a violin will make it easier to recreate this gorgeous instrument! You will be able to make a detailed depiction by following this tutorial for kids.
I absolutely love the sound of the violin, I think it has such a gorgeous sound but it also looks so pretty. Each violin is a masterfully crafted work of art, and that’s why so many people like to learn how to draw them.
That being said, you may find that it’s much more difficult than you may have imagined because of all of the details and specific shapes.
That’s why I made this guide, as I want to walk you through everything you need to know. I’ll take you through each step and explain them as we go.
By the end, you will be able to make a drawing to be proud of!
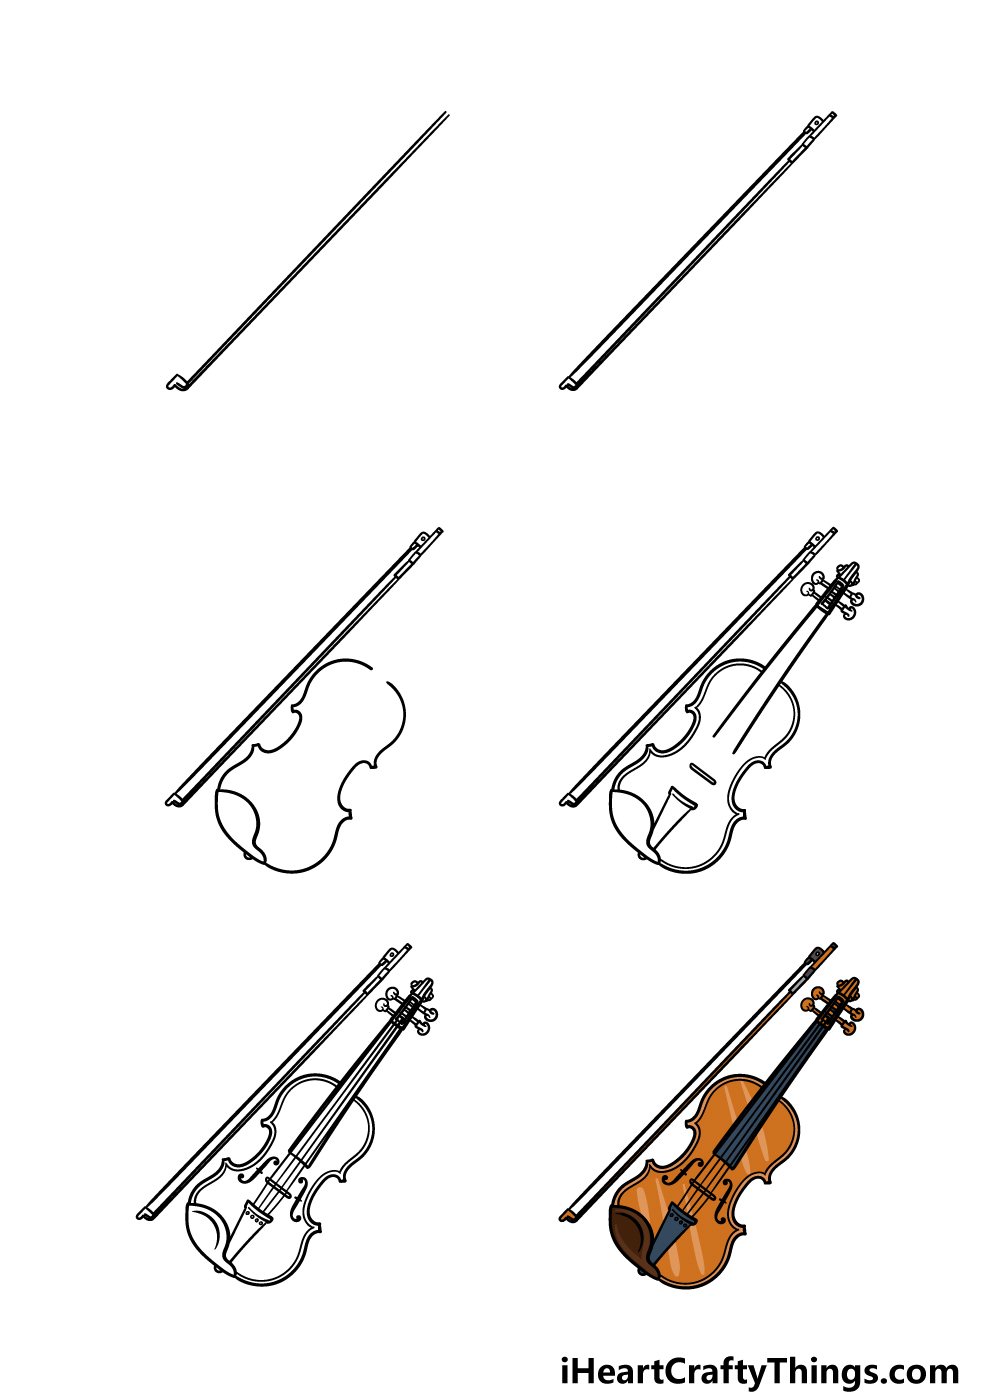
Find Out How To Make Your Violin Drawing
How to Draw A Violin – Let’s Get Started!
Step 1
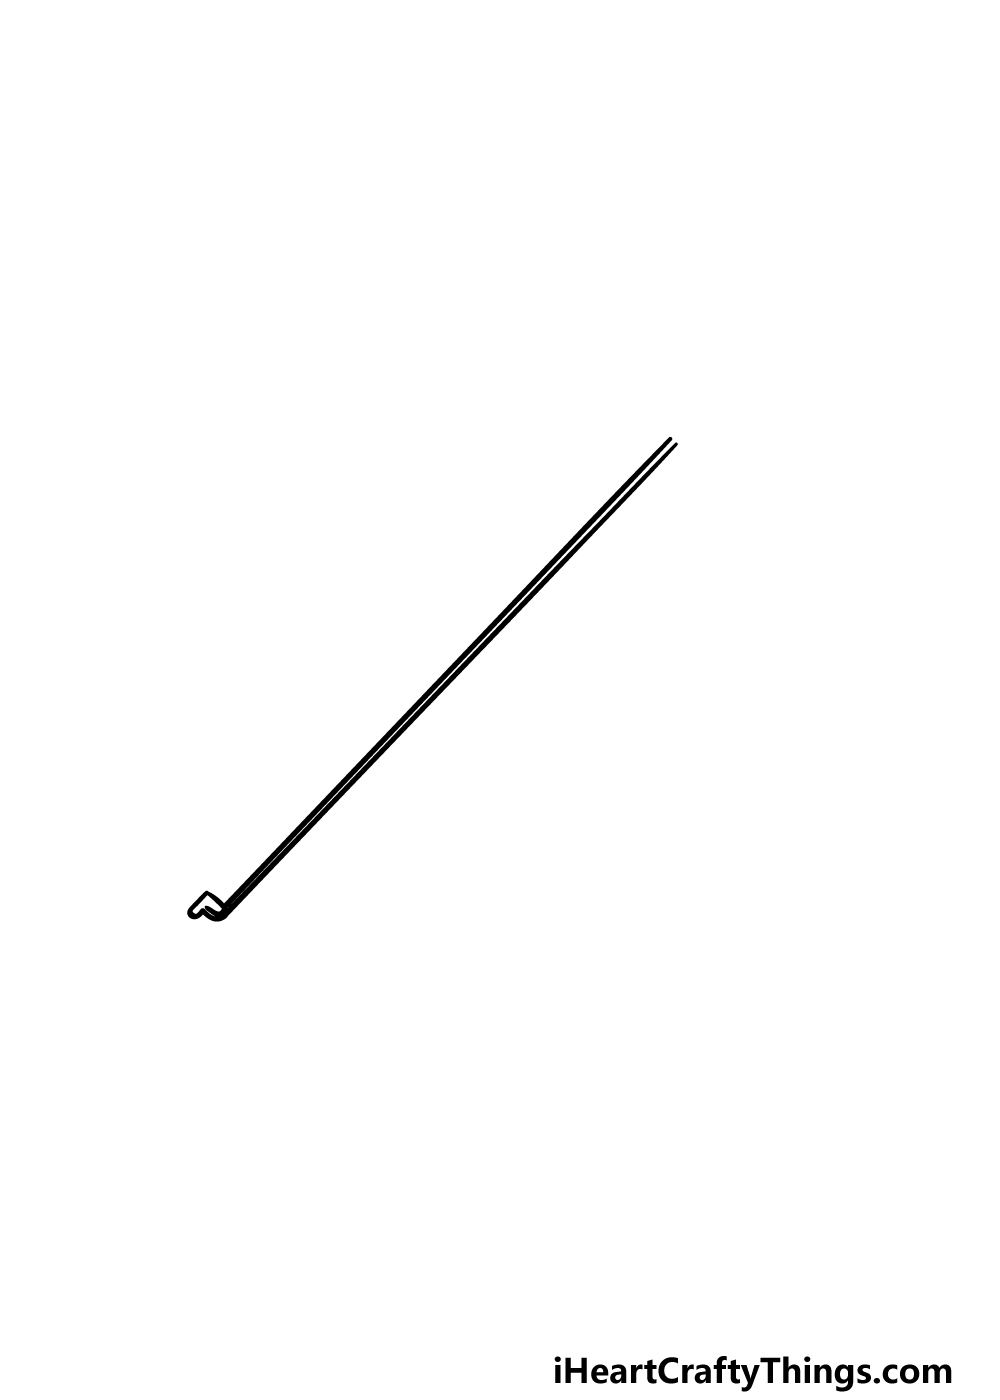
In this first step of our guide on how to draw a violin, we won’t actually be drawing the violin itself. Instead, we will be drawing the bow which is used on the strings to create the notes.
When drawing this bow, you will definitely want to use a ruler to make your life much easier. Using your ruler, draw two thin lines very close to one another.
Then, there will be a small metallic part that you can add to the bottom end of the bow.
Step 2 – Next, we can finish off the bow
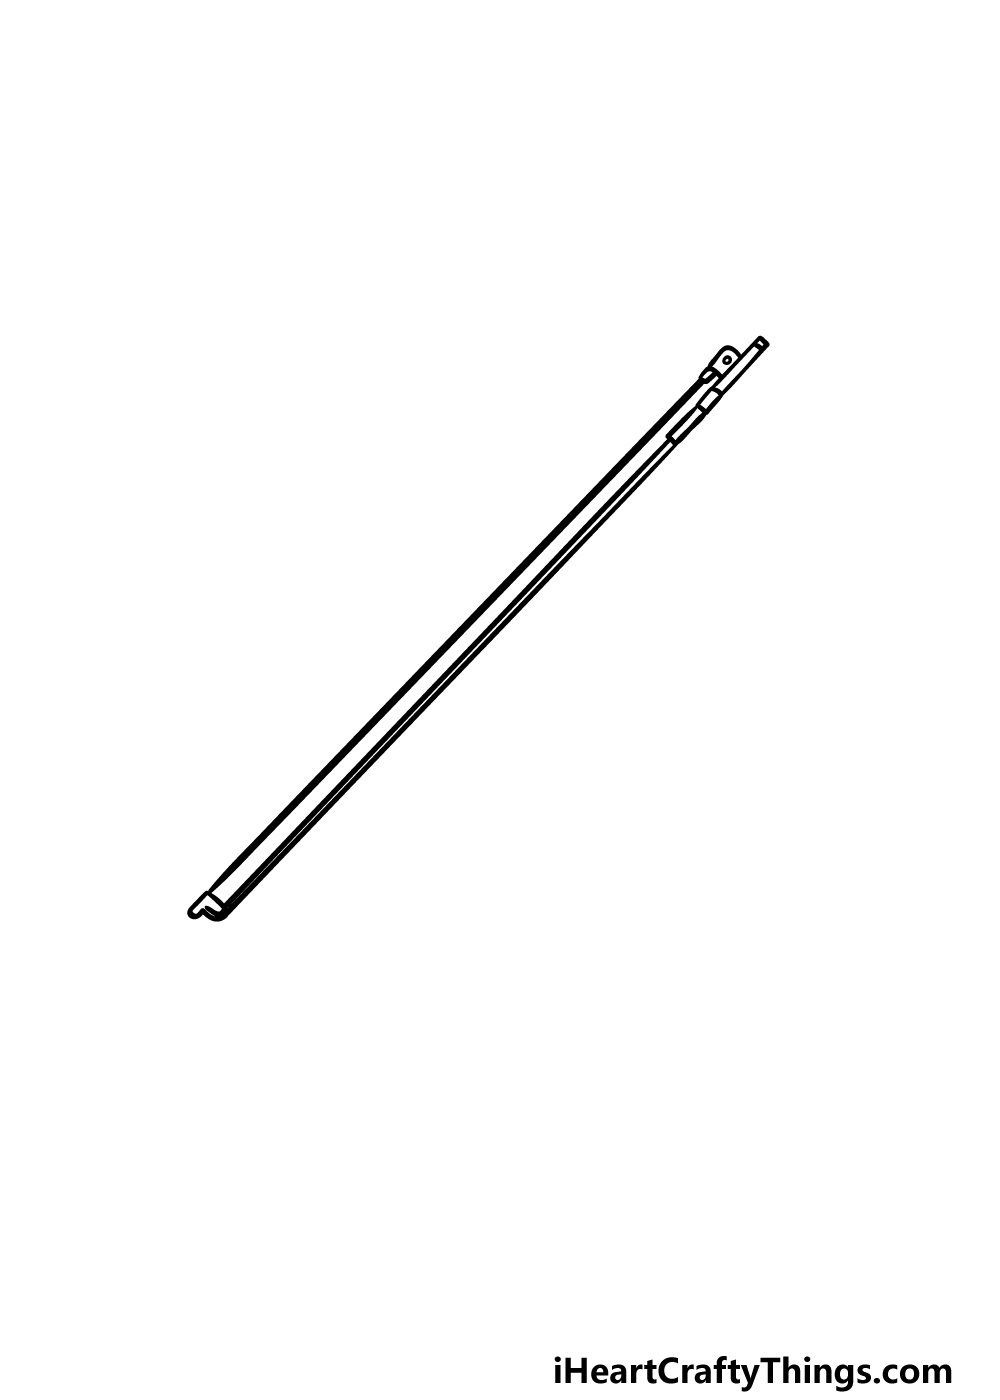
We will be finishing off the bow in this step of your violin drawing. You will definitely still want to have your ruler on hand for this one!
To start, add three very thin sections onto the top end of the bow from last step.
Then you can use your ruler to draw the thicker string of the bow extending from this part to the part that you drew at the bottom of the bow.
Once this bow is complete, we can finally start to draw the outline of the violin itself in the next step, so let’s proceed!
Step 3 – Draw the outline for the violin
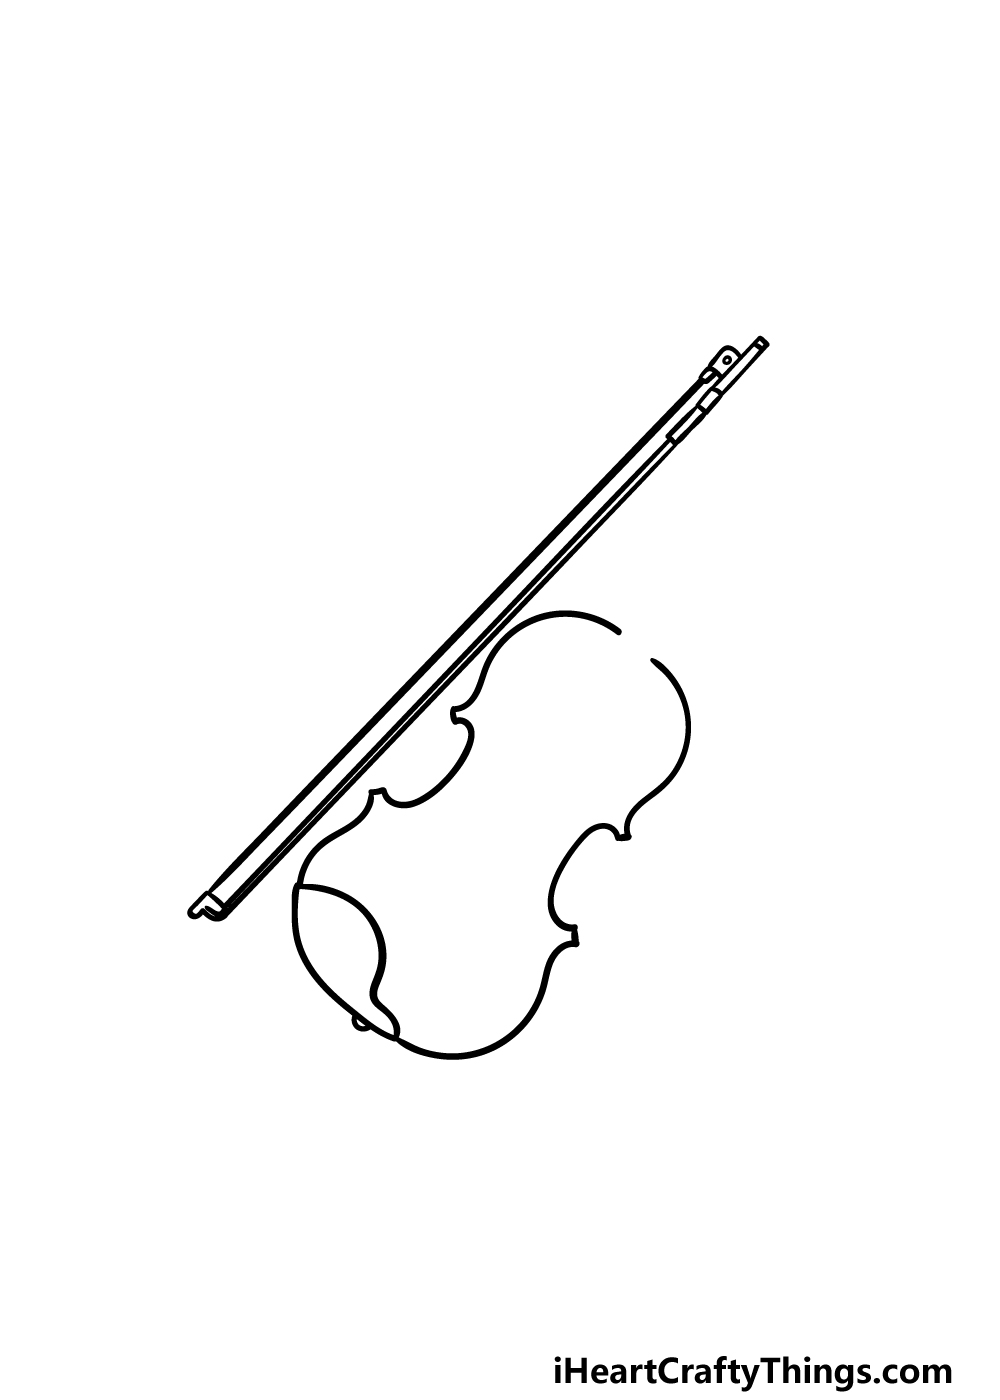
In this third step of our guide on how to draw a violin, we will begin drawing the outline for the body of the instrument.
This could be a bit of a tricky step, so you’ll probably want to take it slowly and follow the reference picture closely as you draw.
The top of the violin will be quite rounded, and then there will be an oval-shaped part extending into the violin.
The body will then extend outward and then back inward for the rounded base of the violin. Once you have drawn the first half of this violin body, simply mirror exactly what you just did on the other side.
If any of this sounds a bit complicated, just make sure to copy exactly what you see in the reference image and you will do just fine!
There will also be a rounded line added near the bottom of the violin for the part that your shoulder would press against.
Step 4 – Now, start drawing the neck and strings
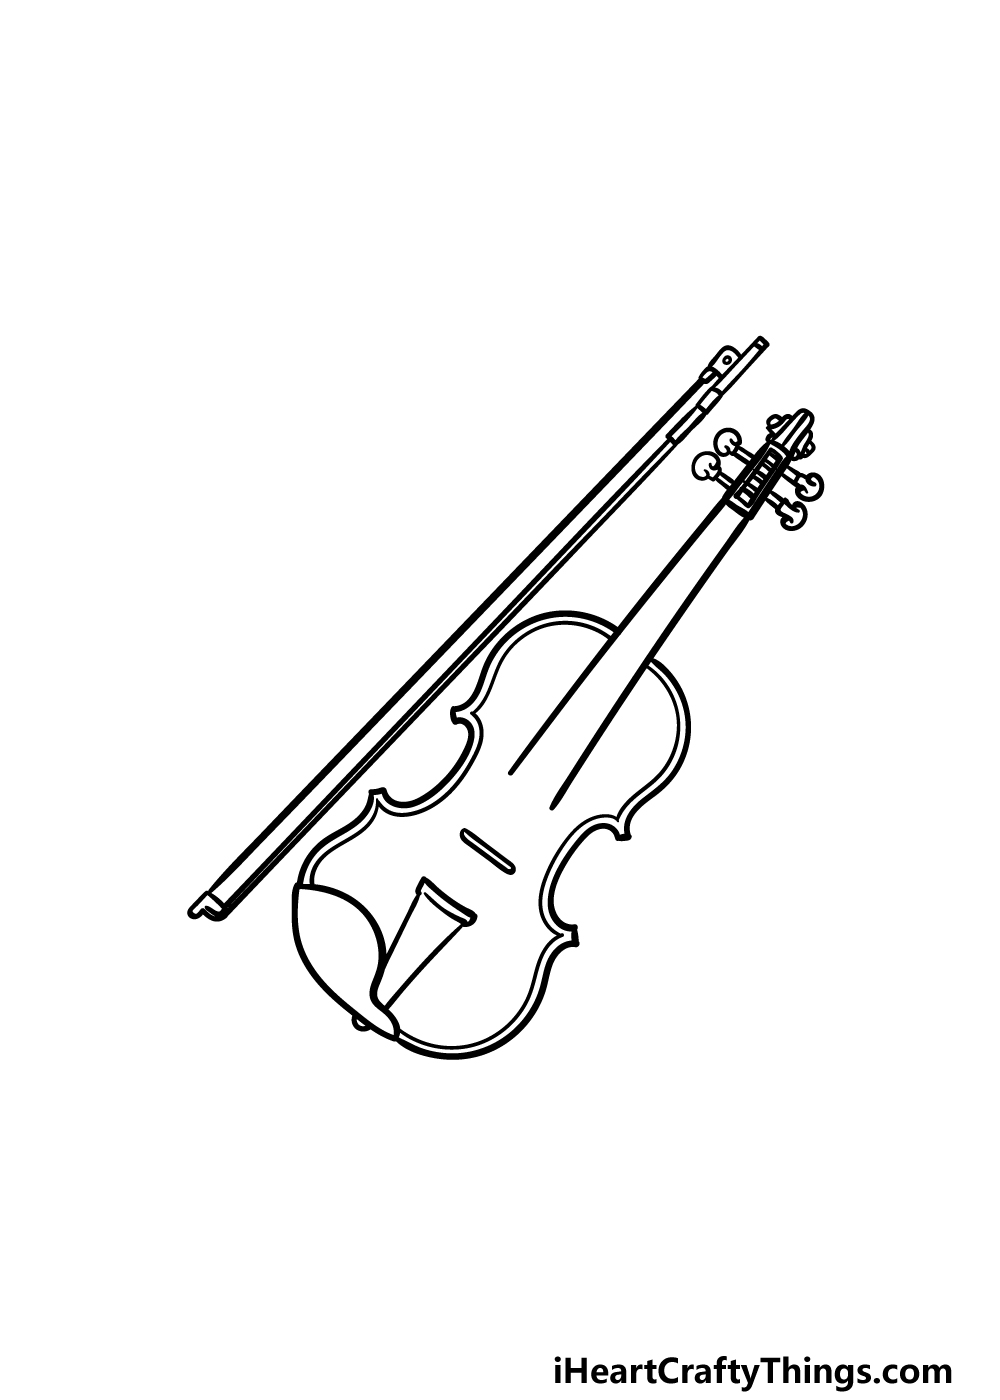
Using your ruler again, draw two lines coming up from the body of the violin drawing for the neck of the instrument.
Then, we will draw some short, straight lines with some circular shapes at the ends of them for the tuning pegs at the end of the neck.
You can then finish off this step by drawing a small, very thin shape near the bottom of the violin and then some curved lines for a triangle-like shape there as well.
Once these aspects have been drawn, draw another line close to the inner perimeter of the outline and then we can move to the next step!
Step 5 – Finish off your violin drawing
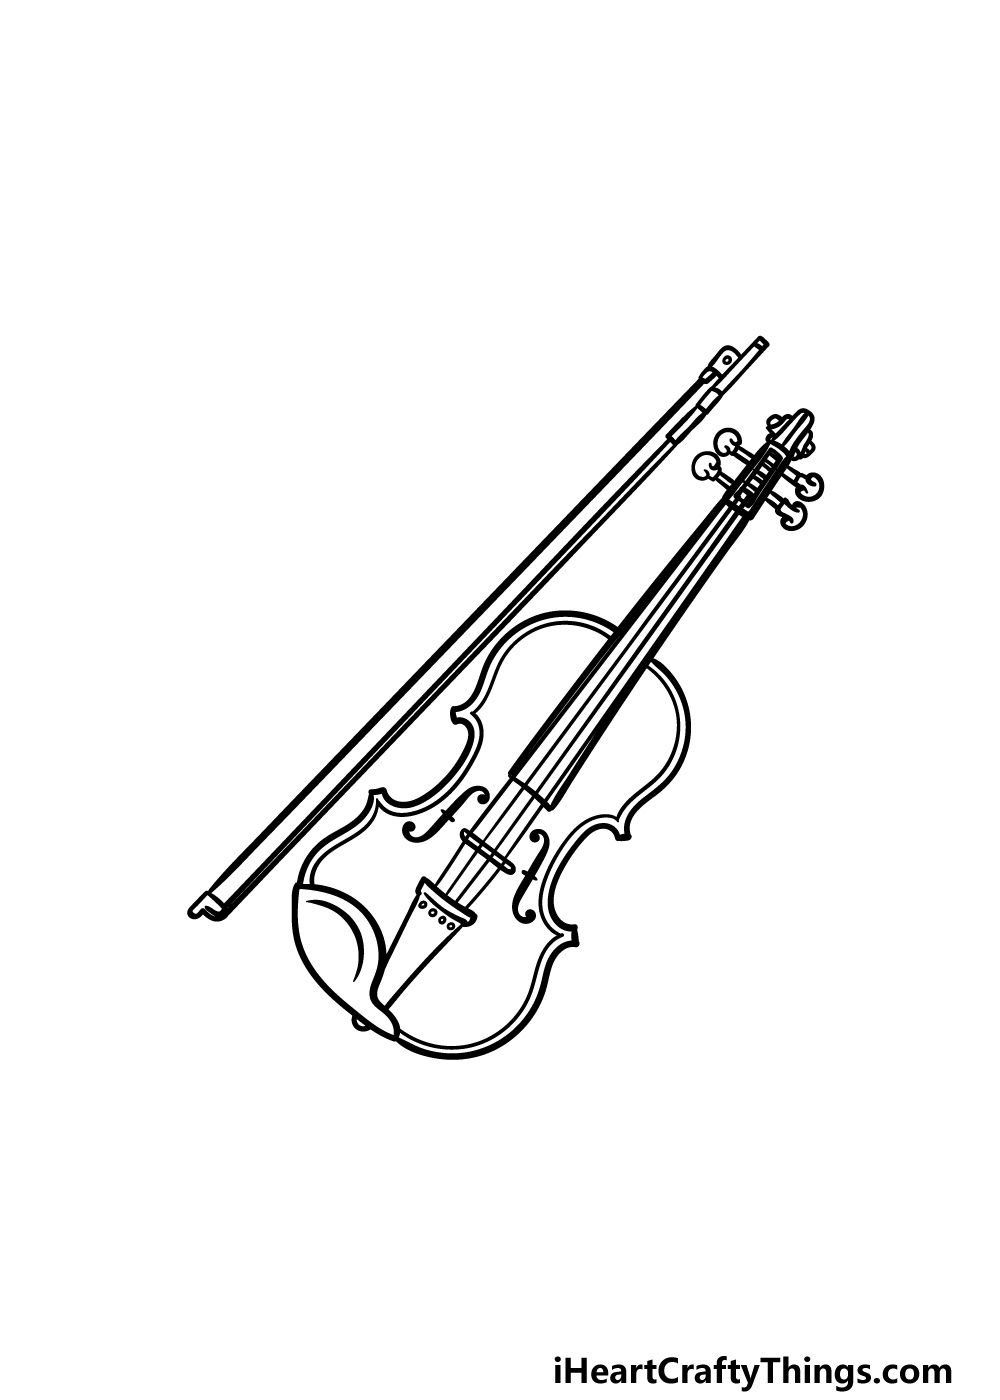
You’ll want to get out your ruler one last time for this step of our guide on how to draw a violin. We will be adding four straight lines through the center of the violin for these strings.
Then you can draw some small little dot shapes on that triangle-like shape you drew earlier to show where the strings would connect.
Then we will finish off by drawing a symbol on either side of the strings. It will look a bit like a fancy F on one side and a backward fancy F on the other.
Once this final detail is added, you’re ready for the final step! You could also draw a background with some more musical instruments, or maybe add some music notes for a more stylistic background.
These are just a few ideas, but feel free to get creative and use some ideas of your own!
Step 6 – Finish off your violin drawing with some color
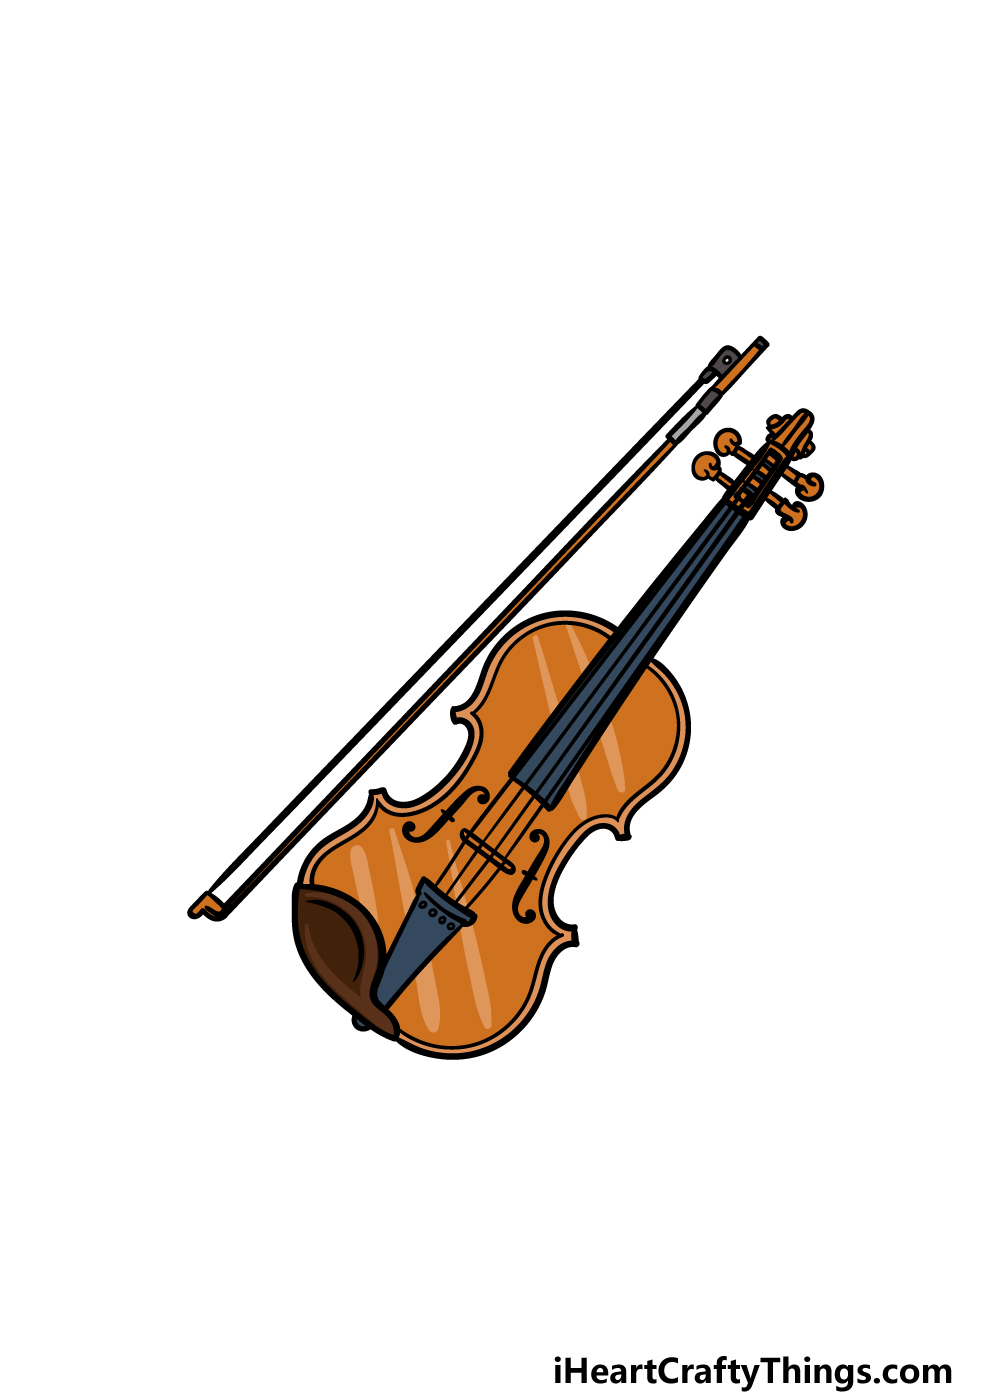
We will be finishing off this beautiful violin drawing of yours with some color now. We used some very light brown for the wooden sections of the violin, and then we used some darker greys for the neck.
These are the colors we went with, but this is your drawing and you should definitely add any colors or shades that you love!
You can also have a great time playing around with your art tools and mediums, as this is a great way to get some additional color variation. We can’t wait to see what you end up going with!
Here’s how you can make your violin drawing even better…
These tips for your violin sketch will help to make it even better!
This drawing of a violin shows the instrument next to the bow that is used to play it. While this is a great way to display this instrument, you could also show the bow going across the strings.
This would make it look like the instrument is actually being played. You could also draw the violin at a different angle to help with this new look for the image you are creating.
You could take our previous suggestion even further by drawing someone holding the violin. This person could be drawn realistically, or they could be in a cartoon style if you prefer.
Once you know the style you would like to use for this character, you could then choose who to base them on.
It could be yourself or someone you know, or maybe you would like to depict a famous violin player.
There are so many options, so who would you like to add to this image?
The violin is usually used along with other instruments in an orchestra. You could add some of these instruments to your violin drawing!
If you need some inspiration, you could look up some images of orchestras to see what these instruments may look like. Whether you would add people playing them or not would be up to you.
What are some other instruments you could add to the image to make this ensemble more complete?
Finally, it would be great to add a background to this violin sketch. There are a few ways that you could do this.
One way would be to actually draw a background setting. So, if someone is playing this violin, you could draw a concert hall setting to finish off the scene.
If you kept it to just the violin, then you could draw a pattern for the background. One fun idea would be to use music notes and lines to make the background look like sheet music.
Your Violin Drawing is Complete!
We hope that you really enjoyed this guide on how to draw a violin!
Our main goal with this guide was to make it so that recreating this amazing instrument would be neither hard nor frustrating for you. We also hope that it was tons of fun for you to work through, and you should be proud of your picture!
Don’t forget that you can also add some details, elements and color choices of your own. We spoke about just a few you could use, but this is your chance to show off your creativity as you add some of your own!
Then, when you’re happy with your finished violin, you can find your next fun drawing guide on our website! We upload new ones frequently, so be sure to keep checking in.
We would love to see how you finished off this amazing violin drawing as well, so please be sure to share your artwork on our Facebook and Pinterest pages.