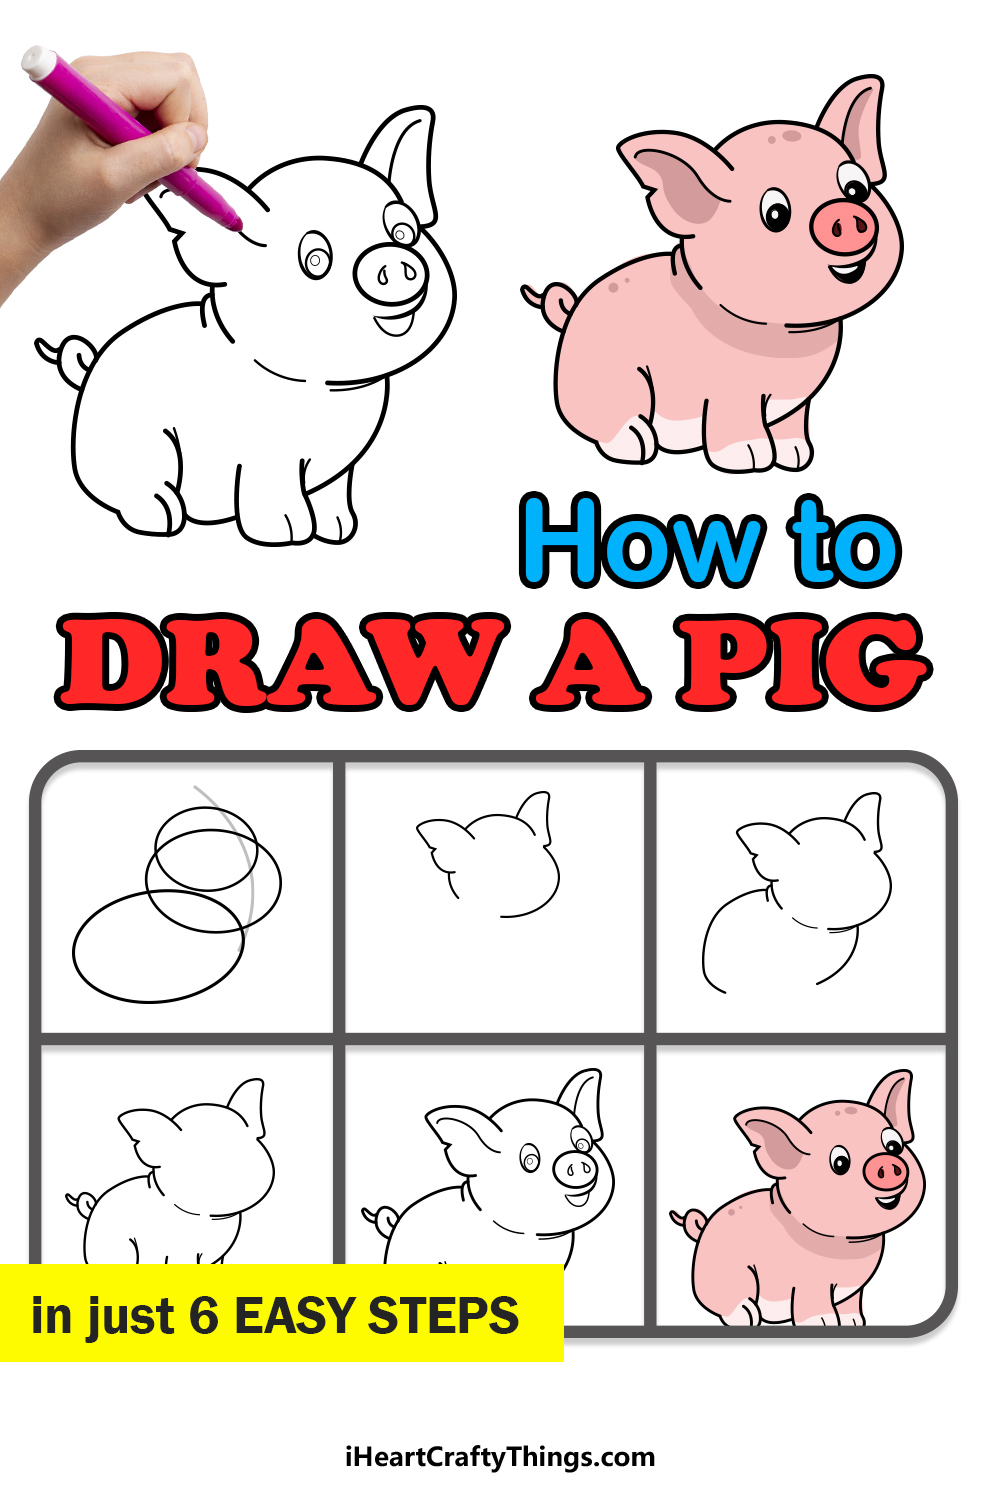
Pigs are a popular animal and are a favorite animal to millions of people. Their popularity isn’t only due to their usefulness in farming, though.
They can also be really cute with a lot of character, which makes them quite beloved to many people.
They have been turned into many different cartoon characters and been featured on many products, movies and shows.
If you are one of the many pig fans in the world, then you may have wondered how you can learn to draw a pig yourself.
This easy step-by-step guide on how to draw a pig in 6 easy steps will make it easier than ever!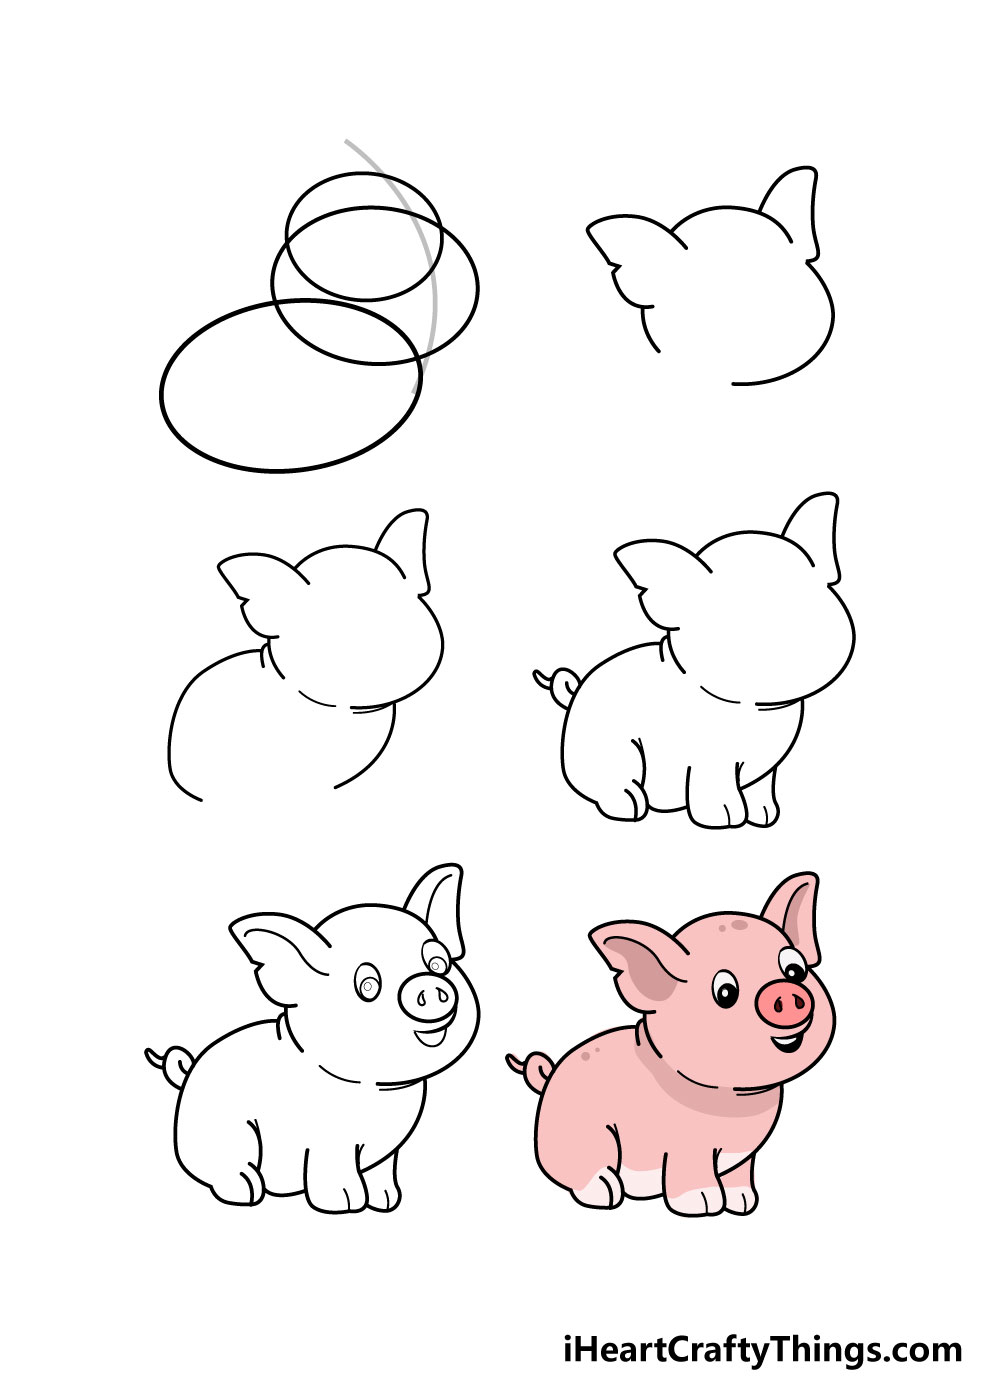
How to Draw A Pig – Let’s get Started!
Step 1
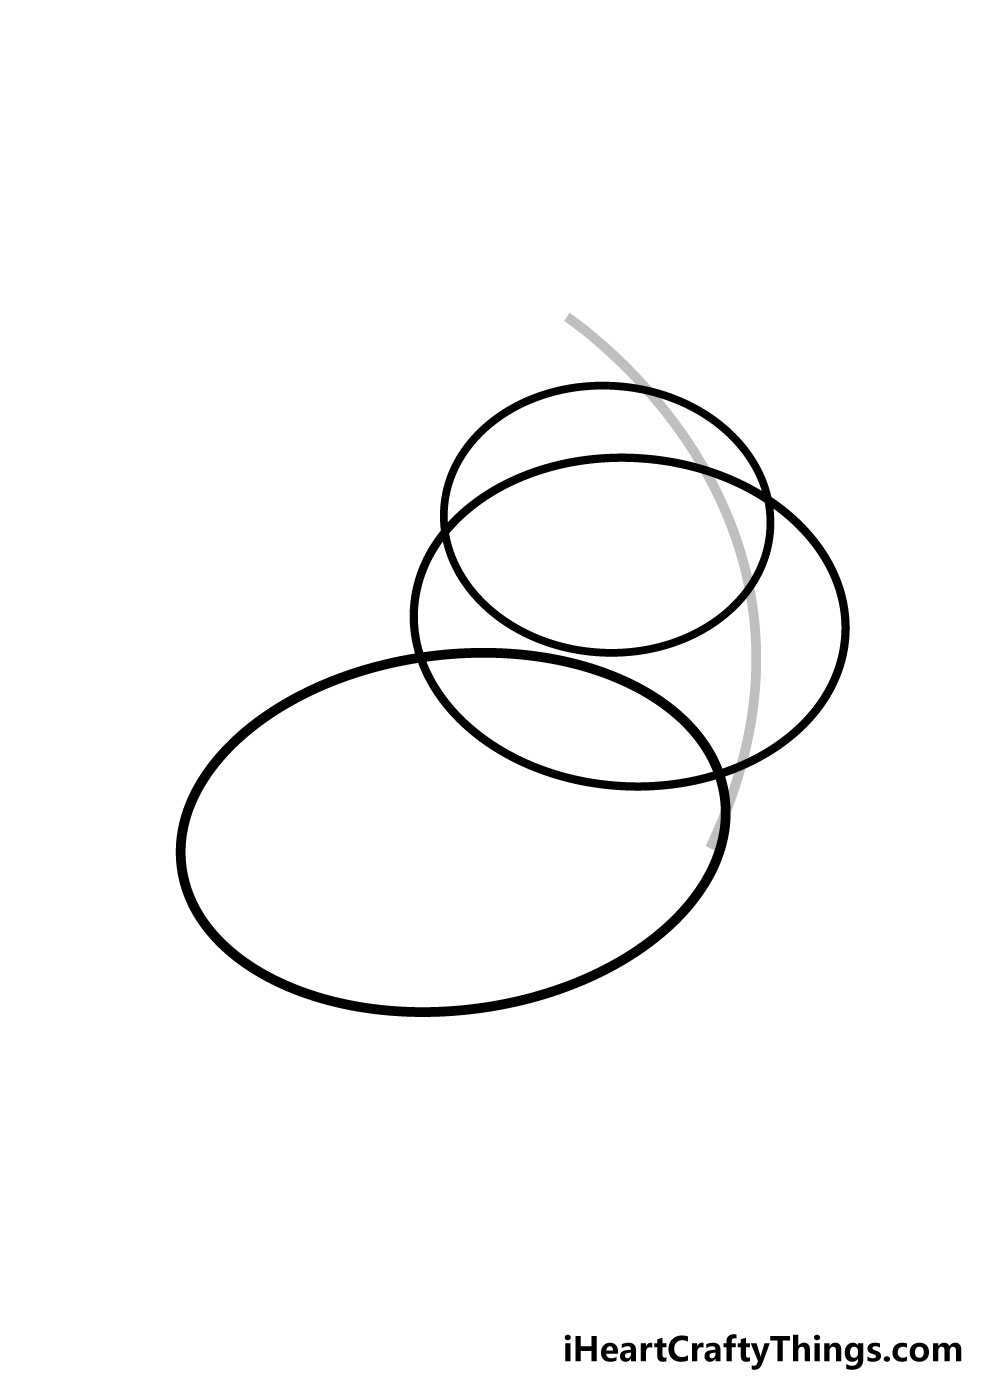
To start this guide on how to draw a pig, we will be drawing in a few shapes that will make it easy to draw your pig later on.
Using the reference image as a guide, we will be drawing in three ovals intersecting with one another.
For this step, it is recommended to use a lighter pencil to draw in these shapes, as we will be erasing them later.
This step would be much easier if you use a drawing compass to create the ovals. This first step is definitely going to be made easier if you follow the picture provided closely.
Once you’ve drawn in the ovals, you can then draw in a curved line through the top two ovals as seen in the image.
Step 2 – Next, draw in the pig’s head
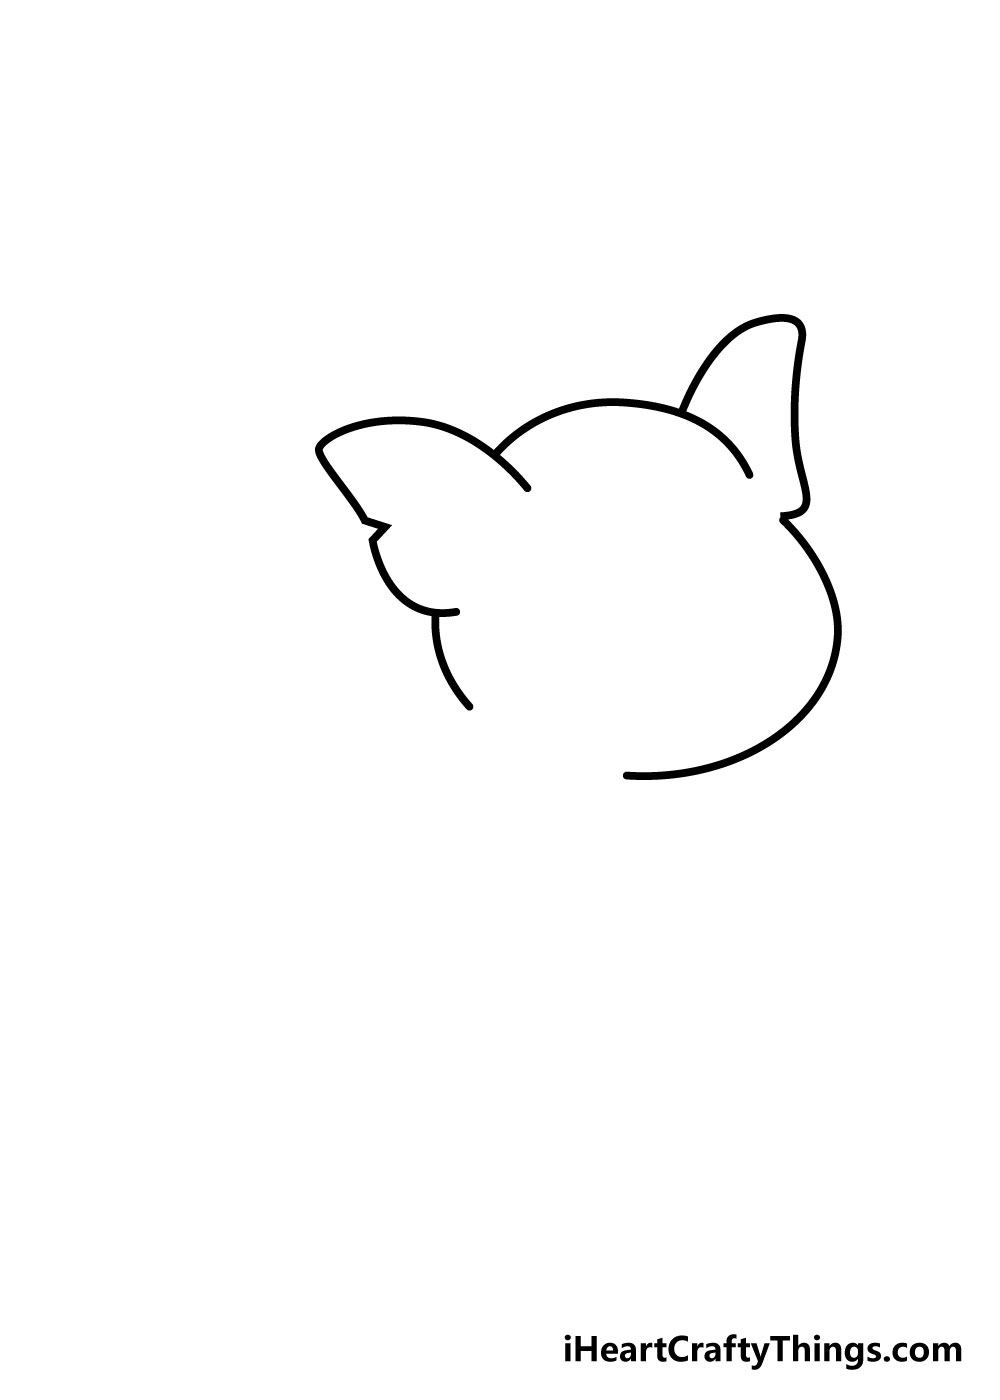
Once you have your pencil shapes drawn in, you can start to draw the outline of your pig drawing.
Using the ovals you drew previously as a guide, you can carefully draw in the head and ears. The ovals you drew will help to keep the pig’s head in the correct shape.
I would recommend not rubbing out the pencil lines until after the next step, as we will be using the other oval you drew as a guide for the body.
Step 3 – Now, draw in the pig’s body
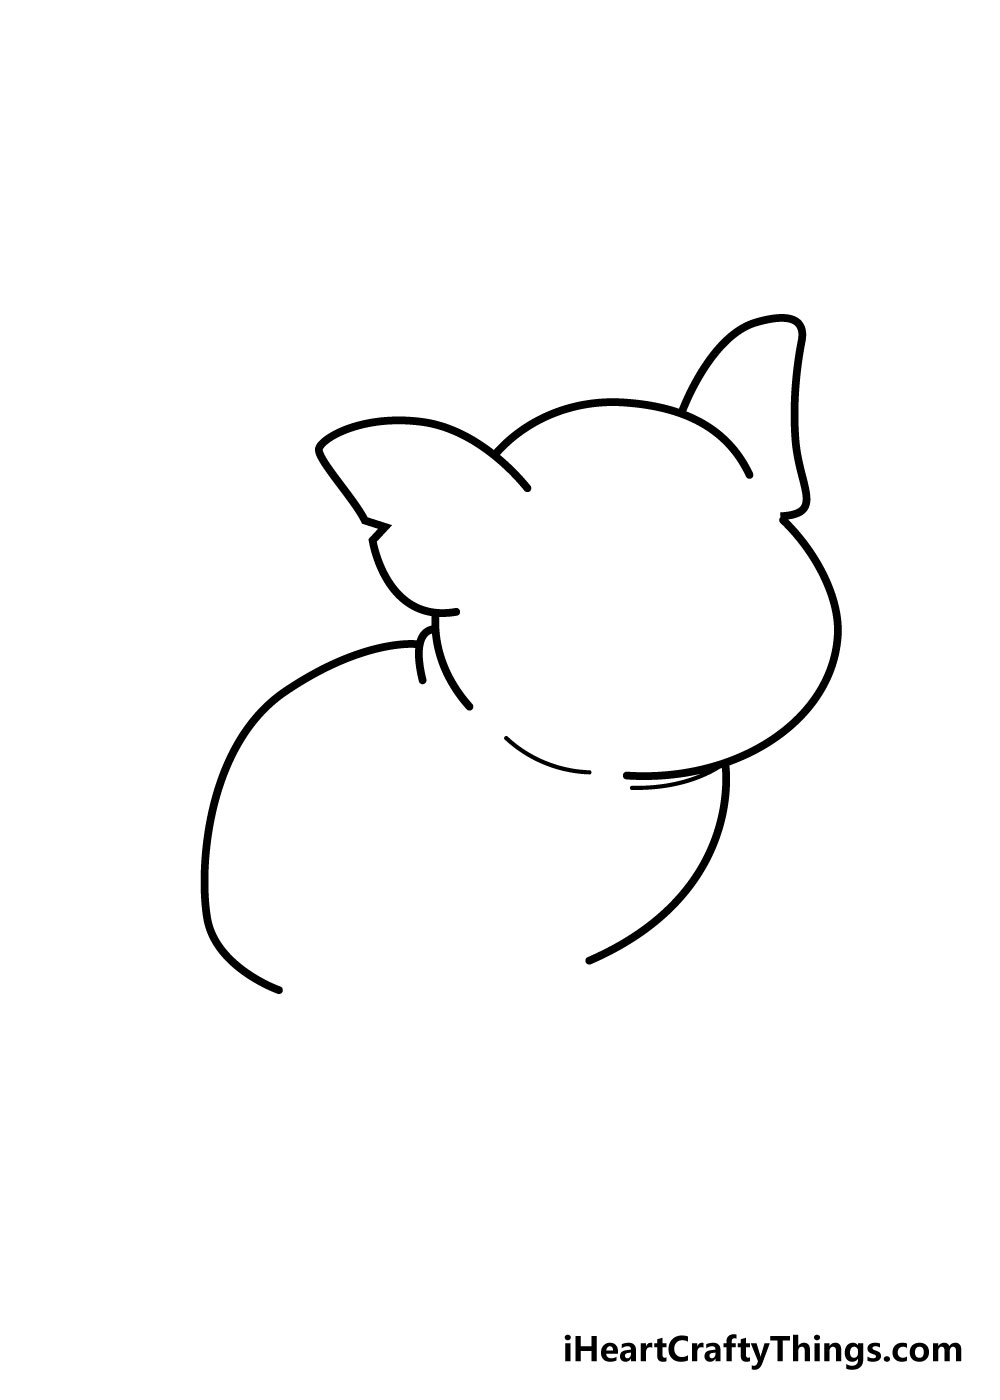
For this step in our guide on how to draw a pig, we will be using the other oval that you draw in as a guide.
You can trace over most of it with a pen, leaving a gap at the bottom where the legs will be going.
Once you’re happy with the head and body of your pig drawing, you can erase the ovals that you drew in step 1.
If you drew over the pencil with a pen, make sure that the ink is dry before you start erasing! If you start erasing too early, you could smudge the ink if it’s a bit wet.
Step 4 – Next, we will draw in the legs and tail
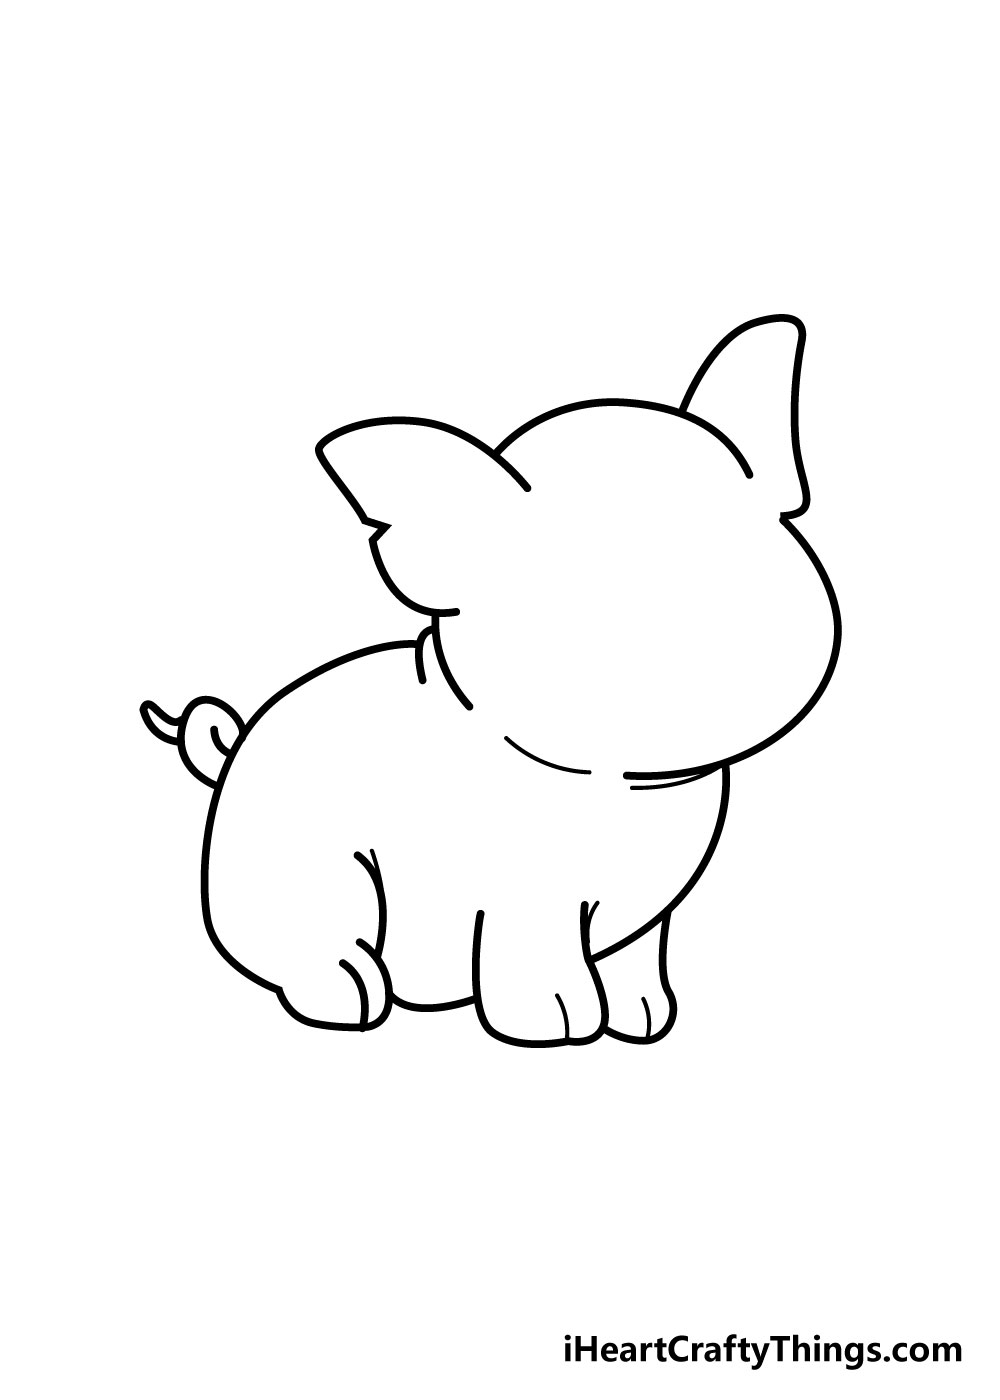
In the next step of our guide on how to draw a pig, we will be adding in some legs and a tail. This pig will have some cute, stubby little legs, so when you add them in they will be really short and stout.
The reference image will show you how you could make them.
Once the legs are drawn in, you can add a little corkscrew tail using some simple curved lines like the one in the picture.
Step 5 – Now, we will draw in a face for your pig
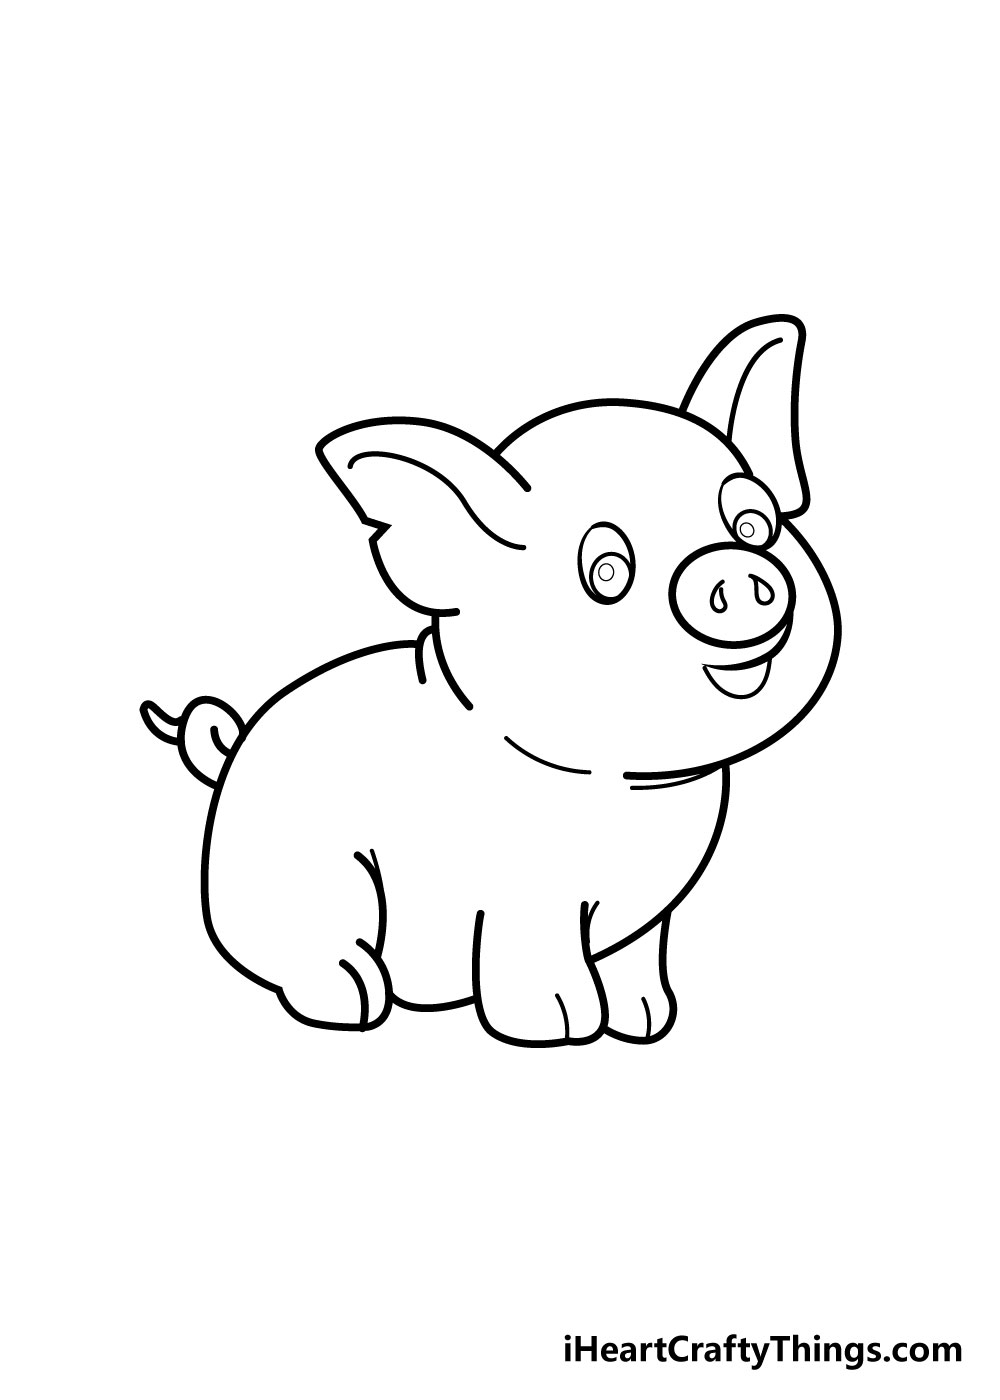
Your pig drawing is almost finished now, and it needs a cute face!
The reference image we provided has a happy face for your little pig, so you can try to replicate it using some ovals, circles and curved lines.
For this step, you could also change some elements for a unique look to it. For example, you could change the facial expression of your pig by changing details such as the eyes, eyebrows and mouth.
There’s definitely a lot of room for you to be creative with it!
Bonus: A Few Extra Tips For This Adorable Pig Drawing
We’re near the end of this guide on how to draw a pig. In the next step, we will cover coloring in your creation, and then after that we have some tips for ways you can make it even better.
Before we get to those points of the guide, we wanted to include a little bonus section with some additional tips you can use to make this drawing easier.
This would be perfect for anyone who had a hard time getting to this point or for people who are not happy with how it turned out. When following through the guide, it doesn’t hurt to add a few extra steps.
For example, you could go back to the beginning of the guide and then get out your pencil. Try to draw some simple rounded shapes for the head, body and limbs of the pig.
Then, you can take a slightly darker pencil and add a few more refined details. With an even darker one, you can start planning out the final lines as they appear in the reference images.
That way, you can erase your mistakes as you go and then draw the final lines when you’re ready. You could also stand to look up some pictures of pigs to help you.
An image search will help you to find tons of pig pictures, and these could be real photos or similar cartoon pigs. Any pictures you look up will give you a better idea of the details and proportions.
You could use these pictures along with our tip on using basic pencil shapes to prepare yourself for the parts of the guide that gave you the most trouble.
We hope these extra tips helped you if you were struggling!
Step 6 – Now finish it off with some color
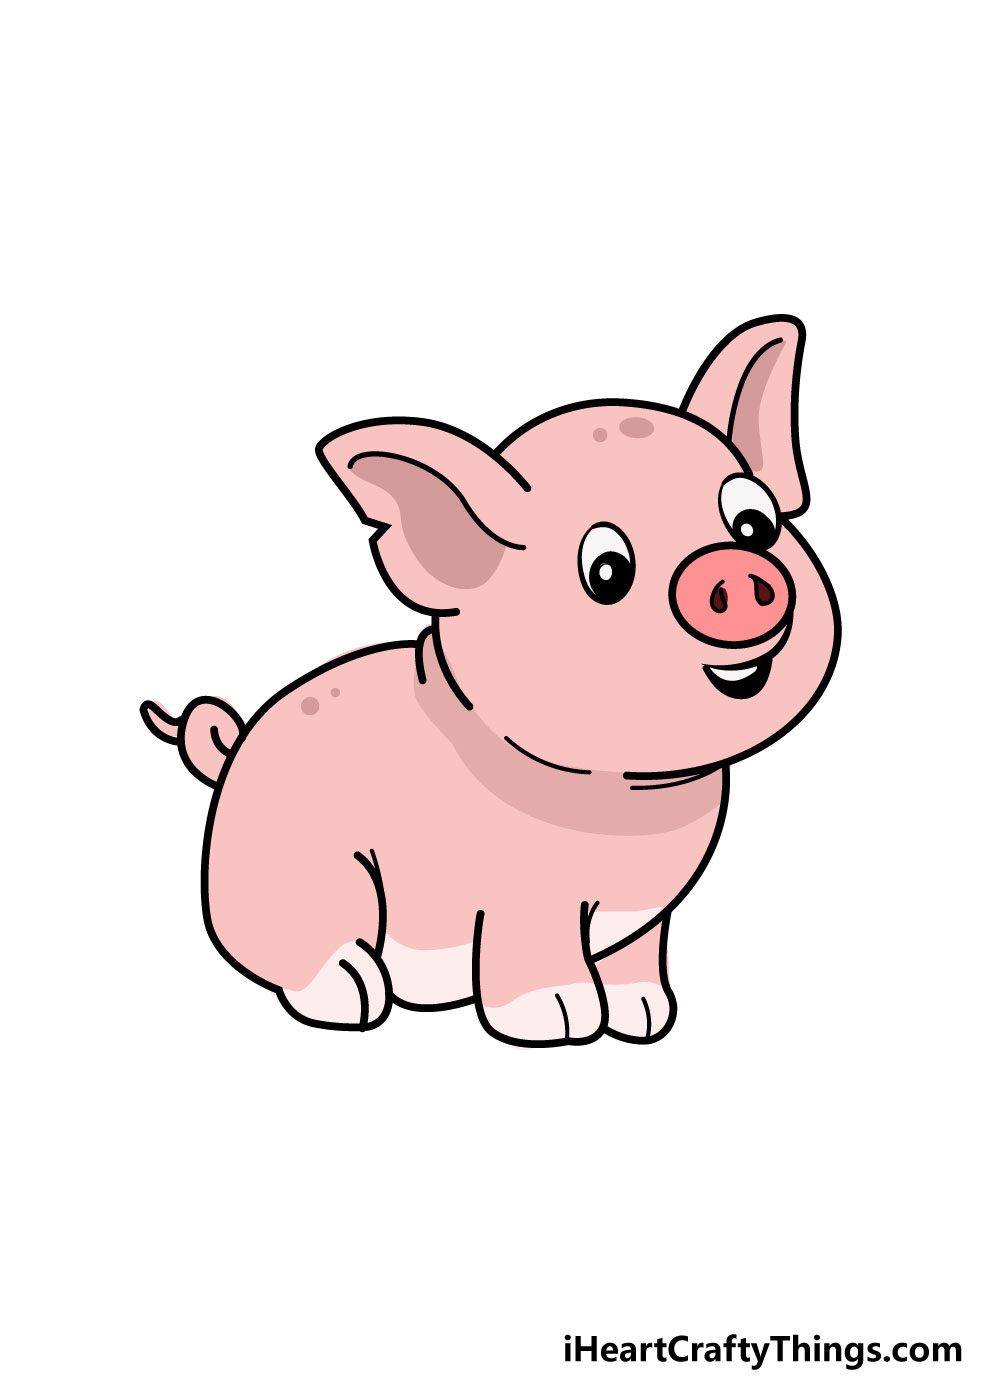
At this point, you have successfully managed to draw a cute pig picture! This is an accomplishment already, but your pig drawing isn’t quite finished yet.
There’s still one more step you need to do, but it’s also the most fun of all the steps!
Your pig drawing needs some beautiful colors, and the reason this is such a fun step is that here you get to show off your creativity.
We’ve shown one way that you can color in your pig in our reference image, but for this part you should feel free to let your imagination run wild!
Will you stick to a similar color scheme as our image or do you think you would like to use your own favorite colors?
You could even draw in a fun background for your pig that you can color in as well. Maybe your pig could be sitting on a pretty farm or maybe it could be ready to dig into a delicious dinner!
You can also have some fun experimenting with different art mediums such as acrylics, watercolors, colored pens and pencils for some wonderful and unique color looks.
The possibilities are endless, and we can’t wait to see how you finish off your pig drawing!
Here’s how you can make your pig drawing even better…
Make this cute pig sketch even better with these fun and easy tips we have for you!
This pig drawing shows a cute little piglet having a nice day, and you could add some friends for it!
You’ve drawn one pig so far, so you could easily add a few more by following the steps of the guide again.
Simply change a few small details and you will have some unique little pigs for this one to be friends with! What kinds of poses would you like to create
If you want to add some friends to this drawing of a pig, you don’t have to stick to more pigs. There are many more farm animals that you could also add to keep this cute pig company!
Animals such as chickens, goats, ducks or horses would be a few examples of animals that could be friends with this pig. It all depends on the kinds of farm animals you love!
What are some animals that you would like to add to the scene?
Another way you could give this pig someone to interact with would be by adding a human character. This could be a farmer character for one idea, and you could use any style you like!
You may want to draw the human in a realistic way or make them cartoony like the pig. You don’t have to stick to drawing a farmer, and you could even add yourself or people you know to the scene.
Who would you like to have hanging out in this pig sketch?
Then, you may want to draw a background to really finish off this pig drawing you’ve worked so hard on. You could create any background setting you like, whether it’s realistic or not!
An obvious choice would be to have a farm background with a silo and a windmill for some specific features. Or, you could have an animal party with all of your favorite critters!
What kind of background setting would you like to create for this picture?
Your Pig Drawing is Complete!
We really hope that this guide on how to draw a pig in 6 steps was really helpful and fun for you to use!
When you first saw what you would be drawing, it may have seemed like an intimidating task, but our goal with this guide as to make it as easy as we could for you.
The best way to tackle a drawing challenge is to break it down into smaller, more manageable chunks, and we know that if you follow the guide and try your best you’ll do a great job!
Once you’ve drawn your pig, there are also so many ways you can personalize your drawing.
Whether it’s by drawing extra details, choosing some awesome colors, using different mediums or drawing in a background, we’re sure to see some brilliantly unique pictures!
We will be bringing out loads of great step-by-step drawing guides like this one in the future, so make sure to check in on our site frequently to never miss out!
Once you’ve finished drawing and coloring your pig drawing, we hope you will share it to our Facebook and Pinterest pages!
We can’t wait to see your awesome and creative pig drawings once they’re all done.
Here Is A Cute Cartoon Pig Drawing To Inspire You!
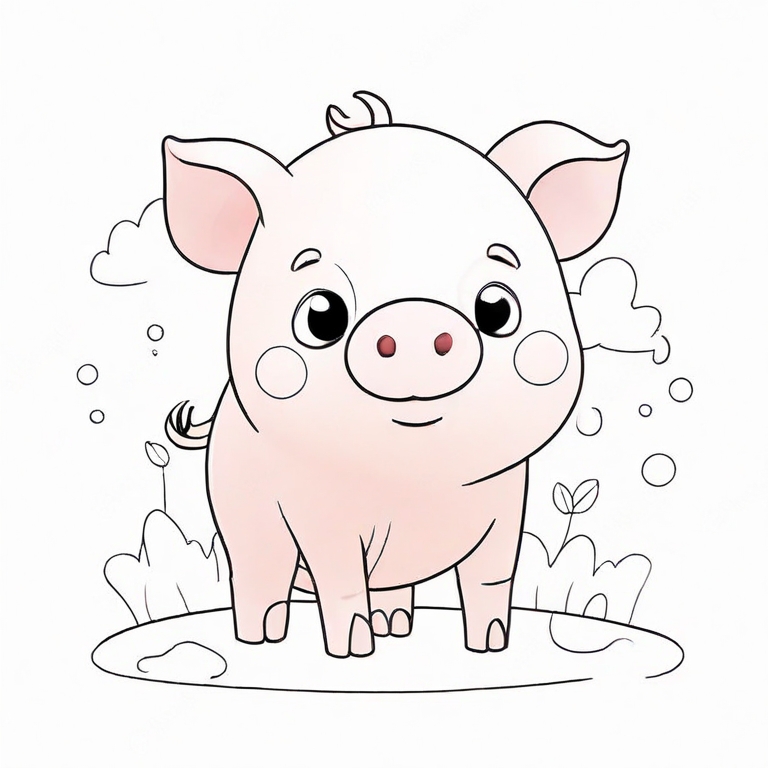
Pigs are really entertaining, cute animals even in real life! Our artist Amanda has created this cute cartoon pig drawing for kids to make this porky creature even cuter.
She has drawn it in a style that is cute and simple, so it’s perfect for all age groups and skill levels to attempt. If you’re not as confident, you could simplify the design even further.
However, if you want to make it more complex and add some details, you certainly can! Drawing a background would also be a great way for you to make this drawing more unique.
This pig would surely love to have a mud pit to play in, for example. That could be accomplished with some simple brown paint, for just one idea.
Now you can take this drawing and apply all of your own amazing ideas!