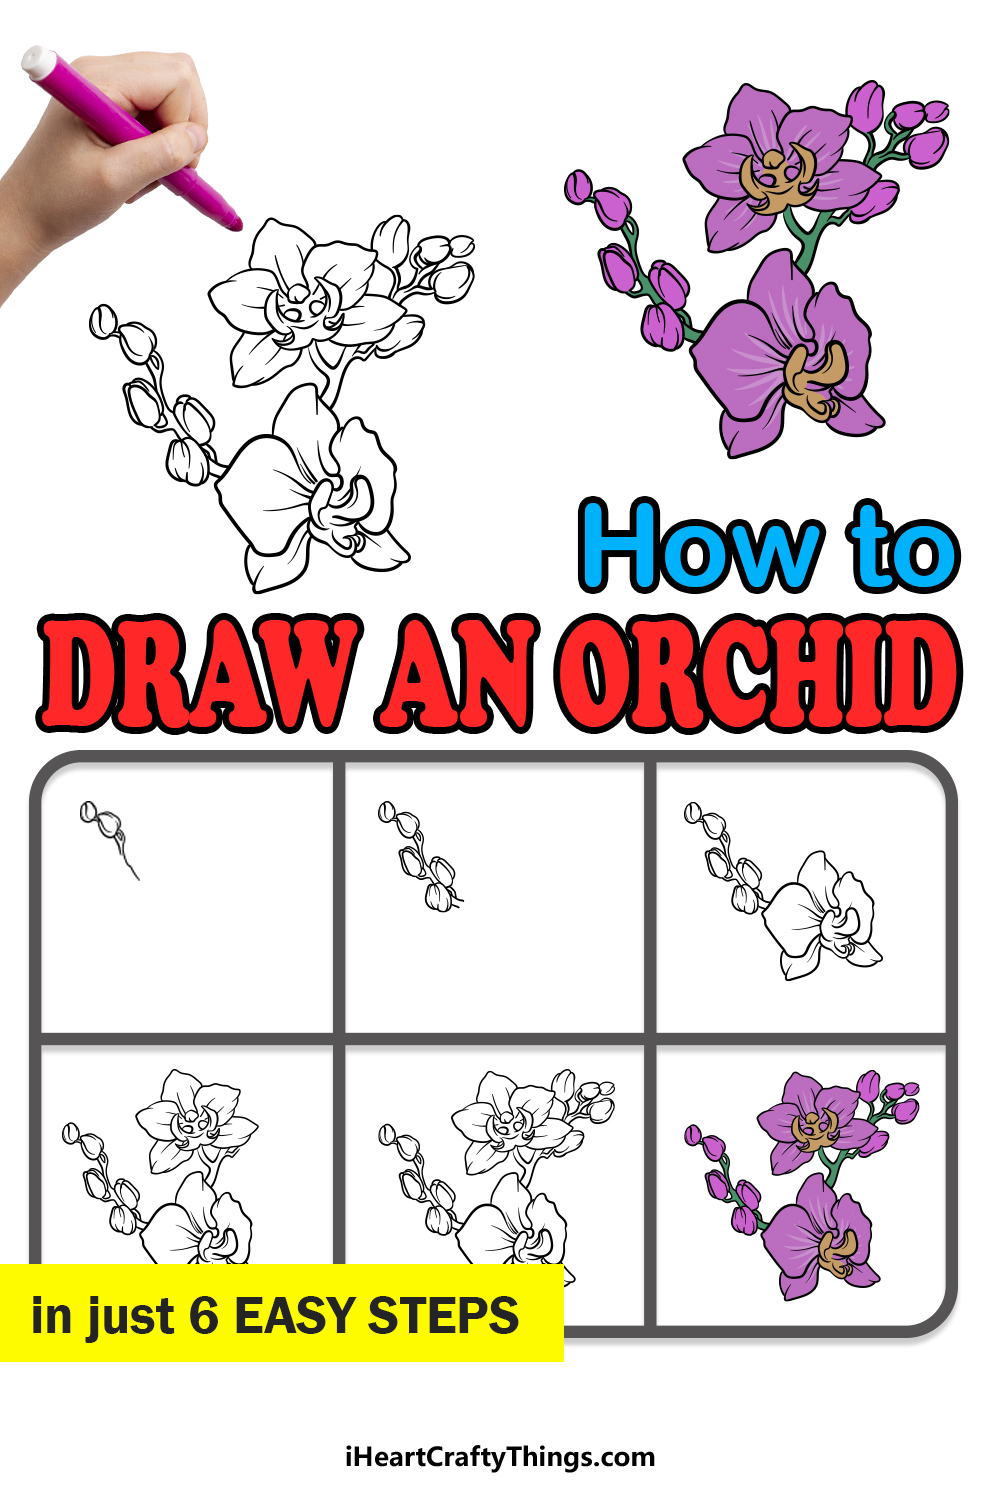
The easiest way to learn how to draw an orchid is just a few steps away! Once you have worked through this guide for kids, you will see that recreating this stunning flower is simpler than you thought.
I’ve always loved orchids because of their delicate structure and pretty pink coloring, and I know I am not alone in that. It’s a popular flower to depict in art, however many people may give up on the mission of drawing one because it’s too tricky.
If you’ve found yourself in that position, then you needn’t worry, as I’m about to show you the best way to make this drawing. You won’t believe how simple it was the whole time!
Once you have finished the guide, you could even draw a pretty background or add lots of orchid flowers to the page.
Watch And See How To Make Your Orchid Drawing
How to Draw An Orchid – Let’s Get Started!
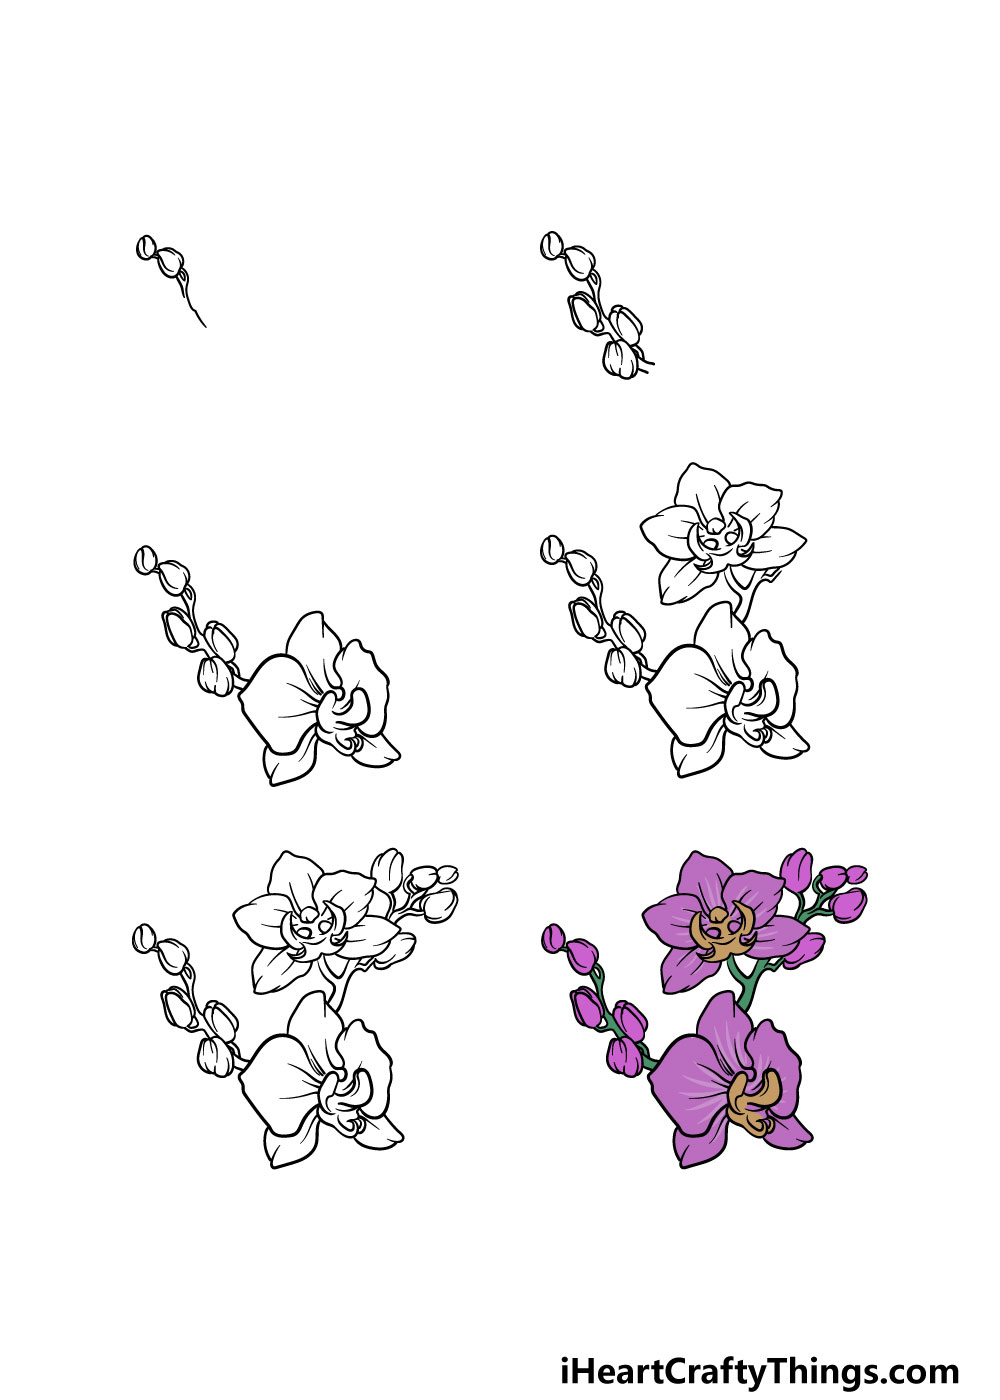
Step 1

To kick off this guide on how to draw an orchid, we will start by drawing some small, closed buds attached to the flower.
The buds will be quite small and round in shape, and they will have lines going into them to show that they are folded in on themselves.
Then, you can draw some thin lines for the stems that the buds are attached to in order to finish off this step.
Step 2 – Draw some more buds for the orchid

Now that you have drawn a few buds for your orchid drawing, you should have no problems drawing a few more! In this step, we will be adding three more buds onto the stem.
As you can see in the reference image, these ones will be a bit larger than the ones that you drew previously. The stem that they are attached to will also get slightly thicker as it goes on.
Step 3 – Next, draw the first orchid flower

We’ve been drawing some buds for this guide on how to draw an orchid, but for this next part we will be drawing the first of the orchid flowers.
The orchid is made up of several large, flowing petals that surround a rather intricate structure at the center. You might find it easier if you start with that central structure and then draw the petals connecting to it.
The image will guide you in how these petals should look, and if you find yourself struggling a bit then you can use a pencil to begin and then use a pen when you’re happy with it.
Once you’re happy with how the orchid looks then you’re ready to proceed!
Step 4 – Draw a second orchid for the drawing

This step of your orchid drawing will see you adding another flower, however even though you have drawn one already this one won’t be an exact repeat of the other.
First, you can draw some more lines coming up from the first orchid that the second one will be attached to.
Then, you will draw the second flower onto that stem. It will be similar to the first one, but it will be facing us directly, so some of the shapes will be a little different.
The reference image will certainly guide you as you draw, so be sure to refer to it closely!
Step 5 – Now, you can add some more buds to your drawing
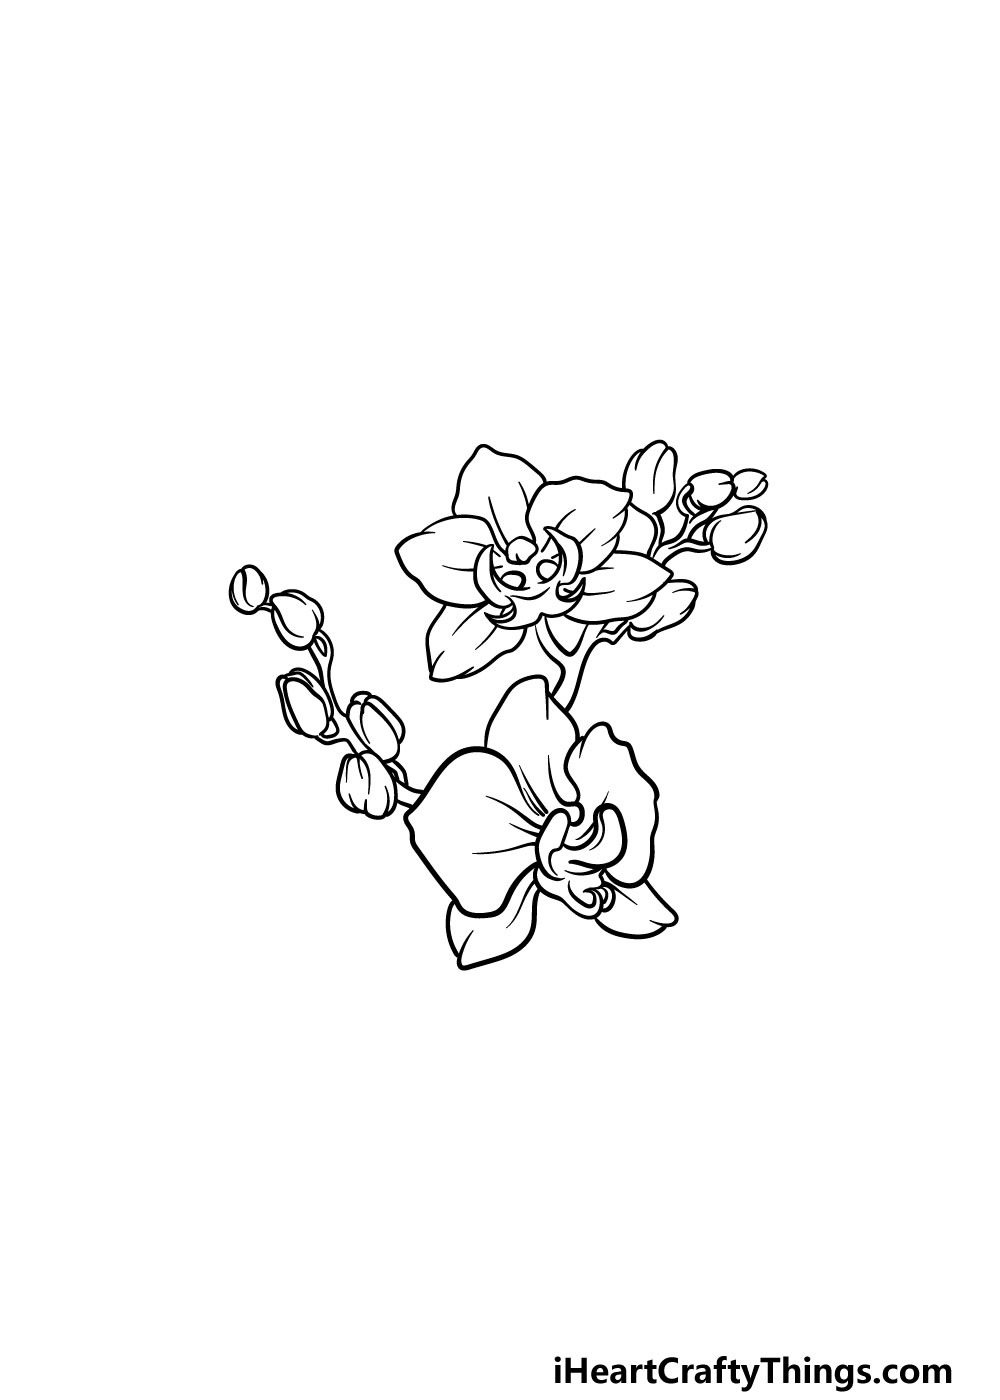
We will be going full circle in this fifth step of our guide on how to draw an orchid. We started by drawing some buds for the picture and we will finish off doing the same for this part before the final step. To do this, we will be adding five more buds of varying lengths above the orchid that you just drew.
Once you have these buds, you’re ready for the final step! This is your drawing, however, and that means you can put some of your own final touches onto it if you would like to.
These could be simple like adding more buds, or more complex like adding whole new orchid flowers next to this one. You could also draw a beautiful garden background, and this would be a great way to add even more of your favorite flowers to this picture.
These are just a few ideas, but what else can you think of to finish off this amazing orchid drawing?
Step 6 – Finish off your orchid drawing with some color
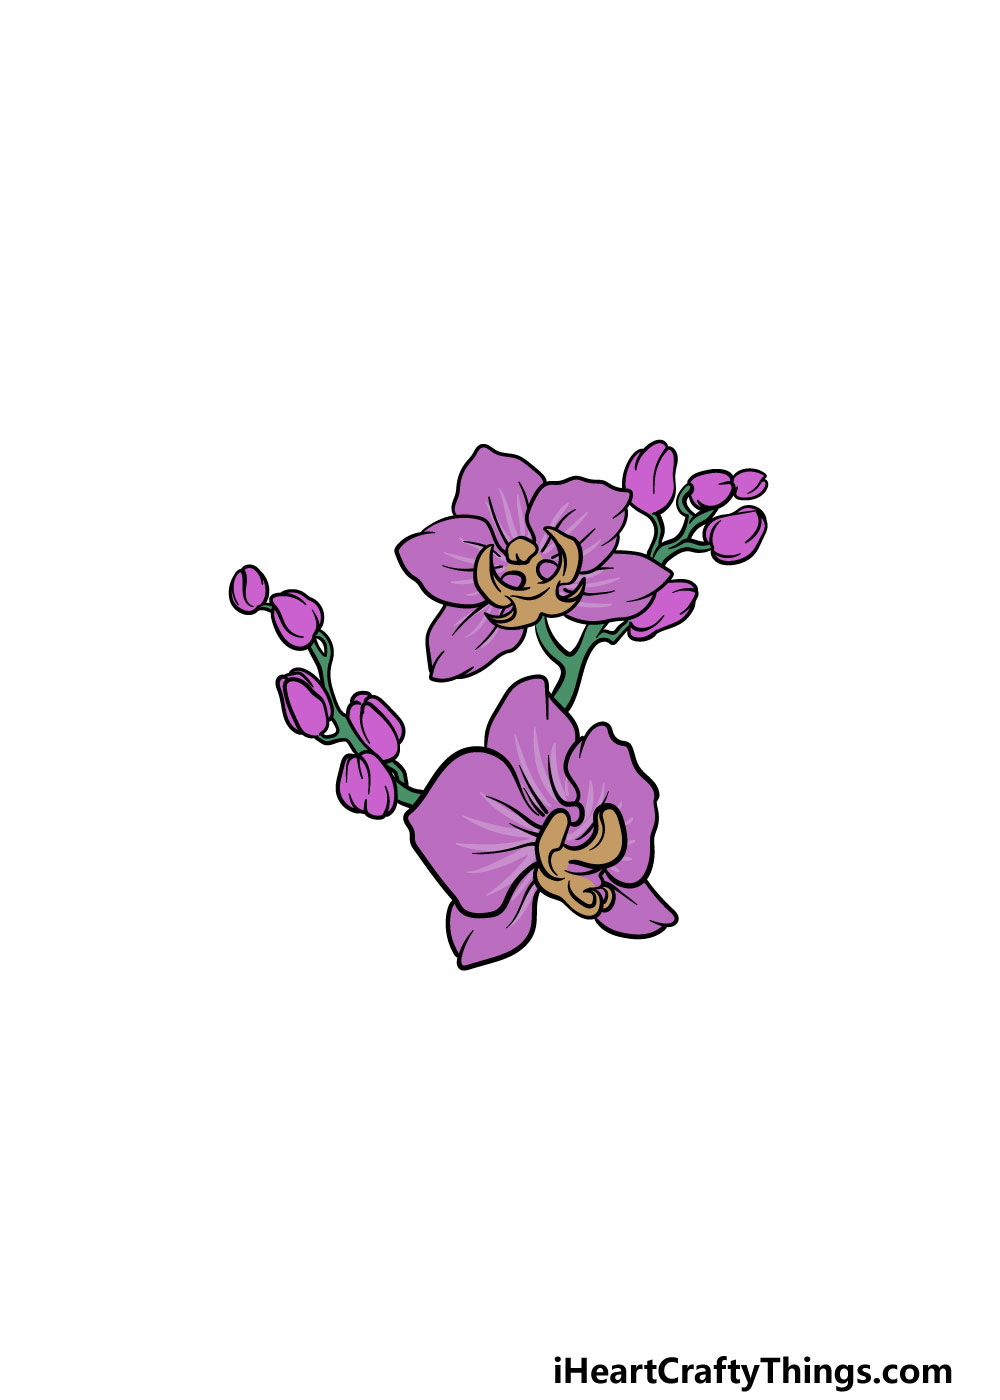
You’ve reached the final step of your orchid drawing, and this one should be lots of fun! In this part, you can add some beautiful colors to really finish off this picture.
You actually have a lot of options to go for even if you want to keep the colors more realistic. Orchids can come in a wide variety of different colors, so you have plenty of colors to go for.
Colors like pink, red, purple, yellow and many more are available to you while keeping it realistic. You could also make it a more stylistic image by using some of your favorite colors that wouldn’t be found naturally.
Whichever colors you decide to go for, you can also have fun experimenting with your favorite art mediums and tools to bring these colors to life.
Watercolors and colored pencils can be great for bringing some lovely soft colors to an image like this.
You could also make the picture bright and bold by using mediums such as paints and colored pens. What do you think you will go for to color your picture?
Do this to take your orchid drawing to the next level
Make your pretty orchid sketch look even more amazing with these tips!
We love the look of this orchid drawing we have created, but you could make it even more stunning by adding more orchids! This would be no challenge for you now that you know how to draw them.
Making a big bouquet of beautiful orchids would be as easy as following all of the steps of the guide and changing a few details. You could make the bunch as big as you like, and it will make for a really stunning picture!
How big will you make this bunch of orchids?
Another way you could make your drawing of an orchid even more amazing would be by adding other flowers to the bouquet. You have millions of different flowers you could use!
It all depends on which flowers you love, and any of them would bring something special to this picture. Do you think you may go for something classic like a rose or maybe something bright and eye-catching like a sunflower?
Once you have decided whether to add more flowers to your orchid sketch or not, you could then take it even further by adding a background.
For a few ideas, you could make a pretty garden or maybe have the orchid in a pot on a table. These are just two ideas you could try, but you can really let your imagination run wild!
We showed you one set of colors you could use for this gorgeous orchid drawing, but you don’t have to stick to these colors! Orchids can come in all manner of different colors, so you would have tons of different options.
You can stick to realistic color variations that you would see with real orchids, but don’t be afraid to use some more stylistic color choices instead!
Choosing the colors you would like is just a part of it, and you can also have fun with the art tools and mediums you use. We think some watercolors would look amazing, but what will you use?
Your Orchid Drawing is Complete!
That brings you to the end of this guide on how to draw an orchid! As we mentioned in the introduction, the orchid is quite a complex flower in structure, so you should be proud of completing such an incredible representation of one.
We hope that by following this guide you found doing this drawing to be fun and easy to do!
Remember that you can also create your own variations on this picture. You could create a background or even draw some more flowers alongside it for a few ideas. What else can you think of for this picture?
Our website has many more amazing drawing guides for you to enjoy! Be sure to visit us there often as we upload new ones frequently.
We would really love to see your orchid drawing when it’s ready! You can share it with us on our Facebook and Pinterest pages for us to enjoy. We can’t wait to see your beautiful artwork!