Drawing humans can be a challenge in the best of times. There are many reasons for this, but it’s mainly due to the fact that it can be very tricky getting the various proportions and posing looking natural.
This is especially true when drawing an elder person, as they will typically take on a different kind of pose to someone younger.
This can make learning how to draw an old man a bit of a frustrating endeavor.
It also doesn’t have to be that difficult, and that’s what we’re here to show you in this tutorial. You’ll definitely want to see this one all the way to the end!
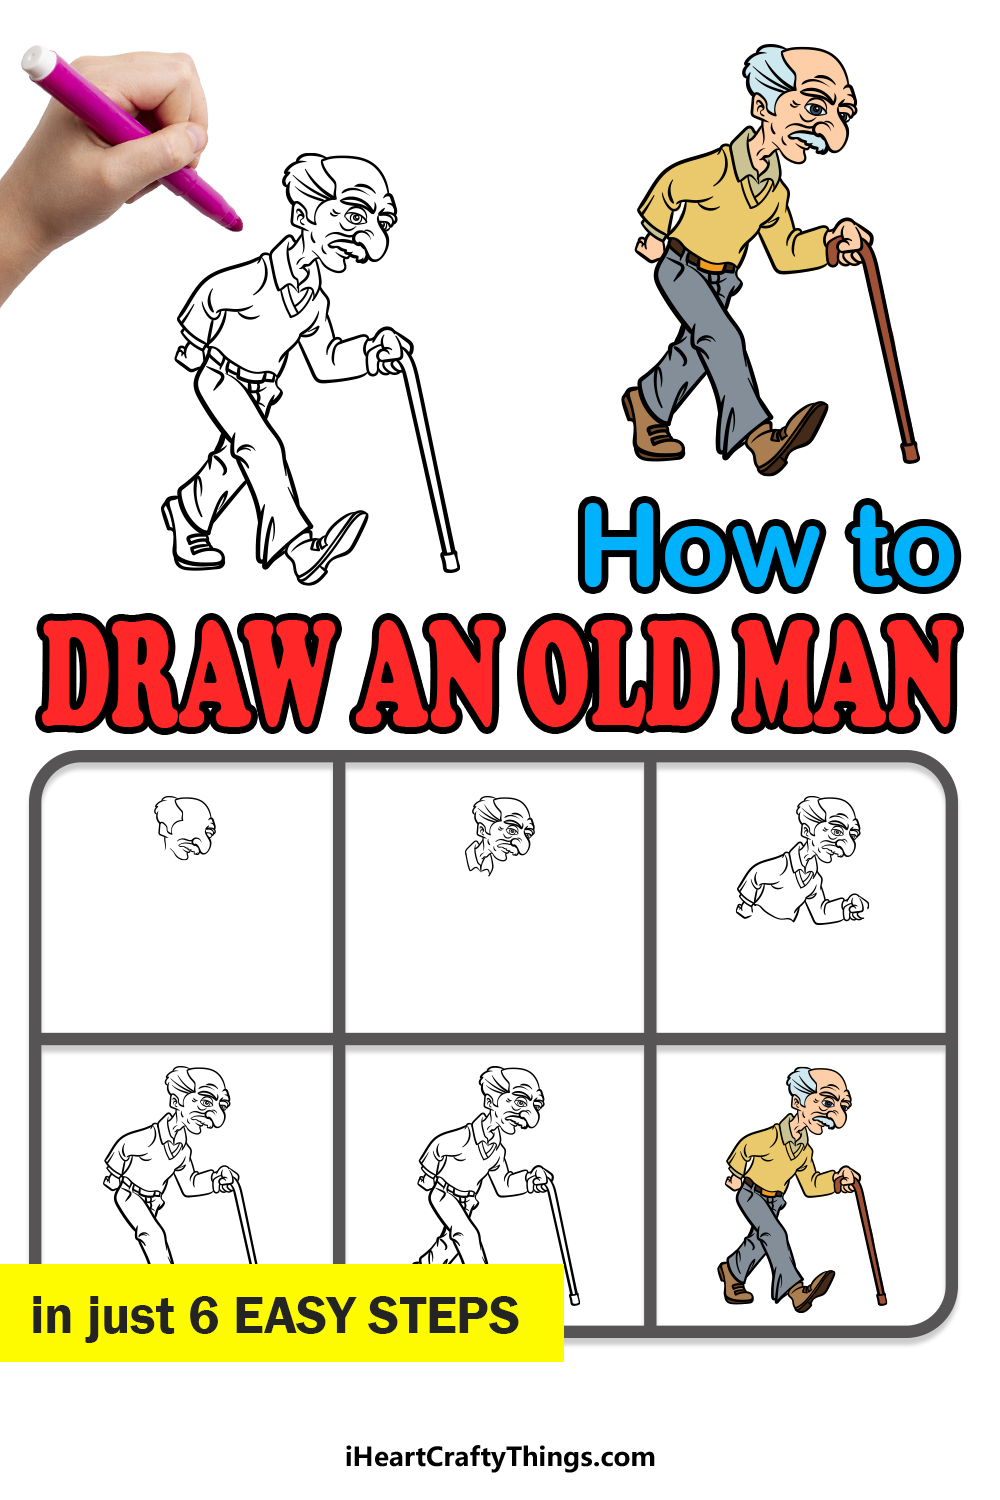
Please enjoy our step-by-step guide on how to draw an old man in just 6 easy steps as we walk you through how it can be done!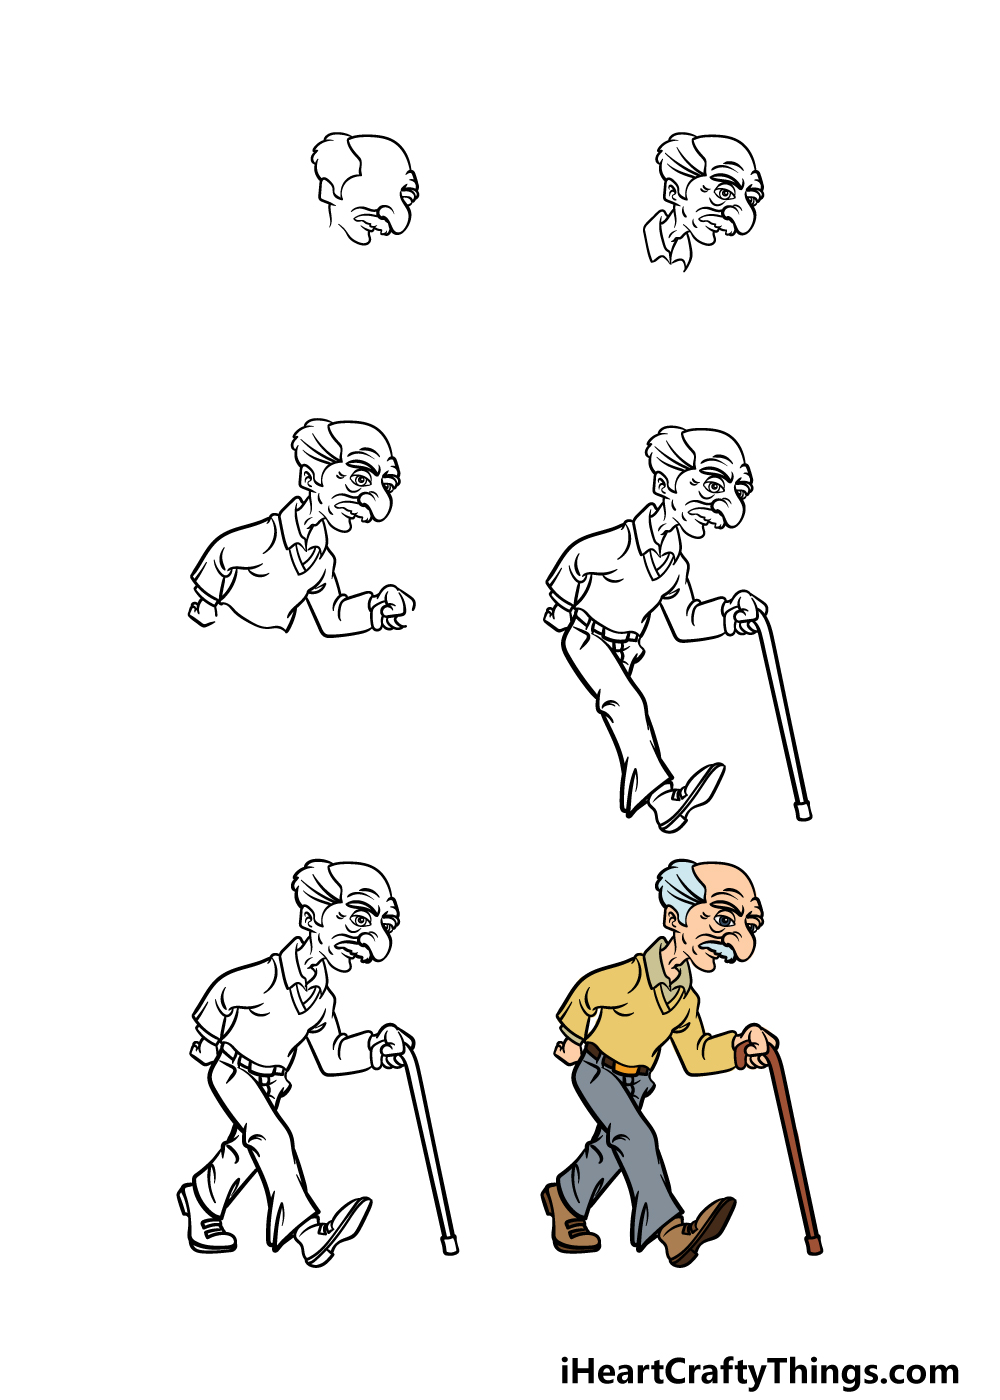
How to Draw An Old Man – Let’s Get Started!
Step 1
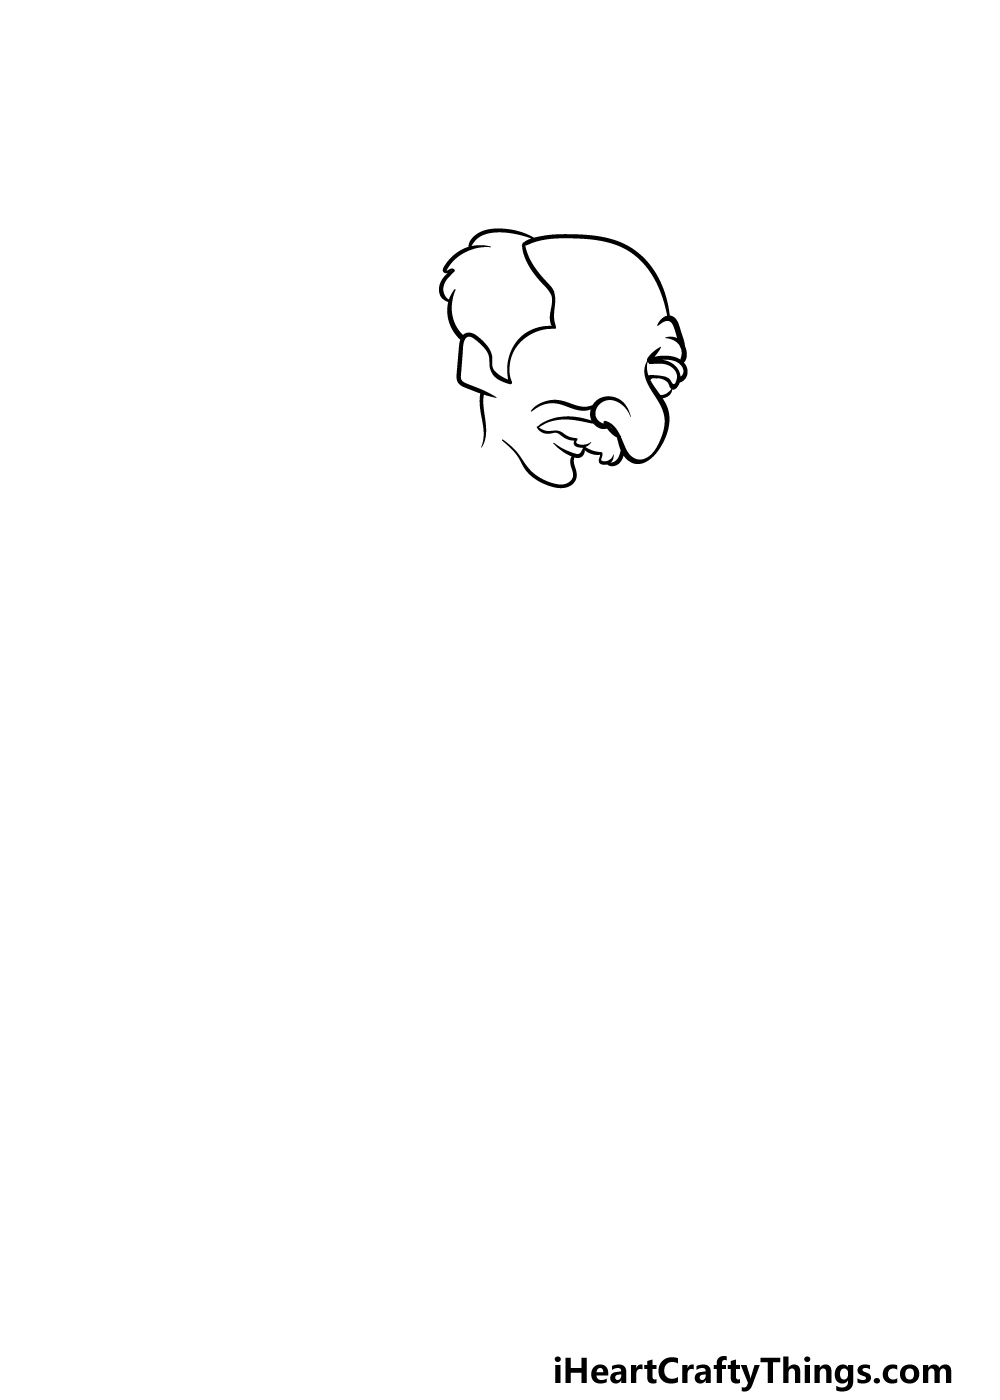
For this first step of our guide on how to draw an old man, we will start with his head and face. First, use a smooth curved line for the bald top of his head.
Then, use some smaller curved lines for his eyelid and then add his large nose. There will then be a small mustache under his nose, and then under that you can add a sharp little chin.
On the other side of his head, we will be drawing the shape of his hair with his rounded ear in it as well. Finish off by drawing some short lines for his neck, and then we can move on to the next step!
Step 2 – Now, draw some facial and hair details
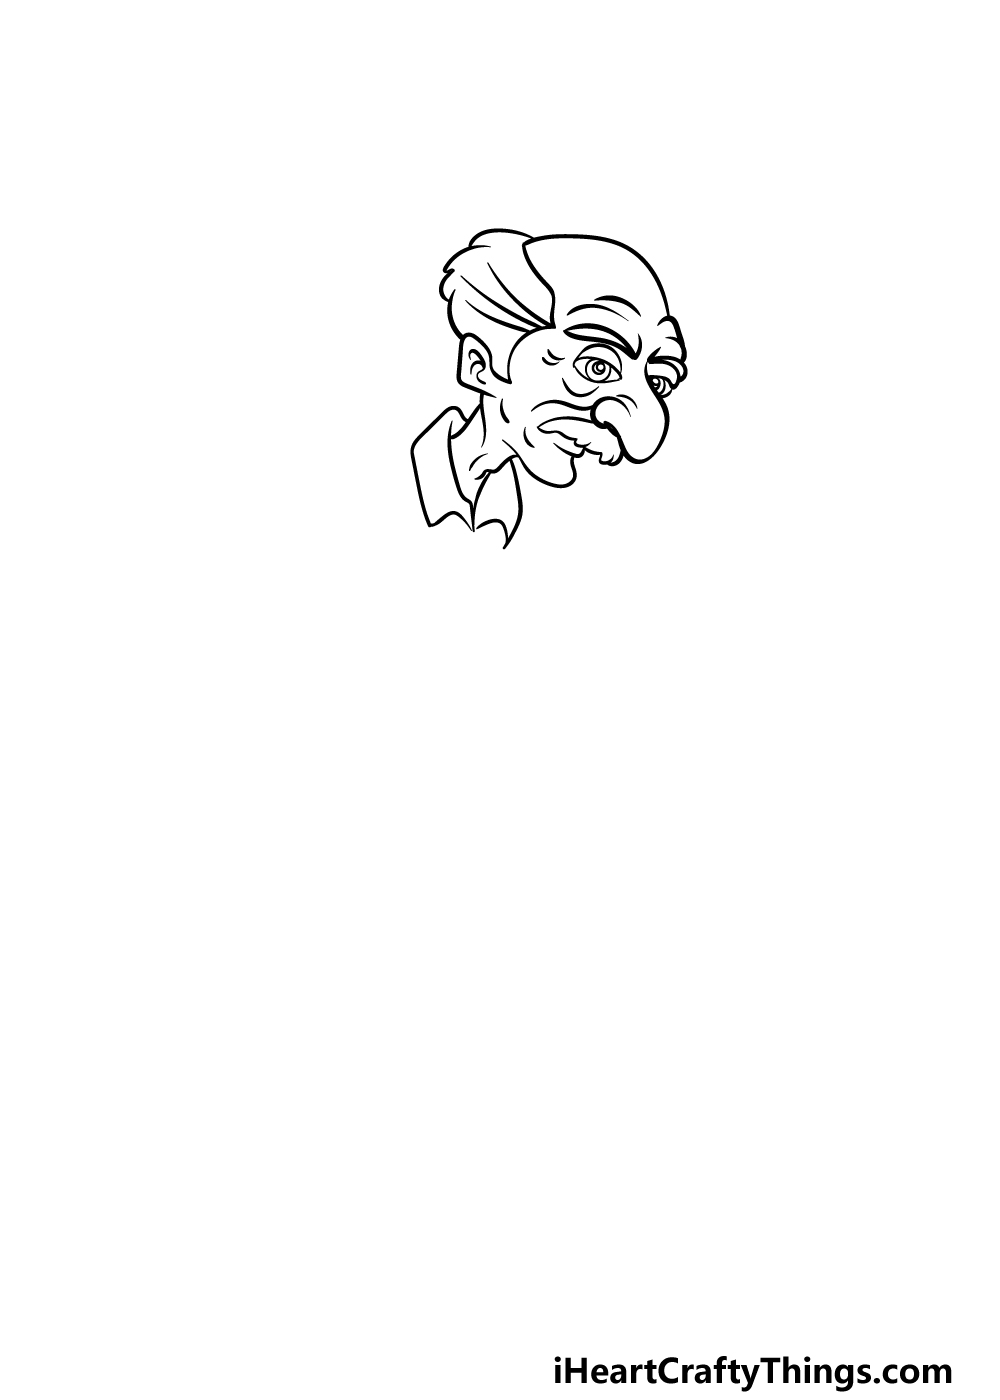
You have the outline of your old man drawing done, so now we can start adding some more details to it.
First, use some rounded lines for his half-closed eye on the right, and then add a thick eyebrow over it.
We will also add some curved line details around his eyes to make his face look a bit more weathered.
Then, draw some more of his neck, and we will also add some small line details inside of his neck. Finally, we will finish off this step by drawing the collar of his shirt at the base of his neck.
Step 3 – Draw the rest of his shirt and chest
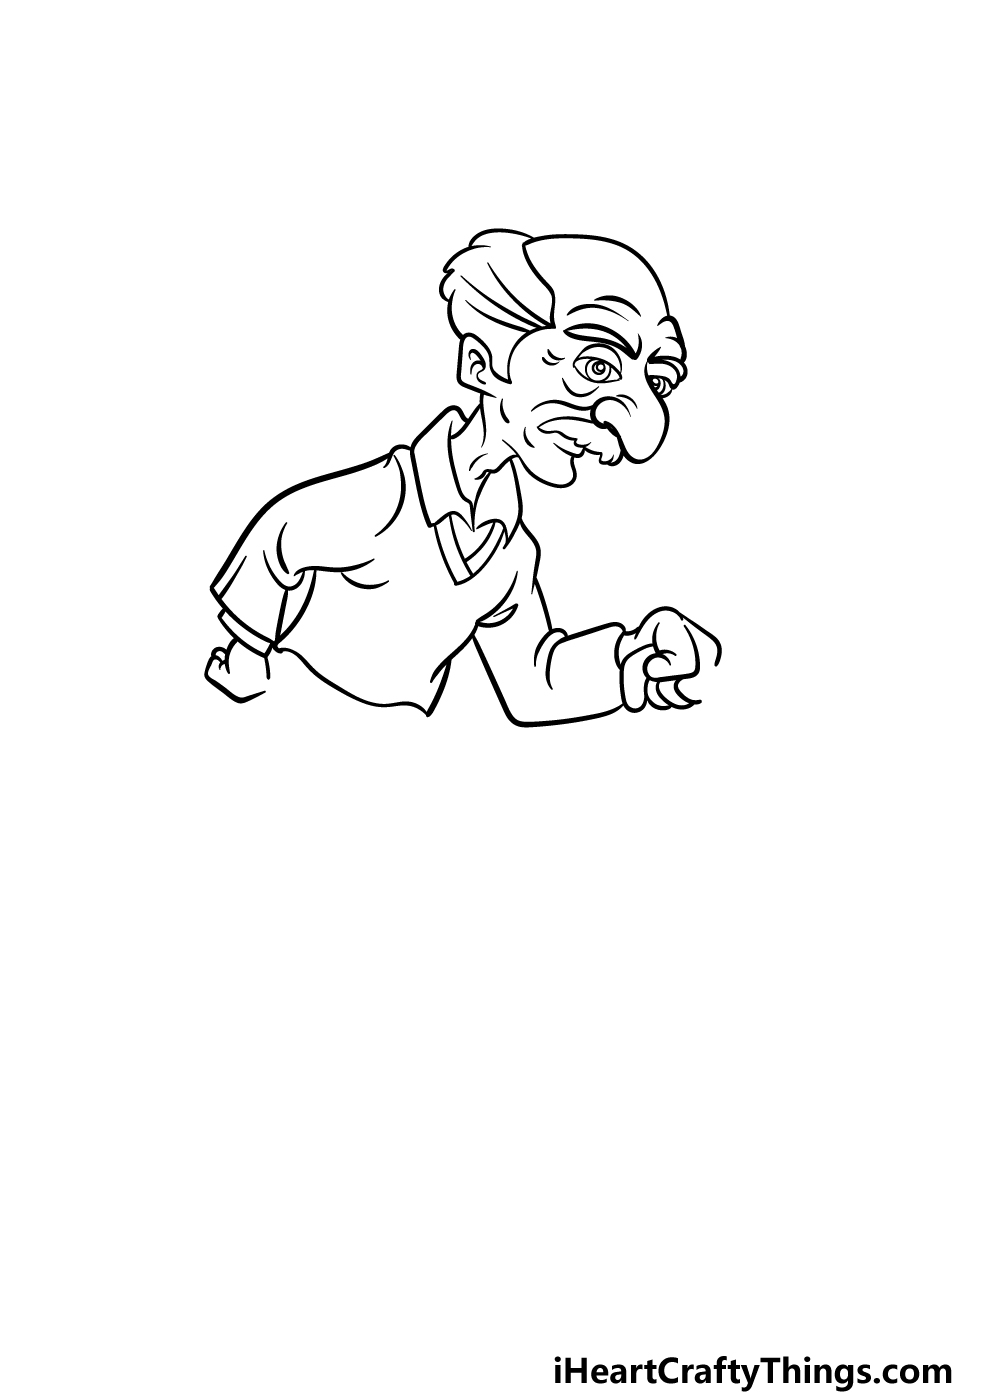
We shall be moving away from the head as we focus more on his arms and chest in this step of our guide on how to draw an old man.
When drawing, bear in mind that the arm on the left will be bent at his back, whereas the one on the right will be resting on his cane.
With that in mind, use some curved lines to draw the fabric of his shirt in the position that we display in the reference image.
Then, you can draw his chest and waist, and then we shall finish off by drawing his hands at the ends of his sleeves.
Try to have his body at the angle we show in the image, as this will show that he is a bit hunched over
Step 4 – Next, draw his first leg and his cane
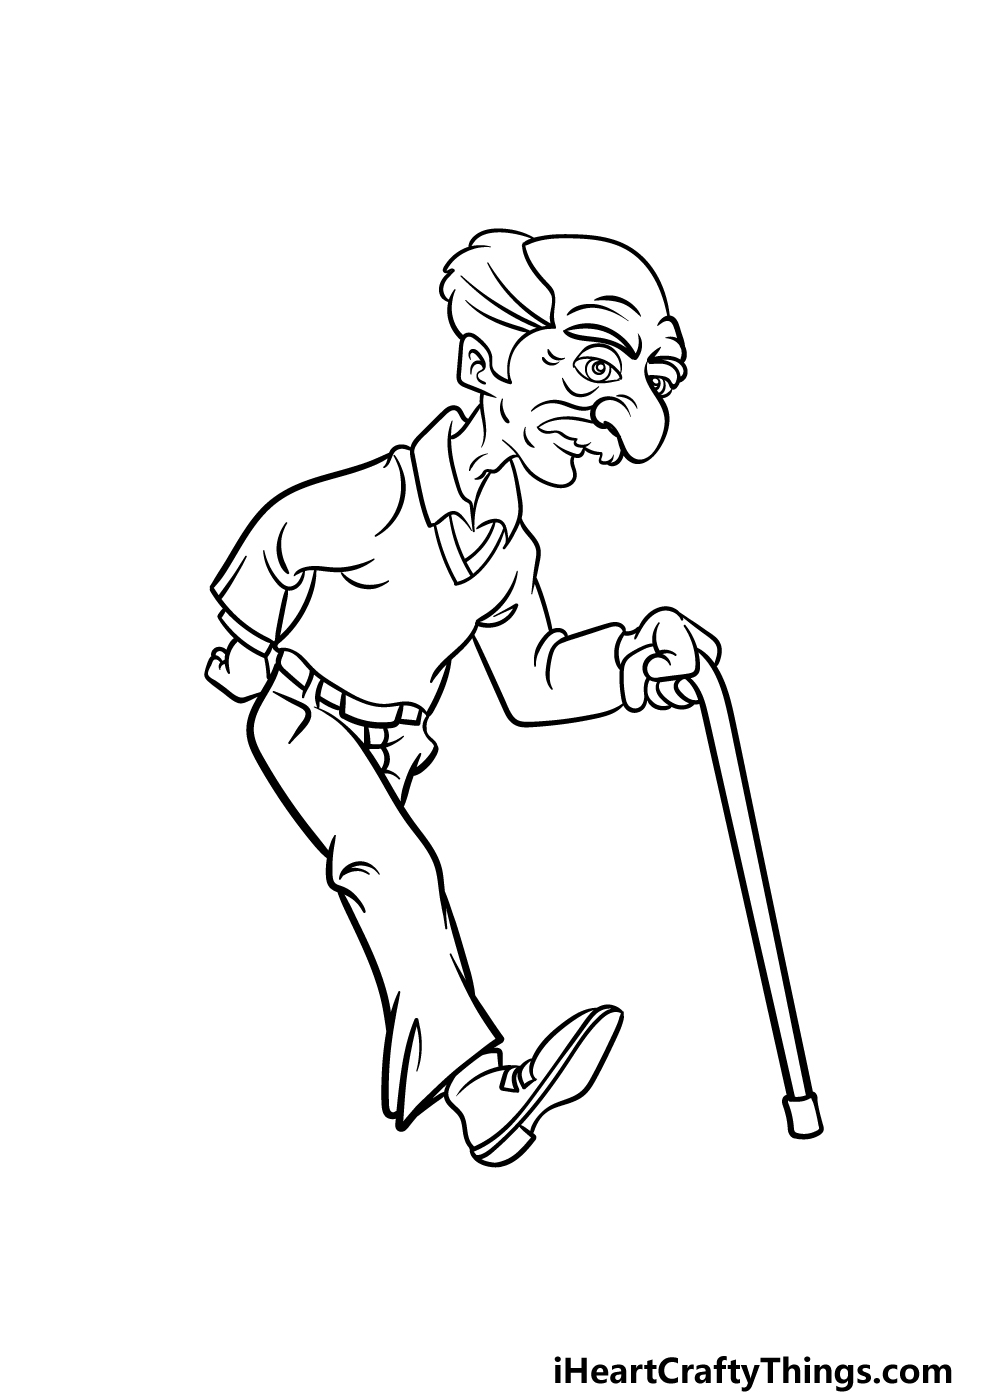
Continuing on with your old man drawing, we shall now draw his first leg along with his cane. For his cane, you may want to use a ruler to make the sides come down in a perfectly straight line.
It will also have a small rubber portion at the base of it which you can draw as a small rectangle.
Then, draw a thin belt for him just below his waist before you begin on the first leg. This leg will be drawn to show that it is moving forward as he walks.
Because of the positioning, we will also see the underside of his shoe that he is wearing on this leg. Once you have drawn these aspects, we will then be ready for some final details in the next step!
Step 5 – Add the final details to your old man drawing
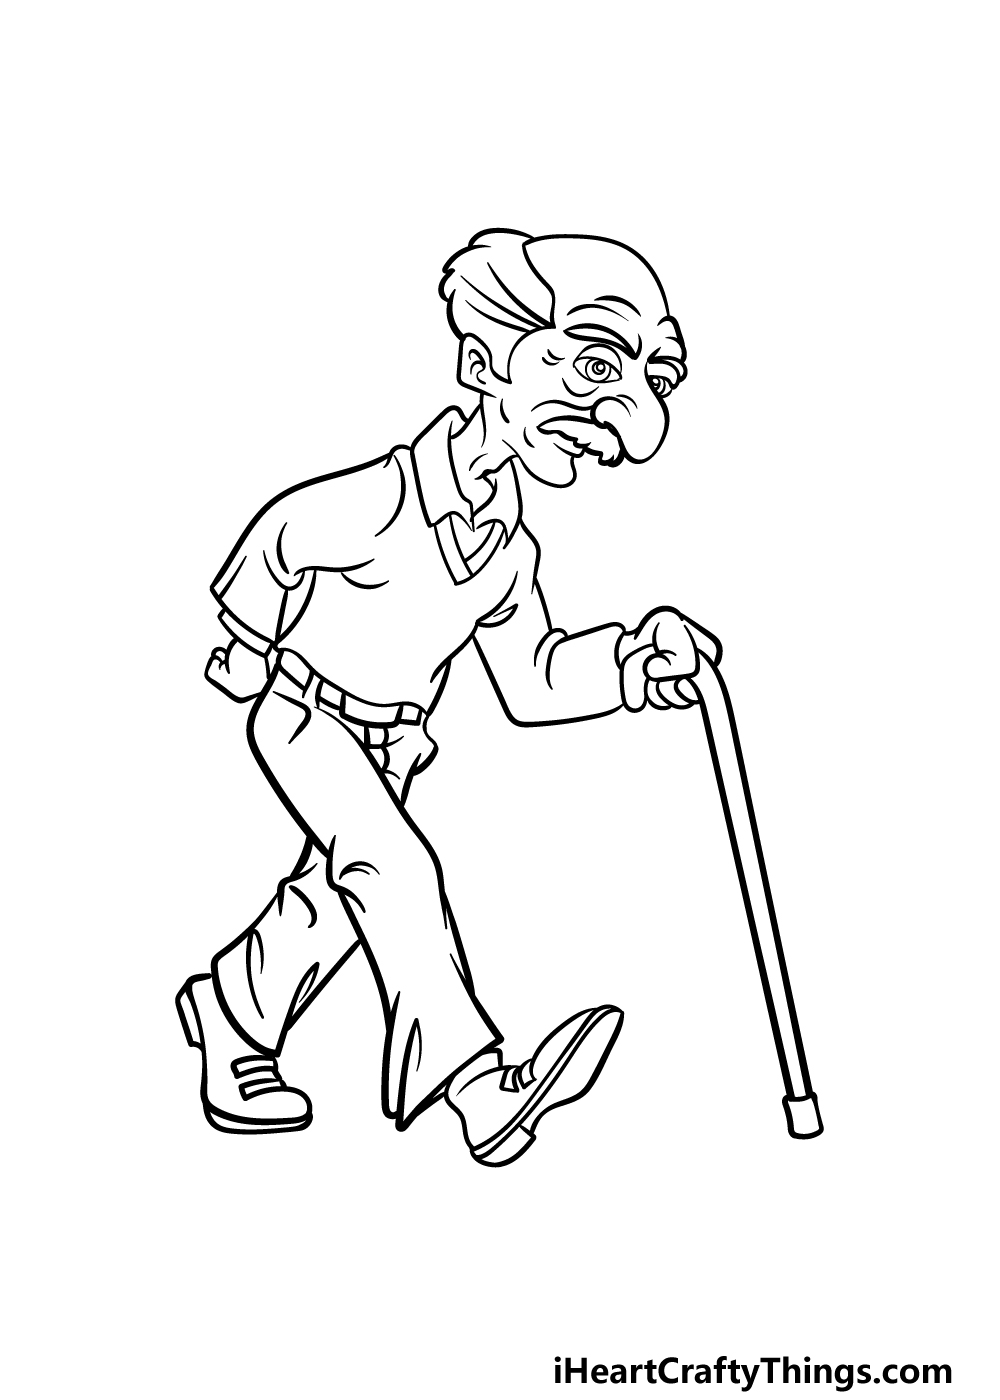
In this fifth step of our guide on how to draw an old man, we will finish off the final details and touches before you color it in for the next step.
This leg will be extending backward to further show he is walking, and the show on this one will be bent to show that he is in mid-stride.
Once this leg is drawn, we will then be ready to move on! Before you do, you could also add some details and elements of your own.
What kind of background setting can you think of for this old man? Maybe you could even draw some more characters alongside him!
Step 6 – Finish off your old man drawing with color
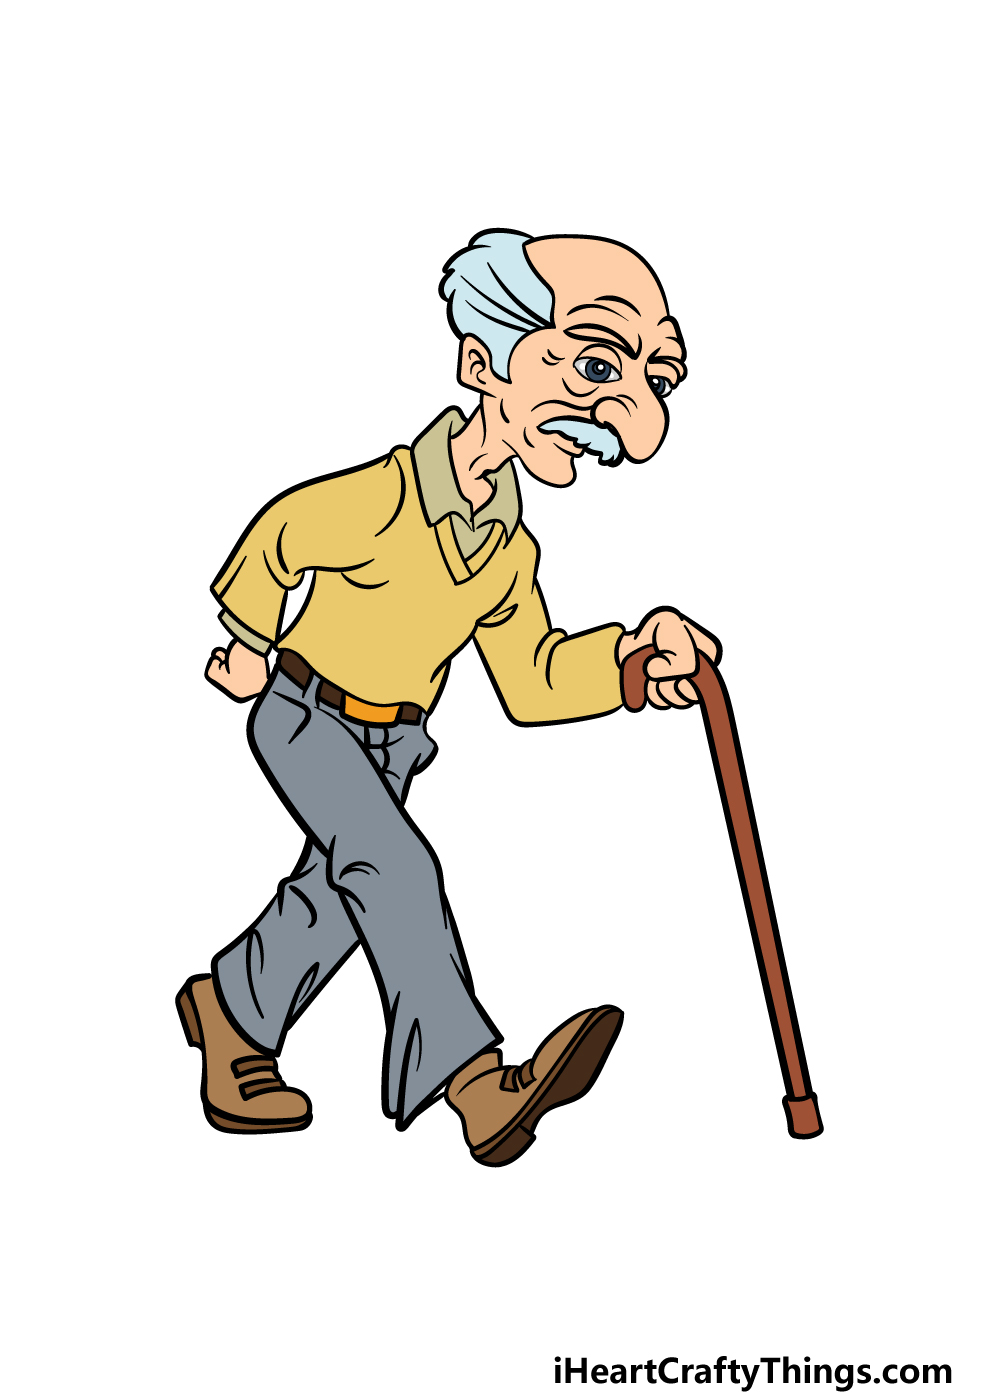
This is the final step of your old man drawing, and in it we shall finish off with some color. In our reference image, we went for some more muted colors like light yellows and browns for his clothing, and you could go for a similar look if you like.
You could also use some completely unique colors of your own if you prefer, so be sure to get creative and make this picture look exactly as you want it!
What colors, art mediums and techniques will you use to finish off this old man drawing?
3 More tips to make your old man drawing easy!
Make your easy to draw old man even easier as we show you 3 helpful tips!
For this old man drawing, we portrayed him in a walking pose. We love the pose, but you may want to switch to something simpler if you’re having a hard time with it.
By changing just a few details, you could have him standing in a simpler position. This would be easy to achieve by changing just a few details.
You could also have him sitting down or in any other position that you would personally find easier to portray. What are some ways you might find it easier to show this old man?
If you are having a really hard time with certain parts of the drawing, you can add elements to prevent you from drawing them. For example, say you just cannot get the hang of drawing his shoes no matter how much you try.
You could just cut the drawing off before you get to that part, or you could possibly show a dog in front of his feet. Or, maybe the man could be sitting at a desk that will hide the lower half of his body.
There are all sorts of tricks you can use to hide the parts you struggle with, and it all depends on what you find easiest to do for this old man sketch!
When drawing a character such as this, you can use basic shapes to make the proportions much easier to get right. When watching professional illustrators, you will often see them using basic shapes drawn with a pencil.
You could use this trick for your drawing of an old man! Using your pencil, you can closely look at the images from our guide and then draw rough shapes that correspond with the different parts.
Slowly add layers of pencil where the details get more defined each time. Before you know it, you will be ready to add your final pen lines to finish off the picture perfectly!
Your Old Man Drawing is Complete!
This concludes our guide on how to draw an old man! We hope that this guide was very helpful for you, and that it made drawing this man fun and easy.
As long as you follow the steps in our guide, you will be able to do it in no time!
Remember that fishing off this guide is just the start of your drawing fun, as you can keep adding your own details, background elements and other creative choices to it. This is your chance to really show off how creative you can be!
The other way to keep your creative journey going is by trying out one of the many drawing guides we have for you on our website. We have many more on the way soon, so keep checking in!
We would love to see how your old man drawing turned out, so please share it on our Facebook and Pinterest pages for us to enjoy!