There are few birds or animals as majestic as the eagle. These creatures are often associated with nobility and patriotism, and many people love to admire these apex predators.
While they are always a majestic sight, they are especially so when in flight. For this reason, when people create artworks featuring the eagle, this is a common pose to use.
By learning how to draw a flying eagle, you can also create some artwork featuring this amazing sight.
If you would like to know how you can do this, then this is the tutorial for you!
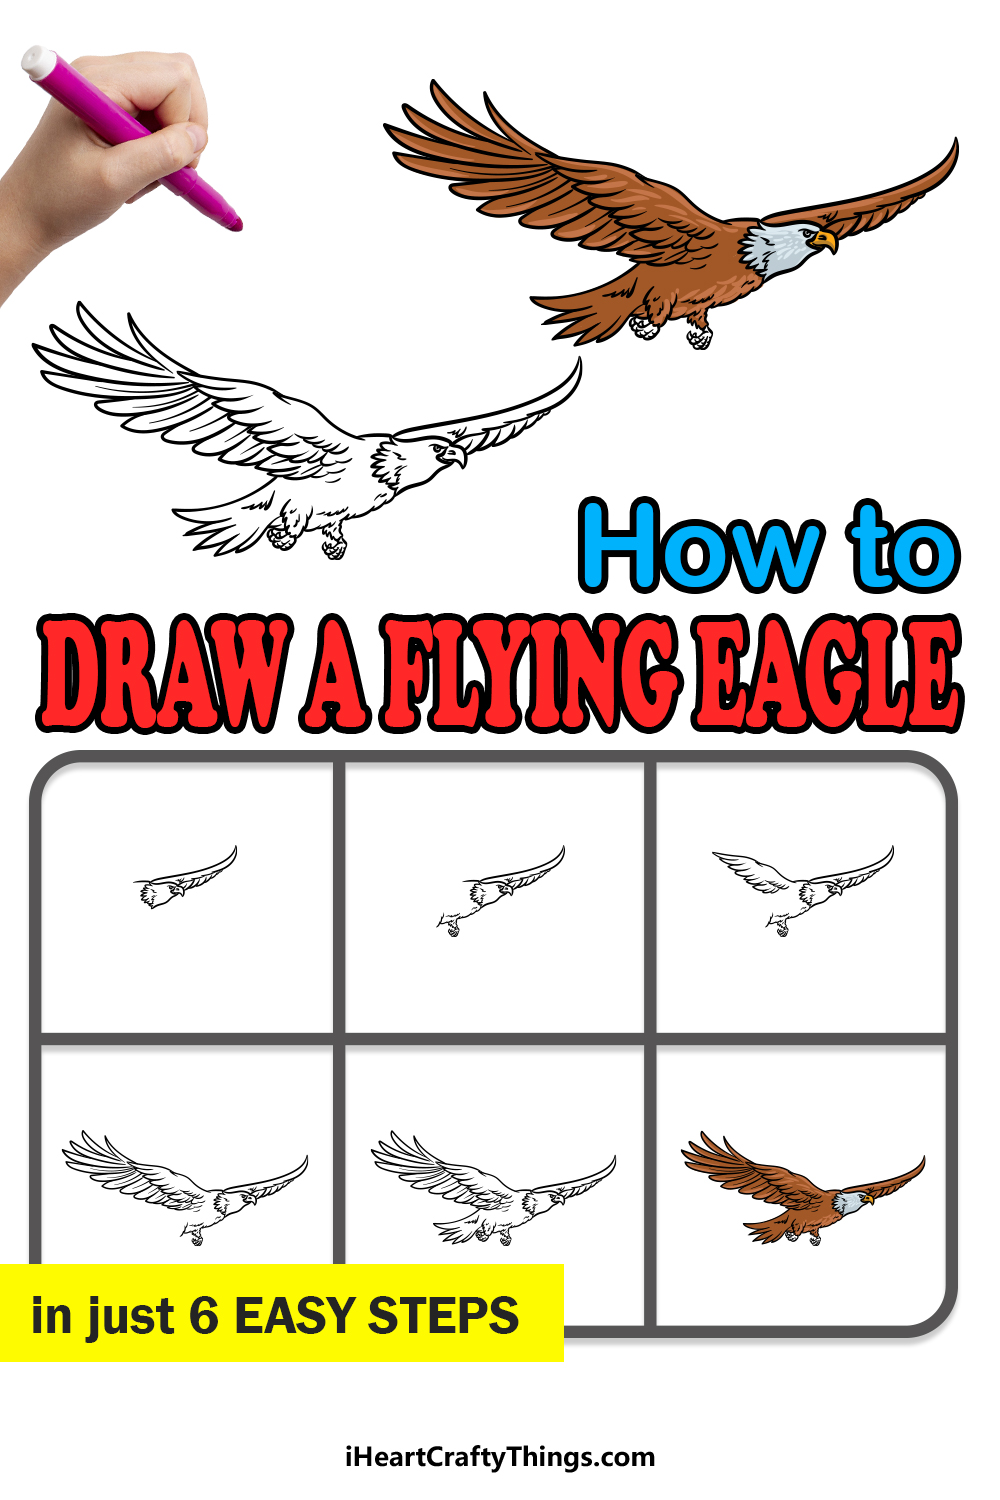
Our step-by-step guide on how to draw a flying eagle in just 6 easy steps will show you exactly how it can be done.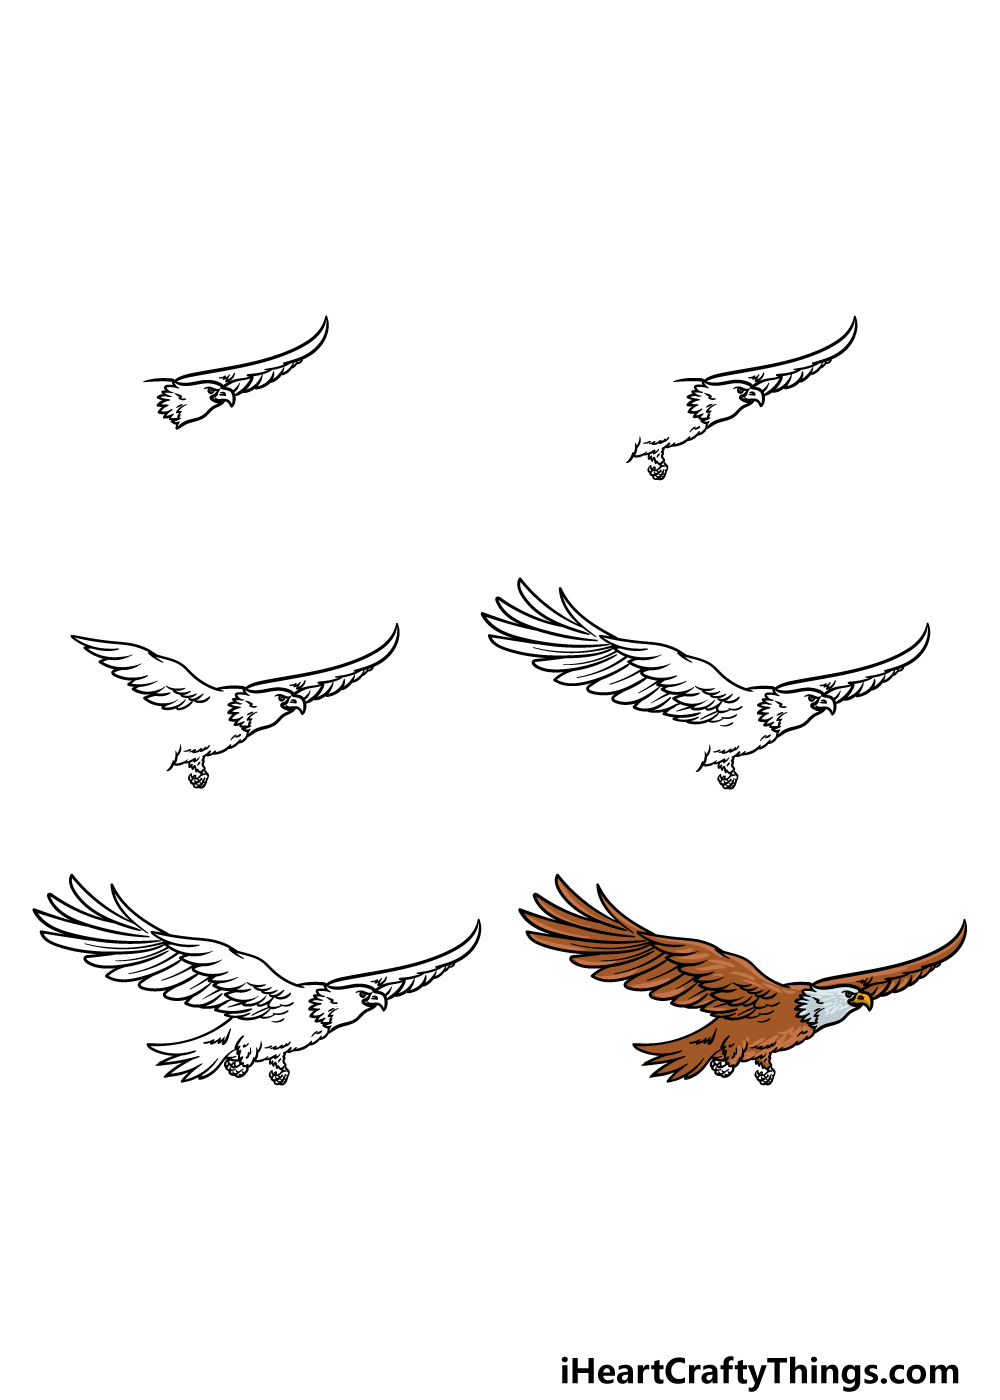
How to Draw A Flying Eagle – Let’s Get Started!
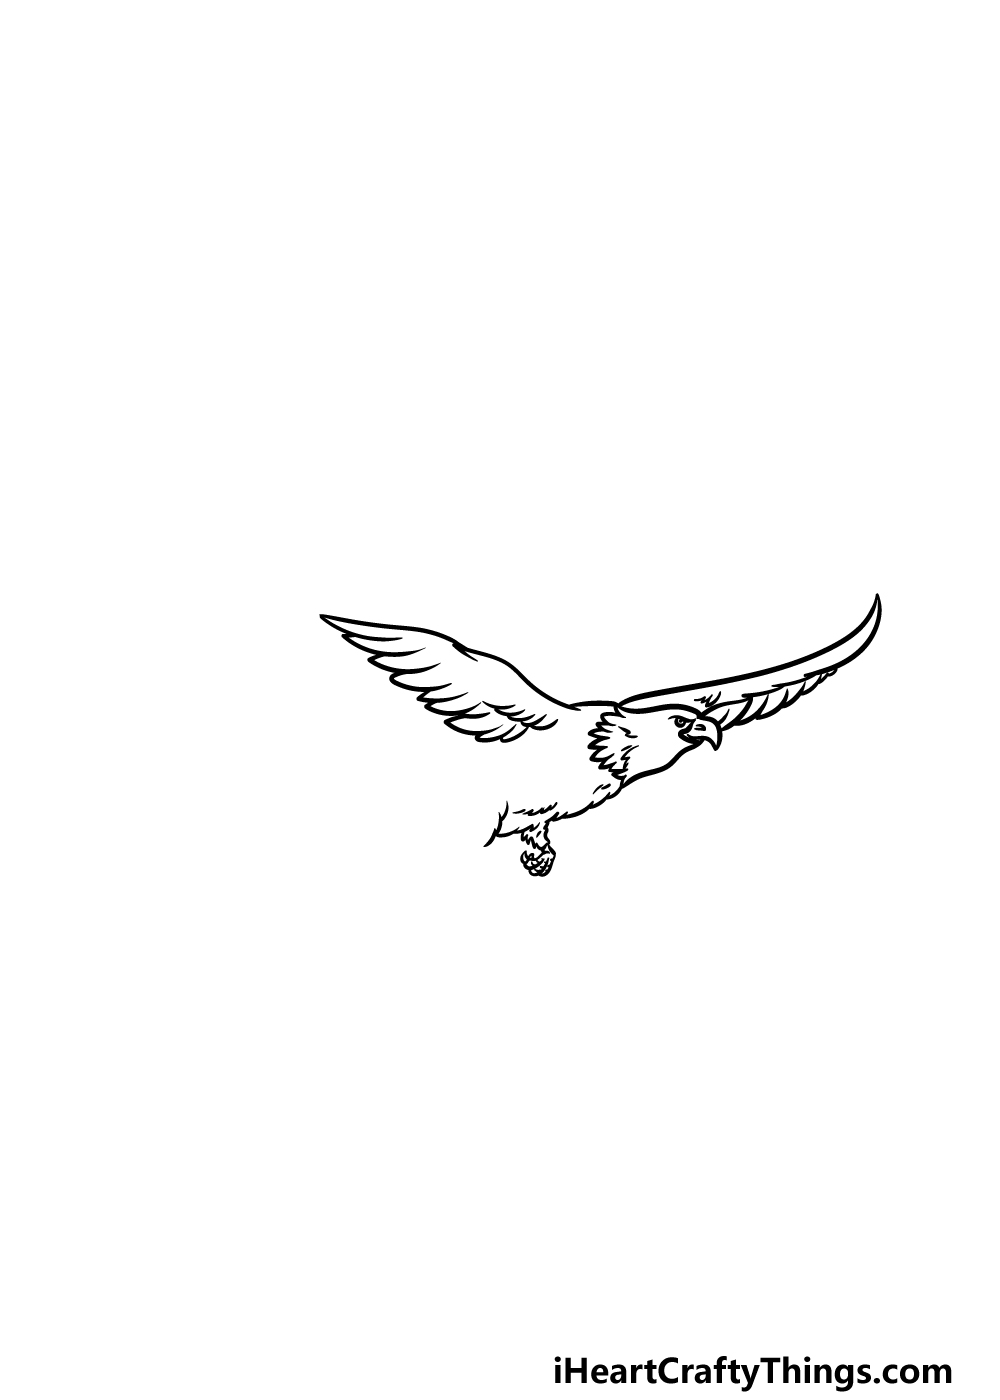
Step 1
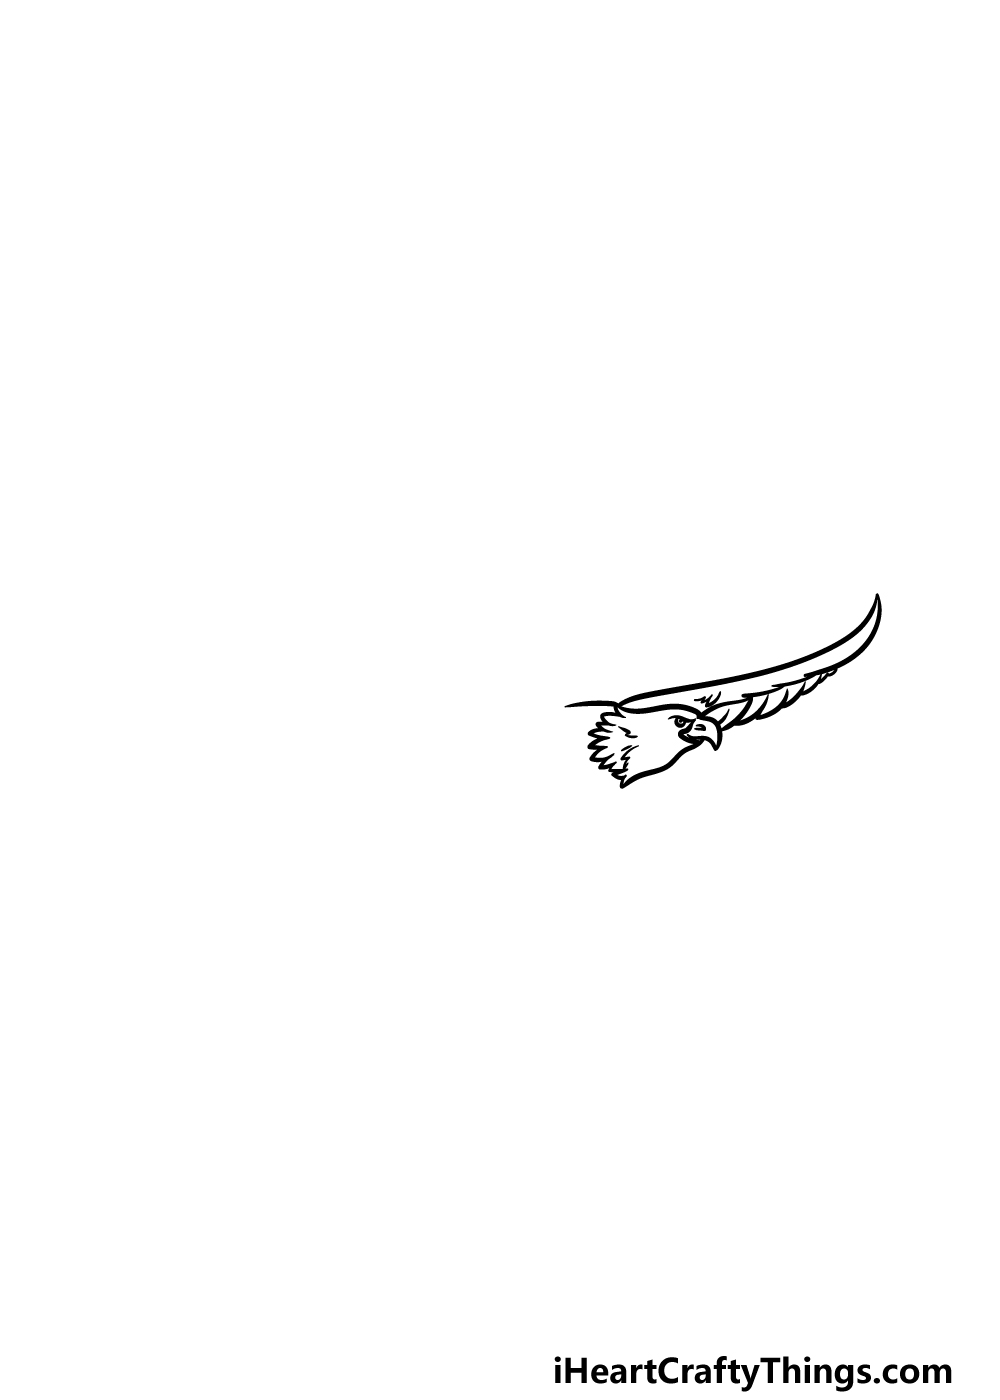
To get this guide on how to draw a flying eagle started, we will begin with the head and first wing of the bird.
For the head, it will look like a separate section from the rest of the body. Use some curved lines for the top and the bottom of it to begin.
Then, use some pointy lines for the base on the left-hand side that will connect to the body.
Then, use some smaller curved lines for the sharp beak and serious-looking eyes. Finally, we will be drawing the wing on the right-hand side.
This will look pretty flat and thin, and it will have several feather sections on it as well.
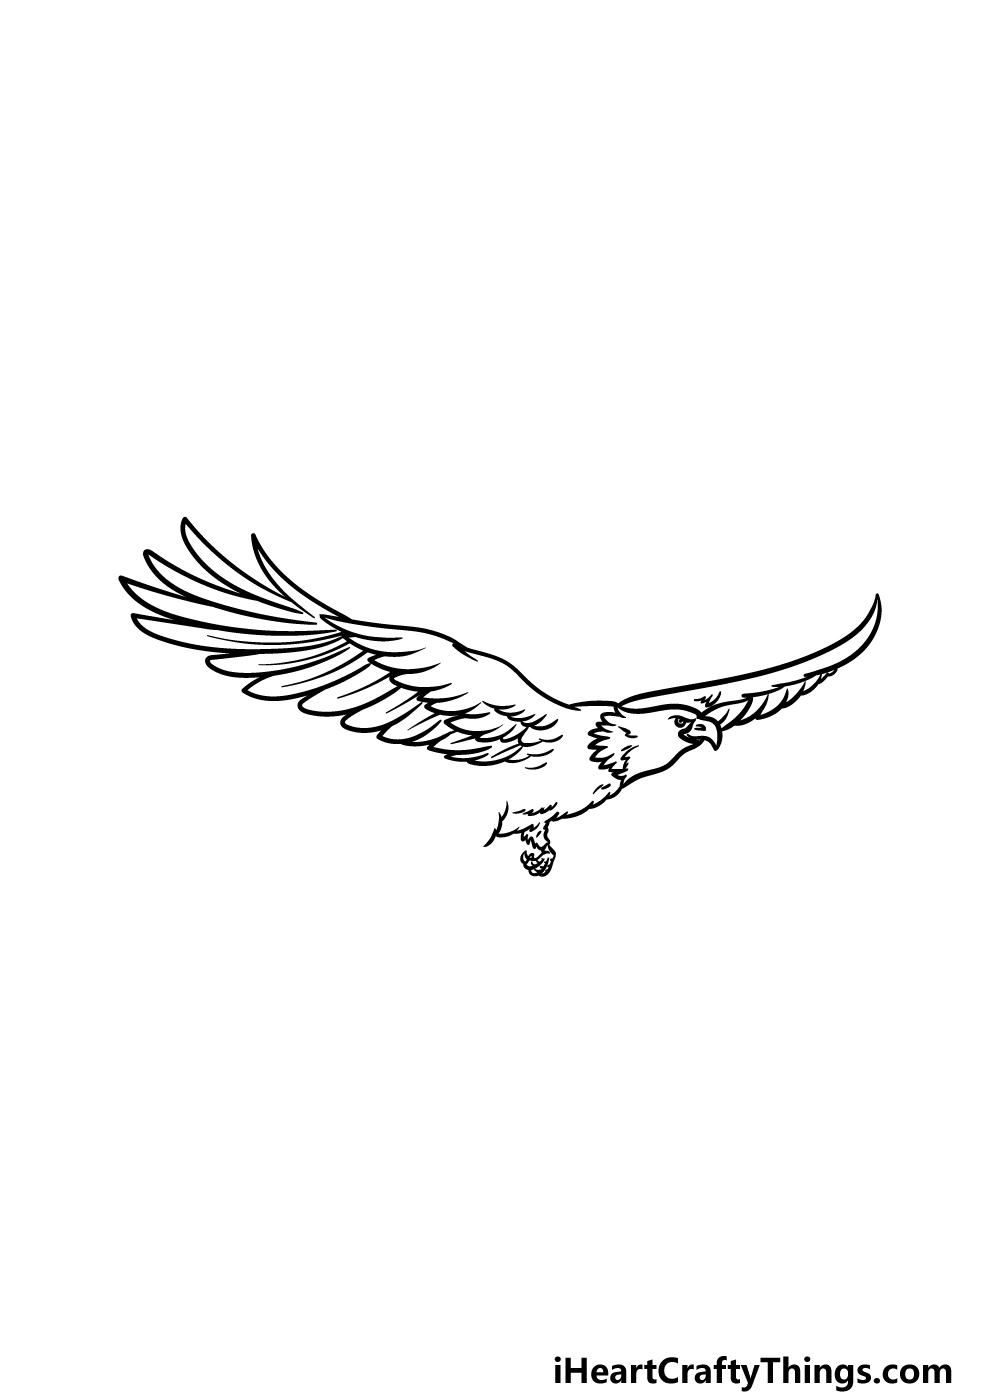
Step 2 – Now, draw the belly of the eagle as well as the first foot
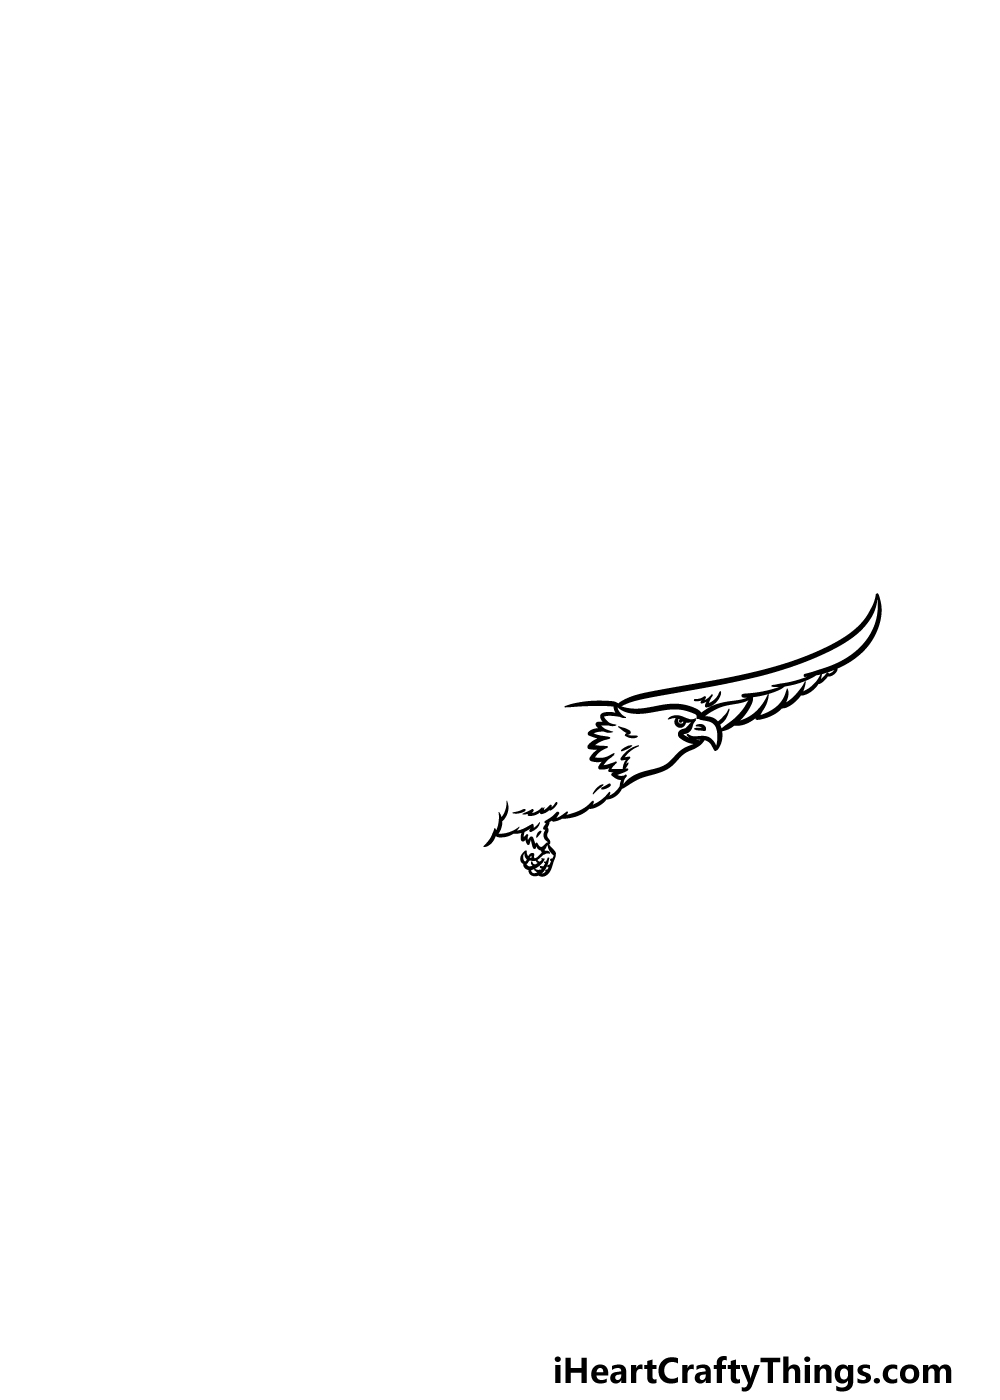
For this second step of your flying eagle drawing, we will start drawing more of the body. Using a slightly jagged line, start drawing the base of the body extending from below the head.
This jagged line will be to make it look like this part of the body is nice and feathery.
Once that is drawn, we will then add the first leg. This leg will have a small, feathery base that has the curled talon attached to it.
That’s all there is to it for this step, and then we can move on to step 3 of the guide!
Step 3 – Next, draw the first section of the second wing
Different sections of the flying eagle look like they are separated into various sections, and this is certainly true for the wings.
We will be drawing the first of these sections for the second wing during this third step of our guide on how to draw a flying eagle.
Use some smooth, curved lines extending out from the back of the eagle for the top of the wing.
Then, we will be drawing some sharp shapes using more curved lines that bend in sharply for the underside of this section of the wing.
Once again, we will be drawing these shapes to make it look like there are some large feathers beneath it.
That’s all there is to it for this step, so once you’re happy with how it looks it will be time for step 4.
Step 4 – Draw the feathers at the end of the wing
This fourth part of your flying eagle drawing will see you finishing off the wing that you just started as we add the final sections of it.
To do this, we will be drawing more of those sharper shapes that you used for the feathers in the previous section.
These ones will be larger and more curved, however. The reference image will guide you in sizing and positioning these feathers.
Once they are drawn, you will have finished all of the features and structure of the wings, and in the next step we can then take care of the final details.
Step 5 – Add the final details to your flying eagle drawing
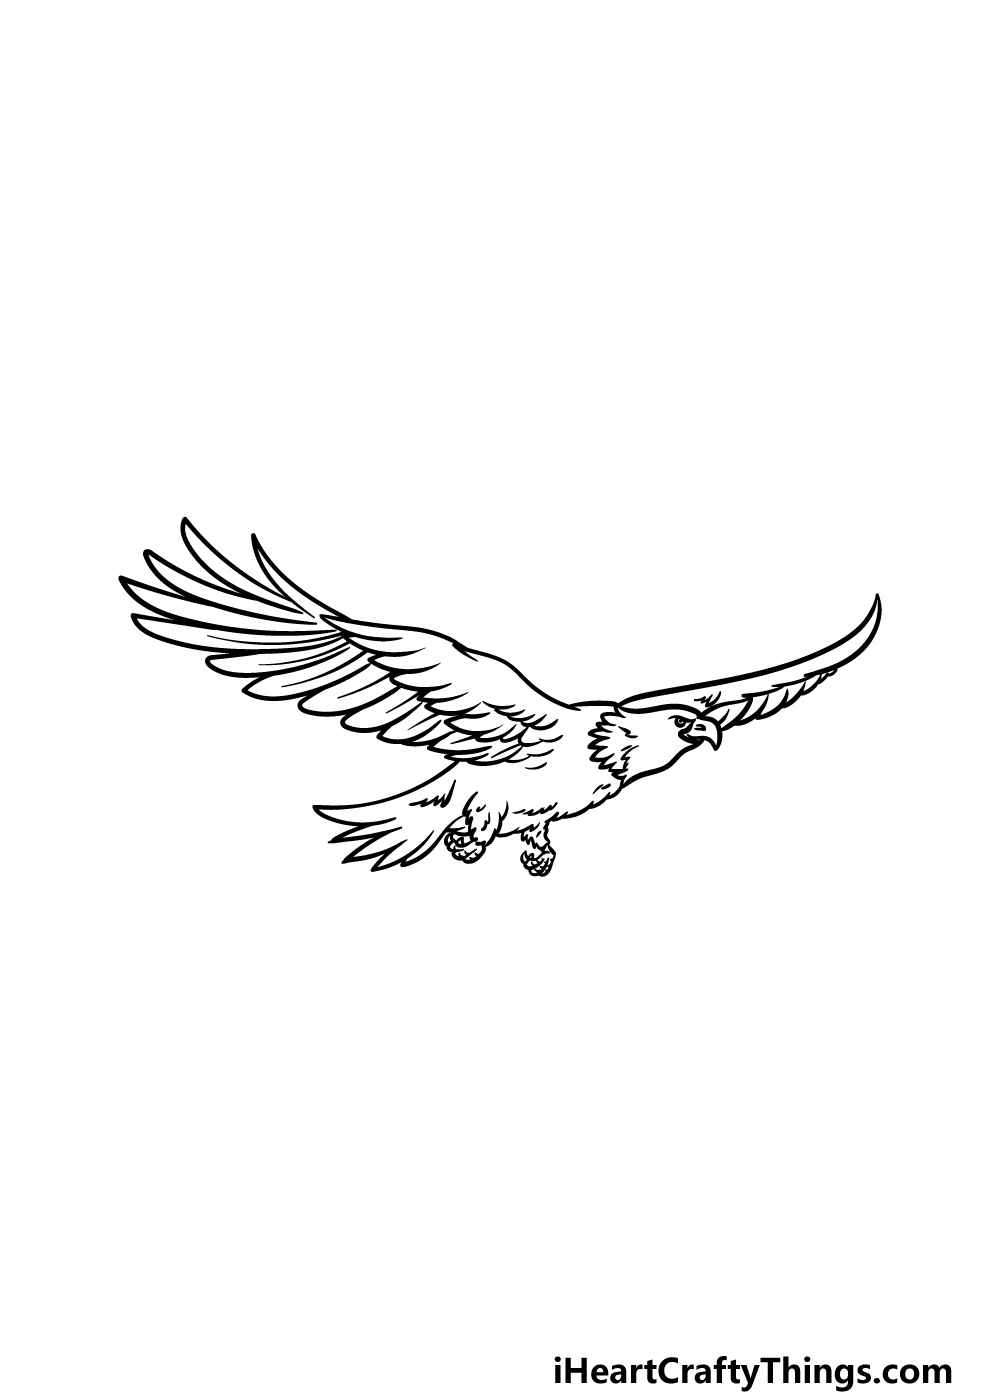
You’re almost ready to color this picture in, but we have just a few final details to add in this step of our guide on how to draw a flying eagle.
First, we will be drawing another leg curled over next to the previous one. Then, we will be drawing the tail.
Much like the wings, the tail will be drawn using some more sharp lines to create a feathery look.
Once you’re finished with these details, you will be ready to continue on to the final step! Before you do, be sure to add some background details or any additions that you may want.
How will you finish off your incredible artwork?
Step 6 – Finish off your flying eagle drawing with color
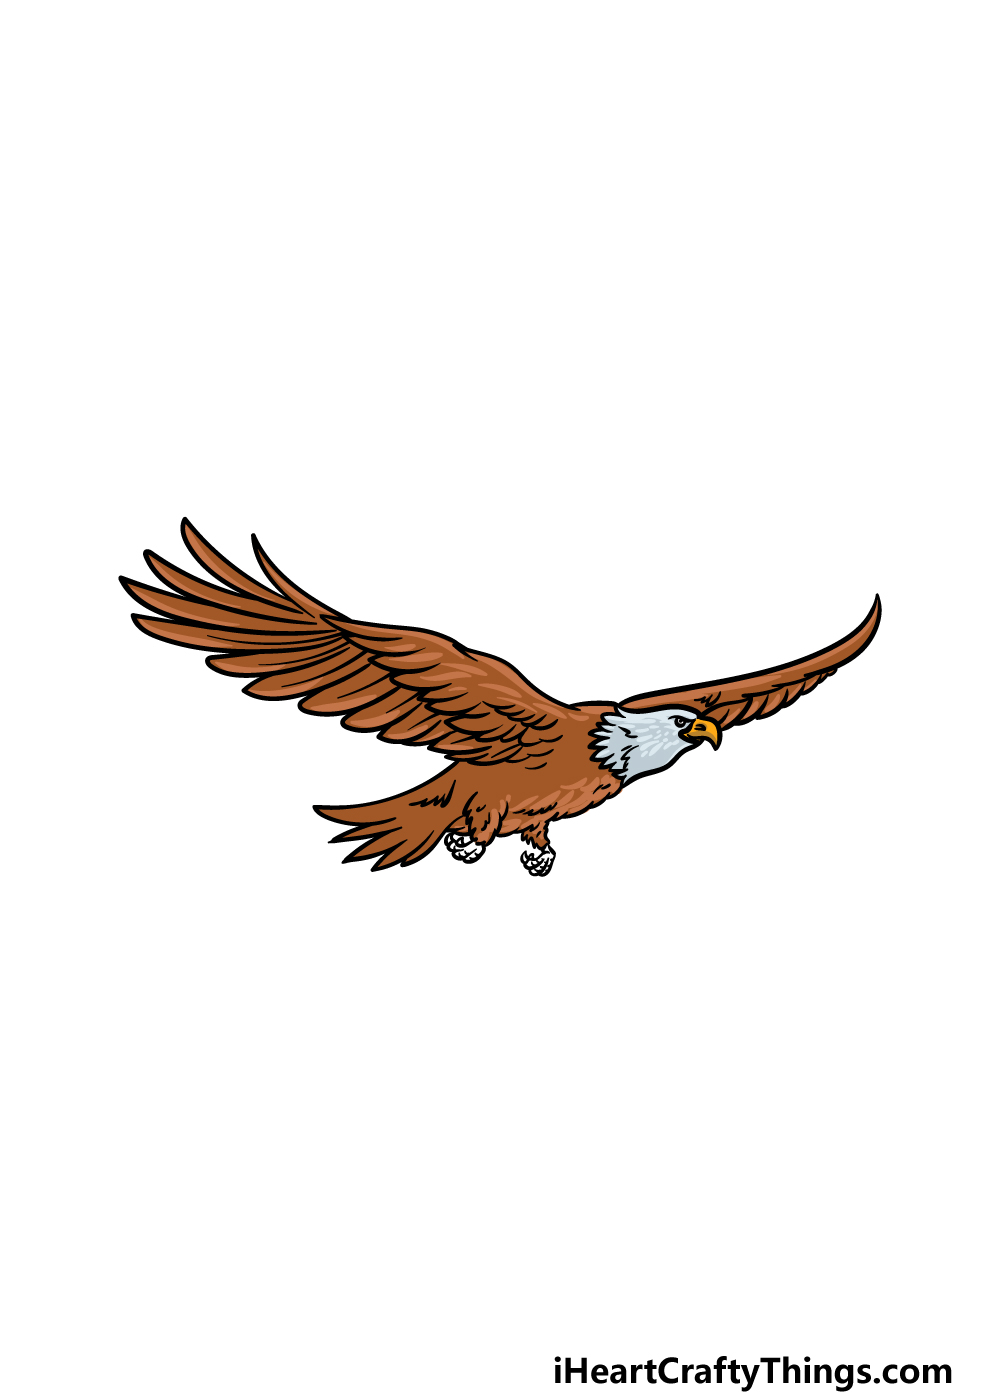
This is the final step of this flying eagle drawing, and now you can finish it off nicely with some colors. In our reference image, we went with some more muted, realistic colors for the eagle.
That means that we used various shades of brown for most of the wings and the body. For the head section, we used white and shades of light greys to give it a nice textured look.
To finish off, we used some yellow for the beak.
These are some of the colors that you could use, but you should also feel free to use any colors and shades of your own that you may like!
When you have decided on the colors, you can also have fun choosing which art mediums you will choose to achieve them.
3 More tips to make your flying eagle drawing easy!
Make your majestic flying eagle sketch even easier with the help of these tips!
This drawing of a flying eagle that we created in this guide is stylized yet quite detailed. Some of the details, such as those for the feathers, can make the depiction a bit tricky to draw.
If you are getting frustrated with some of these details, then you could try to make a version where the details are removed or reduced. One way would be to draw the eagle in a cartoon-inspired style.
The outline could be simpler, and then you could show the feather details with simpler curved lines.
Doing this would then potentially allow you to make more attempts where you add in more details later.
If you want to keep all of the details of this flying eagle drawing, then you may want to use a pencil to map out the drawing. To do this, try to use a light pencil and don’t press too hard on the paper.
Follow through the guide and use your pencil to break down the flying eagle into simpler shapes. Then, you can start adding more and more layers of finer details to the drawing.
Eventually, you can go over the lines with your pen to create the final drawing. Simply erase the pencil lines and you will have your flying eagle!
Finally, we would recommend using a real photo of an eagle when working on this flying eagle sketch. If you can find a picture that shows an eagle in flight, then that would be ideal.
Otherwise, any decent photo of an eagle you can find would still be helpful.
Using a photo would not only make drawing the details of this design easier, but it could help if you want to make a more realistic portrayal.
Try to focus on the smaller details and aspects of the photo and see how they relate to the design in our guide. Then, try to represent these details in your own artwork to make it even more stunning.
Your Flying Eagle Drawing is Complete!
All 6 steps of this guide on how to draw a flying eagle have been completed, and that means that you have finished your incredible artwork!
We hope that with the help of the steps in this guide that you found this to be a fun and easy drawing challenge to take on.
When you have completed all of the steps, remember that you can also add some details of your own!
We mentioned drawing a background, so if you went with that idea then what kind of setting would you like as a background?
If you had fun with this guide, you can find many more on our website to enjoy. We upload new ones often, so keep checking in to never miss out.
Please consider also sharing your completed flying eagle drawing on our Facebook and Pinterest pages for us to admire! We can’t wait to see how it turned out.