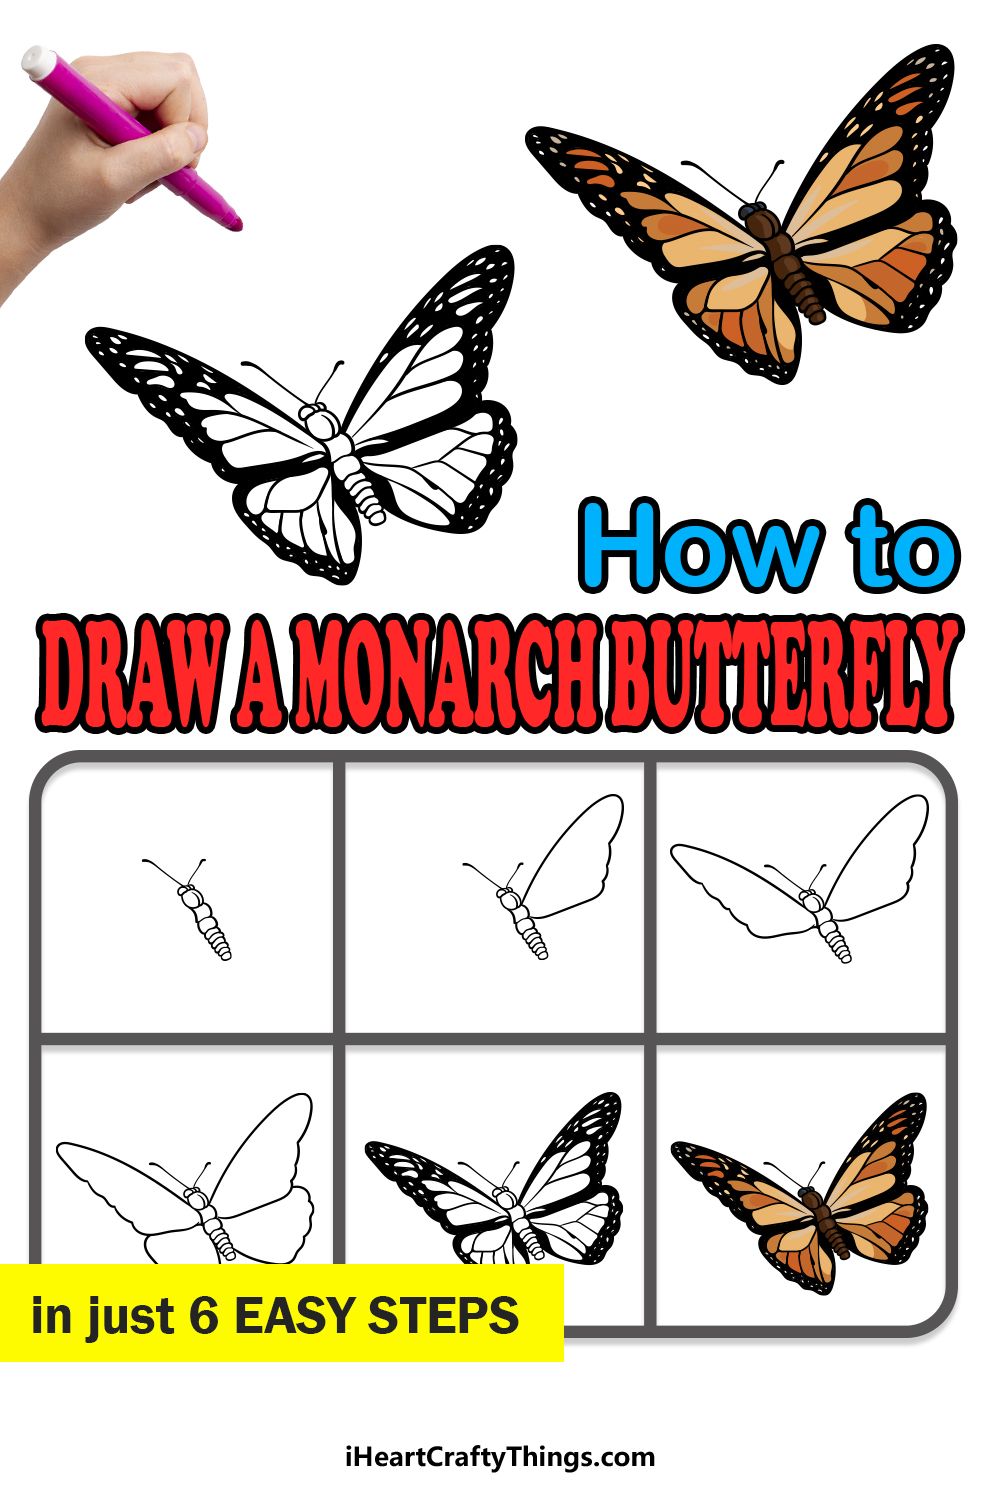
Get ready to create a beautiful work of art with this guide on how to draw a monarch butterfly. You won’t believe how easy it is to recreate this stunning creature when you work through this guide for kids.
There are so many butterfly species in the world, and each is more beautiful than the last. If you ask me, the monarch butterfly is the one that takes the prize for the most gorgeous butterfly of them all.
Because of this beauty, many people like to try and depict them in art, but it’s surprisingly hard to do so. In this guide, I want to make it easier for you by walking you through each step.
By the end, you will have an amazing drawing that you can change and add to in any way that you like!
Discover How To Make Your Monarch Butterfly Drawing
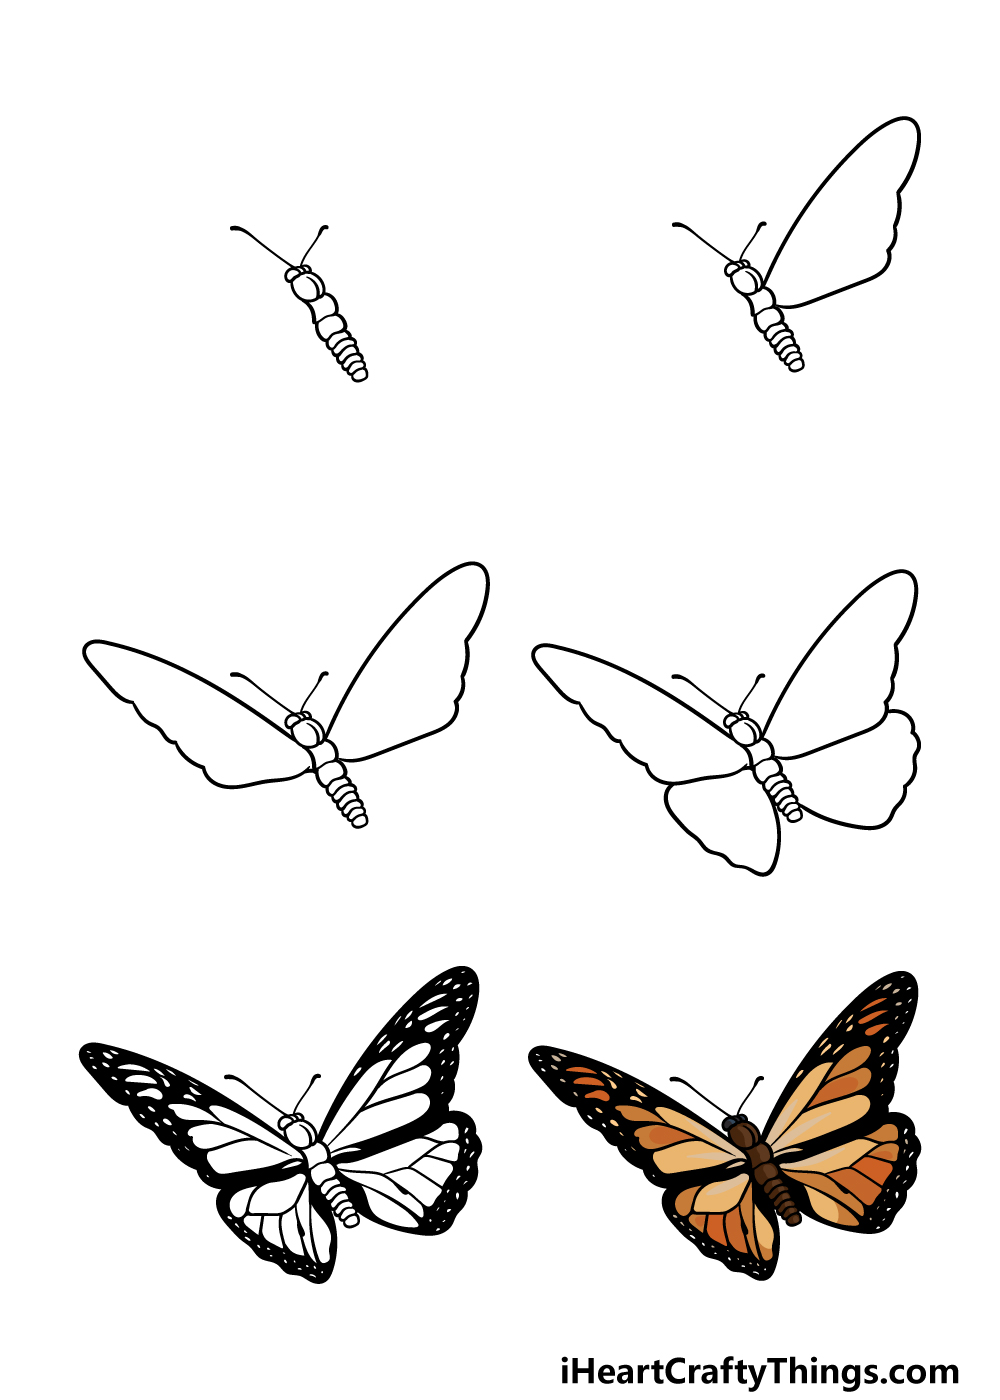
How to Draw A Monarch Butterfly – Let’s Get Started!
Step 1
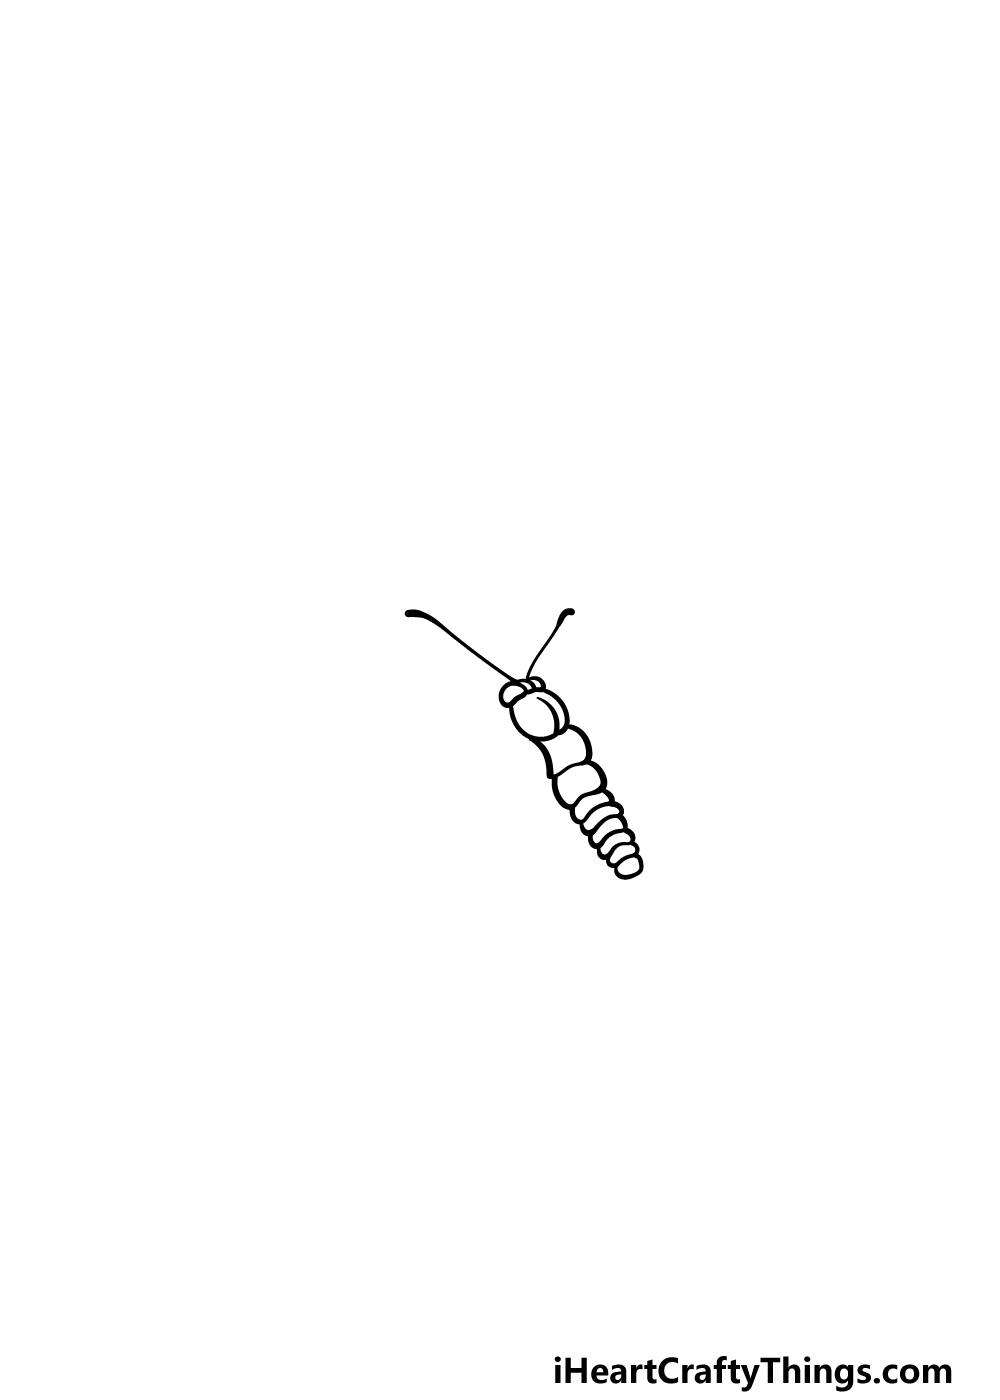
Before we start on the amazing wings of the butterfly, we will first focus on the head and body in this first step of our guide on how to draw a monarch butterfly.
To start off, you can draw two small round shapes for the eyes of the butterfly. Then you can extend two straight lines off of these eyes for the feelers. These lines will also have some thick ends for the tips of these feelers.
Once you have finished this head, we will be building up the body of the butterfly. This will be made up of lots of smaller segments connecting to one another, with the first one being a round shape roughly the size of the head.
Finally, we will then connect more similar rounded shapes that get progressively smaller and thinner as they go down. Once you have drawn the body as it appears in our reference image we will be ready for the next step.
Step 2 – Next, start drawing the wing
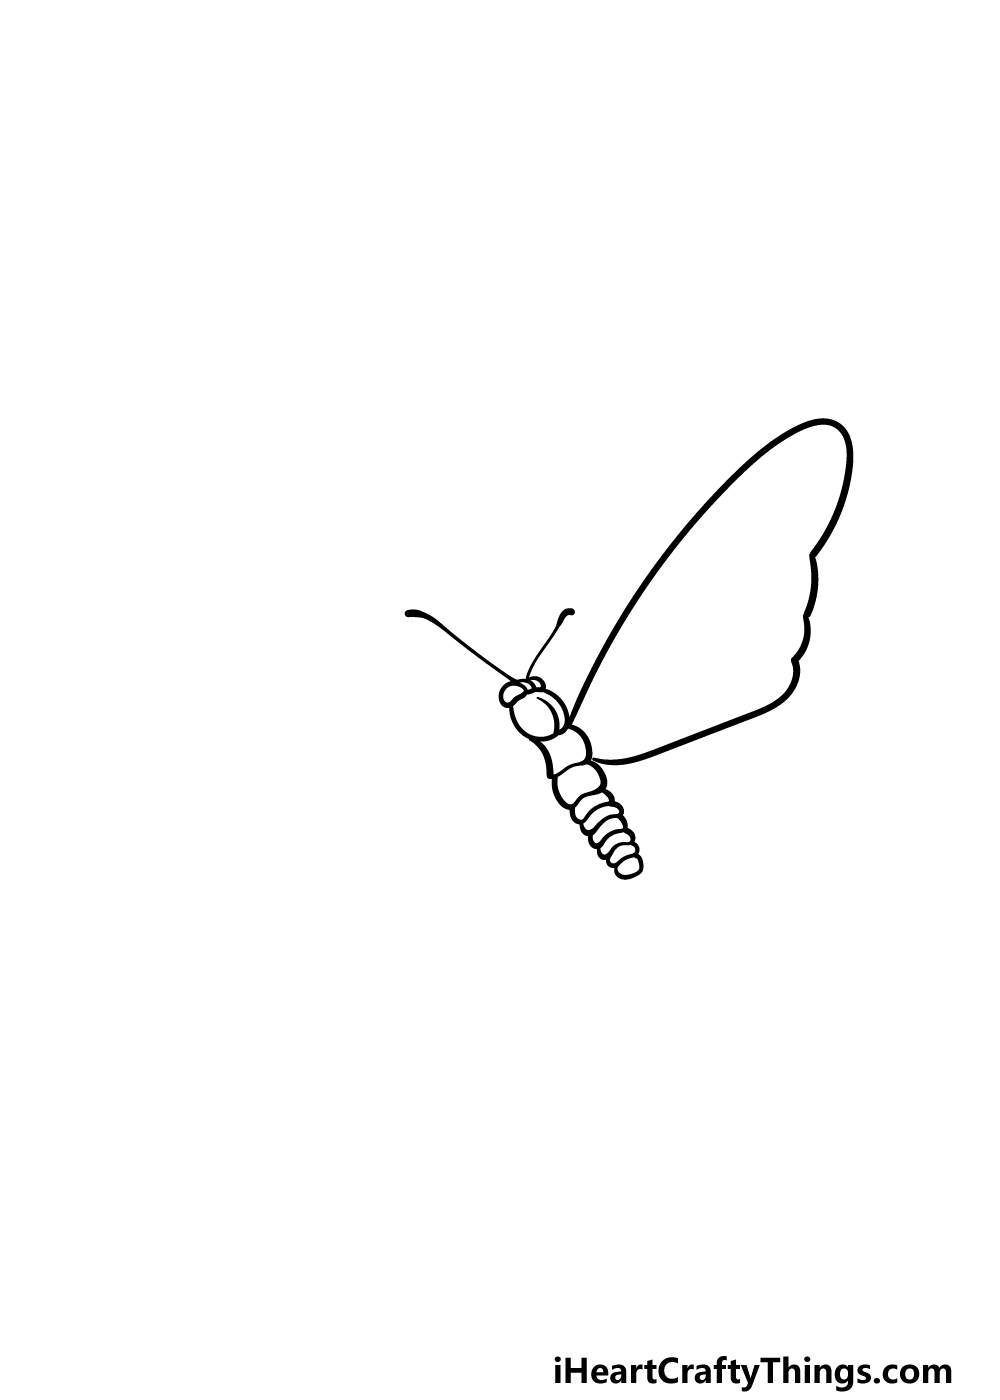
It wouldn’t be much of a butterfly without the pretty wings, so we will start to add the first one to your monarch butterfly drawing in this second part.
For now, we will be drawing the top half of the wing on the right-hand side of the butterfly. To draw this section of the wing, we will be using some curved lines to replicate the shape in the reference image.
There will be some bumpy lines on the right-hand edge of the wing, and then it will move inward to form a fairly small base connecting to the body.
Step 3 – Draw the next section of the wing
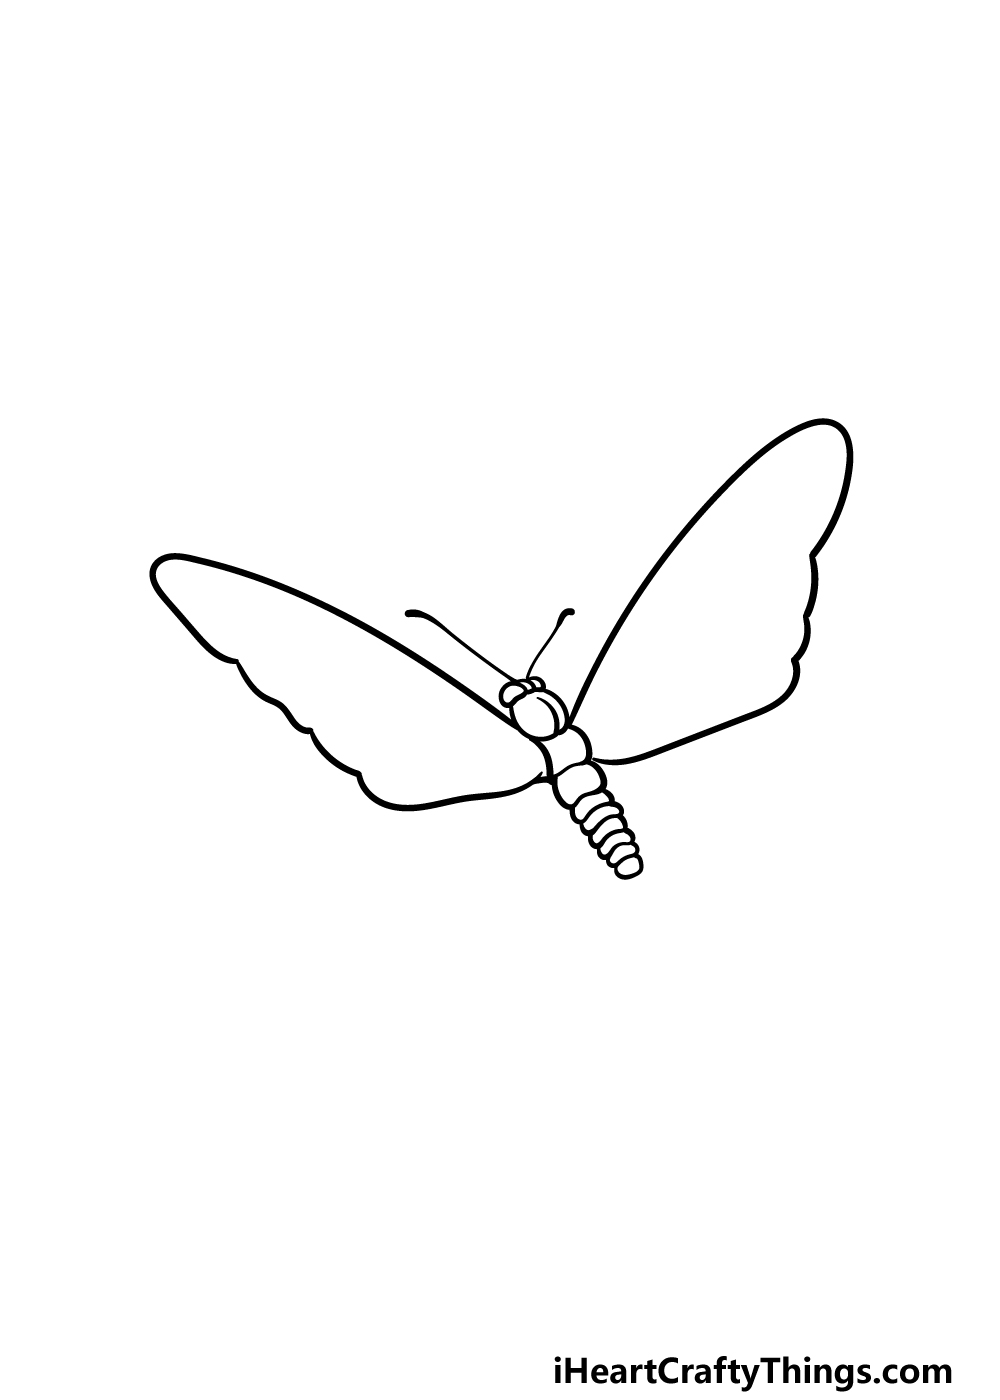
For the third step of this guide on how to draw a monarch butterfly, we will basically be mirroring what you did in the last step.
This part will see us creating the top half of the wing on the left-hand side of the butterfly, and it will be very similarly shaped to the first part that you drew in step 2.
Once these two halves are drawn, we will be ready for the bottom halves of the wings in the next step!
Step 4 – Now, draw the bottom halves of the wings
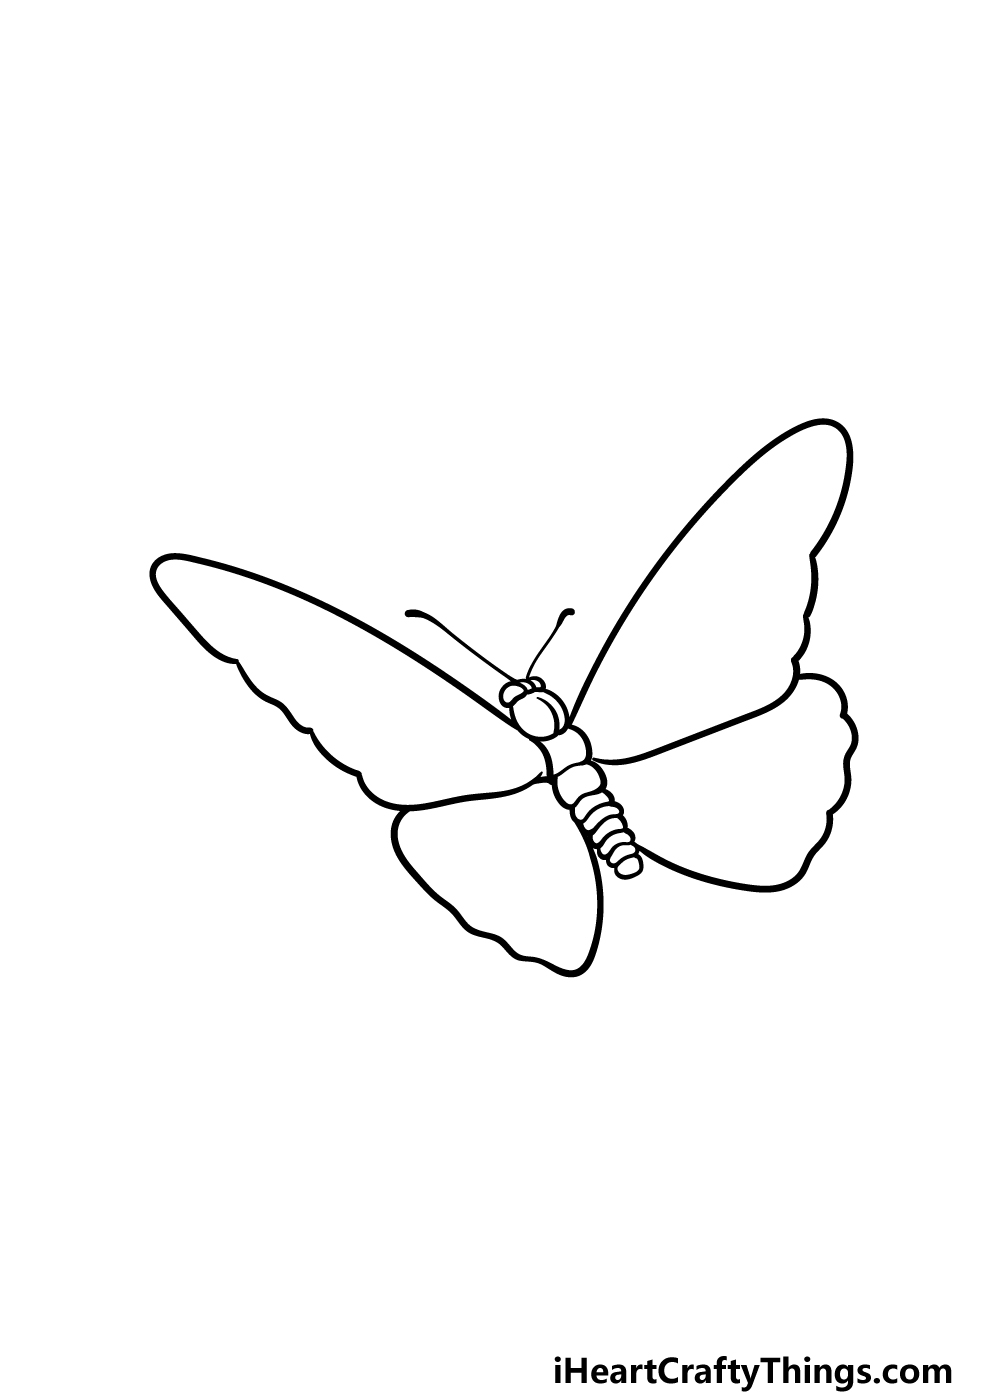
This part of your monarch butterfly drawing will see you drawing the two bottom sections of the wings.
These sections will be shaped very differently from the top halves that you drew already, as they will be more rounded and squat than those ones.
They will extend down from the base of the top halves of the wings and be drawn with some rounded lines with bumpy edges on the sides.
Once you have finished the wing outlines, you will be ready to start decorating them in the next step!
Step 5 – Finish off the wing patterns for your monarch butterfly drawing
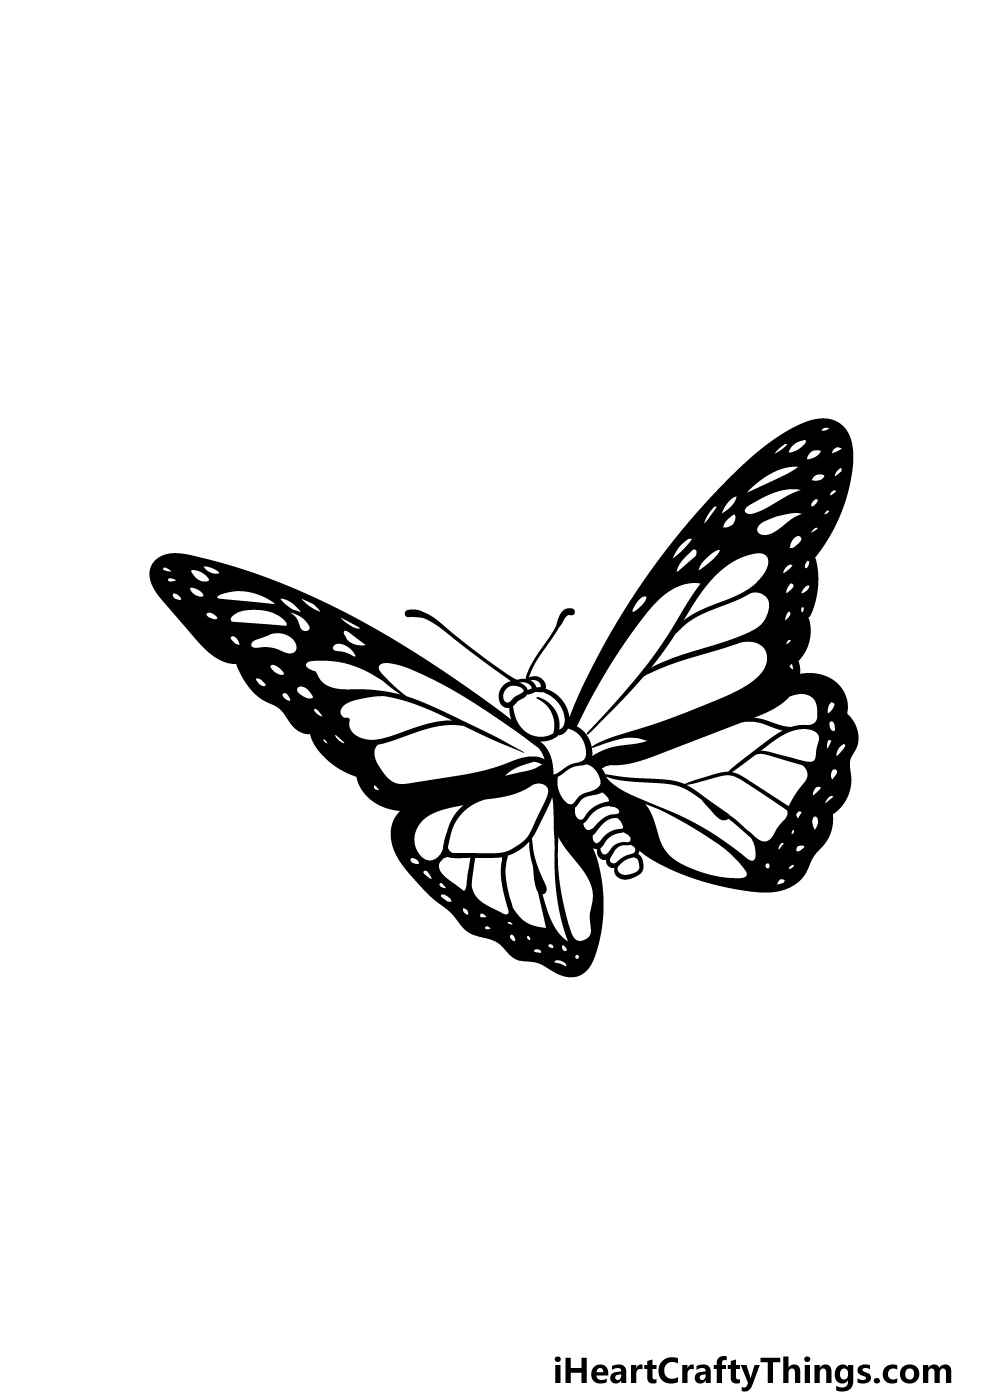
We’ve spoken a few times in this guide on how to draw a monarch butterfly about how beautiful their wing patterns are, and we will start to draw them in this part.
This may be the trickiest part of the guide, as the pattern can be quite intricate. We will take it slowly as we go, and we will also follow the reference image closely to make sure there’s no frustration!
The patterning for the wings will be quite thick on the edges, with some thinner and more intricate linework extending to the interior of the wings.
There will also be some white dot shapes in some of the thicker edges of the black borders.
Once you have replicated the pattern as it appears in the reference image, you’re ready for the final step!
Before you move on, you could also make your own unique wing pattern once you have the hang of it, and you could also draw a cool background for your monarch butterfly drawing. We look forward to seeing how you finish this off!
Step 6 – Finish off your monarch butterfly drawing with some color
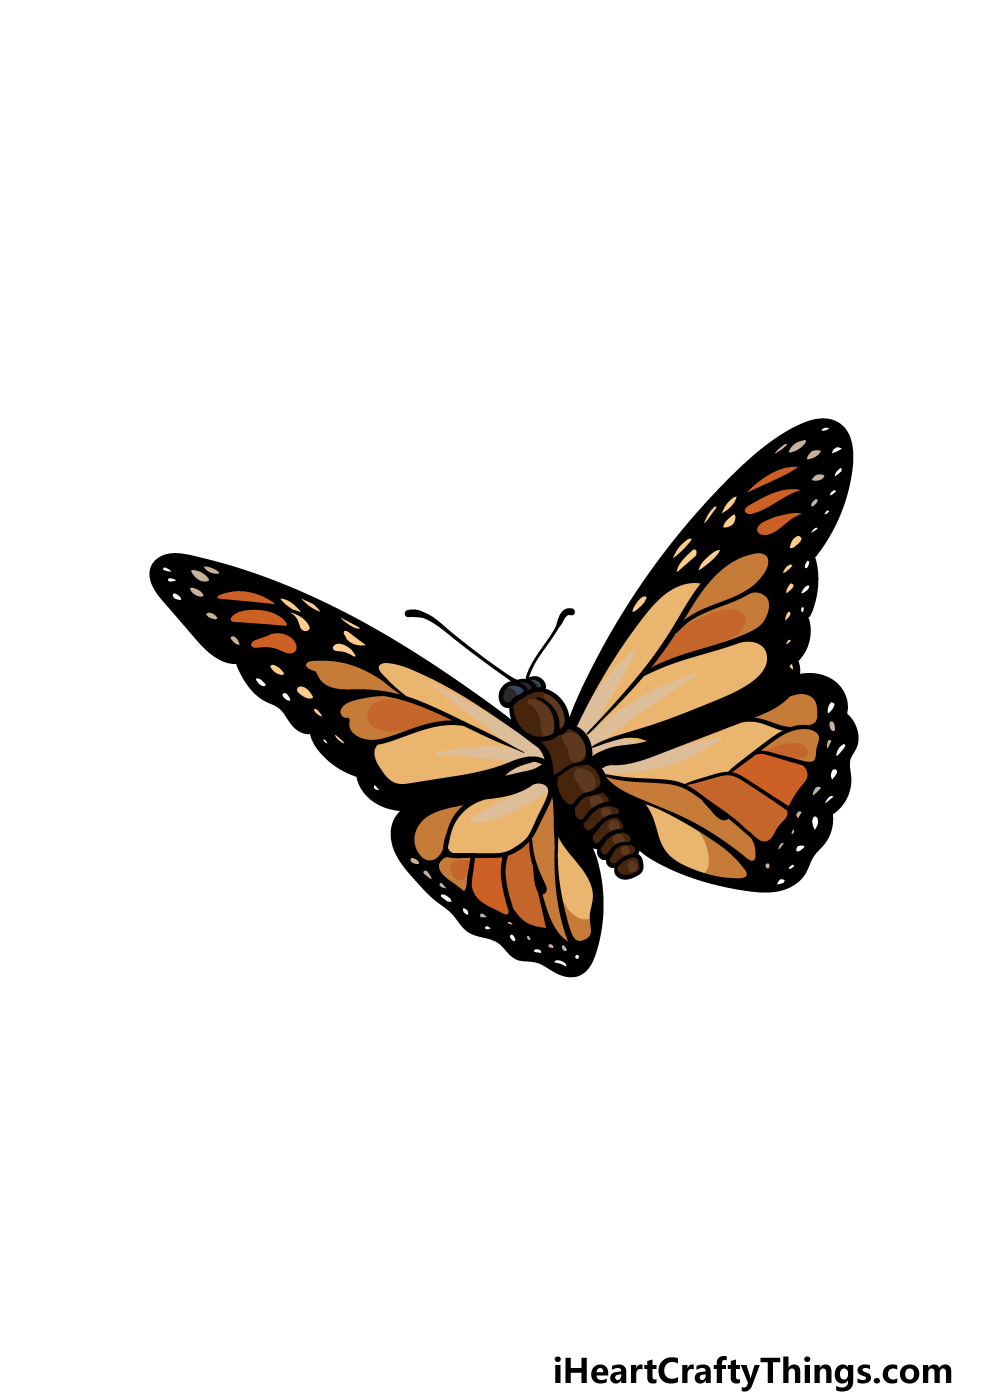
This particular butterfly is well known for its distinctive brown and gold color scheme, and that’s what we went for in our reference image.
You could use this same color scheme for your own monarch butterfly drawing, but this is a step where you could also get creative with your color choices!
You could make your own unique butterfly variation with some bold and unique color choices or go for a more realistic look.
This kind of picture would work really well with some paint mediums such as watercolors or acrylic paints, but anything you use will look amazing!
Bonus: Try Out These Extra Tips To Make Your Drawing Even Better!
This drawing of a monarch butterfly is looking stunning already, but we have some ideas for how you can make it even better! Now that you have finished this guide, you have a good idea of what it takes to draw one of these incredible insects.
You could take what you’ve learned and add some more butterflies to the scene. We think it would look stunning to have a whole swarm of these butterflies on the page.
Each one could have unique patterns and color schemes on their wings, and that would make each one stand out from the rest. If you wanted to add other kinds of butterflies, then that would also be amazing.
Other insects and creatures would work too, so be sure to add your favorites! Then, it could all be finished off with a background, and there are many possibilities for that as well.
You could use your own back yard or a local park as an example, as that would give you some references to work from. Or, maybe you could imagine a beautiful landscape for this butterfly to explore.
When it comes to adding a background, you don’t have to necessarily add a setting. Instead, you could also go for colors and shapes to fill the background.
Using crafts can also be a stunning way to elevate an artwork. Craft paper could be stuck over the wings to give them a more 3D, textured look.
Using different kinds of paint and art tools can also be a great way to make a picture really pop. There are so many ways to make this artwork even more incredible, and we would love to see what kinds of ideas you come up with!
3 More tips to make your monarch butterfly sketch drawing easy!
Make your monarch butterfly sketch even easier to draw with these 3 handy tips.
For this drawing of a monarch butterfly, we tried to include a lot of detail when it came to the wings and body.
This makes the butterfly look even more impressive, but you could remove some of those details.
Removing details might affect the realism of the drawing, but it’s something you could do while you get the hang of the image.
Once you have mastered the less detailed version, you could always make new attempts where you add more details.
If you prefer a simpler, more stylized approach anyway, then this tip may be one that results in a picture you actually prefer over the highly detailed one!
When creating this monarch butterfly drawing, we chose to portray the butterfly from a bit of an angle. This makes for a more interesting picture, but it also makes it surprisingly tricky.
There are a few alternate angles you could use to make the drawing a bit easier. Perhaps the easiest one would be to draw the monarch butterfly from a top-down view.
This way, you can focus on the outlines and the details of the image without having to portray the angle of the wings and the body.
Again, this is a tip you could try in order to make it more to your liking!
Finally, we would suggest using a real version of this insect to help with your monarch butterfly sketch.
Not all of us have access to a real monarch butterfly, so the next best thing would be to use some pictures.
If you search online, you will find many pictures of these butterflies that you can use along with the images in our guide. Alternatively, many textbooks will also have depictions of monarch butterflies.
When you have some pictures to work with, you could also use them to make your version of this drawing more unique and personalized.
They could also give you some ideas for other colors you could use!
Your monarch butterfly drawing is complete!
We hope that this guide on how to draw a monarch butterfly was fun and informative for you to use!
When drawing something like this, it can get a bit tricky as there is some intricate detailing to the patterns on the wings. That’s why we tried to break it down into smaller steps as that allows you to just have fun with it!
Don’t forget that you can also add some of your own pattern designs, details and background elements. These along with the colors and art mediums you use give you lots of options for personalizing your image.
You’ll want to visit our website when you’re done, as we have some great drawing guides uploaded for you there! We add more guides often, so be sure to visit us there frequently.
When your monarch butterfly drawing is complete, we would love to see your pretty creation! Please share your artwork on our Facebook and Pinterest pages for us to admire.