Dragons appear in many myths, legends and stories from around the world. They’re so common in stories, that you may start to think that they must have been real at some point!
When it comes to dragons, few places have ones that are as cool looking as the ones featured in Japanese art and mythology.
Dragons appear in lots of ancient art and stories from this country, and they have a distinct and fearsome look.
You may have seen Japanese dragons before and wanted to create some artwork featuring these legendary creatures. If that is the case, then you’re in the right place!
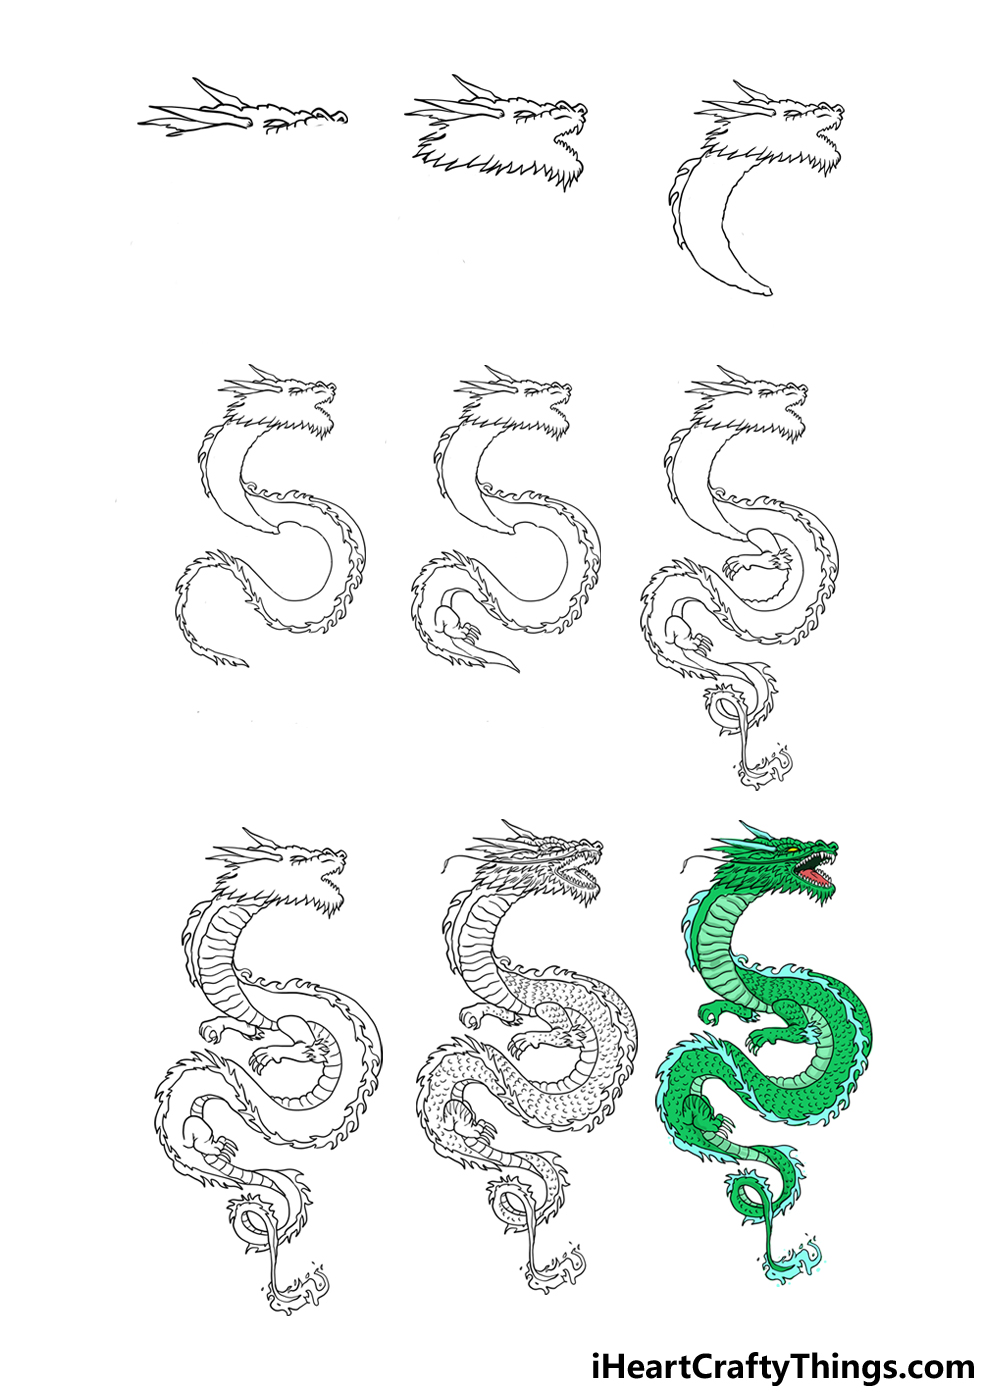
In this guide, we will go over how you can learn how to draw a Japanese dragon in just 9 steps. It will be tricky, but we will go over everything you need to know in order to create your own fearsome dragon.
Not only that, but we will also go over some of the colors, extra details and other elements you can add in order to make your drawing even more unique.
So let’s take a trip into myth and legend as we bring this fearsome beast to life!
How to Draw A Japanese Dragon – Let’s Get Started!
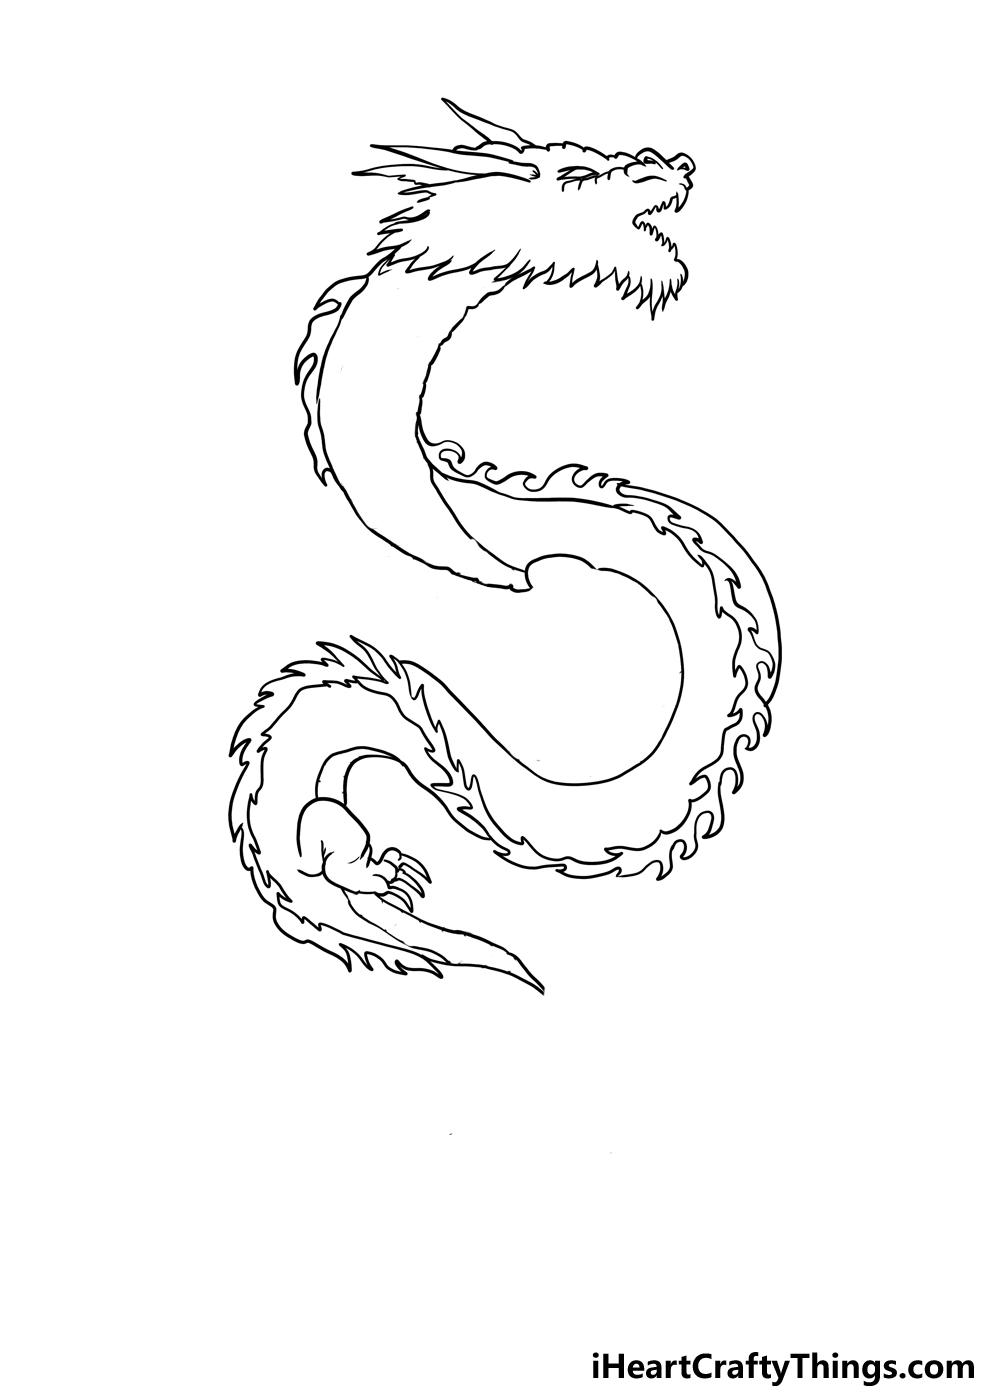
Step 1

There are lots of fine details that we will be drawing when creating this drawing of a Japanese dragon, so we have broken it down into lots of different steps.
Before you start drawing, we would recommend planning your drawing with a pencil.
Look at the later images in the guide where we can see the entire body of the dragon and then draw a rough version of the shape of the outline.
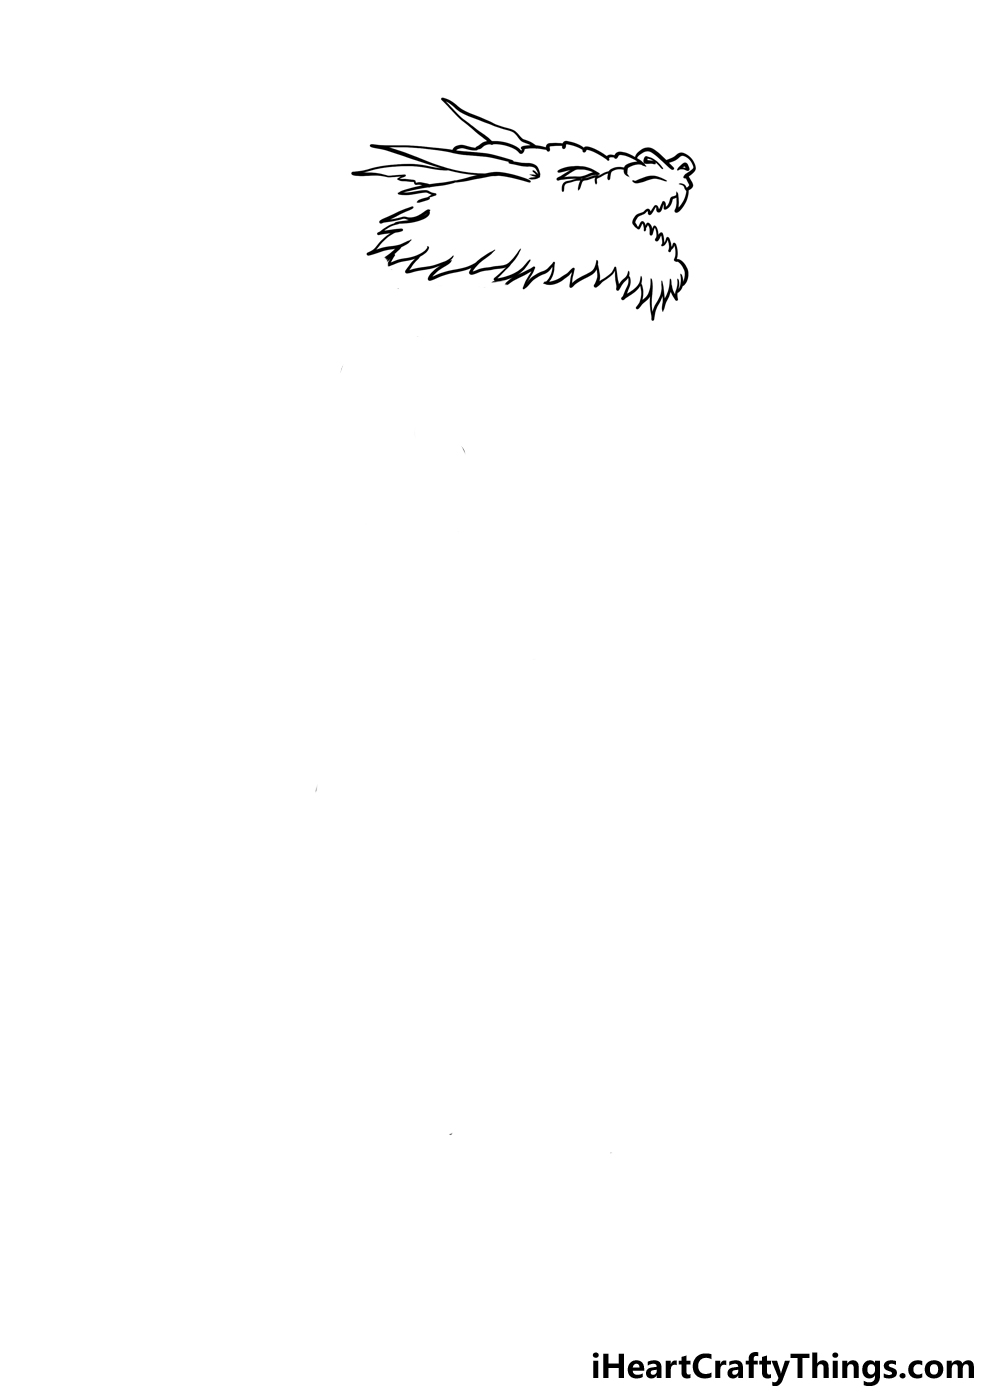
This will help you keep everything in check as you start adding to the finer details throughout the steps. Then, we can draw the first details of the dragon, which will begin at the face of the dragon.
In the reference image, you will see that we have drawn a few small spikes on top of the head, and then we used some curved lines to create a bumpy outline for the head.
We will see the start of the eye and the nostril as well, and we will add details to this as we move on.
When you have this start to the head, we can move on to step 2!
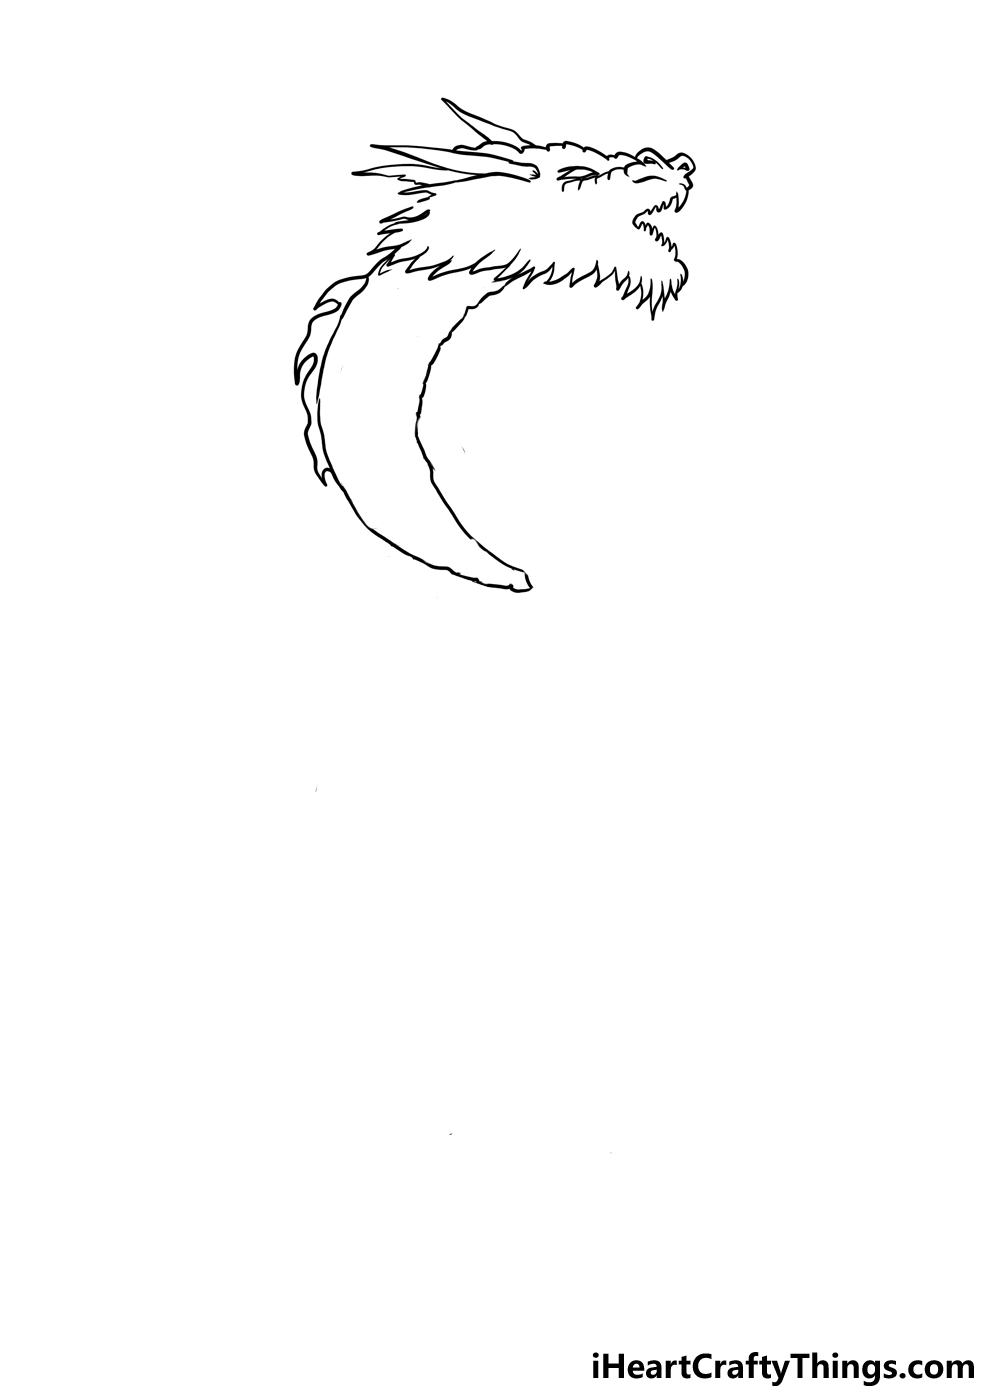
Step 2: Draw the rest of the head outline for the Japanese dragon
We have the start of this dragon’s head, and now we can draw the rest of the head outline. You will see in the reference image that we will be using lots of spiky shapes.
These will help to create a beard of sorts for the dragon. On the right-hand side of the head, there is a small V shape for the opening of the mouth.
This is also drawn with lots of small little spikes to show the teeth of the dragon. It then extends to the lower outline of the head, which is also drawn using some larger spiked shapes.
When drawing your version, try to shape it as it appears in our reference image, as it may look a bit off if the shape isn’t quite right.
When you have the complete outline for the head, we can move on to step 3.
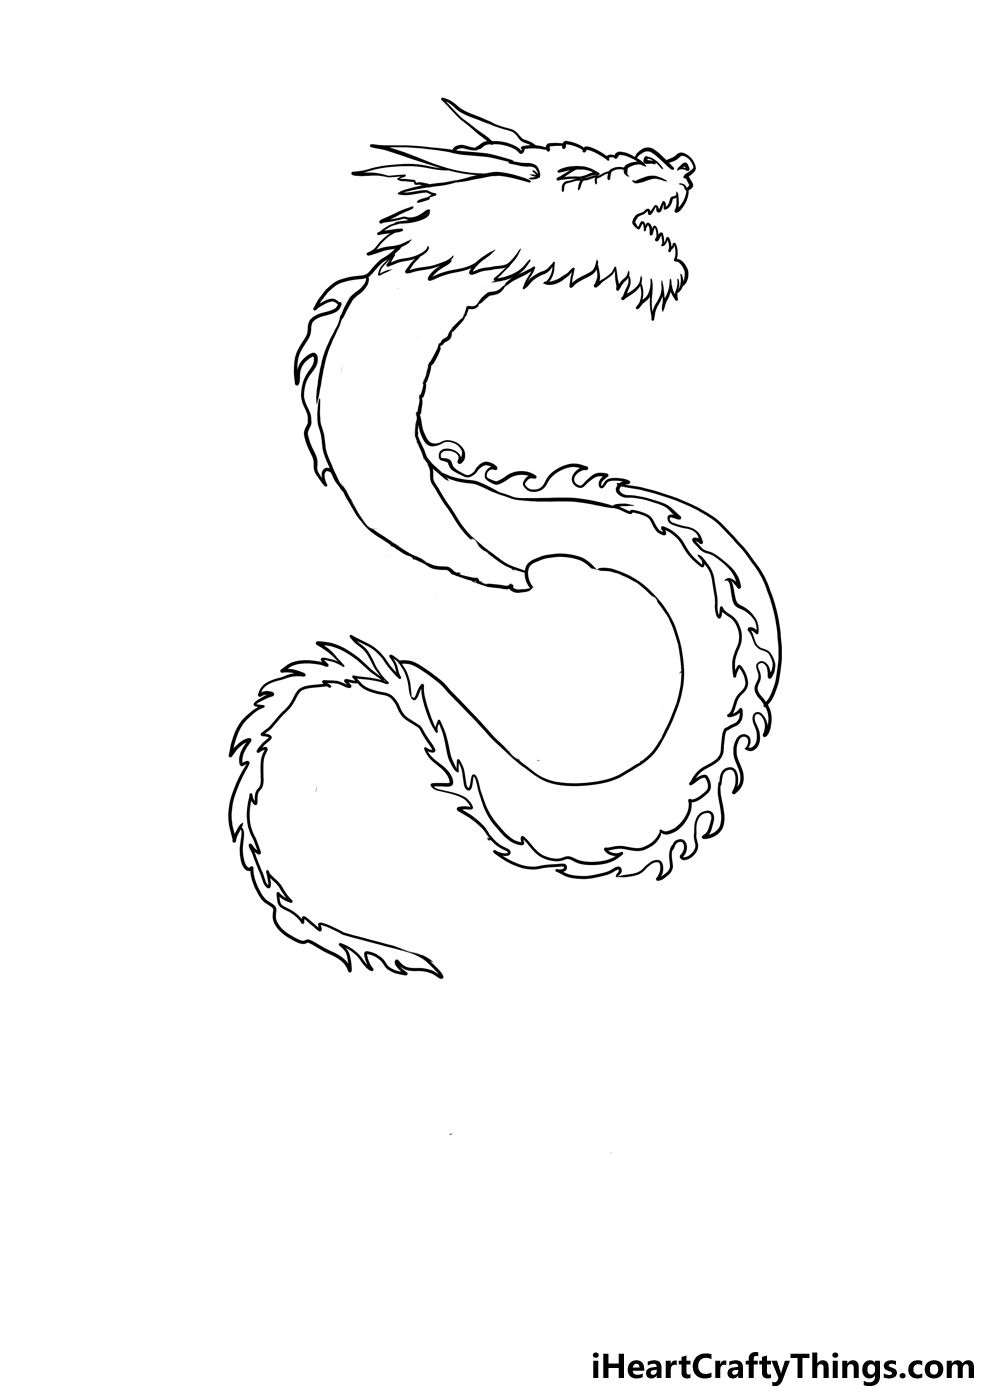
Step 3: Draw the first portion of the body
Dragons from other regions have lizard-like bodies more often than not. A Japanese dragon is usually different, in that their bodies are more snake-like.
They usually still have little legs, but these are usually de-emphasized.
We shall be drawing a twisty snake body for this one, and we will focus on the first section in this third step of our guide on how to draw a Japanese dragon.
Using a bumpy line, we will make a pointy outline that ends in a rounded tip at the base. It will almost look like this is a weird worm with a dragon’s head at this point, but we will add more later!
For now, we will finish off this step with a fin on the back of the body. It will have some curved, pointy lines, as shown in our reference image.
That’s all for now, and we can proceed to step 4.
Step 4: Now draw the next section of the dragon’s body
This fourth step of our guide on how to draw a Japanese dragon could get a bit tricky, so you may want to closely follow the reference image on this one.
First, have a look at the spiky fin that you drew in the previous step. Try to imagine this twisting around with the body and then down so that it’s more visible.
It will extend down in a roughly S shape, and this time we will get a much better look at it than we did in the previous step.
There are lots of small details on this fin, and there are plenty of pointy pieces poking off.
Once you have drawn the fin in this S shape, we will then add a few smooth lines following the path of the fin. These lines will show the dragon’s body that the fins are attached to.
Take your time with this step, as it is a lot of detail to draw! Then, we can continue building up this dragon in the next step!
Step 5: Draw more of the body outline and the first leg
Earlier in the guide, we mentioned that the legs of a Japanese dragon are usually quite small compared to the limbs of dragons from other regions of the world.
We will be adding the first of these small legs in this step of the guide, and we will also finish off the rest of the outline for the body. The body will start with a simple, smooth curved line.
This will extend from the base of the bottom curve of the dragon’s fin that you drew in the previous step. The leg will be small and will also be drawn with a curved line near the base of the body.
While the leg may be small, it will still have some mean-looking claws on it. These claws are drawn with some small curved lines that end in some pointy tips.
Once you have drawn this leg, we will then draw the tail, which will be quite pointy.
With this, we will have most of the main outline of this Japanese dragon, and we can keep adding some details and parts in the next steps.
Step 6: Now, finish off the outline for the body of this Japanese dragon
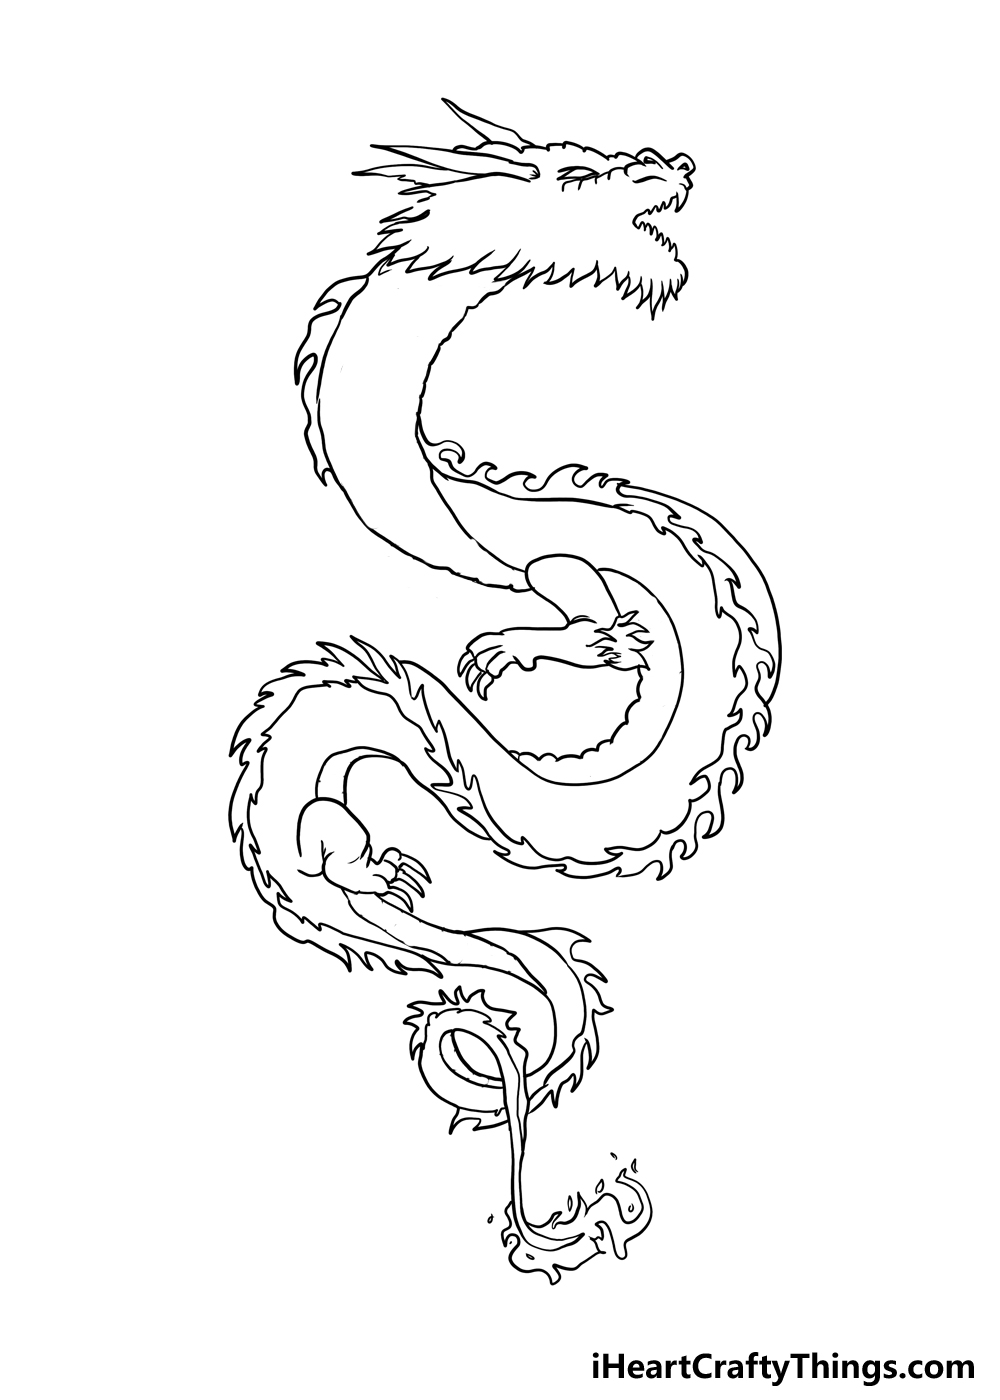
In this step, we will be finishing off the outline for the body of this Japanese dragon drawing.
That will allow us to focus on adding some finer details in the next few steps, but for now let’s focus on that outline.
You will see in our reference image that this step may be a bit tricky, as the tail of the dragon gets quite twisty in this step. First, we will draw another leg for this dragon.
This leg will go near the center of the body, and it will slot into the space we left with a curved line at this area.
While this leg will also be relatively small, it will be a bit larger than the other one that you drew.
We will also get a better look at this leg than the other one. There will also be an additional detail on the knee of this leg, as we will draw a little flame detail using some pointy shapes.
Finally, you can finish off the tail, and this is what we were talking about when we said it could get tricky. The tail twists over itself, and you have to account for the fin on the tail as well.
For this step, we suggest really looking closely at the reference image as you draw and copy it as closely as you can. Then, we can start adding finer details in step 7!
Step 7: Now, draw some texture details on the belly of the dragon

That previous step was quite a tricky one! For that reason, we will keep this step of our guide on how to draw a Japanese dragon simpler.
We will be focusing on details on the belly of the dragon, and these can be drawn with some simple lines. If you look at the belly of a snake, there will usually be some horizontal lines across it.
These are to give the belly some traction for them to crawl across the floor. Because this Japanese dragon has a body like a snake, it will have similar lines across its belly.
All along the visible belly, you can draw some slightly wavy lines across it, and try to make sure they’re somewhat evenly spaced.
Once you have finished these lines, we will be ready for some final touches!
We will take care of these along with adding any of your own ideas in the next step.
Step 8: Draw the rest of the details for this Japanese dragon
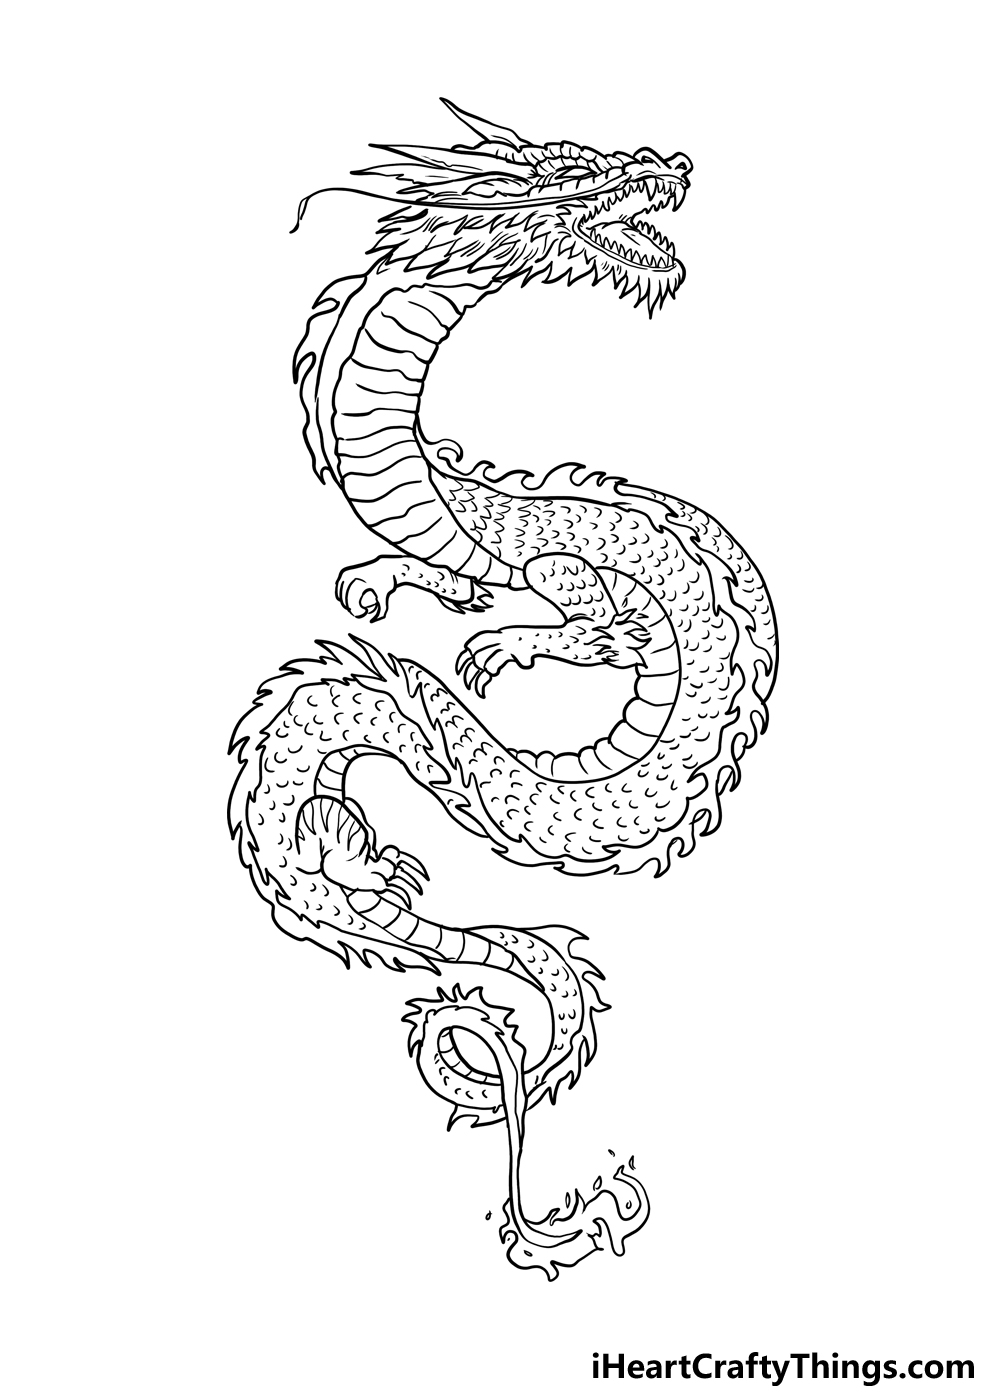
You had a bit of a break in the previous step, but this one will have a lot to add. You can take your time and have fun with it, though!
First, we will be finishing off the details on the face. You can start with the eye and the area around it.
You will then see that there is a small, thin portion extending from the nose area of the face, almost as if it’s a strand of a mustache extending out.
Then, you can draw the dragon’s many teeth and the opening of its mouth along with some pointy line details inside the head outline.
Finish off this step with loads of small curved lines all throughout the body outline to create some scales for this Japanese dragon.
Once you have added all of these details, you’re ready to finish off with your own ideas!
This could include a background, small objects or maybe some other characters. There are so many ways you can add to the drawing, so how will you finish it off?
Step 9: Add some color to this Japanese dragon
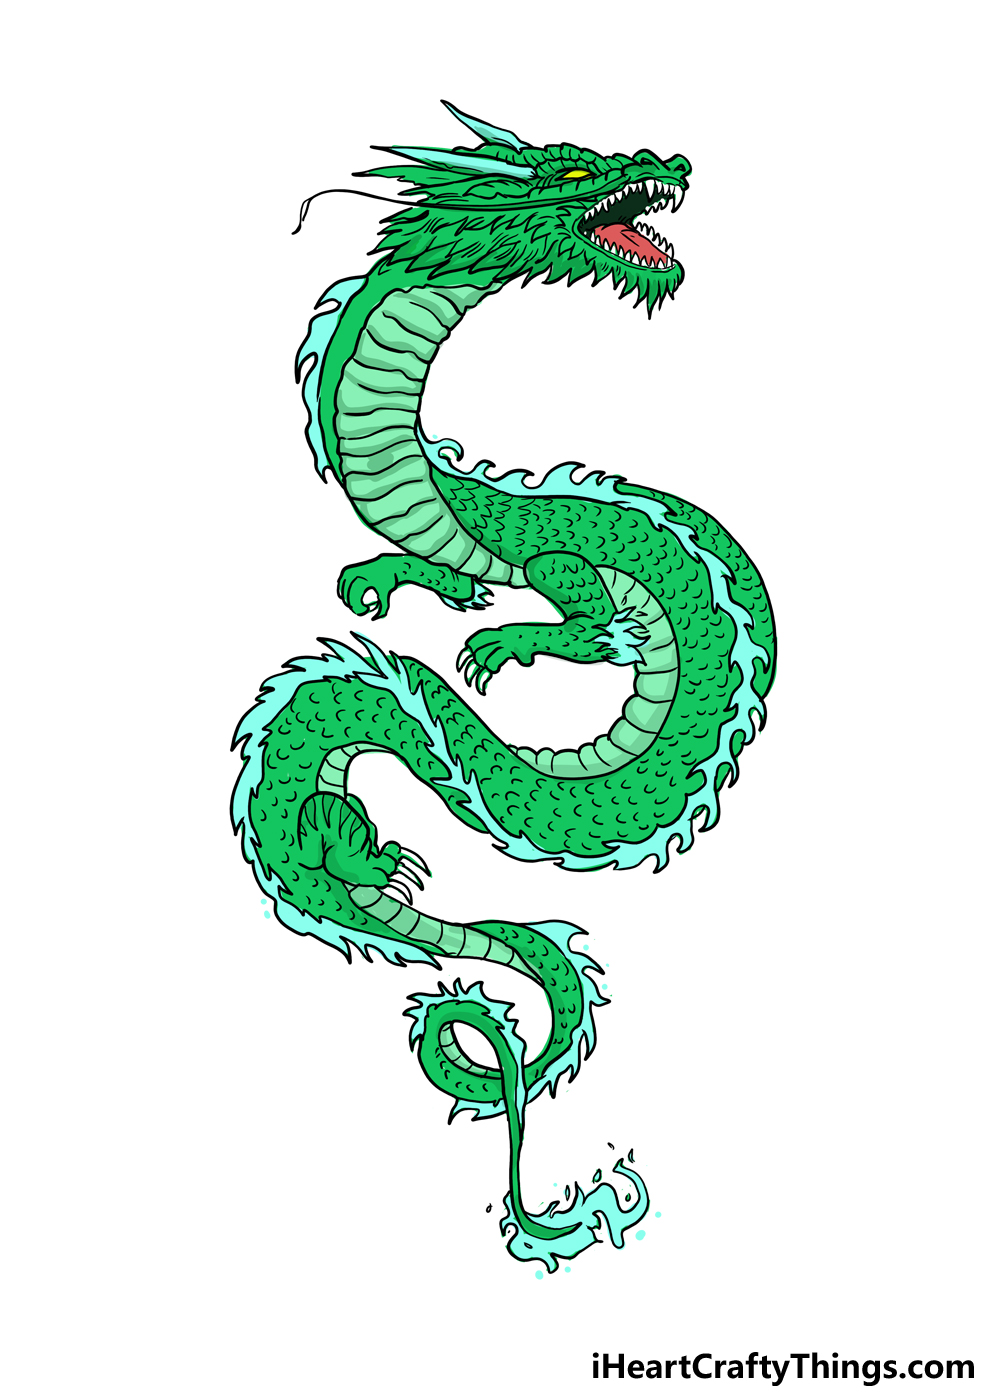
It’s all come to this, and now it’s time to add some color to your drawing of a Japanese dragon! These kinds of dragons are often colored with red and gold, but we went with a different take.
We instead used some shades of green to give the dragon a bit of a colder look, and it looks very good! If you like this interpretation, then you could use it for your own one.
Or, you may prefer to go for a more classic red color scheme instead. Either approach would work, so it’s completely up to you!
You can also try out some different art tools and mediums depending on the kind of look you want for this awesome Japanese dragon. We can’t wait to see what you choose!
Your Japanese Dragon Drawing is Complete!
This Japanese dragon drawing was a tough one to master, but you did an amazing job on it! If you had a hard time with some of the details, you could always simplify the design a bit as well.
If anything, it will just make the drawing more unique! However you decide to finish off this drawing, we hope you will share your artwork on our Facebook and Pinterest pages for us to enjoy.
We would love to see how you decided to interpret this fearsome Japanese dragon with your own details and color choices!