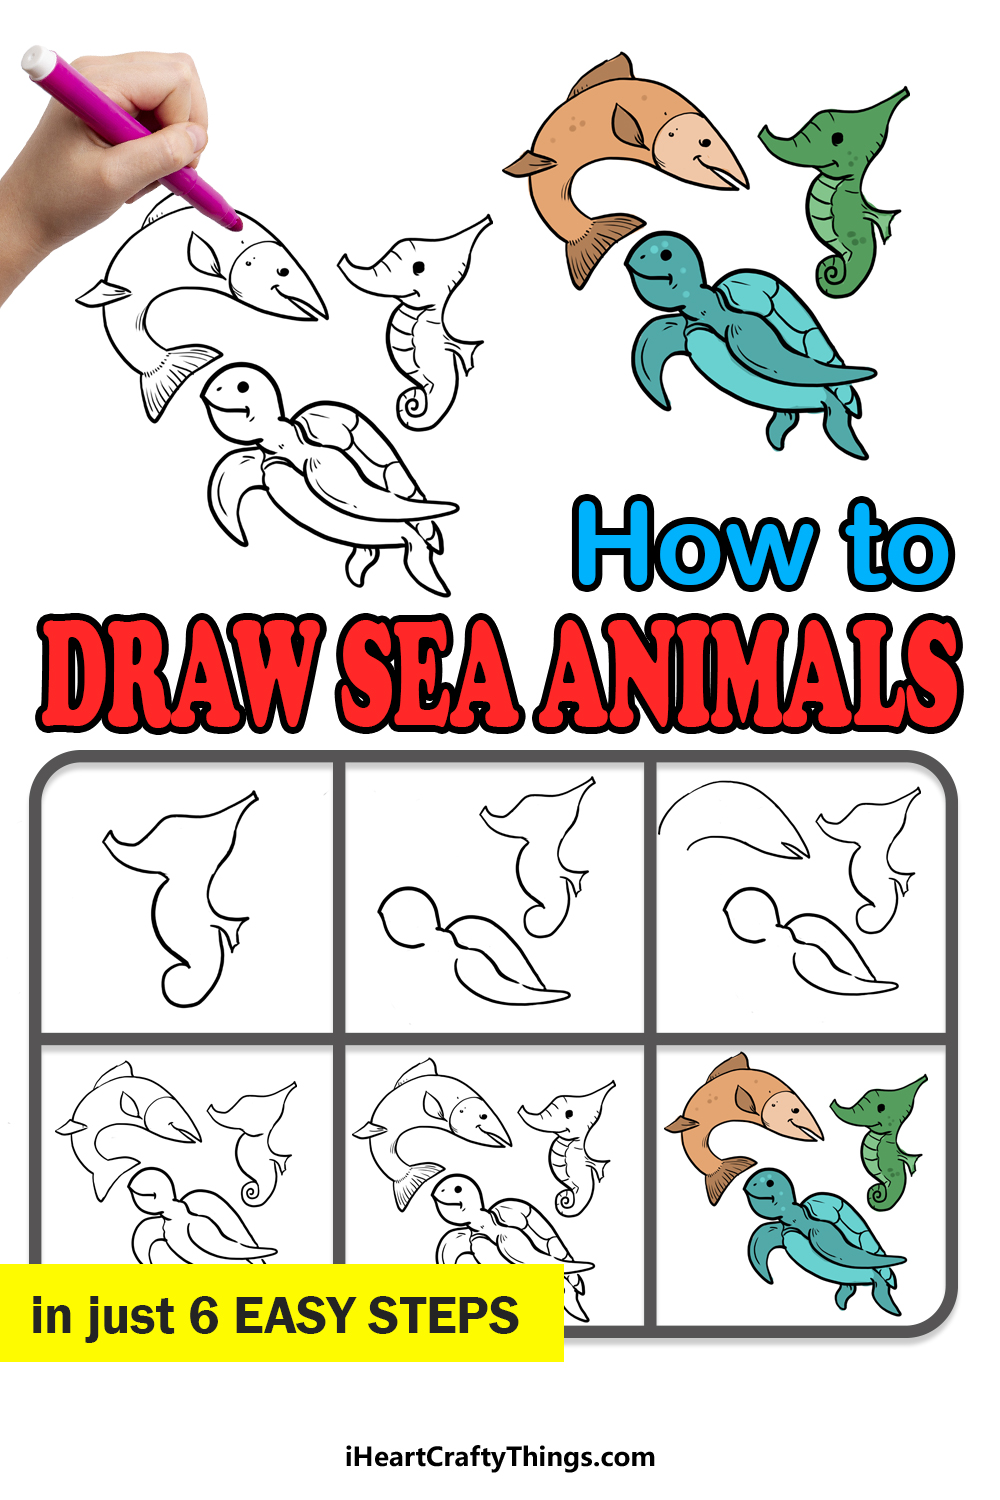
The ocean is filled with all manner of incredible creatures both big and small.
From the smallest organisms to gigantic whales, there are so many living things to see, and we don’t even know what other secrets deeper waters may hold.
Anyone who has an interest in sealife will have their favorites, and it will be different for everybody. In this guide on how to draw sea animals, we picked a few common favorites.
In these six steps, you will draw a trio of a fish, a seahorse and a sea turtle. Once you have drawn these adorable cartoon versions of these animals, you can then add some of your own favorites!
We will not only be guiding you through the process of drawing these designs, but we will also go over a few ways that you can customize your drawing.
This can be done with additional details, colors and other creative choices. There is a lot to cover in this guide, and we’re sure it will be a ton of fun!
So get ready to take a deep breath and dive into this guide as we take a trip under the ocean and draw these three adorable sea animals and any other details you wish to add.
How to Draw Sea Animals – Let’s Get Started!
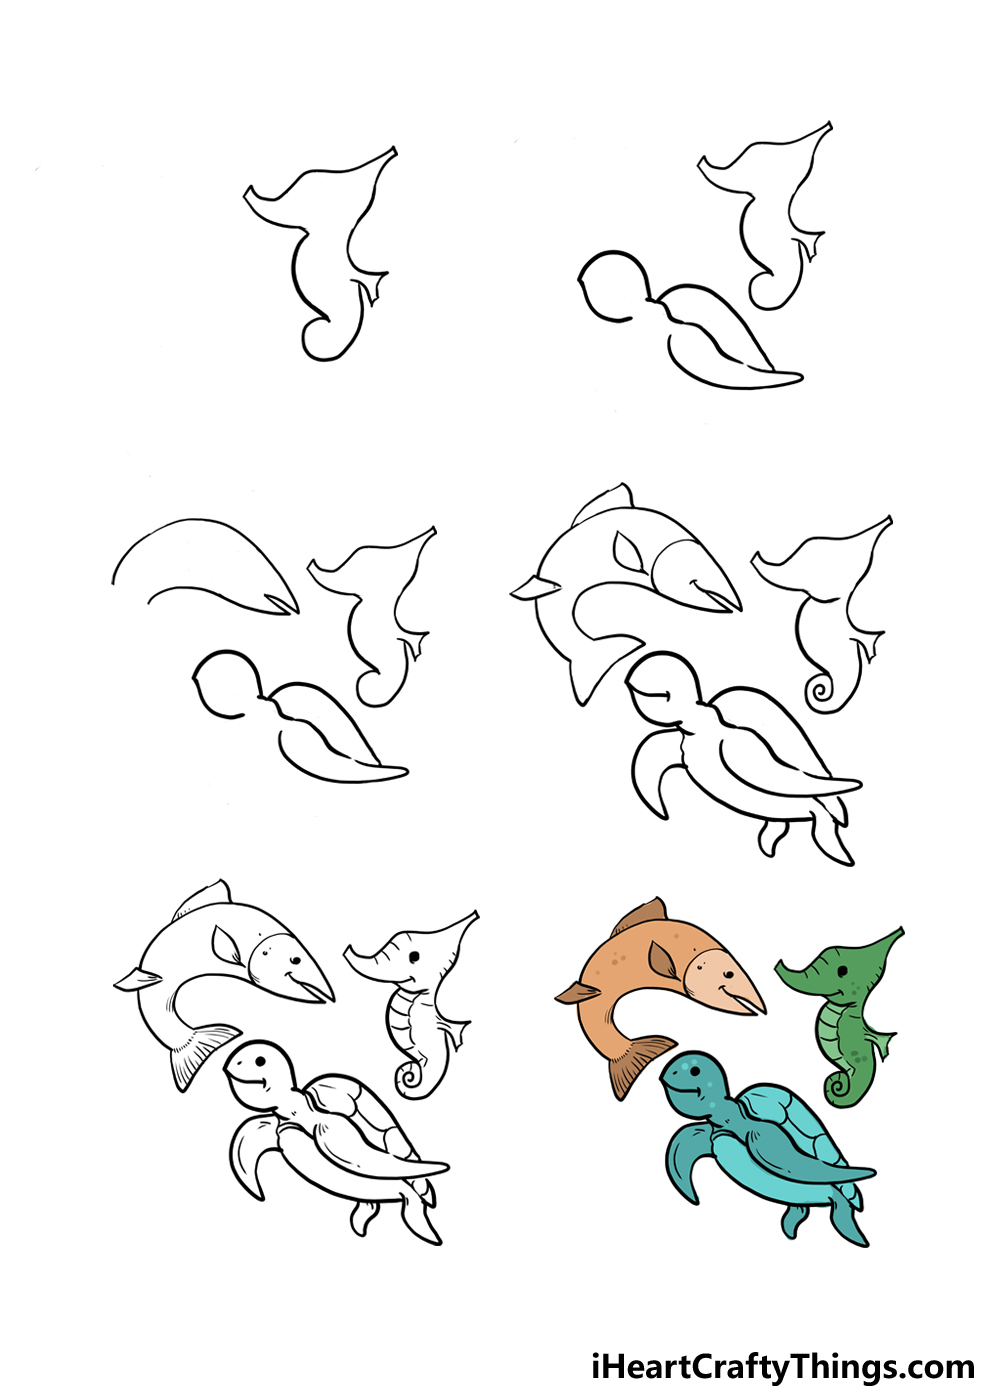
Step 1
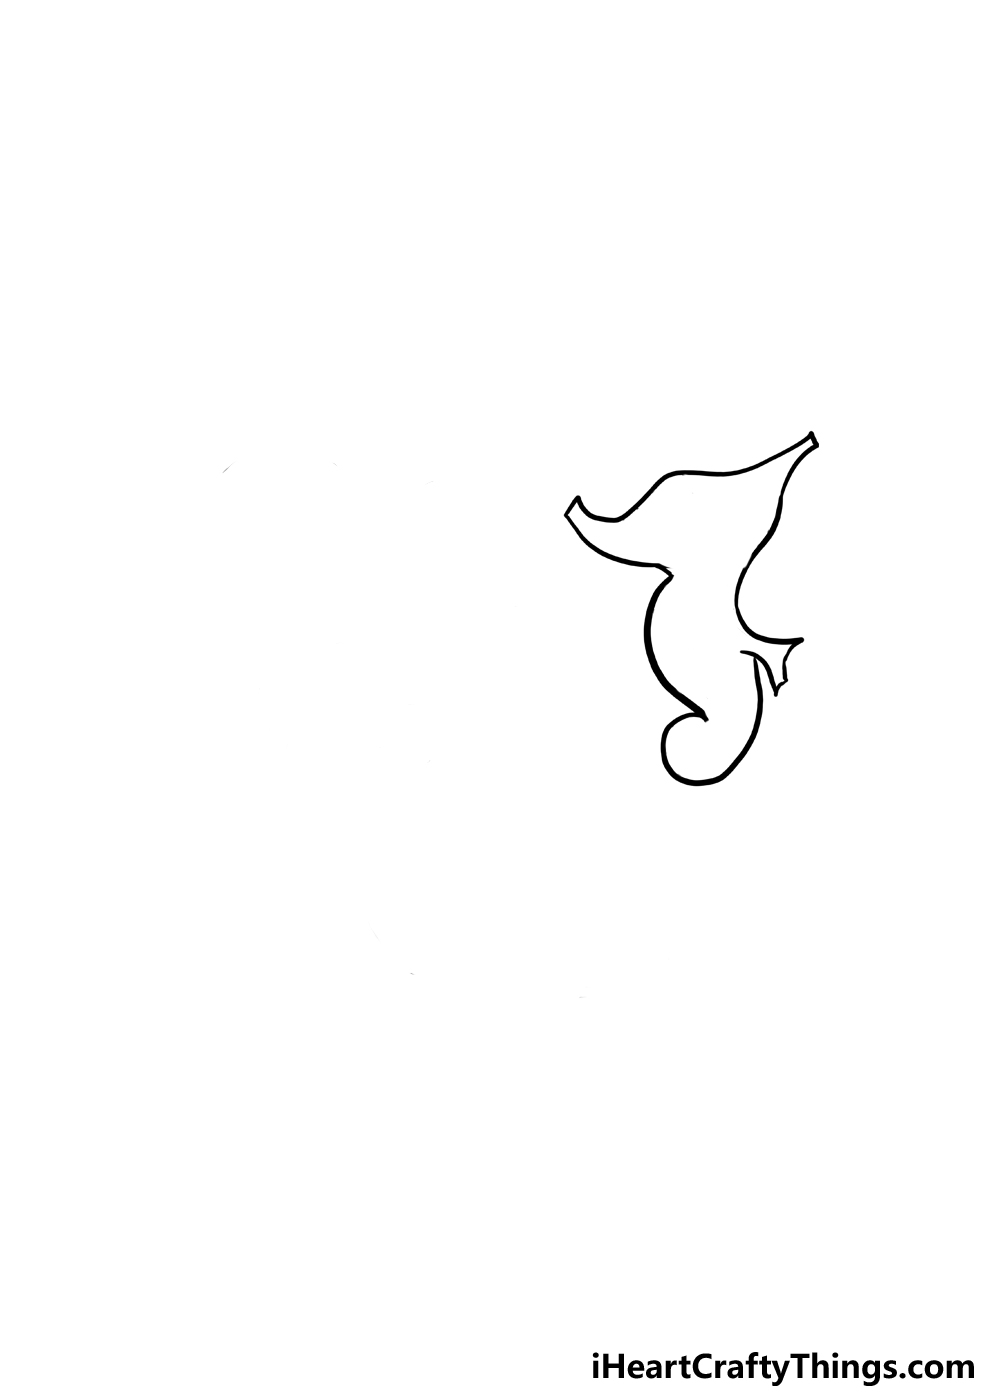
As we mentioned in the introduction, we will be drawing three animals for this drawing. These will include a seahorse, a sea turtle and a fish.
That is also the order in which we will be drawing them, starting with the seahorse. Seahorses are astonishing little creatures, and they have a really unique appearance that makes them stand out.
Before you draw this seahorse, you should look at your page and plan out the drawing. You don’t want to draw a massive seahorse and then have no space left over for the other sea animals!
You can plan this out by doing rough sketches of the animals with your pencil to plan out how they will be placed on the page. You can also sketch out other details, such as background elements.
For example, if you want a treasure chest on the ocean floor, you can draw it out roughly now.
Whether you decide to do these rough sketches or not is up to you, but now we will draw the seahorse.
For now, we will merely be drawing the outline for the seahorse, and it has a specific shape to it. First, let’s draw the head of the seahorse, which will have a thin, pointy section on each end.
The one on the left will be the snout of the seahorse, and it will have a slight curve to it. The pointy bit on the right side will be straighter, pointing up at an angle.
The rest of the head will then be drawn with some curved lines. Finally, you can draw the body with some wavy lines with a small fin poking off to the right.
There will also be a small rounded portion at the base of the body where the curled tail will be. That’s all for now, so let’s head to step 2!
Step 2: Draw the start of the sea turtle
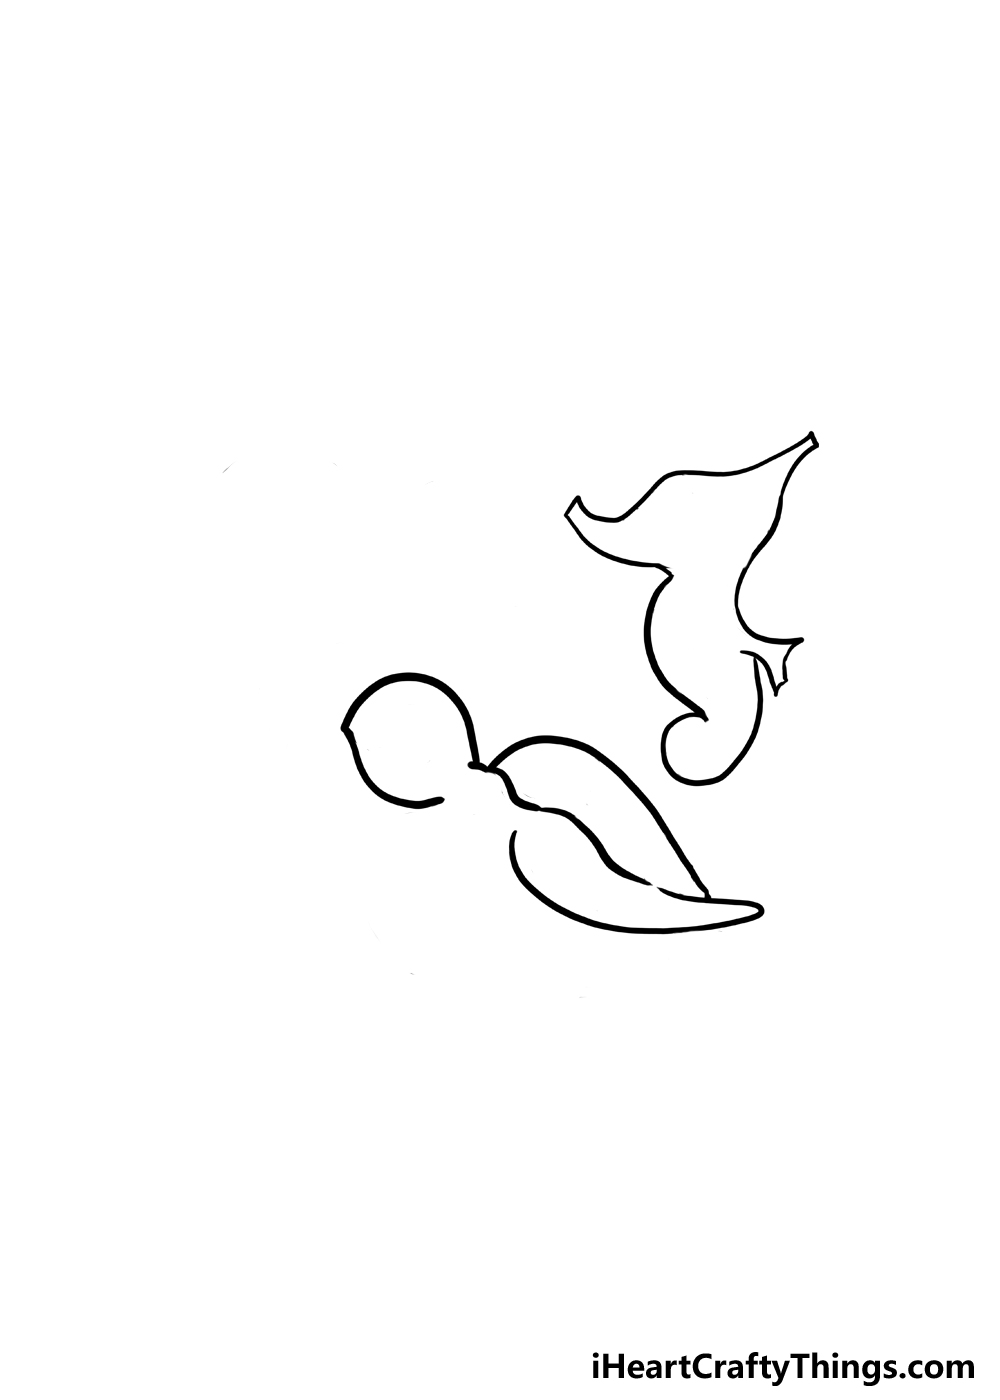
We shall leave the seahorse alone for now, and we will instead begin adding the sea turtle to this drawing of sea animals.
Unlike the seahorse, we will not be drawing the entirety of the outline.
Instead, we will start with the turtle’s head. This will have a rounded line for the top with a little lip pointing out to the left.
Then, you can extend another curved line down for the base of the head. As you can see in the reference image, the head is very rounded, much like a real turtle’s head would be.
The base of the neck on the right will head to the right in a wavy line that will eventually join the fin of the turtle. This fin will be a long shape that has a curved, pointy tip.
When drawing this part, try to refer closely to the reference image, as it can be a bit tricky to see where the neck ends and the fin starts.
Of course, you can’t have a turtle without a shell on its back, so we will add that now as well.
The shell is a simple curved line that goes on top of the upper outline for the fin, and it should be easy enough to draw. It isn’t very detailed right now, but we will add some detailing soon enough.
For now, when you’re happy with how it looks we can head to step 3 of the guide.
Step 3: Add the beginning of the outline for the fish
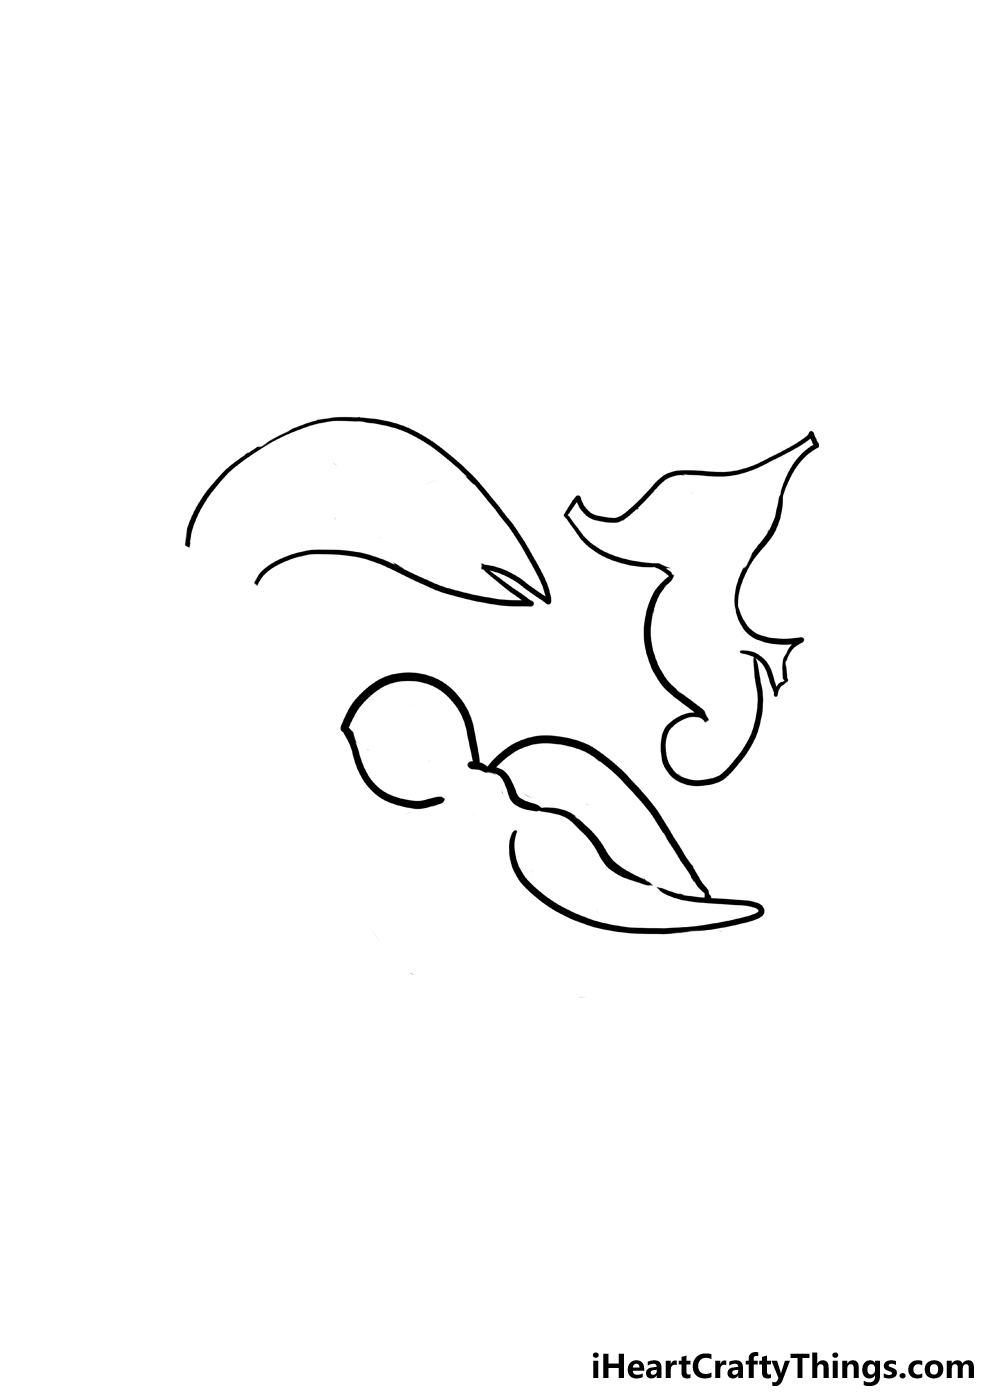
We will return to our turtle friend shortly, but this third step of our guide on how to draw sea animals will focus on the third member of the trio, the fish.
Once again, we won’t be drawing the entirety of the outline for this fish, but will instead just start the outline. As you will see in the reference image, the start of this outline is actually one long line.
This may make you think it will be the simplest one to draw so far, and while that may be true, it still has its challenges. You can start on the left and then extend the line in a curve to the right.
The curve of this upper outline is really sharp, and it can be tricky to get this right. The curve is so sharp because the fish will be mid-swim in the water.
On the far right of the fish, we will draw its mouth, which is pretty simple. This mouth can be drawn with a horizontal V shape extending inward as a slightly curved line.
Finally, you can draw the lower half of the fish’s outline using another curved line that somewhat mirrors the trajectory the top outline took.
Once you have these lines drawn, we will have the start of the fish. There is a gap on the left and there are no details for now, but those will come soon enough as we head to the next steps.
Step 4: Now finish off the outlines for each of these sea animals
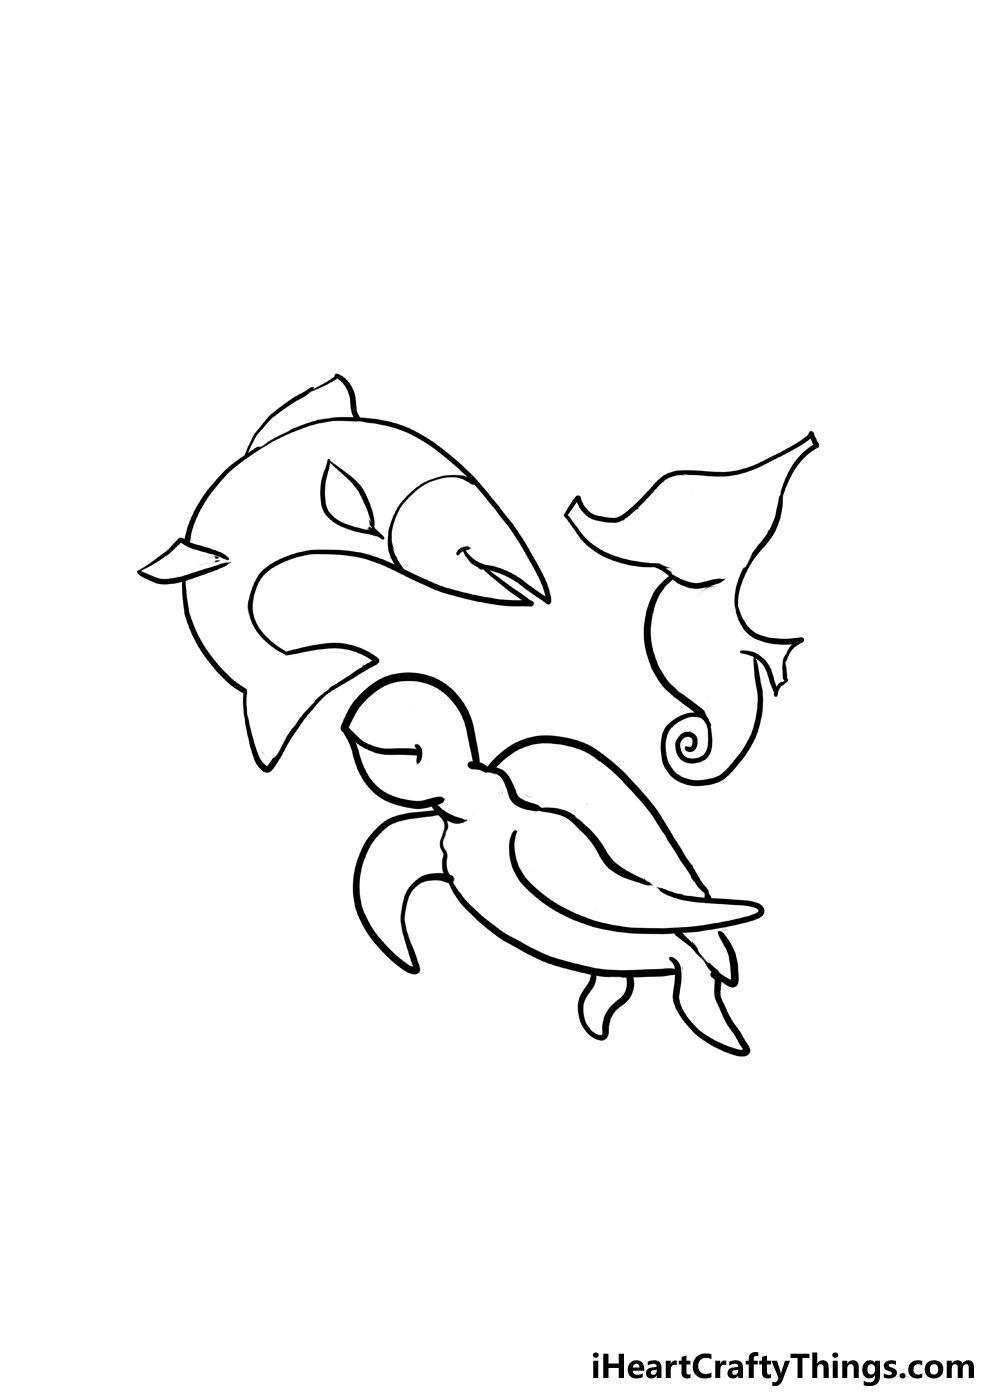
We have the start of each of these sea animals, and now you can finish off the outlines for each one. Doing so will allow us to focus on the inner details in the next step.
As we have been doing so far, we will be focusing on each animal individually, starting with the seahorse. This will be the simplest one of the lot for this step, as we will only add two small lines.
One will go at the base of the head, and simply be a small curved line. Finally, at the base of the tail, we will add a curved line to show the tail curling.
Then, we can focus on the turtle, starting with a curved line for its belly. Next, we will add the other large fin at the front.
We will also add a curved line inside the face for its smiling mouth. You can finish off the turtle with two small fins at the back of its body.
Then, we will conclude this step by focusing on the fish. You can draw its tail using some curved lines that fan outward. Add a small pointed fin near the back of the fish and then near its head.
We will also draw a triangular fin on its back. Finally, draw a vertical curved line for the face section of the fish.
That was a lot to do in one step, but the hardest parts are over! In the next step, we will finish off with some smaller details before coloring your picture in the final step.
Step 5: Draw the final details for these sea animals
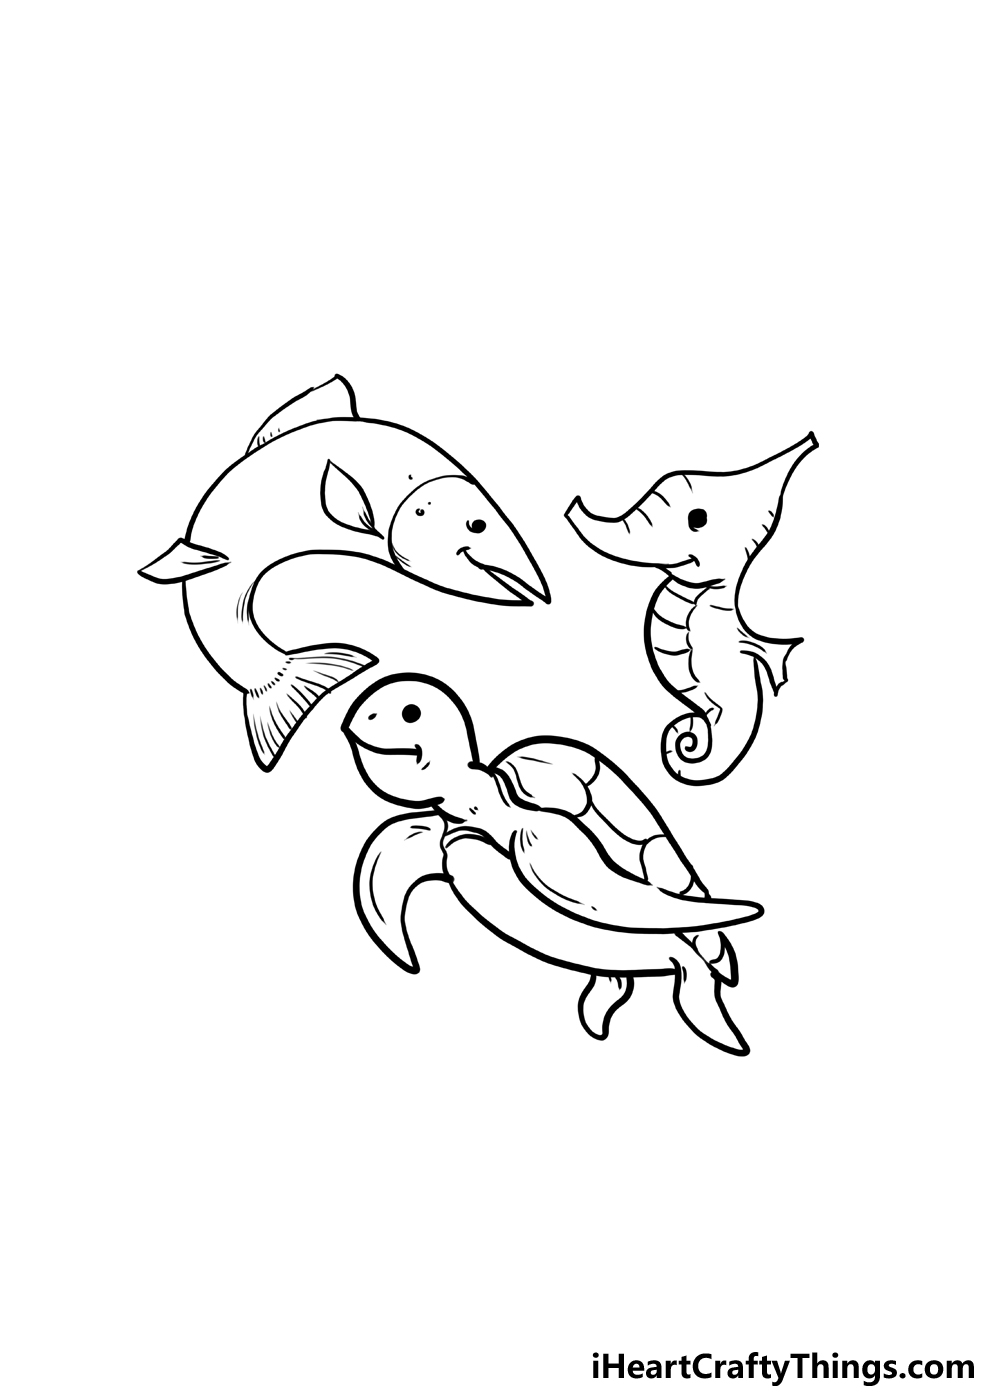
In this step, we will bring this drawing of sea animals to life with some small yet important details.
First, add a black dot to the face of each of these animals in order to give each one an eye.
You can then add some curved lines to the belly of the seahorse, as well as some smaller ones on its head.
Some rounded lines can then be added to the shell of the turtle for some more texture, and some smaller lines can be used on the fins and other areas for more texture as well.
Finally, the fish can be finished off with some texture lines on the tip of the tail and some small details on the fins. Once you have added these details, you are technically done!
Before moving on, be sure to add any additional ideas you have to add to the scene. We touched on the idea of adding a background earlier on in the guide.
There are so many cool details that you could add if you were to do this. We already gave the idea of a treasure chest, but you could also draw any of your favorite sea animals and plants into the scene.
This would be a great chance to show off which sea animals you like the most! You could even add some mythical creatures such as a mermaid.
The possibilities are as vast as the ocean itself, so let your imagination take over and see what happens.
Step 6: Now, finish off with some color for these sea animals

Now you have arrived at the final step of this guide on how to draw sea animals, and it’s time to color in these adorable animals.
We kept the colors fairly simple for each one, and each animal has its own color scheme.
The seahorse is colored with some dark and light greens contrasting against each other.
Then, for the turtle, we went with a similar approach of contrasting light and dark colors, only this time we went with a blue color scheme.
Finally, for the fish we used two different shades of brown to give a more muted look. Hopefully it goes without saying that these colors are a suggestion, and you can use any colors you like!
Maybe you’d want to swap around the color schemes we chose, or you may want to use entirely unique colors. They could be as bright or as dark as you like, and any approach will look great.
You can also think about the art tools and mediums you use to achieve your colors. For instance, if you want bright and vibrant colors then colored pens and markers could be a good bet.
On the other hand, watercolor paints and colored pencils would be a good choice for lighter colors.
This is where you can take over and show off what you think would look best, and it will be great to see what you choose!
Your Sea Animals Drawing is Complete!
Hopefully you enjoyed venturing beneath the ocean for some drawing fun as we worked through this guide on how to draw sea animals.
These animals are all adorable, and we hope that the steps made it fun and easy for you to draw them.
Now that you have drawn them, you can add your own additional creatures, details and elements to the scene. We would love to see what you choose to do to add to the drawing!
You can show it off by sharing your finished drawing on our Facebook and Pinterest pages so we can take a trip under the sea when admiring everything you added to the picture.
We can’t wait to see what you came up with!