Bats have a bit of a bad reputation, and many people are scared of them.
When one thinks of bats, they probably think of scary movies and haunted houses, as that’s what they’ve come to be associated with.
When you take a look at a real one, you will see that bats can actually be quite cute when they’re not flying around graveyards and other scary locations.
We will be aiming to give bats a different reputation as we learn how to draw a cute bat in this guide.
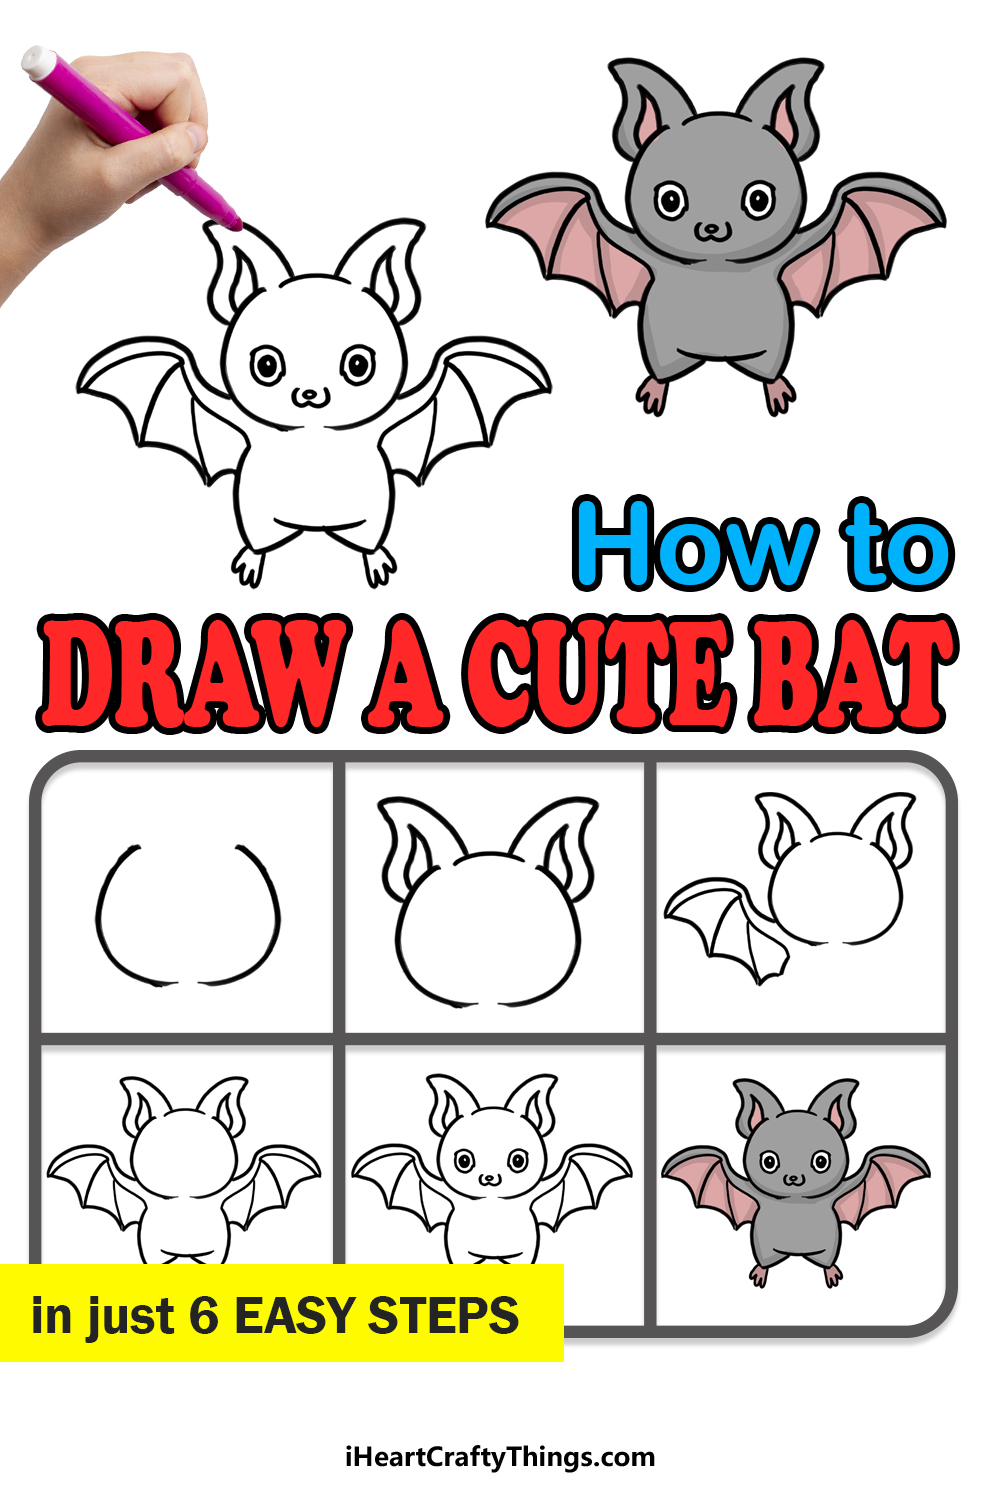
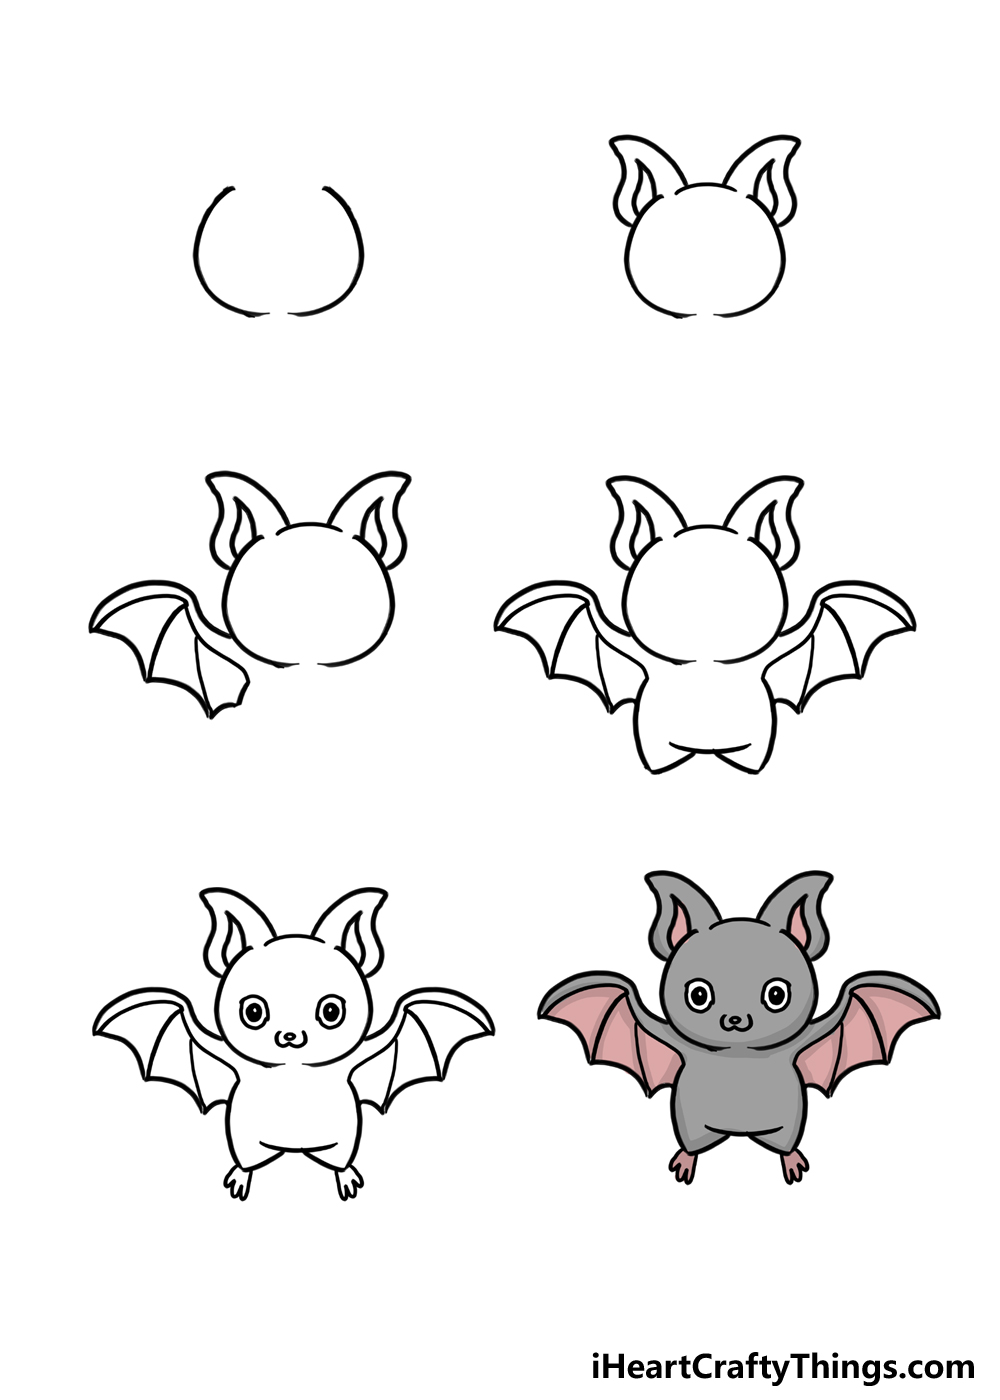
In these six steps, we will show you how to draw this little bat, and we will also cover how you can color it in.
Once we have covered all 6 steps, we will also go over a few ways you could bring your own ideas to the drawing to create something even more unique.
We will also cover some ways you could add a background and make a scene out of this drawing.
All of this and more is ahead of you in this guide, so we hope you’re ready!
Grab your drawing tools and get ready to see a whole new side of these flying rodents as we create this adorable drawing of a cute bat.
How to Draw A Cute Bat – Let’s Get Started!
Step 1
The cute bat we will be drawing in this guide is pretty simple in most ways, but it can’t hurt to do some preparations before you draw.
Whenever you’re drawing something that’s meant to be cute, a good trick is to keep the lines as rounded as possible.
Sharper edges make a picture more intense and sharp, which can impact the cuteness. That’s why we will be using lots of rounded lines in this design.
If you want to prepare for the drawing, you can use a pencil to draw out some rough shapes. We would recommend using a circle for the head and then another smaller one for the body.
As you will see in the later images in the guide, the head will be larger than the body. Both can be planned out as some simple circles for now, however.
When drawing these planning shapes, try not to press too hard with your pencil, as the lines will then be quite difficult to erase later.
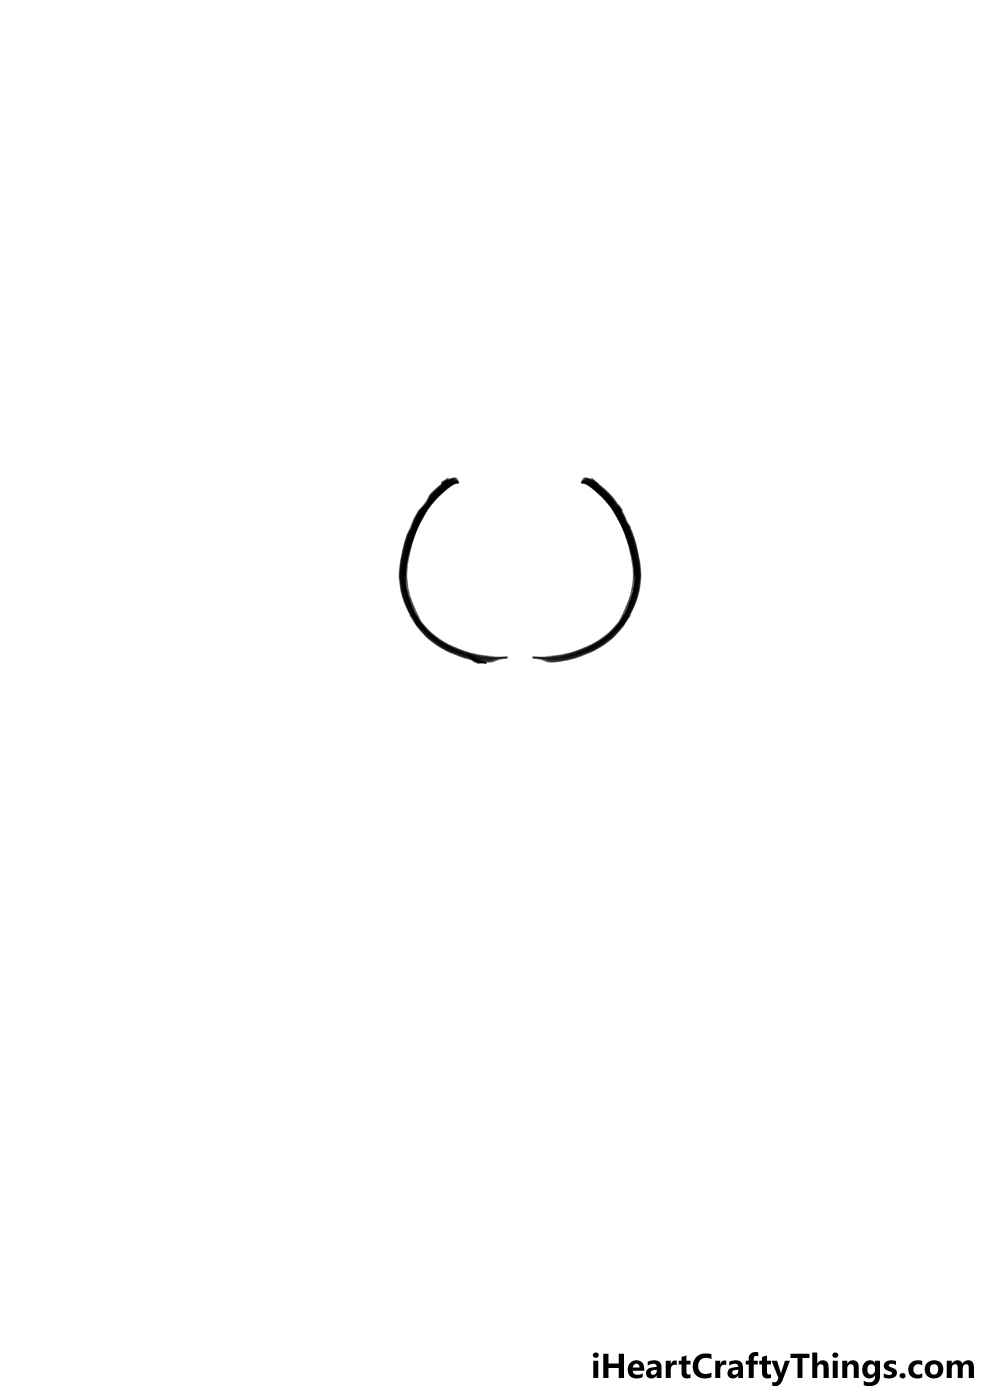
Whether you use these planning shapes or not, we can then start drawing the outline for the bat’s head. This will be a very simple step, and you can draw these lines along the planning circle.
There will be some gaps in these outlines, preventing it from being a perfect circle. The largest gap will be on top of the head, as we will draw the ears there later.
There will then be a smaller gap at the base of the head where it will connect to the body. Then, it’s time to head to step 2 of the guide.
Step 2: Draw the ears for this cute bat
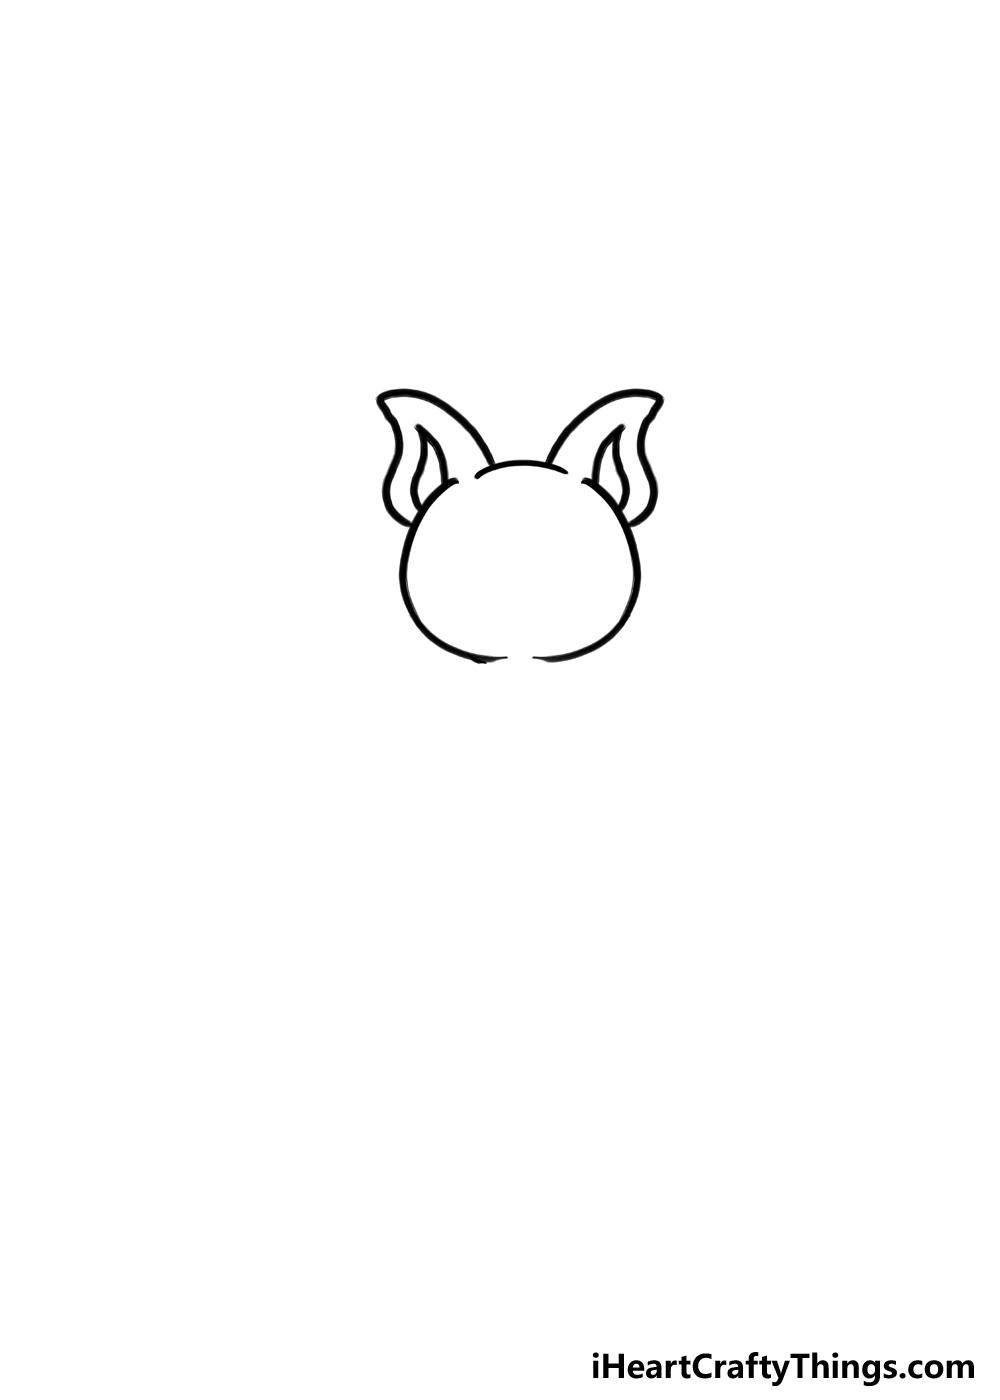
Bats are recognizable for their large pointy ears, and we will add them to this cute bat drawing. As we mentioned in the first step, we’re avoiding straight lines when trying to keep this bat cute.
For that reason, we will be using only curved and rounded lines for the ears. Each ear will start from near the middle of the gap that we left at the top of the head.
You can start by extending a curved line up on each side, each one heading out a bit. There will be a rounded point at the tip of each ear, but it shouldn’t be totally pointy.
The point of each ear will then head down in a rounded line that flares out. When drawing these lines, try to make the ears as symmetrical as you can.
Once you have the outlines, you can connect each ear with a small curved line that will finish off the outline on top of the head.
The final thing we need to do for this step is to draw the inner ear portions.
These will go inside each ear and generally follow the outer outline, with the same rounded point on top. The tip of these inner sections can be a bit pointier than the outer ones.
Once you have these ears drawn, we will be ready for the third step of the guide. So when you’re ready, let’s head to that step.
Step 3: Add the first wing for your cute bat
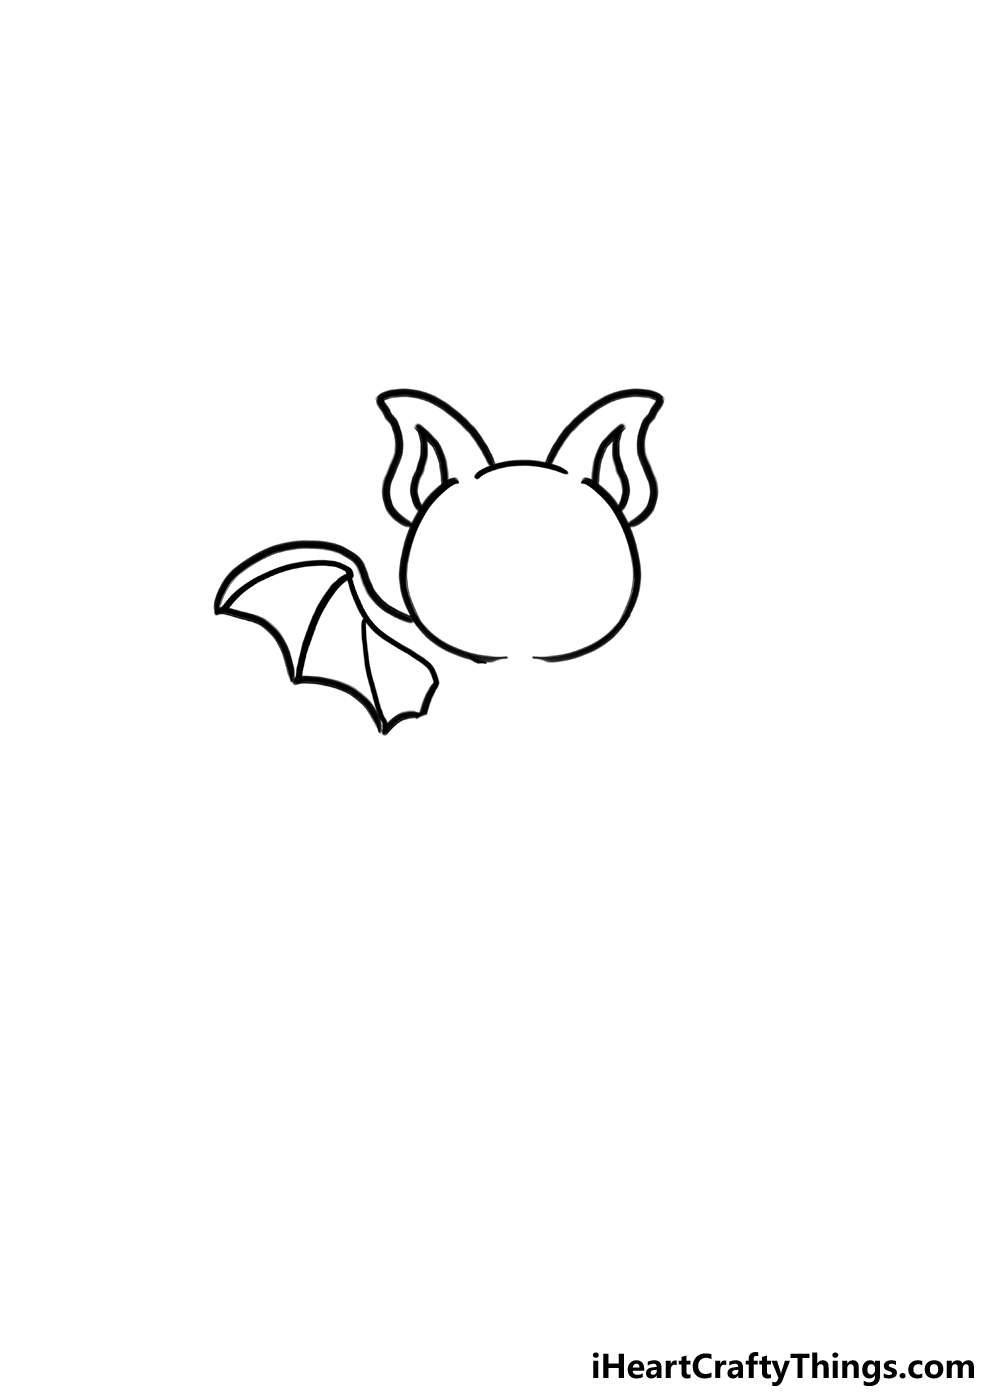
What would a bat be without its wings? Basically a weird looking mouse, so we will avoid that by adding the first wing in this step of this guide on how to draw a cute bat.
Bat wings are very distinctive and recognizable. They have a bony frame, and then there are thin, webbed wings between each stick of the frame.
For now, we will be focusing on the wing on the left side of this cute bat. It will start near the base of the head, and it will head outwards in a gentle curve.
As you see in the reference image, it curves out and then in again. Once again, there will be some pointy tips, but they’re still mostly rounded.
The top outline of the wing will be one curved line with a dip in the middle, but the lower outline will have a few little dips that result in three pointy tips.
Once you have this outline, we will be drawing a smaller shape inside this larger outline. It will run parallel to the outer outline for the most part.
Then, extend a curved line up from the pointy tips on the base up to the top of this shape.
It may sound complicated, but when you look at the reference image it should all become clear.
Once you’re happy with how this first wing looks, we will move on to the rest of the outline in the next step.
Step 4: Now draw the rest of the outline
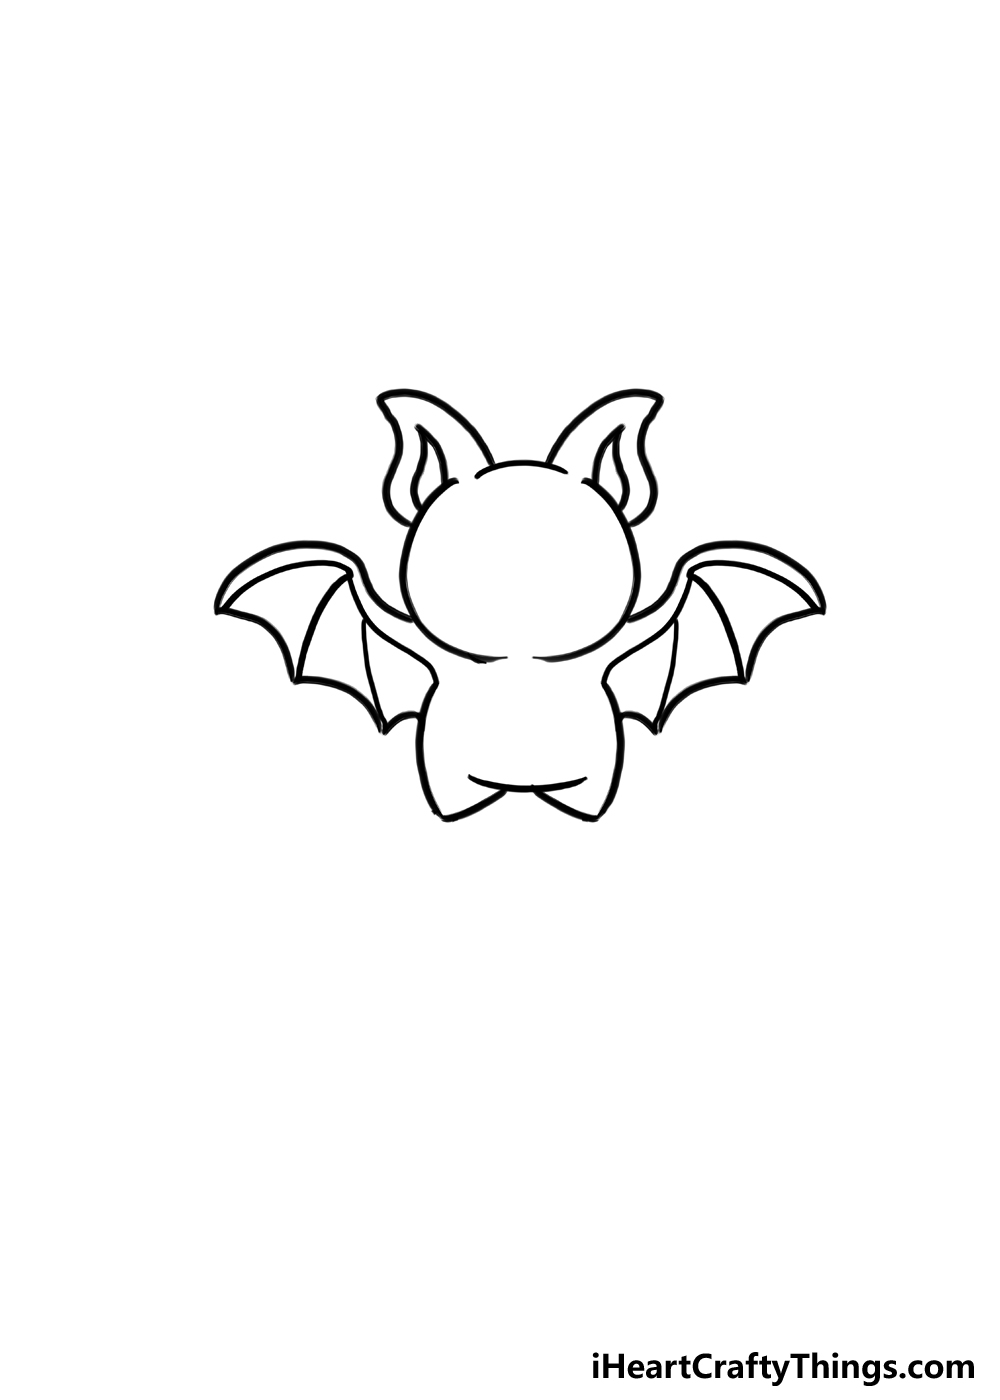
Now that we have the first wing for this drawing of a cute bat, we can draw more of the outline. In fact, we will be adding almost the entirety of the outline in this next step.
The first part of this will be to draw another wing, on the other side of the body this time.
This second wing should be a mirror image of the first one, and you can follow all of the steps that you did for the previous one.
That means drawing the frame with the same curved lines and dips that the first one did. Then, add the inner shape and draw the lines that form the webbing of the wing.
Once you have the second wing drawn and matching the first one, we can draw the rest of the body. This should be easy, as the lines for the body are very simple.
As we mentioned back in the first step of the guide, we will be making the body a bit smaller than the head. This will help to make this bat extra cute!
The sides of the body are drawn with some simple curved lines. Then, we will draw the legs as two small shapes with rounded tips at the ends.
We will be adding the feet in the next step along with any final details and ideas. You can also erase the pencil lines we suggested drawing, if you went for that.
Then it’s on to step 5!
Step 5: Draw the final details for this cute bat
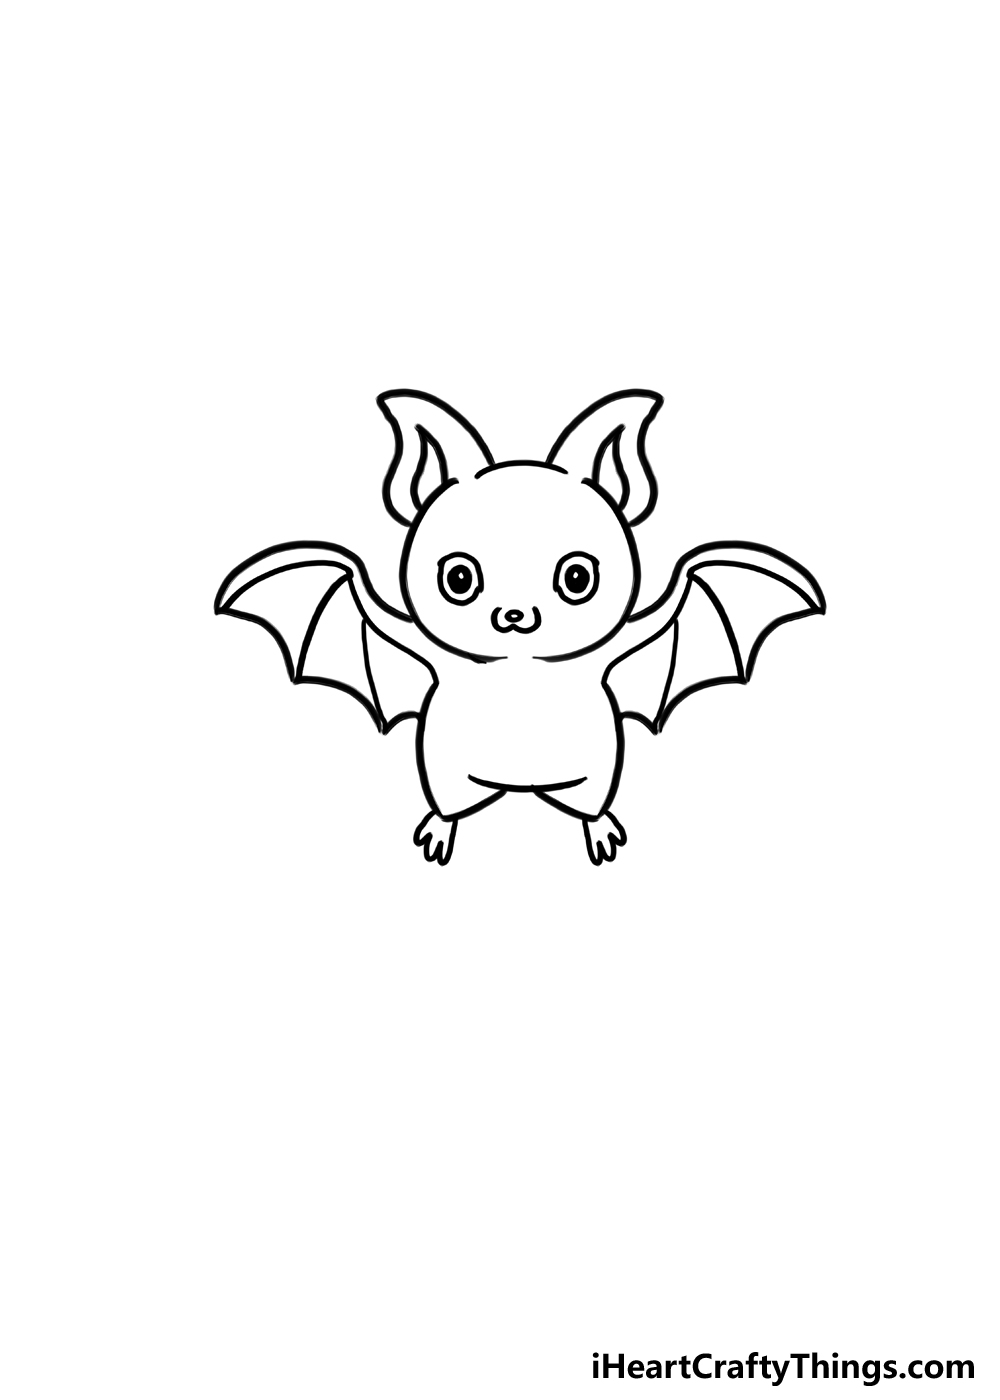
It’s time to finish up this cute bat drawing with some final touches, details and ideas.
We have a few final details in our design, but then we will go over some ways that you can make your drawing more unique to you.
First, we will draw the eyes of this cute bat. Each eye has a circular outline, and then a solid black pupil inside.
These pupils will each have a small white dot inside in order to show a glint in the eye. Then, draw a small nose for the bat and some curved lines for the mouth.
All that remains after that is to draw the feet for this cute bat. They will be small and go at the ends of the legs.
Each foot is small with three curved little pointed toes. Once you have added these little feet, you will have completed the design!
Now you can take over and add some of your own ideas. One way to finish off this artwork would be to add a background for the picture.
Earlier, we spoke of some common places bats are associated with such as graveyards and haunted houses. These would make excellent backgrounds for this drawing.
In keeping with the cute design of this bat, you could make these background settings colorful and cartoony. Of course, these are just a few ideas, and you could use any others you have.
Adding other characters could be fun as well, and these could be other bats or maybe other animals you like. What else would you like to add to this artwork?
Step 6: Now, finish off with some color for this cute bat
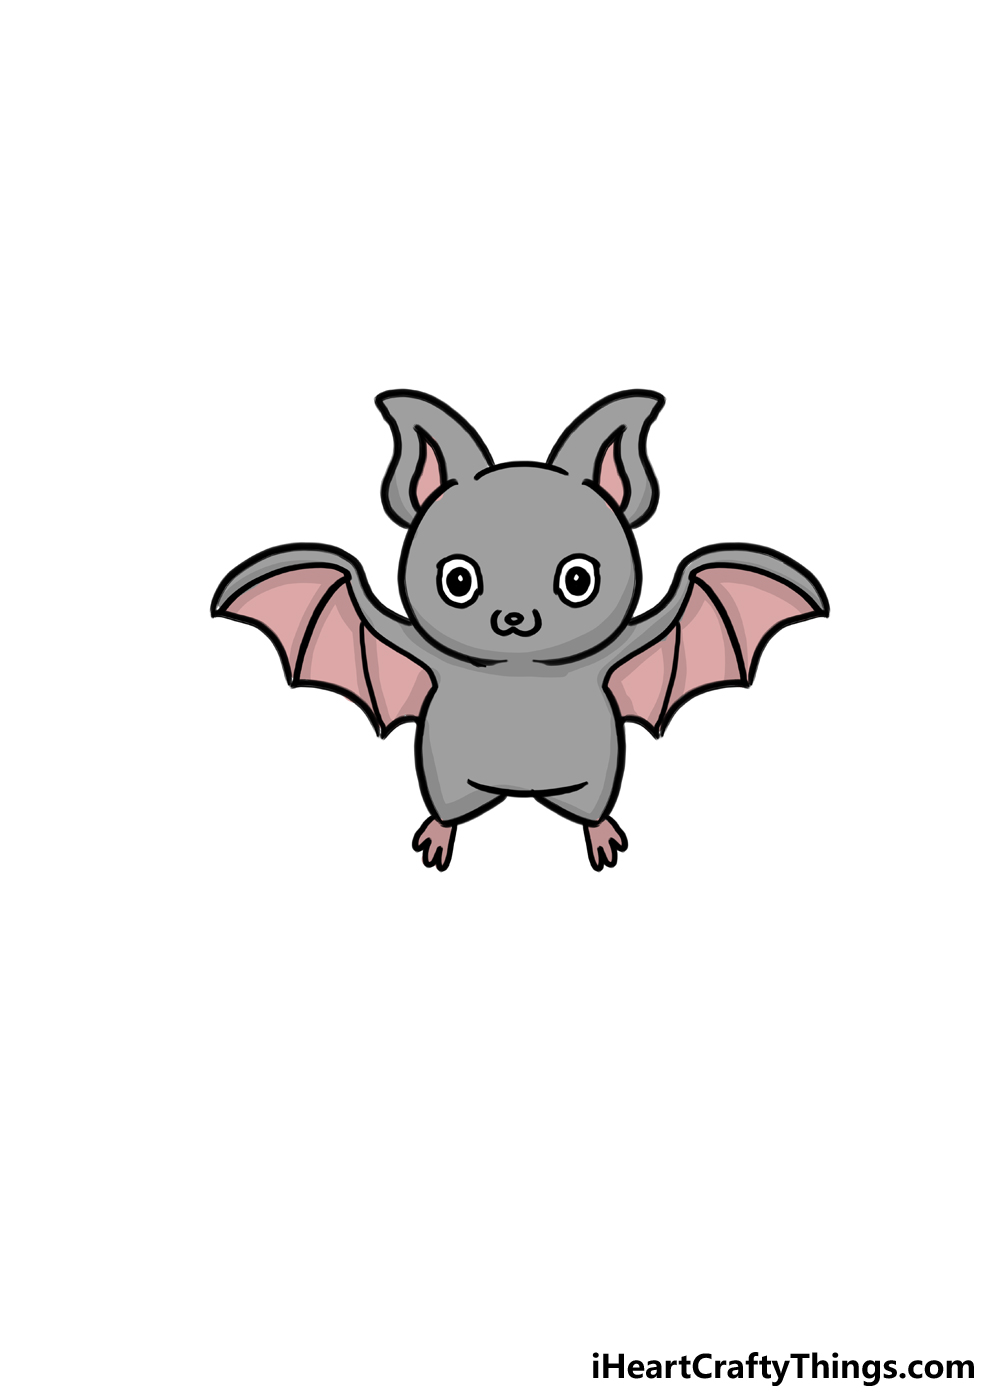
Your cute bat drawing is done now, and all that remains is to use some color to finish it off. This is one of the funnest parts of the drawing, as you will get to really experiment and have fun with it.
In our reference image, we show you just one of the ways that you can color in this cute bat. We used simple greys for the fur of the bat.
Even so, there are light tones with a few darker tones to add some shading and texture to the bat. Then, we used some pink tones for the webbing of the wings and the inner portions of the ears.
Even with these sections, we used some different tones to create some shading and variation. When coloring your own cute bat, you could use the same colors or go in a new direction.
It’s totally up to you! You can also play around with the art tools you use to color in this cute bat.
Maybe you want bright and vibrant colors, in which case some colored pens or acrylic paints could be the way to go.
Watercolor paints or colored pencils would be good ones to use for lighter colors, however. It all depends on what kind of look you want for the picture, so feel free to experiment.
Whatever you choose, we know it will look amazing!
Your Cute Bat Drawing is Complete!
After completing all of the steps in this guide on how to draw a cute bat, we’re sure you’re seeing bats in a whole new way!
You may have thought they were scary or sinister before this, but now you can see how cute they can be.
Now that you have finished the guide, you can also take it further with your own details and ideas as well.
We covered a few ideas such as adding a background and other characters, but you may have other ideas.
Remember that you can also get creative with the colors and how you apply them. Whatever you do, it will look amazing in its own unique way, so feel free to let your creativity flow!
When you have completed your version of this drawing of a cute bat, we would love to see how great it looks.
If you want to show us, you can share it on our Facebook and Pinterest pages for us to see.
We can’t wait to see it!