The character of Huggy Wuggy has a rather cute name, but there is nothing cute about this creature.
He is a creature that looks like he could have been a normal plush toy at one point, but in his current form, he is a mutated horror.
He first appeared in the video game Poppy Playtime, set in an old toy factory where horrific creatures are running amock.
Of all the characters in the game, Huggy Wuggy is by far the most popular.
He has since appeared in countless videos, stories and works of fan art, and he has been able to terrify people who have never even played the game.
Because of his unique, scary design, many like to learn how to draw Huggy Wuggy to make their own creepy art.
Look no further than this guide if you would like to make some scary images featuring this horrific toy!
We will show you how you can draw him and then also cover some ideas on how you can personalize the drawing with your own ideas.
So prepare for a scary drawing journey as we learn how to recreate Huggy Wuggy.
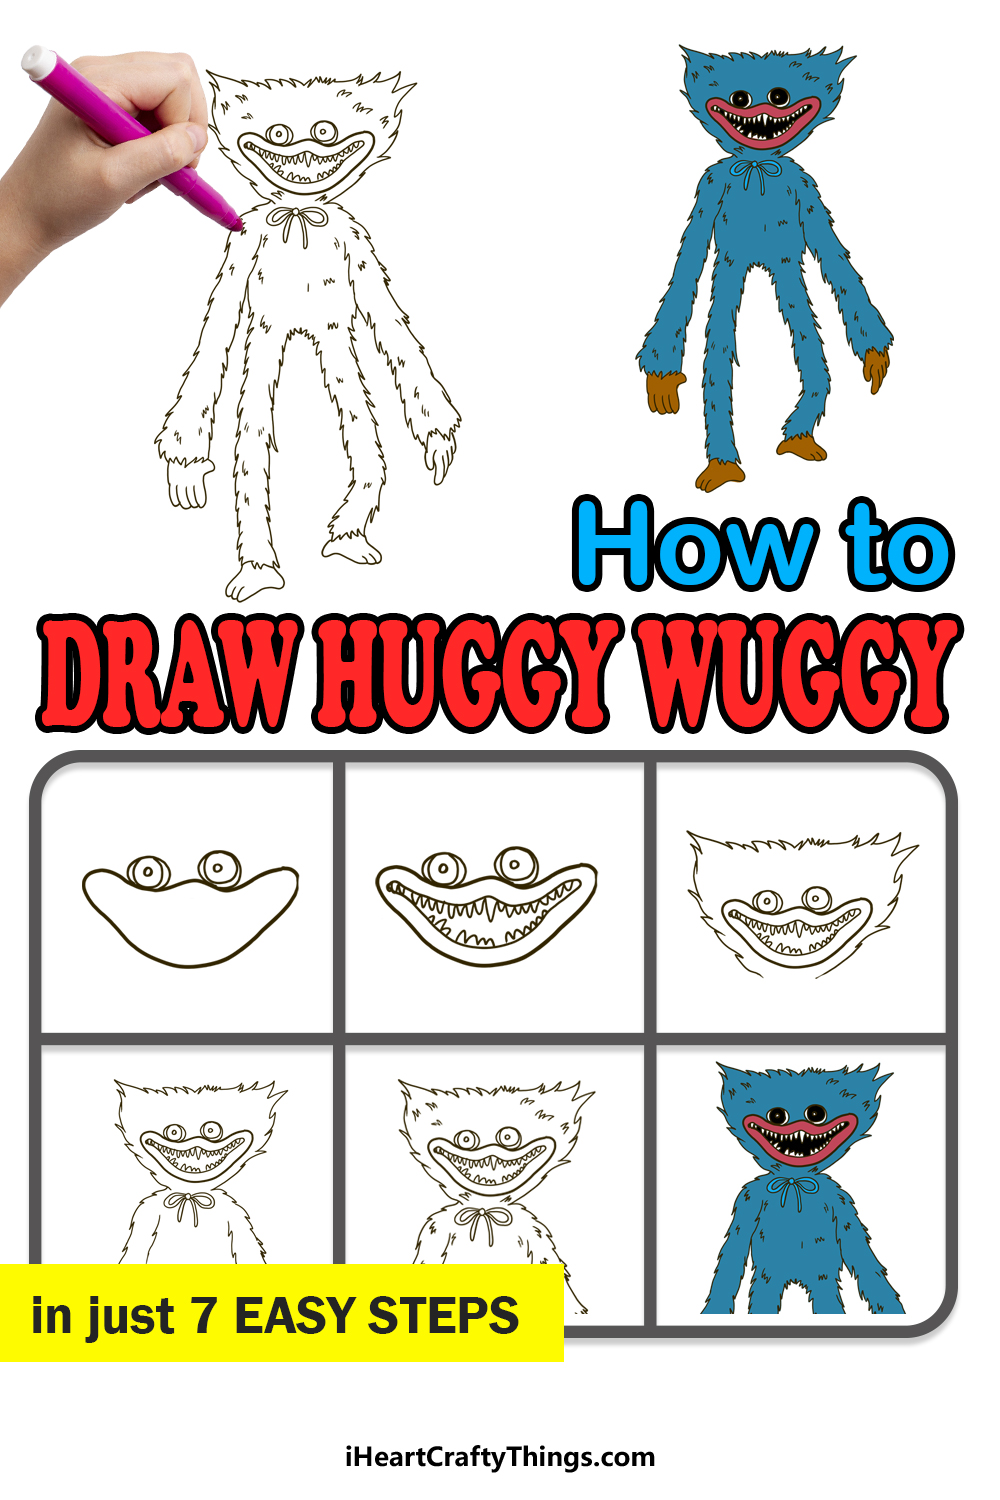
How to Draw Huggy Wuggy – Let’s Get Started!
Step 1
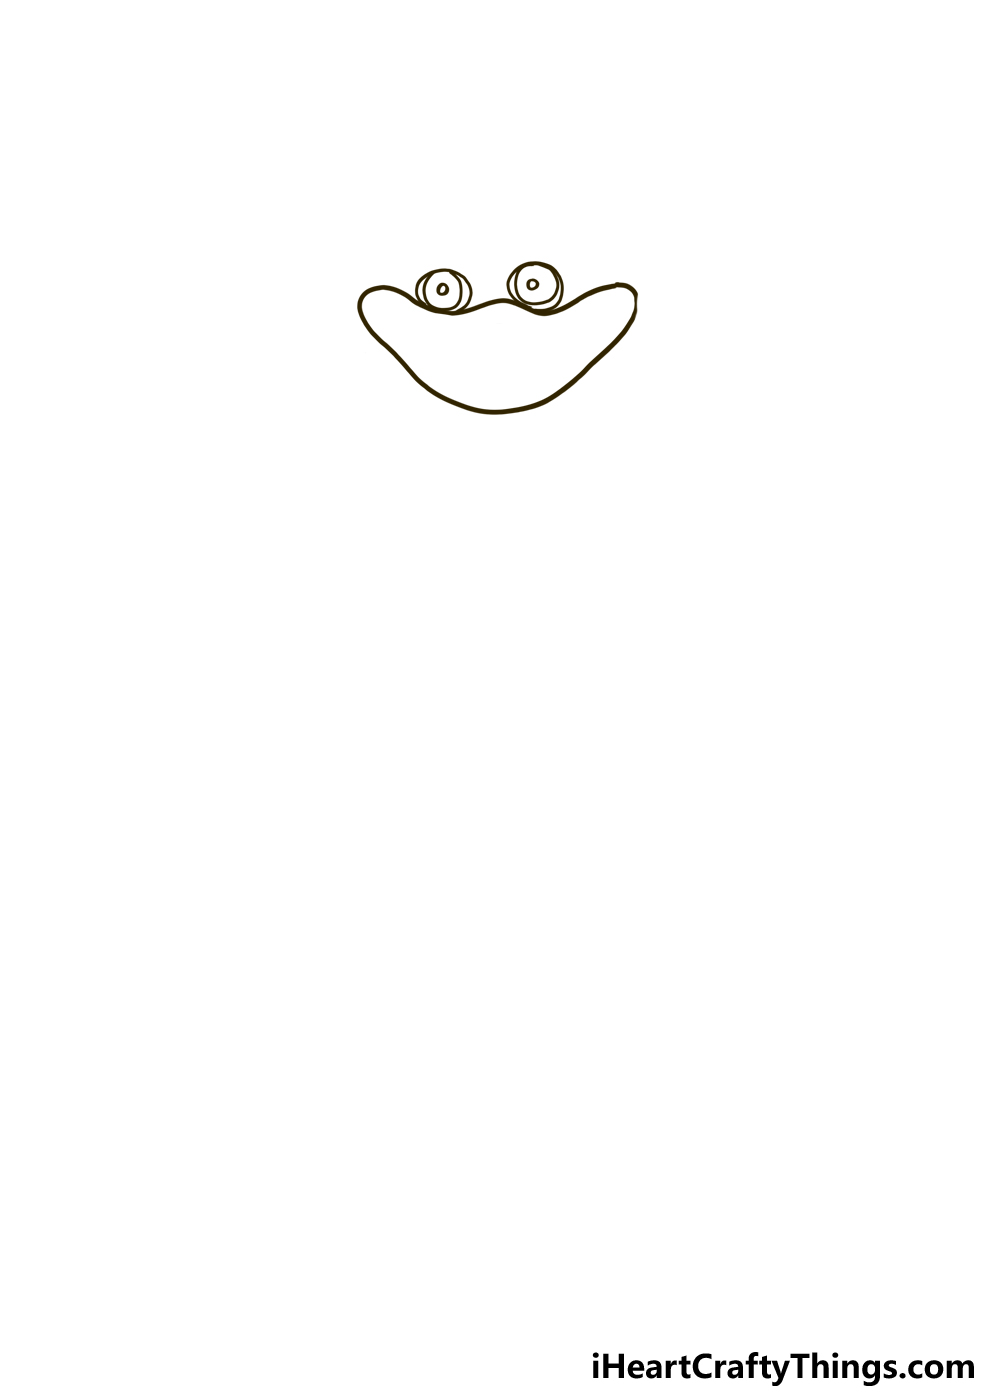
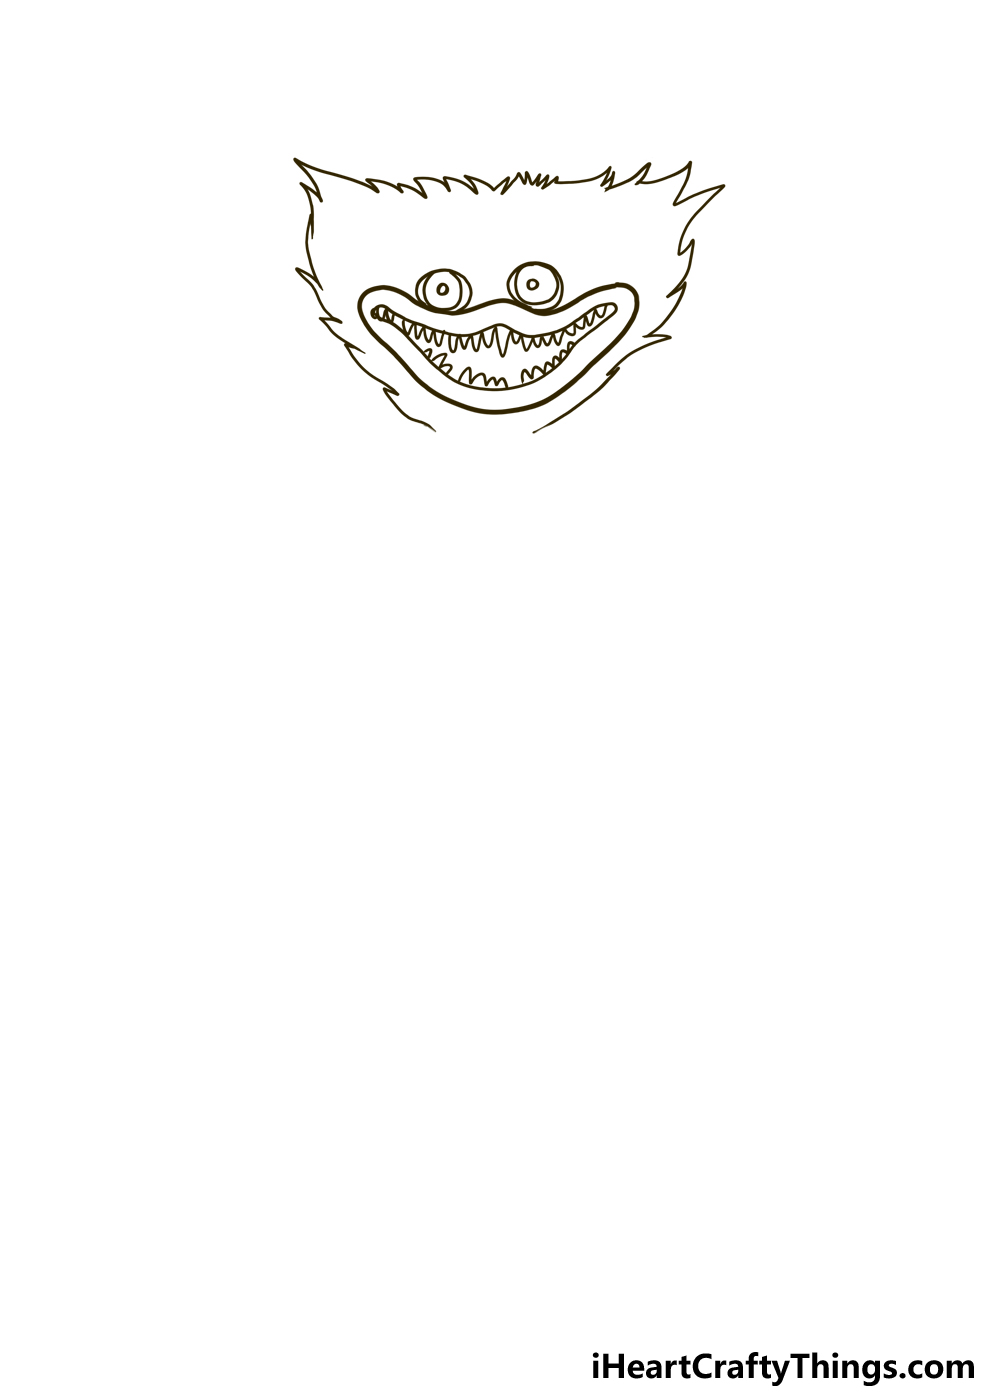
Perhaps the most identifiable aspect of the Huggy Wuggy is his very odd face. That is what we will start with in this guide, and it will be quite simple to start off with.
Before we do that, you will notice that Huggy Wuggy has a rather strange shape to his head and body.
For that reason, you may want to very roughly draw these shapes with a pencil so that you will have a better idea of how it’s going to turn out later.
With that said, we will draw the start of his face. He has a large, elongated mouth filled with sharp teeth, but for now we will just draw the outline of the mouth.
It also looks a bit like the mouth of a clown with makeup, and it is drawn as one solid shape. Start by drawing a boomerang shape that angles upward to make Huggy Wuggy’s famous creepy smile.
Then, we will draw his eyes. They are fairly simple, and you can start by drawing two small circles on top of his lip section.
Then, draw another slightly smaller circle inside each eye outline. Part of this smaller circle should touch the edge of the larger circle, as you can see in our example.
Finally, we will draw his pupils using some really small little circles at the center of the first two.
Naturally, you could place these pupils elsewhere if you wanted to have him looking in a different direction.
Step 2: Draw the mouth and teeth for Huggy Wuggy
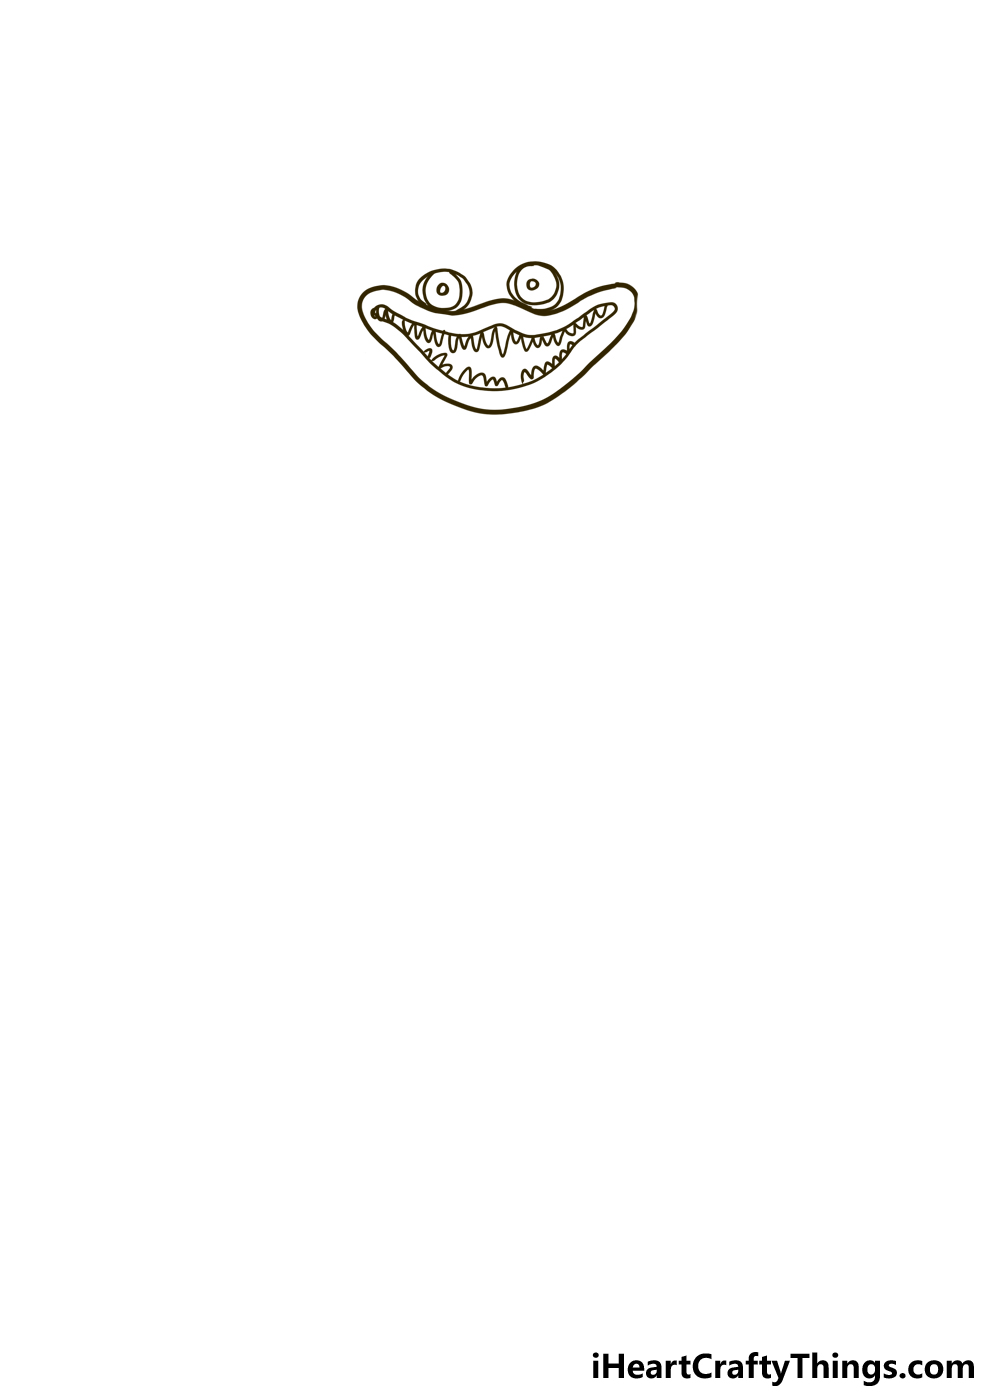
You have the mouth outline for your Huggy Wuggy drawing, but we need a bit more than that if we’re to make him truly terrifying! In order to do this, we will draw his actual mouth itself.
The mouth inside the outline will basically be a smaller version of the outline which you drew in the first step.
The main difference will be that the ends of this inner shape will be much thinner than the ones on the outer shape.
Then, we will add his sinister teeth! This is a big element of what makes this character so creepy, so it’s best to do them in a fairly specific way.
Instead of the teeth being two rows of neat pointy shapes, we actually want them to look a bit more haphazard. That may seem to contradict what we just said about drawing them in a specific way.
However, what we mean is that you should specifically aim to make them irregular and have each tooth be a slightly different size.
This messier approach makes the mouth look more chaotic and therefore makes Huggy Wuggy look scarier.
On the bottom row, you will notice that we left a few gaps between some of the teeth in order to finish off that more chaotic look we’re going for.
Now that the mouth is done, we will be able to draw the rest of his head outline, which we will be doing in the next step of the guide.
Step 3: Add the head outline for Huggy Wuggy
Now it’s time to add the head outline for Huggy Wuggy in this third step. As we mentioned briefly earlier, Huggy Wuggy is a character that looks like a monstrous plushie doll.
With just a few changes, he could probably be a normal looking toy character, but we’re aiming to make him as scary as he appears in the game and in his other appearances.
With the teeth, we tried to make them chaotic, and we will be attempting the same sort of look for his hair. His whole body is covered in long blue fur, but we don’t want it looking smooth or ordered.
In order to draw this head outline, we will be using lots of small pointy shapes of varying lengths. This will make Huggy Wuggy look like he has the same messy fur as he does in the game.
His head shape is quite unusual and distinctive. It is thinnest at the base of his head where it will connect to his neck. The head will get progressively wider the higher up it gets.
The top left and right sides of his head are quite pointy, and the top of his head should be relatively flat (while still having lots of pointy hair poking up.)
That’s all there is to it for his hair, and in the next step we will start drawing his body.
Step 4: Now draw the arms for Huggy Wuggy
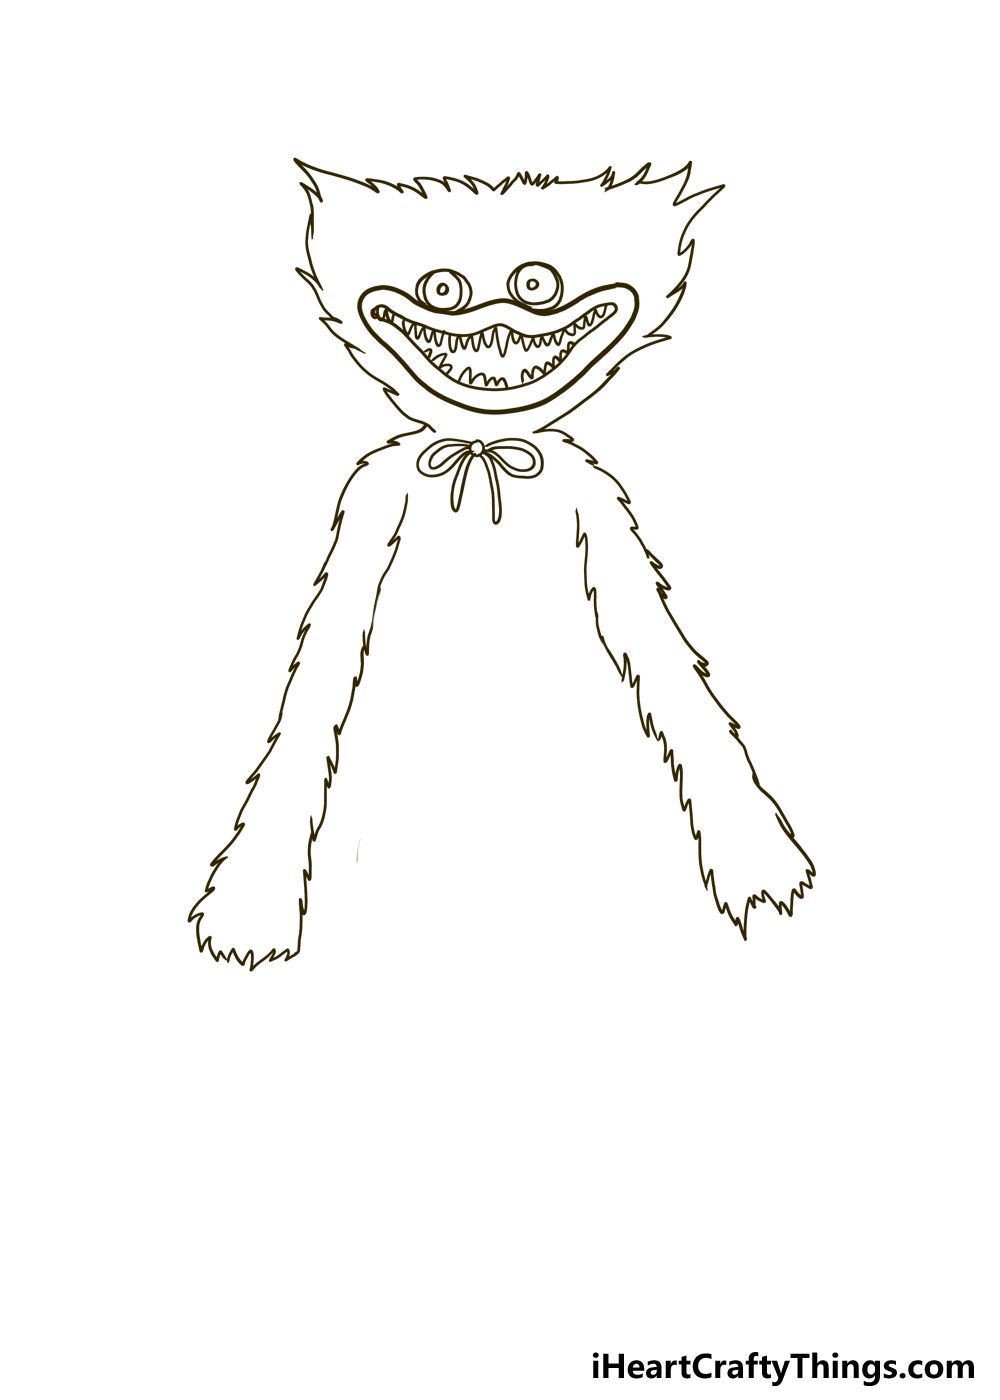
Now we have the head complete for Huggy Wuggy, we can start adding his limbs and his body. As we’ve mentioned before, Huggy Wuggy looks like a big teddy bear or a puppet, and this is clear in his design.
Similarly to how we drew his head with pointy lines to make him look furrier, we will use a similar method for his arms.
As part of Huggy Wuggy’s design, he has a small rounded body with long, gangly limbs.
It somehow manages to make him look even creepier! We will limit this step mostly to his arms for now. Luckily, they should be fairly simple to draw.
For this design, we will have them hanging at his side to make it look like he is standing there menacingly.
If you wanted to have his arms in more elaborate positions, you could certainly do that if you wanted!
Maybe he could be waving or brandishing some kind of weapon if you want to make the drawing even more sinister.
It’s up to you, but however you draw his arms make sure to make the outline pointy and jagged to make him look furry.
The arms are fairly simple, and he doesn’t have hands in the traditional sense of the word. His arms end in two stumps, as you will see in the reference image.
Before we move on to the final details, there is one last thing to add. That would be the bowtie that he wears around his neck.
This has a really small circle at the center of it. You can then add the two large loops to the top of it using some curved lines.
There will then be two small tails hanging down from it, as shown in our example. These should be fairly thin. Then, we can add the final details in the next step!
Step 5: Draw his legs
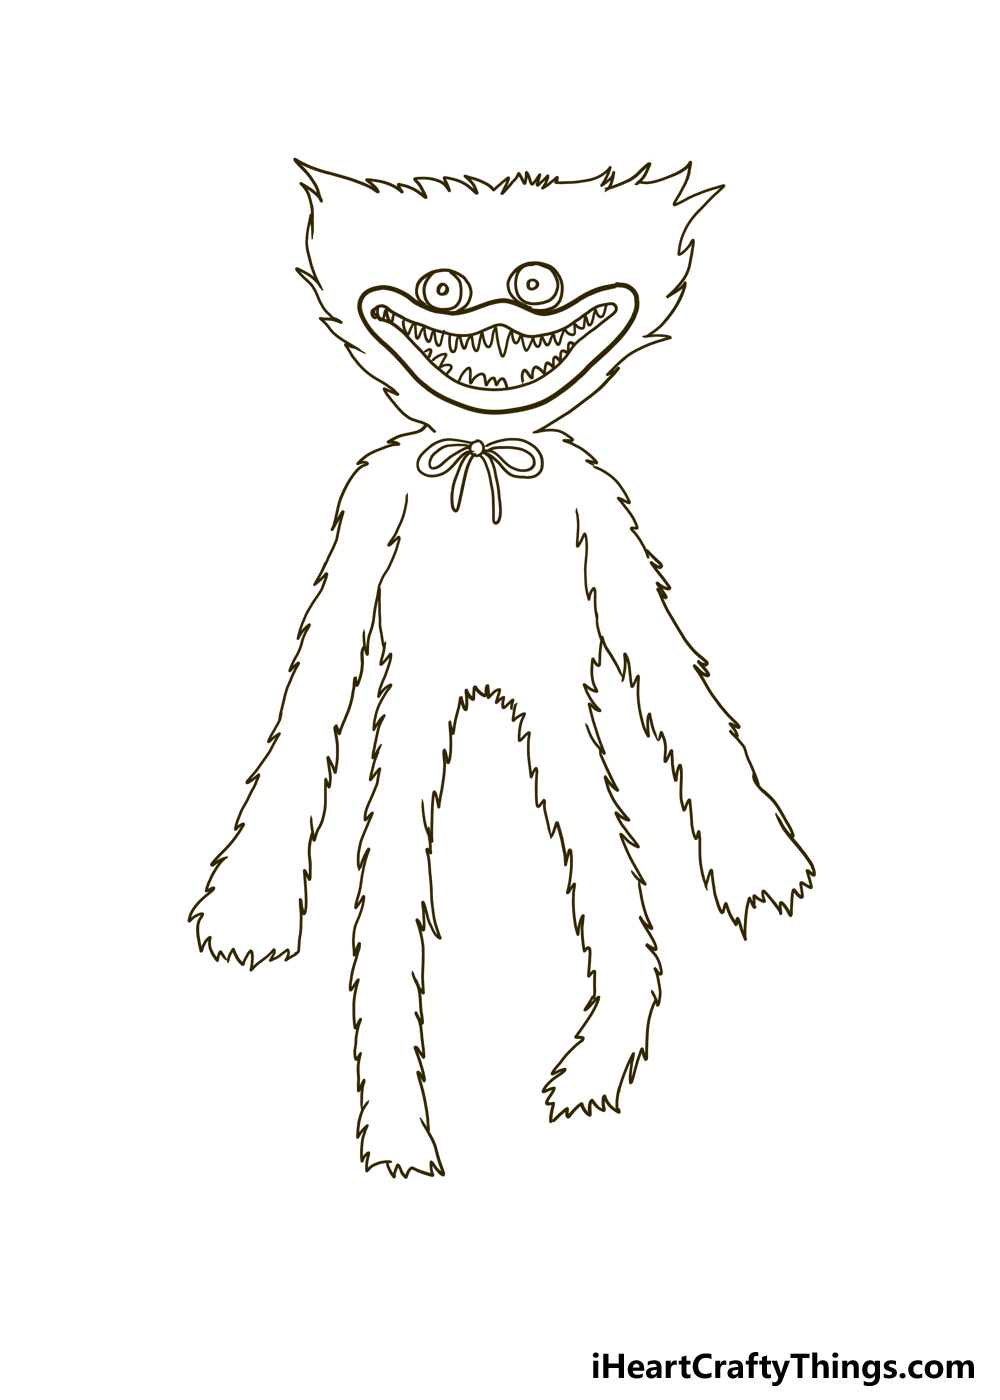
Now, we can add his legs and any final details that we may want for this Huggy Wuggy drawing. As you will see in our example, the point where his body ends and legs begin is hard to see.
That further goes with what we said earlier about him having a small body and long gangly limbs. His legs look rather similar to his arms in terms of how simple they are.
To make it look like he is walking, you can bend the leg on the right over a bit while keeping the one on the left straight. Once again, you could also customize this to make your own poses.
Small changes can make a surprising amount of difference, so don’t be afraid to get creative with it as you make your own drawing!
When you are done, we will then move on to step 6 where we will add some final details.
Step 6: Now, finish off with some final details

This design of Huggy Wuggy is almost complete! Before we move on to that final step, we have a few small details to add.
You can make Huggy Wuggy look even furrier with some small details all over his body. These will mostly be composed of some small, pointy lines like the ones we used in our reference image.
We will also add some simple toes and fingers to his feet and hands to finish off the design.
Then, when you have finished adding the final details your drawing will be ready for some colors in the final step! Before you move on, be sure to add any final ideas that you would like.
If you have a favorite stage or environment from the games or other media Huggy Wuggy appears in, then you could use it as a background for the drawing.
Adding other characters from the games or other series that you enjoy would also be fun to do! Who or what would you like to add in order to make this Huggy Wuggy drawing even cooler?
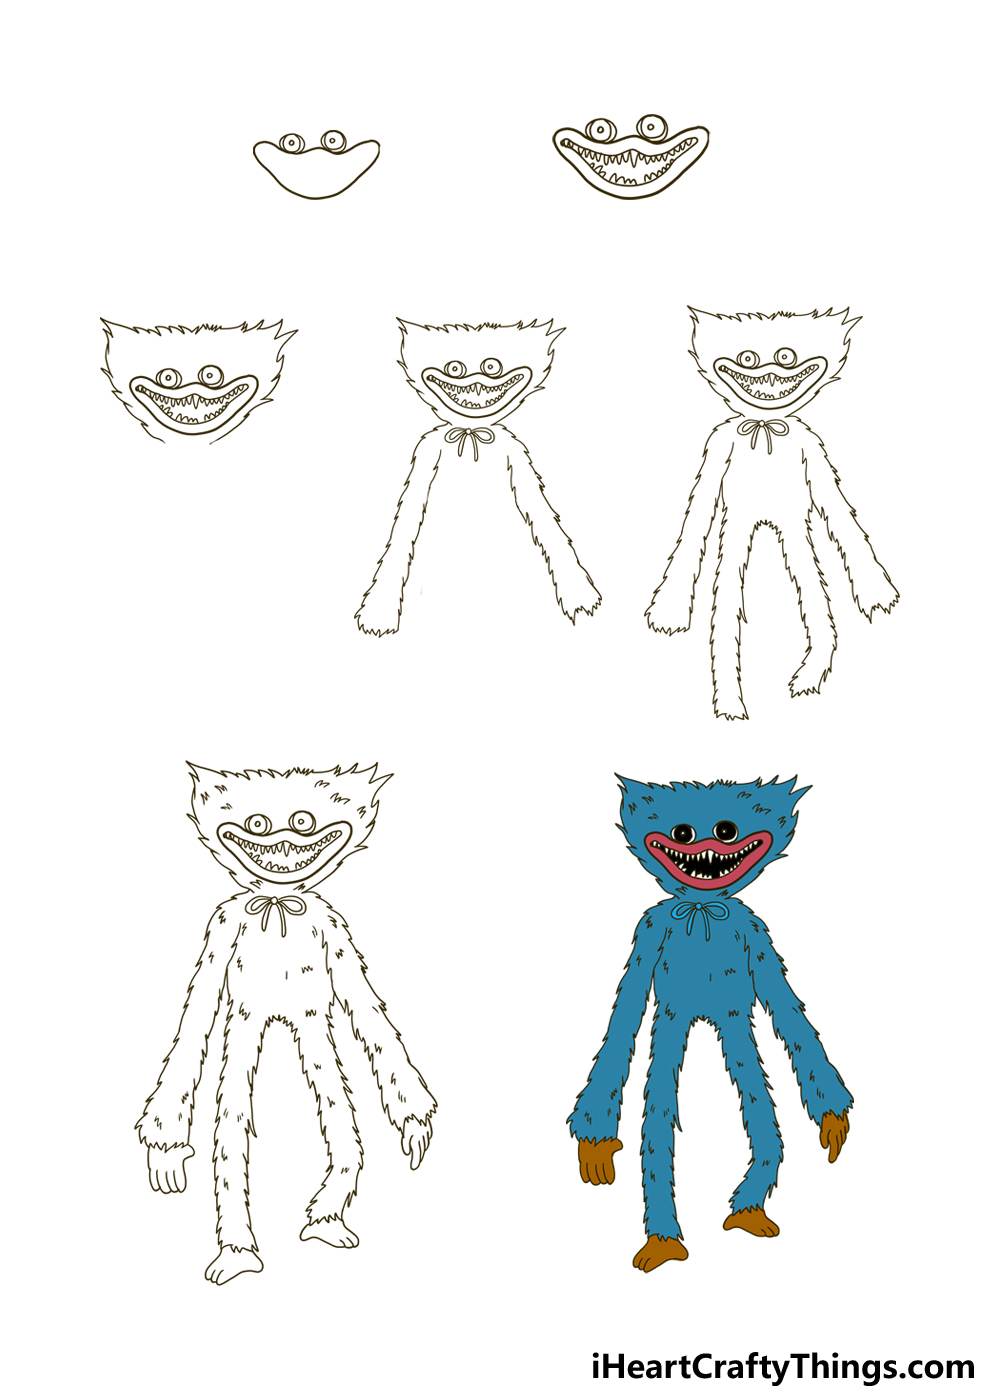
Step 7: Finish the drawing with some colors
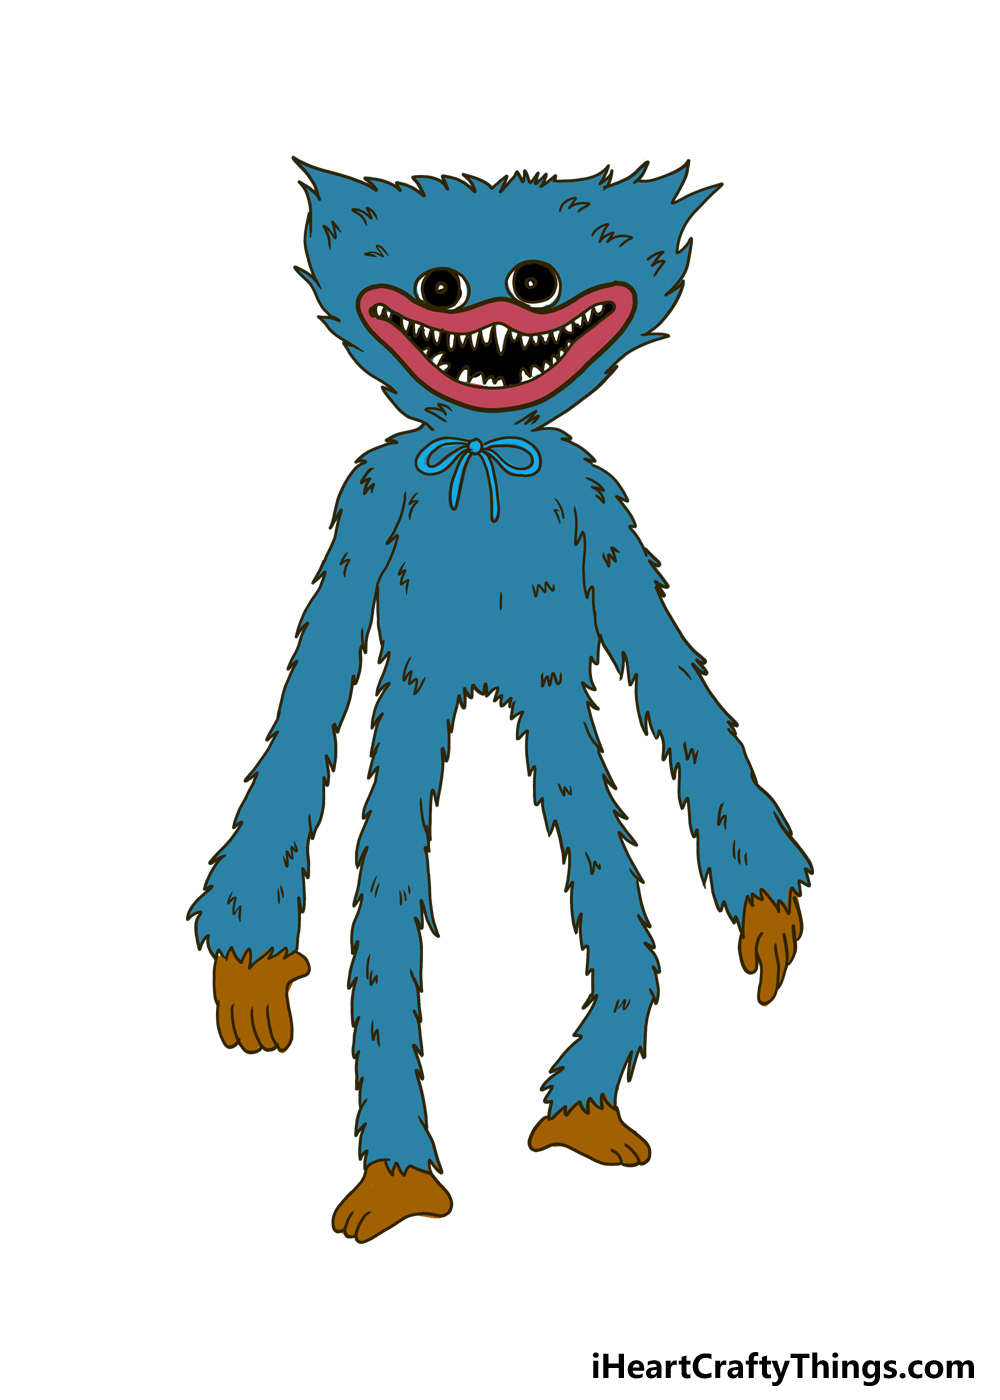
This is the final step of the guide, and it’s time to bring Huggy Wuggy to life with some colors! Not literally, of course, but it will still make him look even more alive.
In the design, we used brown for his feet and hands. Then, we used a bright red for his lips to give him his sinister grin.
Finally, you can finish off by adding dark blue for his fur, which finishes off his design nicely. When you’re coloring in your version, you could also opt for some different color choices.
Making an entirely unique version of Huggy Wuggy could be fun, and it could be as simple as changing the color of his fur.
Using different art tools and mediums can also make the colors pop in different ways.
Will you stick to his classic color scheme or will you create something unique?
Bonus: Add Some Scary Extras To This Huggy Wuggy Drawing
Huggy Wuggy is a pretty terrifying character, even with his rather innocent sounding name. Despite this, we hope that the process of drawing him wasn’t a scary challenge to take on!
Now that you have finished the drawing, you are just about ready to add some color to the artwork. Before we do that, however, we thought it would be fun to add to the drawing to make it even more terrifying.
One of the best ways to do this would be to add a background setting to really bring this to life. There are a few options for how you could do this.
One would be to use a location where you have seen Huggy Wuggy in a piece of existing media. Another option would be to make an entirely unique location.
A good way to do that would be to choose a location you see in your life so that you will have some reference material to work from. You could also change his pose and expression.
Adding other characters could be a great way to make this drawing even more awesome, too. These could be some unfortunate victims running away from this monstrous character.
Or, maybe you could add some other monsters to join this Huggy Wuggy drawing. They could be based on famous movie monsters or maybe some other internet monsters like Slender Man.
As you can see, there are all sorts of fun ways to add to this drawing! Even with just a few extra details and additions, you can make all sorts of cool stories and scenarios.
We have gone over a few ideas, but how else could you add to this drawing?
Your Huggy Wuggy Drawing is Complete!
Huggy Wuggy is certainly a creepy character, but we wanted to make the process of drawing him as easy as possible to make the experience of drawing him one that isn’t scary to take on!
We hope you enjoyed working through the 7 steps of this guide on how to draw Huggy Wuggy.
Now that you have mastered how to do this drawing, there are so many ways that you can take it even further.
Adding a background or some extra characters are a few ideas that we mentioned, but there are so many more.
Adding props, weapons or items of clothing would all be examples of how to put a unique spin on it.
This is your turn to get creative and show off what you can do with your own ideas! Whatever you do or don’t add, we would love to see how the drawing turns out.
You can show off what your artwork looks like by sharing it on our Facebook and Pinterest pages when it’s done!