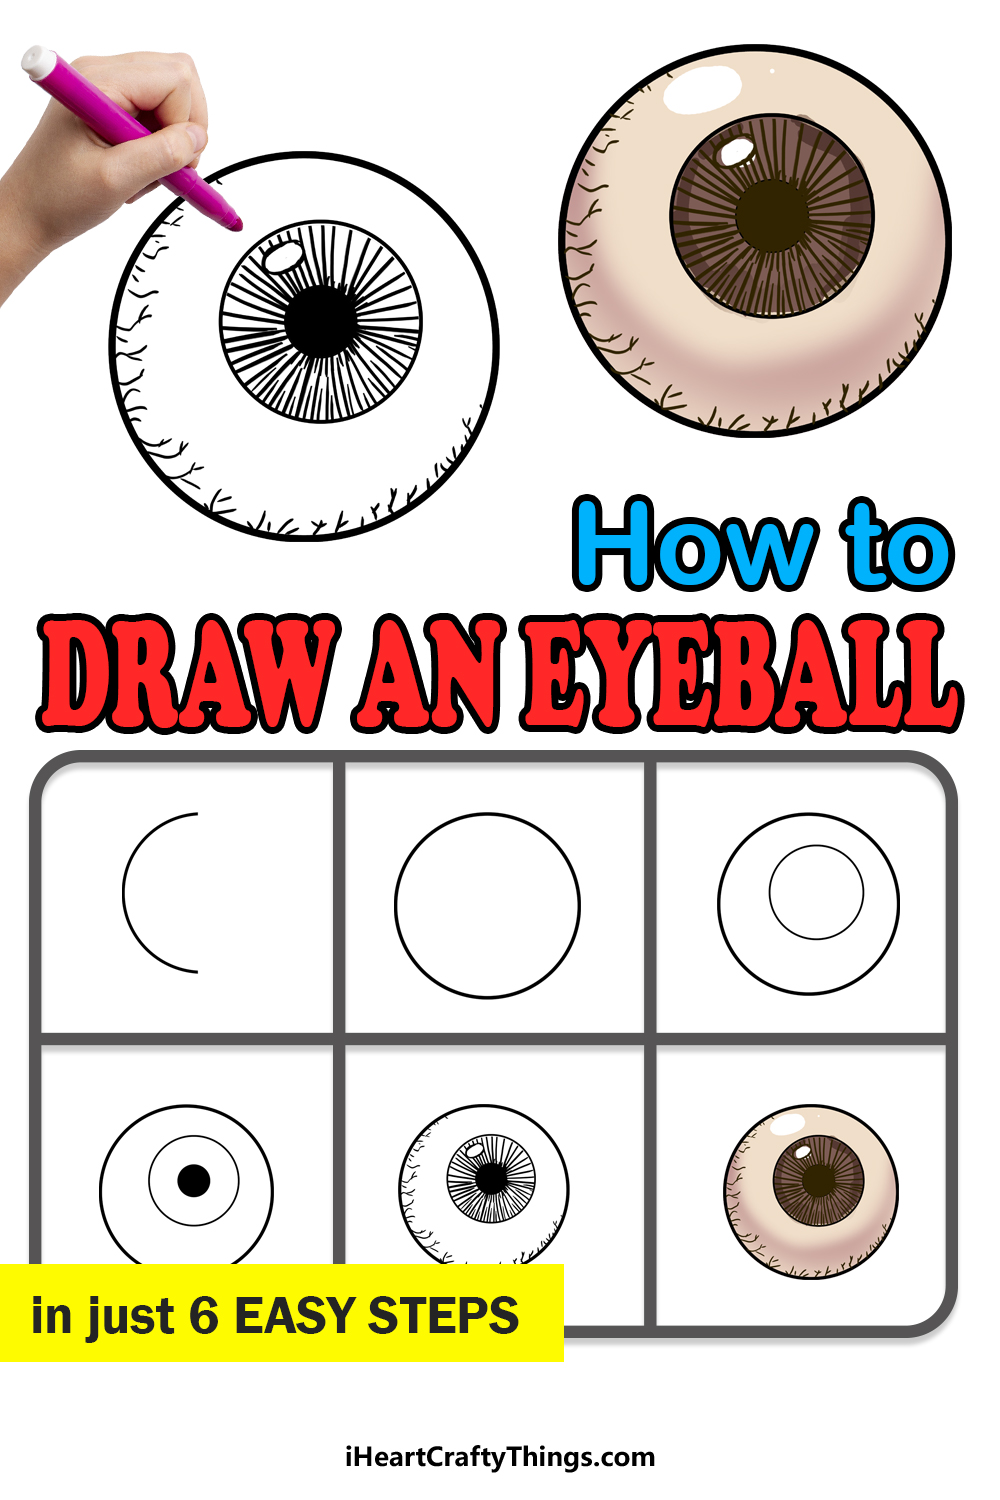
Allow us to show you how to make an eyeball drawing with this simple step-by-step guide for kids! These steps will break it down to make this easy for kids and adults of all skill levels.
You may assume drawing an eyeball would be easy, as we see them every day. However, it can be much harder than you think as you need to get the shape right as well as details such as the iris, pupils and the veins of the eye.
Worry not though, as these steps break it down and let you know what tools and techniques you can use to make your drawing of an eyeball realistic and detailed.
Let’s go through each step slowly with our eyes and discover how to make this drawing a reality.
Watch This Step-By-Step Guide To Create An Eyeball Drawing
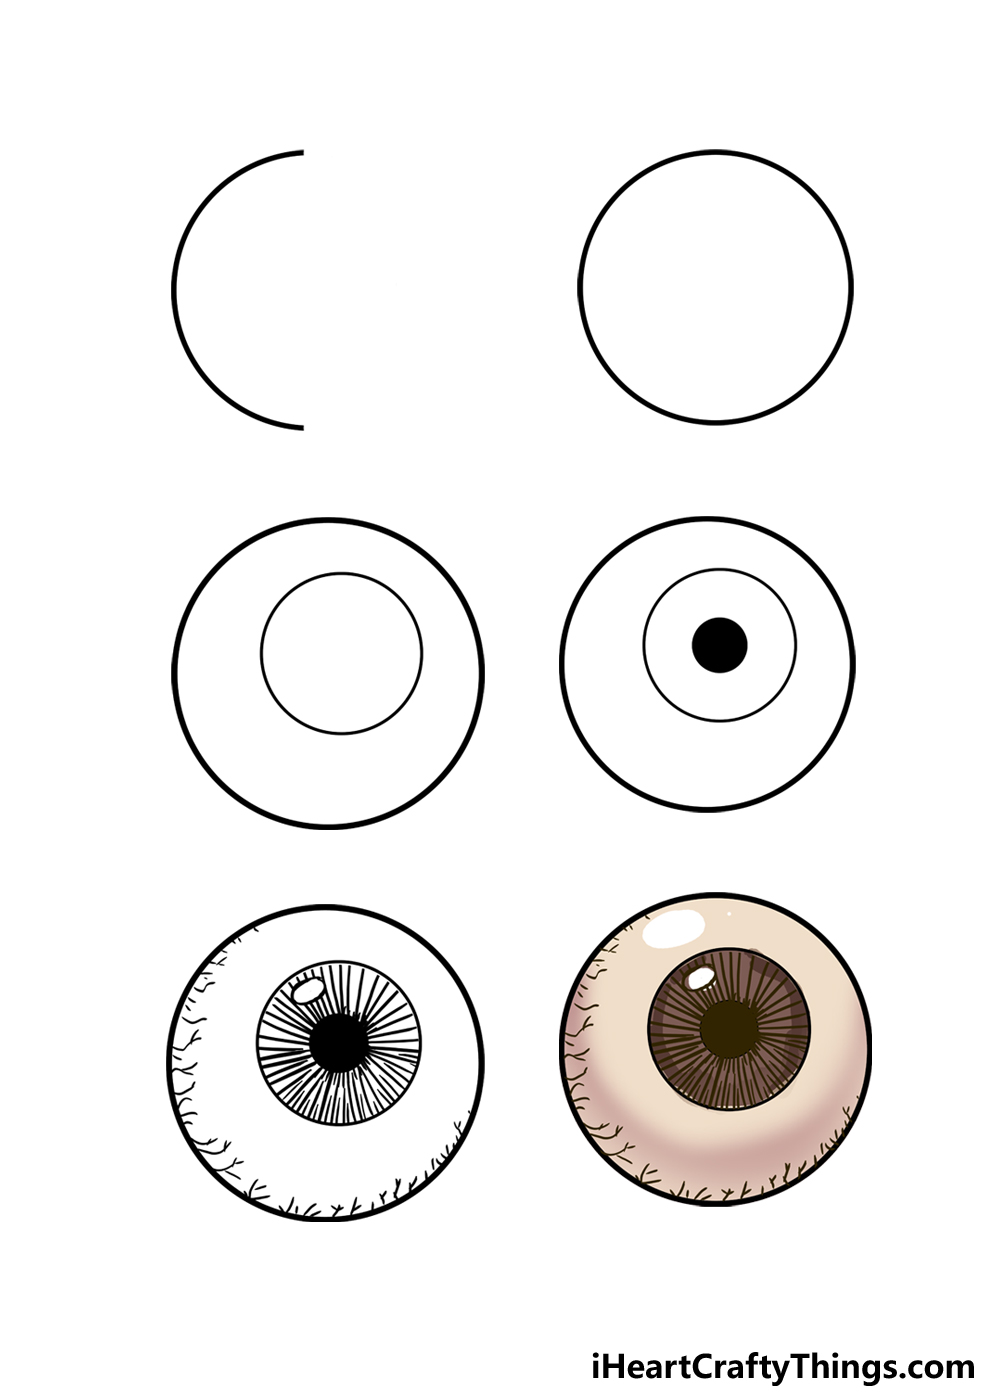
How to Draw An Eyeball – Let’s Get Started!
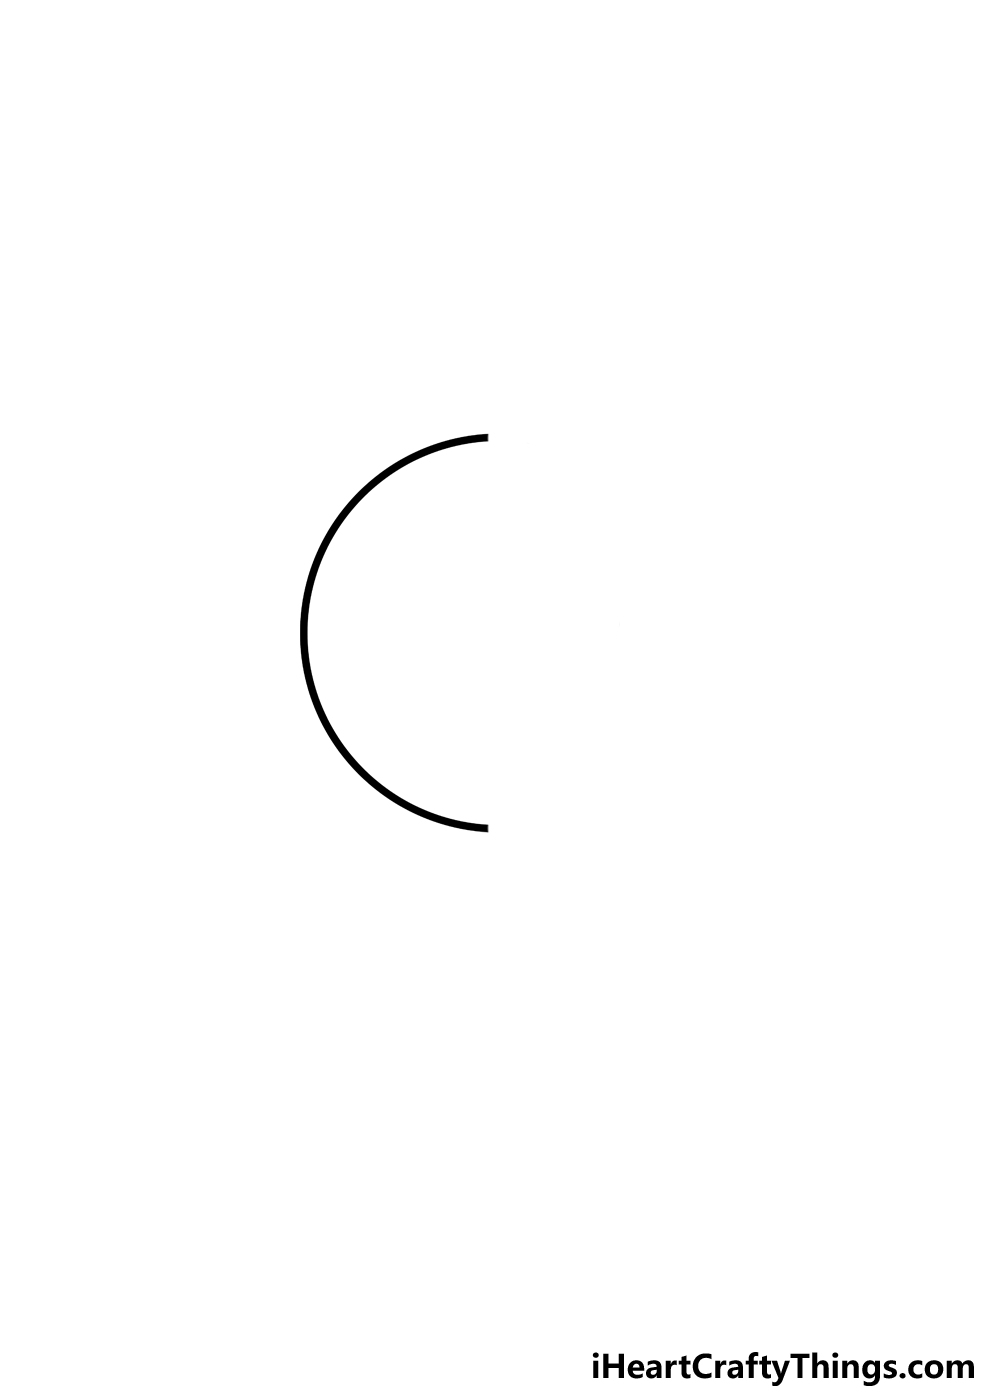
Step 1
For this eyeball drawing, all you really need technically would be a pencil or a pen, but there are a few tools that can make it much easier. For this drawing, we will be creating lots of circles.
Drawing perfect circles is pretty much impossible when done freehand, so if you want them to be perfect then you will need to use a drawing tool.
A drawing compass is the best tool to use for the job. These tools have a sharp point that you place on the page, and then you clip your pencil to the other end.
Using the point on the page, it can then rotate in a perfect circle. If you don’t own a drawing compass, they can be purchased cheaply at any stationery or art stores.
Another option is to use a round stencil or a flat round object that you can draw around. You could even use something like the lid of a jar in a pinch.
If you don’t have anything to use, you can try your best to draw as smooth a circle as you can, it doesn’t matter if it’s not perfect! For this first step, we will draw the first half of the circle that will form the main outline.
No matter what you use to draw it, we can move on to step 2 when you’re ready.
Step 2: Draw the rest of the outline
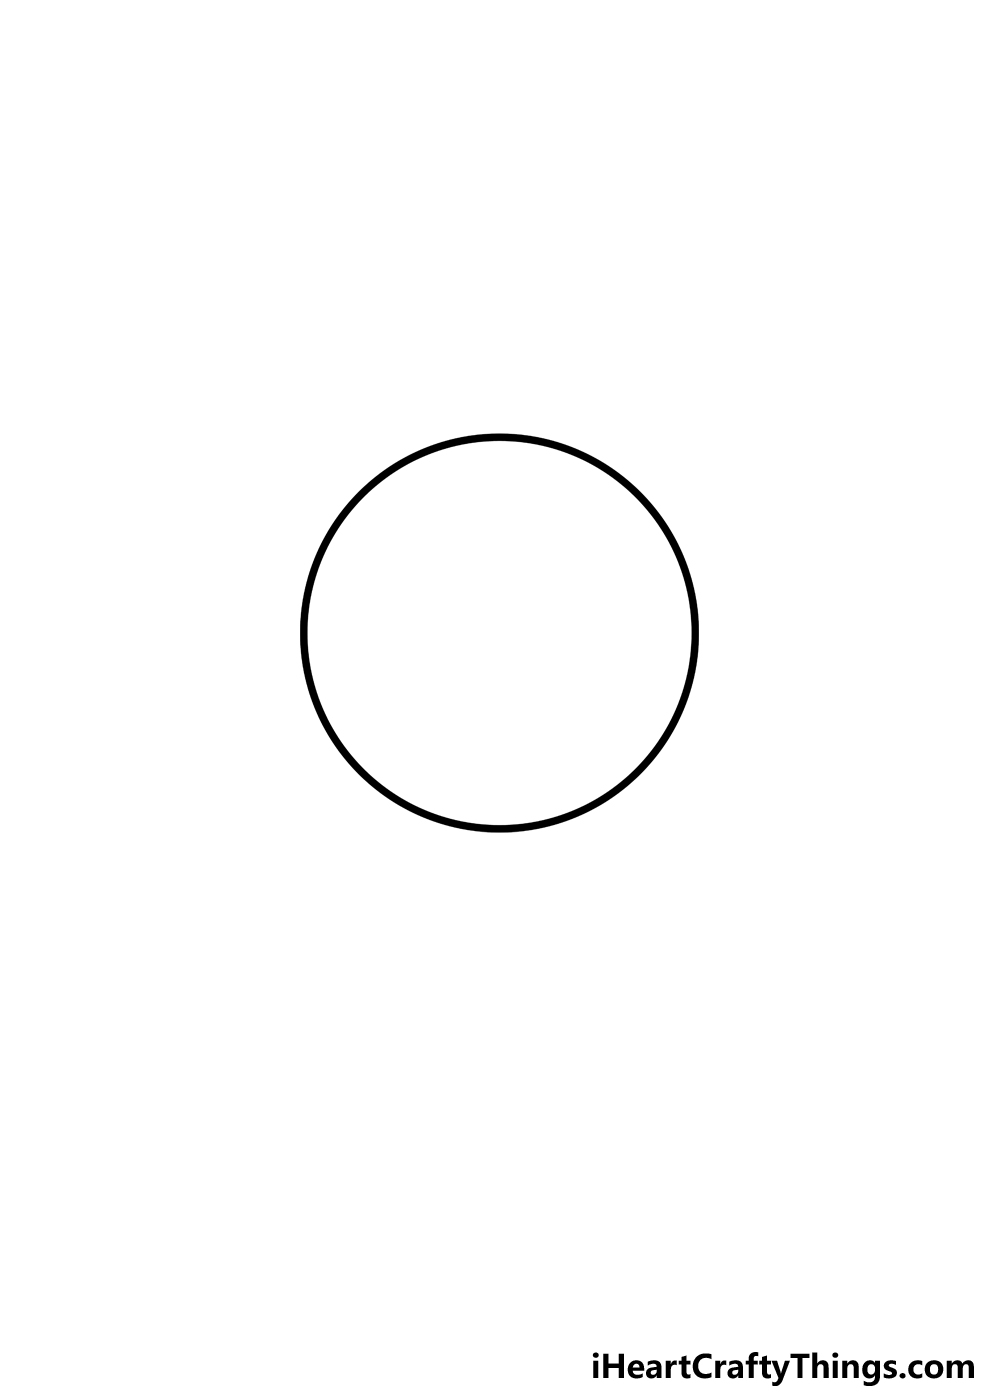
You have one half of the eyeball outline done, but in this step we will finish it off by drawing the rest. How you go about doing this will depend on the method that you used to draw the first half.
If you used a drawing compass, then simply continue the motion to finish off the circle. If you used a stencil, then you can similarly continue the motion of the circle.
No matter which method you used, you can look at the circle and ensure that it is smooth throughout. Any method may result in small holes or spots that your pen or pencil didn’t reach.
Those should be easy enough to fix, and then you will have your complete circle! Even if you use a tool to help you, it can take a bit of getting used to, so be sure to practice a few times until you get the hang of it.
If you don’t have a tool to use, then we would recommend slowly drawing with a very light pencil. Take it as slowly as you need to, that way you can make it as smooth as possible.
When you have something that is as close to a smooth, perfect circle as you can get, then you can go over it with a darker pencil or with your drawing pen.
Now that we have the outer circle outline of this eyeball, we can start drawing some of the interior details!
Step 3: Add the iris
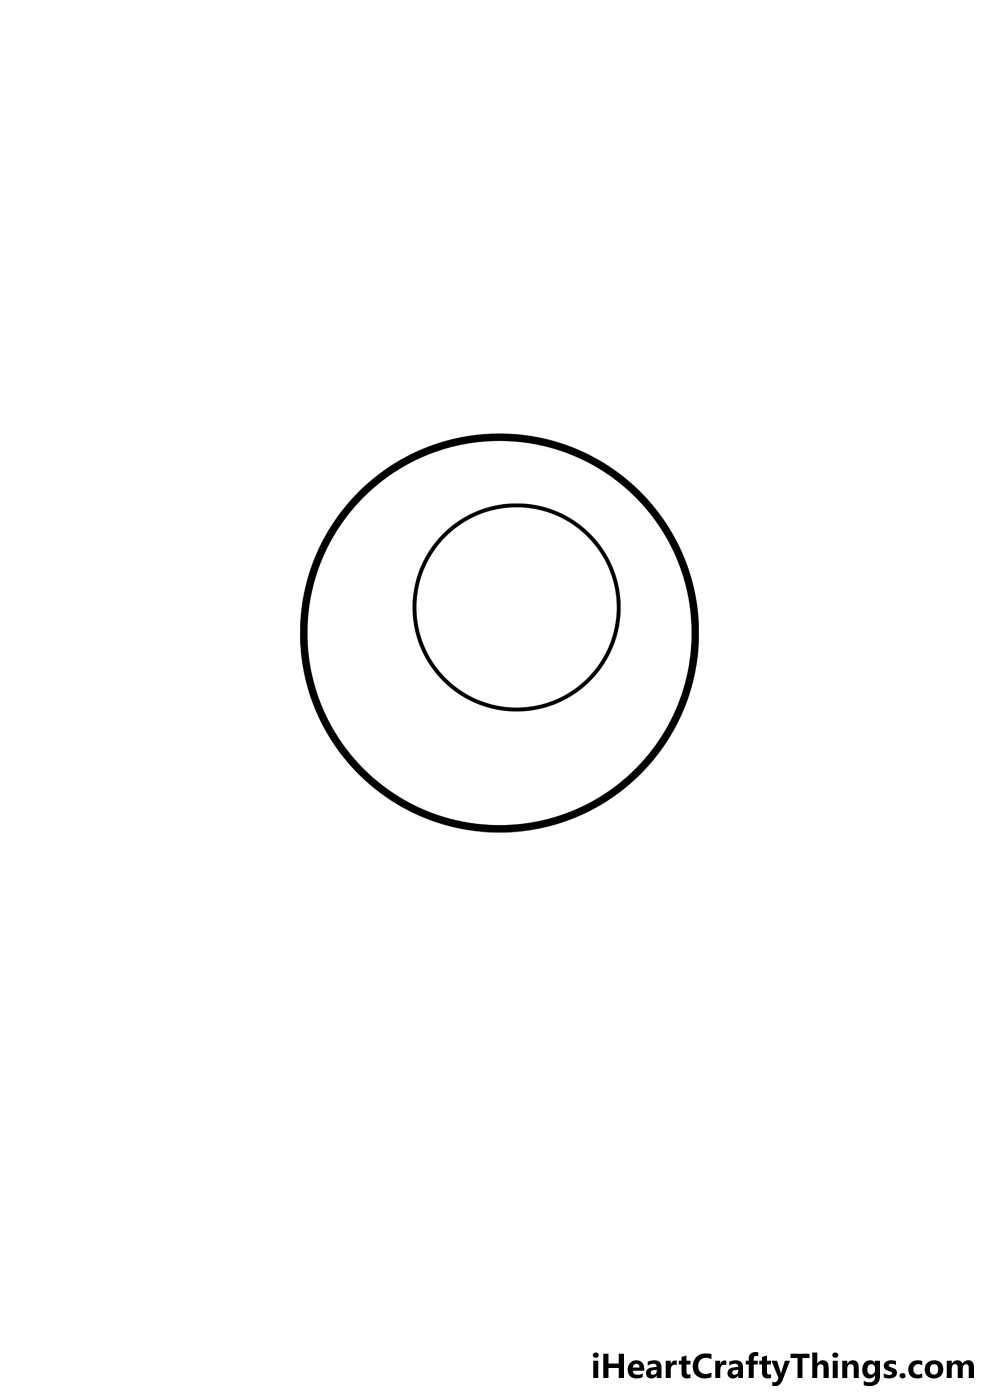
The iris is the part of the eye that is colored, and we will add that part to your eyeball drawing now.
To do this, we will essentially be doing what we did in the first step, just on a smaller scale.
In our example, we have the iris a bit off the center of the eyeball as a whole, but you could place it elsewhere if you wanted to. The iris could go pretty much anywhere on the eyeball that you choose.
As you can see in the reference image, the iris is actually quite large on the eyeball. It should be around half the size of the actual eyeball, maybe a bit smaller.
When drawing it, you can use the same drawing tools and methods we recommended for the eyeball in the first two steps.
The way you do it will be more or less the same, but it will be a bit trickier now that the circle is smaller.
It may be trickier to draw with a compass now, but will be a bit easier if you’re doing it freehand, ironically enough.
Remember that you can use a light pencil to practice drawing it before adding the final lines.
As you probably well know, there is a lot more detail to the iris, even if you don’t count the colors of the eye. The iris is looking a bit bare right now, but we will add some more details to it later on.
Now that you have the iris in its most basic form, we have one more circle to draw before we get to some final details, so let’s go ahead and add that in step 4 of the guide!
Step 4: Now draw the pupil of this eyeball
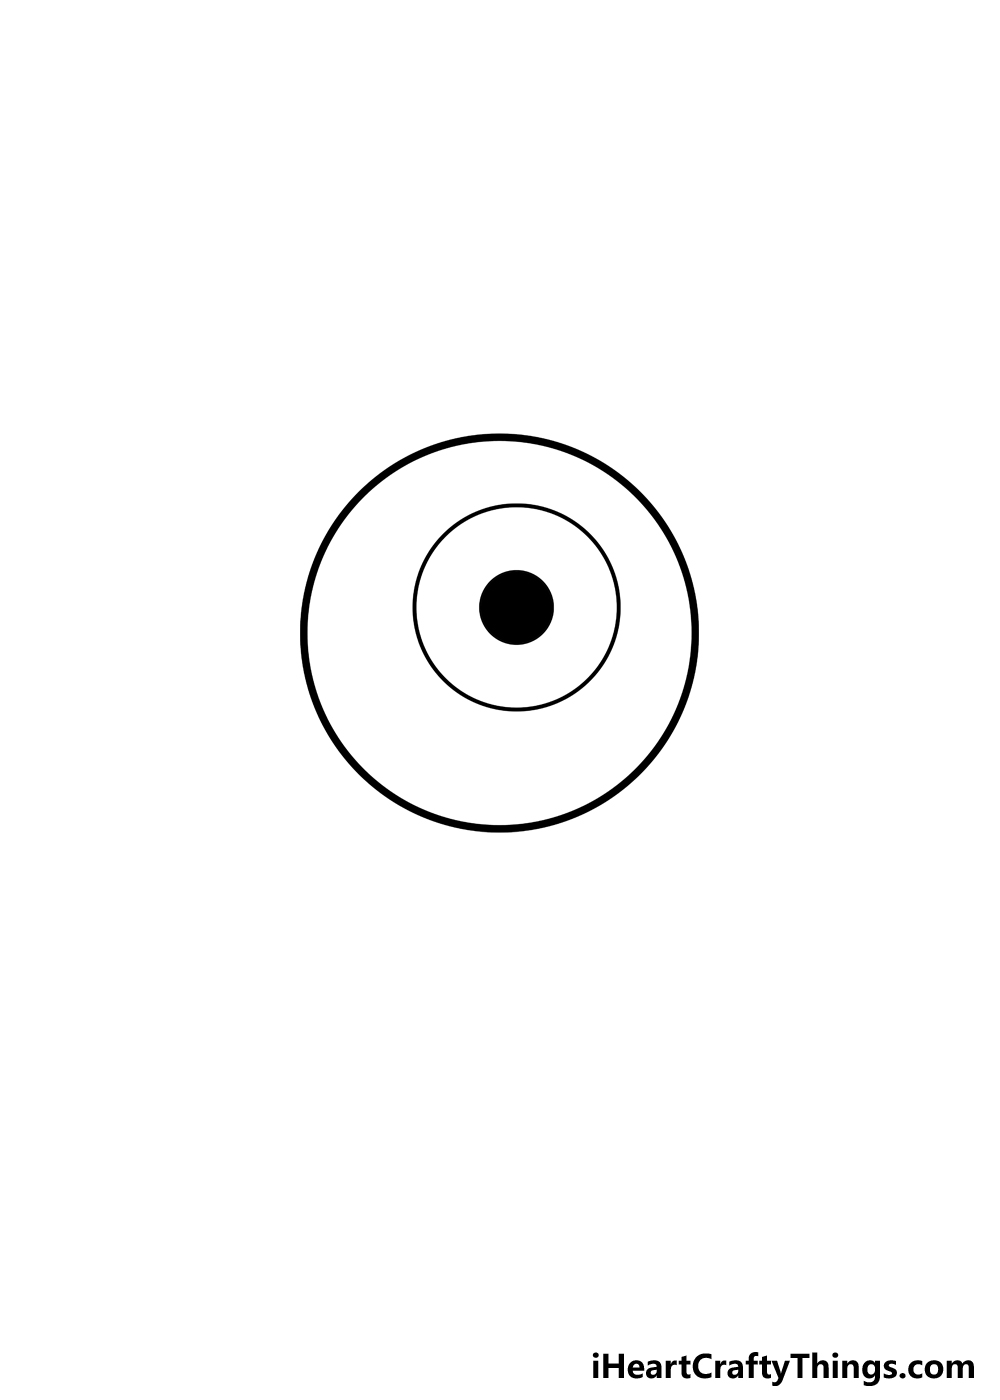
The pupil of the eye is a small black dot at the center that we see out of. That is what we will be adding in this step to prepare us for some final details coming up soon.
To draw the pupil, we will use some similar methods that have been used to draw all the other aspects of the eye. Therefore, we would recommend using a drawing compass or a stencil.
If you have to draw one circle freehand though, this would likely be the easiest one due to how small it is on the eye. When drawing the pupil, try to position it at the center of the iris, or at least as close as you can.
Once you have the pupil there, all that remains is to fill it in. the pupil is a large black dot, so be sure to color it in with some solid color.
With the pupil drawn, we are ready for those final details. If you drew rough versions or guides for the eye with your pencil, then we won’t be needing them anymore.
You can go ahead and erase any of those lines now, but try to be careful as you do. If there is any fresh pen ink, then it could be smudged if you erase too soon, and you also don’t want to erase any lines you want to be included in the final drawing.
With that out of the way, let’s focus on some final details and make this drawing even cooler!
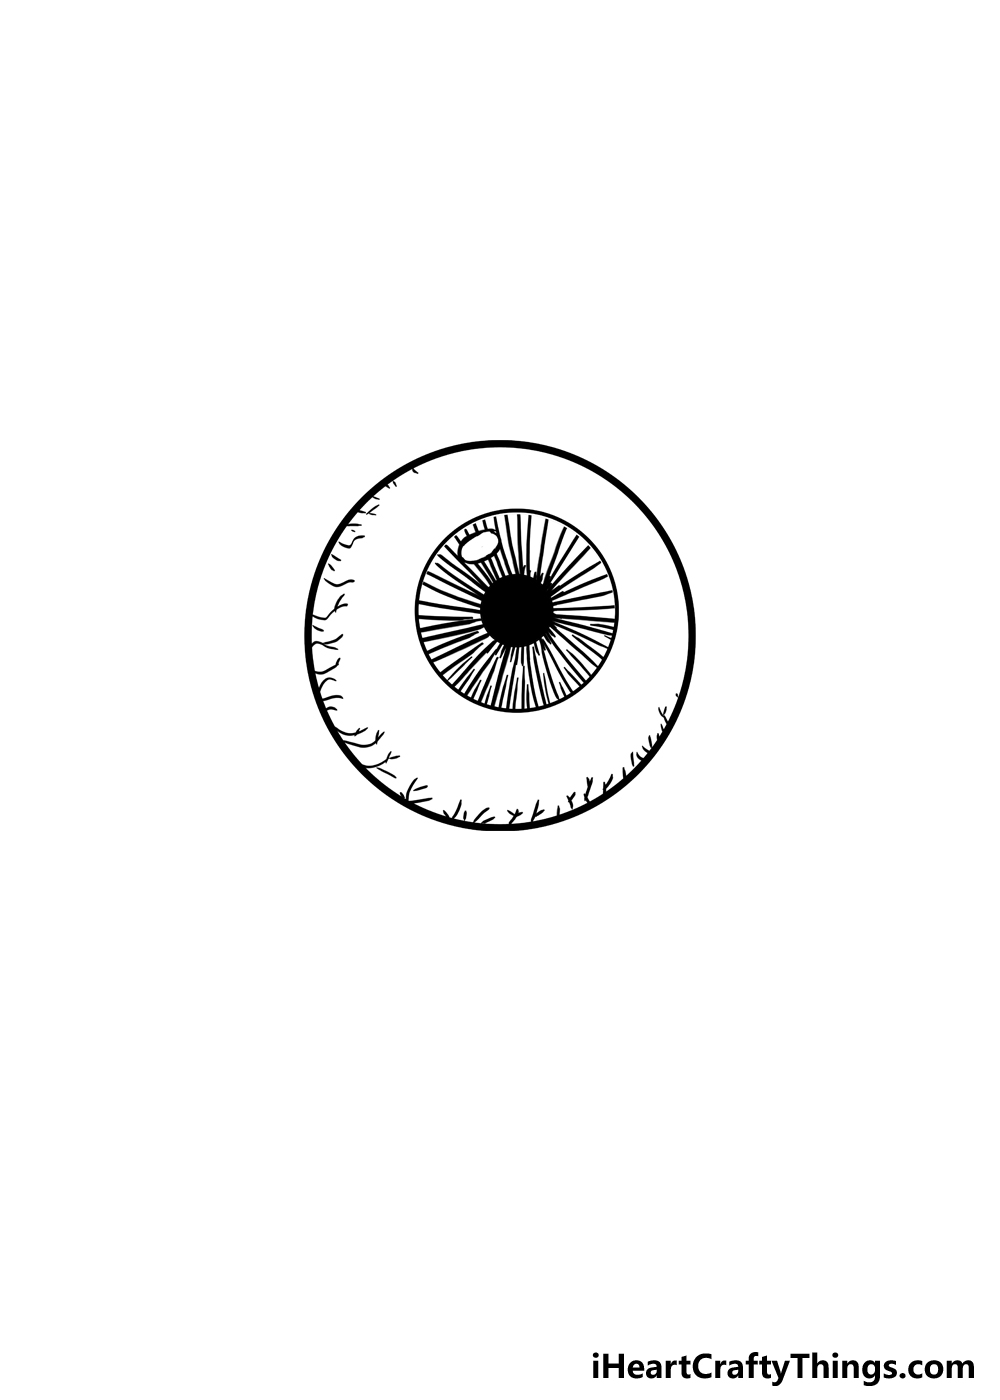
Step 5: Draw some final and extra details
Now it’s time to make this eyeball drawing look even better with some smaller details.
We will also cover a few ways that you could make the drawing even more unique in a bit, but first let’s cover these details.
First, create a glint on the eye by drawing a small oval shape on the iris. Then, we will make the iris a lot more realistic.
To do this, we will be adding many lines from the outline to the center of the pupil. These should be pretty straight, and you can try to fit in as many as you can to create that realistic look.
Then, we will finish off the design by adding lots of little vein details on the outer edge of the eyeball. This is a pretty gruesome touch, but it looks pretty cool.
With that, we have finished the design and can move on to the final step! Before you do, be sure to add any other fun details that you may like.
There are some creative ways that you could finish off this artwork. For another kind of gross touch, you could add the optic nerve hanging from the eye.
It could also be fun to draw a background setting such as a jar that’s filled with eyeballs. For a more educational angle, you could label the different parts of the eye.
These are a few ideas you could try, but feel free to get creative with it and create some fun interpretations!
Step 6: Now, finish off with some color
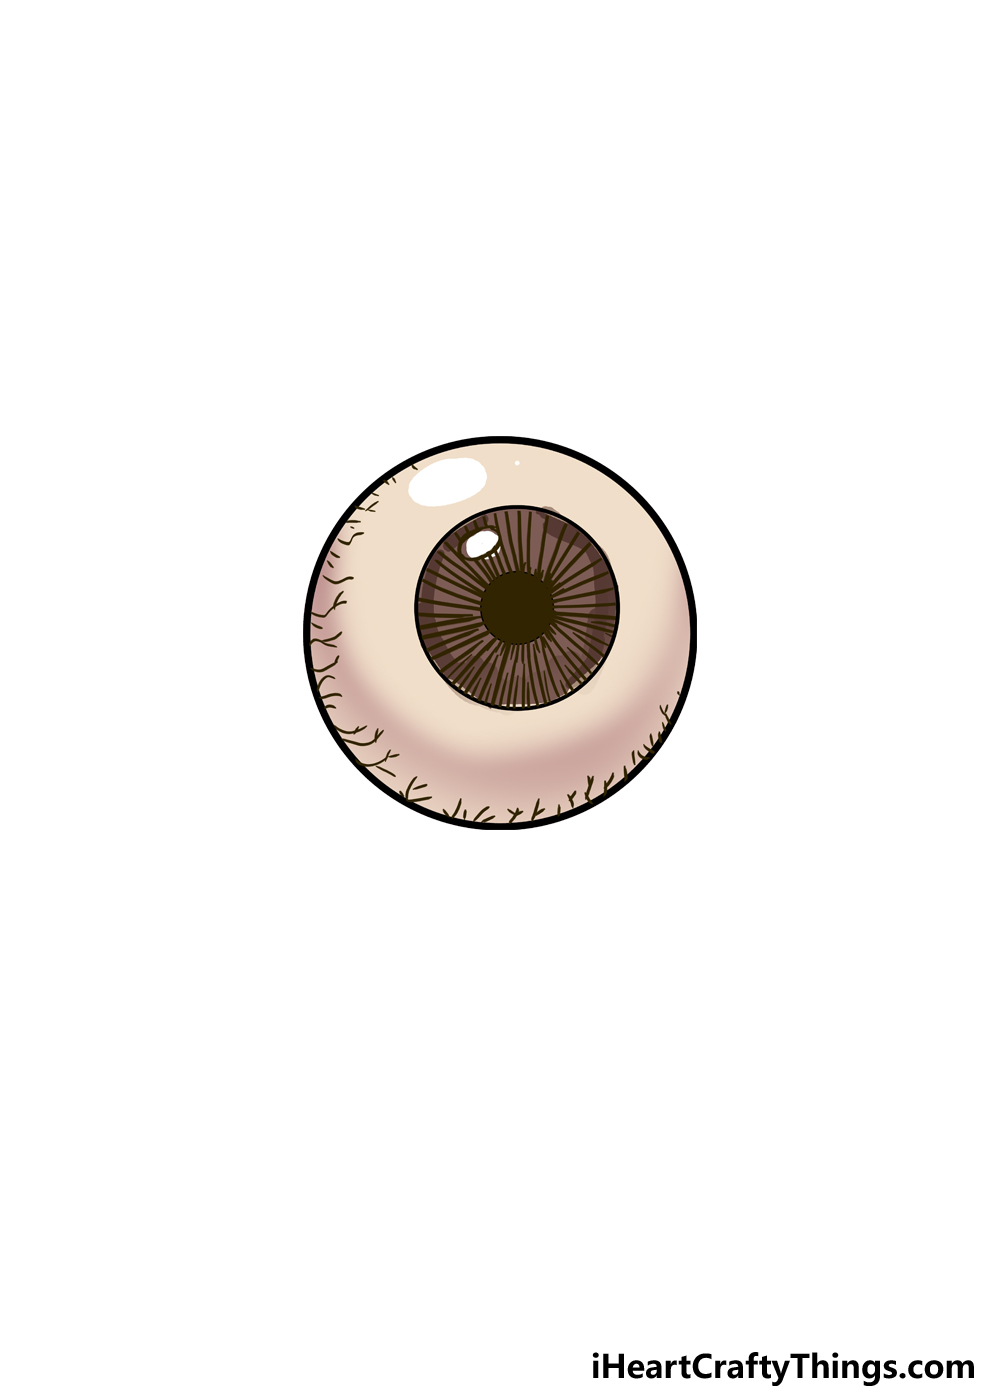
Now we’re ready to finish off this drawing with some colors. In our example, we kept the colors pretty muted and simple.
We used brown for the iris, and a much lighter wash of brown for the rest of the eyeball.
When you color in the iris, the medium you use can make it easier. For example, let’s say you drew the eyeball using a black pen.
If that’s the case, then coloring in the iris will be fiddly as you need to color in all the sections of the iris details. There are a few ways that you could make this easier.
For example, you could use a medium such as watercolors and do a light enough wash that the pen lines will still show beneath. Of course, you also don’t have to stick to the same colors that we did.
You could make the iris any other color you like, it could match your own eye color or you could have it be any other color you want. It doesn’t even have to be a realistic color, necessarily.
You can also add some additional fun color details. For instance, you could make the veins on the eye more noticeable by using a red pen to highlight them.
Not only can you try out different mediums, but mixing them together can also be fun. So if you use a lighter medium for most of the and harsher ones for smaller details, that will make those details stand out.
What colors and mediums will you choose to finish off this eyeball in style?
Your Eyeball Drawing is Complete!
That brings us to the end of this guide on how to draw an eyeball! The eyeball is simple and complicated all at the same time, and that can make it tricky to draw.
As you saw in the guide, the eyeball is made up of lots of circular shapes, and these can be really tricky, especially when done freehand.
Luckily, there are some tools and methods that can be used to make it so much easier, so be sure to use all of these when making your own drawing. If you have any other tricks to make it easier, be sure to use them!
Now that you have finished the drawing, you can take it even further by adding your own ideas. We spoke of a few ideas that you could use to do this.
You could make it more educational with some labels or create a Halloween-inspired image by creating some creepier setting for the eyeball.
There are so many possibilities for this relatively simple drawing, so let your imagination run wild! When your drawing is finished, we would be thrilled to see how it turned out.
You can show off your drawing by sharing it on our Facebook and Pinterest pages for us to see.