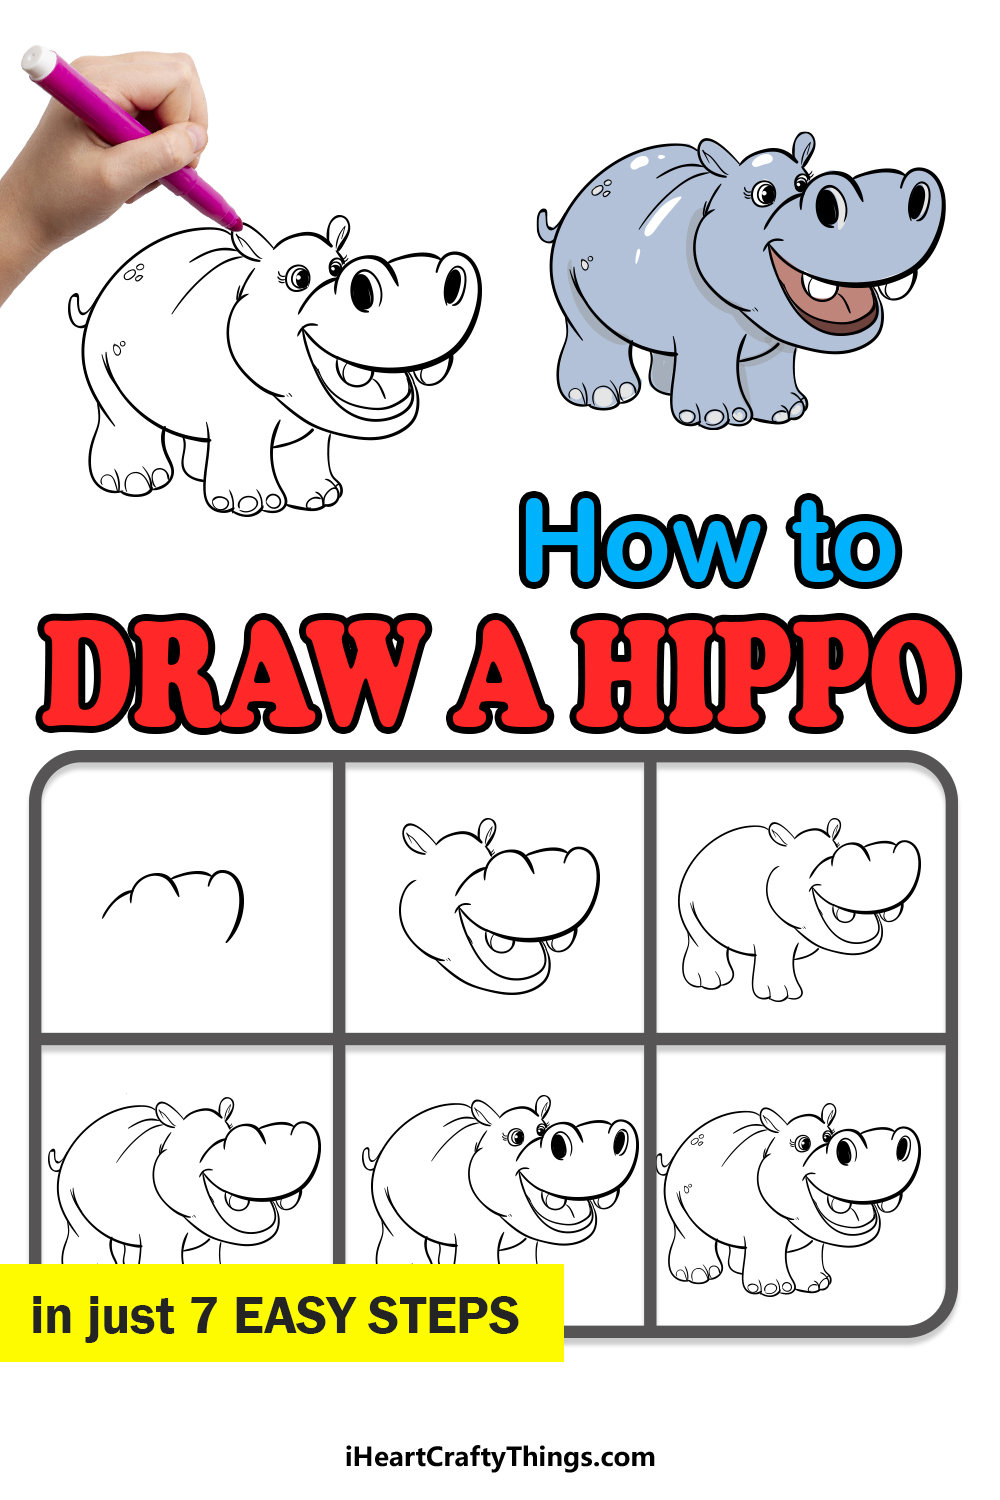
Anyone wanting to learn how to draw a hippo will love this tutorial for kids! It will be possible for kids of all ages to create their very own cartoon hippo.
Hippos are lazy creatures that live throughout Africa, and they love nothing more than to relax in the water after a big meal. However, you also don’t want to mess with a hippo, as they will show off their immense strength if provoked!
Luckily, the hippo we will create in this guide isn’t a mean one. In fact, he’s a very cute little cartoon hippo.
I will walk you through all of the steps until you have the finished drawing you see below. Once it’s done, you could draw a background environment for it to exist in and you could even try to draw some animal friends for it to hang out with.
Watch And Learn How To Make A Hippo Drawing
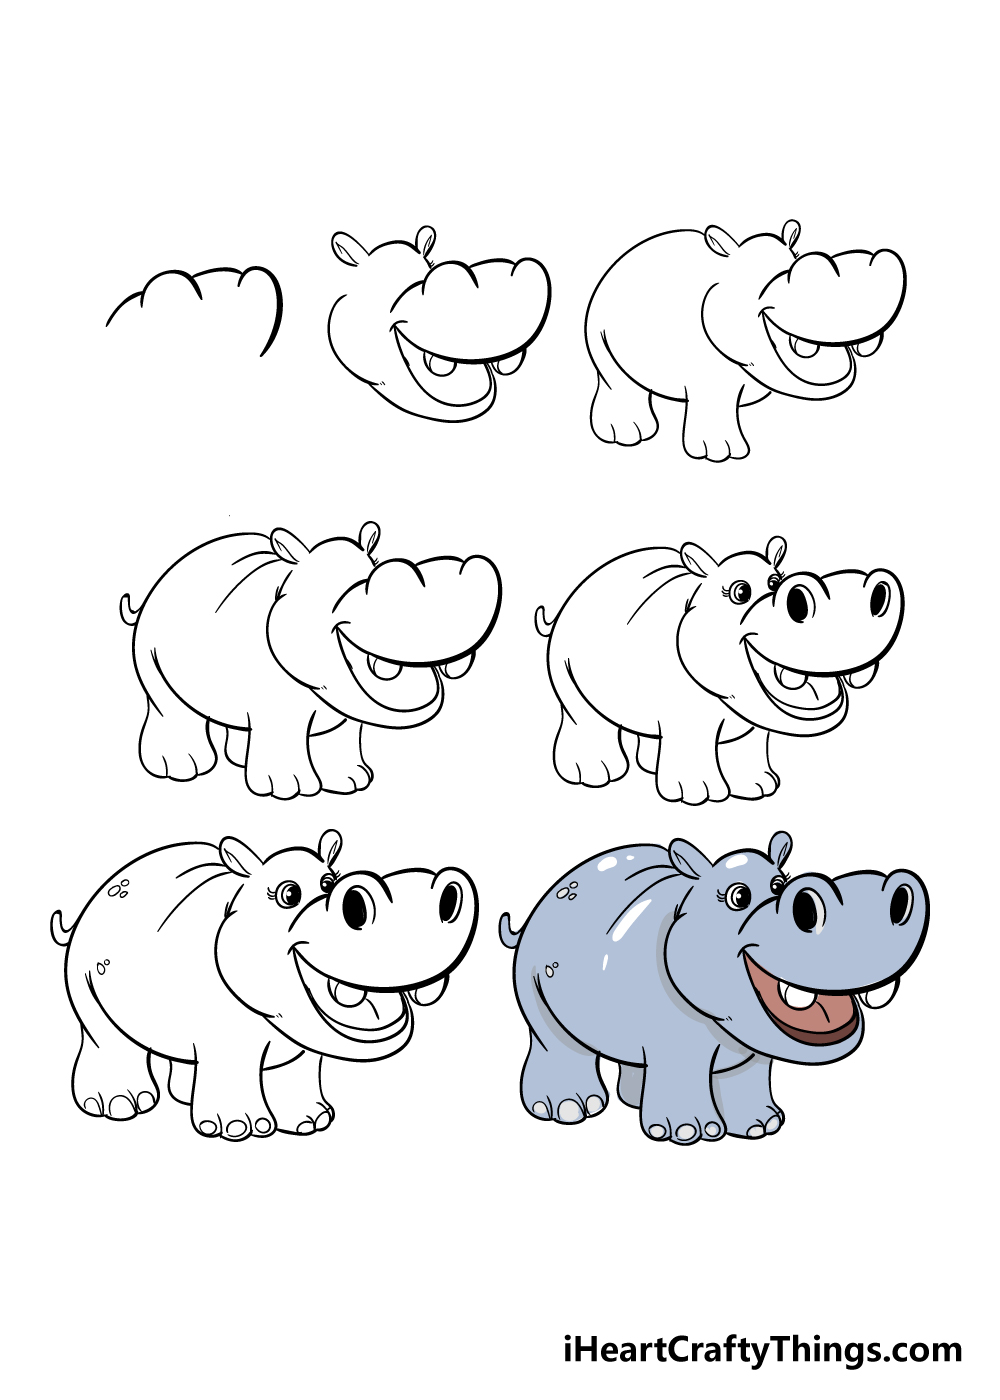
How to Draw A Hippo – Let’s Get Started!
Step 1

Hippos can be quite a dangerous animal if provoked, but we will be creating a very cute one in this guide on how to draw a hippo!
To begin with, we shall be drawing the snout of the hippo. To do this, you can draw several curved lines that have two protruding bumps for the nostrils.
The reference picture will show you what it should look like, and once you’re happy with it we can move on to step 2!
Step 2 – Draw more of the face for your hippo drawing
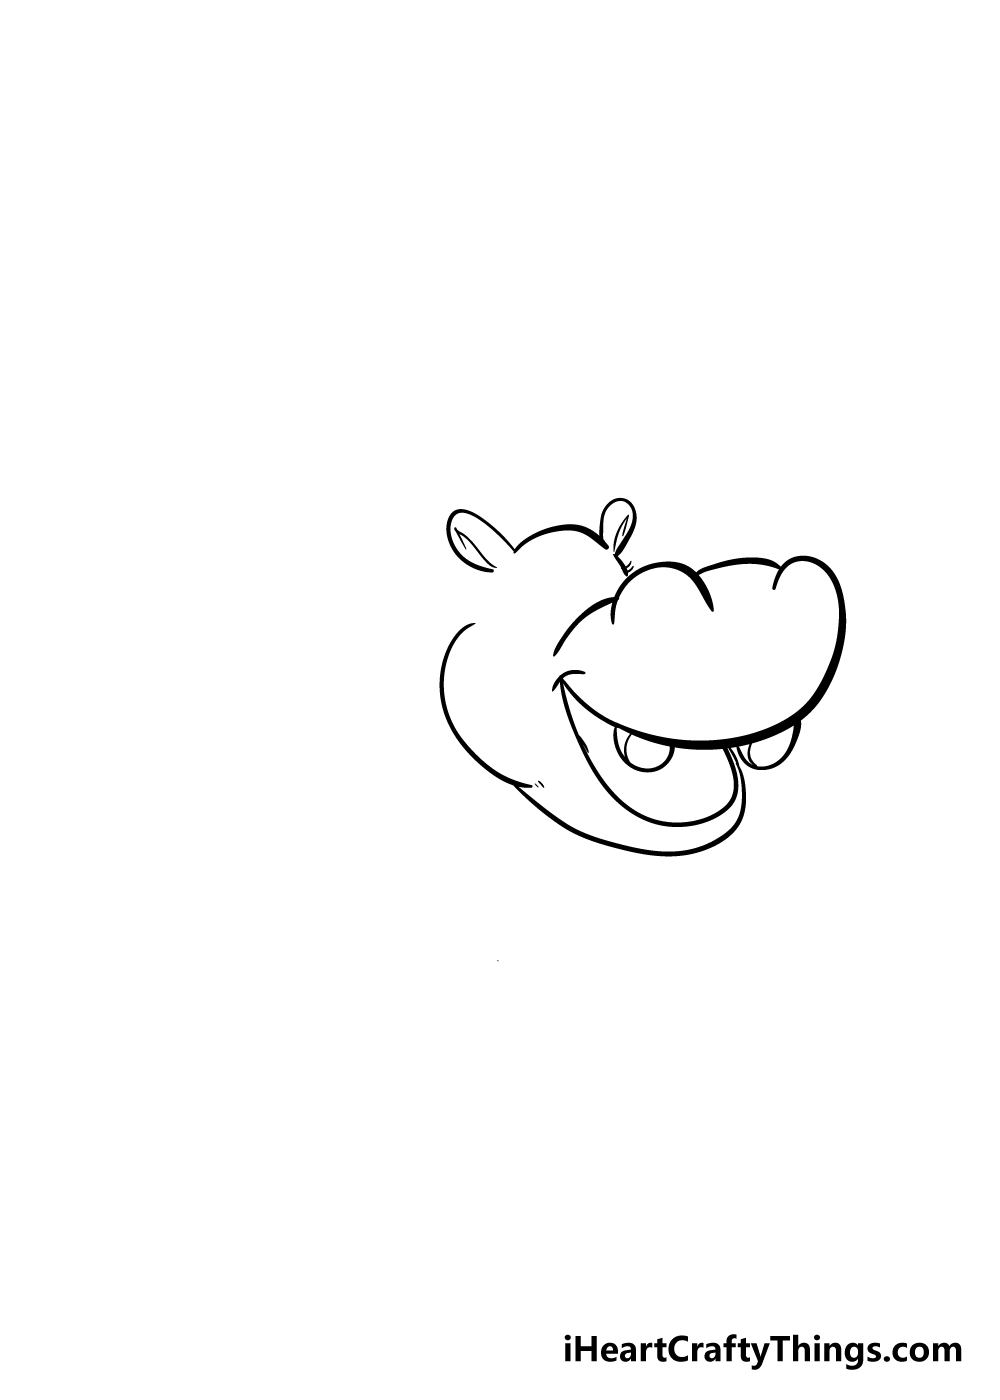
This next step of your hippo drawing may look like a lot, but it will be easy if you follow along with the reference picture! We will also take it step by step to make sure you don’t get lost.
To begin, the top of the head will be drawn with a rounded line with two small ears poking off of it.
This line will connect to the top of the bigger nostril you drew in the last step.
You can then extend the snout line around to form a smiling mouth for your hippo. Then, simply draw two round teeth coming out the mouth, and then use more rounded lines for the inside of the open mouth.
Finally, you can draw a cheek on the left-hand side of the face.
This may sound complicated, but it will make a lot of sense when you follow the reference image as you draw!
Step 3 – Start drawing the body and legs in this step

We will be leaving the head alone for now as we focus on the body in this step of our guide on how to draw a hippo.
The body will be quite short and round and will begin by the left-hand ear of the hippo. The legs will then be very short, thick and have three toes. Finally, you can draw a rounded belly between them.
Step 4 – Now add the other legs and some detailing

You’ve got the hang of drawing these hippo legs now, so you should have no problems adding the next two for your hippo drawing now!
The first leg will go beside the front leg that you drew in the previous step, and the other will go behind this one.
Before moving on, you can also add a small, bent tail and some lines on the body for some wrinkles.
Step 5 – Next, draw some eyes and facial details
We will again be focusing on the face for this step of our guide on how to draw a hippo. The eyes will be quite simple, and you can draw them as small circles.
Some more black circles for the pupils will finish them off, and you can also draw some eyelashes coming off of them.
Finally, you can draw two black ovals for the nostrils, and then add a curved line to the bottom of the open mouth. That’s all there is to it for this step!
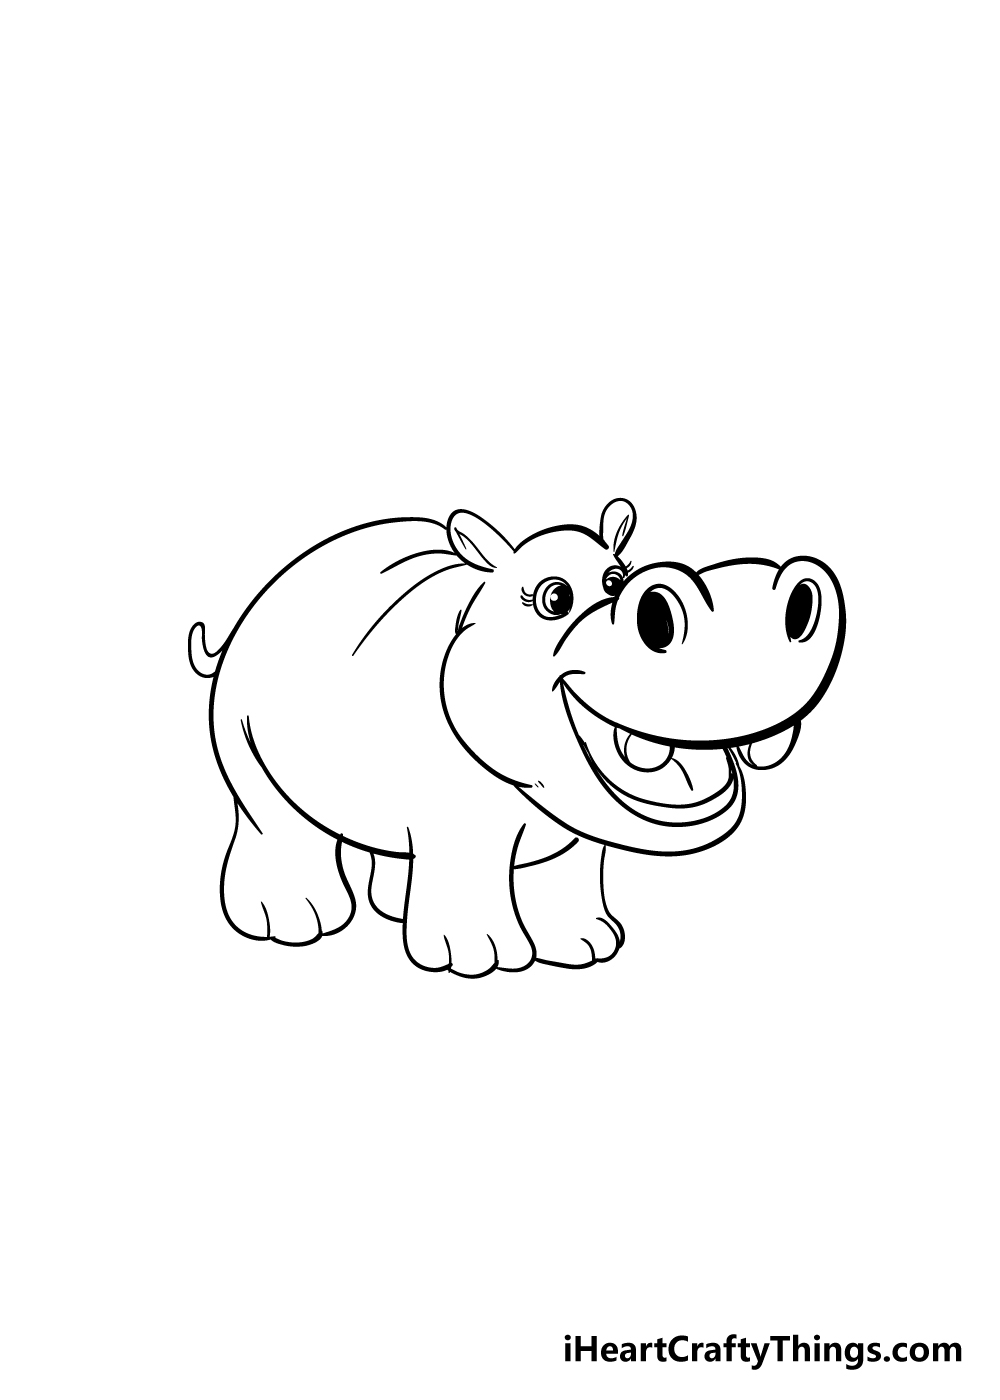
Step 6 – Now, add some final details

You’re almost ready to start coloring in your hippo drawing, but before you do there are some small details that you can add to finish off the drawing.
First, draw a small circle inside each toe for some big round toenails for your hippo.
Once you have these toenails drawn you can add some small round spots to the body for some extra detailing.
Then your drawing is pretty much done, but you can add some of your own touches before moving on! You could create a beautiful background, perhaps a waterhole where this hippo is hanging out.
You could even draw some more animals to the scene if you’re feeling creative! What extra touches can you think of for this hippo drawing of yours?
Step 7 – Finish off your hippo drawing with some color

For this part of your hippo drawing, it’s time to show off what you can do by coloring in your amazing picture!
In our example image, we used a bluish-grey to color in our hippo, but you should feel free to choose any colors you like for this picture!
Even if you stick to more muted, realistic colors for this hippo, there are still ways that you can inject some beautiful, bright colors into the mix.
You could do this by coloring in a nice background for the image, or perhaps by adding some colorful birds around the hippo for some amazing color contrast.
You can also play around with art mediums like watercolors, acrylic paints, colored pencils and more, so we can’t wait to see what you do!
3 More tips to make your hippo drawing easy!
Have some lazy drawing fun as we make this easy to draw hippo even easier!
Even though this easy to draw hippo is done in a cartoon style, we still managed to squeeze in a lot of details.
Now that you have worked through the guide, you will have a good sense of the details you find the trickiest.
If you want to try and make it easier on yourself, you can modify or even outright remove certain details.
This can be done to make it easier, but it can also be done to make the image suit your preference more.
It’s up to you to decide which details you will alter, so what will you potentially change?
For people who love drawing, they will often have a style that they feel most comfortable with. If you have such a style, you could use it to change the design of this drawing of a hippo.
For instance, you might enjoy drawing in a simple and stylized cartoon format. If that is the case, you could change the design to suit that style.
Some people even like to draw in a more detailed and true to life way, so that could be another way to change it. It all depends on what you personally find easiest.
What style would you like to create here to make this hippo drawing easy for yourself?
Finally, no matter what kind of style you draw this hippo sketch in, you can use the real thing to make it easier. Most of us don’t have hippos in our backyards, but you can find photos in many places.
Either by looking online or consulting nature books, you can find many pictures of hippos. Some may even be posed similarly to the one in our guide!
Once you have some photos to work with, you can use them to help you with the proportions, posing and details. As we mentioned, this could be adapted to any style you choose for this hippo.
Then maybe you can even create new poses!
Your Hippo Drawing is Complete!
With all 7 steps completed, you have finished this guide on how to draw a hippo! You started this guide with a blank page, and now you have an amazing hippo drawing in front of you.
Drawing challenges are always much harder when you go in blind, so we hope that this guide showed you how much easier it can be if you have steps to follow.
We also hope that it was a lot of fun for you, too!
Now you can make this drawing even more unique with your own details. Whether you create a background, draw other animals or use some new art mediums we know it will look amazing!
We hope you will visit us on our website, as we have many varied drawing guides for you to enjoy!
We upload new ones frequently, so be sure to check in often!
We would love to see your incredible finished hippo drawing, so please be sure to share it on our Facebook and Pinterest pages when it’s done!