There are many weird and wonderful beasts and monsters throughout different legends and mythologies around the world.
One of the most famous of these beasts is the mighty griffin, and it is typically believed to have originated from Greek and Roman mythology.
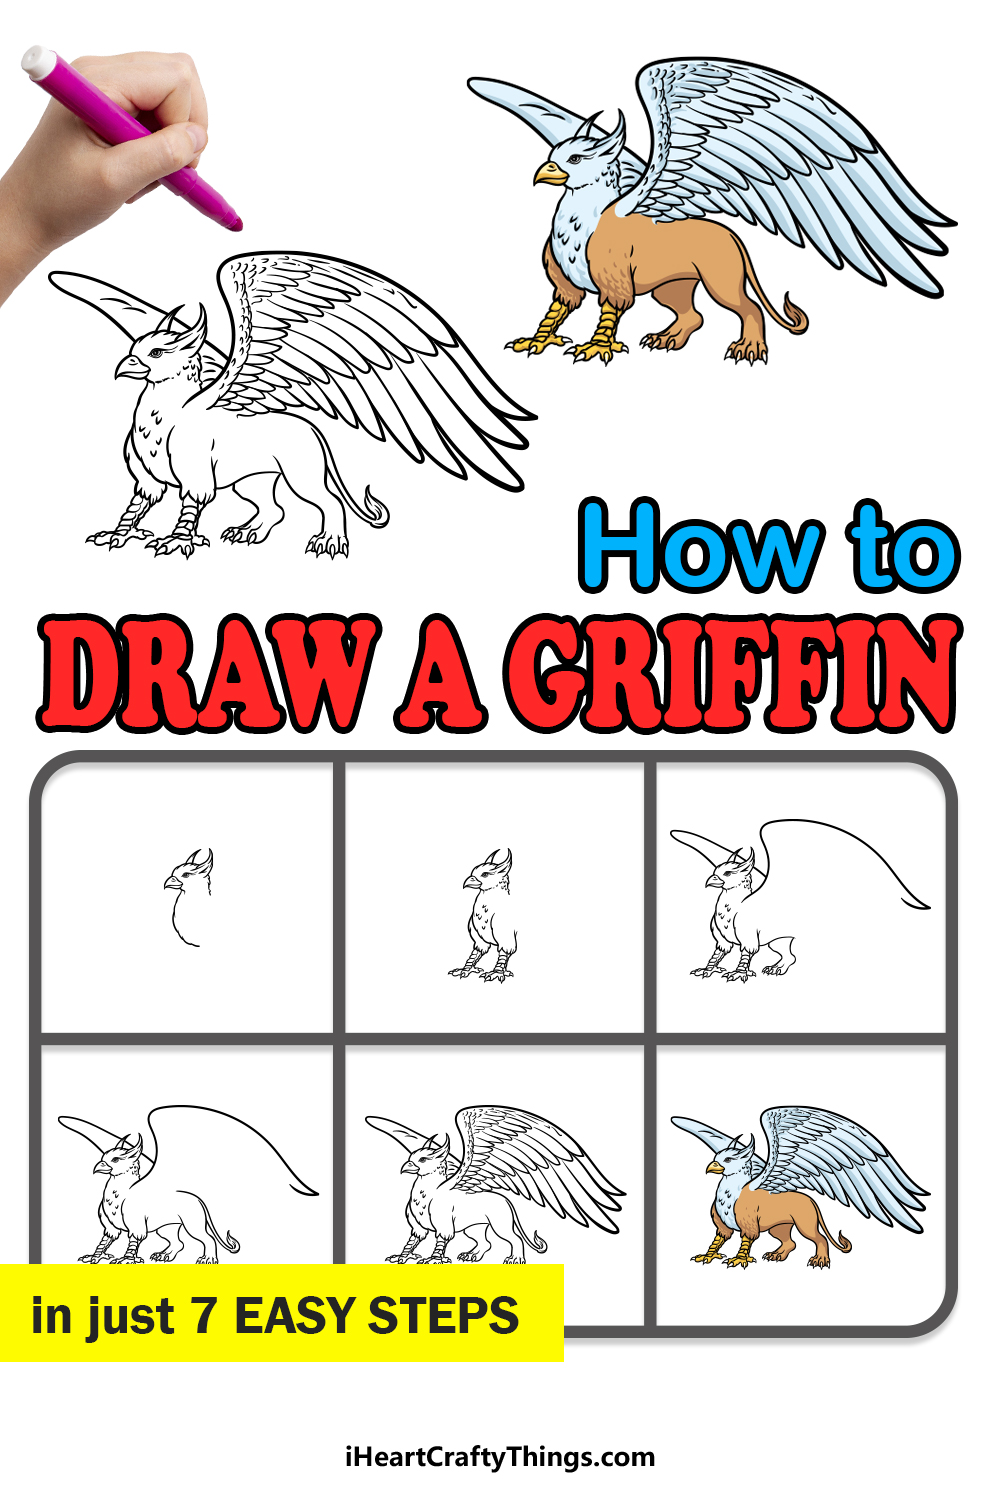
This creature has the body of a lion while having the head, wings and talons of a giant eagle. This means that it looks really cool, but it can also make it tricky to learn how to draw a griffin.
That’s what this tutorial is here for, and by the end of it you will see how fun and easy it can be!
We hope you enjoy working with us on this step-by-step guide on how to draw a griffin in 6 easy steps.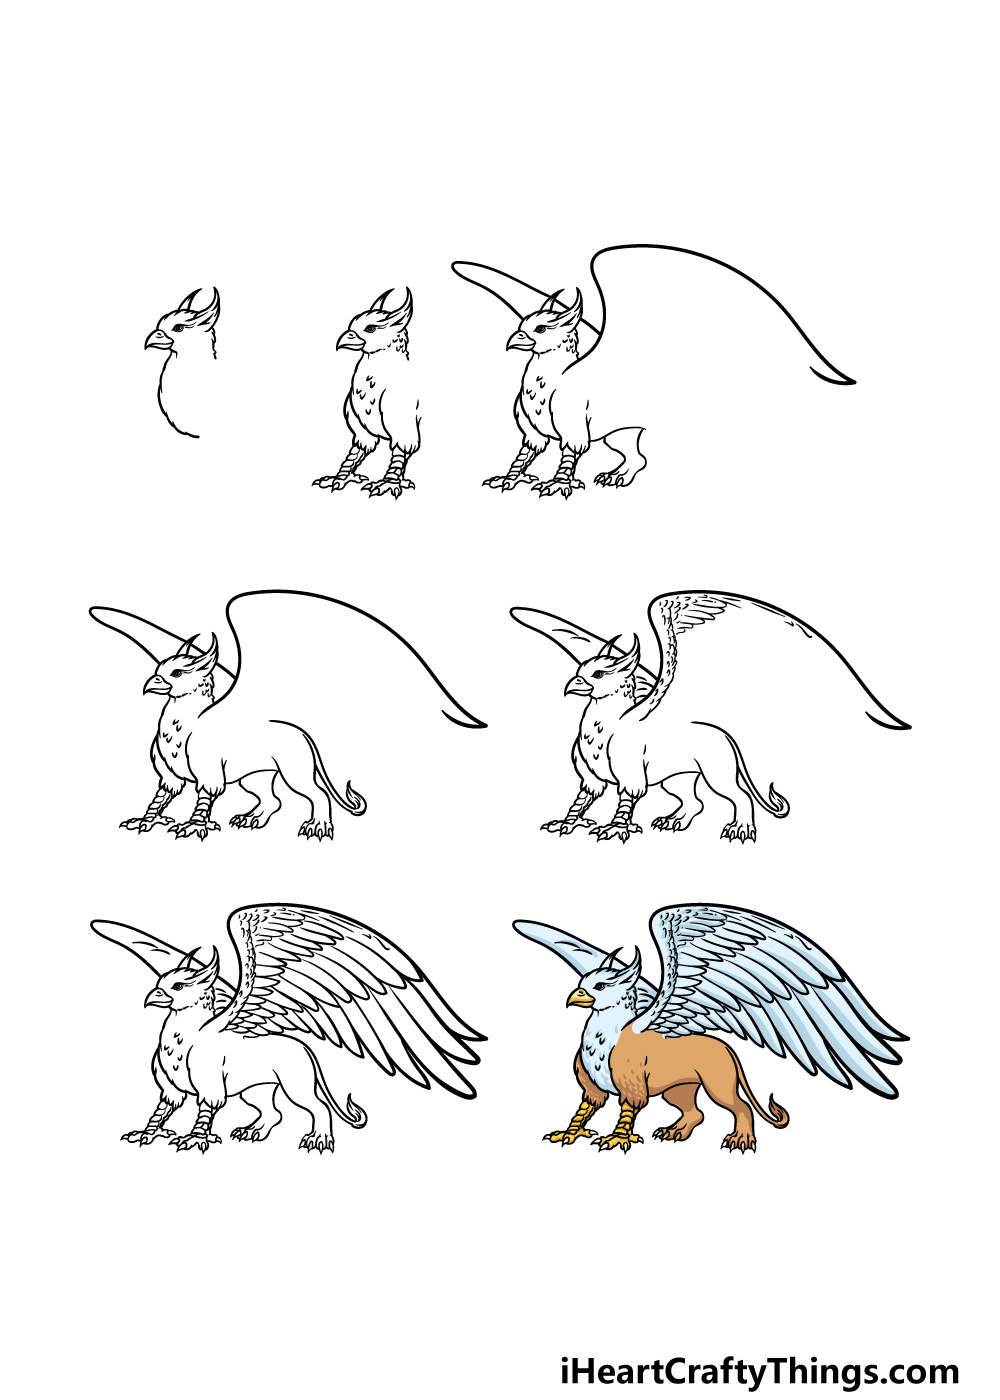
How to Draw A Griffin – Let’s Get Started!
Step 1
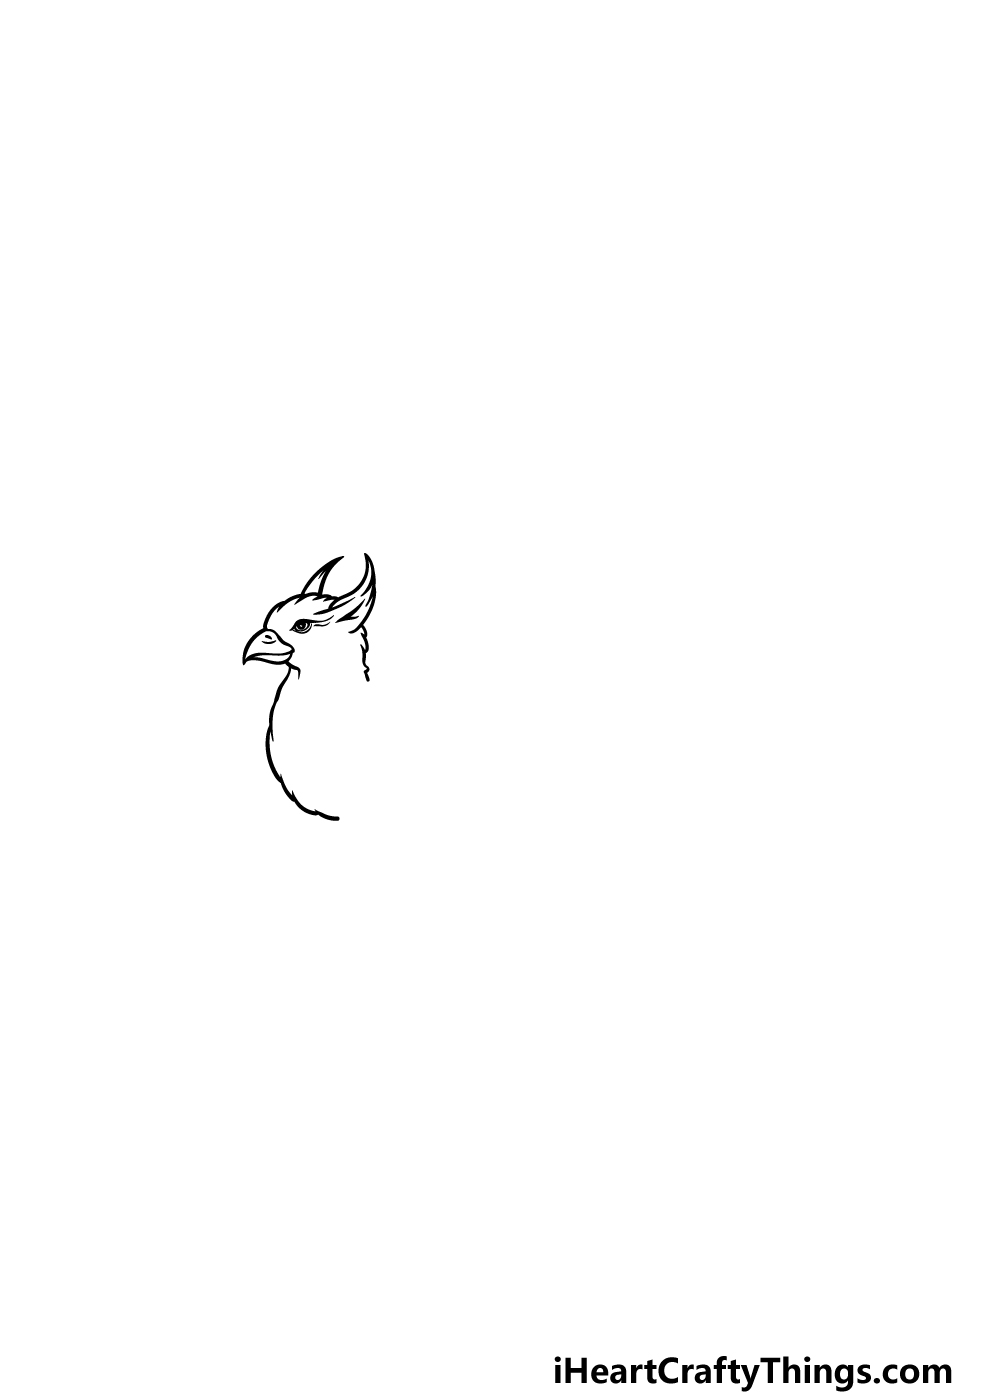
As we begin this guide on how to draw a griffin, we will first be drawing the head and beak of the beast. For the outline of the head and neck, we will be using a bumpy line.
This will be to give the outline a softer, more feathery texture to it. We will also be using some curved lines culminating in a pointy tip to give the griffin a nice sharp beak.
Finally, draw some eyes onto the face, and then we can finish off this step by drawing two pointy feathers poking off the top of the head.
Once all of these have been drawn, we can move on to the second step of the guide.
Step 2 – Draw the first legs and add some feather details
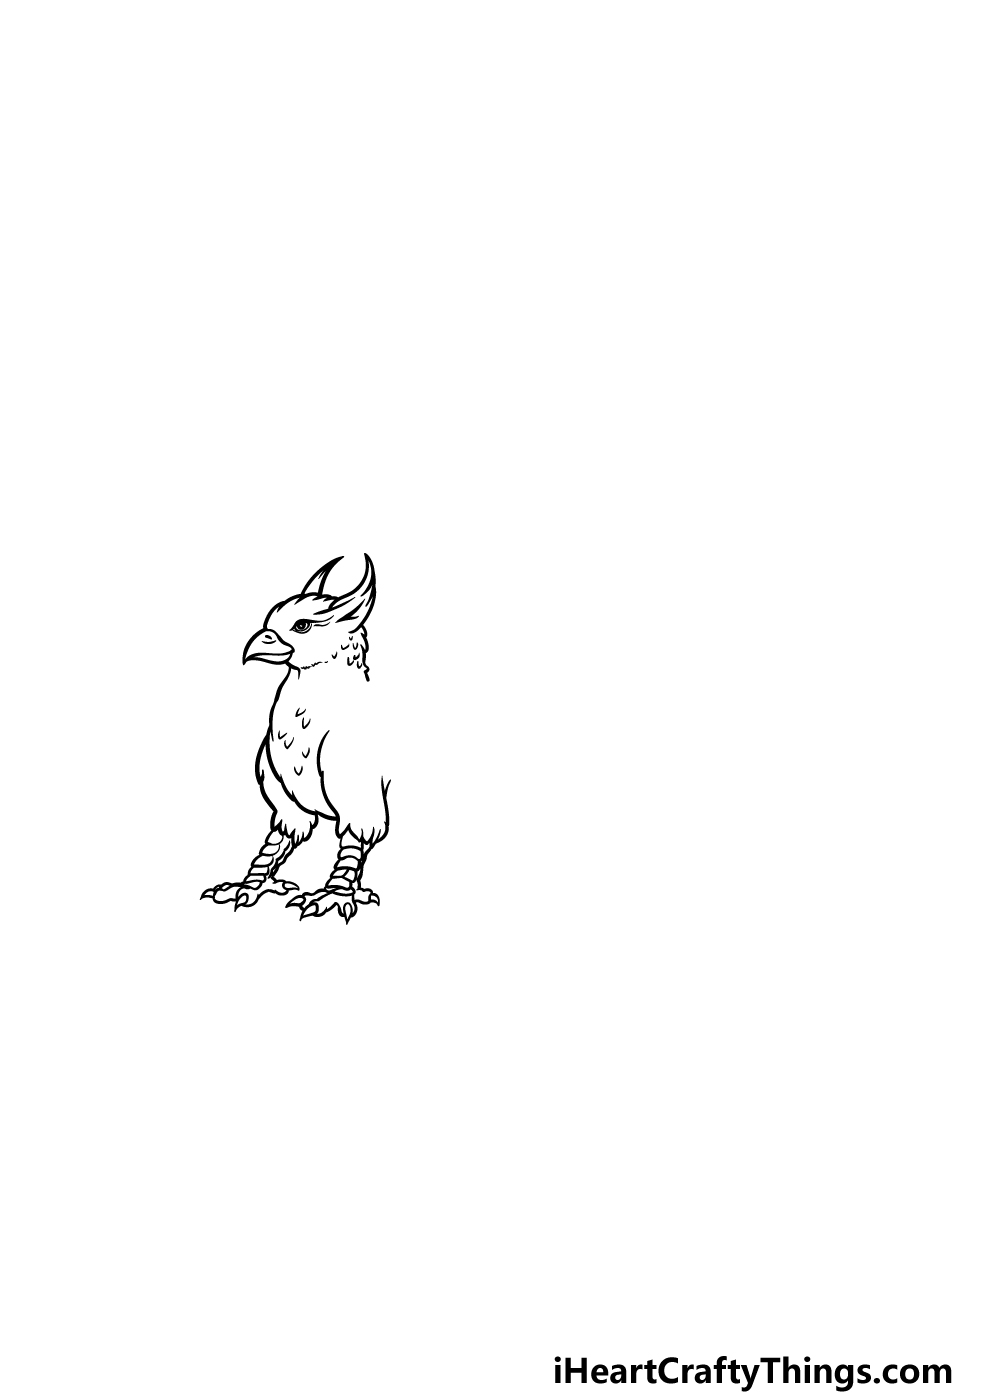
For this next part of your griffin drawing, we will be adding the front legs to the creature. As we mentioned, these will mostly be shaped like a lion’s legs, but the ends will culminate in some sharp talons.
Use some more bumpy lines to create the rounded, feathery tops of the legs as they appear in our reference image.
Then, we will be using lots of small shapes connecting to one another to make the wrinkly legs of the griffin, and finally you can draw the clawed talons at the end.
Step 3 – Add some wings for the griffin
Griffins are almost always portrayed with large and impressive wings, and that is what we shall be drawing in this step of our guide on how to draw a griffin.
For now, we shall simply be drawing the fronts of the wings.
The first one will extend up and backward from the base of the head, and as seen in the reference image it will have a rather impressive size to it.
Draw another curved line for the wing outline on the other side, and then you can finish off by drawing another leg underneath.
Add some feather details to the chest, and then we can proceed to step 4!
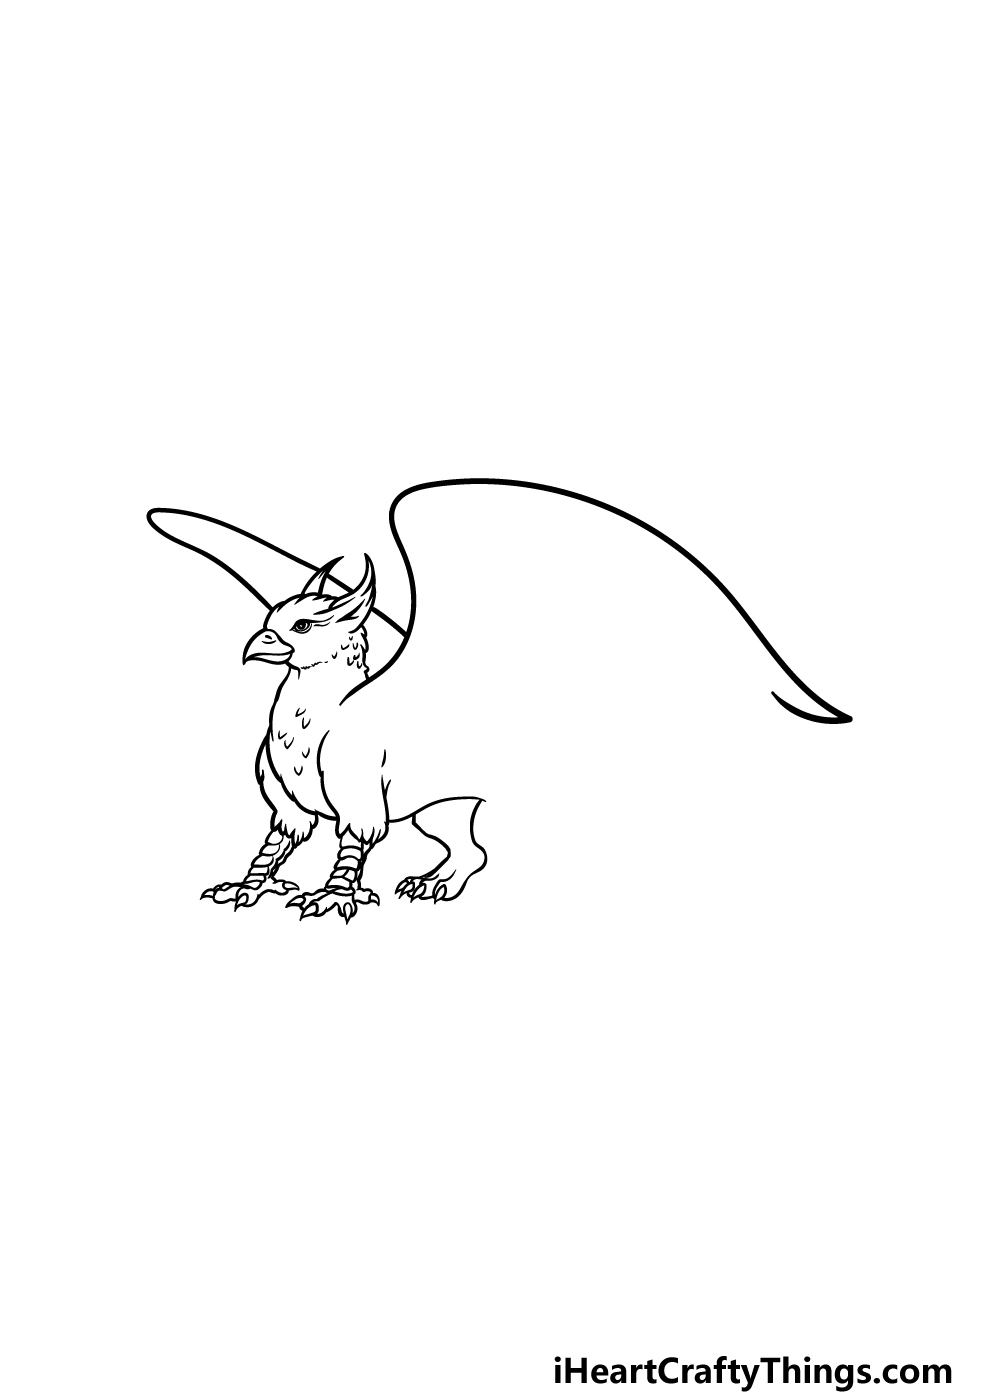
Step 4 – Now draw another leg and more of the body

This part of your griffin drawing will see you adding the final back leg for the creature. Use some more curved lines to draw the other back leg next to the other one.
This will also be connected to the rest of the back of the griffin, and the tail will also be flowing backward from it.
There will still be a space between the wing and the back of the griffin, but we will fill that in soon!
Step 5 – Draw some details for the wings
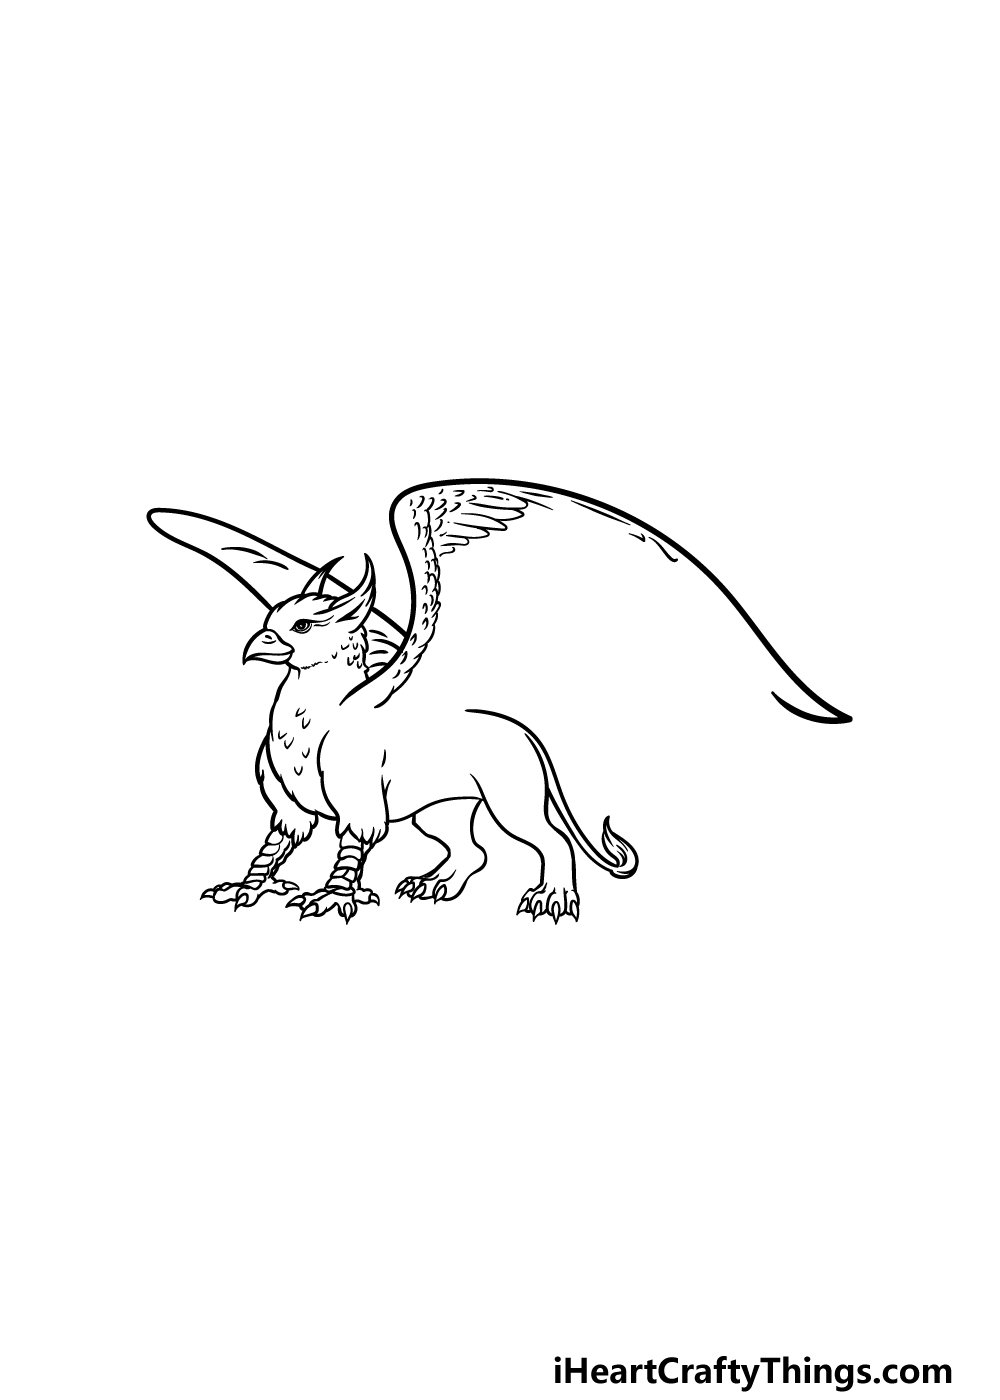
Continuing with this guide on how to draw a griffin, we will now be adding some more feather details for the wing of the griffin.
To do this, draw lots of little curved lines all along the edge of the front of the wings. As you get nearer to the top of the wing, these lines can get larger and longer to make them look like bigger feathers.
Once these have been drawn, we will be ready to add some final details in the next step of the guide!
Step 6 – Now, add the final wing details for this griffin
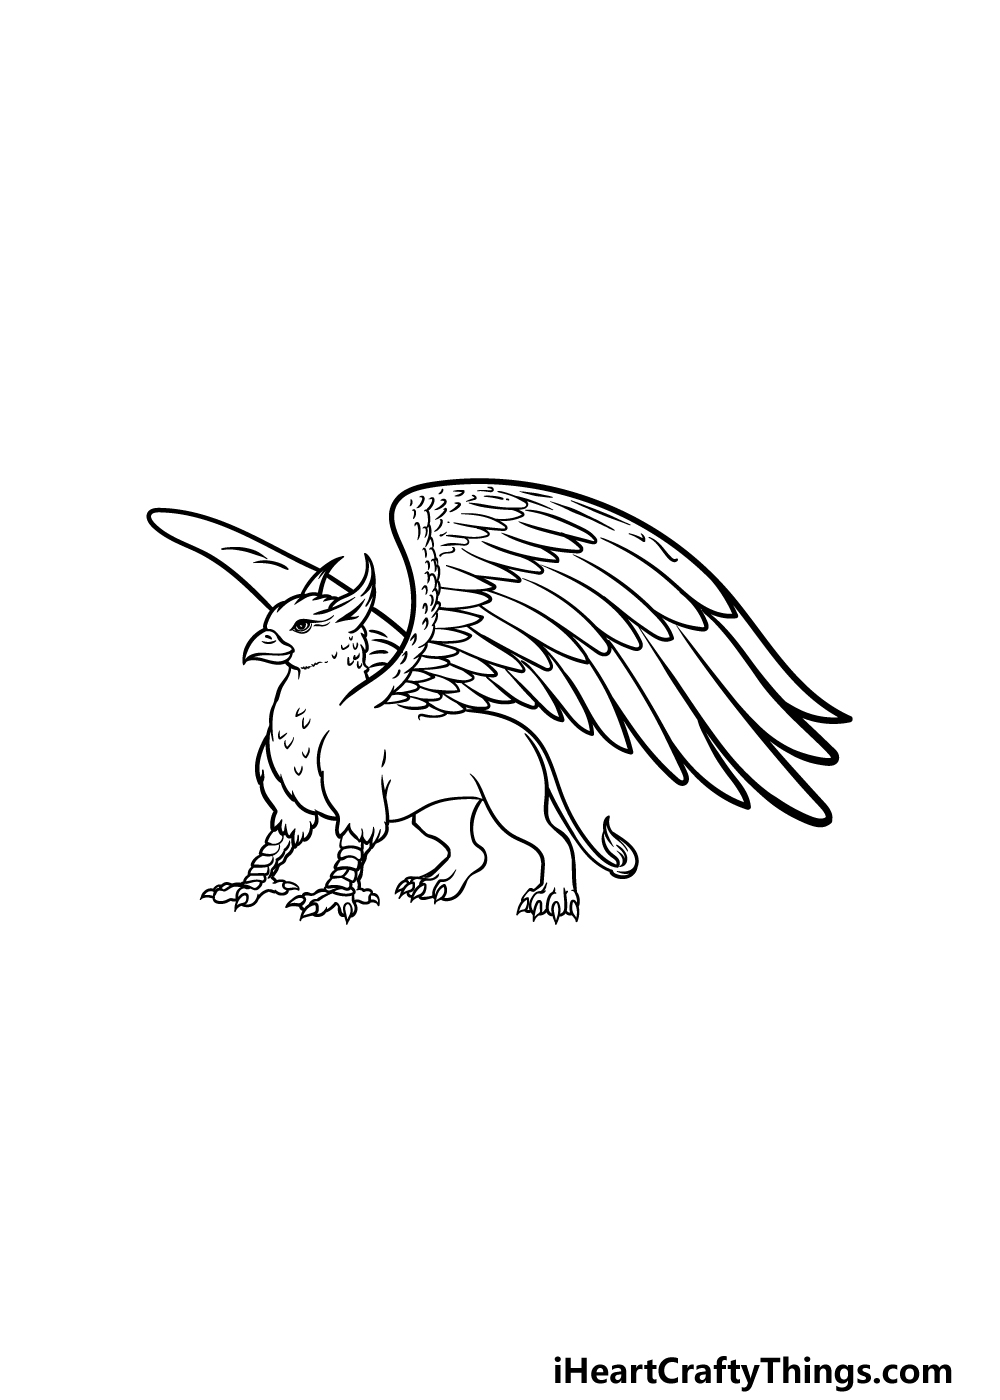
You’re almost ready to move to the final step of this griffin drawing, but first we have a few elements to add.
The main thing that we will be doing is drawing the rest of the wings, and we will do this by using many more long, curved lines to create more feathers.
These feathers will be significantly larger than any of the others that you have drawn so far, and they will fill in the final space between the body and the wing.
Once the outline is finished, you could also add some details and elements of your own!
Perhaps you could draw a background or add some more mythological creatures to go with it for a few ideas. What can you think of to finish off this image before the final step?
Step 7 – Finish off your griffin drawing with some color
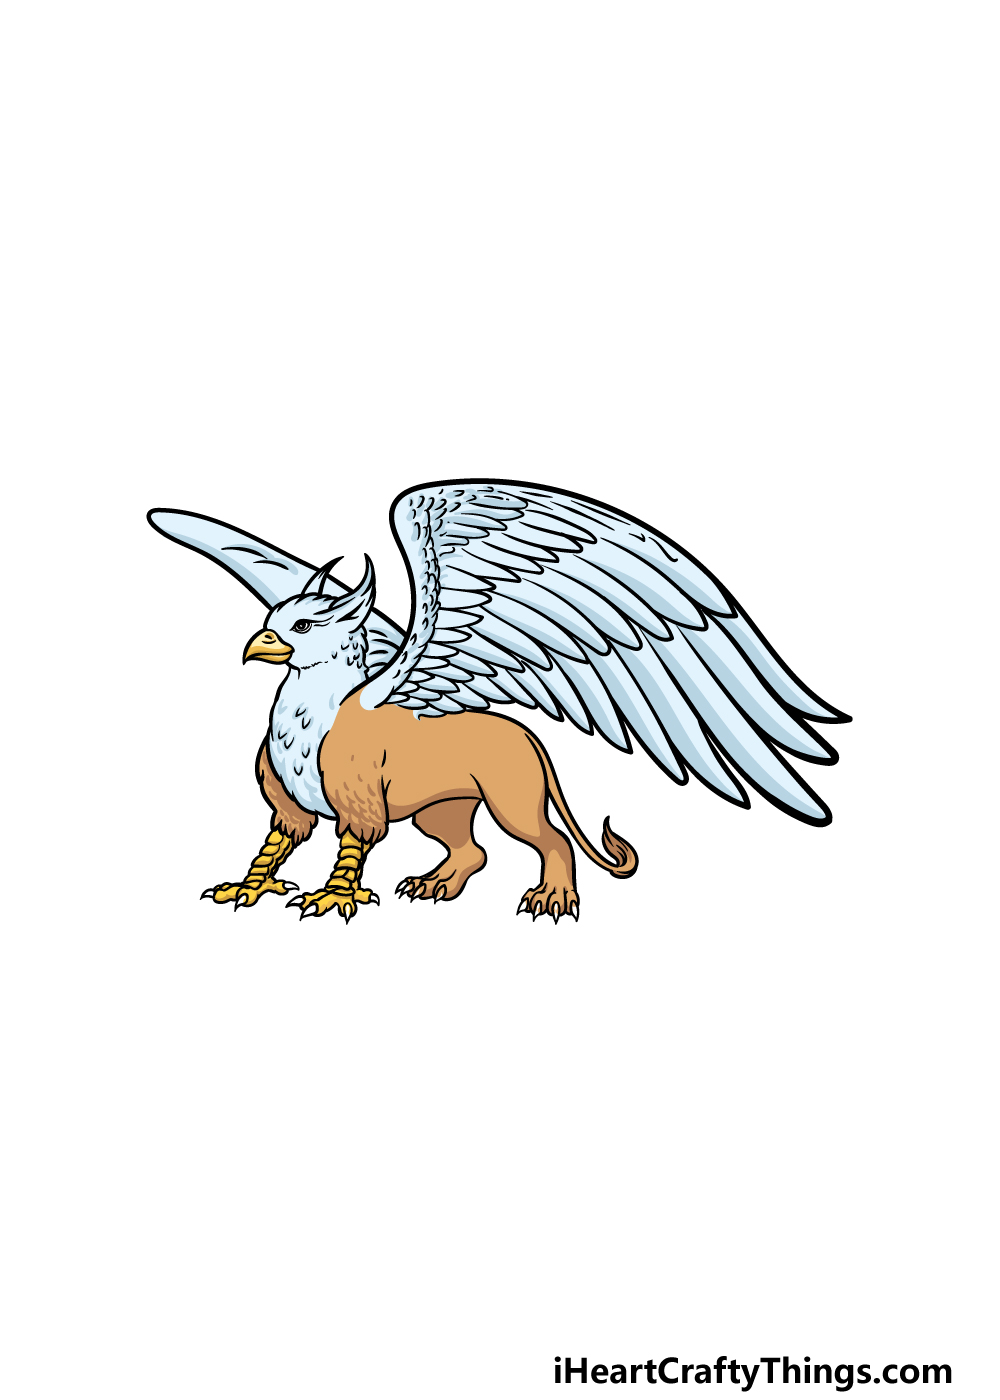
This is the final step of our guide on how to draw a griffin, and in it we shall finish it off by adding some colors.
In our reference image, we used a light, tan brown color for the lion portions of the body.
We then used some yellow for the eagle parts of the legs and beak, and then we finished off by using light blues and greys for the feathers on the head and neck.
You could use similar colors tours if you like this color scheme, but what other colors and art mediums can you think of to use?
Here’s how you can make your griffin drawing even better…
Make this griffin sketch even more majestic with these 4 fun and easy tips we have for you!
This drawing of a griffin you have worked on already has some great details, but it could look even greater with a few more!
A good place to start would be to add some texture lines on the wings and body.
You could do this with a series of small, curved lines to create a look of fur and feathers. These will help to make the griffin look even more realistic.
Once you really have the hang of drawing this griffin, you could change certain aspects to make it more unique to you. This could be as simple as having the head facing the opposite direction.
Or, maybe you could have the wings spread out more or perhaps even folded in. you could make this easier by looking at pictures of real bird wings to help you out.
Changes like these may seem small, but they can help to personalize your drawing even further.
Another way to really take your griffin drawing to new heights would be to add a background. Griffins are fantasy creatures, so this means you could create any background you can imagine!
It could be a setting based on a book or movie world, or you could create and design your very own fantasy setting.
No matter what you may create, any background will help to make this picture even more fascinating, as it will help to create a sense of place.
Finally, you may want to add even more mythical creatures to this griffin sketch. You would certainly have many to choose from!
These could include creatures such as unicorns, dragons or something more unusual like a basilisk. If you have some favorite fantasy creatures, this is your chance to add them to this artwork.
If you need some help drawing these additional creatures, you could probably find some pictures online to inspire you as you populate this fantasy setting you have created.
Your Griffin Drawing is Complete!
We hope that you had a great time recreating this classic mythological beast during this guide on how to draw a griffin!
Our goal with this tutorial was to make it much easier for you so that you could focus on the fun of drawing with no frustration.
Now you can take over and show off your creativity by adding your own details, ideas and color choices!
When you’re ready for more, please visit our website, as we have plenty more drawing guides for you to enjoy there. We have more on the way as well!
Please also remember that we love to see how your artwork came out, so be sure to share your finished griffin drawing on our Facebook and Pinterest pages for us to admire.