When it comes to features on a building, it would be hard to deny that gargoyles would have to be one of the most and grotesque decorations you can find.
This is by design, however, as they have been used for many purposes.
Sometimes they are used to direct rainwater from roofs of buildings, and other times they were believed to be intended to scare away evil spirits from places of worship.
No matter the purpose, they at least do look really interesting, and it can be fun to learn how to draw a gargoyle!
If you would like to know how you can draw one of these intentionally hideous statues, then be sure to read on.
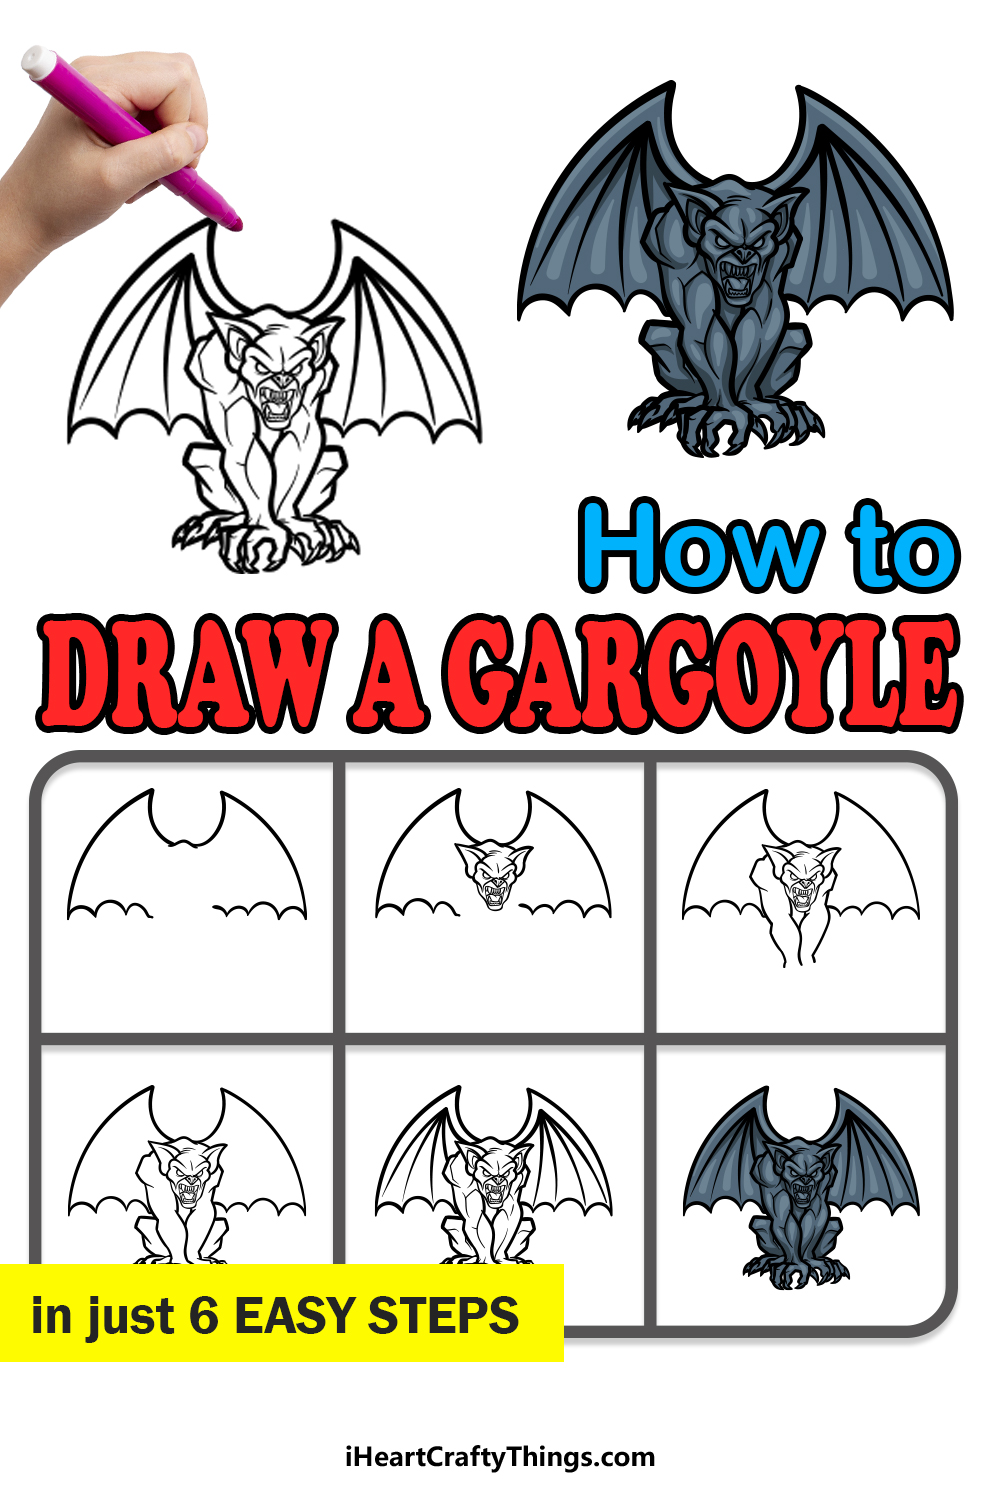
Our step-by-step guide on how to draw a gargoyle in just 6 steps will show you how you can do just that while having lots of fun!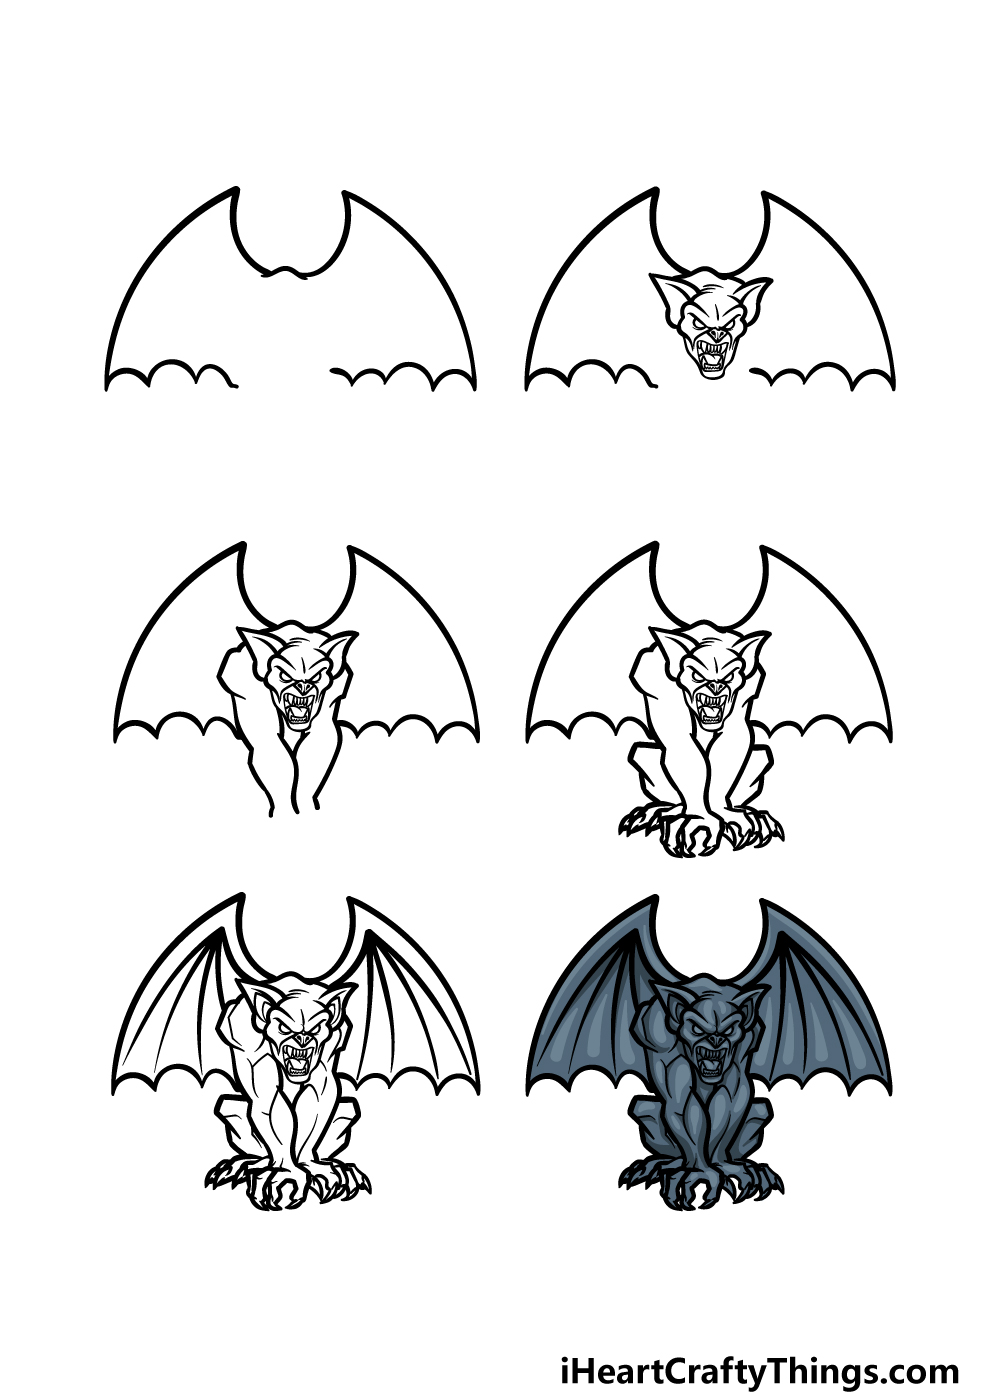
How to Draw A Gargoyle – Let’s Get Started!
Step 1
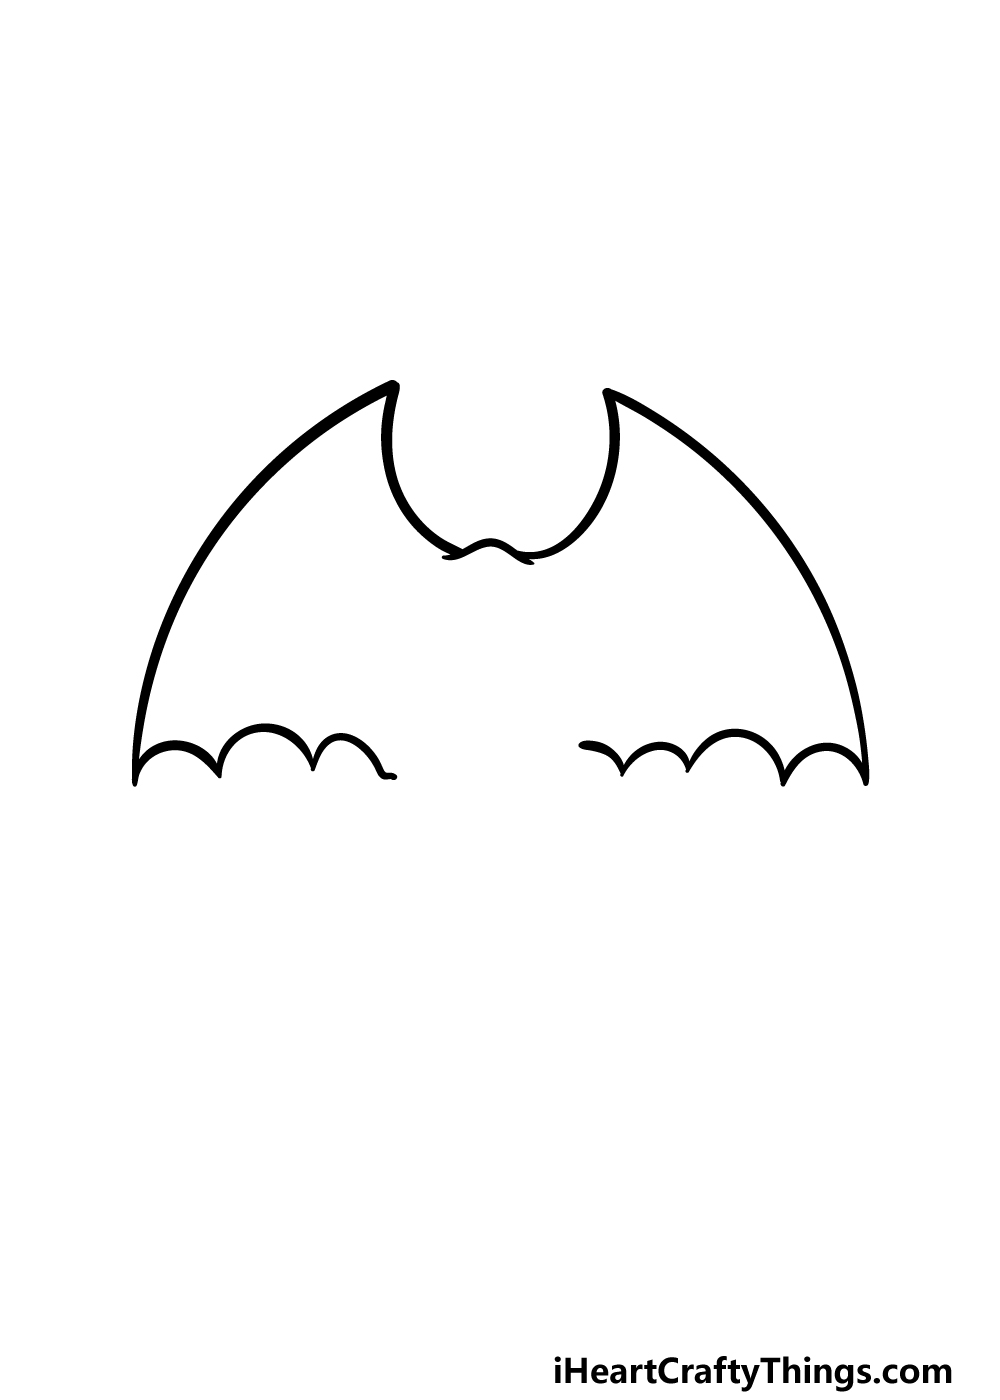
In this first step of our guide on how to draw a gargoyle, we will start with the outline for the webbed wings of the gargoyle.
These kinds of wings are quite common on gargoyles, and that’s why we will be adding them to this one!
First, draw a small, curved line that points upward a bit. This will form the back of the gargoyle, but we will finish drawing that in a later step.
For now, draw a curved line up from the back in the same way that we did in our reference image. Then, draw more curved lines down from these ones to create the sides of the wings.
Finally, finish off by drawing some shorter curved lines for the webbed base of the wings.
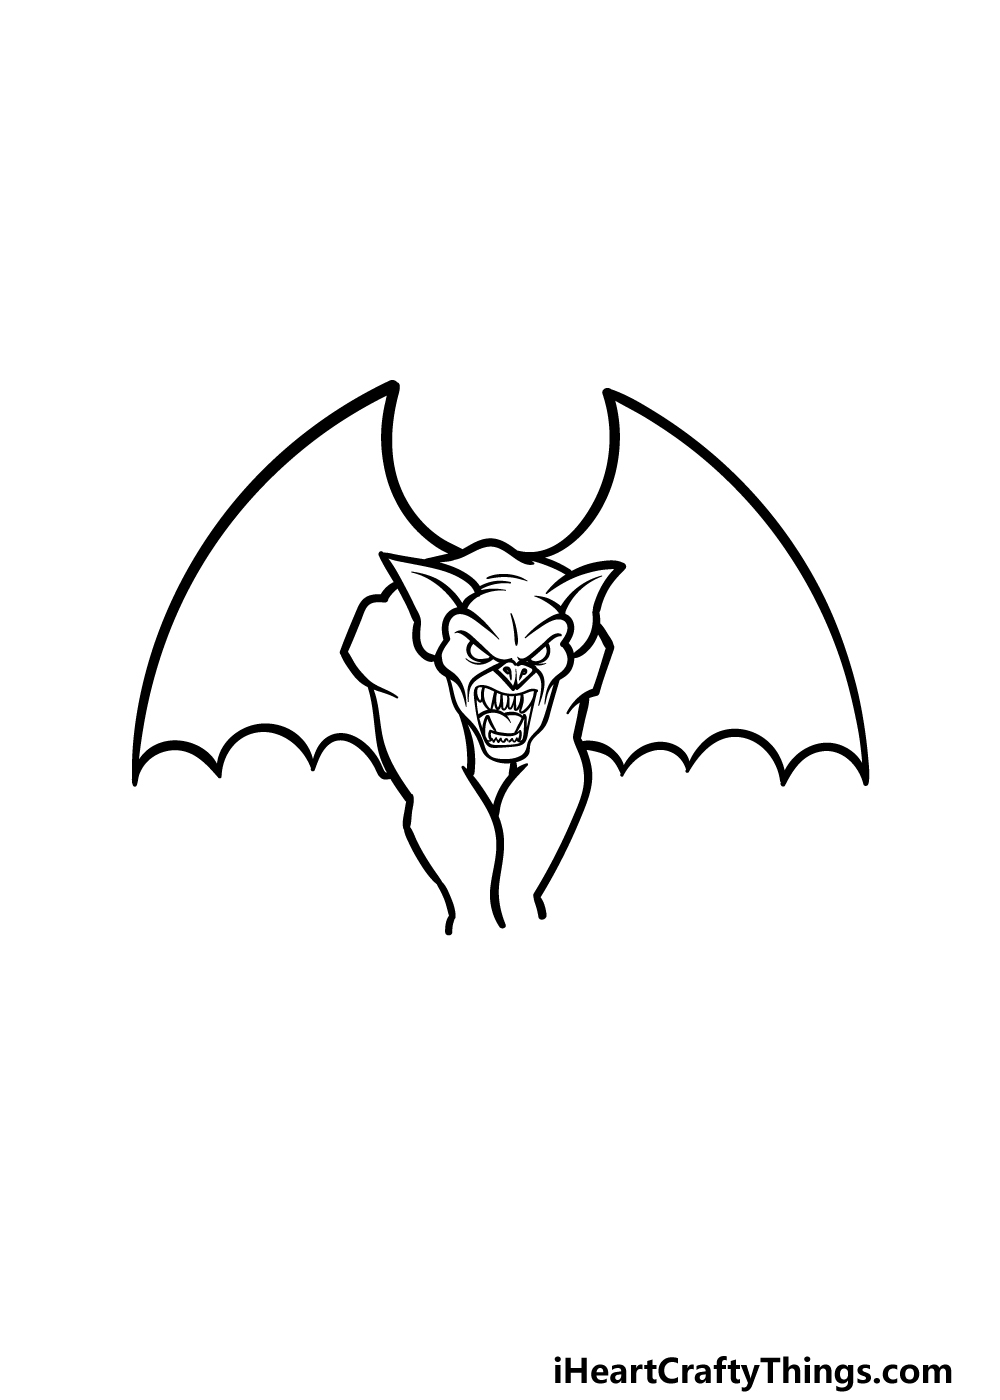
Step 2 – Now, draw the fearsome face for your gargoyle
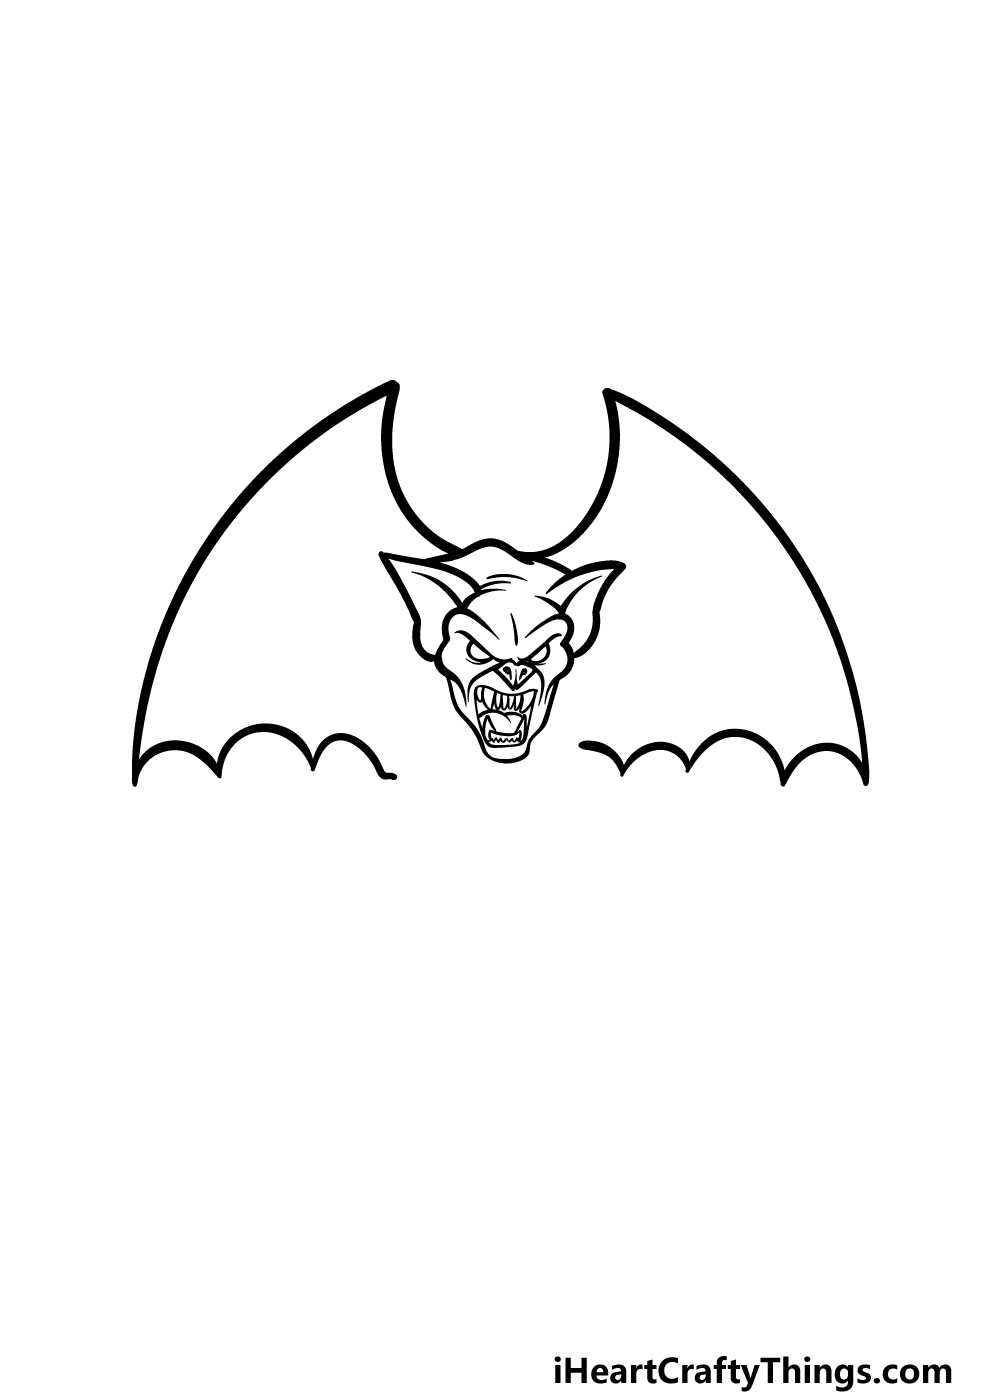
This second step of your gargoyle drawing will focus on the main attraction of this guy; the scary face!
The face for this gargoyle is very much inspired by that of a bat, so that’s worth keeping in mind as you draw.
You can start by drawing some large ears with pointy ears. We will then use some curve lines for the angry eyebrows of the bat which will have eyes with no pupils beneath them.
Finish off by drawing the bat nose and a mouth full of sharp teeth, and then it’s time to move on to step 3!
Step 3 – Next, draw the arms of the gargoyle
We are depicting a rather typical gargoyle pose in this step of our guide on how to draw a gargoyle, and that means that the arms will be extending down beneath it.
Because this gargoyle is made of stone, we will be making the arms of it quite angular.
Use some curved lines with a bit of an angle to them to create the shoulders, and then add the rest of the arms.
We will finish off the claws at the end in the next step, so don’t worry about the empty space left behind.
Step 4 – Finish off the outline for the gargoyle
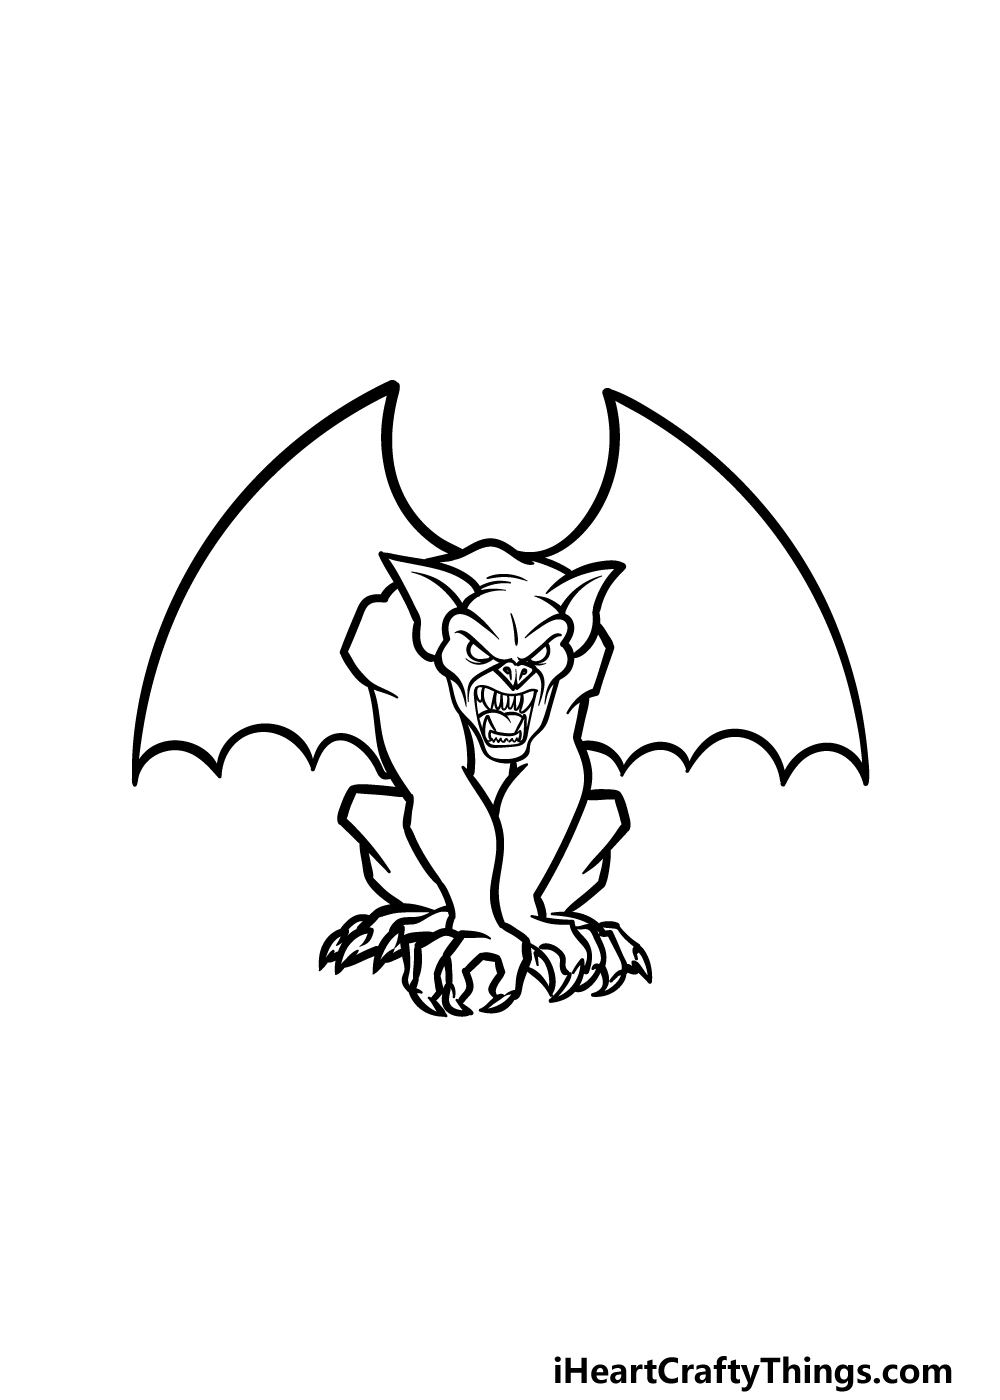
Before we add the final details to your gargoyle drawing, we must first finish off the rest of the outline.
As we mentioned in the previous step, we will be drawing some hands and feet at the ends of the arms.
These will be drawn with some curved and rounded lines, and we will also add some sharp nails at the ends of them.
Once these are drawn, we can add some final details and touches in the next step of the guide.
Step 5 – Add the final touches for your gargoyle drawing
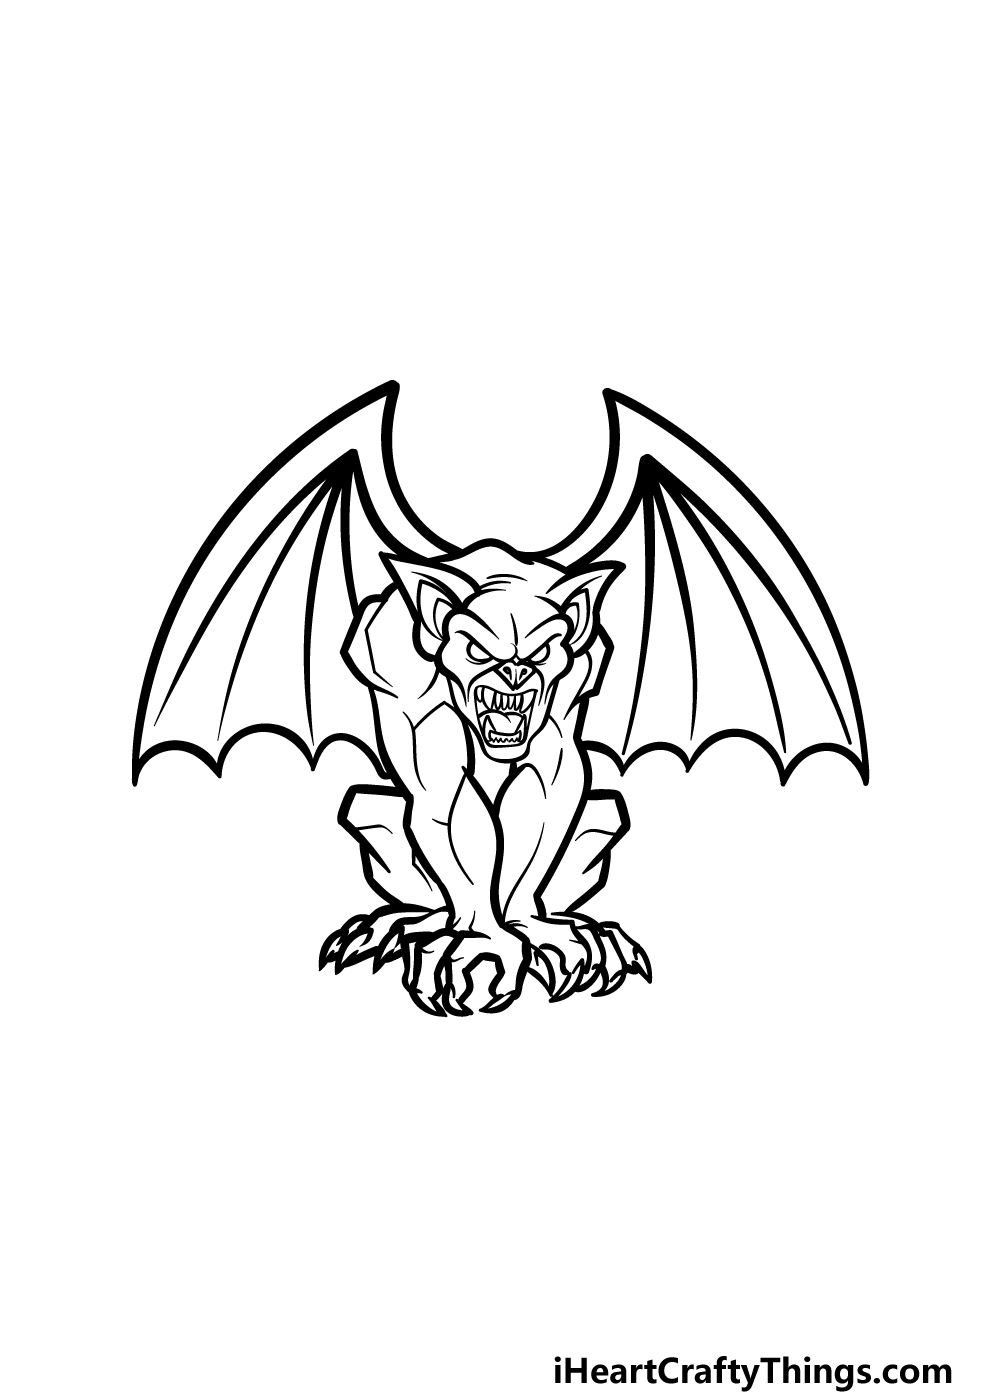
This picture is already looking great, but we can make it look even better as we add some final touches in this step of our guide on how to draw a gargoyle!
These details will be quite simple, but they will also be very effective. First, use some thick, curved lines near the edges of the wings, and then extend some other ones into the interior of the wings. The reference picture will show you what we mean!
That will finish off the bat-wing look of the wings, and then we shall add details to the body and limbs. Add some simple lines to the muscles and body, and these will give it some more form.
Once these are drawn, you could add some elements like a background! If you’re feeling ambitious, you could create a cathedral background for this gargoyle. What else can you think of that you could draw?
Step 6 – Finish off your gargoyle drawing with some color
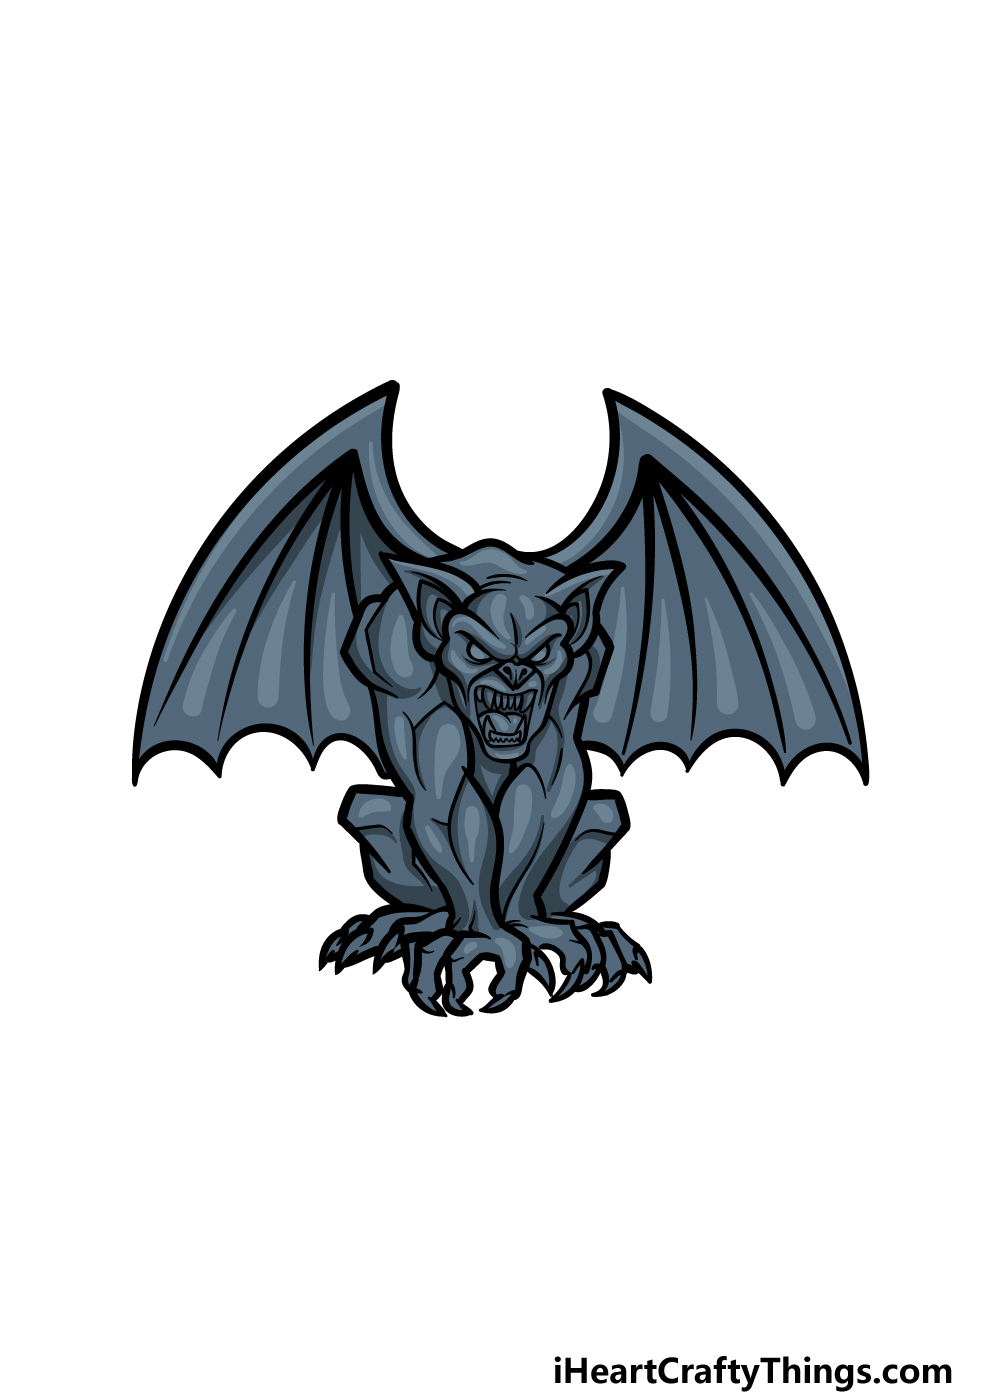
You have arrived at the final step of your gargoyle drawing, and in this one we shall be finishing it off by adding some color.
These gargoyles would usually be made of stone, so you can probably see why we chose the color scheme that we did for our reference image!
We used various shades of dark greys to highlight the stony effect of this image, and you can use this as an example for a similar look.
This is one approach that you could take for the colors, but you should also feel free to use any others that you would like!
Which colors and art mediums will you choose for this fearsome gargoyle?
3 More tips to make your gargoyle drawing easy!
Find out how to make this easy to draw gargoyle even easier with these 3 tips!
With this gargoyle drawing, we created quite a detailed design. We love the way it looks, but it does make it harder to draw!
If you’re having a hard time with it, you could make it easier on yourself by simplifying some of the details. You could do this by removing lines from the design, such as the ones for the muscles.
These would change the drawing a little, but you would still be maintaining the overall design of the gargoyle. What are some details you could simplify to make it easier for yourself?
Gargoyles are found on cathedrals around the world, and there are plenty of photos of these gargoyles. You could use some of these to help you as you draw this gargoyle sketch!
Photos of gargoyles can be found easily online, and you might even be able to find some that look similar to our example. Even if they look relatively similar, they could help you out.
If you happen to live near a big cathedral, you might even be able to use some real ones! Using real gargoyle photos will also help you if you want to create unique designs.
You will definitely find it easier to do if you have the real thing to refer to!
With any drawing that is a bit complex, you can make it much easier using your pencil. That can be true for this drawing of a gargoyle as well.
Using a light pencil, you could use some basic shapes to create the general outline of the gargoyle. Once you have these drawn, you will have an idea of the proportions.
With that taken care of, you can then start adding some finer details in layers with your pencil. When you are satisfied with the lines, you can then add some pen lines to finish it off.
You can plan as much as you need with your pencil, and by the time you’re done no one will ever know they were there!
Your Gargoyle Drawing is Complete!
Gargoyles may be quite scary in real life, but hopefully this step by step guide on how to draw a gargoyle wasn’t scary to work on!
We aimed to give you a really cool gargoyle to draw, but we also tried to make it so that drawing it would be fun and easy.
If you follow all of the steps and try your best then you will definitely be able to complete this drawing!
Remember that you can also bring your own creativity to this image.
We spoke about a few ways that you could do this, but there are endless ways that you could go about putting your own spin on it. What ideas do you have for this picture?
If you had fun with this drawing challenge, be sure to find your next drawing guide on our website! We have tons for you there and have many more coming out soon for you.
We would be thrilled to see your completed gargoyle drawing, so please do share it on our Facebook and Pinterest pages for us to enjoy.