There are many artists who remain popular and relevant many years after their passing. Their artistic legacy lives on, and their works continue to inspire new art lovers every day.
Frida Kahlo would be a great example of this. Her work went relatively unappreciated in her own lifetime, but it has since come to be heavily appreciated and seen as highly influential.
She was noted for her self-portraits, so learning how to draw Frida Kahlo seems only fitting to recognize her legacy!
If you love this incredible artist and her work, this will be a tutorial that’s not to be missed.
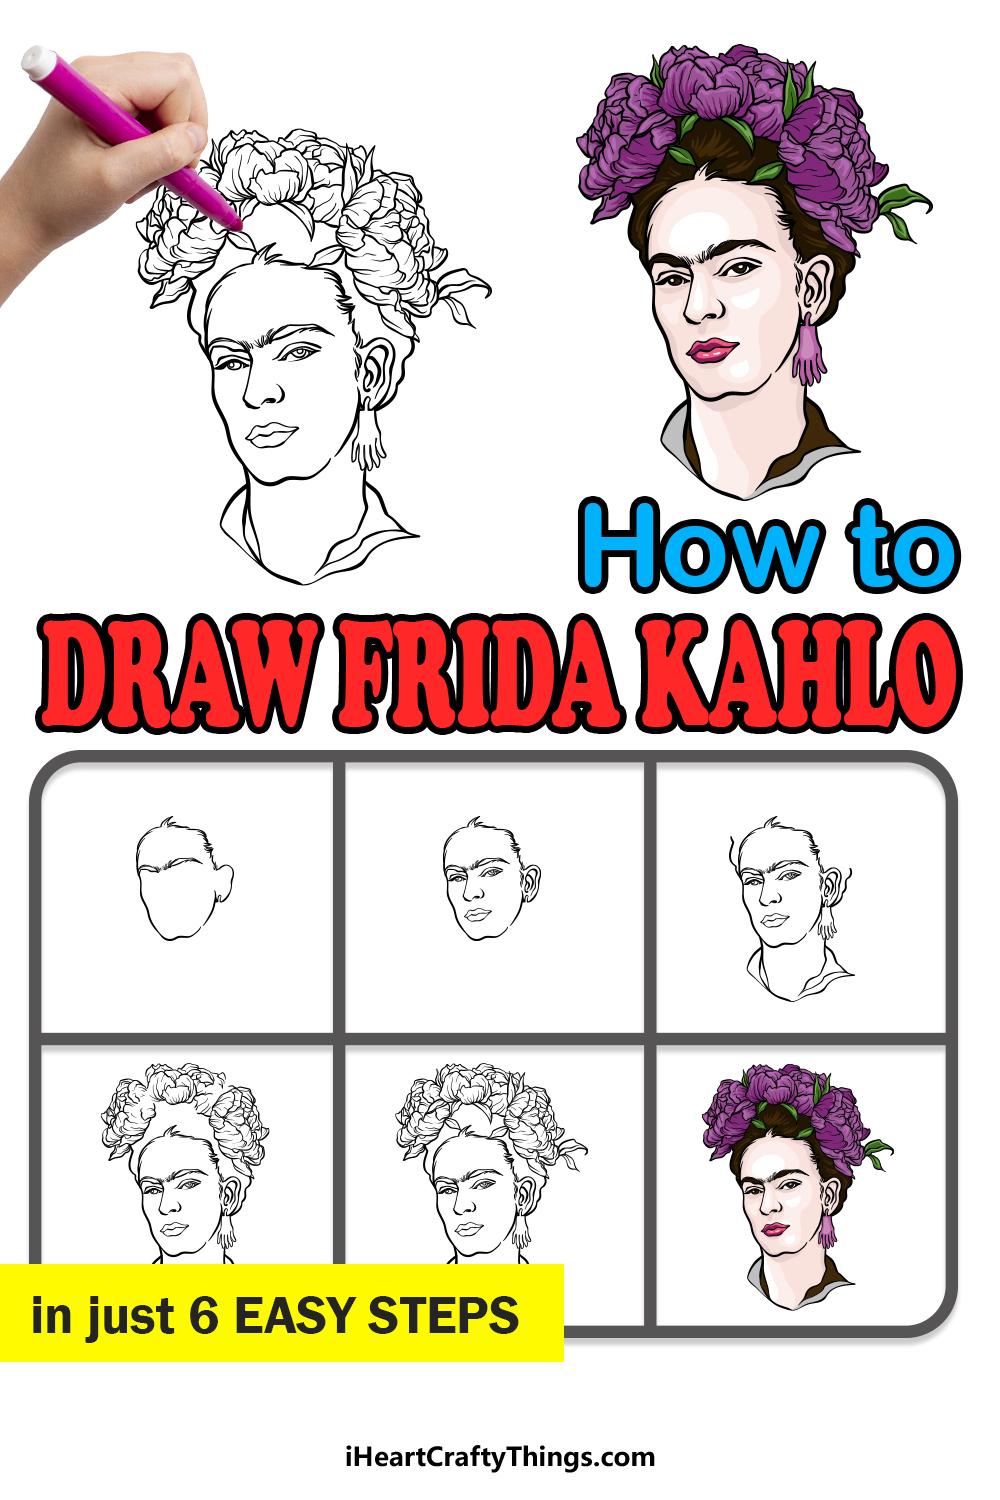
Our step-by-step guide on how to draw Frida Kahlo will show you how to create an incredible portrayal of this wonderful artist.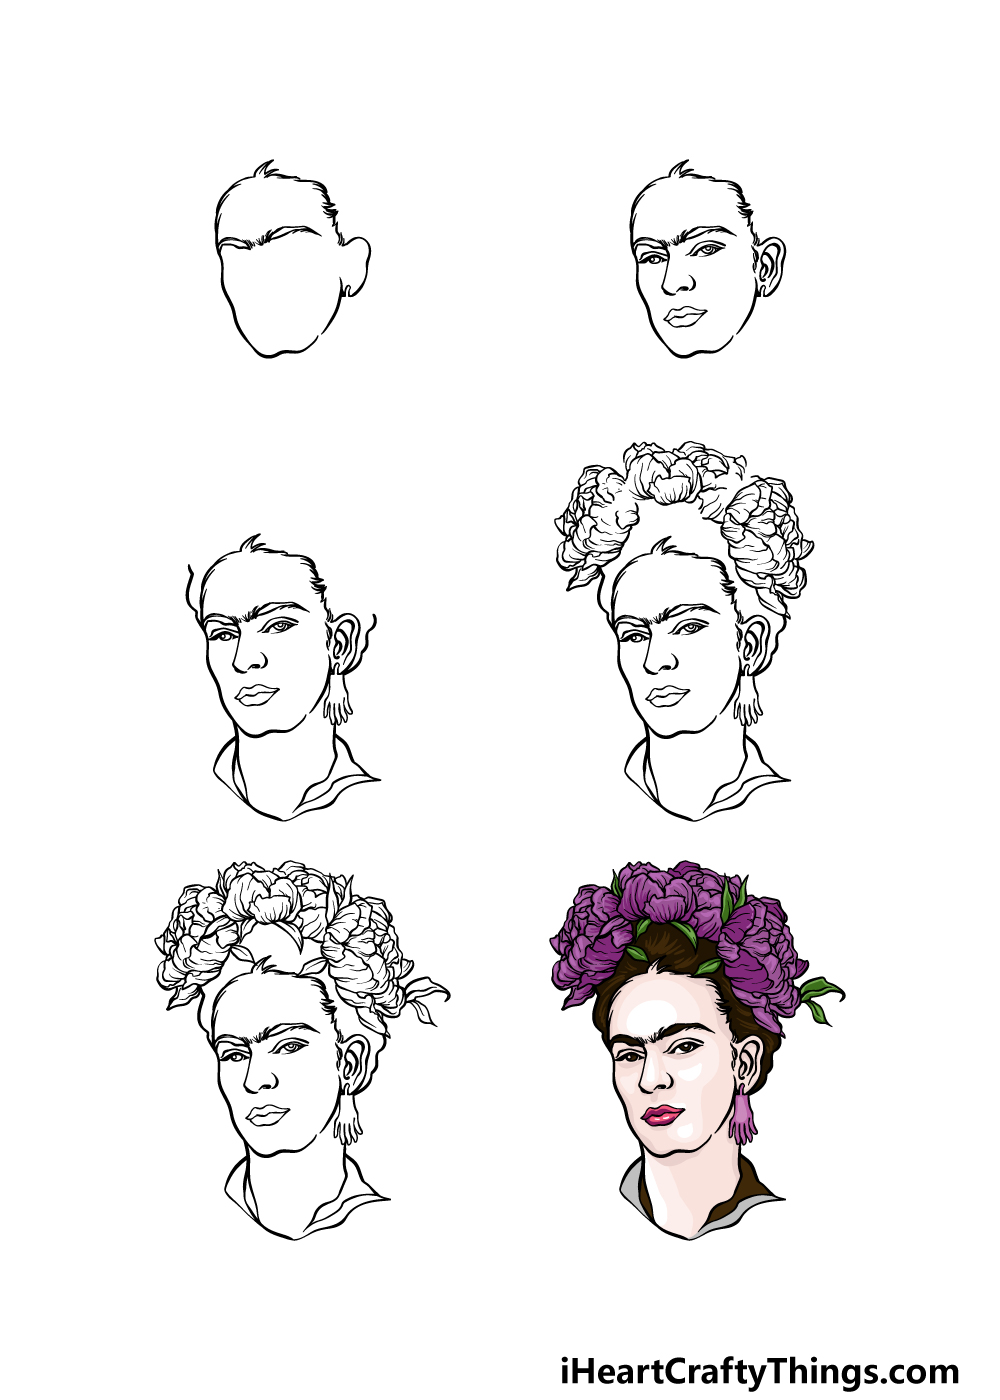
How to Draw Frida Kahlo – Let’s Get Started!
Step 1
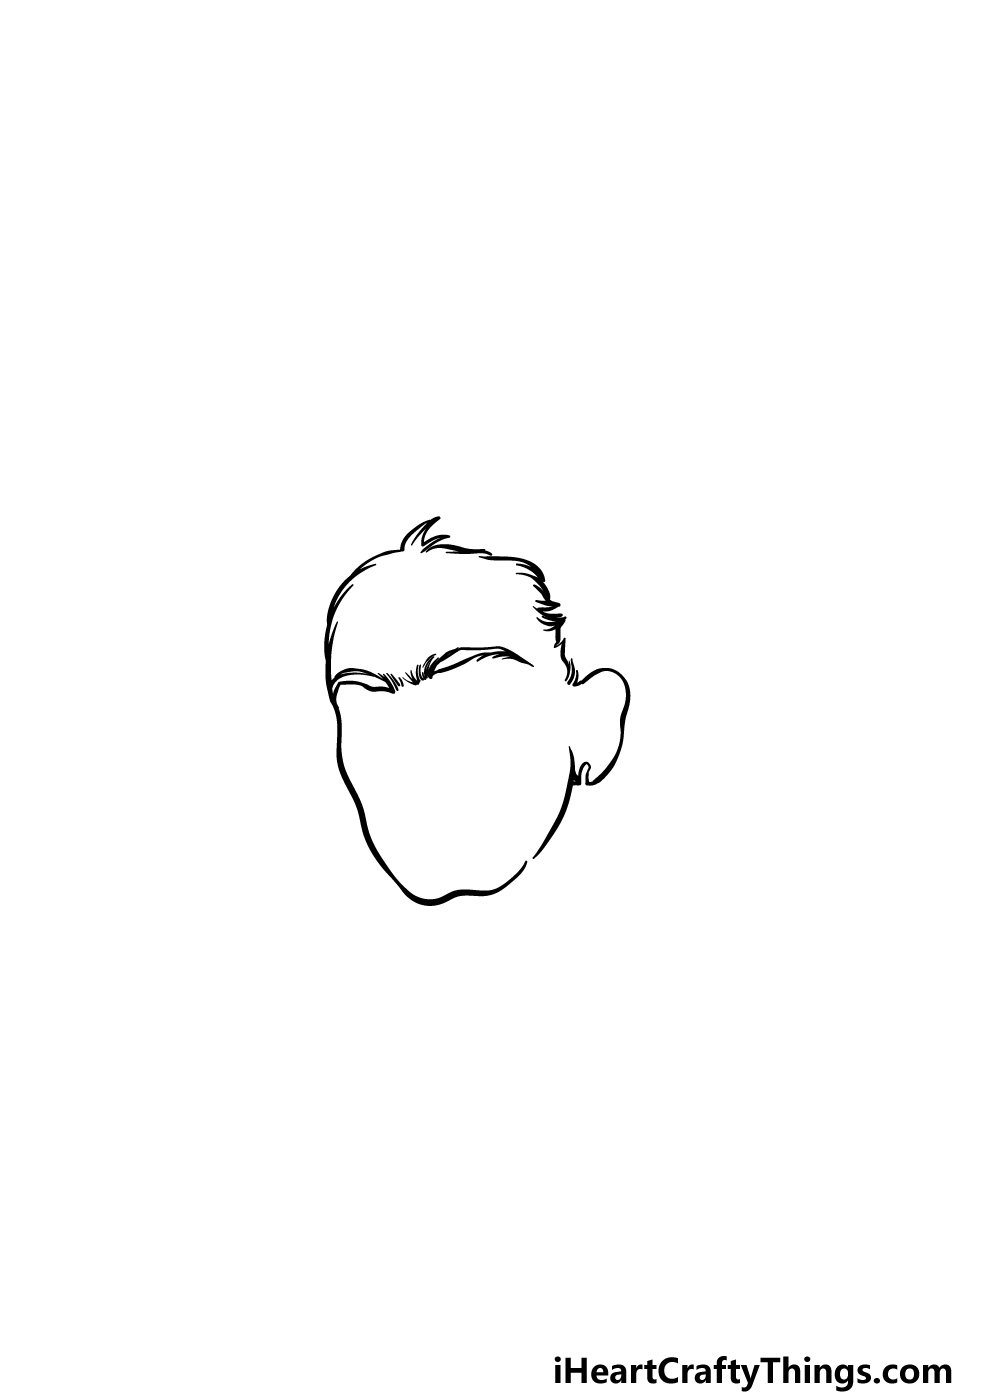
Drawing real people can usually prove to be quite a challenge, and this is especially true when dealing with someone as distinctive looking as Frida Kahlo.
To make this easier, we will be taking it step by step and dealing with various elements separately. For now, we will focus on the outline for her head and a few finer details.
For her face outline, we will be using a smooth line for her face, chin, jaw and ear. We will also be drawing her hairline in this part, and this will be drawn using some smaller, sharper lines.
Then, we will be drawing her eyebrows. Her eyebrows are rather thick and distinctive, and we will also be adding some small lines in between them, as shown in our reference image.
With these elements drawn, we can then move on to step 2.
Step 2 – Now, draw some facial details for her
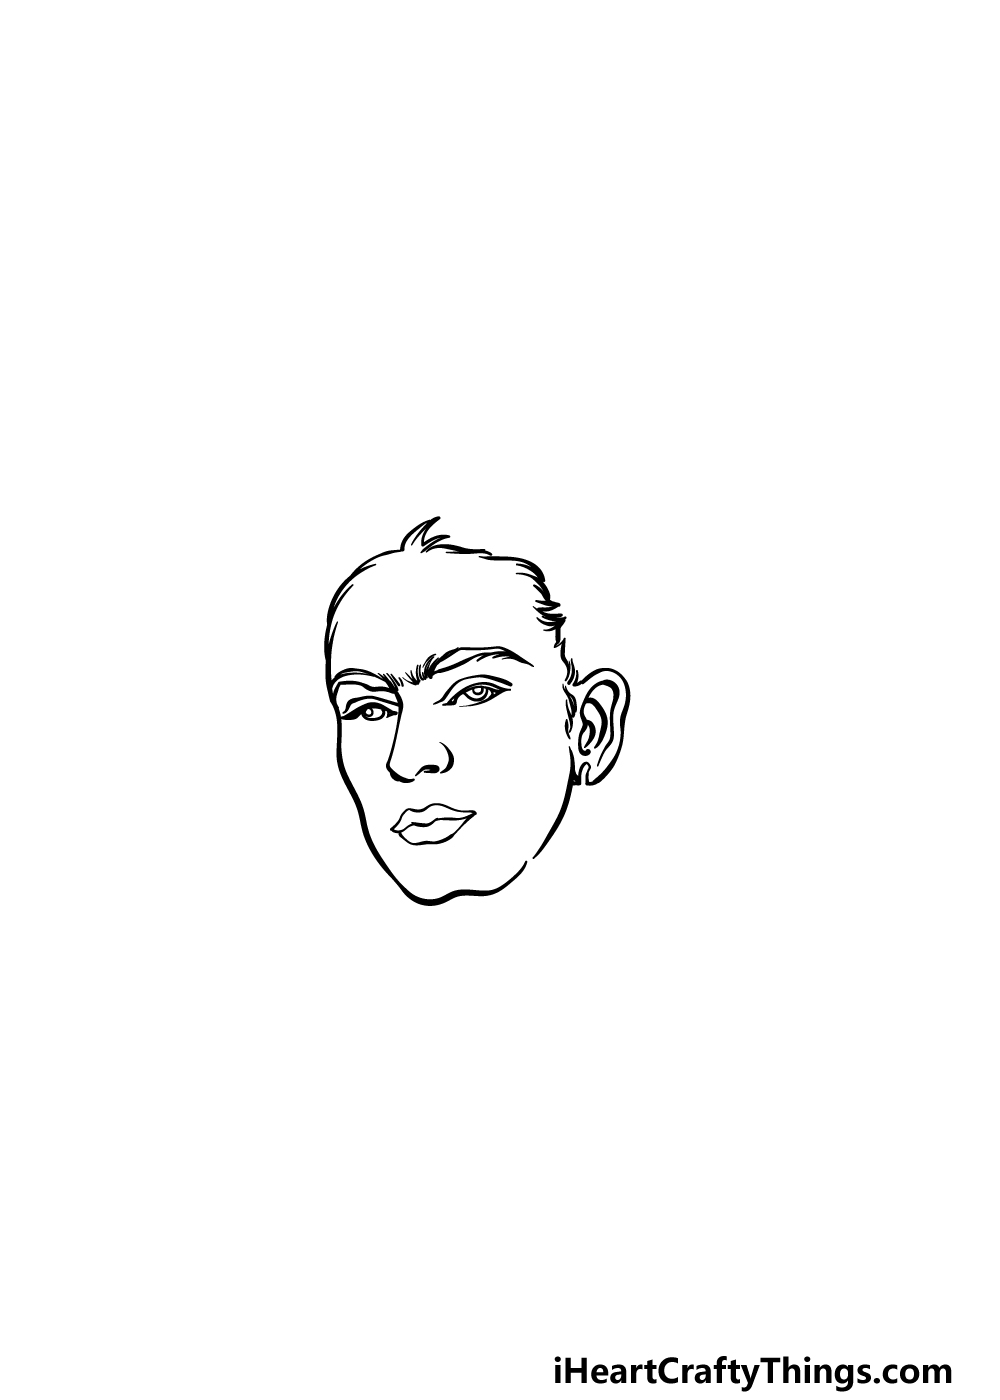
Now we shall be focusing on what is often the trickiest part of drawing a real person; their facial details.
When adding these details for your Frida Kahlo drawing, it would be best to make sure that you follow our reference image as closely as possible to help you.
Her eyes will be drawn with her eyelids down a bit, and this will help her to look nice and expressive. Then, use a smooth line for her nose and nostril outlines.
Finally, draw her lips to finish off her facial expression.
Before you move on to step 3, you can also draw some details inside of her ears, as shown in the reference image.
Step 3 – Draw her hair and neck outlines
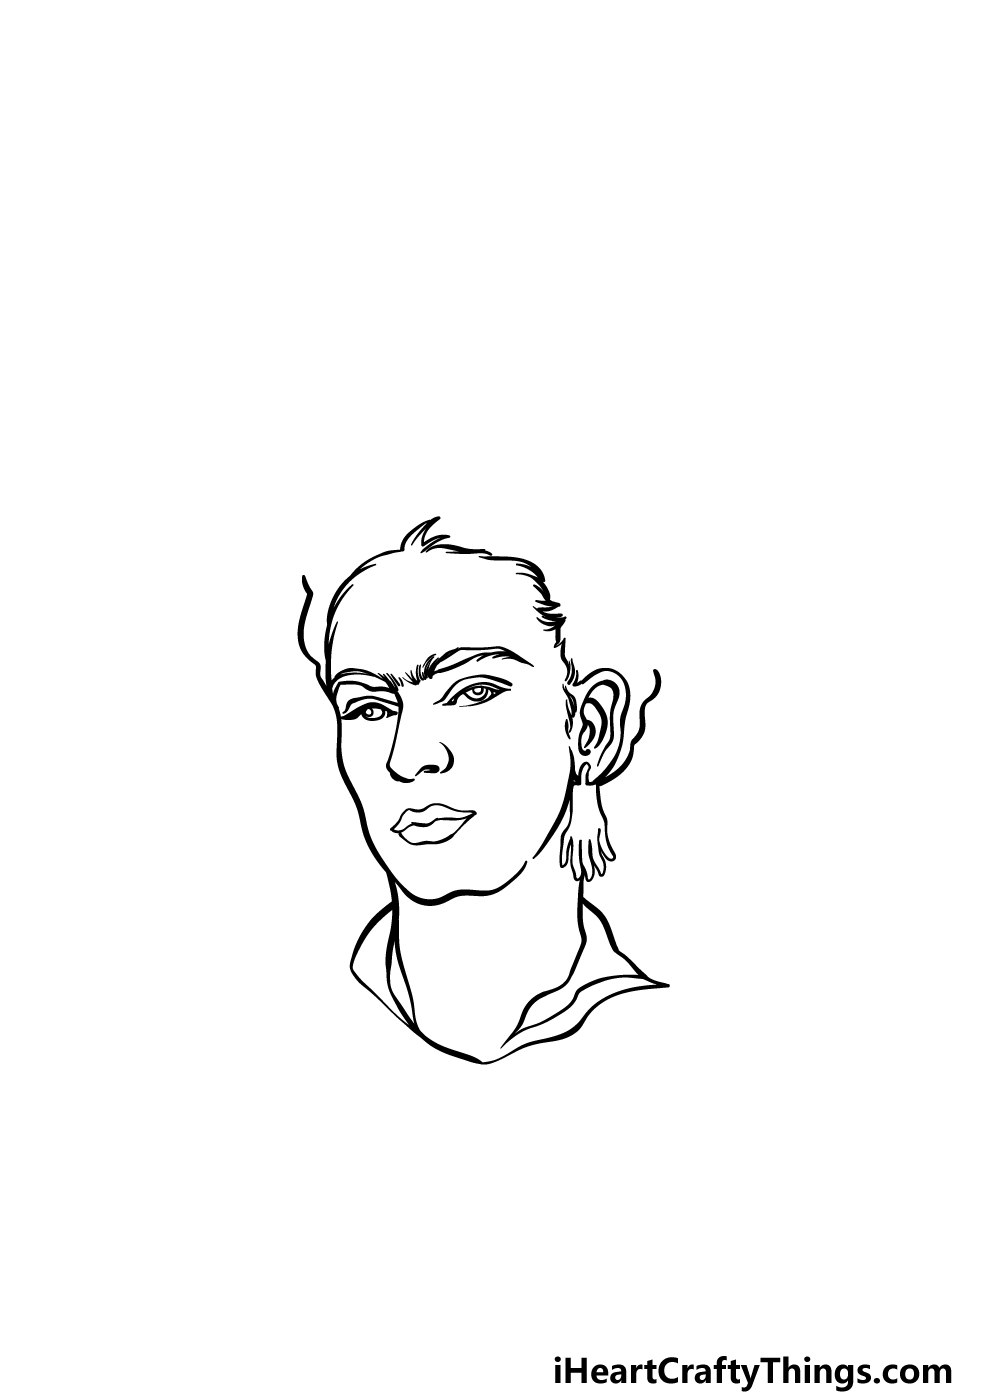
For this third step of our guide on how to draw Frida Kahlo, we will be adding some more of her hair outline as well as her neck.
Before you add these details, we will draw her long earring hanging from her ear on the right.
Then, use some short smooth lines for her neck coming down from beneath her head. You can then draw the outline of her collar at the base of her neck.
To finish off this step, simply draw some bumpy lines coming up from her forehead and the base of her ear. Then it will be on to step 4!
Step 4 – Next, draw the flowers on top of her head
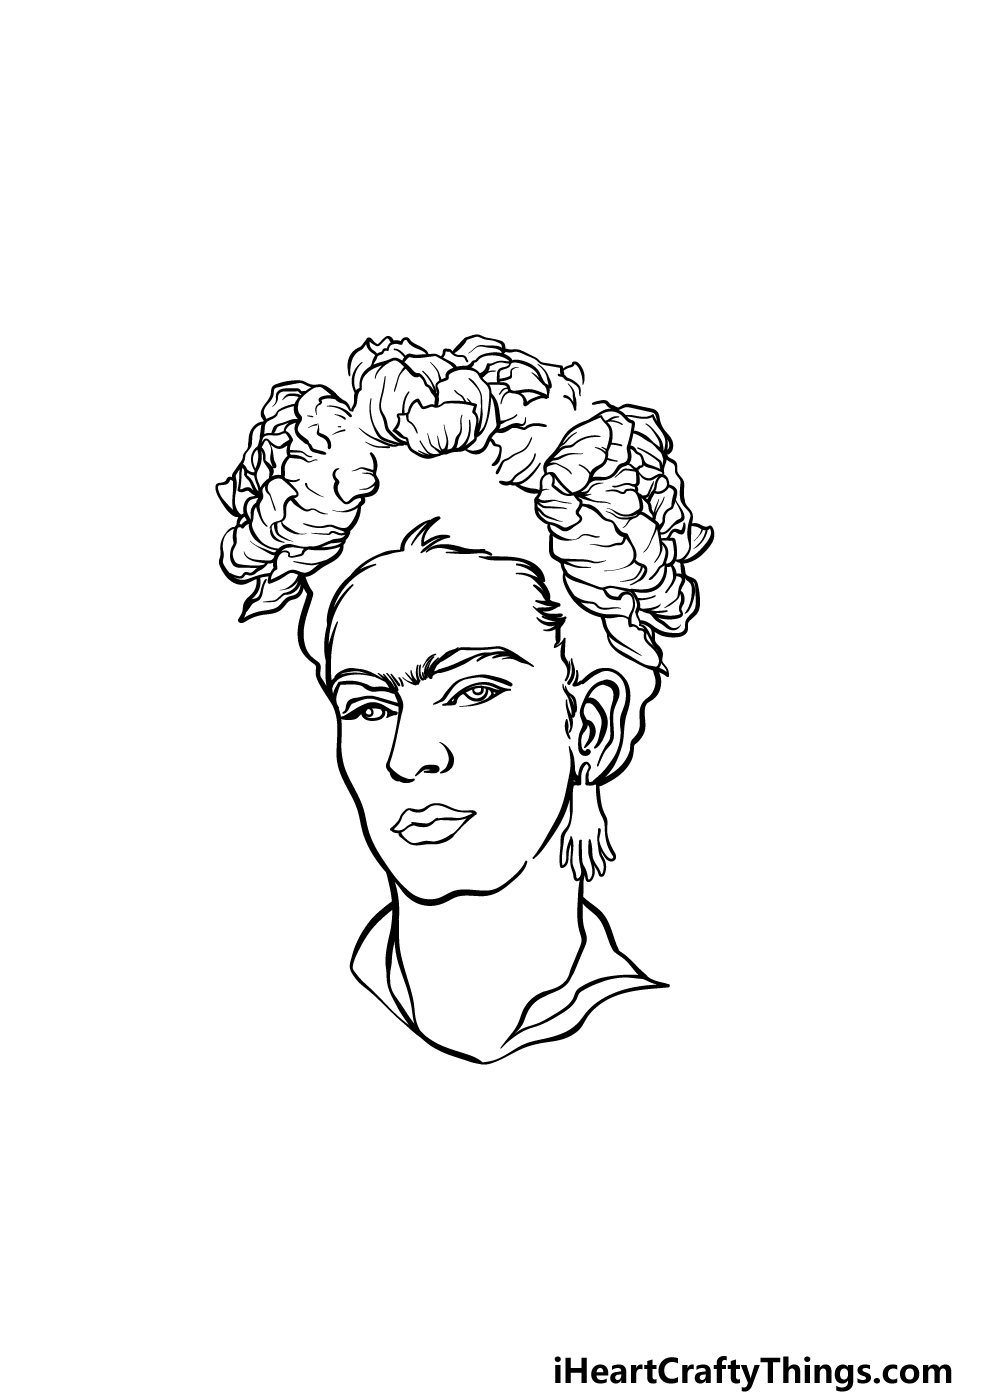
This depiction of Frida Kahlo will have her wearing a beautiful crown of luscious flowers. We will start adding these to your Frida Kahlo drawing in this fourth step of the guide.
These flowers will be quite highly detailed with plenty of crease details on the petals.
These could prove a little tricky to draw because of their high level of detail, but as long as you take it slowly and follow the reference image closely then you should have no problems!
Once these have been started, we will finish them off along with any final details in the next step of the guide.
Step 5 – Add the final details to your Frida Kahlo drawing
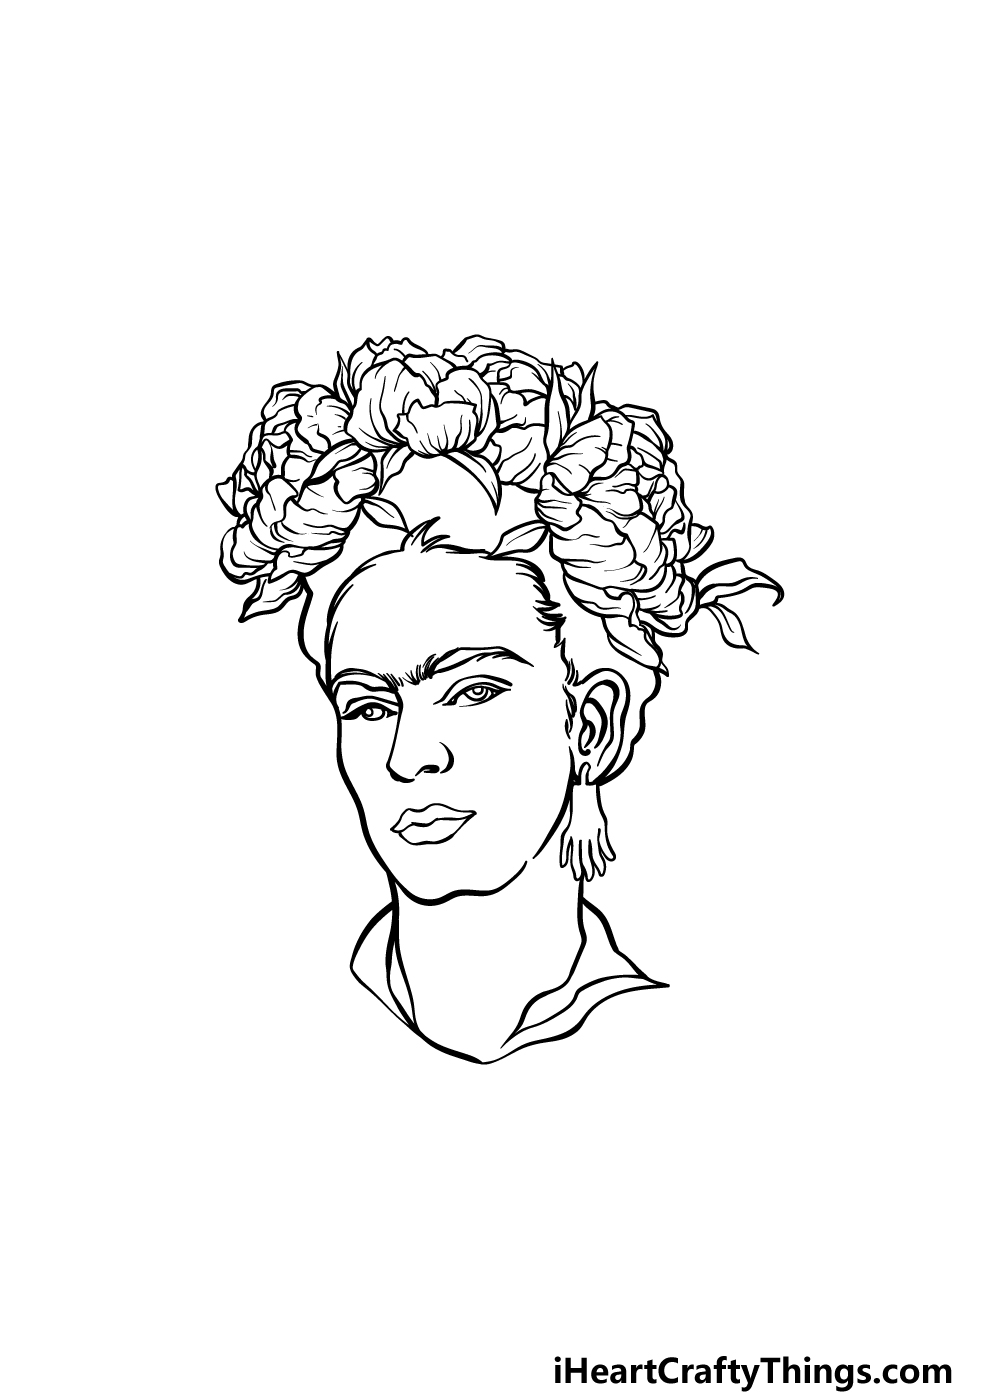
You started the flower crown she is wearing in the previous step of this guide on how to draw Frida Kahlo, and in this one we will be finishing them off.
To do this, all you need to do is add some minor details to the petals as well as drawing some small pointy leaves amongst them.
Once these details have been added, you will then be ready for the final step of the guide!
Before you proceed to that final step, you could also add your own extra details and elements.
One idea would be to draw a background, and if you did this you could even incorporate elements from your favorite Frida Kahlo artwork.
This is just one idea, but what else can you think of to finish it off?
Step 6 – Finish off your Frida Kahlo drawing with color
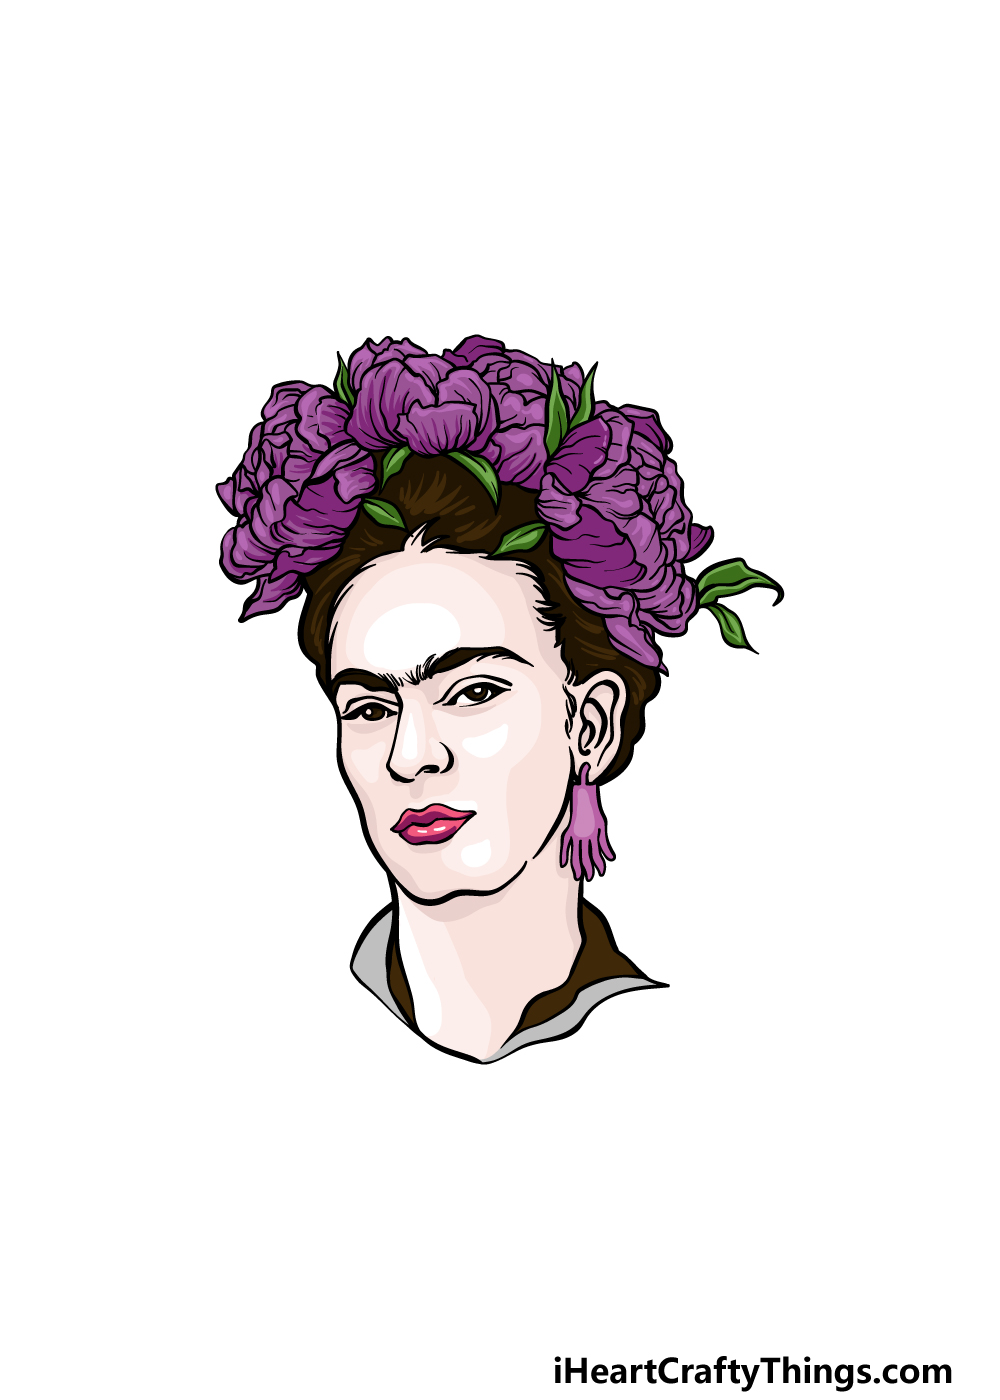
This is the final step of this Frida Kahlo drawing, and in it we shall finish off with some color.
We kept the colors looking quite realistic, and we colored her hair with dark browns while using some stunning bright purples for the flowers in her hair.
You could also go for a more stylistic set of colors if you prefer, and this would even be keeping with the spirit of many of her more abstract artworks.
You could also experiment with various art tools and mediums to really create a dynamic image, so be sure to let your creativity flow!
3 More tips to make your Frida Kahlo drawing easy!
Create some amazing art as we make this Frida Kahlo sketch even easier to draw!
When drawing a real person, it can be difficult to make the drawing look like the real person.
This is made even harder when there are additional elements, such as the flowers in this drawing of Frida Kahlo.
These flowers in her hair look amazing, but they can also make the drawing that much harder to complete. While you get the hang of drawing her face, you could leave this detail out of the drawing.
This could be something you do for a first attempt, and then you could always make more attempts where you do include the flower details if you miss them.
Any other extra details that are proving tricky to draw could also be left out if you like!
When drawing real people, creating realistic proportions can be the hardest part. Artists have a few methods they often use to make this easier, and you can use them for your Frida Kahlo drawing.
One of these methods involves using a pencil to draw a rough shape outline for the face. Then, they will draw two lines down and across the face.
This will help with positioning facial features like the mouth, nose and eyes. Plus, you can use your pencil to start adding more details until you’re ready to draw the final lines.
Carrying on from the last tip, you could also make your Frida Kahlo sketch easier by using more references along with our guide.
First, there are many photos of Frida Kahlo online that you could use to help you.
Also, she is famous for the many self-portraits that she completed in her career. These can also be found online to help you.
The more references you find the better, as they can help with the proportions and finer details of her face.
If you can find additional pictures that are posed similarly to our example then that would be perfect, but any you can find will be helpful!
Your Frida Kahlo Drawing is Complete!
We hope that you had a great time celebrating this incredible artist during this guide on how to draw Frida Kahlo!
As we mentioned near the beginning, drawing real people is not always the easiest challenge to take on.
We aimed to make it much easier for you by breaking it down into smaller steps, so as long as you follow all of these steps then you’ll get the hang of it in no time!
You can also keep adding more to this wonderful image by experimenting with extra details, background details and creative color choices.
It’s up to you, so be sure to have fun with it and see what happens!
Then, your drawing challenge continues on our website! We have tons of awesome guides to enjoy there, and there are many more on the way that you won’t want to miss.
When your Frida Kahlo drawing is complete, you can show off your amazing artwork by sharing it on our Facebook and Pinterest pages!