Winter is a wonderful time of the year, as cold weather starts setting in and the snow starts to fall in many places around the world.
It can sometimes get a little too cold for comfort, however, and when this is the case a roaring fire can be just what is needed to fight off the Winter chills!
Making a fire in your living room can be quite inadvisable, so you’re better off using a fireplace.
Learning how to draw a fireplace is a great way to recreate the cozy atmosphere they bring to a room!
If you would like to do that, then this will be a really fun guide for you to work on!
Why not start a cozy fire and settle in to have some drawing dun in this step-by-step guide on how to draw a fireplace in 6 steps!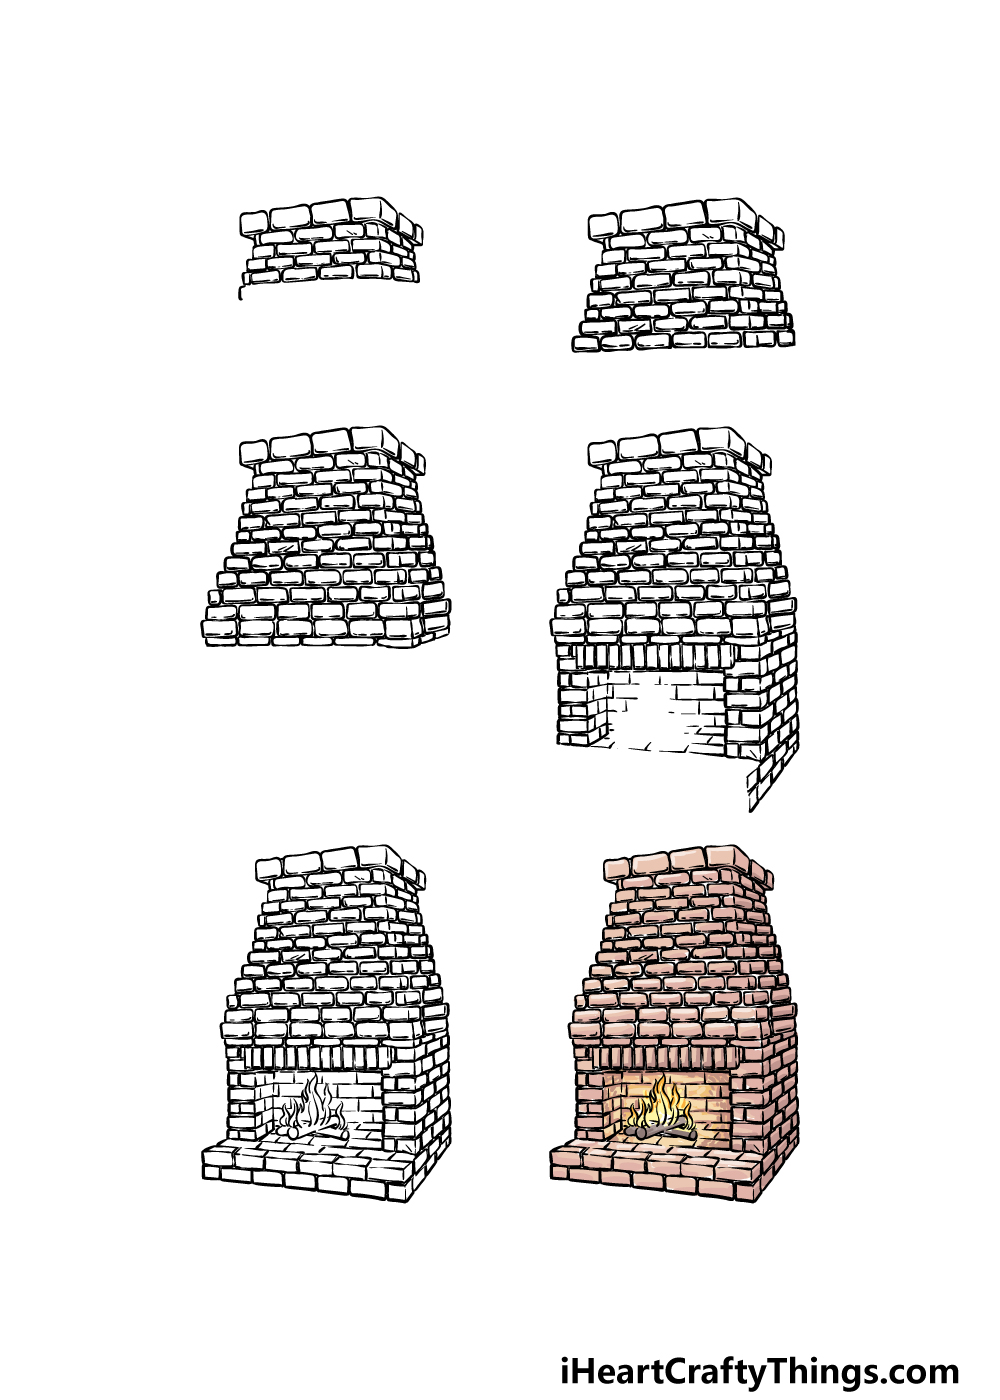
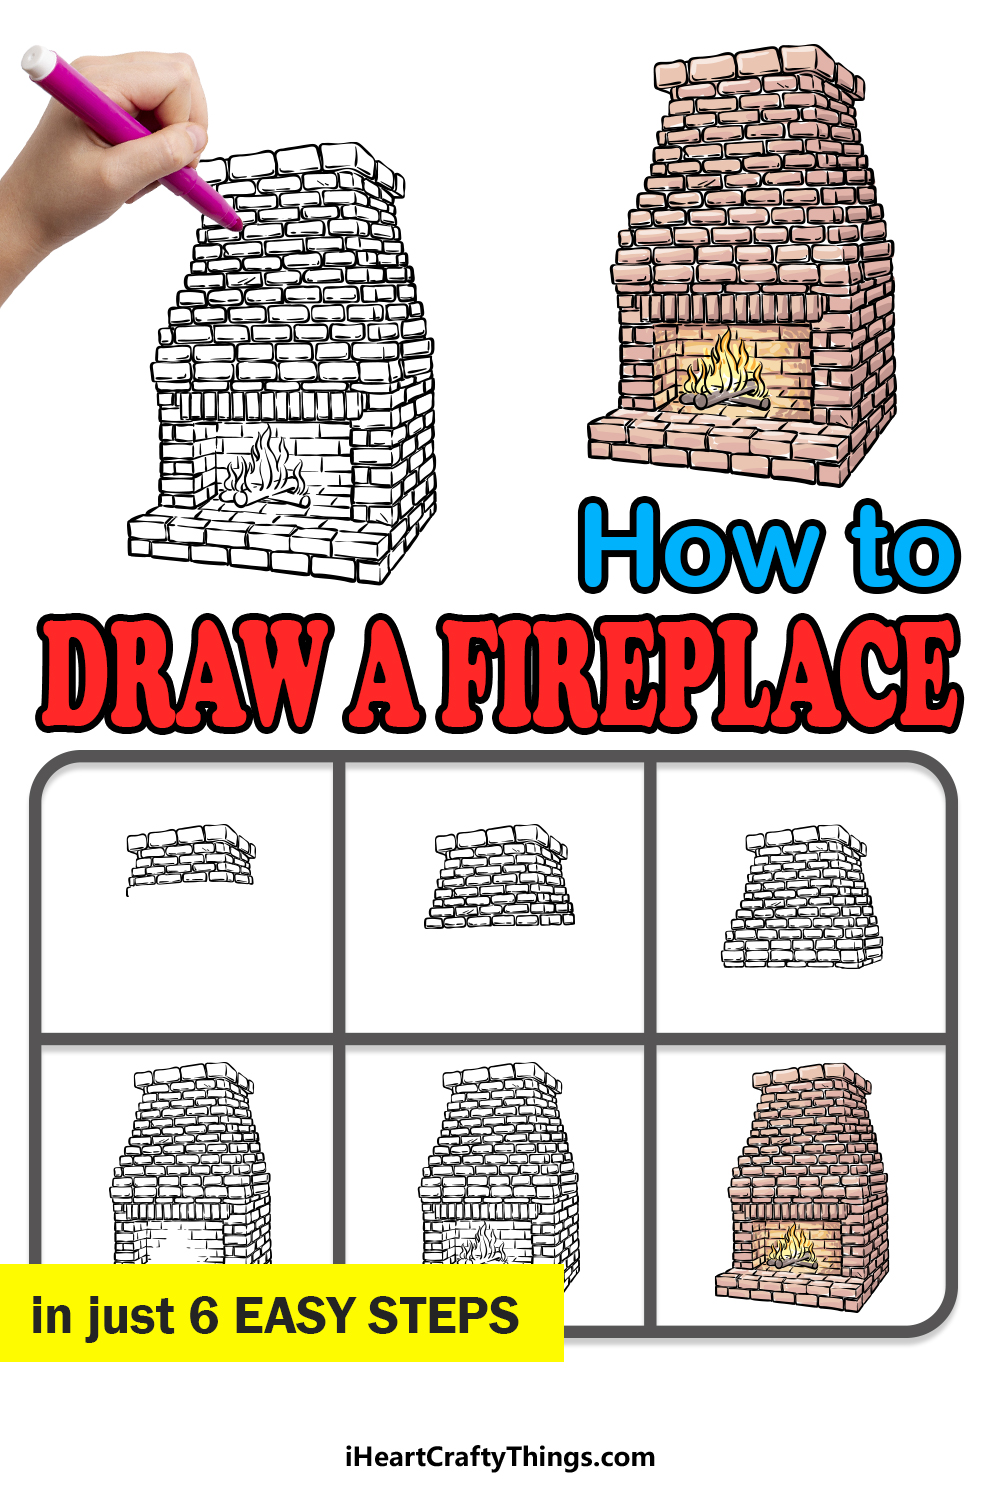
How to Draw A Fireplace – Let’s Get Started!
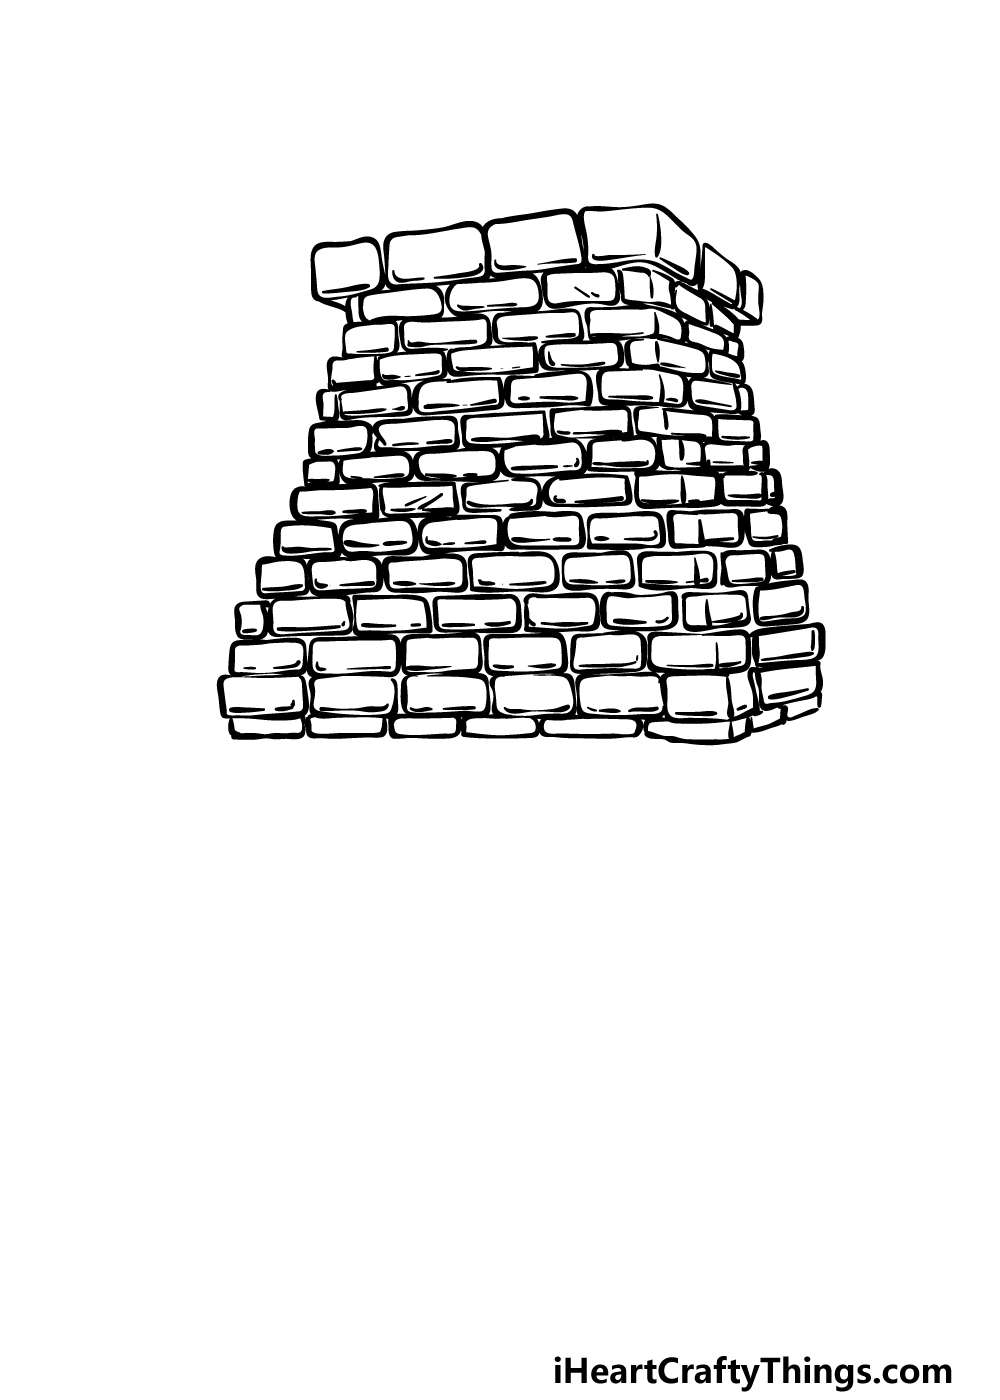
Step 1
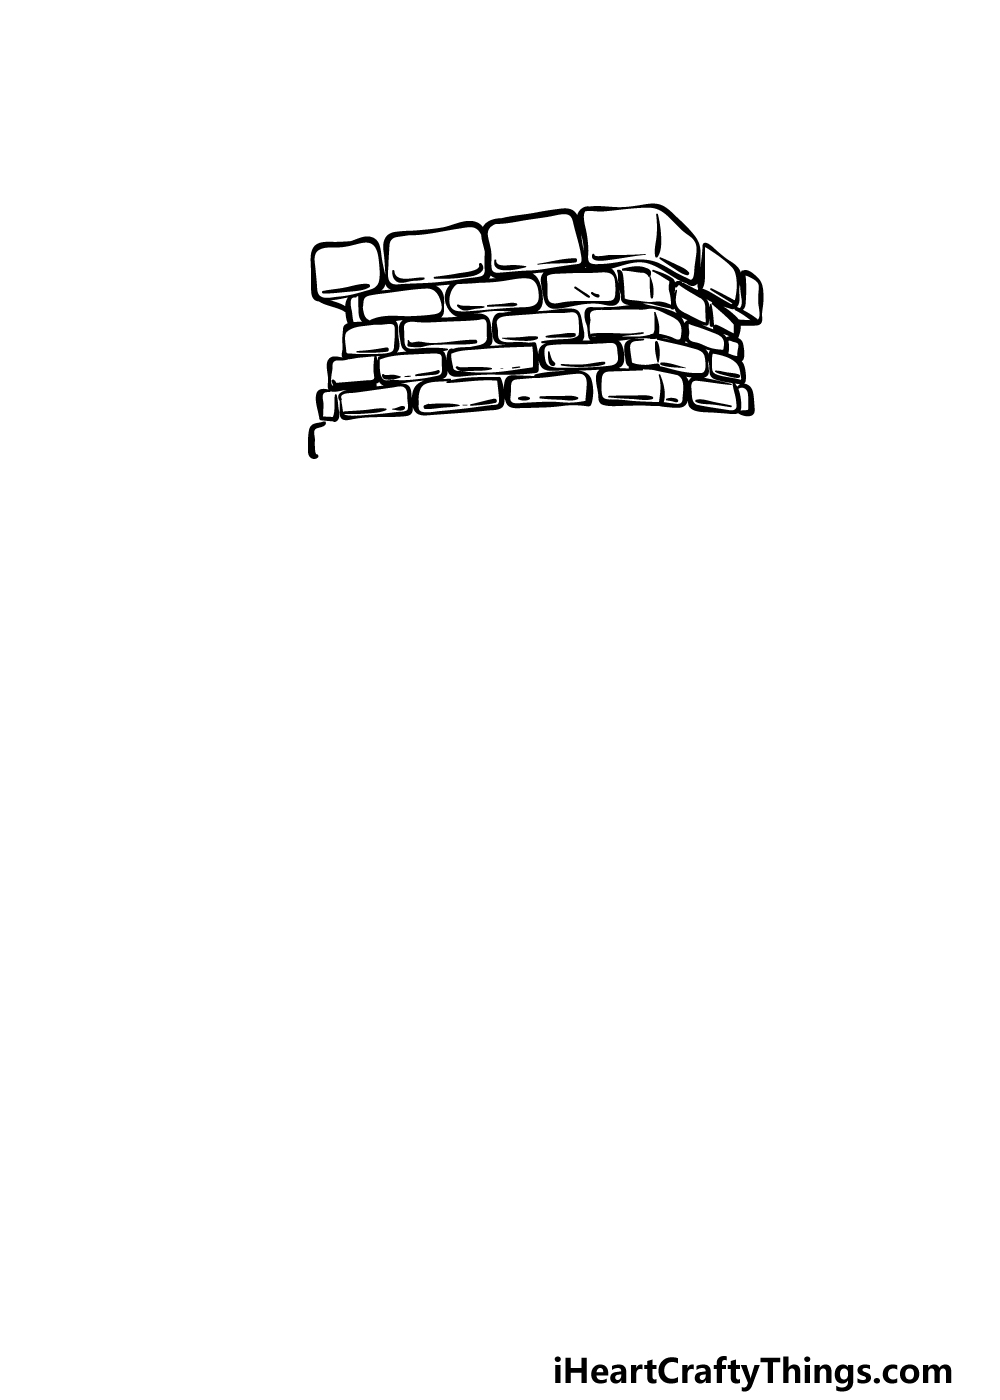
When working on this guide on how to draw a fireplace, it would be highly recommended to take it nice and slowly!
The reason for this is that the style of fireplace we’re depicting is made up of many individual bricks, and this can take a bit of patience to draw each one.
First, draw a row of larger bricks for the top section of the fireplace. Near the end of this row, they will angle inwards a bit to give the fireplace some depth.
Then, start adding the rows of bricks that make up the main section of the fireplace, and these will have spaces between them.
Once you have drawn these sections as they appear in the reference image, you’ll be ready for part 2!
Step 2 – Now, draw the next section of the fireplace
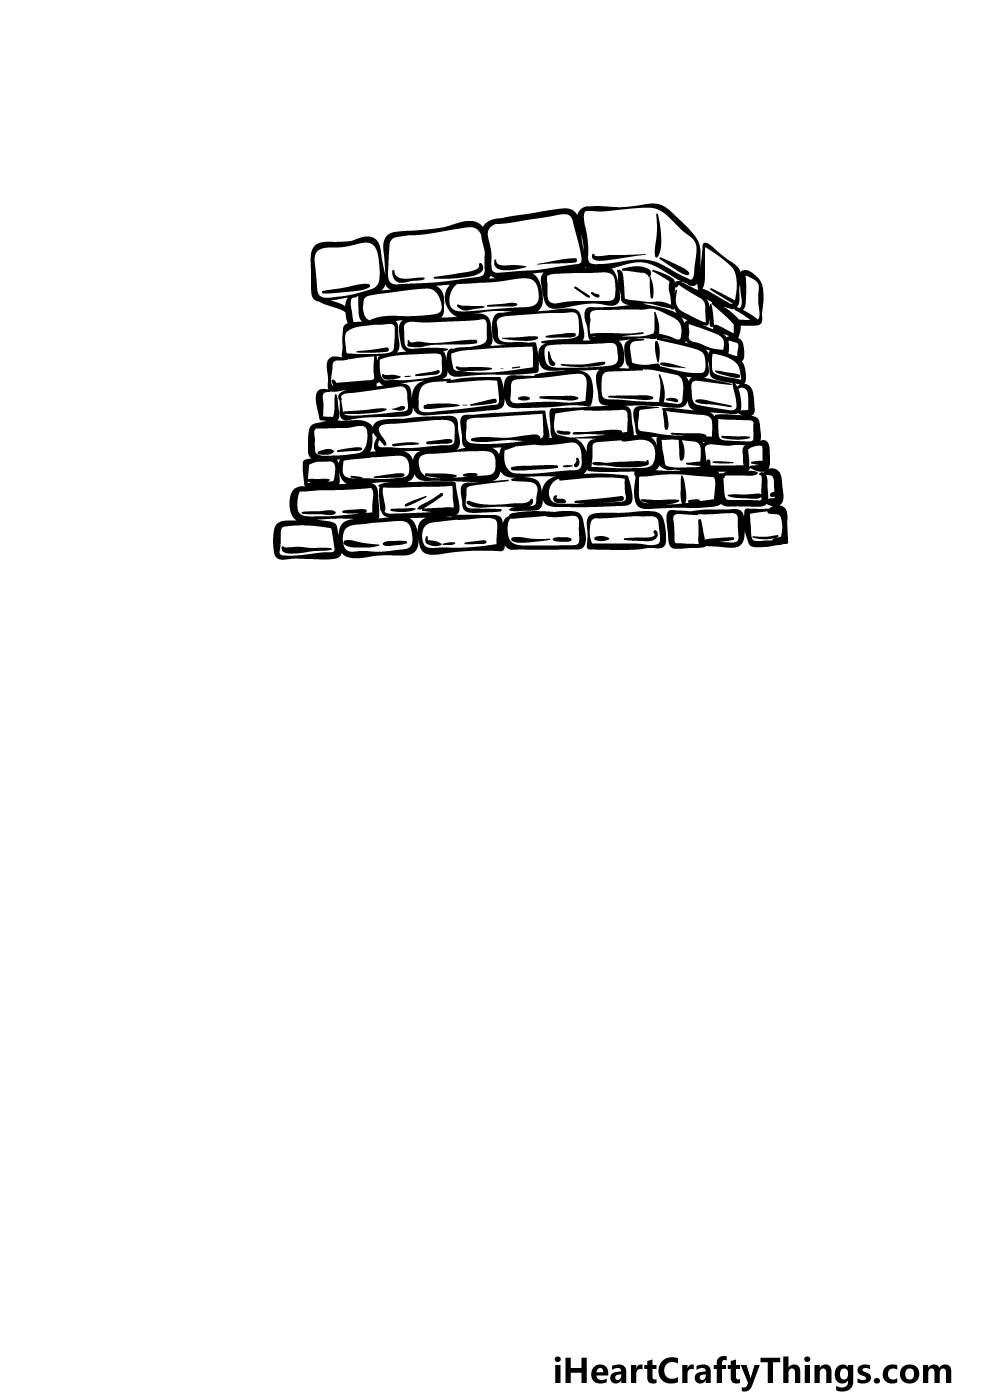
We will continue what you started in the previous step of this fireplace drawing as we proceed to this second step.
To do this, you will be adding more rows of bricks beneath these sections, and the rows will get slightly longer each time.
The reference image will show you how you should aim to have this fireplace body shaped! We will then continue adding more sections to the fireplace in the next few steps.
Step 3 – Draw another section of the fireplace
It’s almost time to draw the opening of the fireplace, but first we will be drawing one more section that will go above the opening in this step of our guide on how to draw a fireplace.
This means you will continue from the last step by adding more rows of individual bricks that get longer with each row.
That’s all there is to it, so now we can start drawing the opening of the fireplace in the next step.
Step 4 – Next, draw the start of the fireplace opening
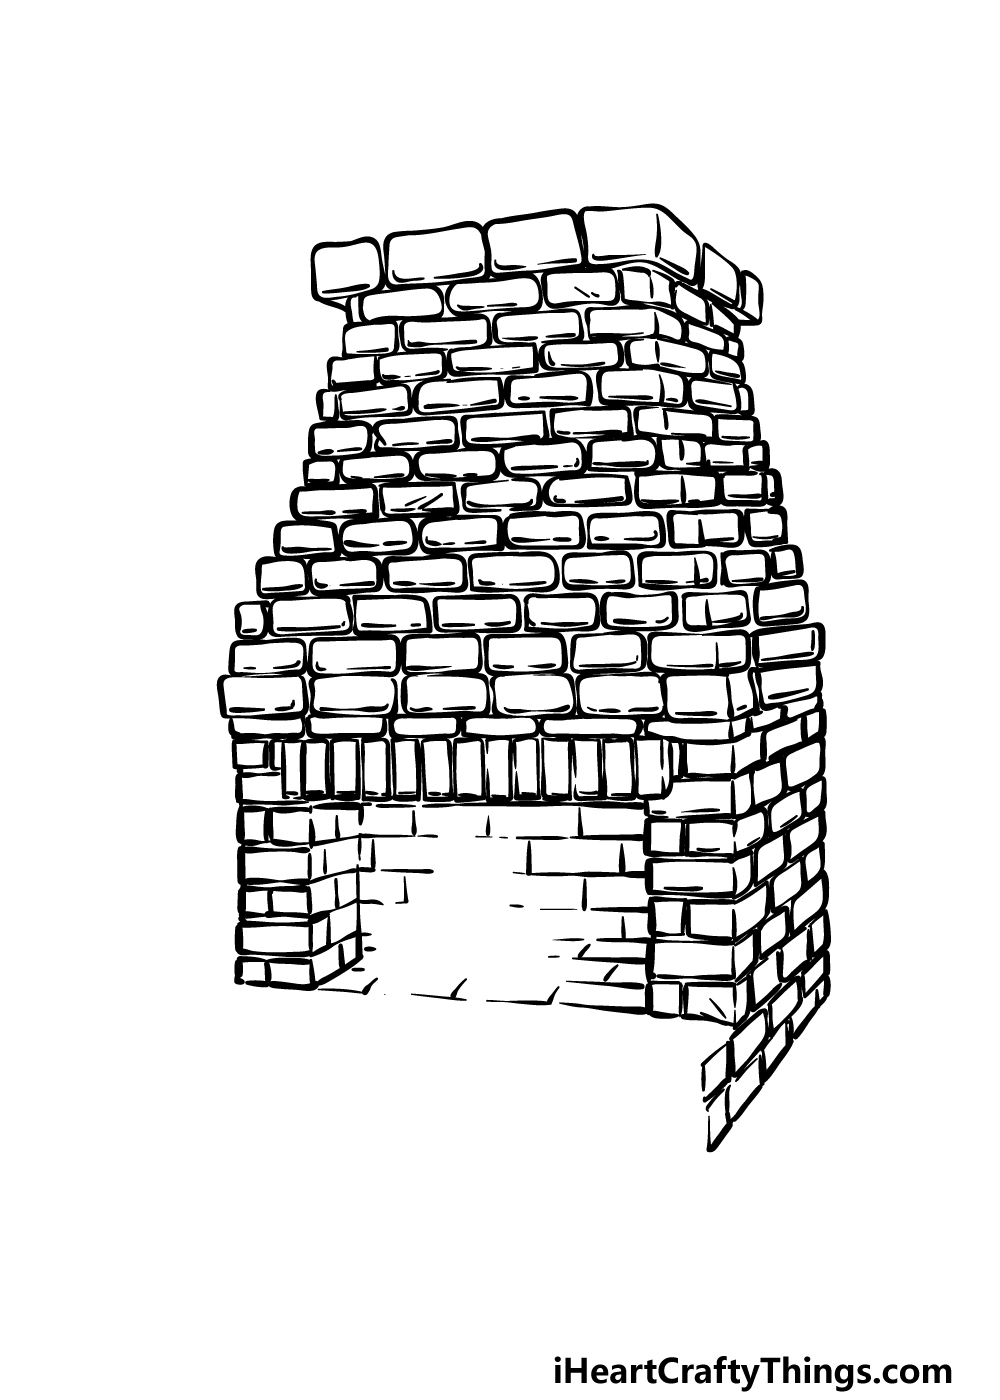
This part of your fireplace drawing will be a bit different from the previous steps.
We will still be adding rows of connected bricks, but this time we will also work in the opening and the sides of the opening, along with the rim above it.
There will be an empty space inside of the opening that is vaguely triangular in shape, and this will be where the fire will be drawn in the next step.
This part of the drawing can be a bit tricky, so try your best to follow the image exactly as it appears in our example!
Step 5 – Add the final details to your fireplace drawing
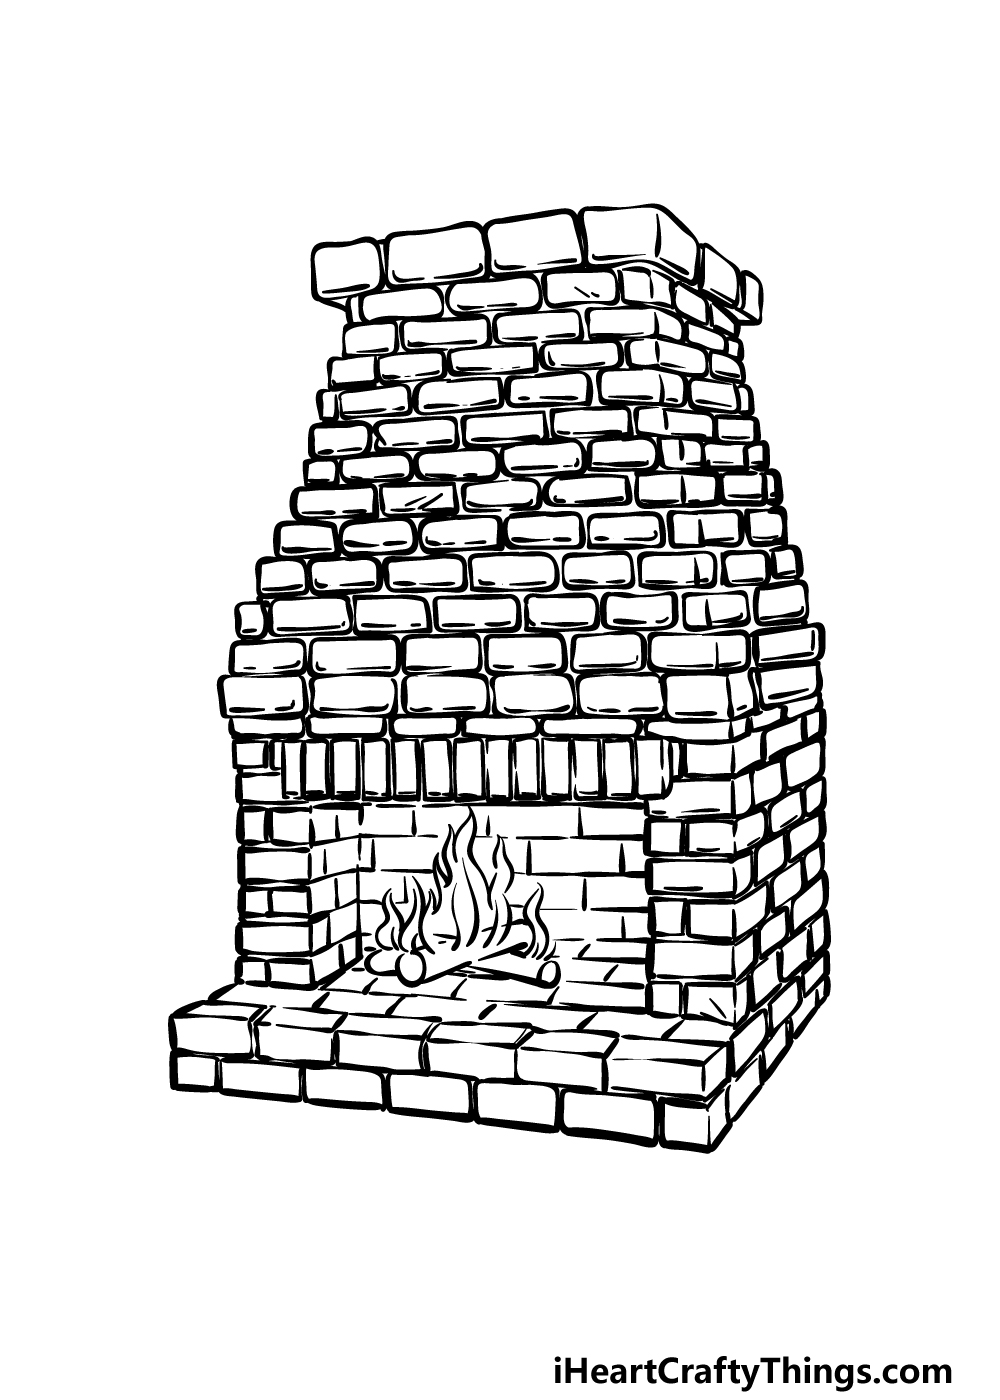
In this fifth step of this guide on how to draw a fireplace, we will be finishing off the final section of the fireplace while also adding the fire itself.
For the final section, draw some more interlocking bricks to form the flat base that goes in front of the fireplace.
Then, you will be ready to draw the fire. To start this, add several small, flat shapes piled on each other for the logs. Finally, use some wavy lines for the fire flickering above it.
Before you move on to the final step, you could also add some fun details of your own!
You could add to the background to show what kind of setting this fireplace is in, or you could even add elements such as Christmas stockings hanging from the mantle.
How will you finish off the scene with your own details?
Step 6 – Finish off your fireplace drawing with color
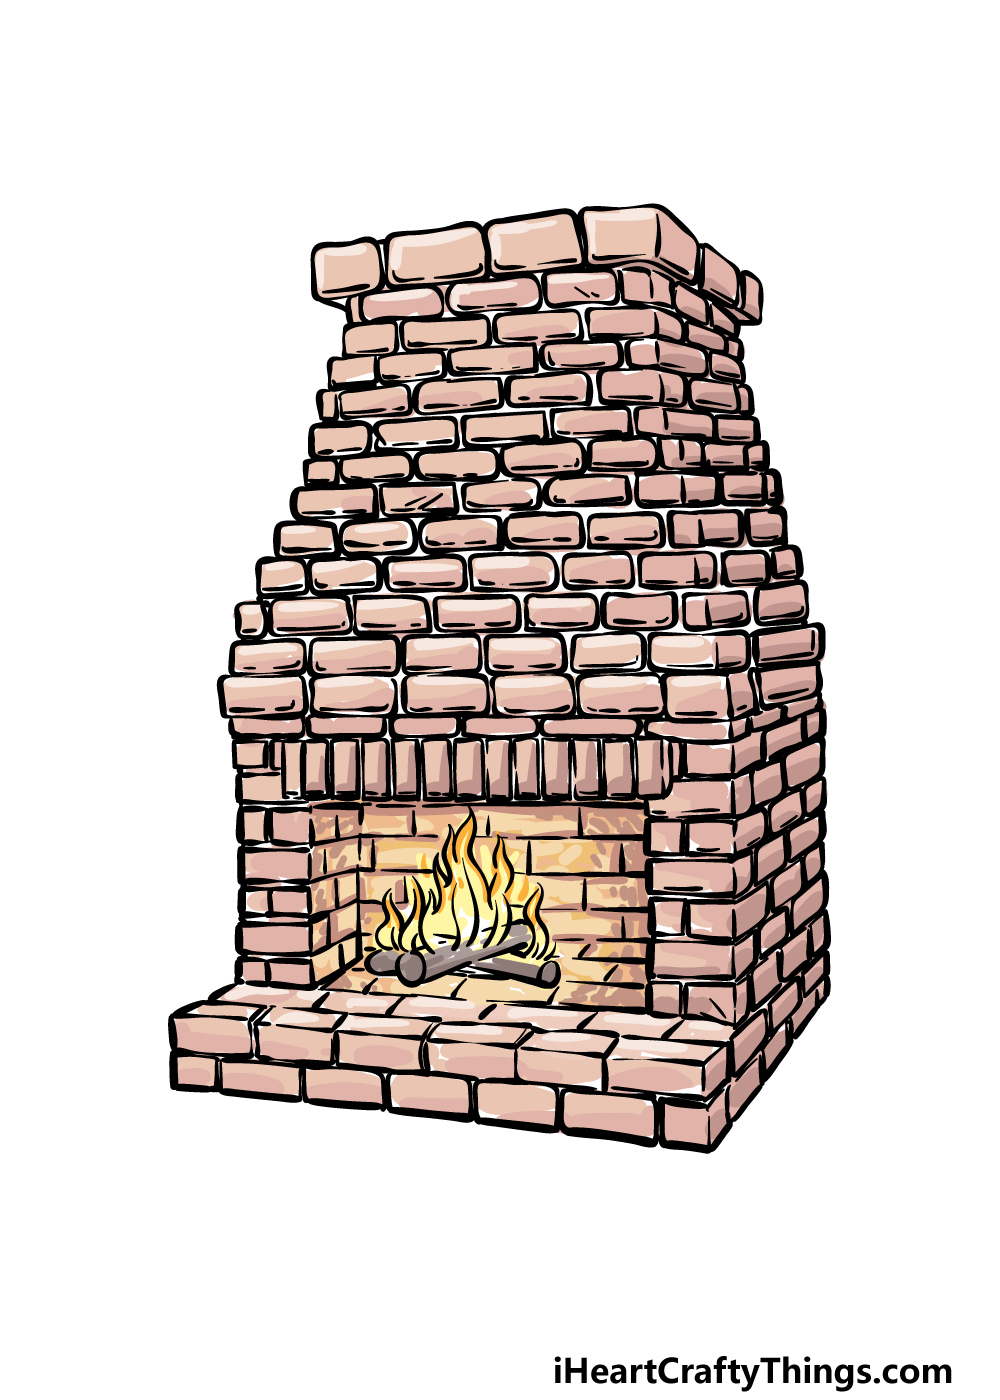
It’s time to finish up this fireplace drawing with some color in the final step of this guide.
When coloring in, we used some lighter tones for the brickwork and then contrasted it with some brighter yellows and oranges for the fire.
This is one approach that you could take, but there are many other colors you could also go for!
Bricks can come in many different tones depending on the material they’re made of and how they have been baked.
When coloring, you can also play around with the art mediums and tools that you use.
If you would like a subtler look like the one in our reference image, you could use milder mediums such as watercolors or colored pencils.
Brighter mediums like acrylic paints or colored markers would look equally great, so how will you choose to color this image?
5 Tips To Make Your Fireplace Drawing Even Better!
Heat things up with these tips for your fireplace sketch that will make it even better!
A fireplace can come in many different styles and be made from a variety of different materials. This gives you some options for customizing your drawing of a fireplace.
It could be as simple as a different kind of brick, or you could have it made from larger stones instead. You could look up some images of real fireplaces if you need some inspiration.
Fireplaces will often have other additional elements attached to them, and these could also be added to your drawing. One common one would be a grate over the opening of the fireplace.
This would be a simple and easy element to add, but it will help to make your drawing look a lot more realistic.
Next, you could add some accessories that you would use with a real fireplace. There are a few simple objects that you could add to do this.
One simple one would be a fire poker sitting beside the fireplace. Or, you could add a container with some firewood and kindling ready to go.
What are some other accessories you could add to the fireplace to make it more complete?
Having a roaring fire is all well and good, but you need some people to enjoy it. That is something you could add to this fireplace drawing!
This could be done by drawing some human characters sitting around the fireplace or even roasting marshmallows. For extra fun, you could base them around your own friends and family.
They could also be drawn in any style you like!
Finally, you could finish off this fireplace sketch with more of a background setting that this fireplace could be a part of. This would be a great way to design an entire room setting!
It could be based on your own living room or maybe a room in your house that has a fireplace. What kind of room would this fireplace belong in?
Your Fireplace Drawing is Complete!
We hope that you enjoyed this extra cozy guide on how to draw a fireplace in 6 steps!
This is the kind of picture that can prove to be rather hard to draw because of all the small brick details and other elements.
In this guide, we hoped to show you just how fun and easy it can be when you have some steps to follow, so we hope we succeeded in this regard for you!
Now that you have finished this guide, remember to also add your own details, elements and ideas!
We mentioned a few ways that you could go about doing that earlier in the guide, but how else can you think to show off your creativity?
Your creative journey can continue on our website, as we have tons of awesome guides ready for you to enjoy.
We are bringing out new ones all the time, so there will be no shortage of fun for you there!
When your wonderful fireplace drawing is all done, you can show us how it turned out by sharing it on our Facebook and Pinterest pages.