It’s always a lot of fun visiting a funfair or carnival, as there are so many different exhibits, games, attractions and rides to enjoy.
There are some rides such as rollercoasters that provide high octane thrills and more relaxing, slow-paced rides such as a merry-go-round.
A Ferris wheel sits somewhere in the middle of these two extremes, as it is calm and slow but provides the thrill of being lifted high up in the air.
It is lots of fun to ride a Ferris wheel, and it can also be fun to learn how to draw a Ferris wheel so that you can design your very own one.
This is the guide you’ll want to use if this is something you would like to do.
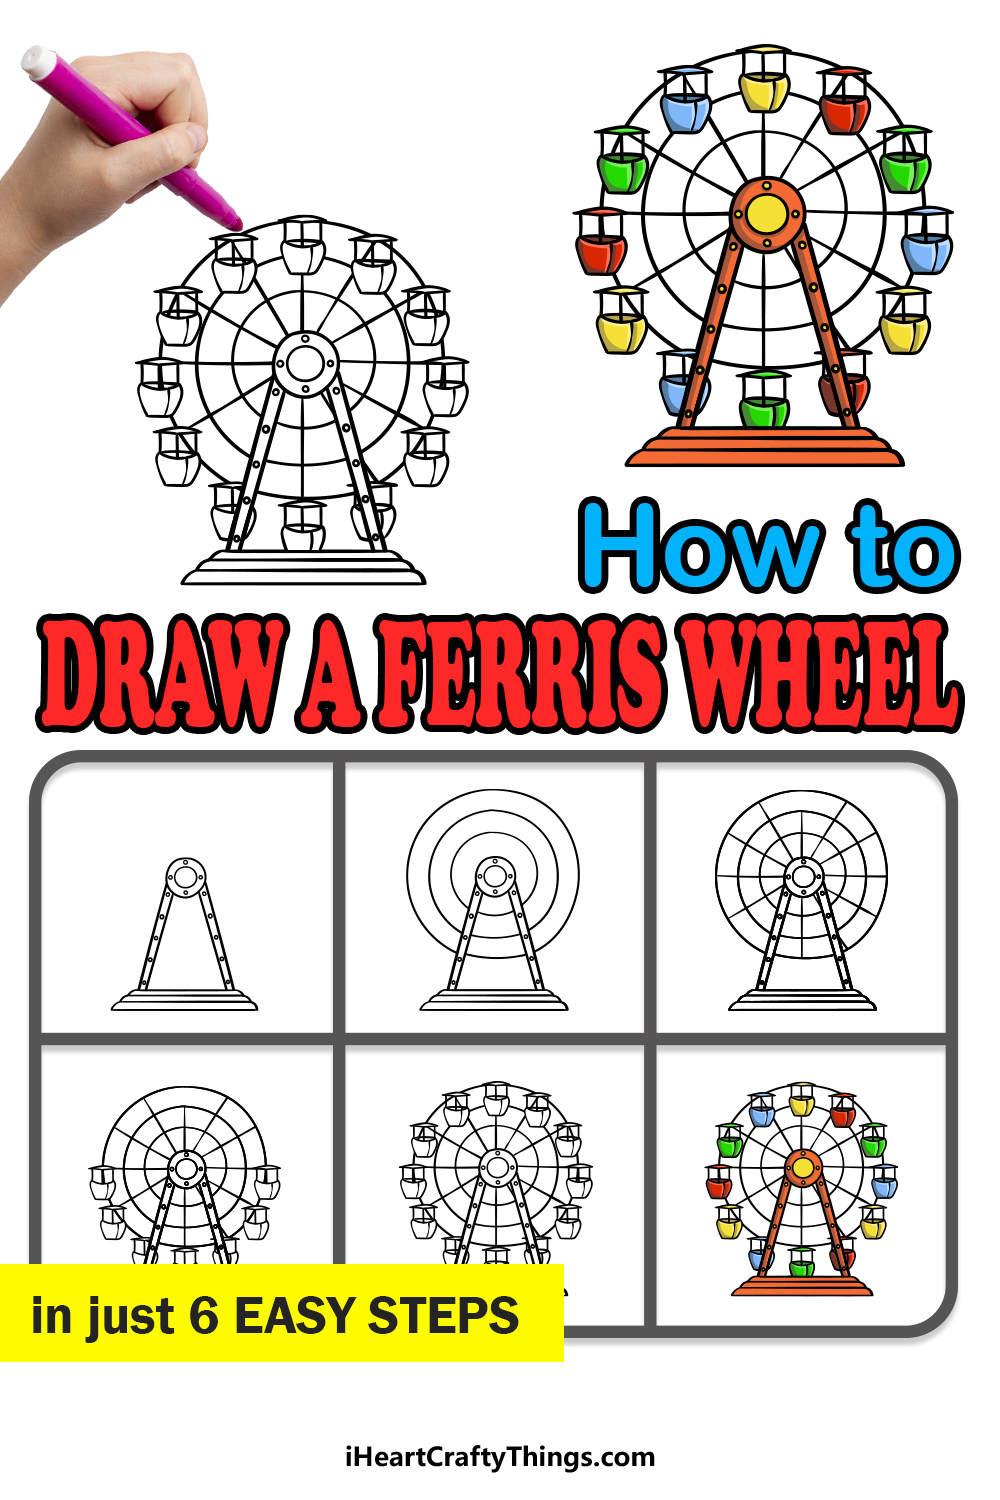
Our step-by-step tutorial on how to draw a Ferris wheel in 6 steps will bring the fun of the carnival to your house!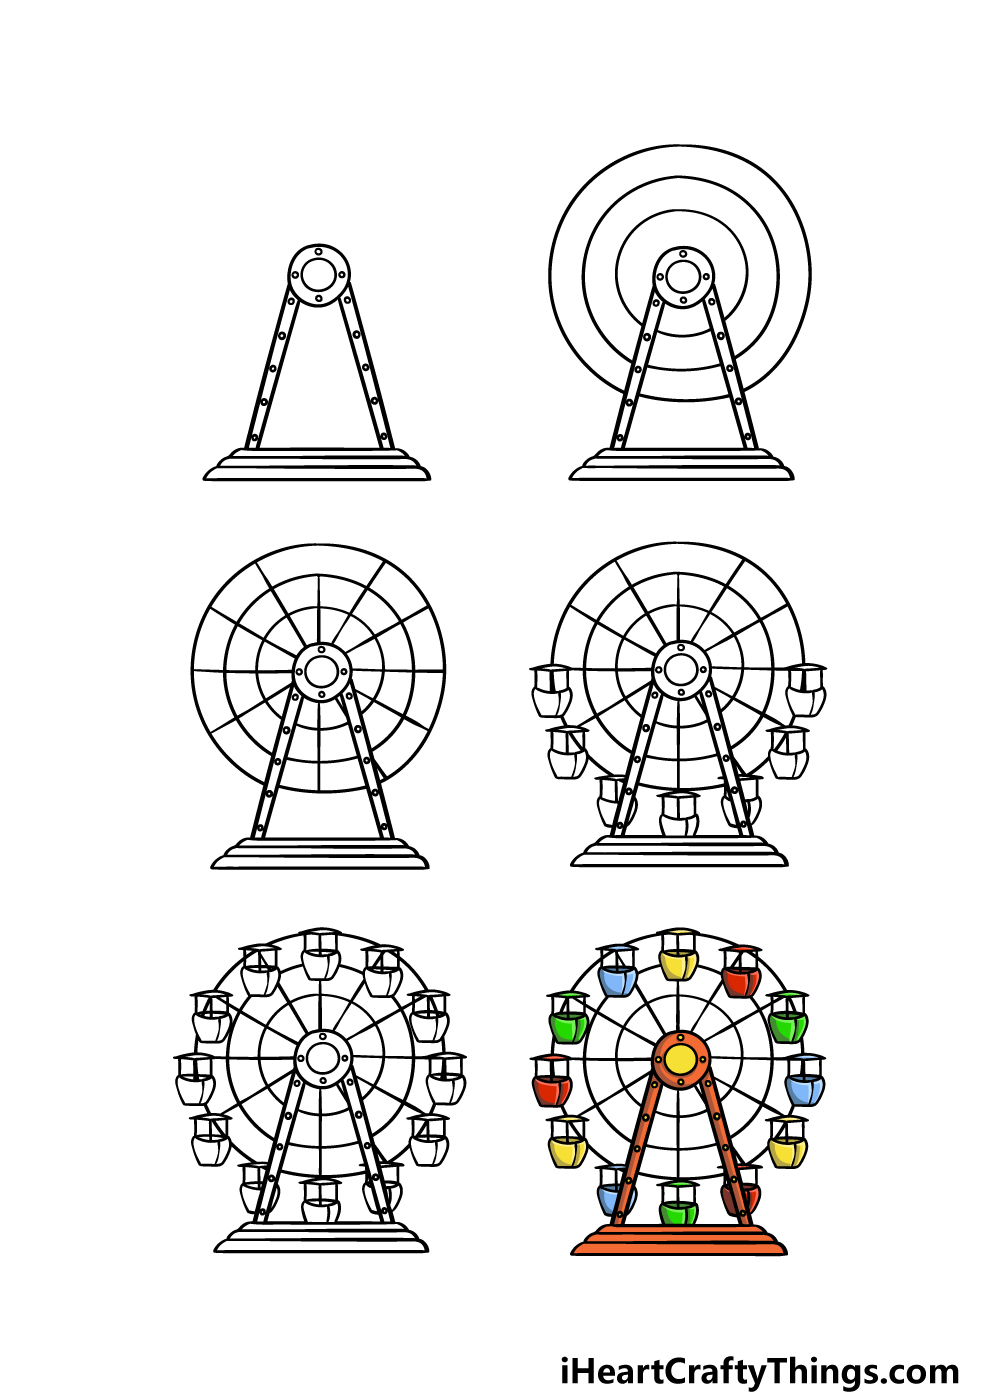
How to Draw A Ferris Wheel – Let’s Get Started!
Step 1
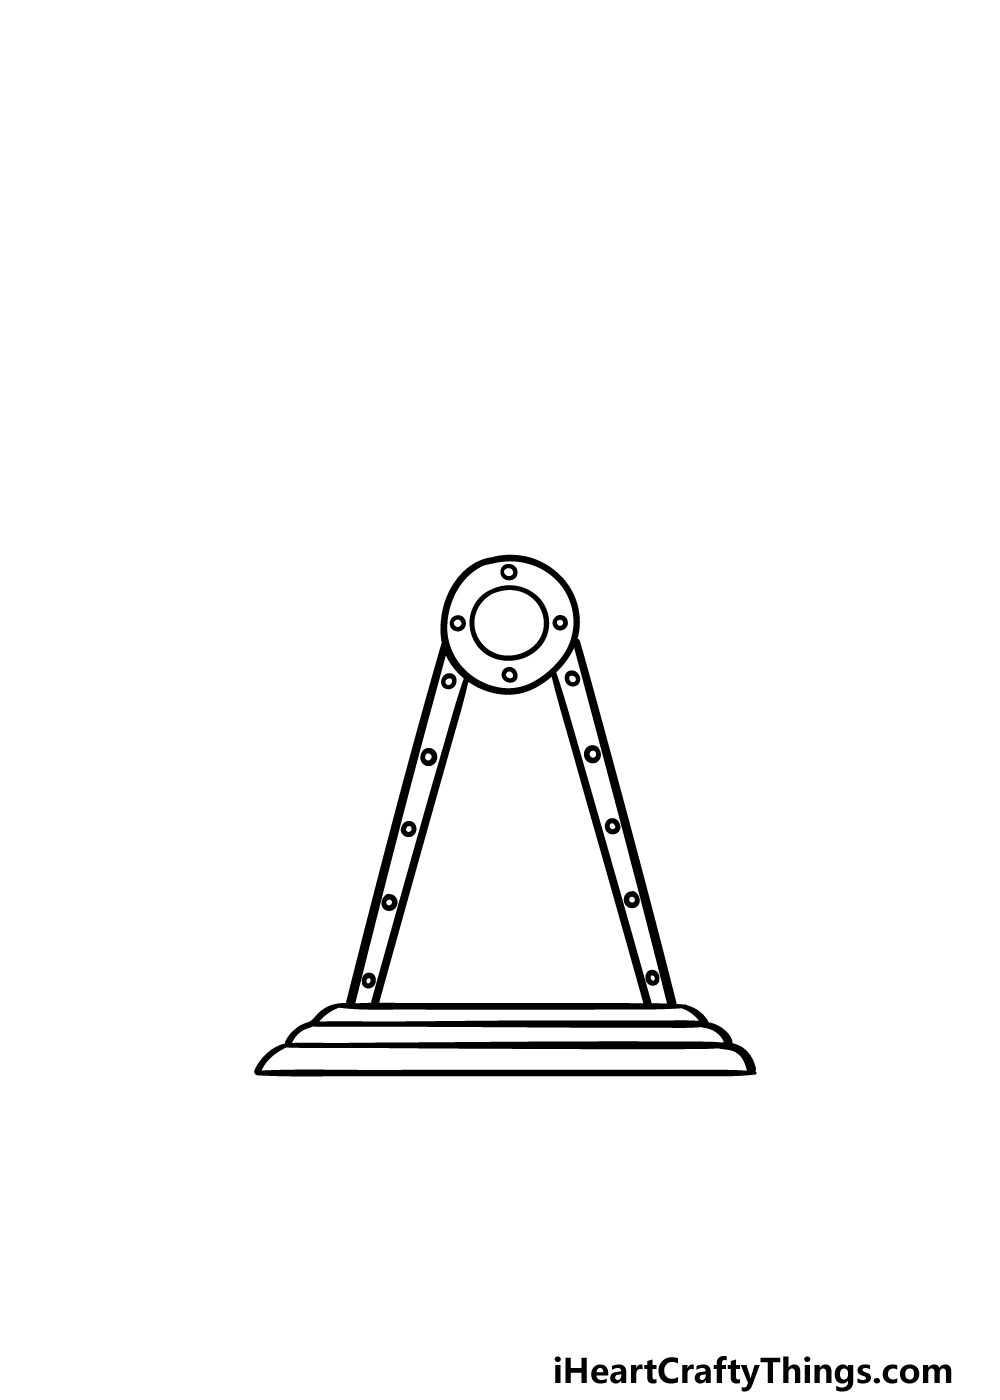
Before we get started on this guide on how to draw a Ferris wheel, there are a few drawing tools you will want to have on hand to make it much easier on yourself.
These tools will include a ruler, a drawing compass and a light pencil. Don’t worry if you don’t have any of these on hand, as we will still be able to create the drawing without them.
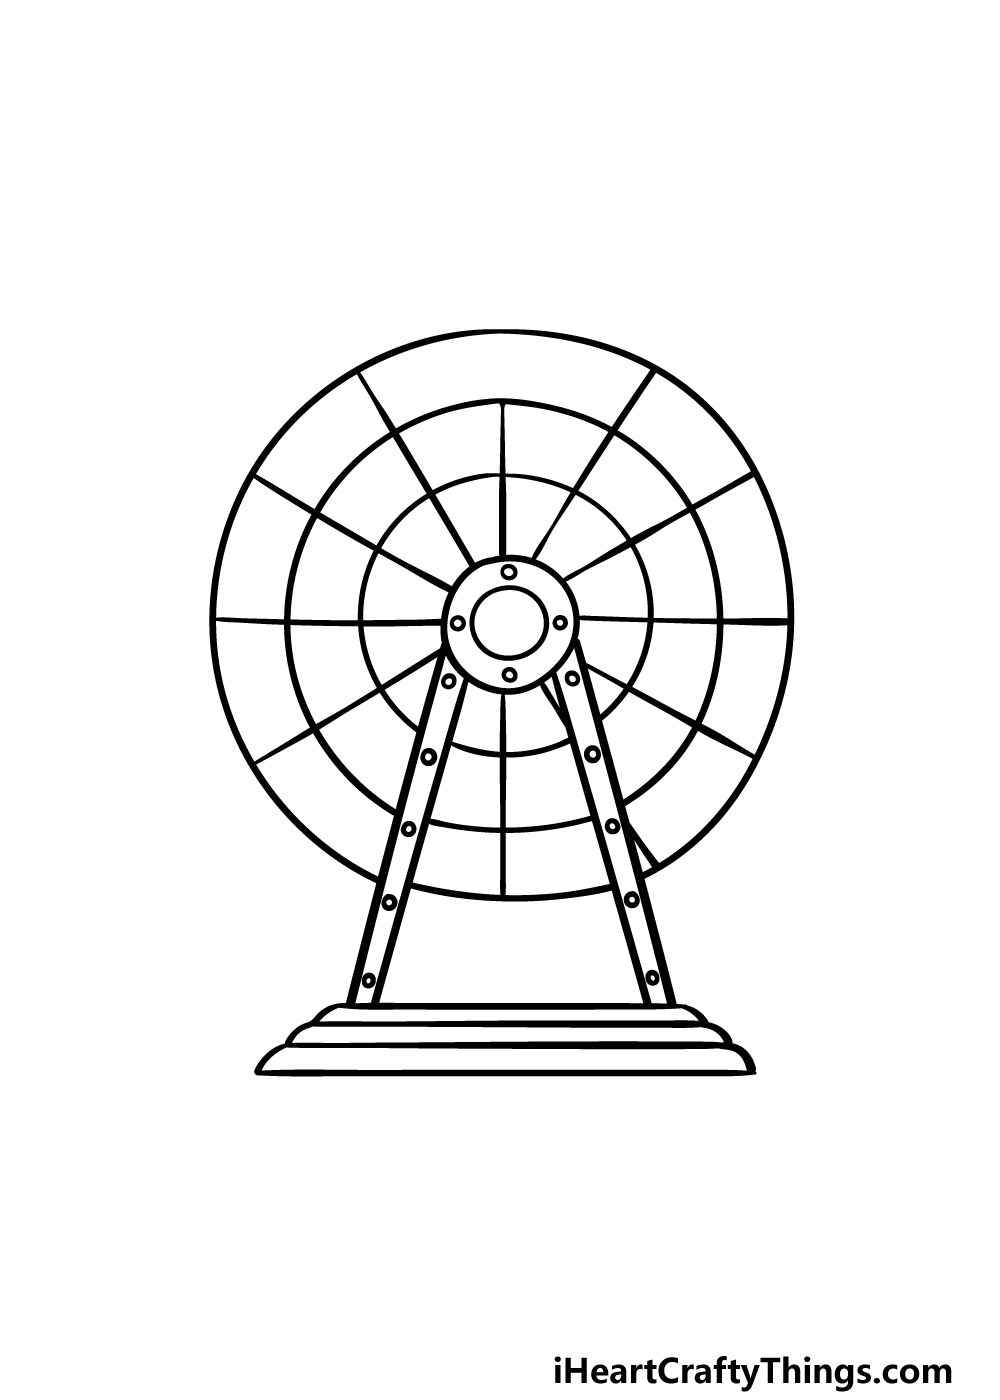
When you’re ready, start by drawing a small circle surrounded by a larger one. You can draw these circles freehand or with your drawing compass. Then, draw four small circles in the outer circle for the bolts holding it together.
Using your ruler, you can then draw two pillars coming down at diagonal angles from these circles.
This will lead to a three-tiered base like the one in our reference image. Finish off by drawing some more round bolts along the two pillars, and then we will be ready to proceed.
Step 2 – Next, start drawing the center of the Ferris wheel
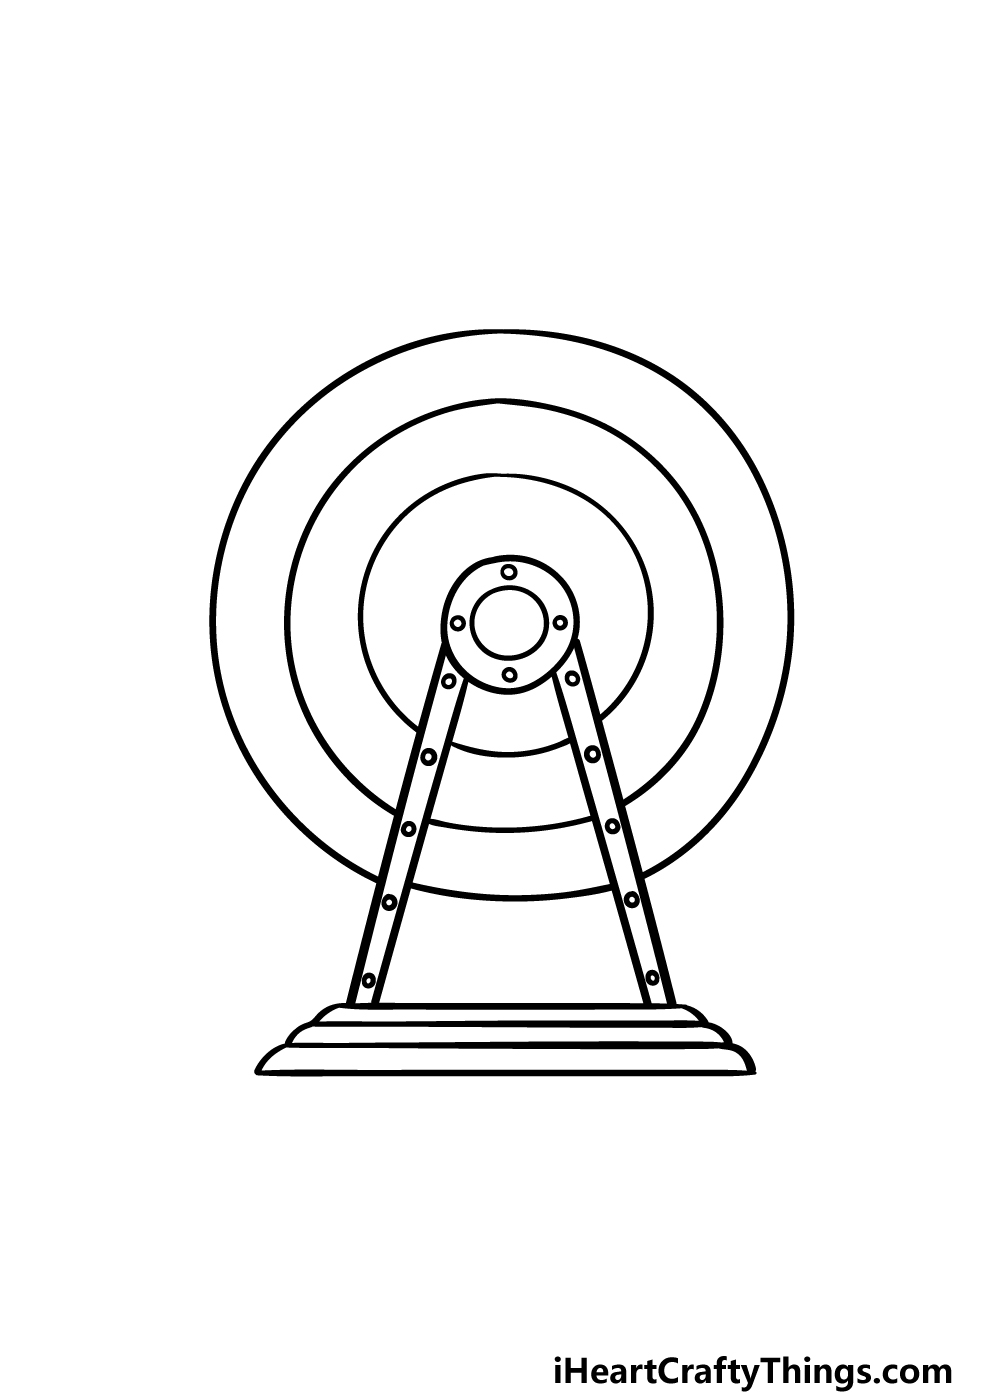
This second step of your Ferris wheel drawing is where you will benefit from using that drawing compass and light pencil that we mentioned earlier.
If you have these tools, use them to draw several circles that have the two circles from step 1 as their center.
We will be using a pencil for now, as we will be drawing the seats of the Ferris wheel over them in a later step.
Make sure that these circles do not go over the pillars from the previous step. If you don’t have a drawing compass, simply try to draw the circles slowly and carefully. It doesn’t matter if they’re not perfect circles!
Step 3 – Draw some more of the Ferris wheel center
We will be using our rulers again for this step of our guide on how to draw a Ferris wheel.
Using your ruler, you will be drawing several straight lines extending from the center of the Ferris wheel and outward to create a pattern that looks a bit like a spider web.
These will later connect to the seats of the Ferris wheel.
Simply try to replicate the lines as they appear in the reference image, and then we can start adding the seats in the next step.
Step 4 – Now, start drawing the seats of the Ferris wheel
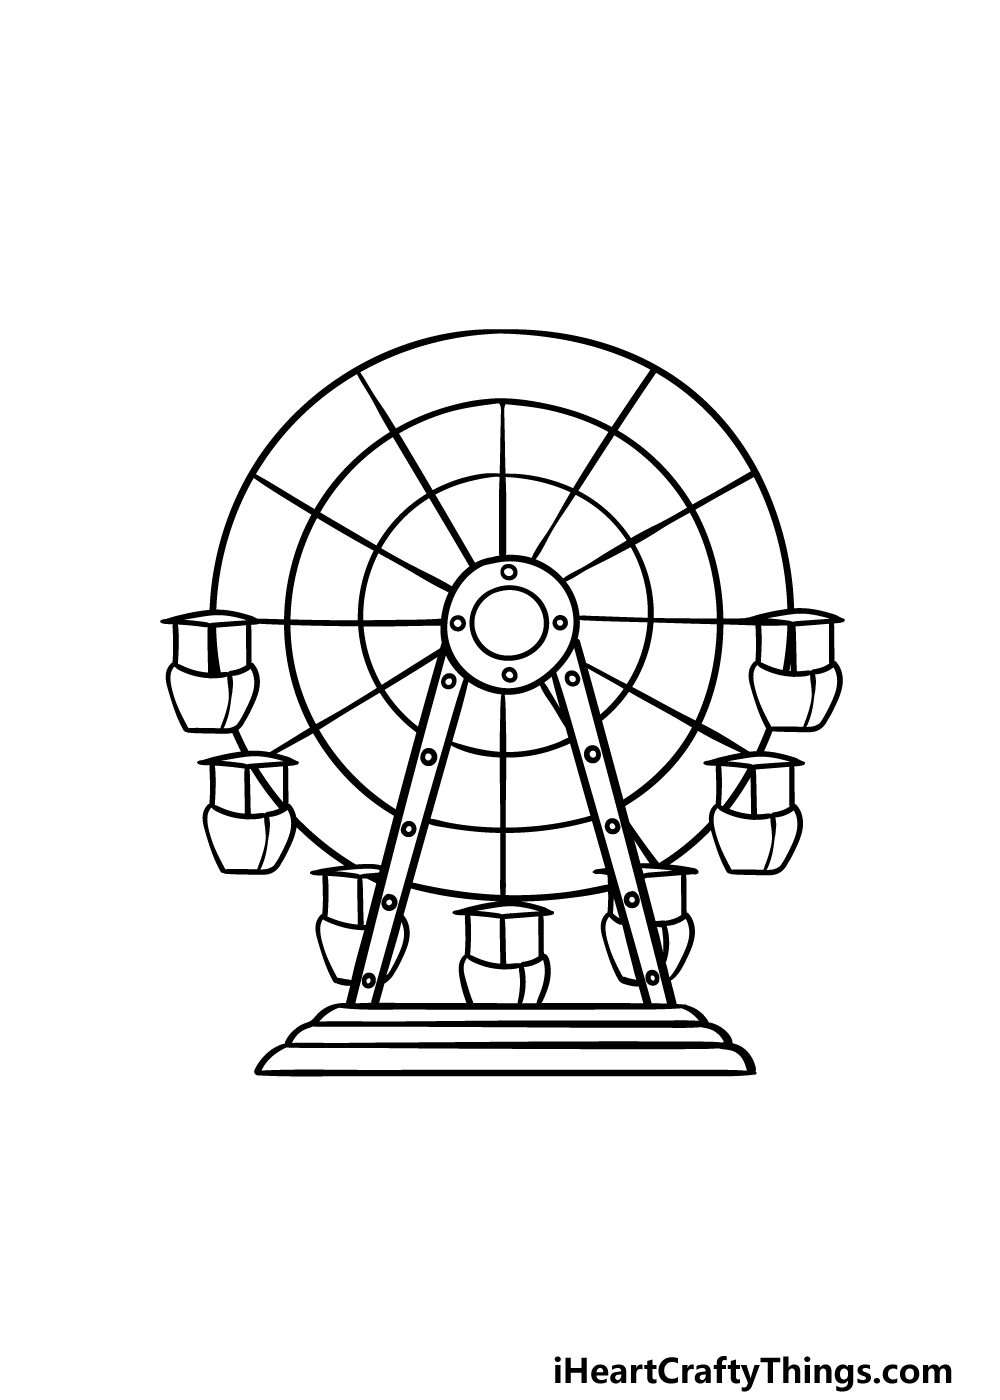
Now it is time to start adding some seats to your Ferris wheel drawing. Each of these little compartments will look identical, and they will have a rounded lower half with a flat roof on top.
Each line that you drew outward from the center of the Ferris wheel will have one of these compartments attached to it.
For now, we shall only be drawing carts for the bottom half of the Ferris wheel.
We will add the rest in the next step, so when you’re ready then we can proceed!
Step 5 – Finish off your Ferris wheel drawing
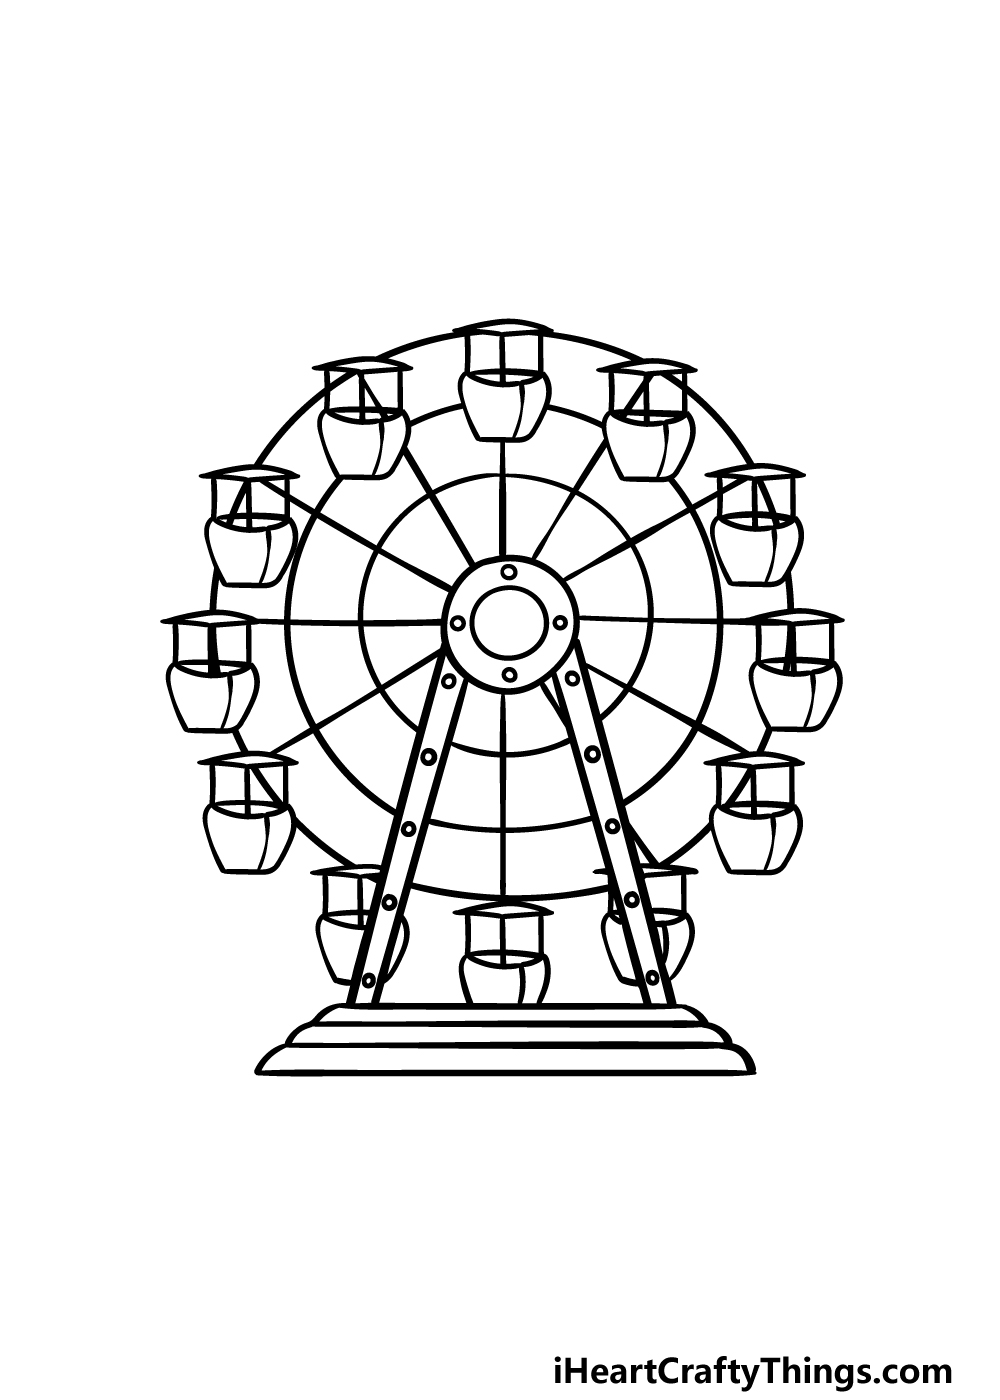
Before we color in this drawing in the final step of this guide on how to draw a Ferris wheel, we will finish off the final elements.
First, we will continue what you started in the previous step and add the rest of the seat compartments.
These will go on the rest of the lines to fill in the top half of the Ferris wheel. Once you have added these, you can then use your pen to go over the pencil lines for the central circles from earlier.
Then you can add some more of your own fun details and elements! Maybe you could draw some more carnival rides in the background or draw people sitting in the Ferris wheel.
What can you think of to finish off the picture?
Step 6 – Finish off your Ferris wheel drawing with some color
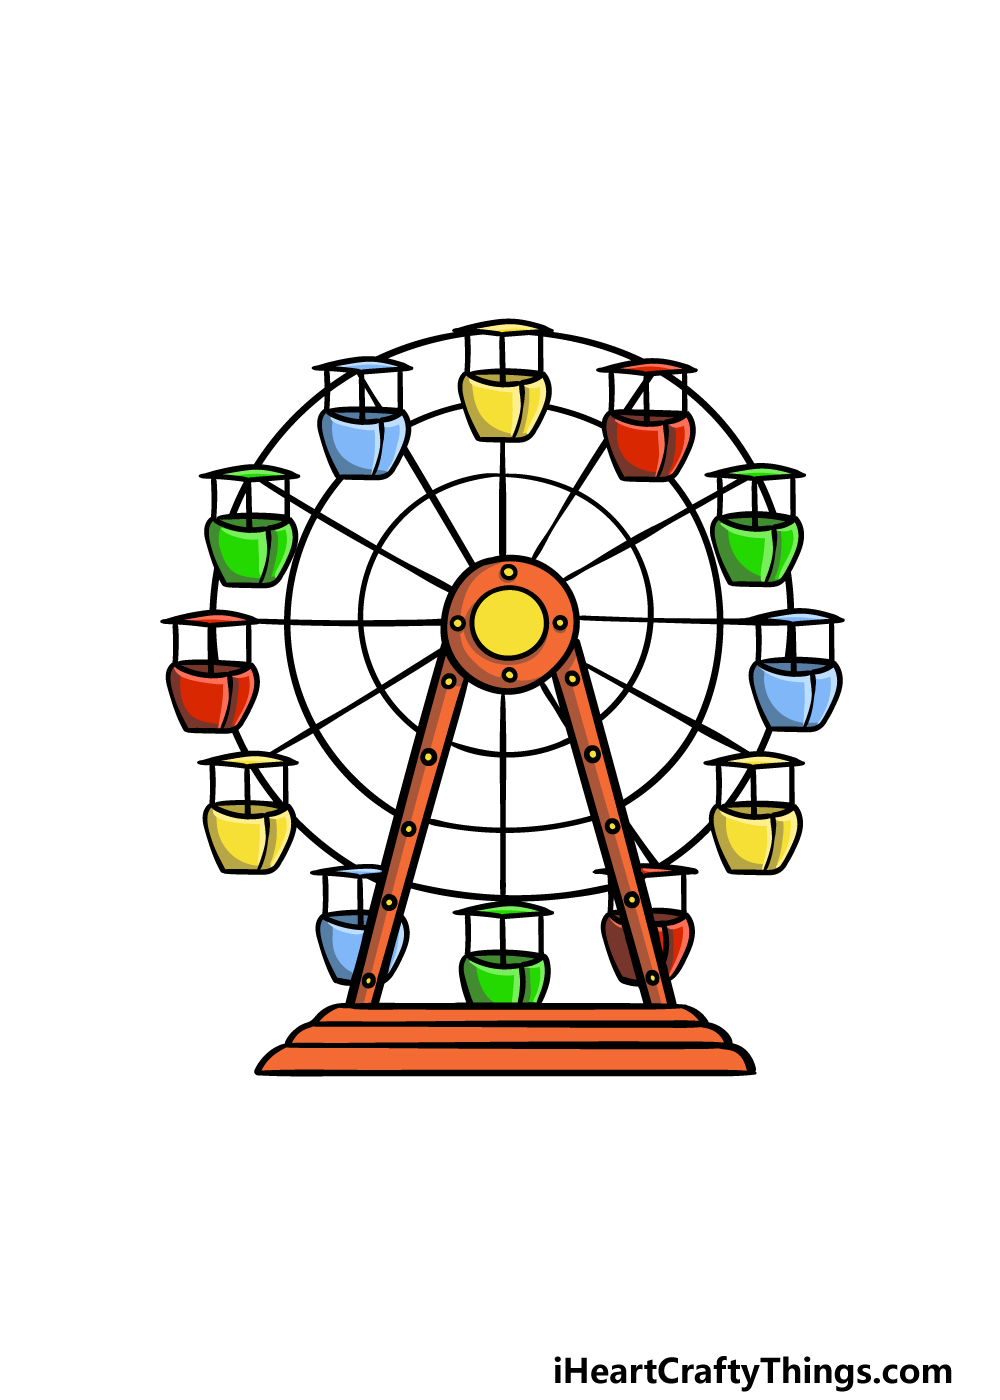
We will close off this guide by finishing your Ferris Wheel drawing off with some amazing colors! In our reference image, we used lots of bright colors to suit the carnival setting of this Ferris wheel.
This is a drawing where you could really have lots of fun incorporating your favorite colors!
Certain art mediums such as acrylic paints and colored markers would work great for this picture, as you can achieve some bright and vibrant colors.
Anything you use will look amazing in its own way though, so what are you feeling for this picture?
Here’s how you can make your Ferris wheel drawing even better…
Go on a wild ride as we make this Ferris wheel sketch even more amazing!
Even though the concept is similar no matter where you find one, Ferris wheels can come in many variations.
We created a classic design for this Ferris wheel drawing, but you could change it up a bit.
This could be the design of the Ferris wheel’s frame or the shape of the cars attached to it. These are just a few ways to customize the design, but what else can you think of?
The Ferris wheel is a classic fairground ride, but there are many more that people can enjoy. These could be fun to add to your drawing of a Ferris wheel!
There are so many different rides you could add to this image. From rollercoasters to rocking pirate ships, this is your chance to create your very own unique theme park.
What are some cool and fun rides you could add to finish off this drawing you have created?
Once you have altered the Ferris wheel sketch in any ways you want and have added any other rides, you could also add a background setting.
The extra rides we suggested would be a great place to start, but there is so much more you could add! This could be weather details or even a big city in the background.
These details would allow you to add all sorts of fun little features and aspects to admire. Where do you think that this Ferris wheel could be located?
Finally, our final tip involves the colors you can use for this Ferris wheel drawing. We showed you a few colors and mediums you could use in the guide, but there is so much fun to be had as you experiment!
Mixing various mediums like colored pens, markers and softer colored pencils can create a wonderfully dynamic look to the colors.
There are also some fun crafts you can use to make the colors look incredible. It’s time to have fun and experiment as you finish it off!
Your Ferris Wheel Drawing is Complete!
Hopefully this guide on how to draw a Ferris wheel helped to bring a bit of carnival fun to your home!
In this guide, we aimed to show you the easiest possible way to draw an effective Ferris wheel, so we hope that we succeeded in that goal for you!
This guide is full of our suggestions, but you can also add some elements and details of your own to create a unique image.
We went over a few ideas you could try in order to do this, but we can’t wait to be wowed by your creativity!
If you had lots of fun with this guide, you’ll be glad to know that there are many more for you to enjoy on our website. We will be bringing new ones out frequently as well, so definitely keep checking in!
It’s always great to see your amazing creations, so please do share your finished Ferris wheel drawing on our Facebook and Pinterest pages!