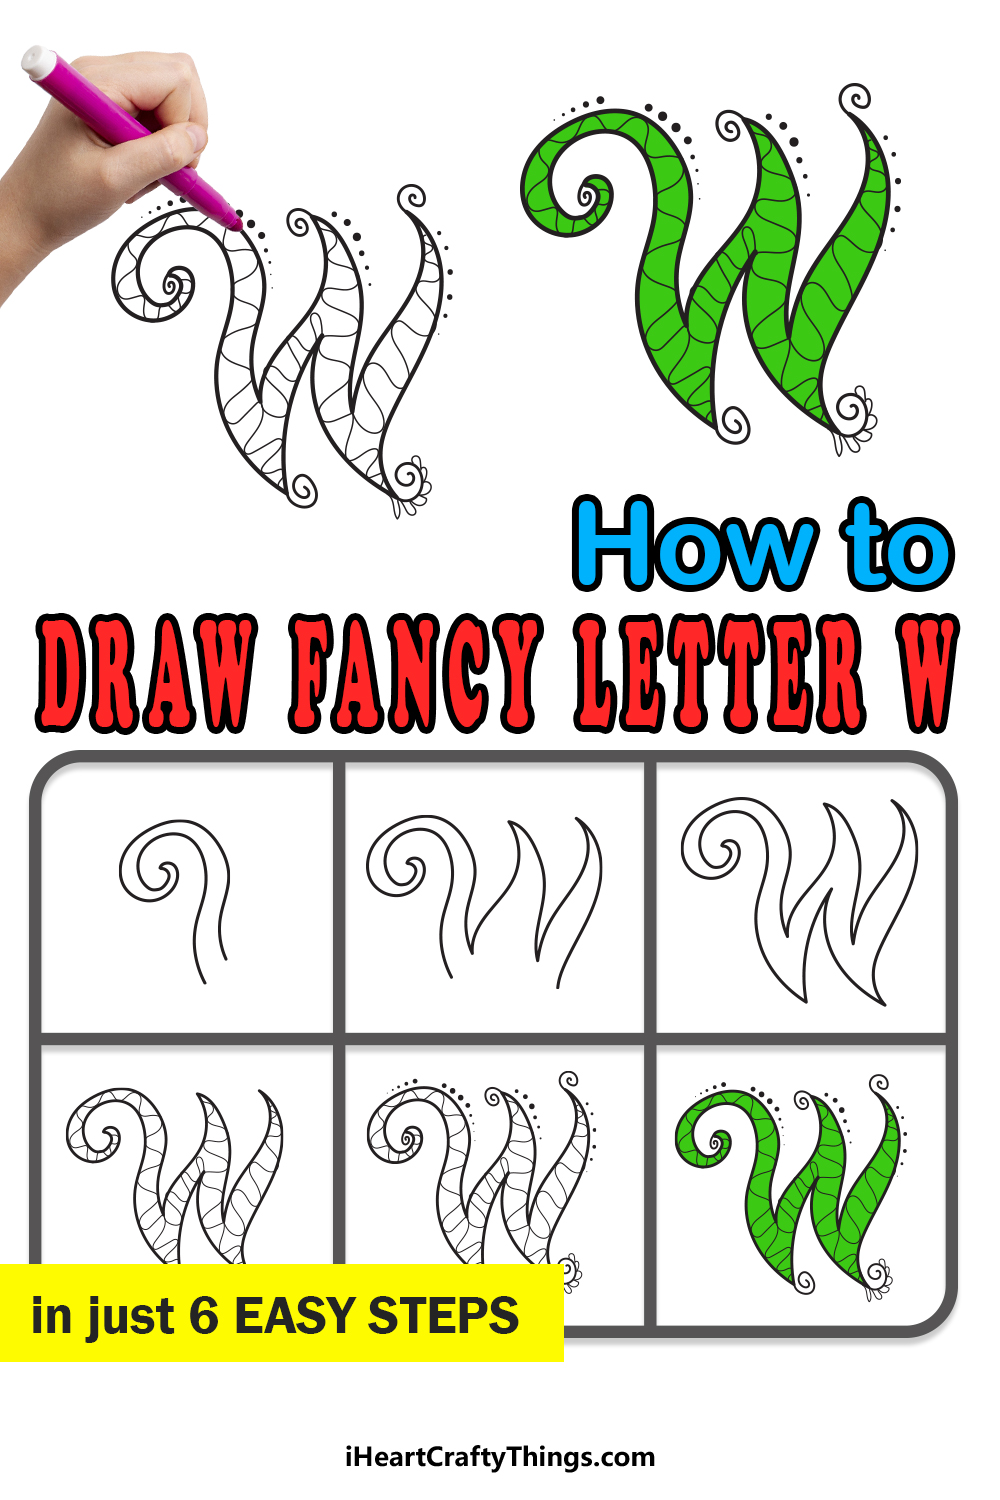
In this guide, we are turning the spotlight on the twenty-third letter of the alphabet: The letter W. Statistically, it is a fairly average letter when it comes to how often it appears in words.
It’s also a relatively easy letter to write, as it essentially looks like two letter V’s glued together. While it can be easy to write, learning to draw it can actually get tricky.
This is especially the case with the fancy letter W that we are covering in this guide. It may look super difficult with all the details and flourishes we added, but we’re here to make it easier!
In this guide, we will cover 6 six steps that will break it down and make it so much easier for you to do. After that, we will look at some ways to decorate the letter with colors and other additions.
So let’s kick off this guide with the first step and see how fun it can be!
Let’s Get Started
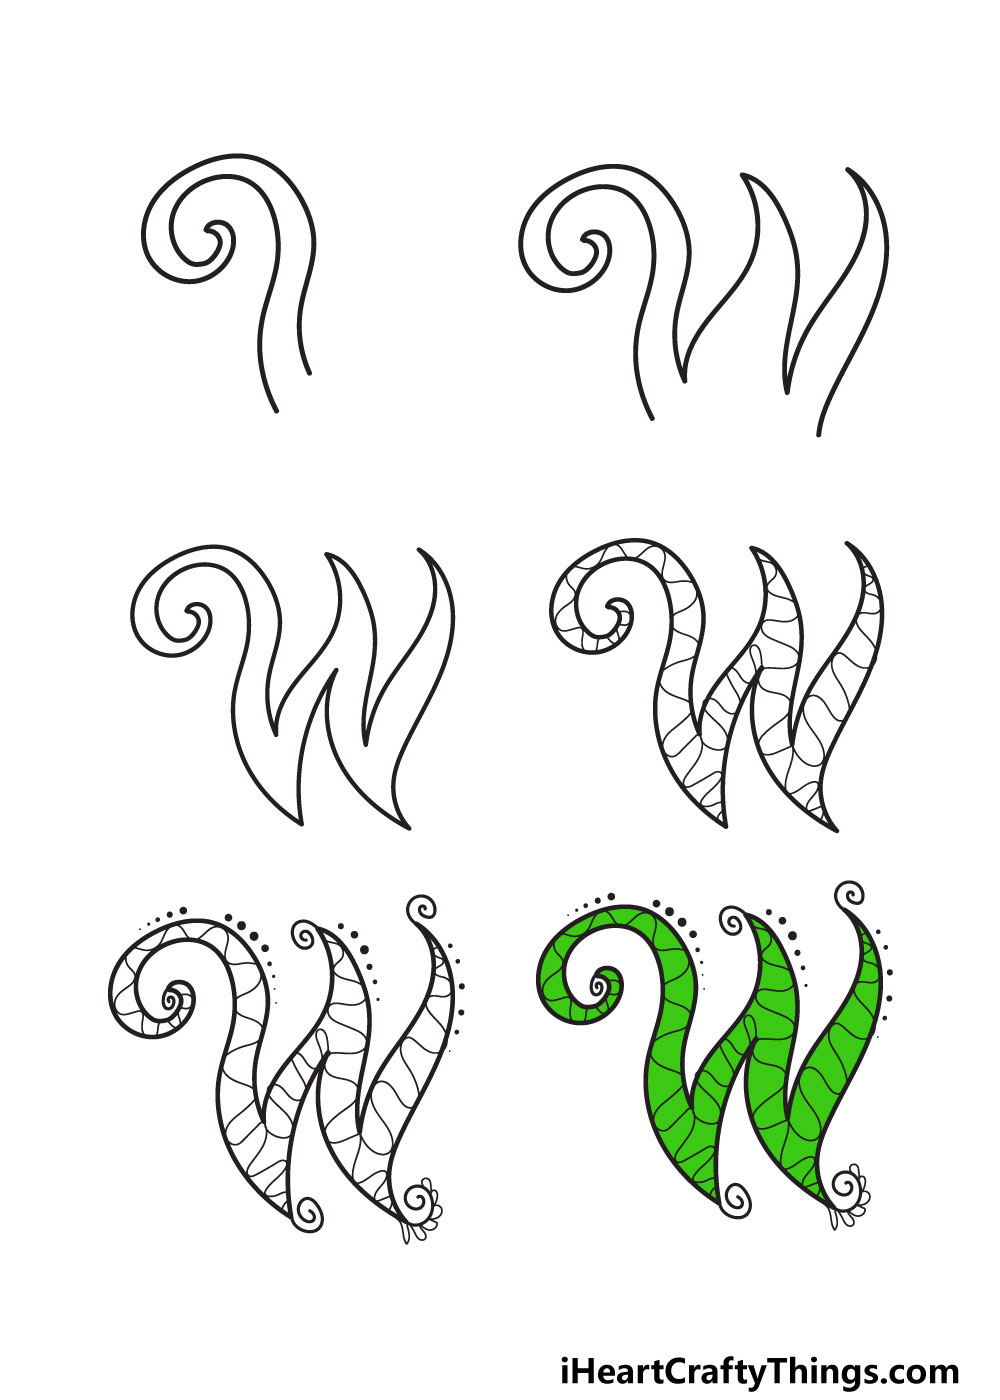
STEP 1:
If you were to make a big letter W in the same way you would write it normally, then you would be trying to make the lines as straight as possible.
We will be taking a bit of a different approach in this guide, though. In fact, we won’t be drawing a single straight line in this whole design.
Despite this, it could actually be helpful to draw out a regular letter W regardless. This one should be done with a pencil, and it can look the same as a regular letter W you would write.
Even though it will look different to the final product, it will still help you to depict the shape of this letter as we add details.
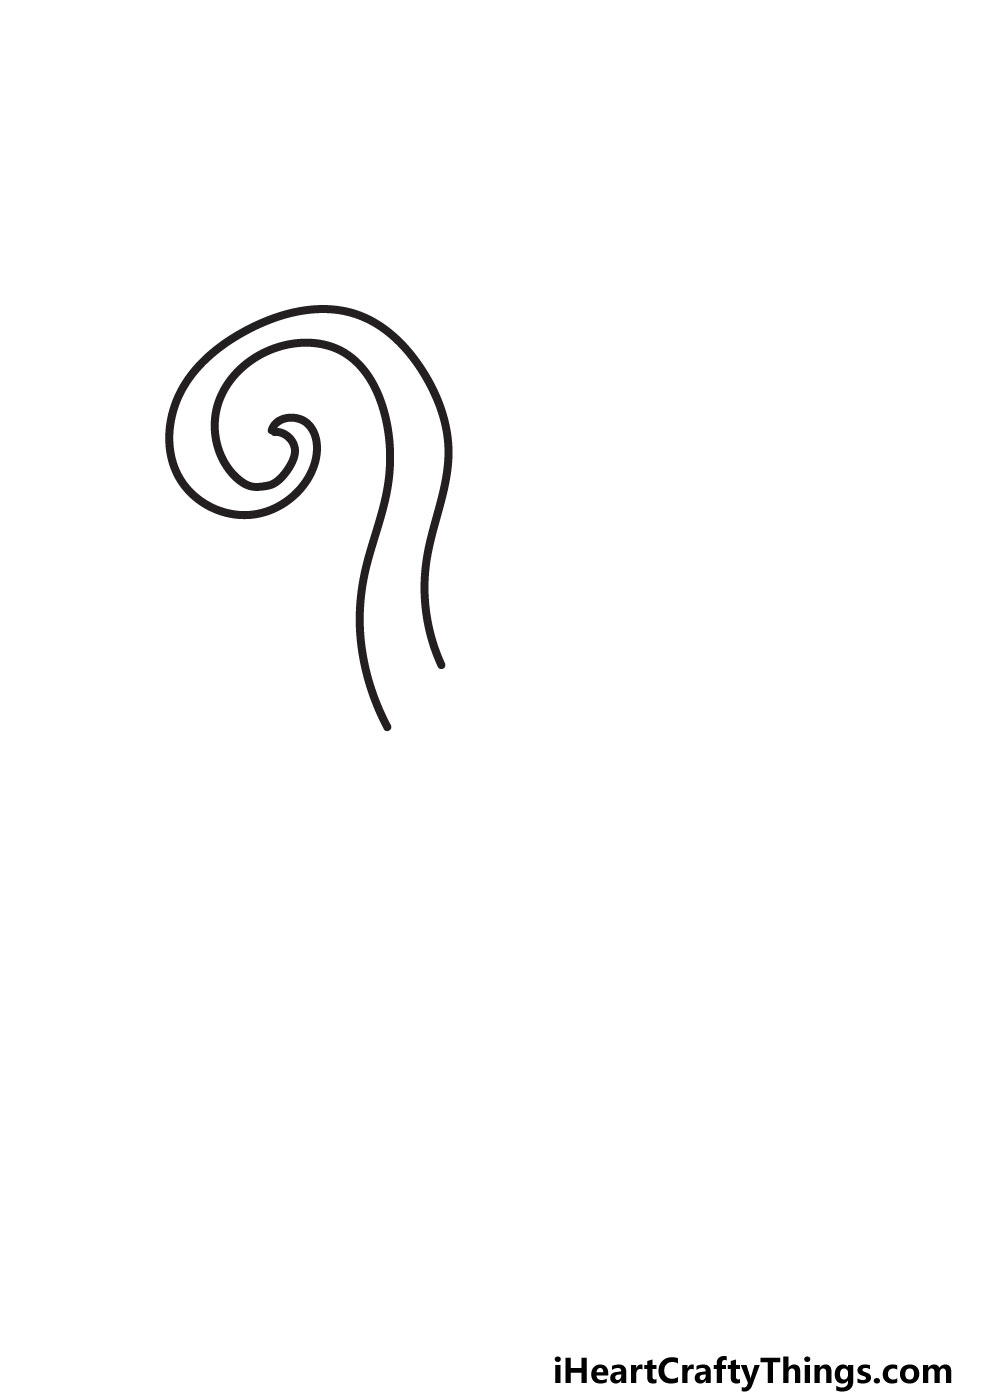
Then, we will add the first part of this design. The design will have a few spirals attached to it, and we will add the first of these here.
Start by drawing a loose spiral shape that has a pointy tip at the center. Try to make it look as close to our example as you can, as the angle will be important later.
This spiral will then twist out and to the right. It will then slope down quite sharply, forming the beginning of the left side of the letter.
Now we can move on to the second step!
STEP 2:
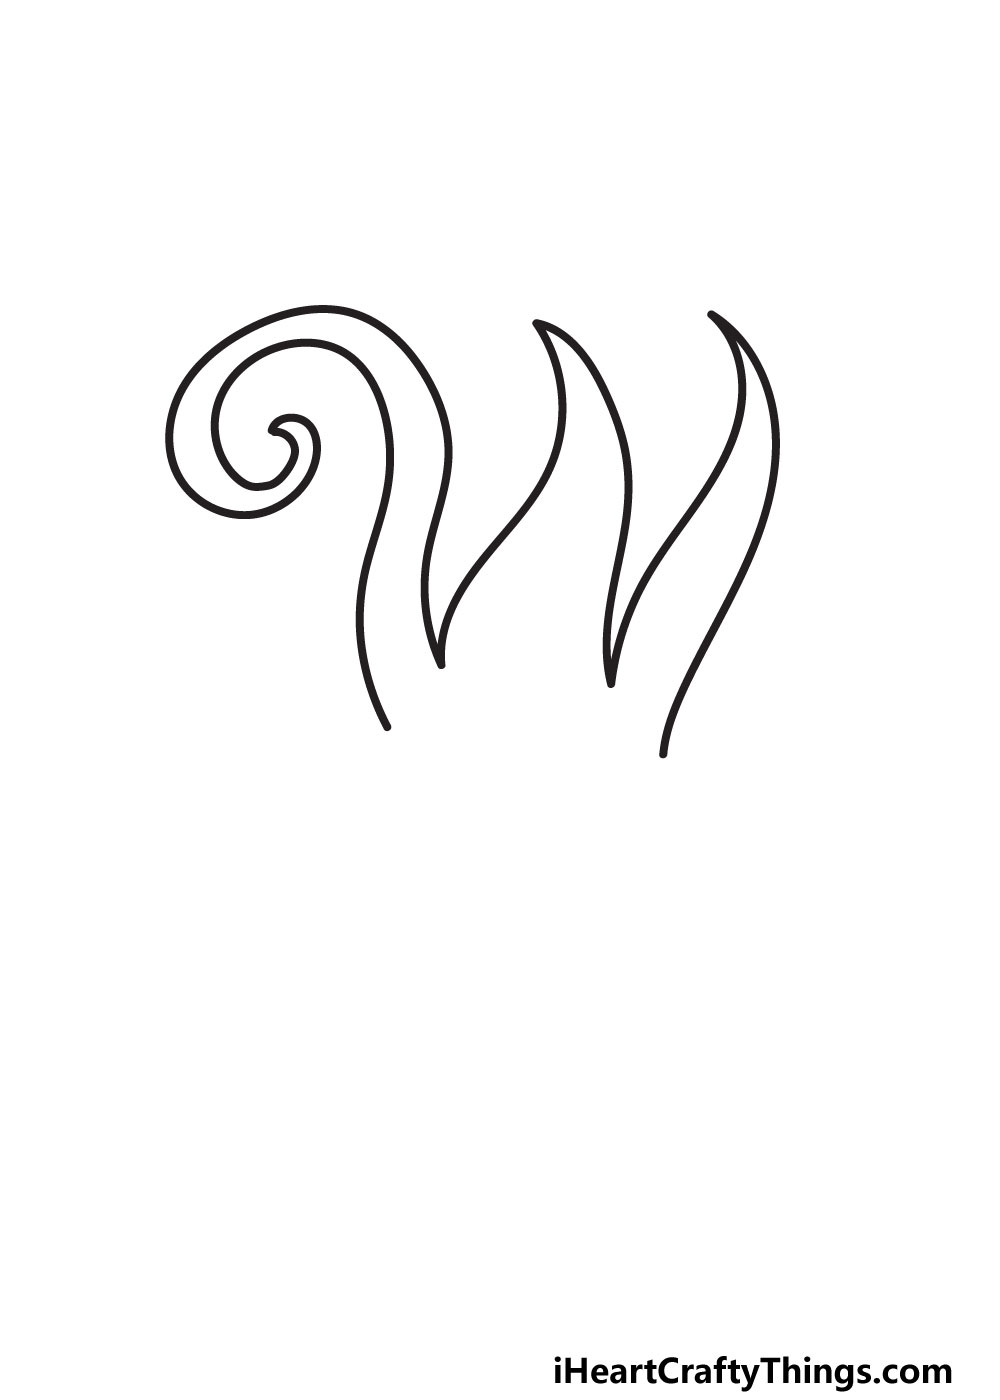
The letter W has three pointy tips at the top no matter what style you’re drawing it in. That will be true for this particular one, and we will be drawing the other two points now.
You already drew the first one, even though it is a lot more rounded than the pointy tips of this step. We will begin this step where we ended off last time.
Where the previous line ended, draw a wavy line up at an angle. This will end in a pointy tip at the top, where it will slope down again until it ends at a sharp dip.
Then, it will slope up again like last time, ending in another pointy tip at the top. Finally, slope it down again to create the third peak of the letter.
This may have sounded like riding a roller coaster with all these ups and downs, but it’s not as complicated as it may sound!
Now that we have the upper part of the letter done, we can start adding the base of the letter in the next part of the guide.
STEP 3:
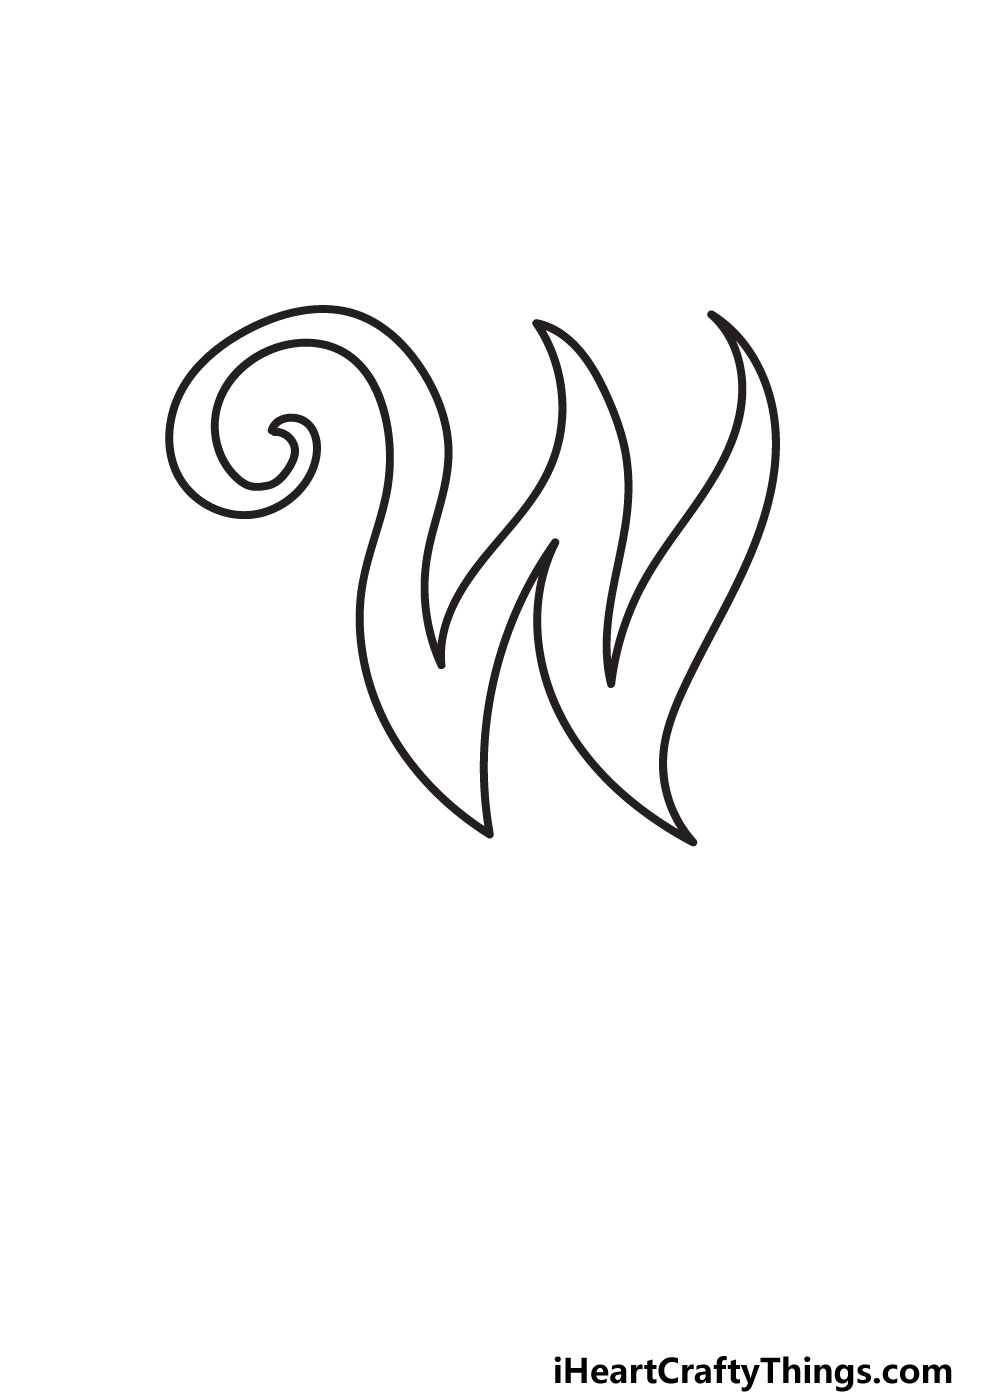
This third step of your fancy letter W should be easier than the previous one, as we finish off the total outline of the letter.
This will focus on the lower base of the letter. Let’s start with the line on the left where it ended off and extend it down in a slope.
It will end in a pointy tip at the bottom, and it will rise sharply in another curvy slope. This line will also end in a pointy tip.
Once again, we will slope down at an angle until we have another pointy tip at the base of the letter. Finally, there will be a small gap between this line and where the line ended on the right earlier.
This can be closed off with one more line. Step 3 is another one that could potentially sound trickier than it is.
Now that you have finished this step, you won’t need to use the pencil guide we suggested in the first step. If you used that suggestion, it can be erased now.
Now that we have the outline completed, we can add some interior details to make your letter look even fancier.
STEP 4:
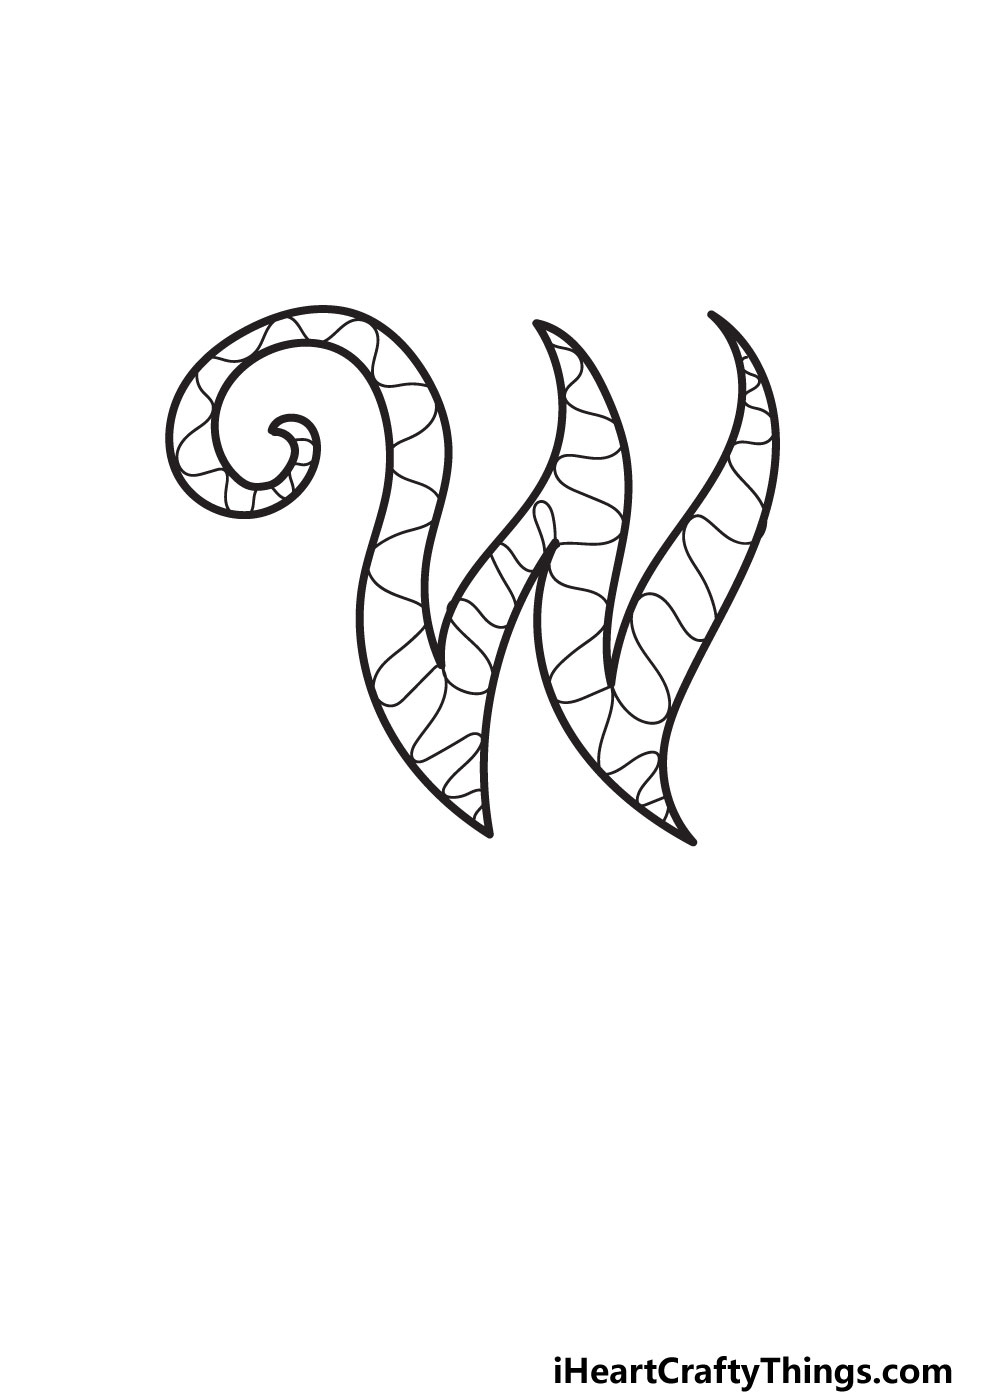
In steps 2 and 3, we had some lines that had lots of twists and turns, and it got a bit tricky at times! That’s why we want this fourth step to be nice and relaxing.
We recommended that you follow our reference images closely in the previous steps, but this is one where you can bring your own ideas into the mix.
In our example, we show you just one of many ways that you could decorate this letter W. We decorated it with a series of wavy lines all across the design.
It’s a simple way to make the letter look more detailed and vibrant, but there are many other ways you could fill the interior.
You can try out any ideas you may have, and they could range from simple lines to shapes and other details.
Once you’re happy with how it’s looking so far, we can then add some final little details to the exterior of the letter to really finish it off before we add some color.
STEP 5:
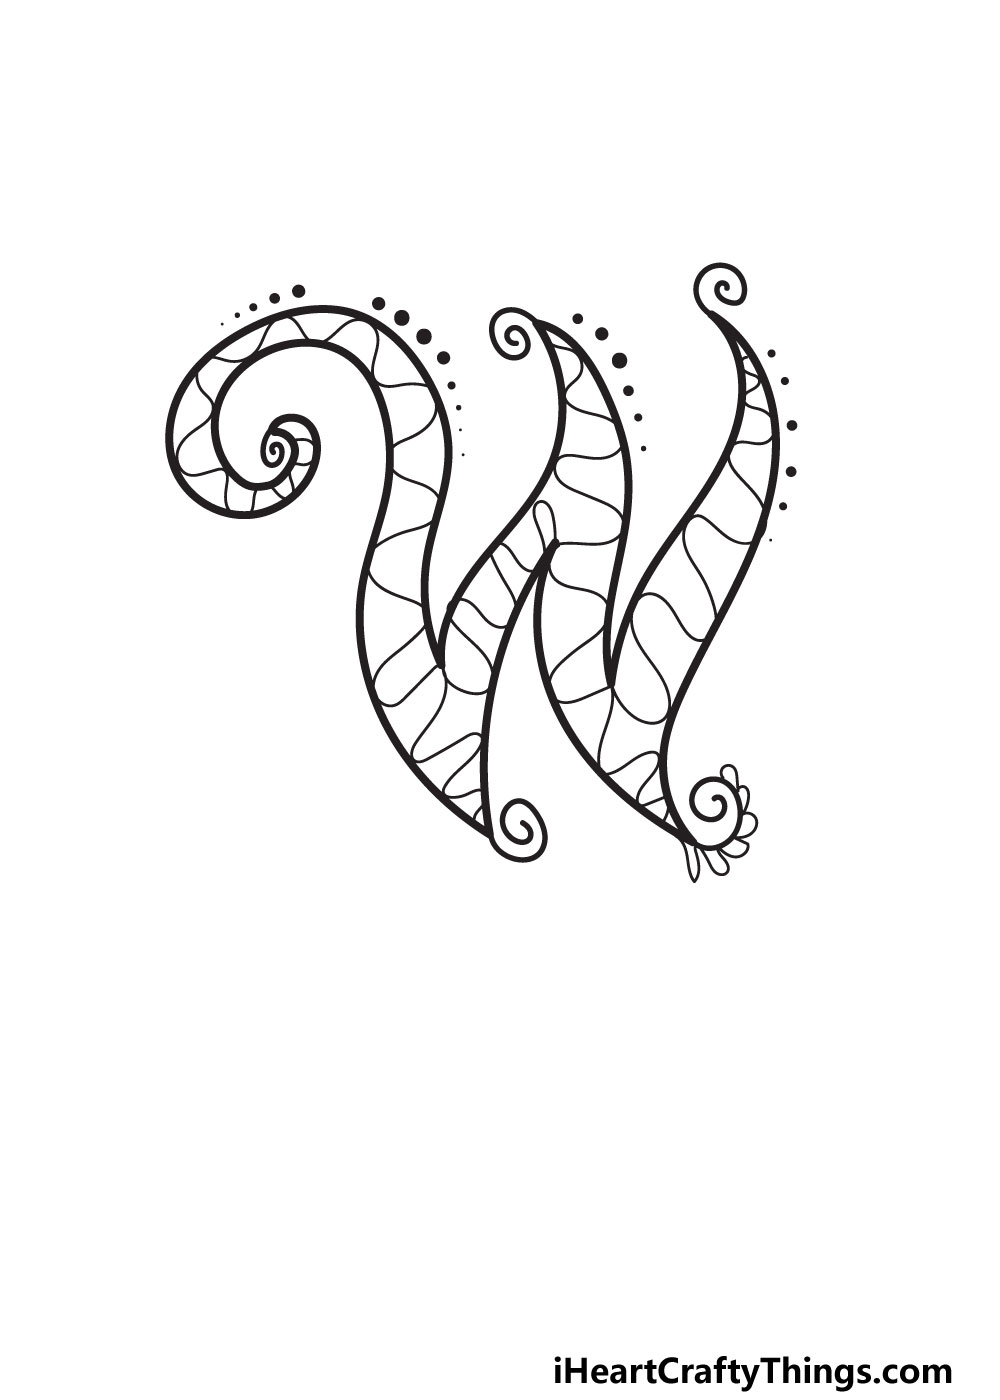
We’re almost ready to add some color to this awesome drawing, but we have a few more details to add. As we mentioned in the previous step, these will be focused on the exterior of the letter.
First, we began by drawing a small spiral line extending out from every tip of the letter. It’s such a simple thing, but it already adds more life to the drawing!
We’re not quite done yet, however! For example, we added some little leaf shapes to the spiral on the bottom right.
Then, we drew a series of dots of varying sizes around the upper sections of the letter. All of these details have been included mainly as examples of the kinds of details you can add.
You can move them around, change them up or add some details of your own! Then, why not add something to the background?
This could be simple shapes, other letters or maybe just some simple colors. We will go over some ideas for the background in the final sections of this guide, so let’s move on.
STEP 6:
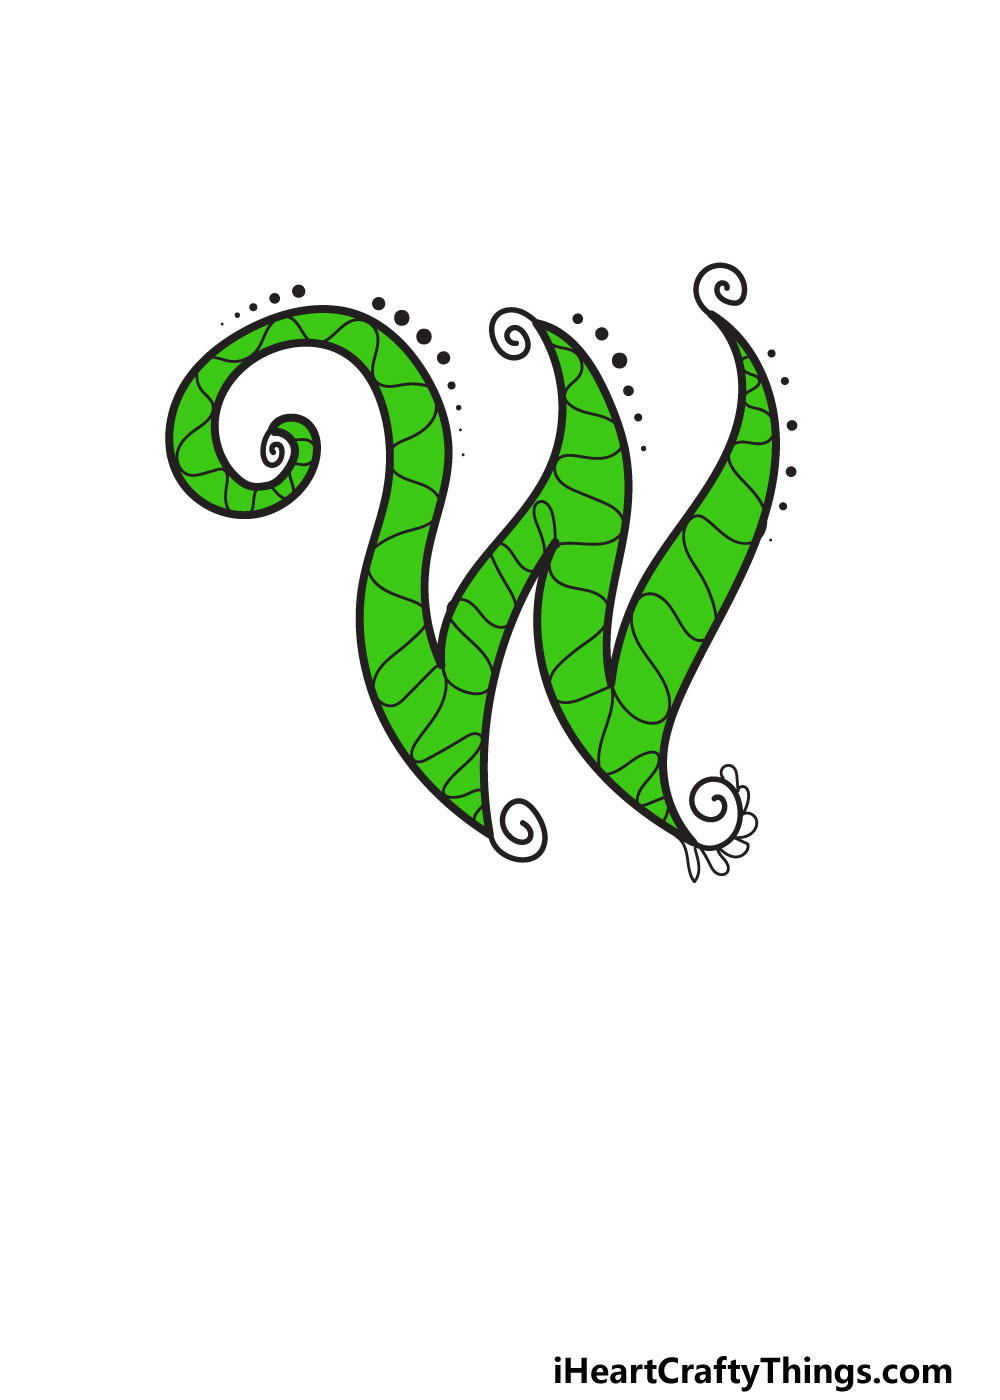
We hop you’re ready for some coloring fun, as this is the step where we bring this fancy letter W to life with some color!
In our reference image, we chose to color the letter with a bright green color to make it pop on the page. If you like how this looks, then you can try to add a similar color to your own version.
Otherwise, you should definitely go for any colors you prefer! You could even use a mix of a few of your favorite colors to really make this a striking image.
Earlier we mentioned filling the background with colors, and that can be a great way to make the design of the letter stand out even more.
Using a different art medium for the background as opposed to the one used for the letter can also create a wonderful contrast!
Which colors would best suit this drawing?
My Final Tips To Make Your Fancy Letter W Drawing Even Better!
Whenever we create a drawing that focuses on a letter, we always like to think of a way to create a theme for the drawing.
One thing that makes this easier is to use words or names that start with the letter. For example, let’s say you choose the word ‘water.’
You could write out the rest of the word in a fancy style, and then use details and colors that evoke water. The background could even look like waves and have fish and other aquatic creatures.
If you have a friend whose name starts with W, then it would be a fun idea to write their name out in this style.
We’re sure they would get a kick out of seeing their name written out all fancy, and you could add some background details that they would specifically like.
What are some names or words that would make a great theme for this drawing?