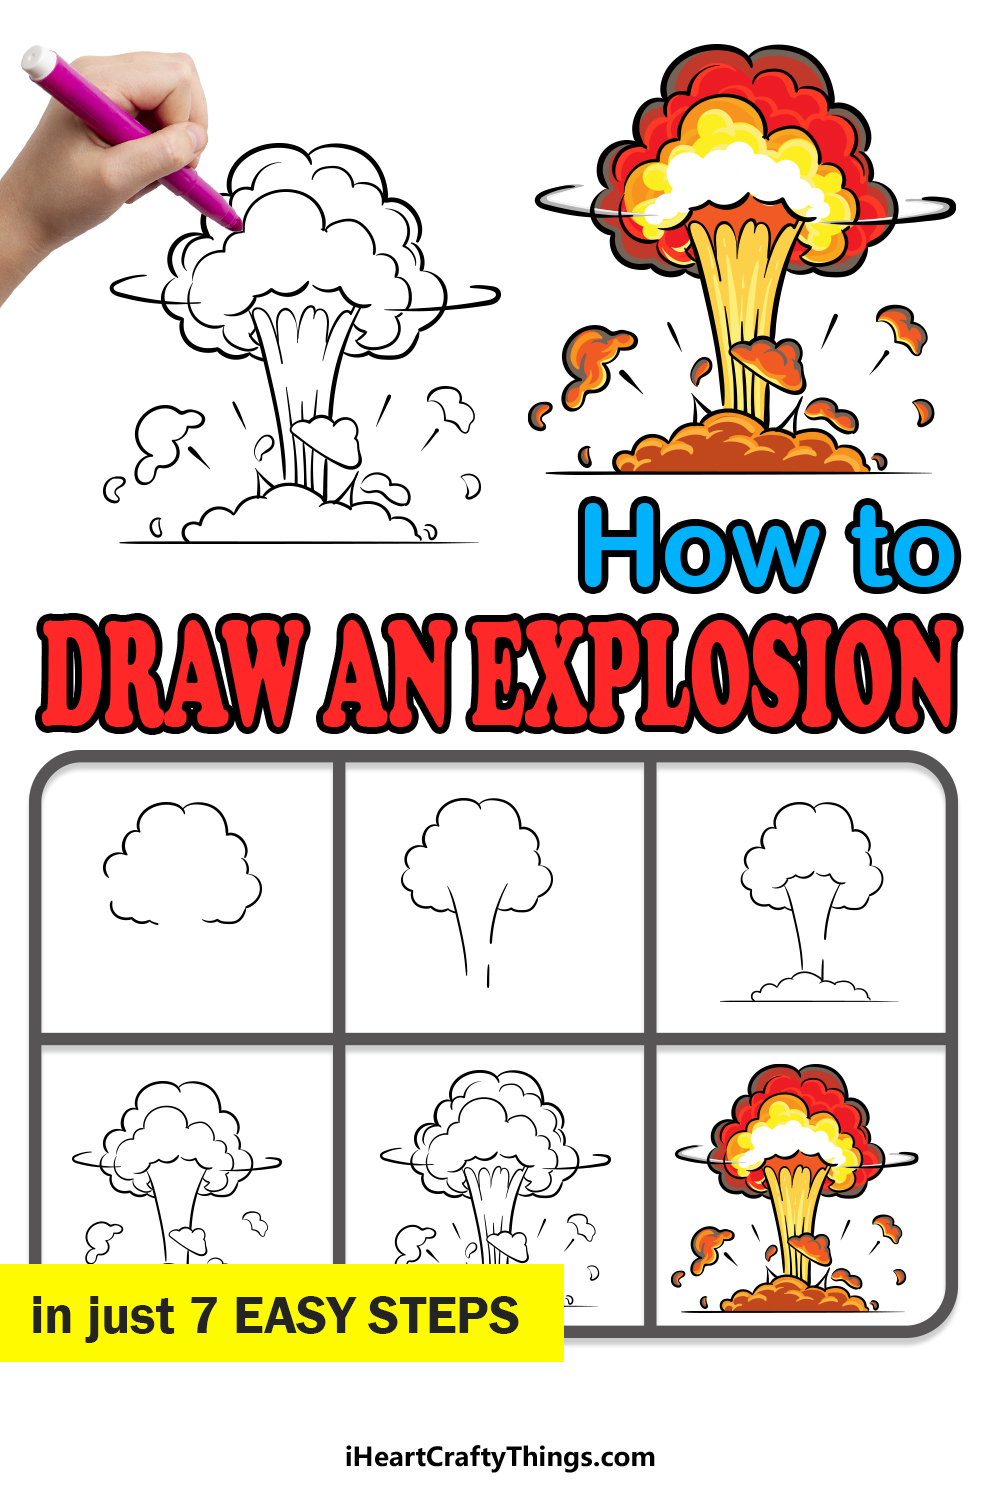
When watching an action movie, there are few effects more spectacular than a giant explosion! An explosion is big, loud and dangerous, and it can create tremendous excitement seeing the hero running away from one in the nick of time.
We may see explosions in plenty of blockbusters, but it can be quite a challenge to learn how to draw an explosion properly.
When you know what to do, however, you can create your own amazing explosions effortlessly and set your inner action director free!
This step-by-step guide on how to draw an explosion will show you how to do it while having lots of fun along the way!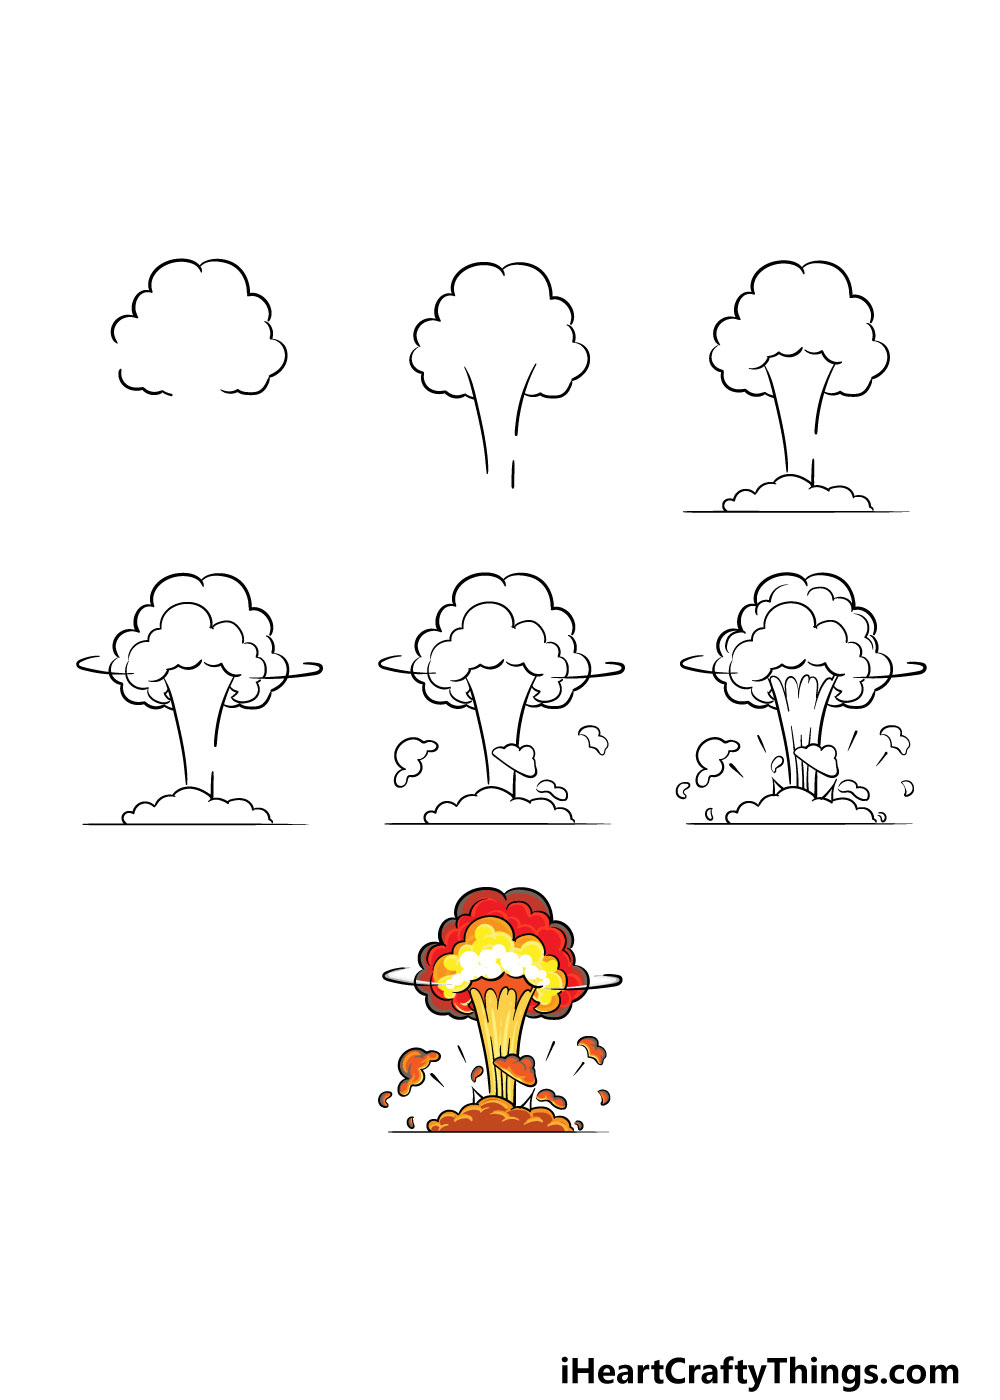
How to Draw An Explosion – Let’s get Started!
Step 1

To get this guide on how to draw an explosion started, we will be starting with the fluffy top of the explosion.
To do this, you will be drawing several bumpy lines in a curve to create this effect. For now, there will be a gap at the bottom and a small one to the left, but we will be filling those gaps in shortly.
Once you have these elements drawn then you’re ready for step 2.
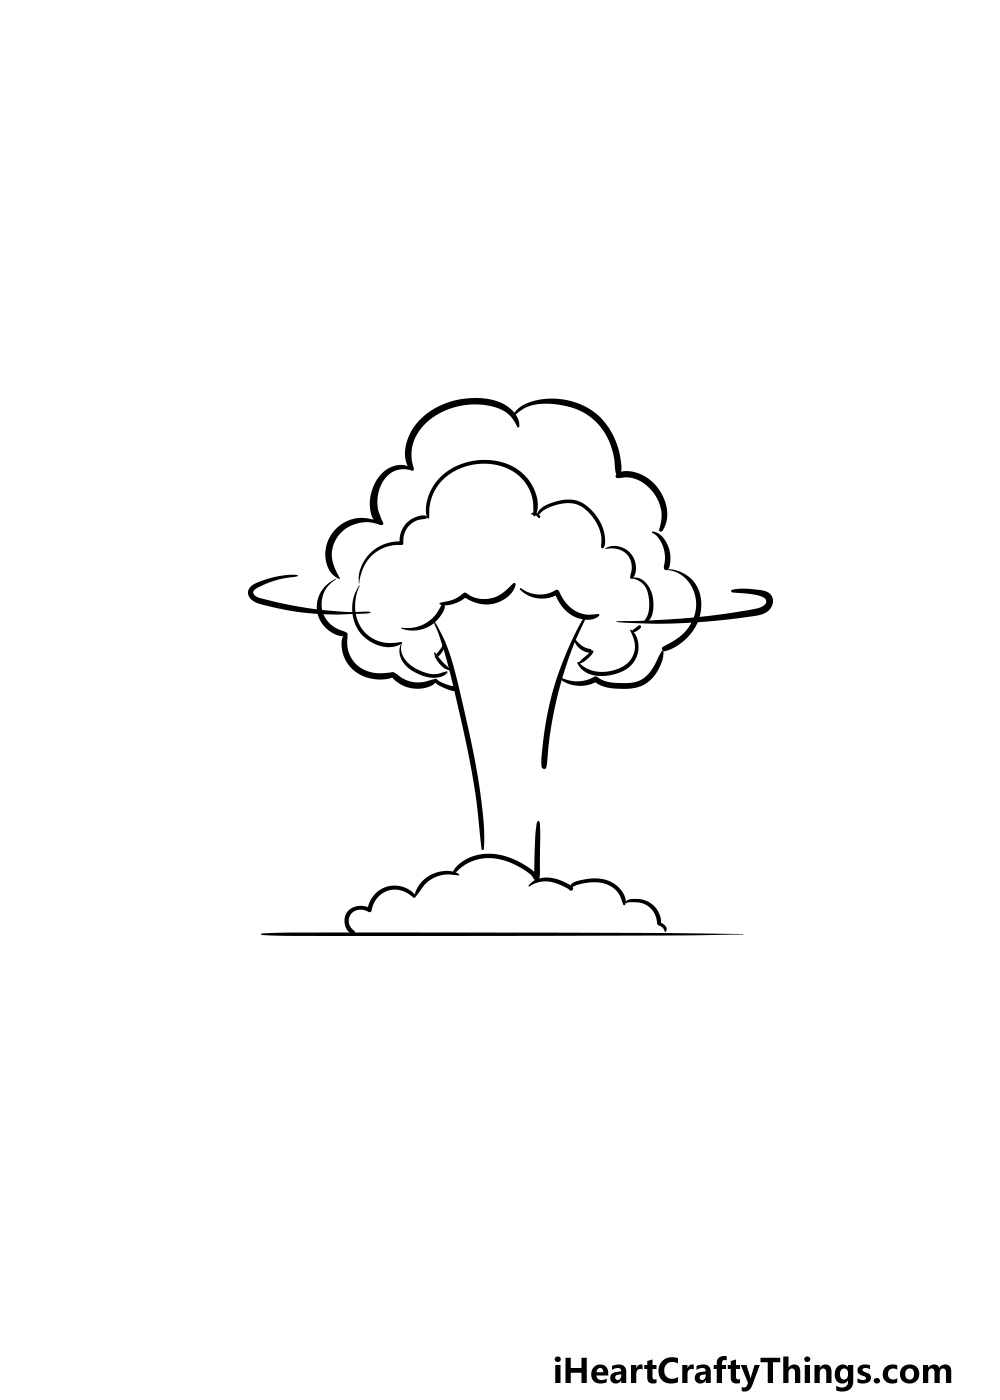
Step 2 – Draw the thin center of the explosion
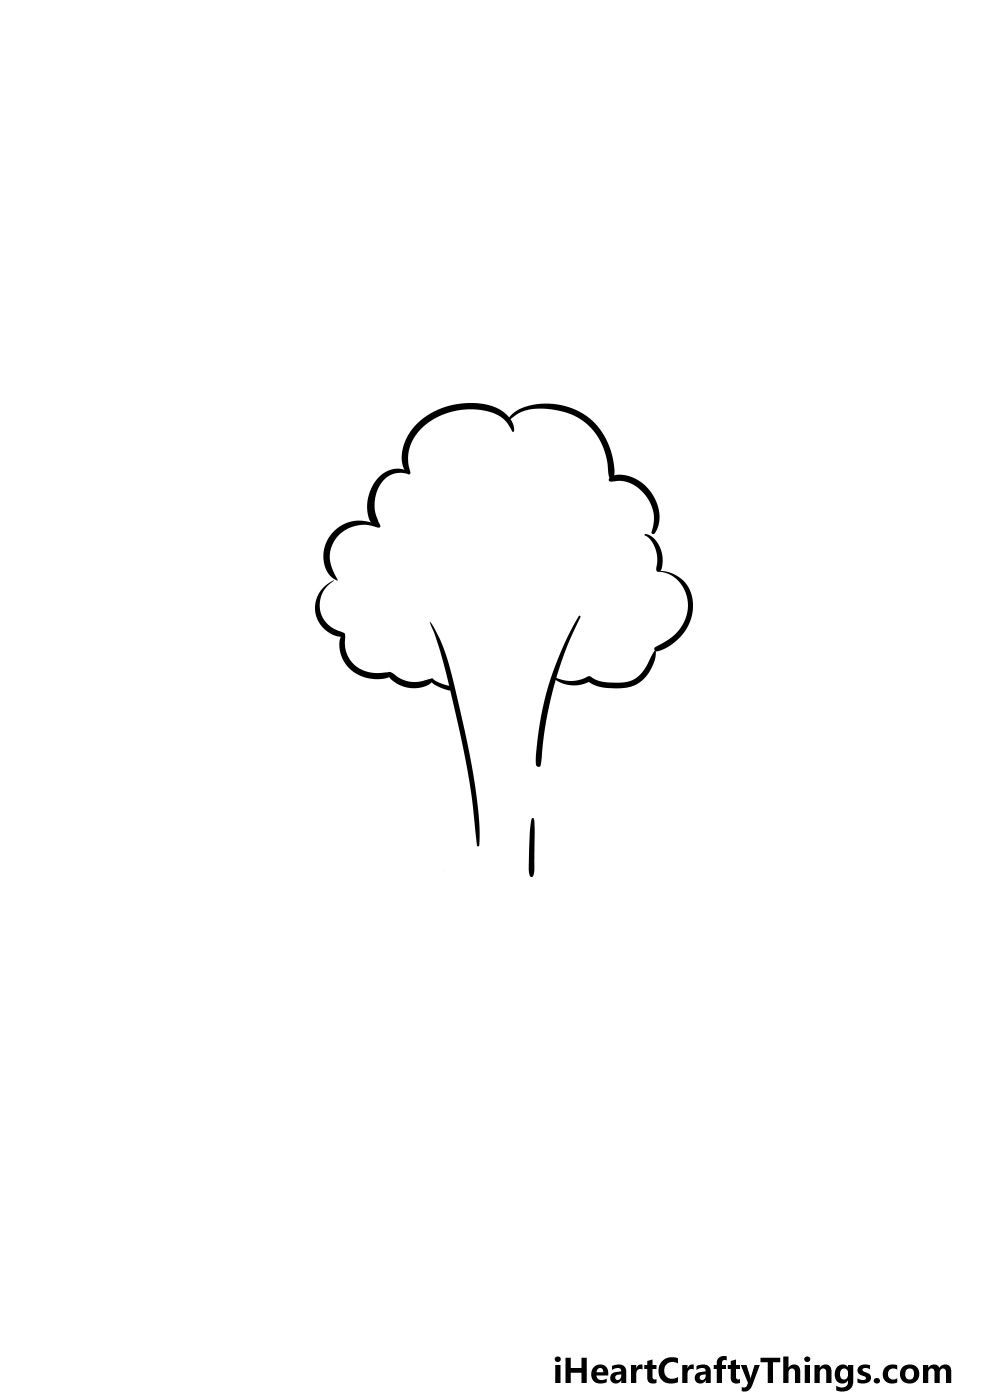
For this part of your explosion drawing, you will be drawing the thin central ‘column’ of the explosion. First, you can draw a curved line coming from the left-hand side of the explosion going downward.
While you’re at it, you can also draw a small curved line in the gap that you left on the left-hand side of the top cloud.
You can then draw a curved line coming down on the right, but this time you will leave a medium-sized gap near the bottom of the line.
Step 3 – Add a base and some inner details
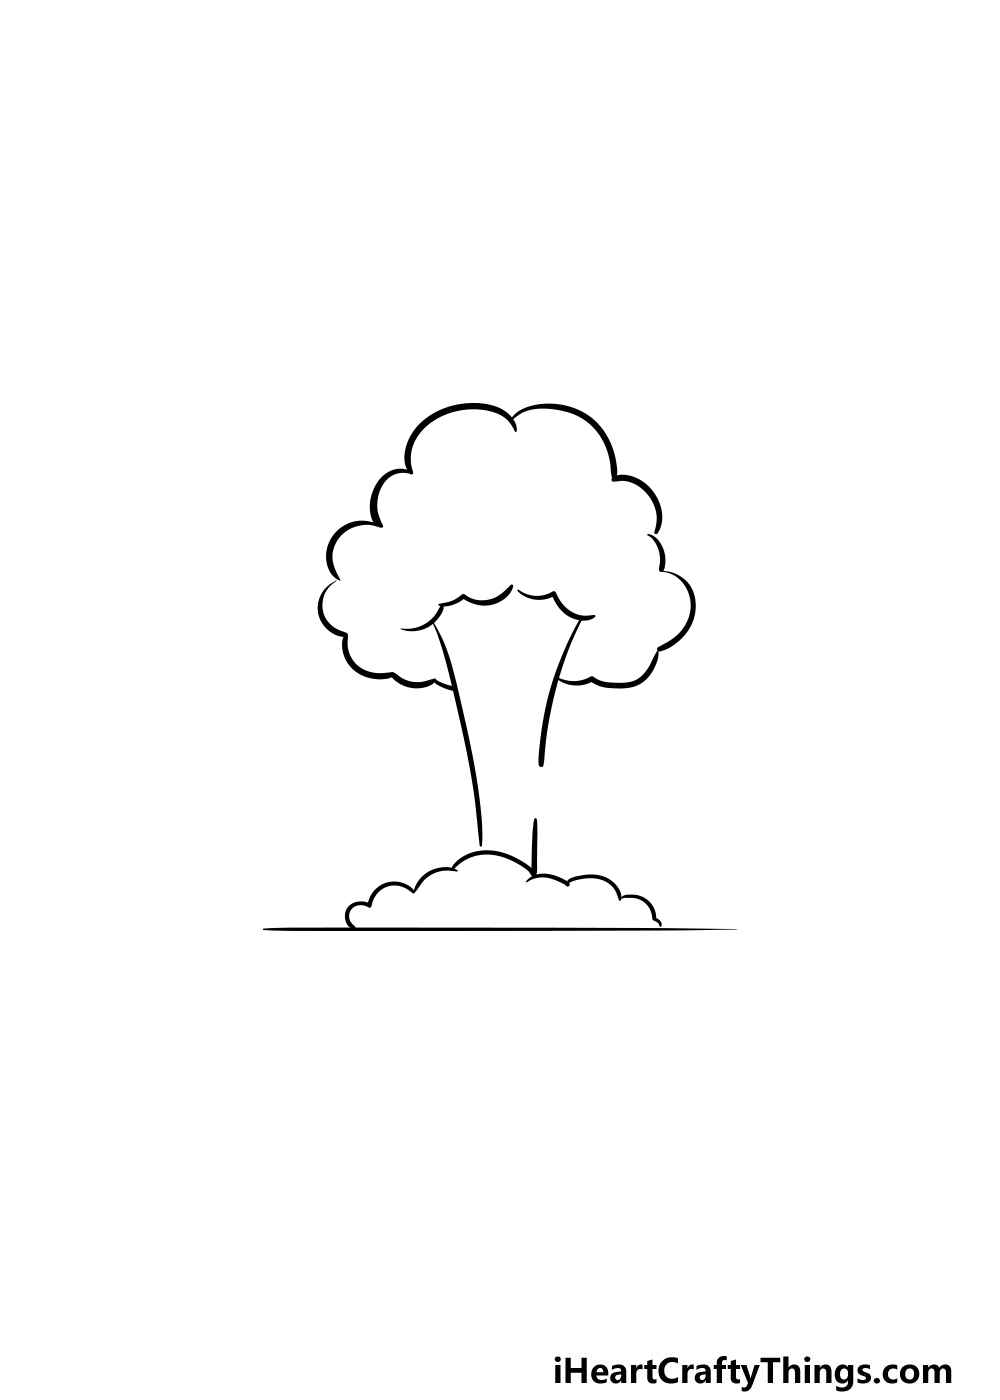
We will be adding a base and some more details in this step of our guide on how to draw an explosion.
First, you can draw a straight line at the bottom of the drawing. Then, you can draw some more bumpy lines to create a cloud at the bottom of the explosion.
This cloud will also go over the central column of the explosion, as shown in our reference image.
You can also add some more bumpy lines at the top of the inner column of the explosion as you can see in our picture.
Step 4 – Keep adding some more fun details in this step
This step along with the next few will be all about adding some awesome final details to your explosion drawing to finish it off.
For now, you can draw some more bumpy lines on the interior of the top of the explosion and extending from the sides of the column.
Then, you can use some curved lines going around the head of the explosion for a cool effect.
Step 5 – Draw some debris in this next step
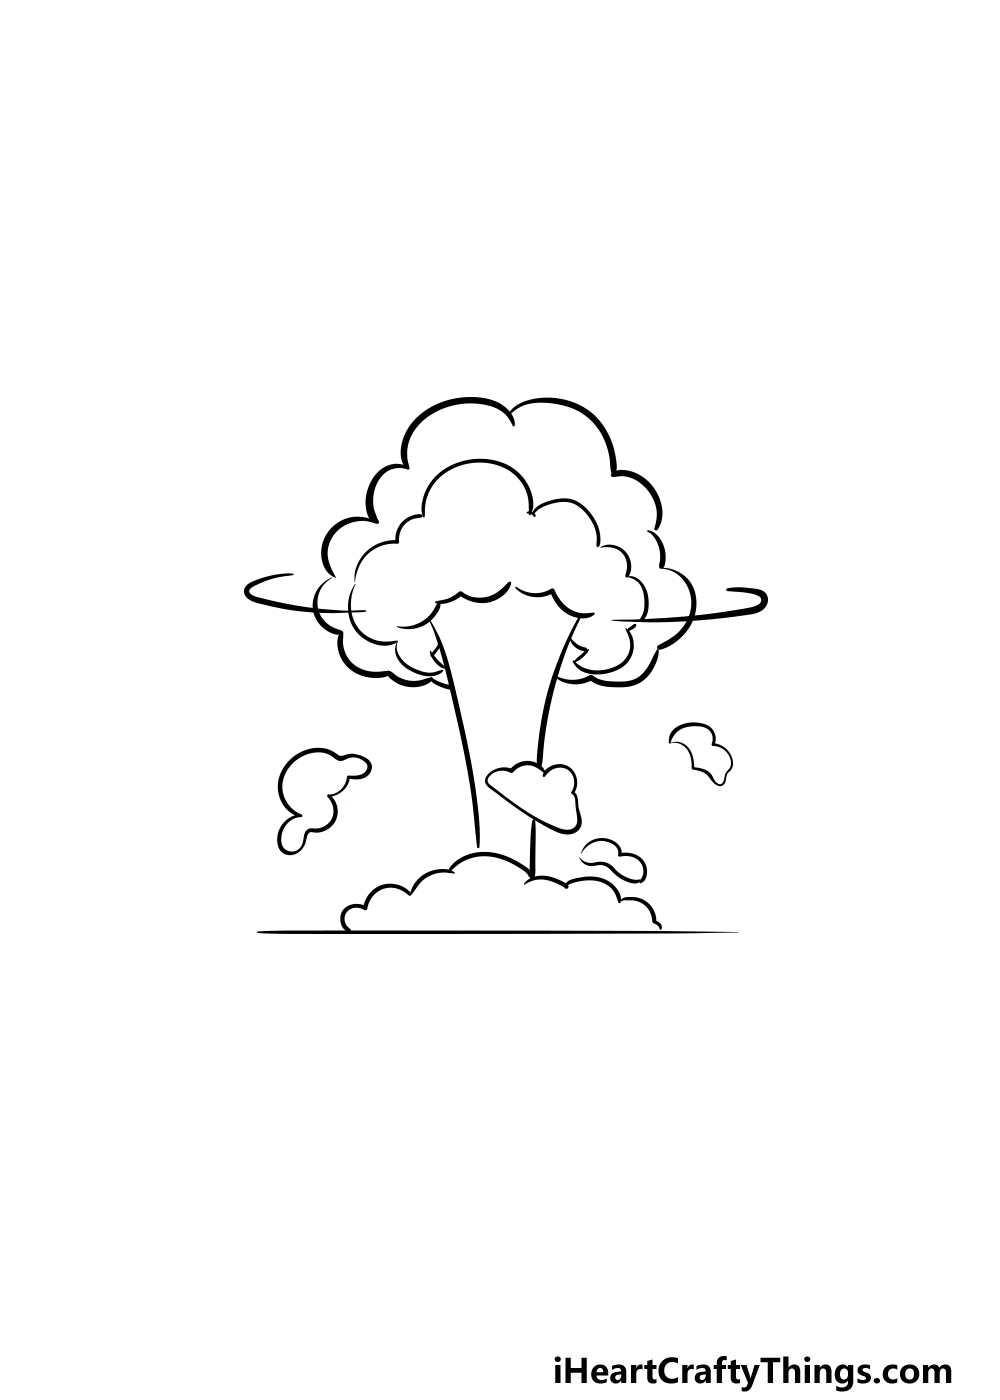
When there is an explosion, shards of debris will go flying in every direction, and we will be drawing that debris in this step of our guide on how to draw an explosion.
One of these bits of debris will be filling in the space that you left on the right-hand side of the central column of the explosion.
To draw the rest, simply add some irregular shapes flying out from the center of the explosion.
We added four bits of debris, but you could add more or less depending on your preference, and you could also change the positioning a bit.
Step 6 – Now, draw some final details
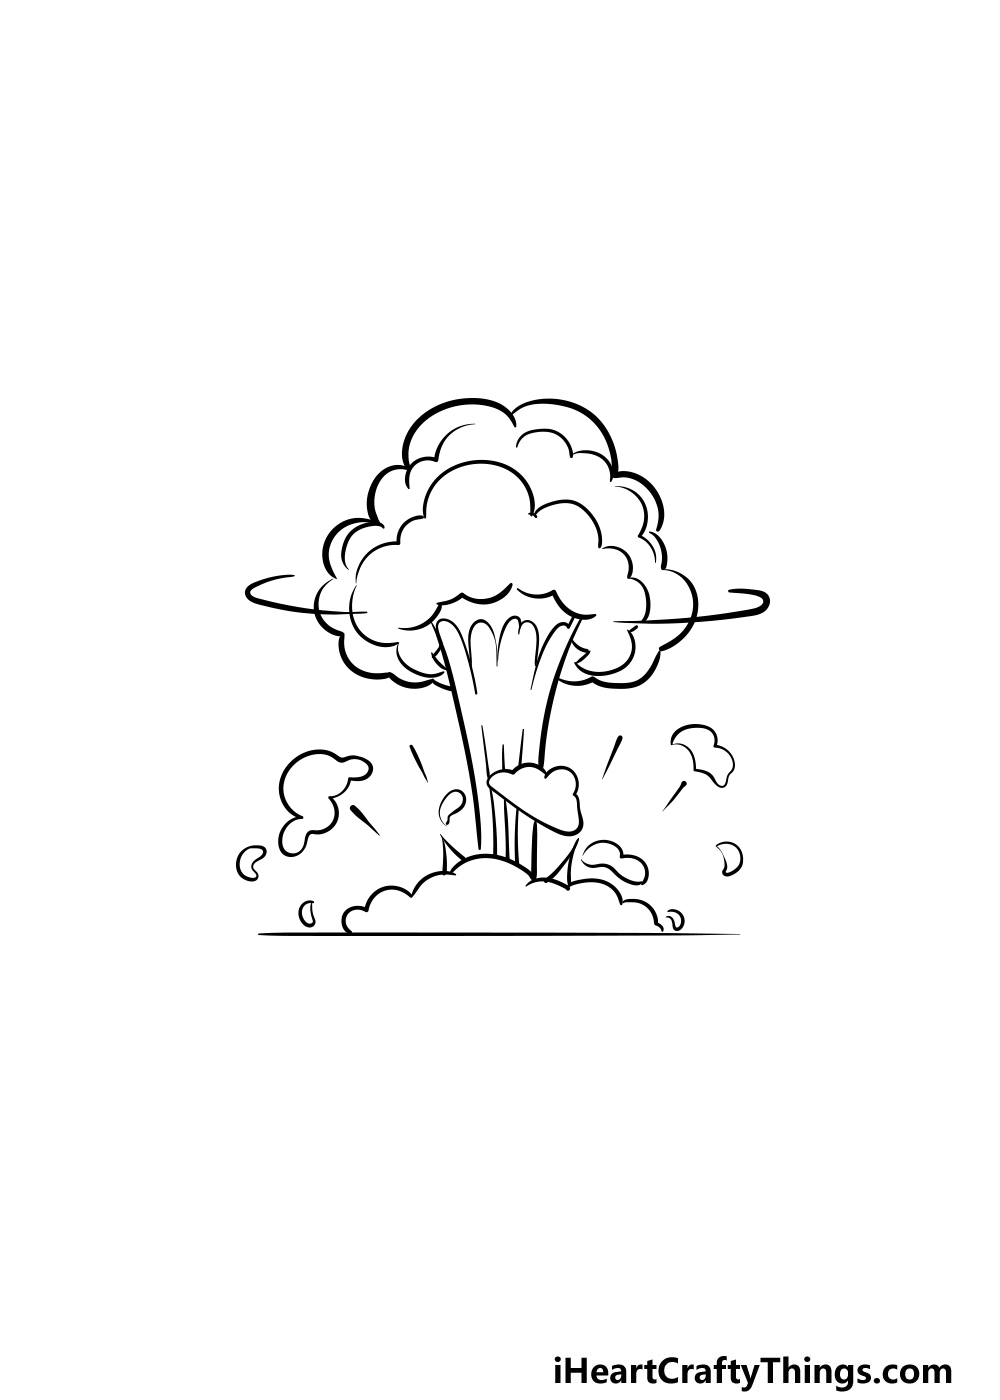
Your explosion drawing is almost complete now, and we just have a few more details to add before it’s done.
First, you can draw some lines going up inside the central column, extending from the base.
Then, you can add some long jagged lines extending down from the top of the head of the explosion. Some more bumpy lines inside of the explosion will also help to build on this effect.
Finally, there are some details you can add around the explosion itself. First, draw some lines going outward from the base of the explosion as shown in our reference image.
Then, it will be finished off with some more sharp shapes extending outward with some more small bits of debris for good measure.
That will technically finish off this drawing, but be sure to add any details of your own that you would like.
Maybe you could draw someone dramatically running away from the explosion to make this look like a real action scene!
Step 7 – Finish off your explosion drawing with some color
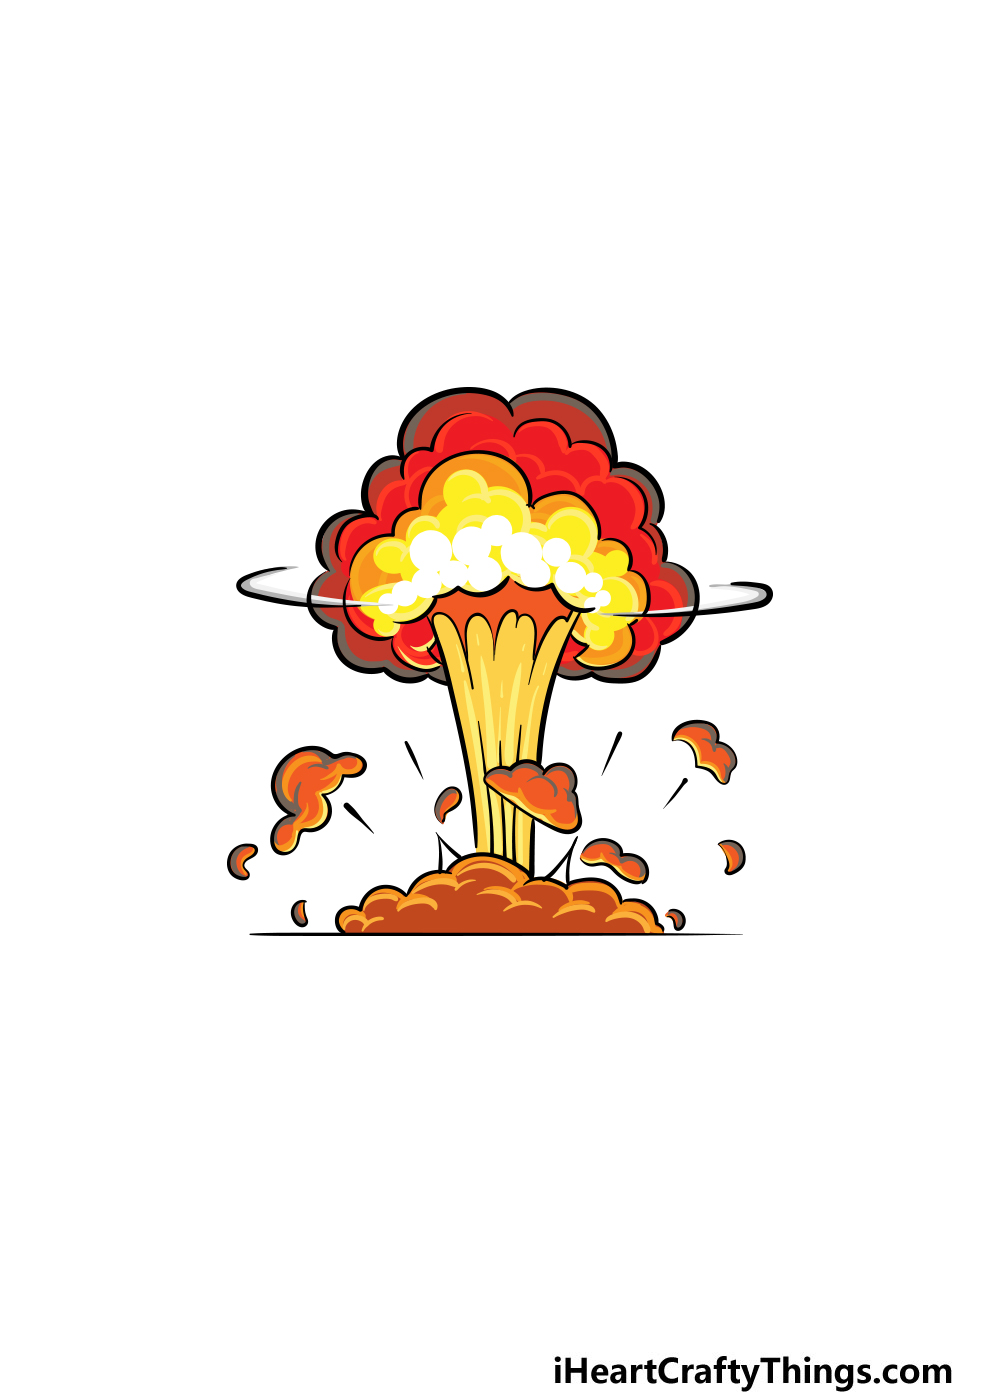
This picture is already looking incredible, but you can make it look even better in this final step of our guide on how to draw an explosion! To do this, you can add some beautiful colors to really bring this picture to life.
In our example image, we used colors like red, orange and yellow to make this explosion look striking and hot!
You could use similar colors for your own explosion, but feel free to incorporate any colors you would like.
Using mediums such as acrylic paint or colored pens would give this drawing a bright comic book style to the image.
Whereas something like watercolors or colored pencils would create a more classic, soft look. What colors and art mediums will you use to finish off this explosion drawing of yours?
Do this to take your explosion drawing to the next level
Create an action-packed artwork with these tips for your explosion sketch!
You will see plenty of explosions in action movies, so it could be fun to create an action scene for this explosion drawing! If you have watched an exciting movie with explosions recently, you could replicate a moment from the film.
This could be a great opportunity for you to also make your very own awesome action scene! What are some background settings that you could use for this explosion?
Another classic trope for explosions is to have someone running heroically from the explosion. That would also be cool to add for your drawing of an explosion!
This would also be a tip that would go well with the previous suggestion, as it would really add to the scene. You would have lots of options for this if you wanted to do it.
You could have a superhero or maybe a spy for a few ideas. If you have always pictured yourself as an action hero then you could draw yourself!
The explosion we have created here is pretty impressive, but what if it were even larger? You could pretend you are a director with an unlimited movie budget and create a truly spectacular explosion!
To do this, keep what you learned in the guide in mind as you increase the size of the explosion. You could also add different bits of debris and other details to make it look even more powerful.
Finally, you can play around with different colors and art tools to make your explosion sketch even more impressive. We would suggest making the colors as bright as possible to really make it stand out.
There are certain mediums you could use to make the colors pop. Colored pens, markers and certain paints would be great for bright colors.
You might want to make the colors a bit darker and richer for a more realistic look. You can refer to photos of real explosions if you want to make the colors more true to life.
Your Explosion Drawing is Complete!
With that, you have reached the end of this guide on how to draw an explosion!
We hope that by breaking it down into some small, easy steps that you found this drawing to be not only so much easier but also lots of fun to do!
Now you can take this drawing even further with your own details.
We mentioned a few ideas like drawing someone running from the explosion, and you could also create an awesome background to really make this image stand out!
When you’re finished with this guide, we hope to see you on our website! We have tons of awesome drawing guides for you to enjoy, and we also upload new ones often.
We would also love to see your explosion drawing when it’s finished! Please be sure to share your artwork on our Facebook and Pinterest pages for us to admire.