Emojis have become a vital part of online communication in recent years.
They say a picture speaks a thousand words, and sometimes one of these little faces can express a feeling in a shorthand way that words wouldn’t be able to.
Whether it’s happiness, sadness, frustration or feelings of giddy love, there is likely an emoji for the job!
Learning how to draw an emoji can be a great way to try and design your own ones or replicate your favorites.
This is the guide to be on if you would like to learn how to do that.
We hope you have a happy face on as you work on our step-by-step guide on how to draw an emoji!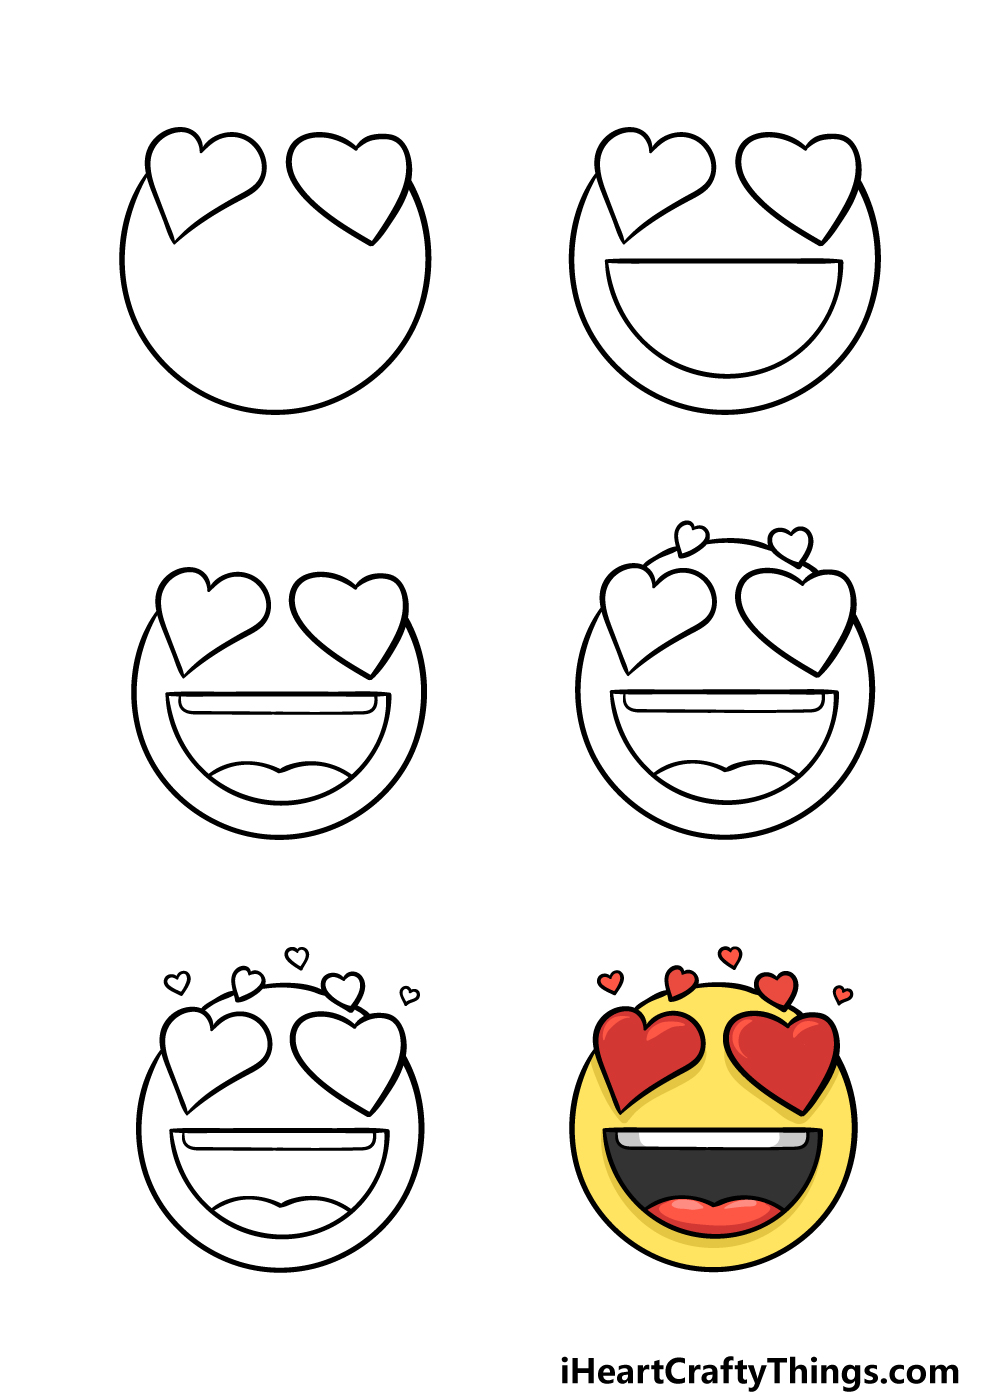
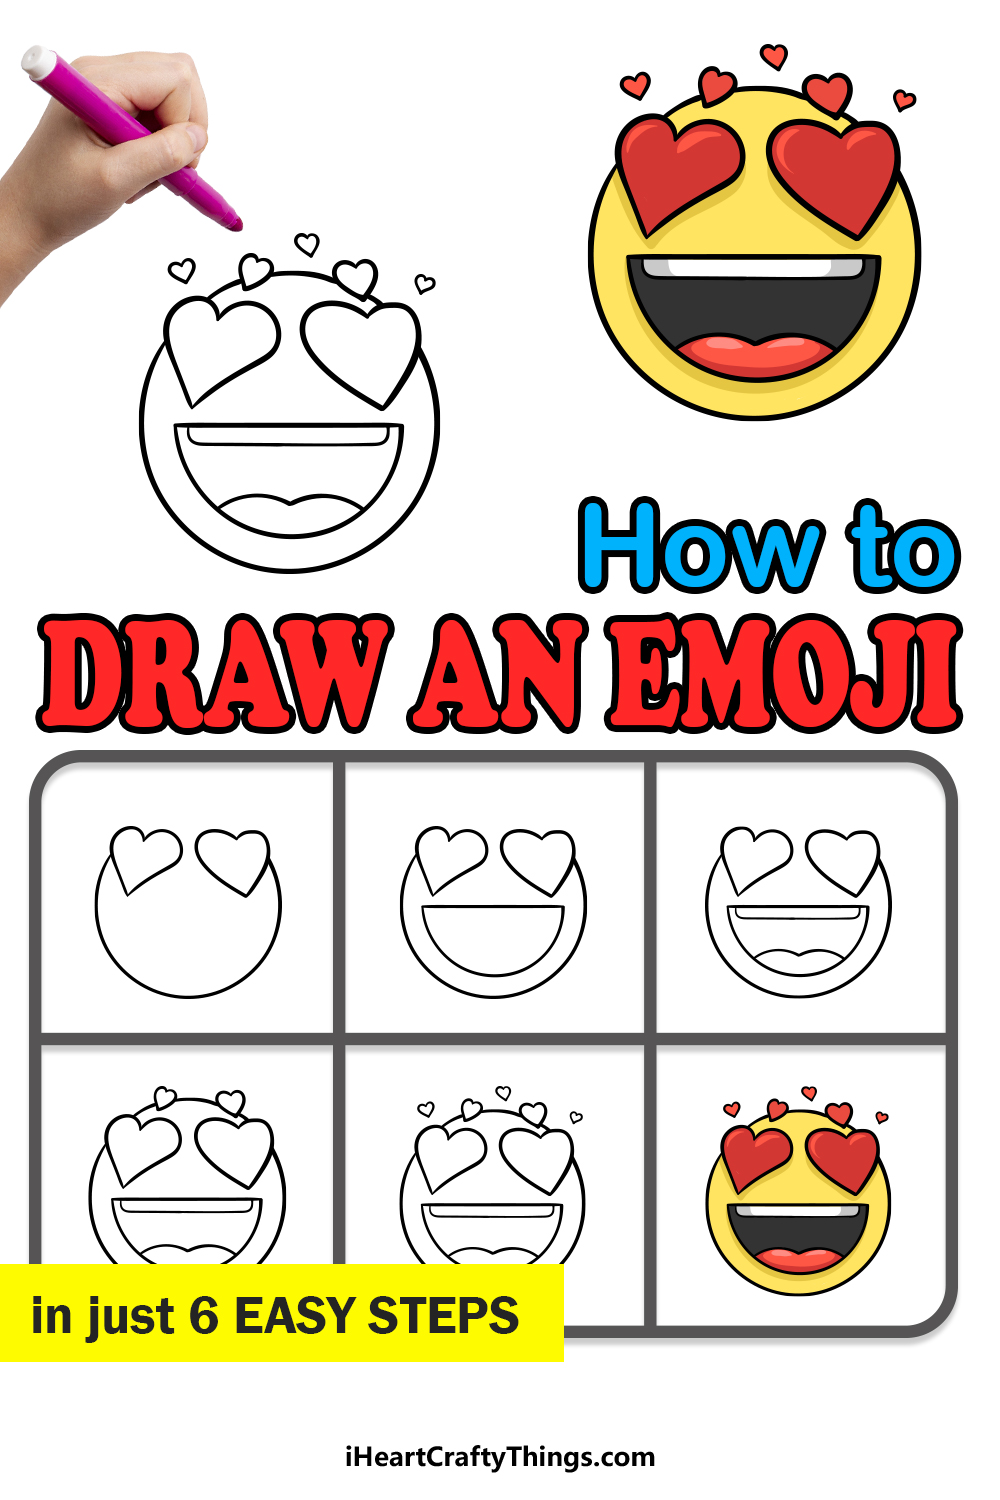
How to Draw An Emoji – Let’s Get Started!
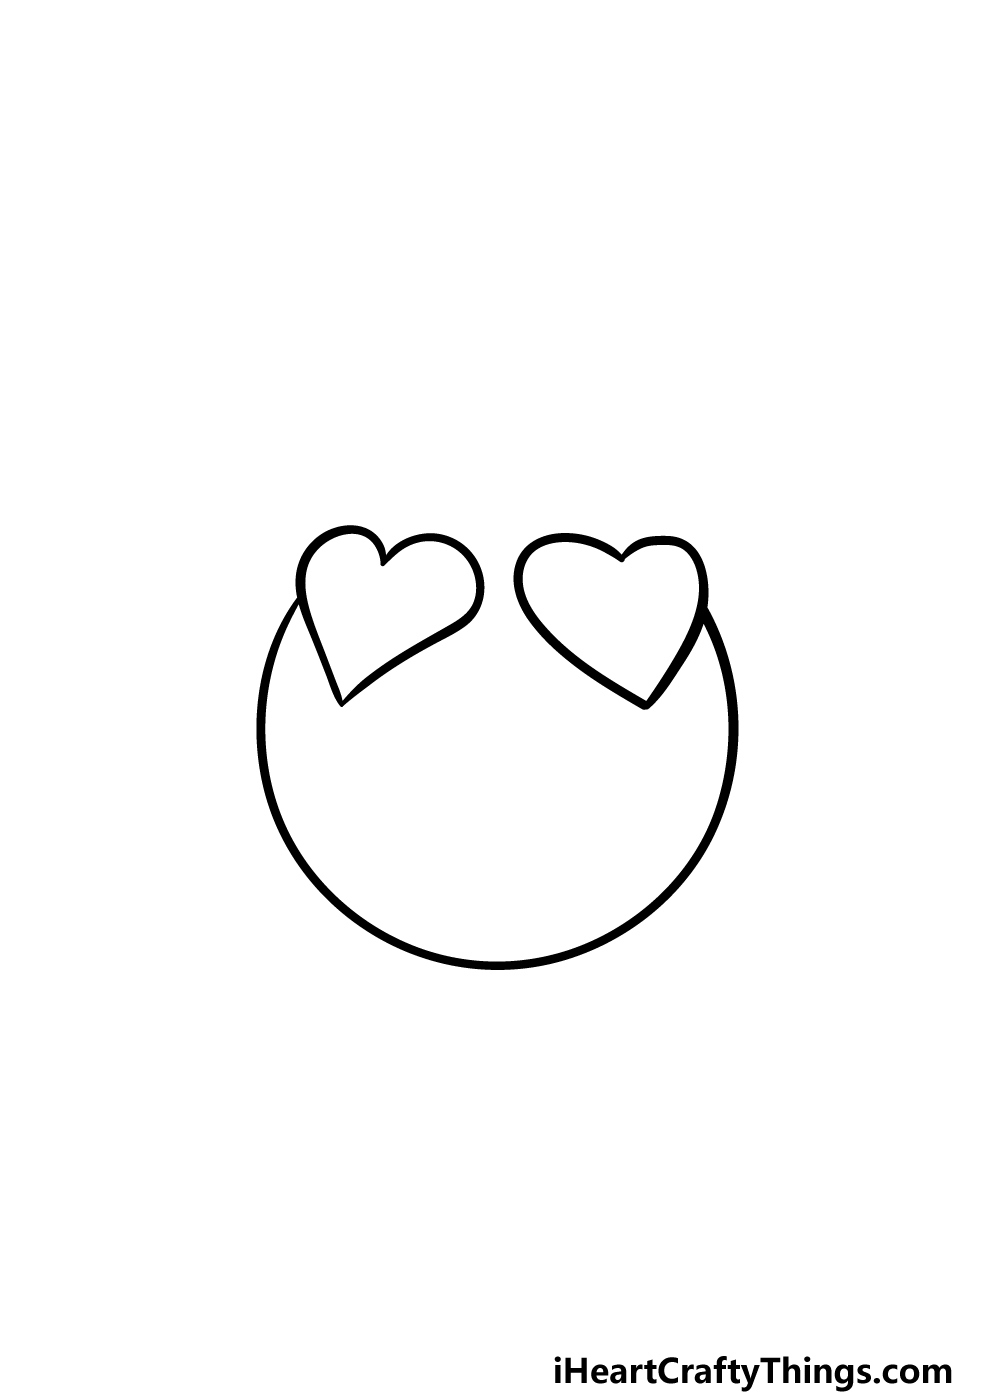
Step 1
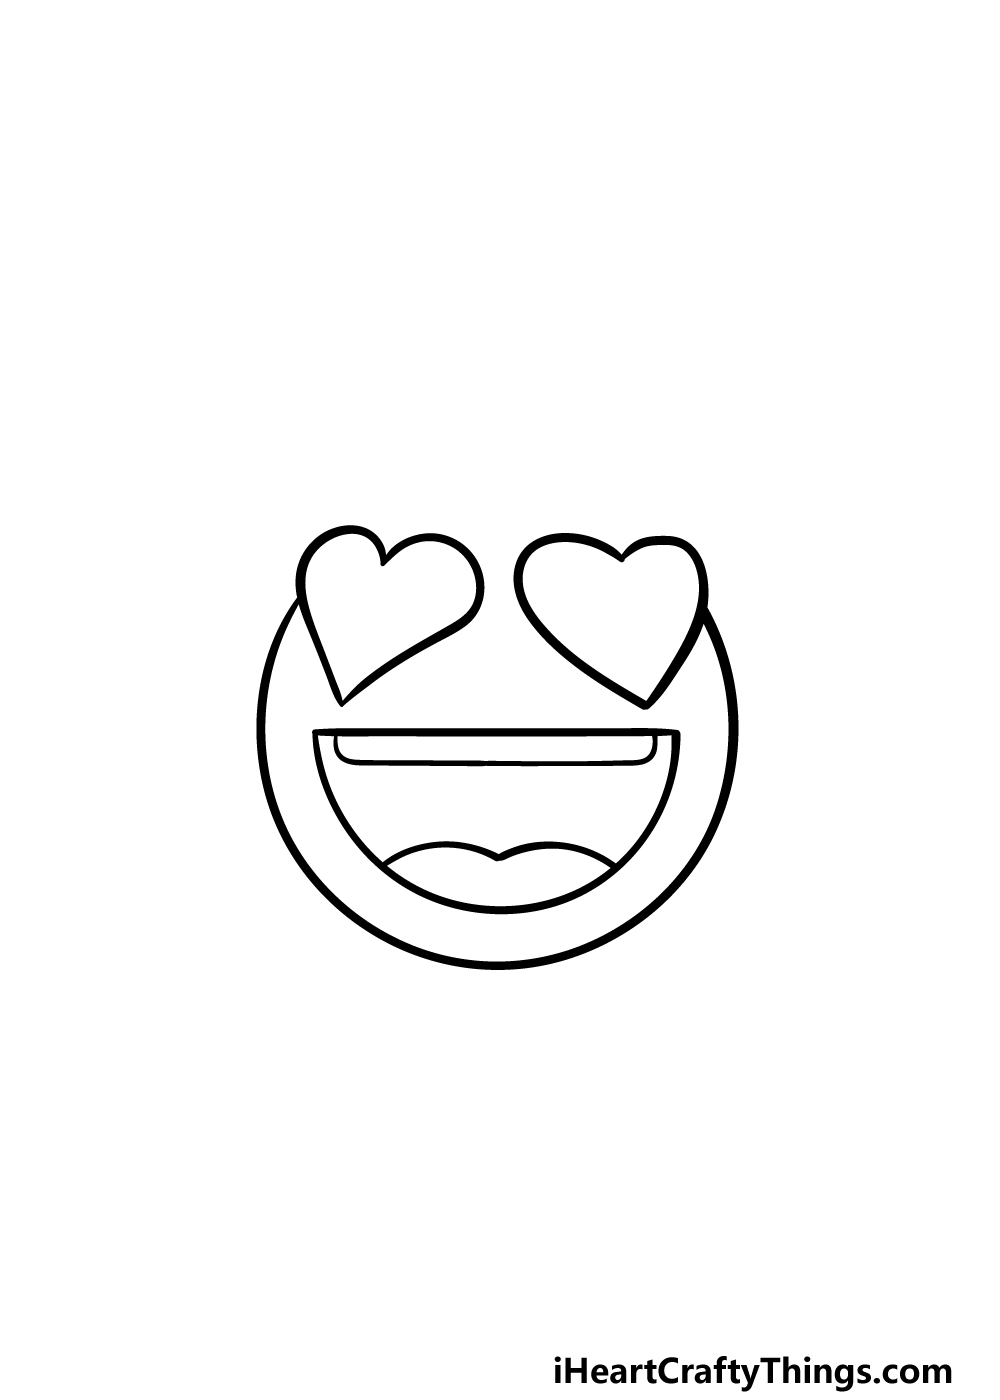
In this guide on how to draw an emoji, we will be drawing a love face emoji. While this is the specific one we will focus on, you can use what you learn here to draw any other emojis you may like!
One way that you can make things easier on yourself for this emoji would be to draw a circle with a pencil.
You could use a drawing compass or another drawing tool to accomplish this, and it will guide you as you draw some more elements.
Then, draw two large hearts near the top of the face, as shown in the reference image.
Once you have these hearts drawn, you can use your pen to go over the circular outline that connects these hearts from their lower halves.
Step 2 – Next, draw the open mouth for the emoji
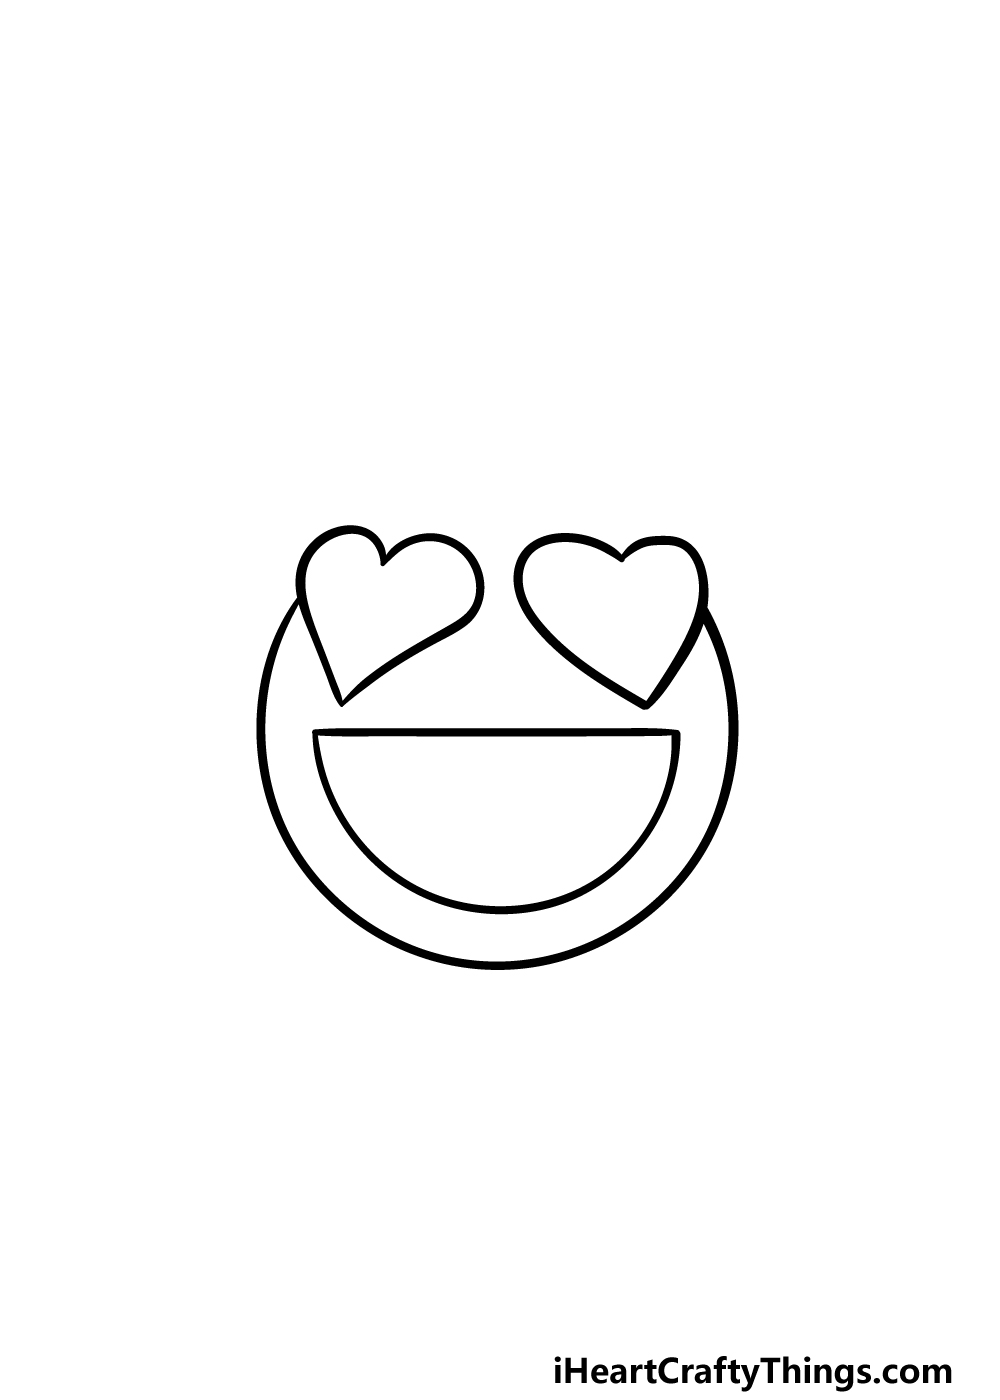
We will draw the mouth in this step of your emoji drawing. This heart-eyed emoji will have a joyfully happy look on its face, and the wide-open mouth will help emphasize this.
Start by drawing a straight vertical line not far under the eyes. Then, use a curved line beneath this for the bottom of the mouth, as shown in the reference picture.
That will finish off the wide-open mouth outline, and we can keep adding some more details as we move on in the guide.
Step 3 – Draw some mouth details for the emoji
Now that you have the mouth outline drawn, we can start on some details for it in this next step of our guide on how to draw an emoji.
First, we will draw a row of teeth into the upper portion of the mouth. This will be drawn with some straight lines to create a very thin rectangular shape along the upper edge of the mouth.
Then, finish off this step by drawing two curved lines connecting to one another at the bottom of the mouth.
That’s all there is to it for this step, so let’s proceed!
Step 4 – Now, draw the top of the head with some more hearts
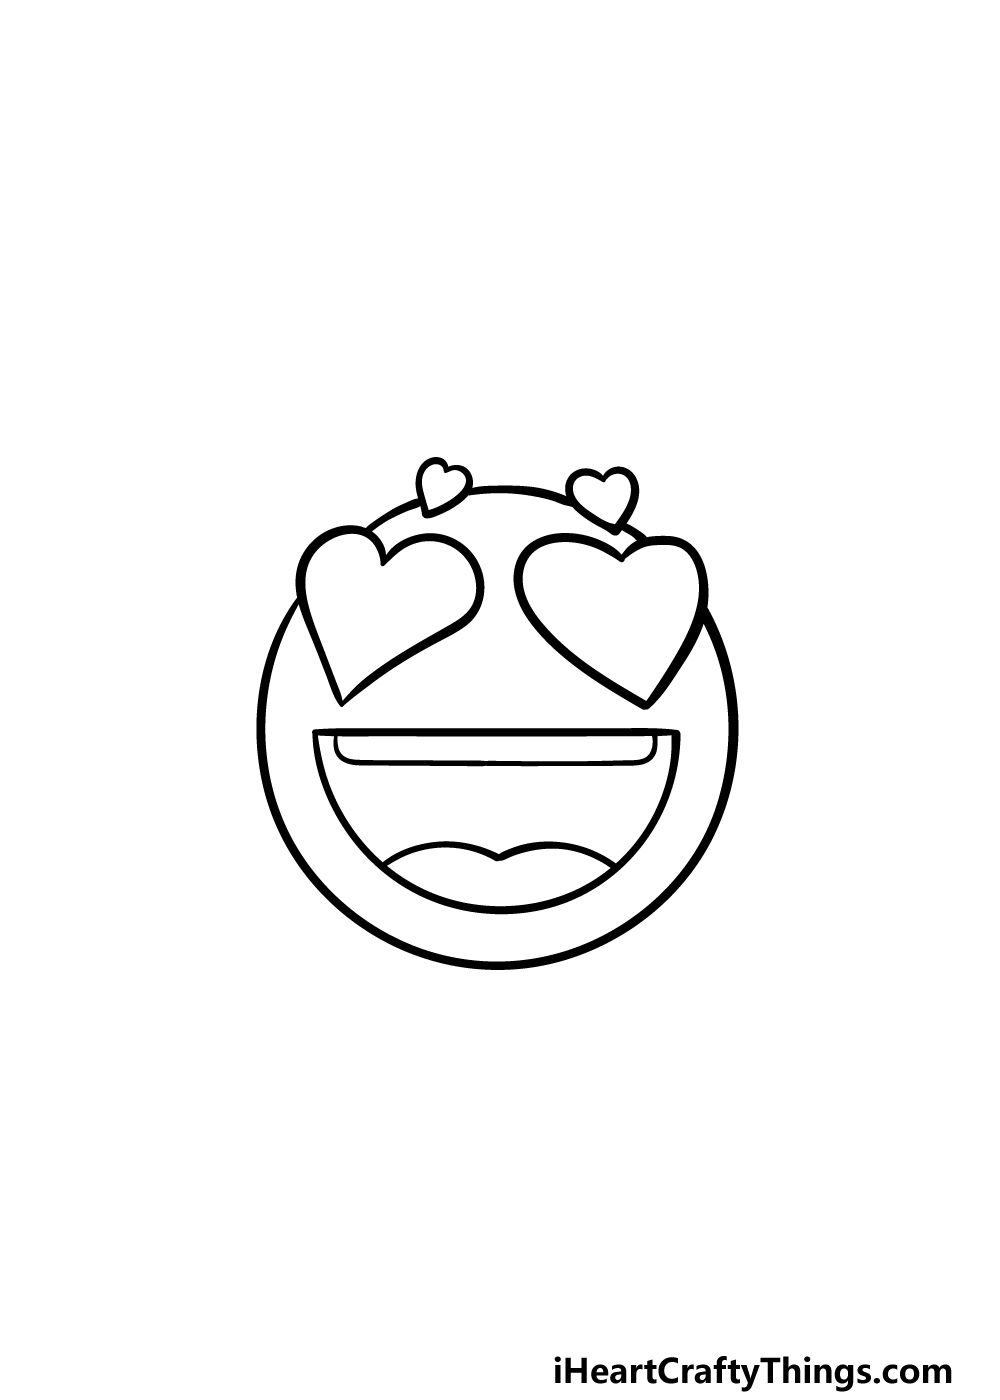
We will be adding some small hearts along with the top of the head in this part of your emoji drawing. Start off by drawing a small heart above each eye in the face.
This will help to portray the lovey feeling of this emoji! Then, use another curved line to finish off the circular outline of the head.
Once that is done, you can erase any pencil lines you may have drawn and prepare for some final details in the next part.
Step 5 – Finish off your emoji drawing
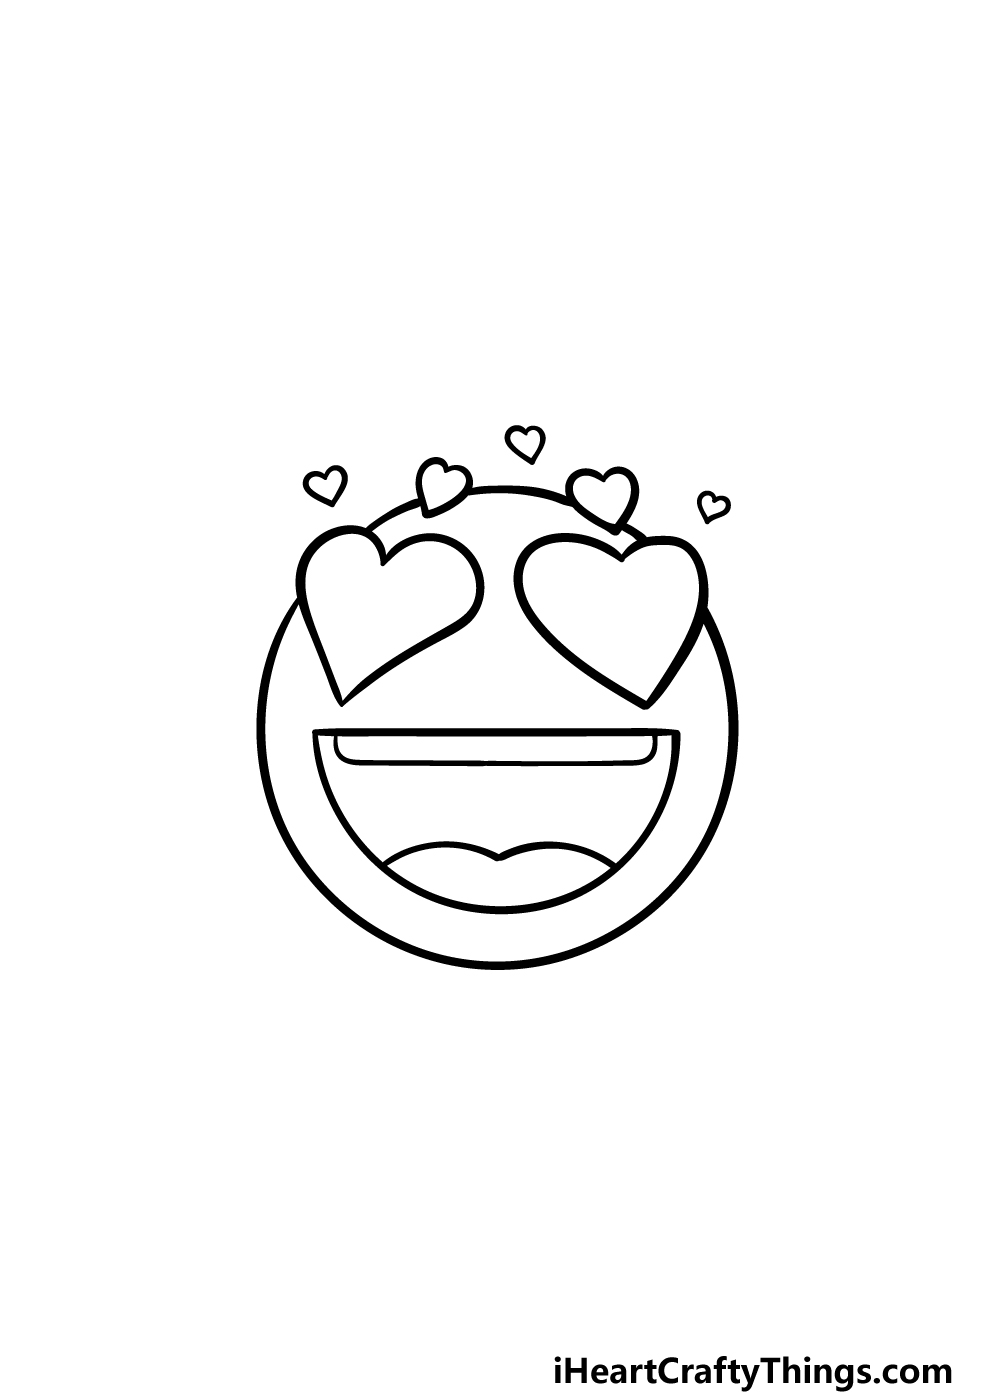
This fifth step of our guide on how to draw an emoji will be all about drawing some final details to finish it off.
This will also be where you can change up some details of your own to create your own unique emojis if you would like!
For now, we will finish off the loving feeling of this heart-face emoji. To do this, we will be drawing some more small hearts above the head for that floaty love feeling!
With these drawn, you are ready for the final step, but you can also add some touches of your own if you so wish.
You could add some more hearts, change up the details or even draw a background. This background could be filled with your favorite emojis!
You could also take what you drew in this step and change details like the hearts to create another emoji. Maybe you can even create the one emoji you wish existed but hasn’t been created yet!
These are just a few ideas that you could go for, but feel free to have fun getting creative with the final details as you prepare for the final part!
Step 6 – Finish off your emoji drawing with some color
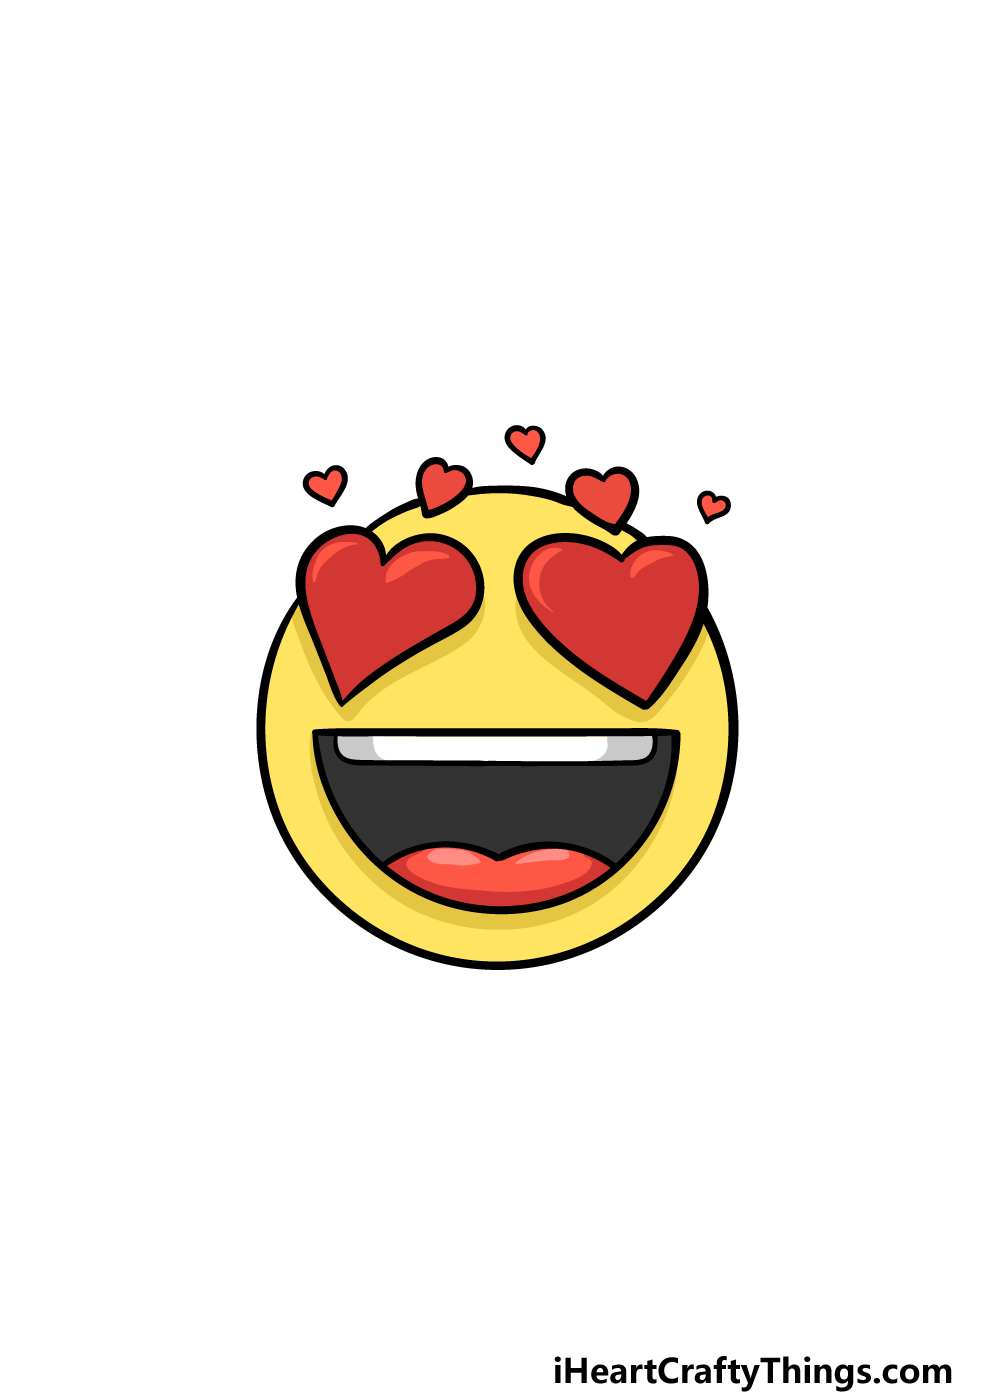
We will be finishing off your cool emoji drawing with some amazing colors in this final step. Emojis are known for their bright and vibrant colors, and that’s what we went for in this picture.
We used some bright yellow for the face itself and used some vibrant, warm red for the hearts.
Emojis can come in many different color variations though, so you could use any colors you love!
Using mediums such as acrylic paints and colored pens would be a great way to replicate the bright emoji look, but you could also go for a more muted look if you prefer that.
How will you finish off this emoji drawing with your colors and art mediums?
5 Tips To Make Your Emojis Drawing Even Better!
Put a smile on your face as we show you how to improve this emojis drawing even more
There are so many emojis to express whatever you may be feeling, so that gives you options if you want to change this emojis drawing.
Whether you want to create a happy face or a distressed one, you can create it by changing a few small details.
Simply use some different shapes and lines for the eyes and mouth, and you can recreate your favorite emojis or design your own.
This next tip will go nicely with the previous one! You don’t have to stick to creating just one unique design for your emojis sketch.
If you were to draw several circles on this page, you can create as many emoji faces to hang out with one another. How many unique emoji faces do you think you could fit on this page?
Once you have settled on the expression and design for this emoji, you could customize it by adding some fun accessories. Maybe you could add some sunglasses to one that wouldn’t normally be wearing them.
Or, maybe you want to recreate the sunglasses emoji in which case you could create a different type of shades for it to wear. There are so many fun ways you can change this emojis drawing with a simple accessory!
This drawing of an emoji could also do with a fun, cartoony background. This could depend on whichever emoji you decide to depict.
If you stick to the heart eye emoji, then maybe it could be at a Valentine’s party. Or, if you have the sunglasses emoji it could be chilling at the beach. What settings would you choose for this emoji?
Emojis started out all being yellow, but as time has gone on they have started to come in many different colors. That means that you could use any colors you love for this emojis sketch!
You could stick to yellow, but if there are any others that you like then they would look great. What art tools and mediums will you choose to depict your chosen colors?
Your emoji Drawing is Complete!
The awesome picture in front of your right now means that you have completed this guide on how to draw an emoji!
Even though emojis are somewhat simple in structure, it can still be surprisingly tricky to draw one. Hopefully this guide made sure that it was not only simple but also lots of fun for you to do!
Now that you have completed this picture, there are lots of ways that you can take it even further.
You could add your own details, change some up or change the picture completely with backgrounds and unique color choices. What’s most important is that you have fun with it!
We have much more drawing fun in store for you on our website, so be sure to check it out! We upload lots of new guides often, so be sure to visit regularly.
Once your emoji drawing is finished and colored in you can let us see your joyful artwork by sharing it on our Facebook and Pinterest pages.