Dragons are one of the most well-known of all mythical creatures. These mighty beasts can be found in the pages of many fantasy stories as well well as on the big and small screen.
Dragons are known for many things like their fiery breath and their distinctive bat-like wings. These wings can be tricky to draw, however, making a guide on how to draw dragon wings very handy!
Luckily, you have a guide like that in front of you now!
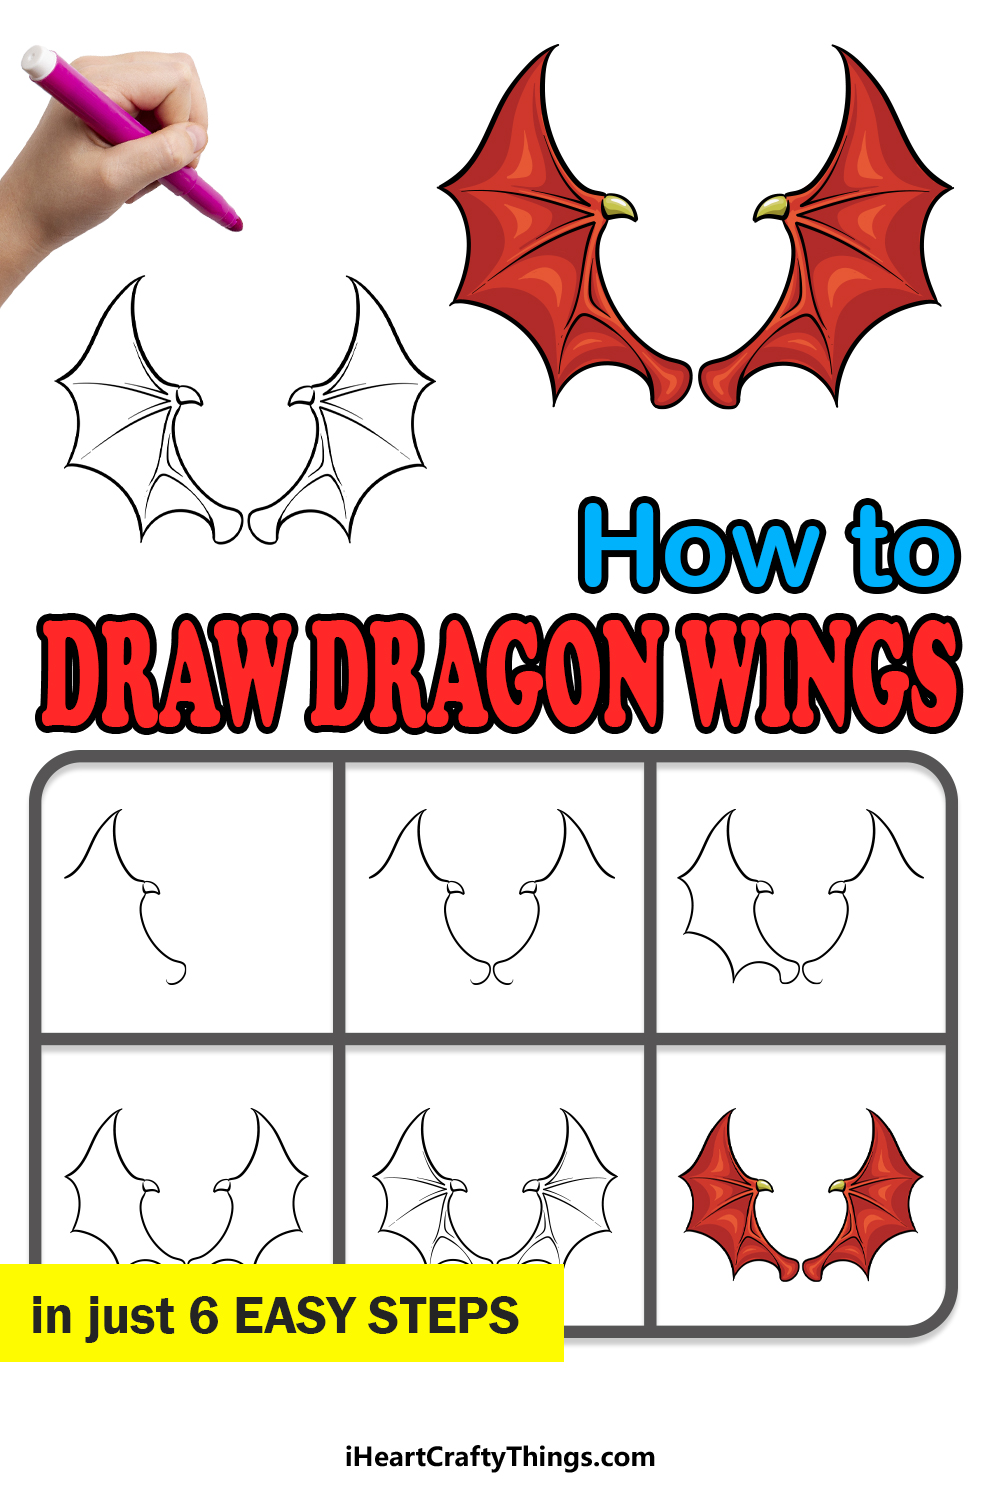
We hope that you really enjoy this step-by-step guide on how to draw dragon wings in just 6 easy steps!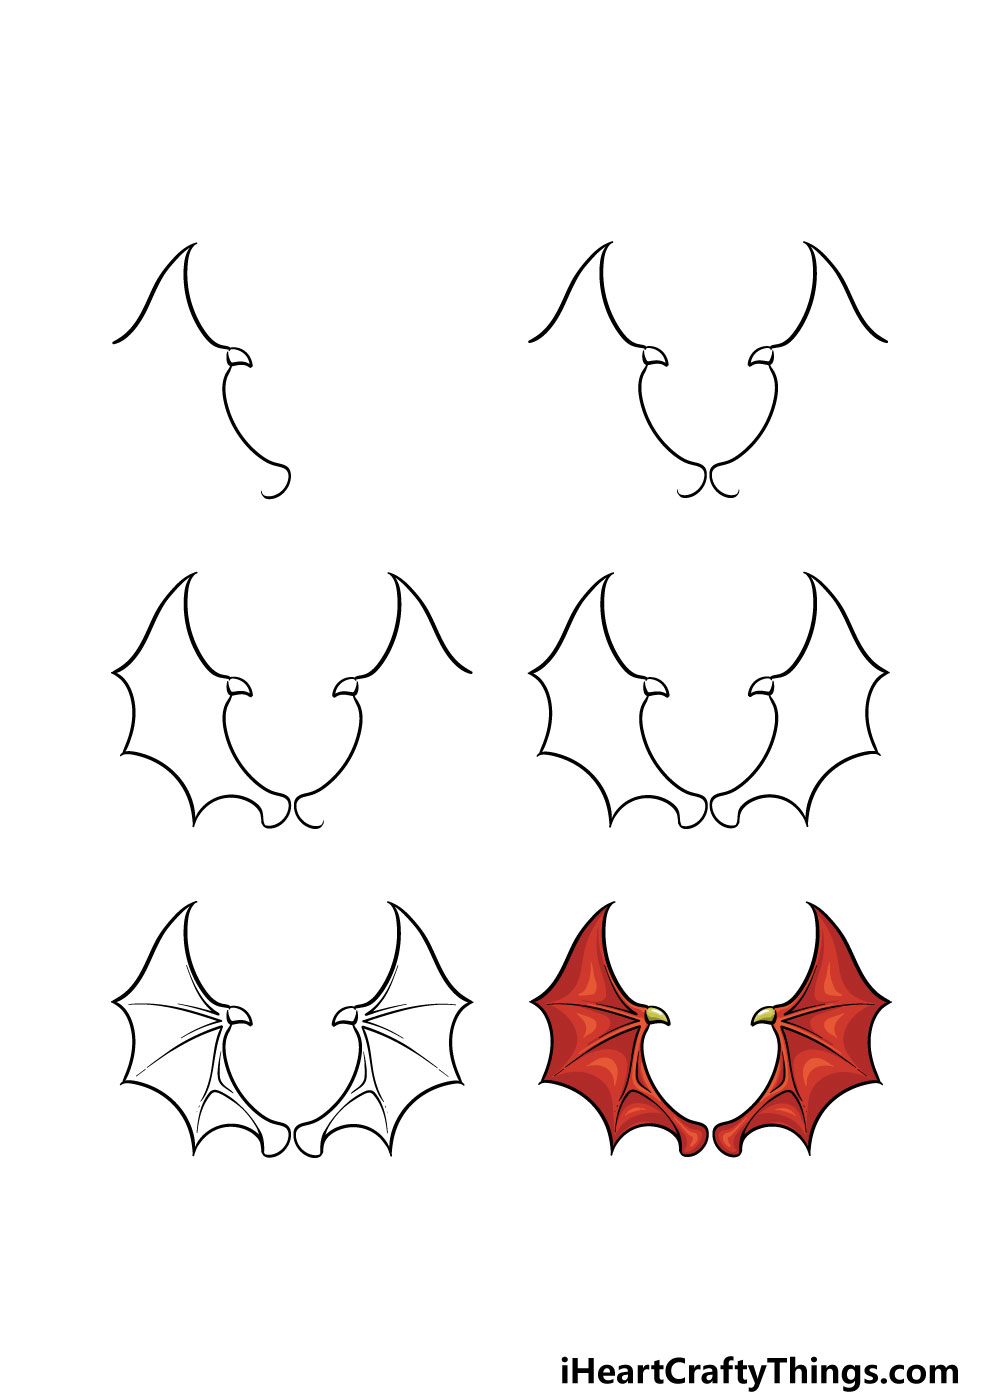
How to Draw Dragon Wings – Let’s get Started!
Step 1
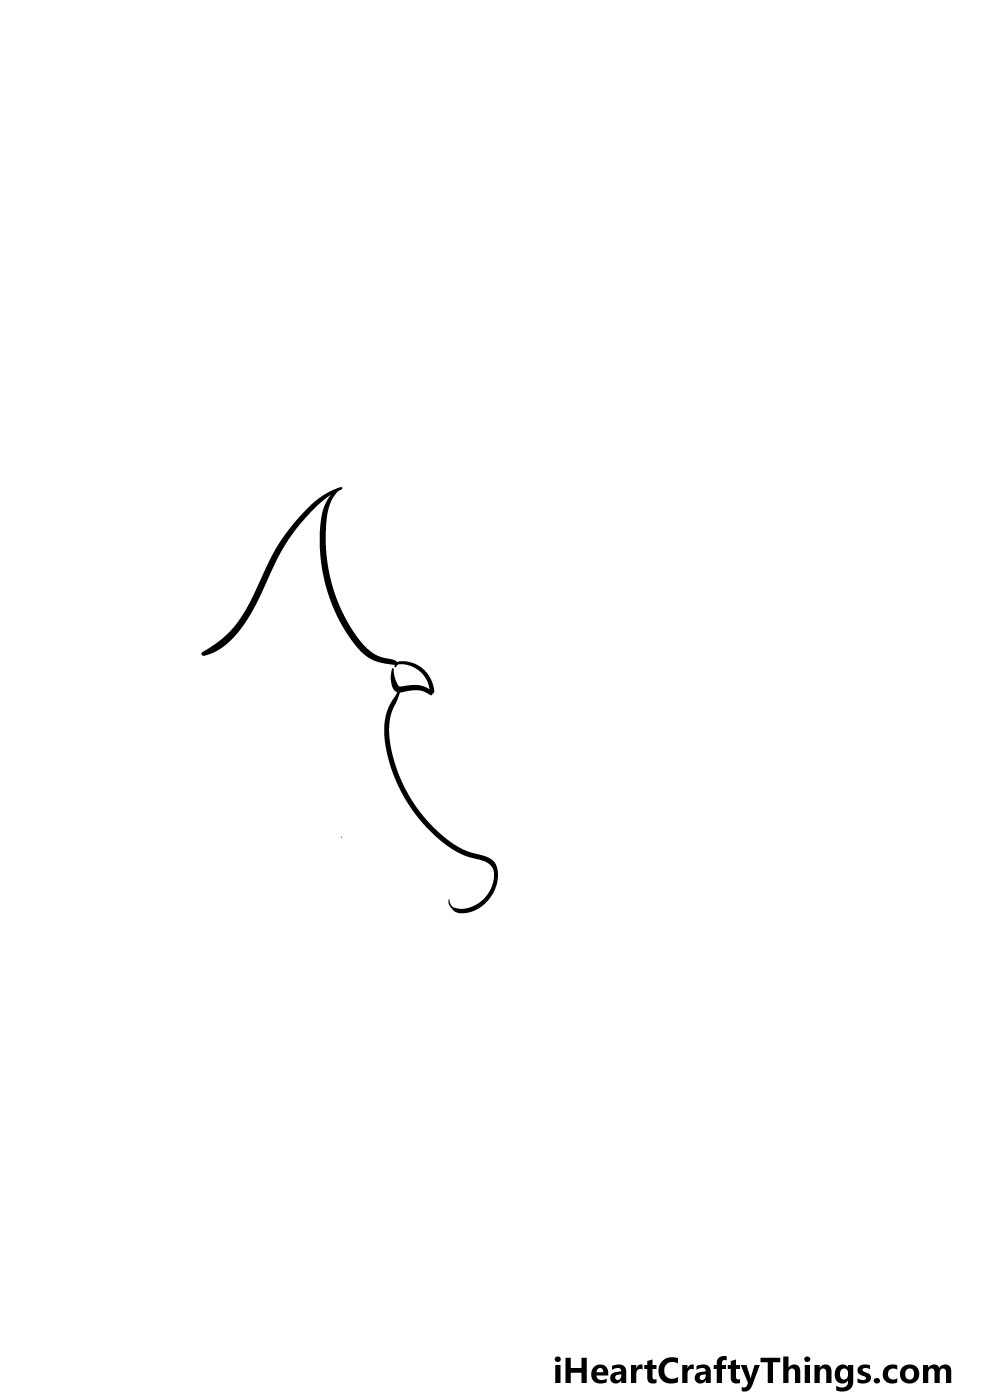
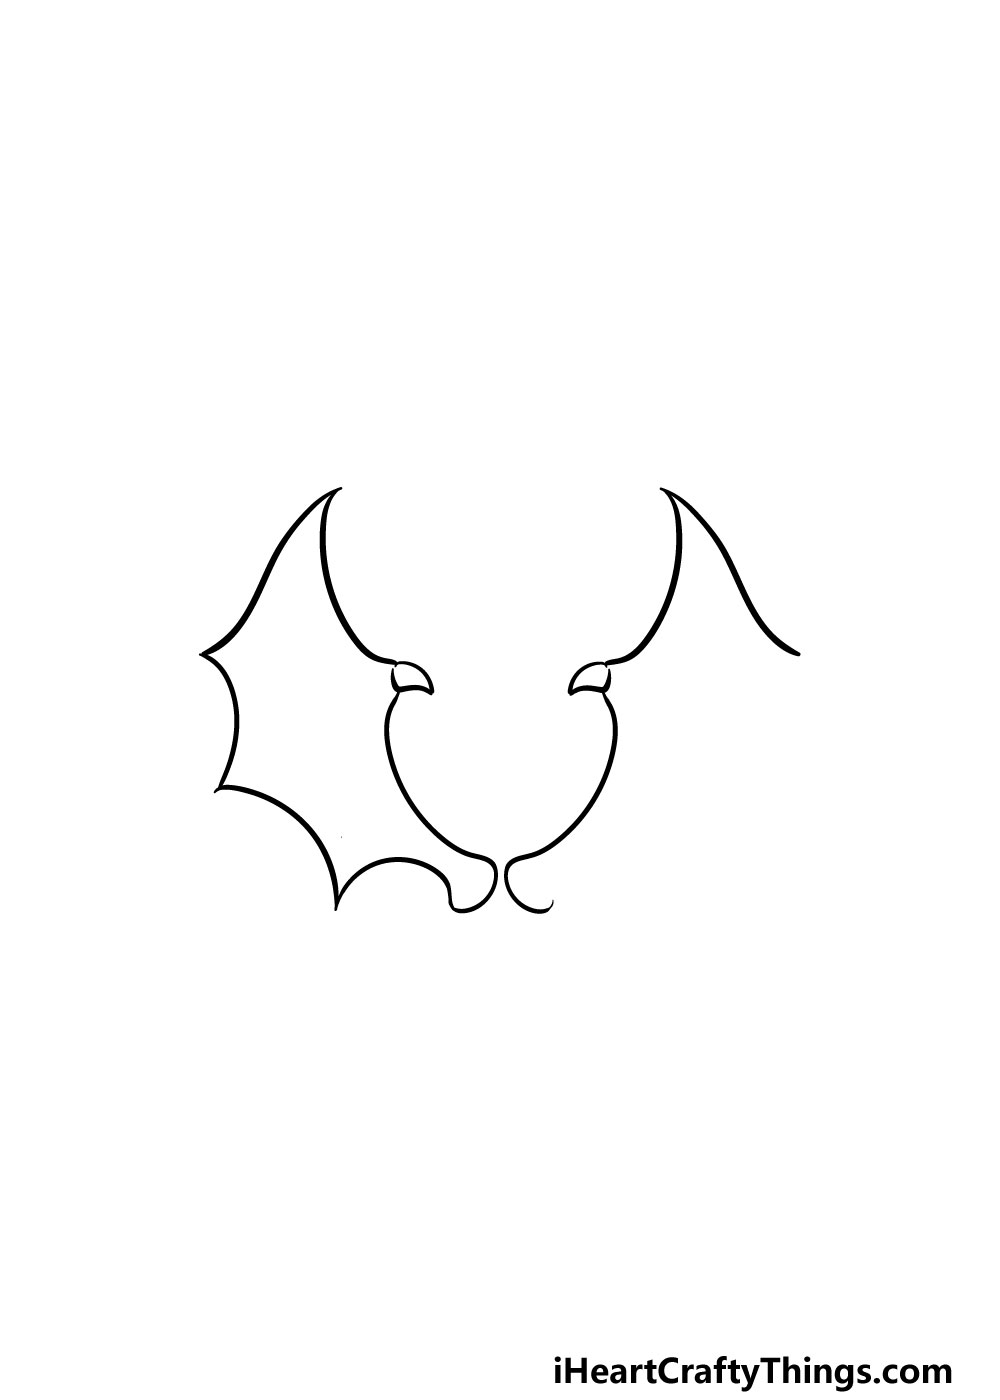
In this first step of our guide on how to draw dragon wings, we will begin with the edges of the wing on the left. To draw this part of the wing, you will be using some sharply curved lines that connect to one another.
The wings will be pointing up vertically, as seen in the reference image. The wings will be attached to a much thinner section with a rounded bit at the end where it would connect to the body of the dragon.
You will also be drawing a small curved spike onto the middle protrusion of the wing. Once you’re happy with how it looks then you’re ready for the second step!
Step 2 – Mirror what you did in the previous step
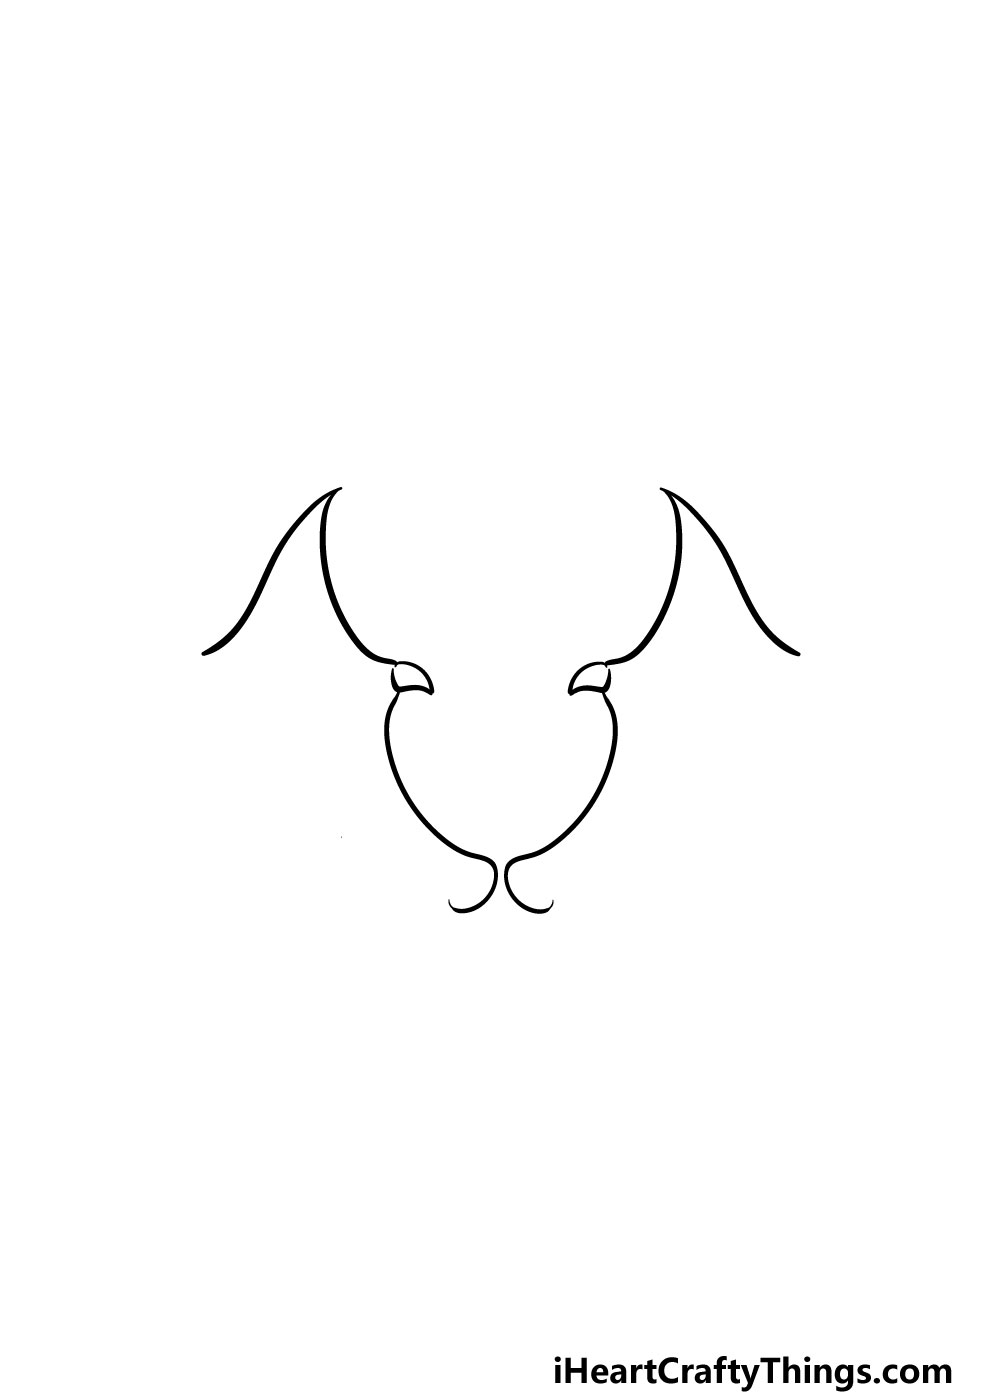
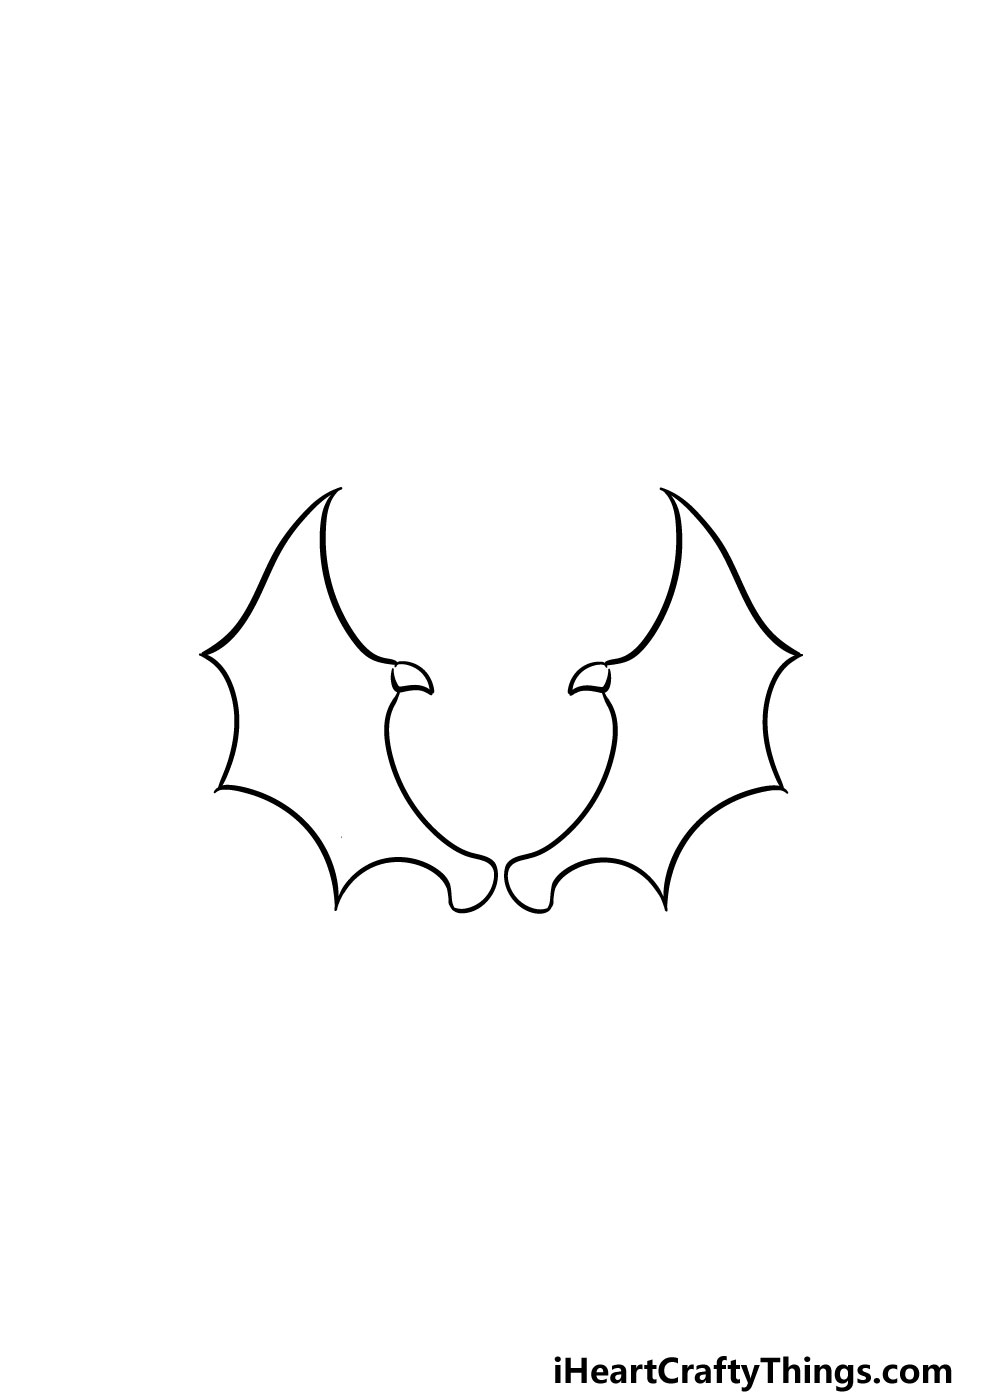
This second part of your dragon wings drawing will be all about basically mirroring what you did in the previous step.
To do this, simply copy everything that you did in step 1 except the other way around. That’s all there is to it in this part, and you’re ready to move on!
Step 3 – Now, you can draw the outer edge of the first wing
Now that you have the inner edges of the wings drawn, you can start to draw the outer ones in this step of our guide on how to draw dragon wings.
To do this, you will be using some longer curved lines to make the soft, leathery edges of the wings.
Once you’re done with it, there should be three points on the outer edge of this wing. That will finish off the outline of the left wing, and we will add some more details to it shortly.
Step 4 – Next, mirror the previous step again
This step of your dragon wings drawing will be another one where you mirror what you did in the previous step.
This part will be all about finishing off the outer edge of the wing on the right-hand side this time.
That means that it will also have three points on it as the first one did. Then, once both outlines are complete you will be adding some final details in the next step.
Step 5 – Now, you can finish off the final details
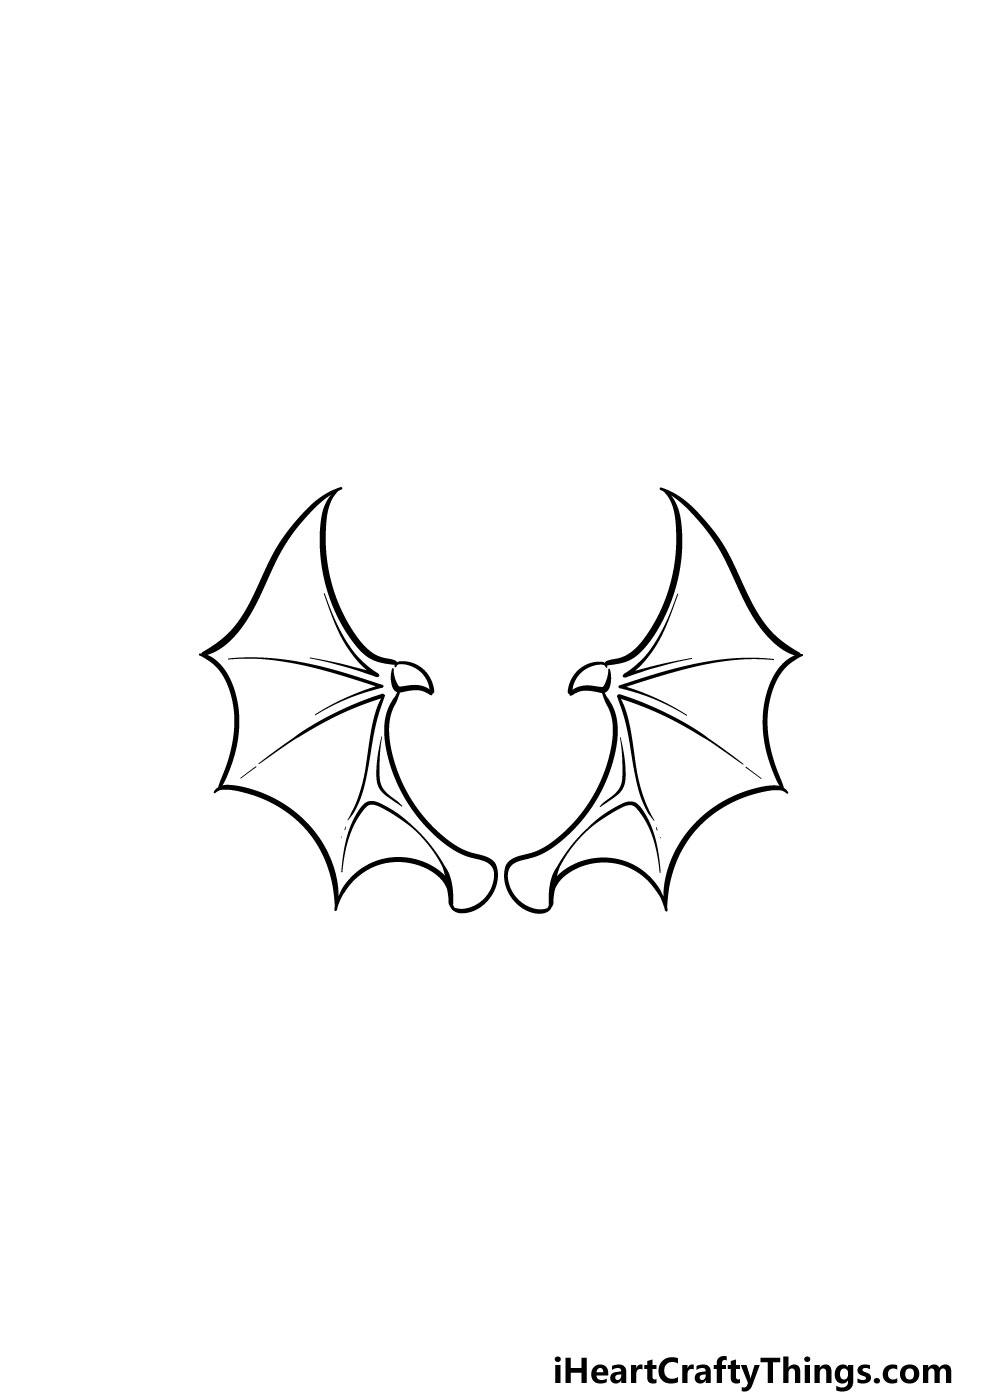
Your picture is already looking great, but before we start adding some amazing colors to it we have a few more final details to add in this step of our guide on how to draw dragon wings.
The main element of this step will be drawing some thin lines inside of the wings to create the bone structure of the wings. You can follow the reference image to make sure that the bone structure is looking accurate.
That will do it for the final details of this guide, but before you move on you can also add some details of your own!
You could add some cross-hatching and other line details throughout the wings for some leathery texture detail for one idea.
Perhaps you could give these dragon wings some history by drawing some arrows poking into them!
If you’re feeling very creative, you could even draw the head and body of the dragon onto the wings.
You could look up some dragon pictures on the internet for some inspiration if you would like to try this out.
These are just a few ideas that you could try, but what else can you think of to finish off this image?
Bonus: Use Some Craft Materials To Make This Drawing Even Better
You’re about to begin the final step of this guide on how to draw dragon wings, and we will go over some simple yet fun ways you can color in your artwork.
Before we go over some more conventional ways to color this drawing, we wanted to go over a few of the crafts you can use to bring some life to your drawing.
One idea would be to get some material that looks leathery. You could then cut it into the shapes of the wings to give them an actual leathery texture.
For the bony sections of the wings, it could be cool to use some straws or sticks that match the color scheme and stick them over the material.
If you can’t get hold of any leathery material, then you could use some more regular material and go for the same effect. Whatever you use will give the wings an actual texture that you will feel.
It adds a whole new dimension to the picture, so you can really expeiremnt and have fun with it. You could find some material at art and craft stores, or perhaps even find some things around the house that could be used.
There are no wrong ways to do it, and you could really surprise yourself with how things turn out! More conventional crafts like glitter could work to give your dragon wings a magical sparkle, for instance.
Or, sticking beads on the wings would make it look like there are bumps and warts on the skin. Now you have some ideas to get started, and we would love to see a picture of how your artwork comes out, no matter how you decide to color it.
Step 6 – Finish off your dragon wings drawing with some color
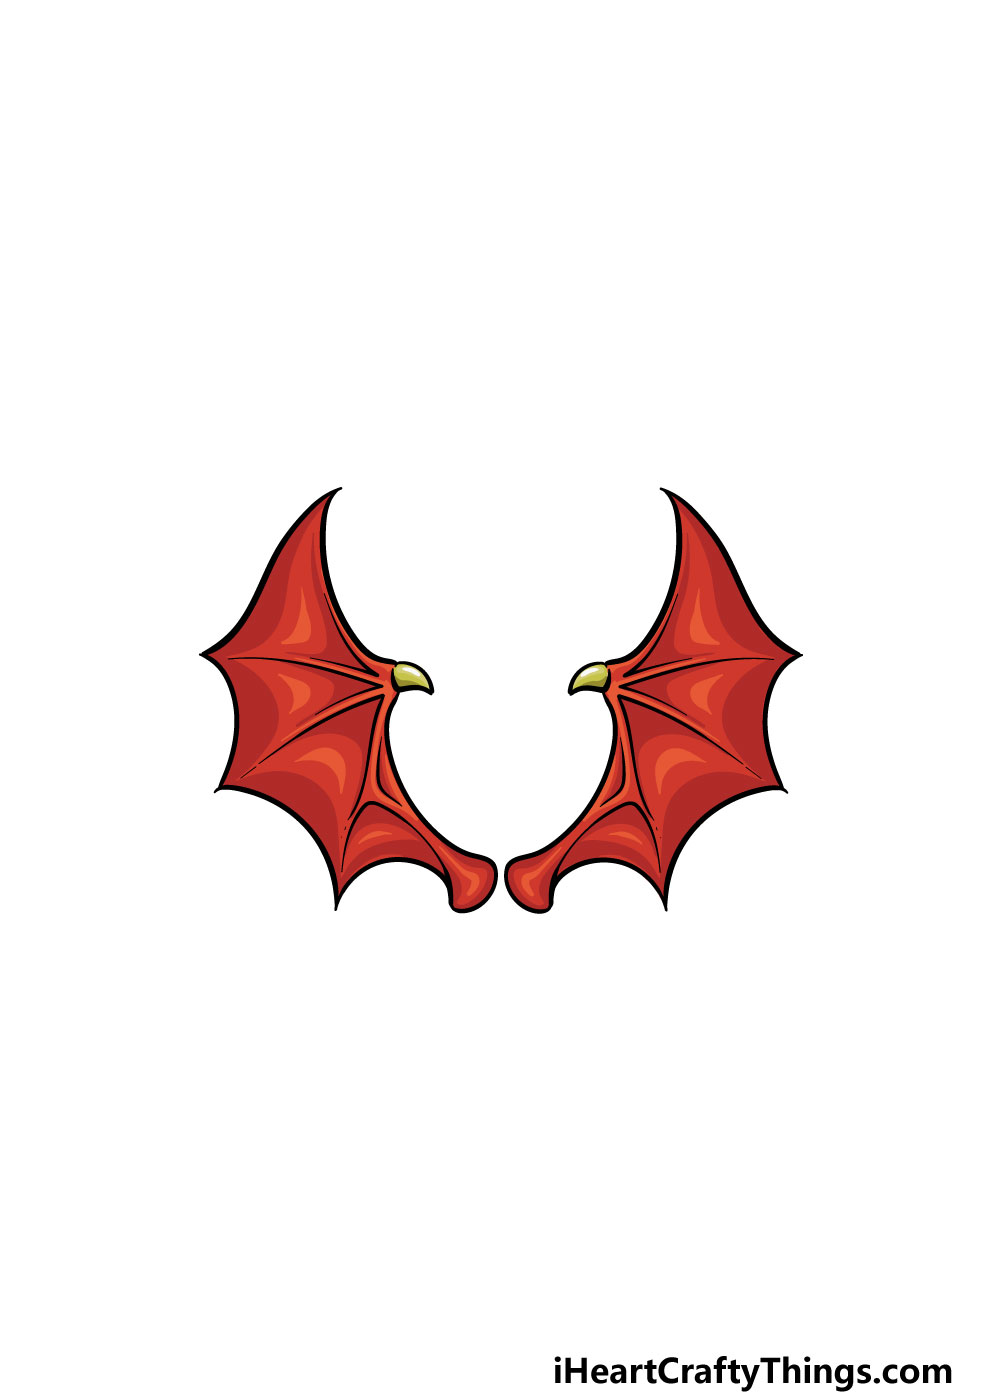
This final step of your dragon wings drawing will be all about adding some amazing colors to it! Colors can really help to finish off a drawing nicely, so this is a step where you should really express yourself with some amazing colors!
For our example image we used some red and yellow to color in the dragon wings, but you should feel free to use any colors that you want for it!
Once you know how you want to color in, you can also experiment with some amazing art mediums!
Whether you use acrylic paints, watercolors or something like colored pens we know you will end up with an incredible picture.
5 Tips To Make Your Dragon Wings Drawing Even Better!
Bring this drawing to life with these 5 fun and easy tips we have for you.
One way to make this dragon wings drawing even better would be to add some more details. There are a few spiky parts on the edges, and you could add a few more of those for one example.
You could also make them look even larger and more impressive by increasing the wingspan. These are just a few ideas, but what else can you think of?
The wings look cool on their own, but they would also look great if added to a pattern! They would go perfectly inside an intricate fantasy-inspired pattern for example.
This could include ancient runes, twisty shapes and dragon tails for a few ideas. It would add a cool element to this dragon wings sketch, and there are many things you could use this pattern for!
Dragons may not be real, but they are often styled after dinosaurs and lizards. For this reason, we think it would look good to add some texture details to the wings.
These could look subtle and scaly like a lizard’s skin. Looking up some pictures of lizards and reptiles and zooming in would help make this much easier.
The easiest way to make this drawing of dragon wings even better would be to add the rest of the dragon they’re attached to.
That would be quite a challenge, but would be a fun one! There are many famous dragons in movies you could use as inspiration, but you could also use dinosaurs and lizards in your design. What kind of setting would you create for the dragon?
Finally, you should try and have some fun experimenting with colors! One approach would be to use some watercolor paints for most of the wings.
Then, when it is dry you could use another medium to add small dots to make the wings look more textured. This is one idea to try, but what else can you think of using?
Your Dragon Wings Drawing is Complete!
That brings you to the end of this step-by-step guide on how to draw dragon wings! When you first took on this drawing challenge it may have seemed like it would be difficult, so we hope that this guide made it much easier and also more fun for you!
Taking on a new drawing can always be made much easier when broken down into smaller, more manageable steps, so that’s what we tried to do in this guide.
Now that you have finished this guide, you can keep the fun going by adding some elements to make it your own!
We mentioned drawing the rest of the dragon that the wings are attached to, but that’s just one idea out of many that you could try.
Remember that you can also add your own spin to the image with the colors that you use! It’s not only which colors you choose but also the art mediums and tools that you pick as well. Be sure to have fun with it and see what happens!
The fun doesn’t have to end here either! When you’re ready for more then you can more incredible guides on our website. We upload new ones frequently so be sure to visit often to never miss out!
We would also love to see your creative dragon wings drawing when it’s done! We hope that you will share your artwork on our Facebook and Pinterest pages for us to enjoy!