Since her book debut in 1865, Alice and her strange and wonderful friends have captivated audiences the world over.
Since then, these characters have starred in pretty much every form of media imaginable, including several hit films.
While so many aspects of the series are iconic, the grinning Cheshire Cat is one of the most recognizable of all!
This distinctive character is almost always seen with a huge grin and has a distinctive design.
This has become an immensely popular character, and many fans like to learn how to draw the Cheshire Cat.
For fans of the Alice books and films, this guide will be a real treat!
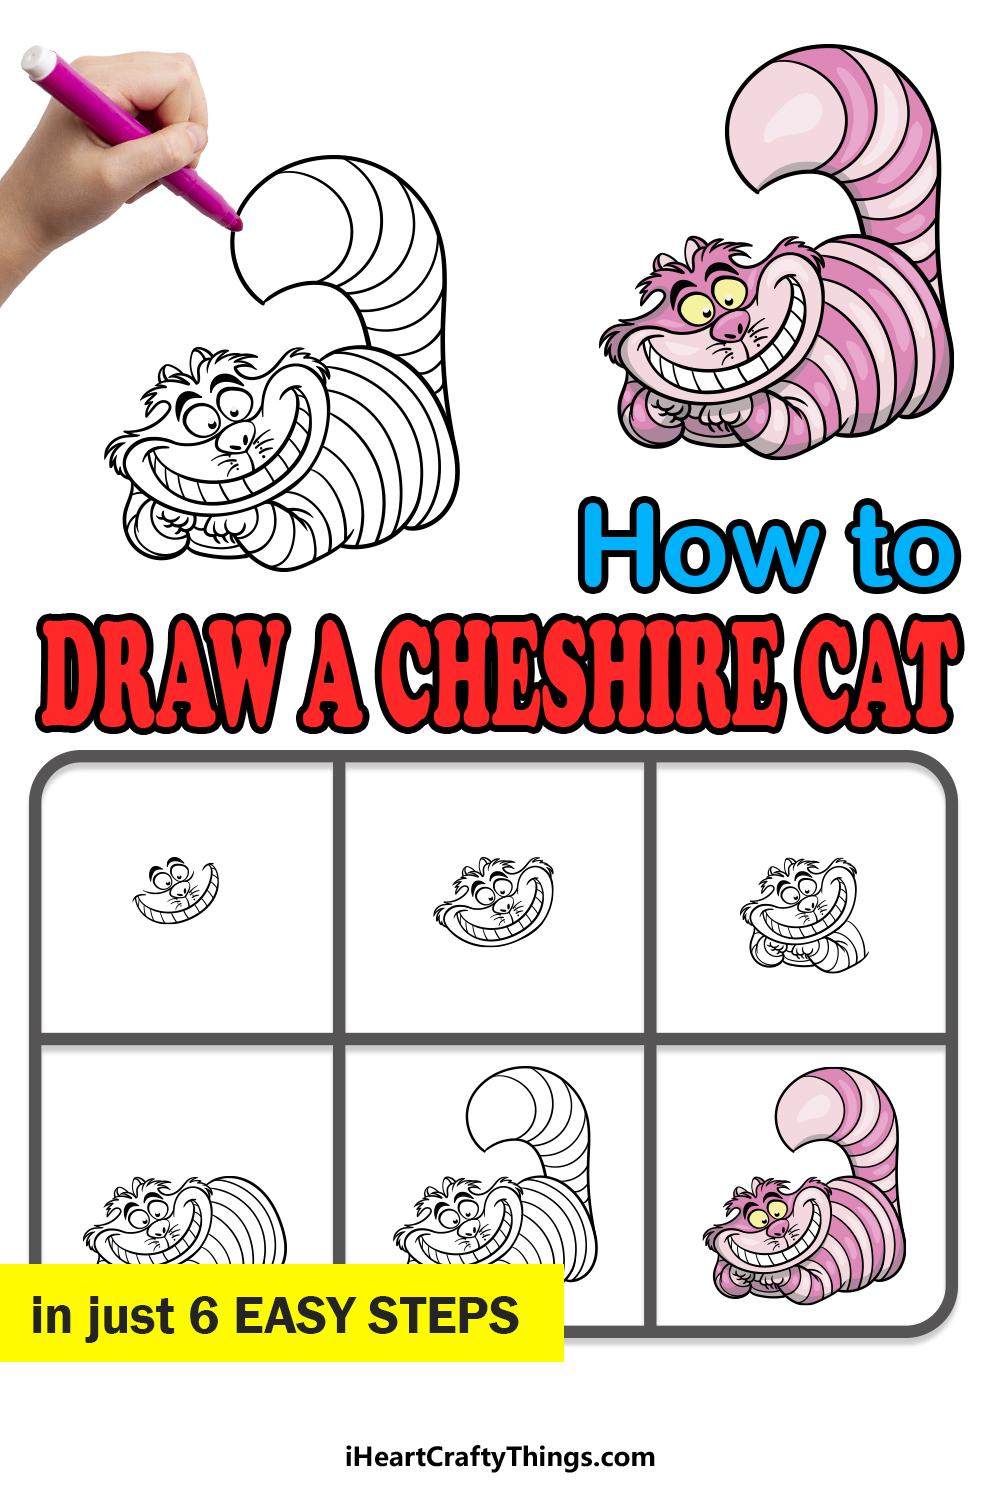
Prepare to take a trip through the looking glass as you enjoy our guide on how to draw the Cheshire Cat in just 6 steps.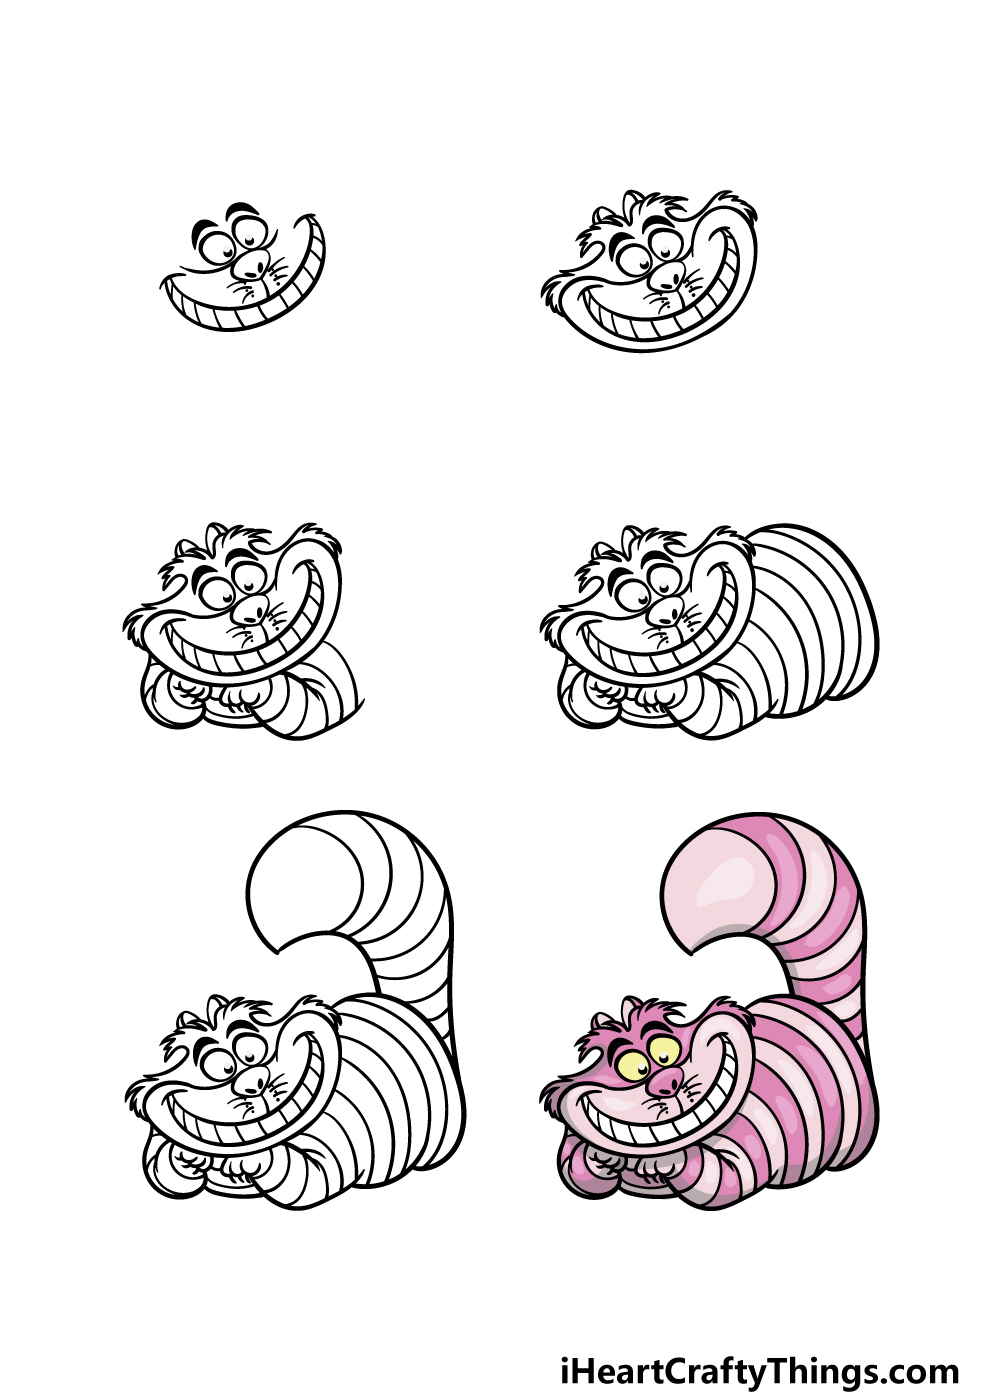
How to Draw The Cheshire Cat – Let’s Get Started!
Step 1
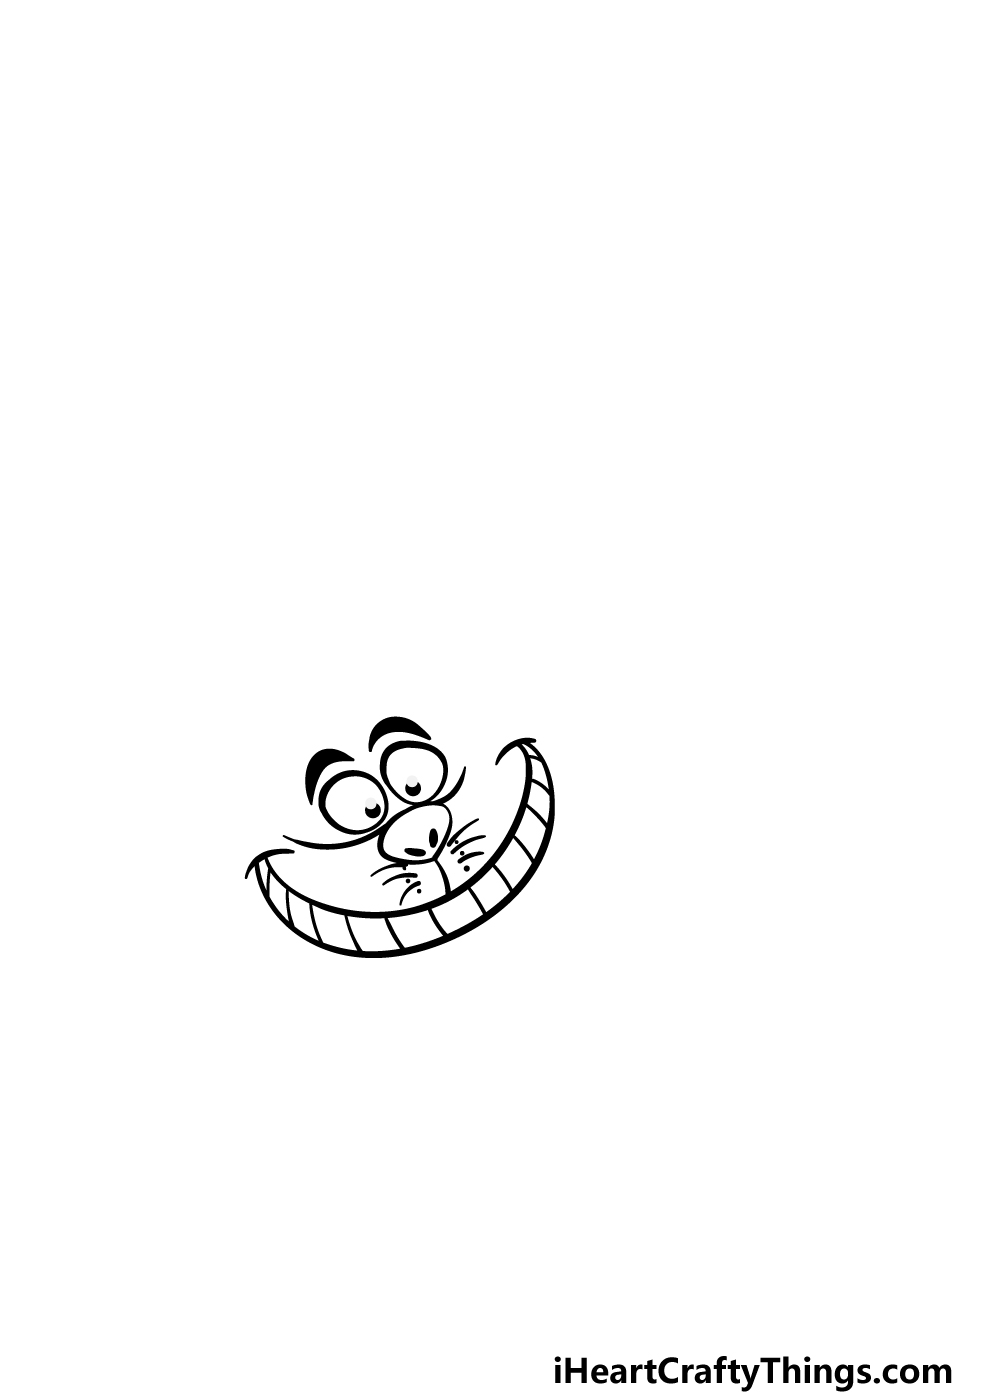
As we mentioned in the intro to this guide on how to draw the Cheshire Cat, he is probably most well known for his wide grin.
It seems only fitting that we begin this guide with that aspect, then! To draw his grinning mouth, start with a fairly long curved line.
Then, draw another line running parallel beneath it, and then connect both with some lines at the corner of the mouth. Then, draw a series of lines inside of the mouth for his teeth.
Then, above this mouth you can draw two rounded shaped for his eyes and then add some pupils inside.
Sometimes the Cheshire Cat’s body will disappear showing only his eyes and mouth, so you could technically stop here!
We will be drawing the rest of the body though, so you can finish off the face with his round nose and some whiskers.
Step 2 – Next, start drawing his facial outline
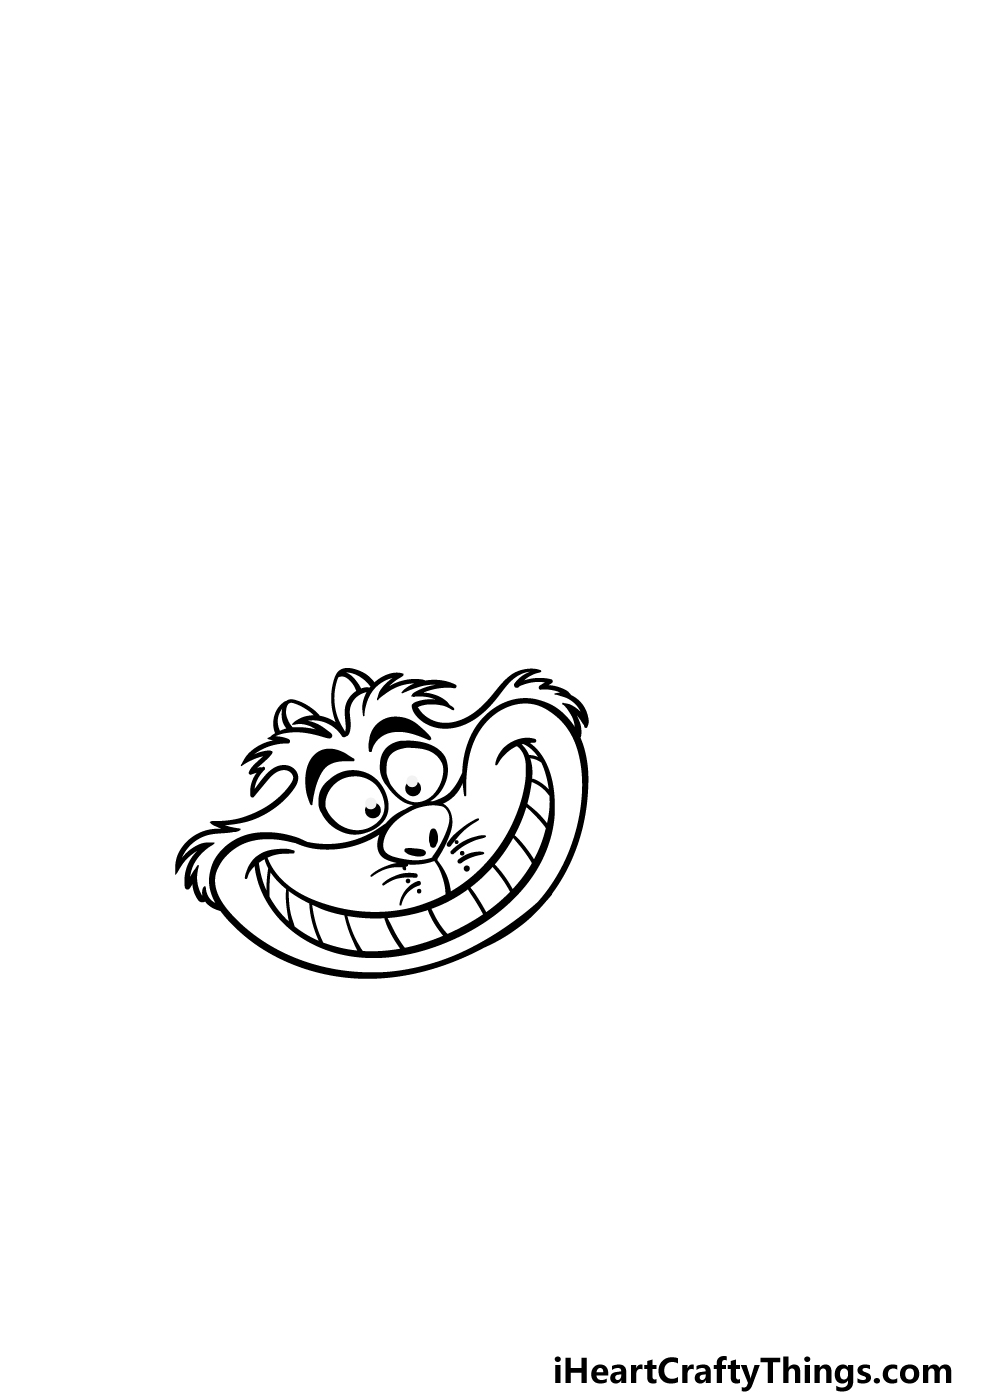
Now that you have his face drawn, you can start to draw the head outline for your Cheshire Cat drawing in this next step.
First, use some rounded lines for the outline surrounding his mouth. Then we will be using a series of smaller jagged lines connected to this mouth outline for the general outline of his head.
You can also add his small, round ears next to one another on top of his head.
Once you have replicated his head outline as it appears in the reference image, you can move on to step 3.
Step 3 – Draw his front legs
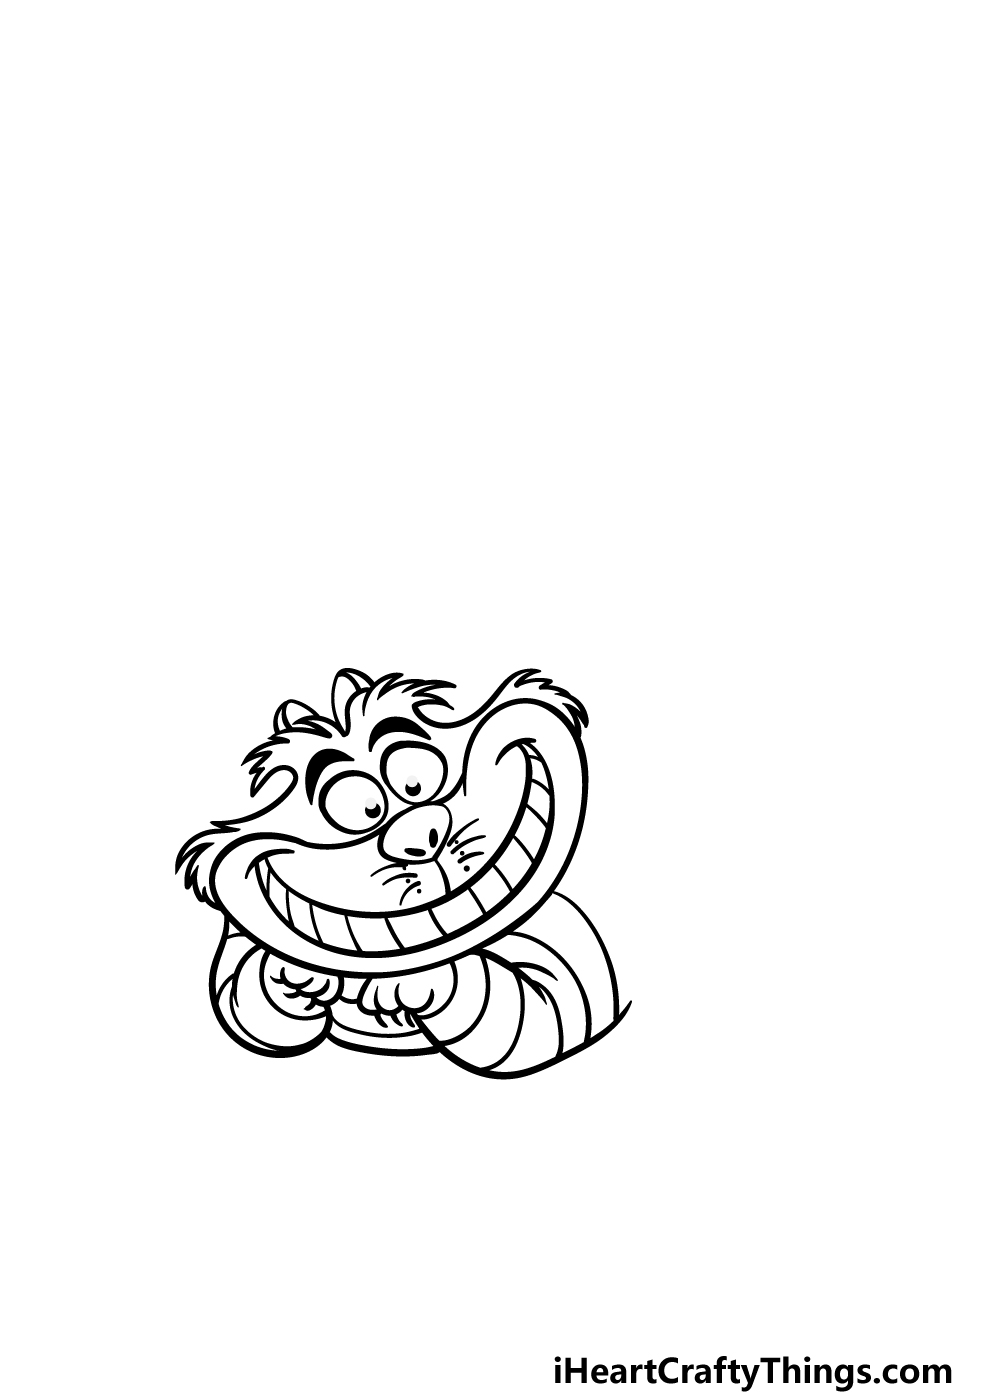
We will start drawing the body in this step of our guide on how to draw the Cheshire Cat. use some curled lines for his paws beneath his head that he is resting his face on.
Then, you can use some more rounded lines for the outlines of his chubby legs beneath him.
Another iconic aspect of the design for this incarnation of the Cheshire Cat are the stripes all throughout his body, so you can start drawing some of those for his legs in this part.
Step 4 – Now, draw the body for the Cheshire Cat
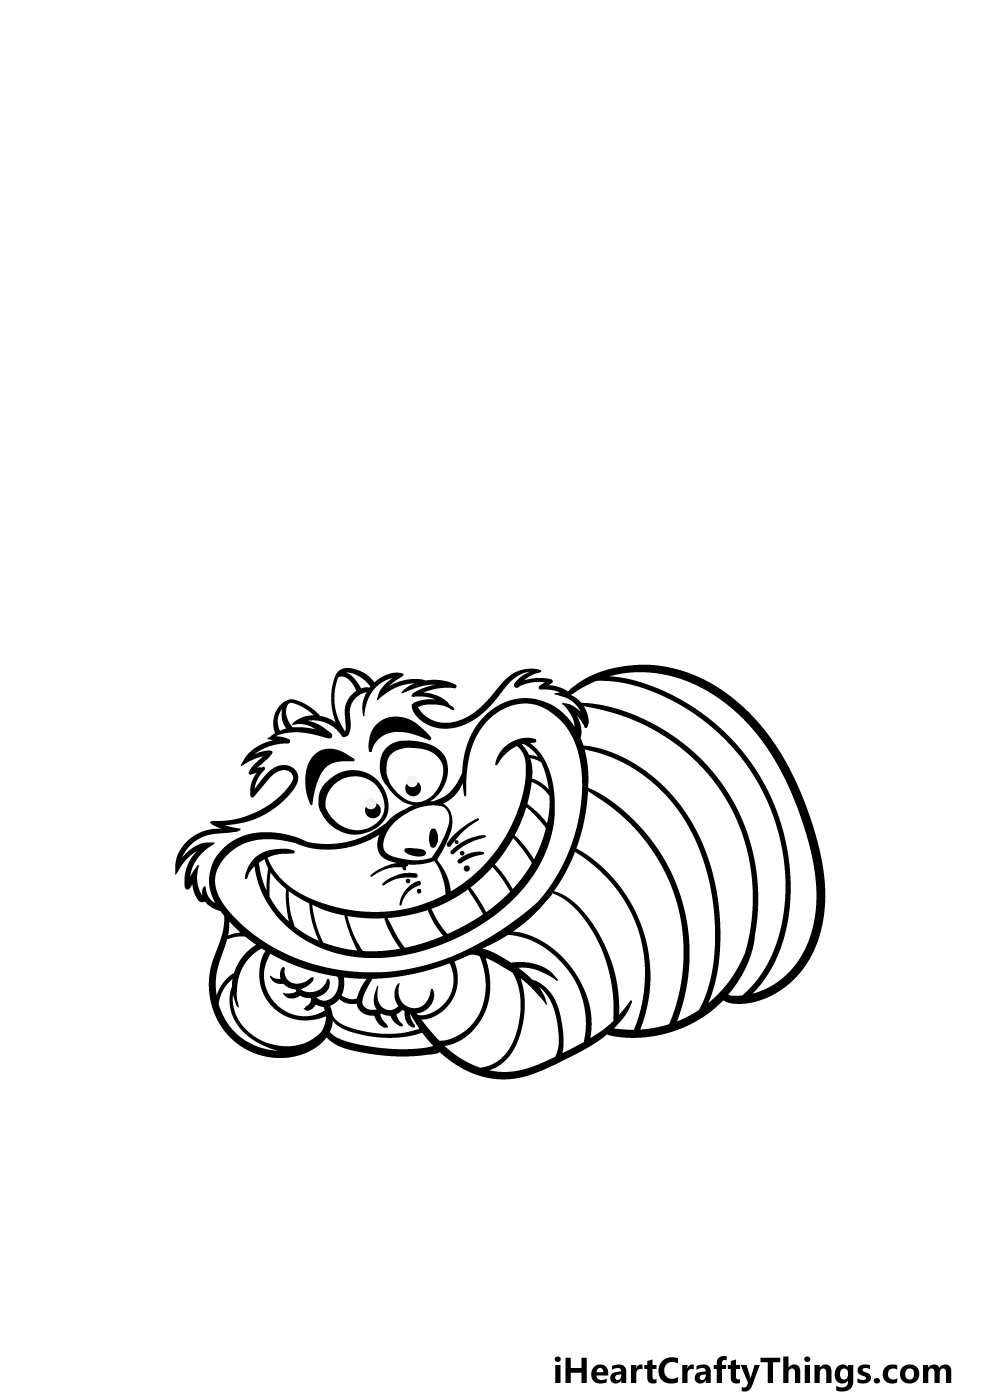
Now we can add a body for your Cheshire Cat drawing in this step. The cat has a large, chubby body, and we will start with the outline for it in this part.
First, extend a rounded line back from the side of his head and downward.
Then, draw a shorter rounded line extending back from his leg and then have it connect to the larger line that you drew for the top of his body.
Once you have drawn the body outline as it appears in our reference image, you will be ready to add the final details and elements in the next step, so let’s move on when you’re ready!
Step 5 – Finish off your Cheshire Cat drawing
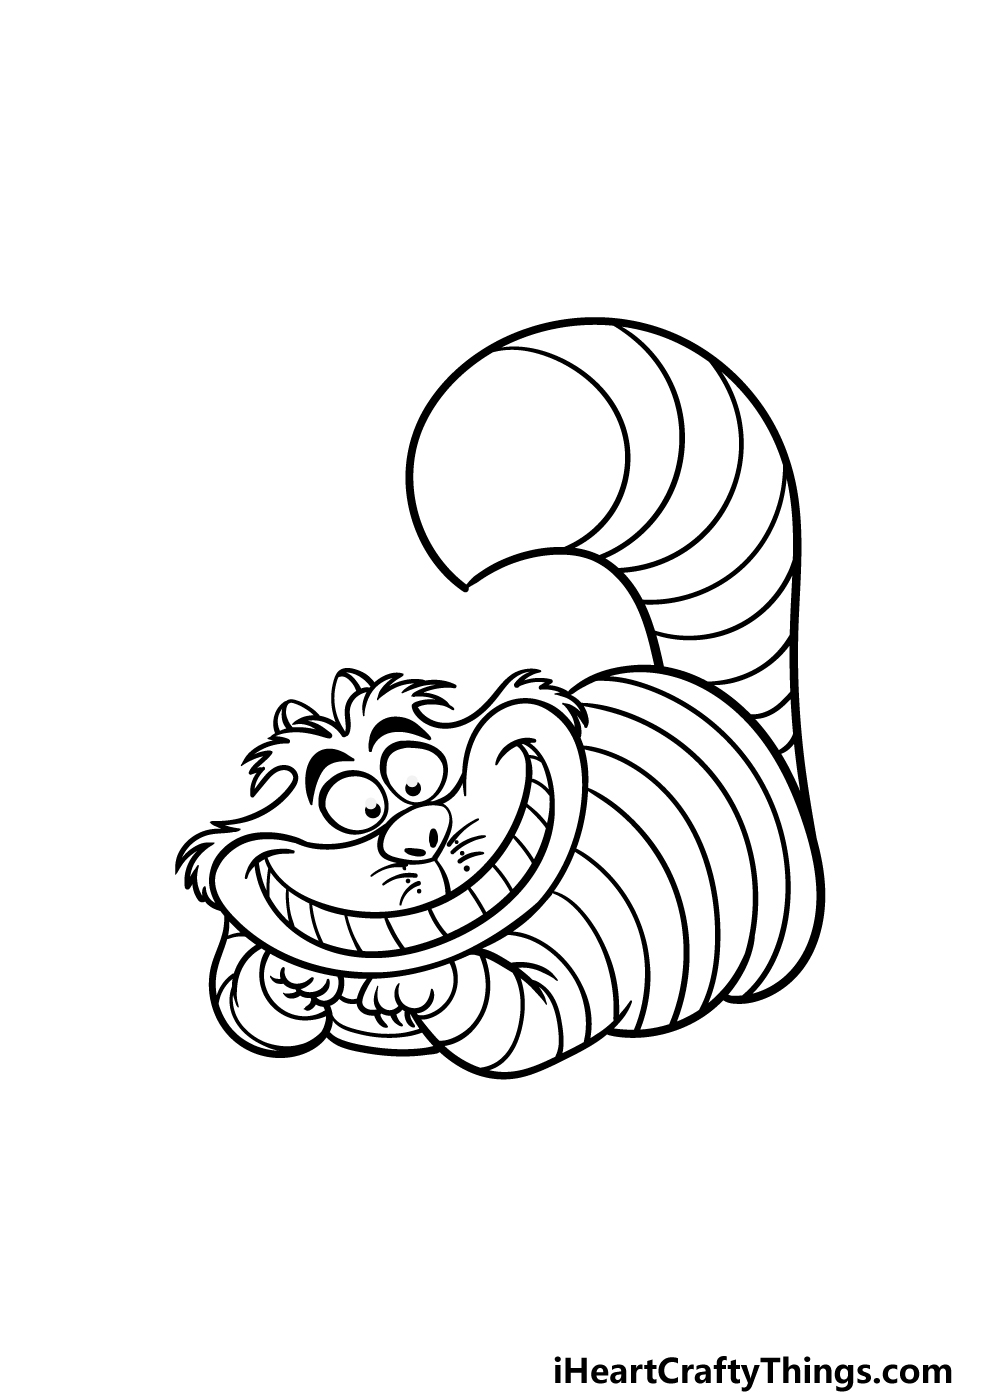
What would the Cheshire Cat be without his distinctive tail? “Incomplete” would be the answer to that question, and we wouldn’t want that!
For that reason, we will add the tail along with some final touches in this step of our guide on how to draw the Cheshire Cat.
The tail for this cat is large and fluffy, and we will keep that accurate in this drawing. Start by extending a line up from the back of the body and have it curl upward into a point.
Then draw the other side of the tail connecting back to the body.
Don’t forget to add some rounded lines along the tail for more stripes! This character is also often seen hanging from a tree by his tail, so for an extra fun detail you could draw a tree branch and have his tail curled around it.
That’s just one idea for how you could personalize this picture, but what else can you think of to finish it off?
Step 6 – Finish off your Cheshire Cat drawing with some color
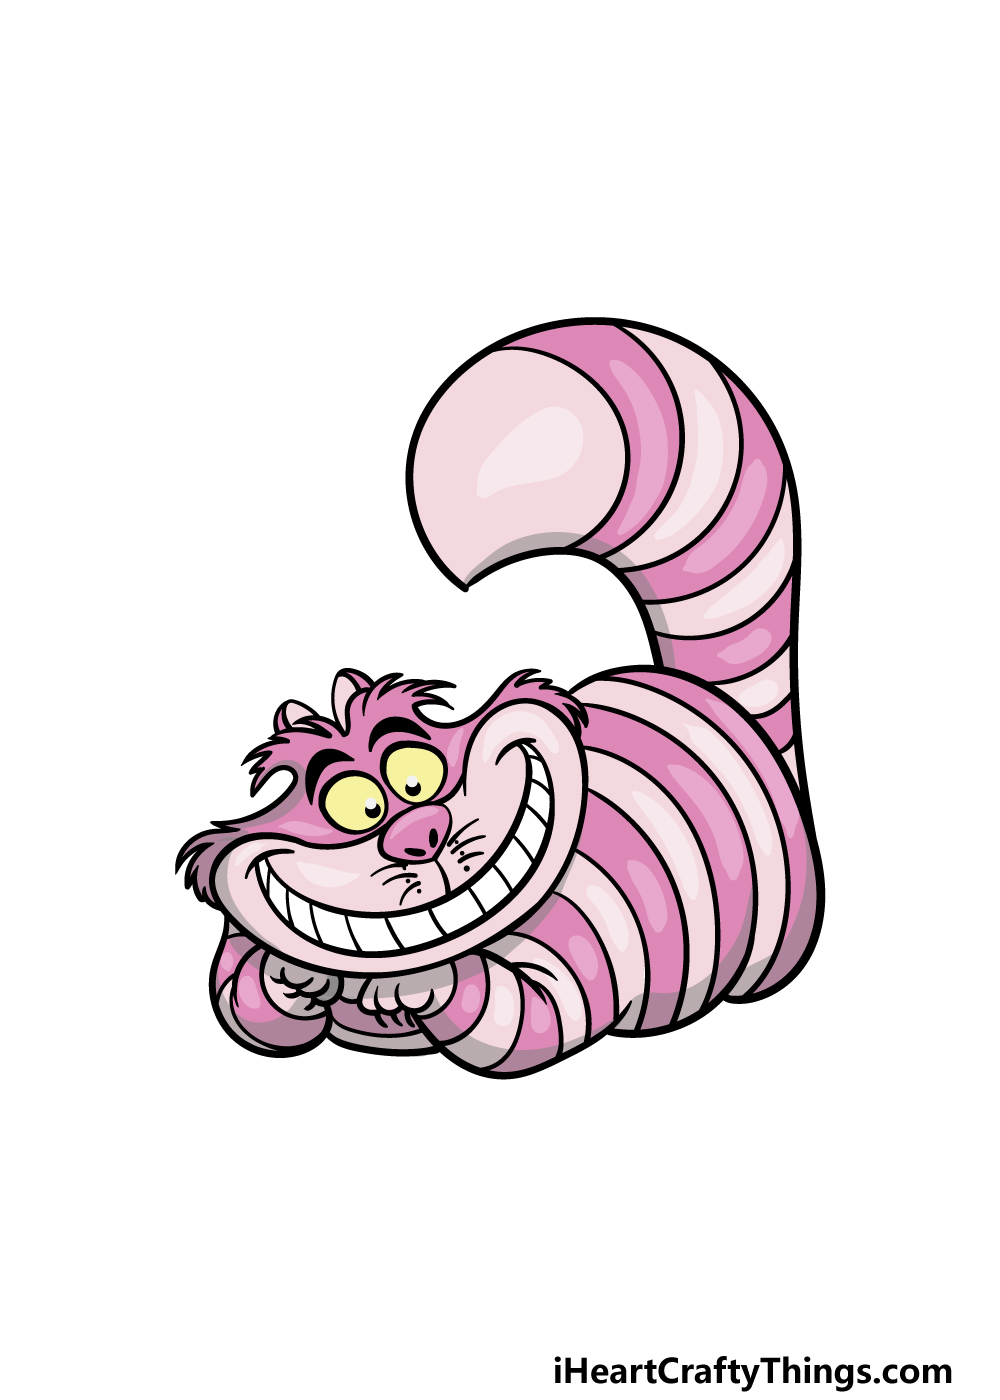
Now we arrive at the final step of your Cheshire Cat drawing! The version of the cat that we have drawn in this guide is from the animated Disney film, and we have used the same characters that he appears with in that film.
That means that we alternated a light pink with a dull purple for the stripes for a splash of color, we used yellow for his eyes to finish it off.
You could use these same shades or make them a bit lighter or darker depending on your preference. You could even create your own variation of this character by using some unique colors!
Will you go for a classic look or change it up for your drawing as you finish off?
4 More Ways To Make Your Cheshire Cat Drawing Unique
Make this Cheshire Cat sketch even more amazing with these 4 ideas!
One way that you could show off one of the main characteristics of this character would be by removing most of this drawing of the Cheshire Cat!
In the stories, the Cheshire Cat can make most of its body disappear, leaving only his eyes and grin.
You could show this by drawing just these aspects, and most people would still know exactly who the character is!
If you went with our previous suggestion, you could make it even more impactful by adding a background. There is a great scene from the Disney adaptation where the Cheshire Cat is hanging on a tree.
That would be the perfect setting for this drawing! Of course, a background could be added even if you went with the full drawing we made in this guide.
You could also choose your favorite Cheshire Cat scene to depict, or you could create a brand new background setting to use. What are some backgrounds you could create for this image?
The Alice in Wonderland stories are filled with so many iconic characters. First, there is Alice herself, and then you have the Mad Hatter and the white rabbit.
These are just a few of the characters you could add to your Cheshire Cat drawing! You could look up these characters online or use the movies themselves to help you.
Which of these classic characters would you like to add to your image to finish it off?
Another thing these stories are famous for are the various quotes and descriptions that are used by the characters. You could add one or two of these famous lines to your Cheshire Cat sketch!
For example, the Cheshire Cat is famous for the line: “we’re all mad here!” This would be the perfect quote to add to your picture.
There are many more you could go for as well, and they could help to turn your artwork into a poster. What other quotes could you use?
Your Cheshire Cat Drawing is Complete!
We had a lot of fun recreating this classic character in this guide on how to draw the Cheshire Cat, and we hope that you had even more fun working on it!
If you take your time and follow each step in this guide, then you’ll definitely be able to create an amazing drawing in no time.
Now you can show off your creativity by adding even more to it! You could draw some more classic Alice characters, add a background or try out some new art mediums and colors for a few ideas. Be sure to have fun with it!
We have many more guides for you on our website, so be sure to check in often, as we plan to release many more soon!
We would be thrilled to see your Cheshire Cat drawing when it’s finished, so please do share it on our Facebook and Pinterest pages for us to admire!