Phone technology has come a long way in recent years!
They have gone from being a communication tool that only rich people can afford to something that most people carry around in their pockets.
Phones are more accessible and affordable than ever, and they serve as a constant companion to many people.
But what would it be like if your phone was a living little buddy you could carry around? That’s what we will cover as we learn how to draw a cartoon phone.
This guide is here to show you how fun and easy it can be to create this fun design, so read on!
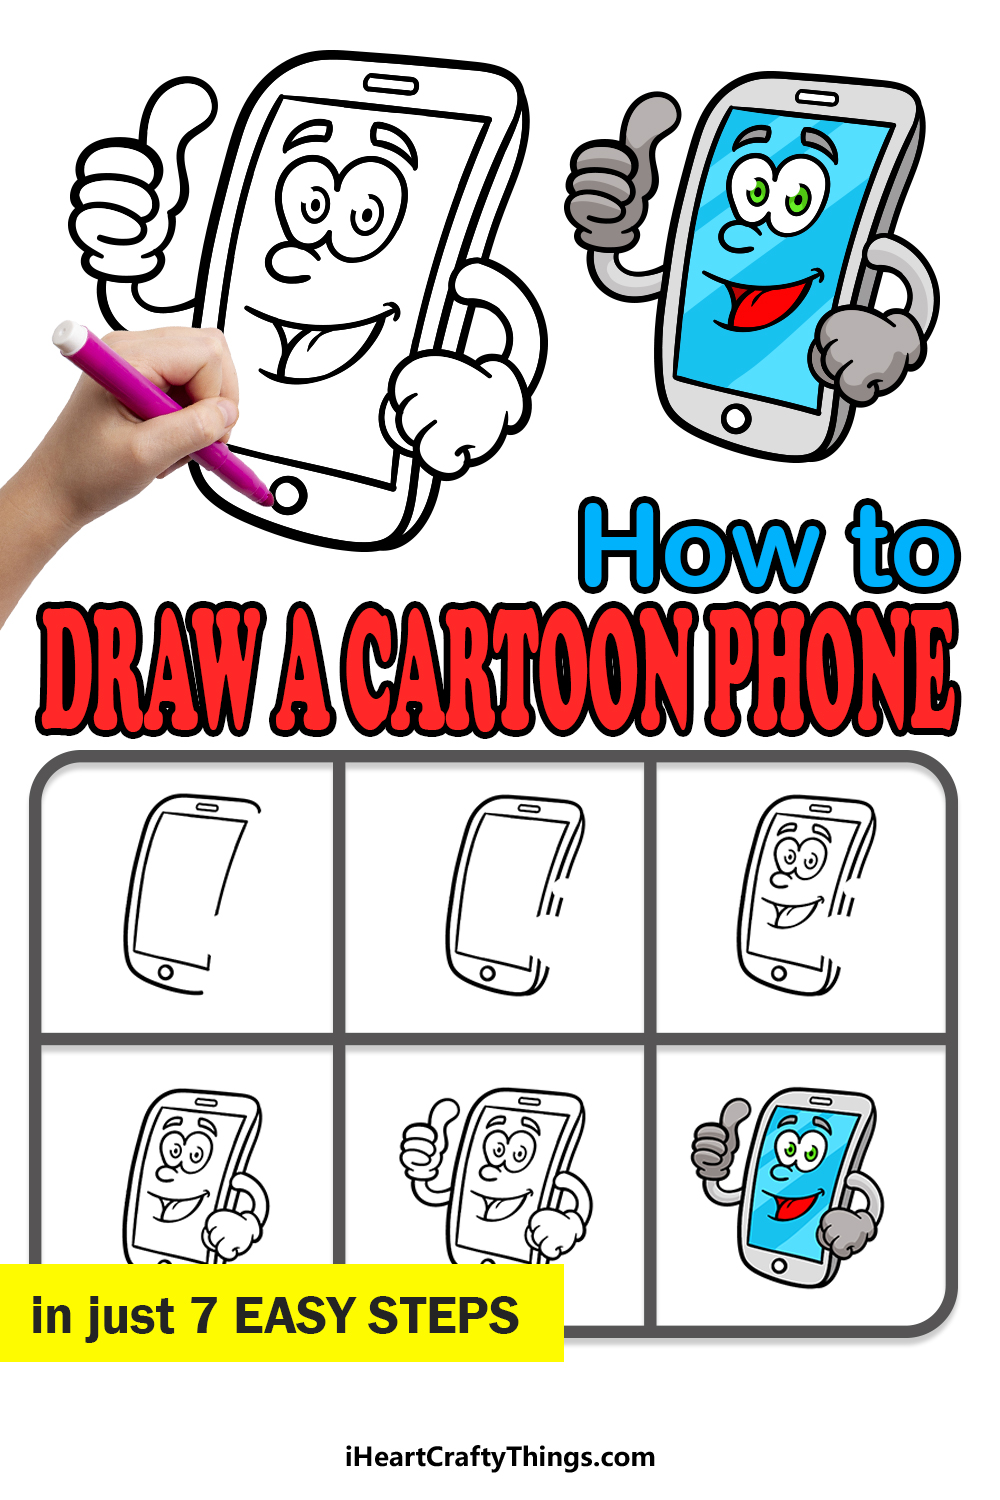
Now we can begin this step-by-step guide on how to draw a cartoon phone in just 7 fun and easy steps!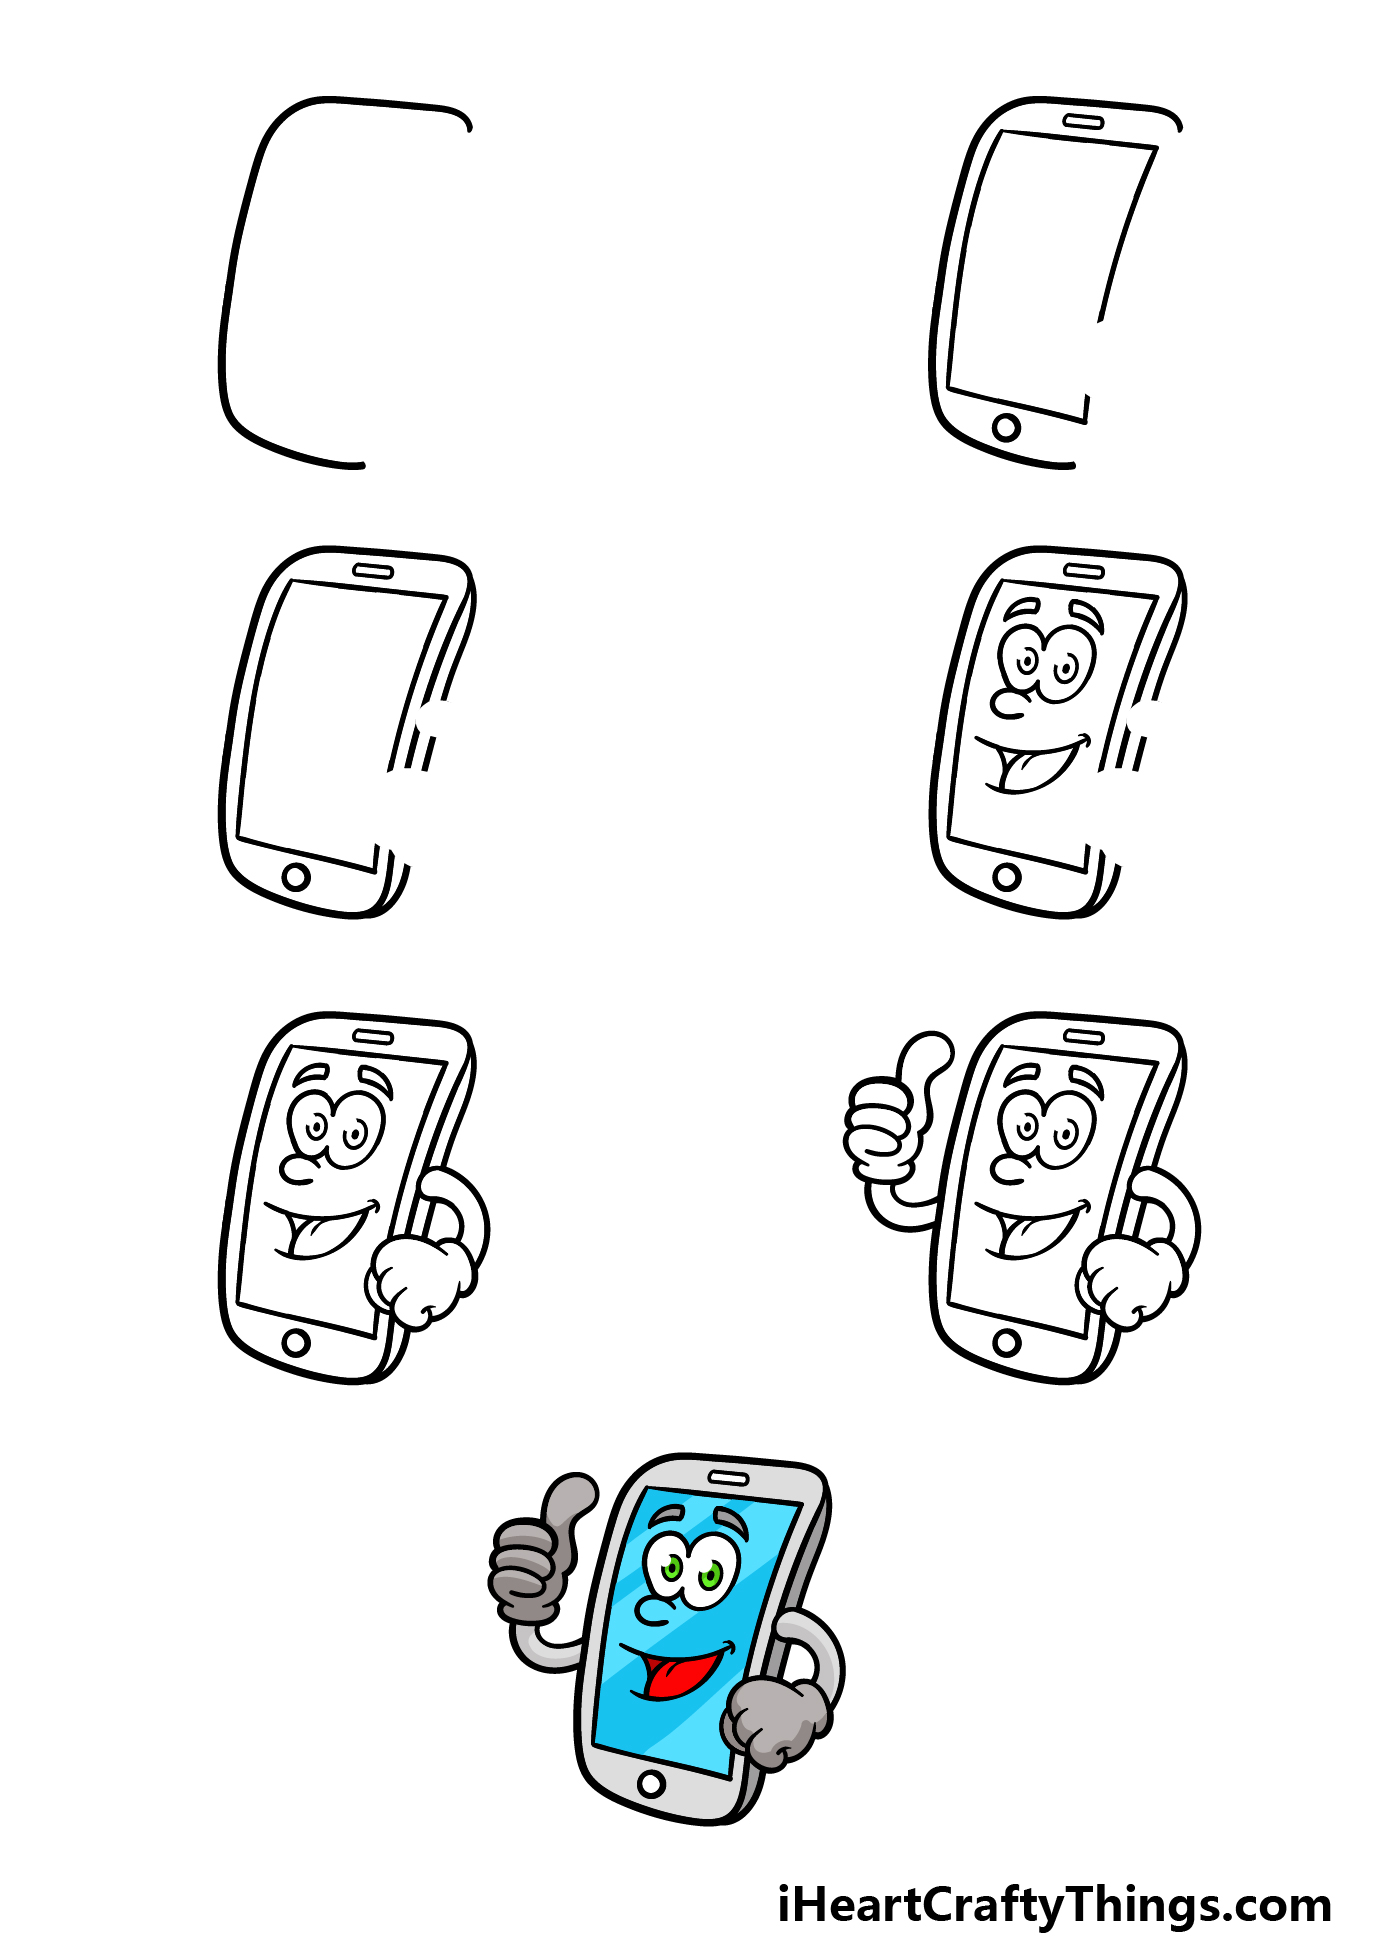
How to Draw A Cartoon Phone – Let’s Get Started!
Step 1
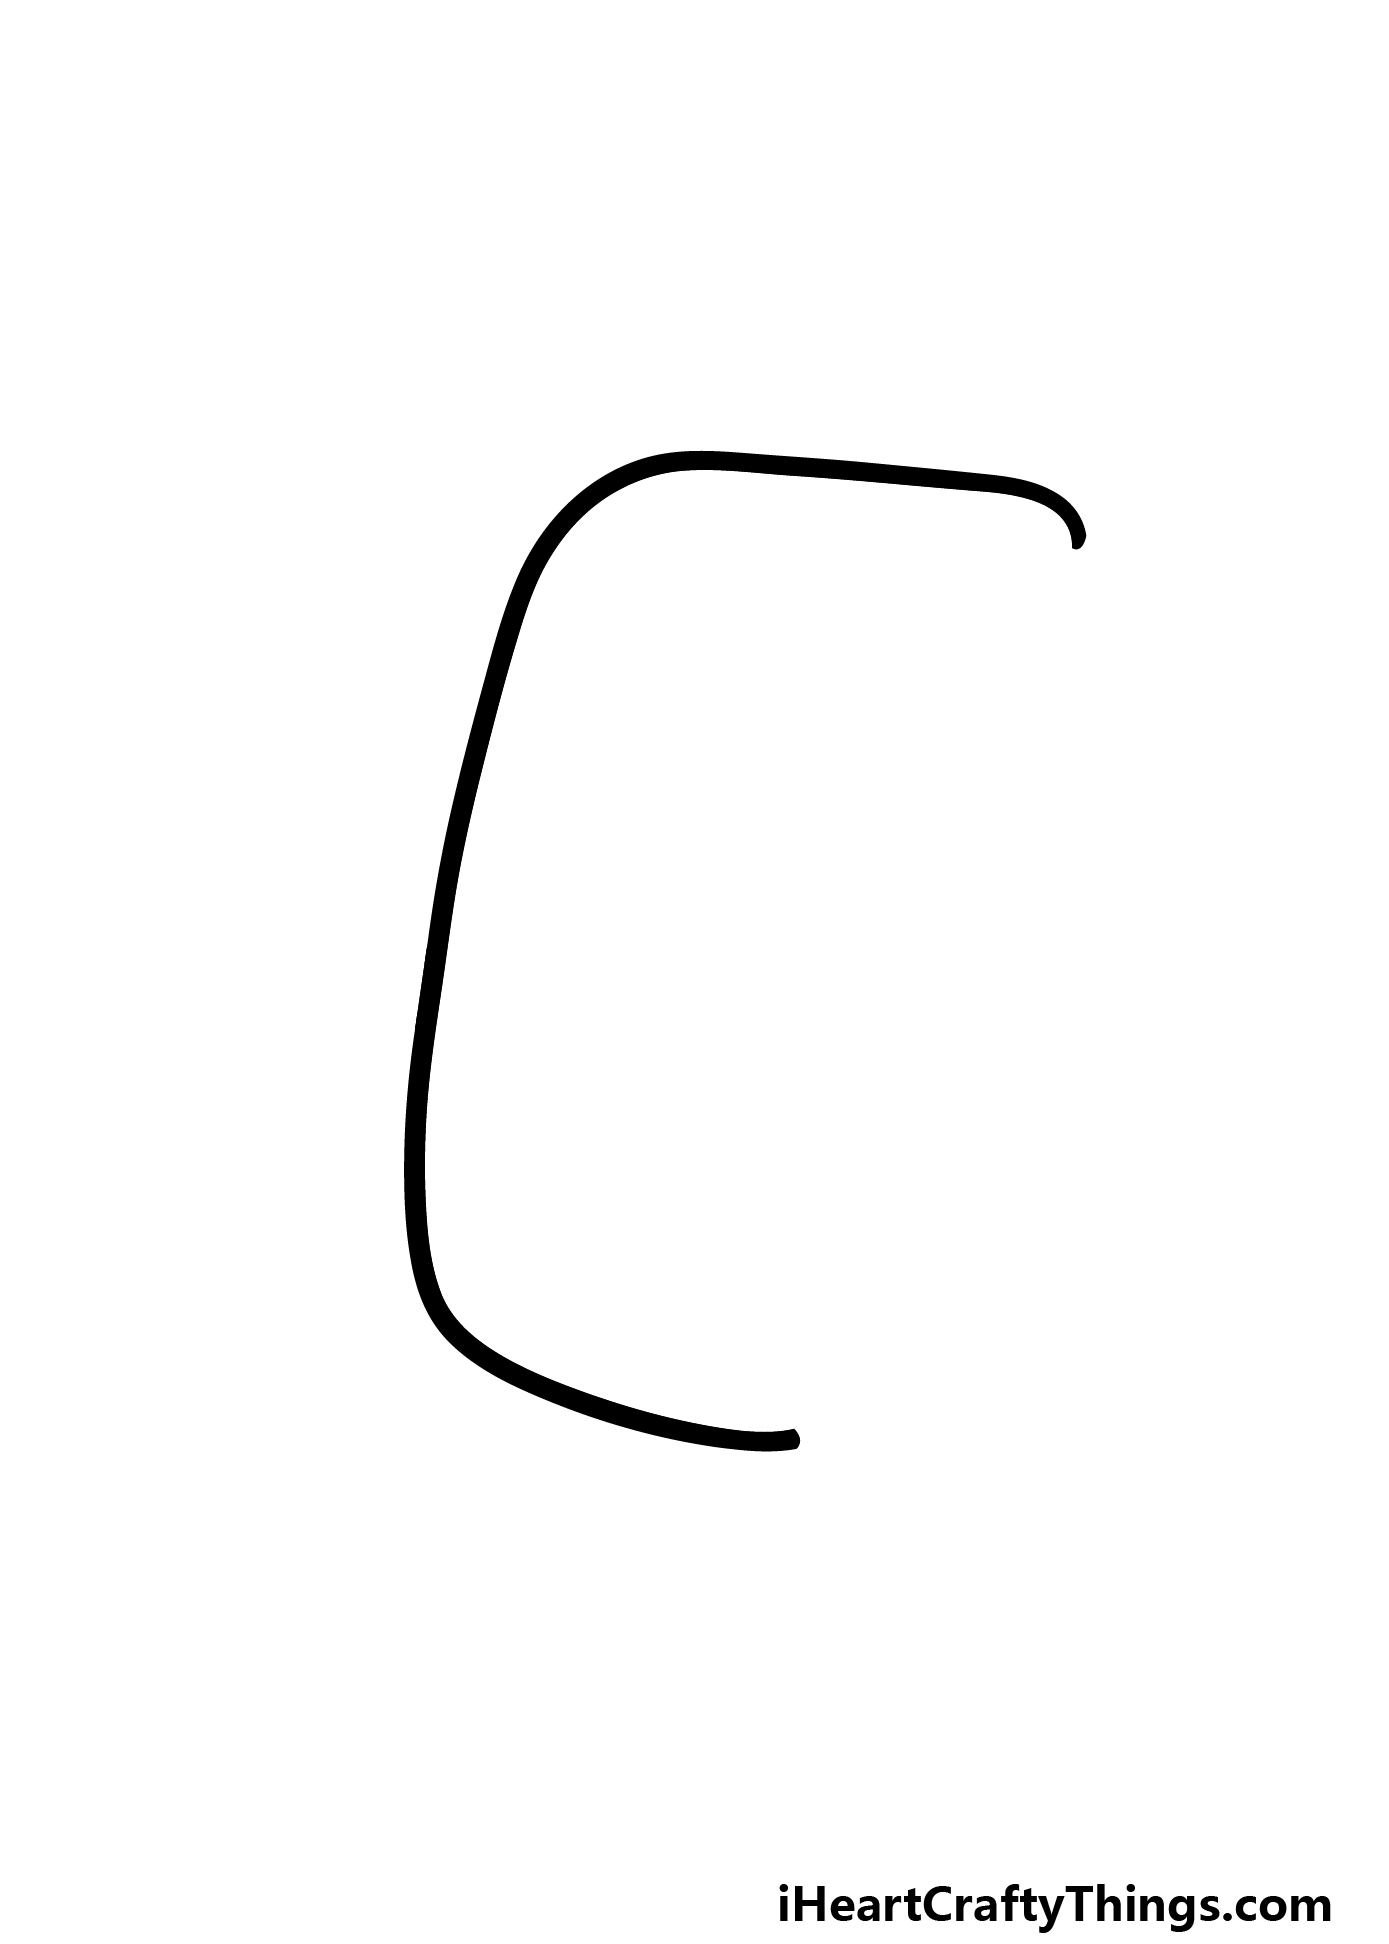
We will begin this guide on how to draw a cartoon phone with the outline for the phone’s body. This will be drawn in a rectangular, vertical shape.
You’ll notice that we will have a large empty space on the right-hand side of the phone’s body, and we will add some details there later. The corners of the phone will also be rounded.
Try your best to follow the reference image as closely as you can as you draw this first line! Then, we can move on to some more details in the next step.
Step 2 – Draw some details on the front of the phone
Next, we will add a screen and some buttons to the front of your cartoon phone drawing. First, let’s draw the screen of the phone.
This will also be rectangular in shape, and the sides will curve to math the outline of the phone’s body.
As you can see in the example image, there will be another gap in this rectangular shape as well.
Finally, we will add a small rectangular speaker at the top of the phone, and we will finish off with a circular button at the base.
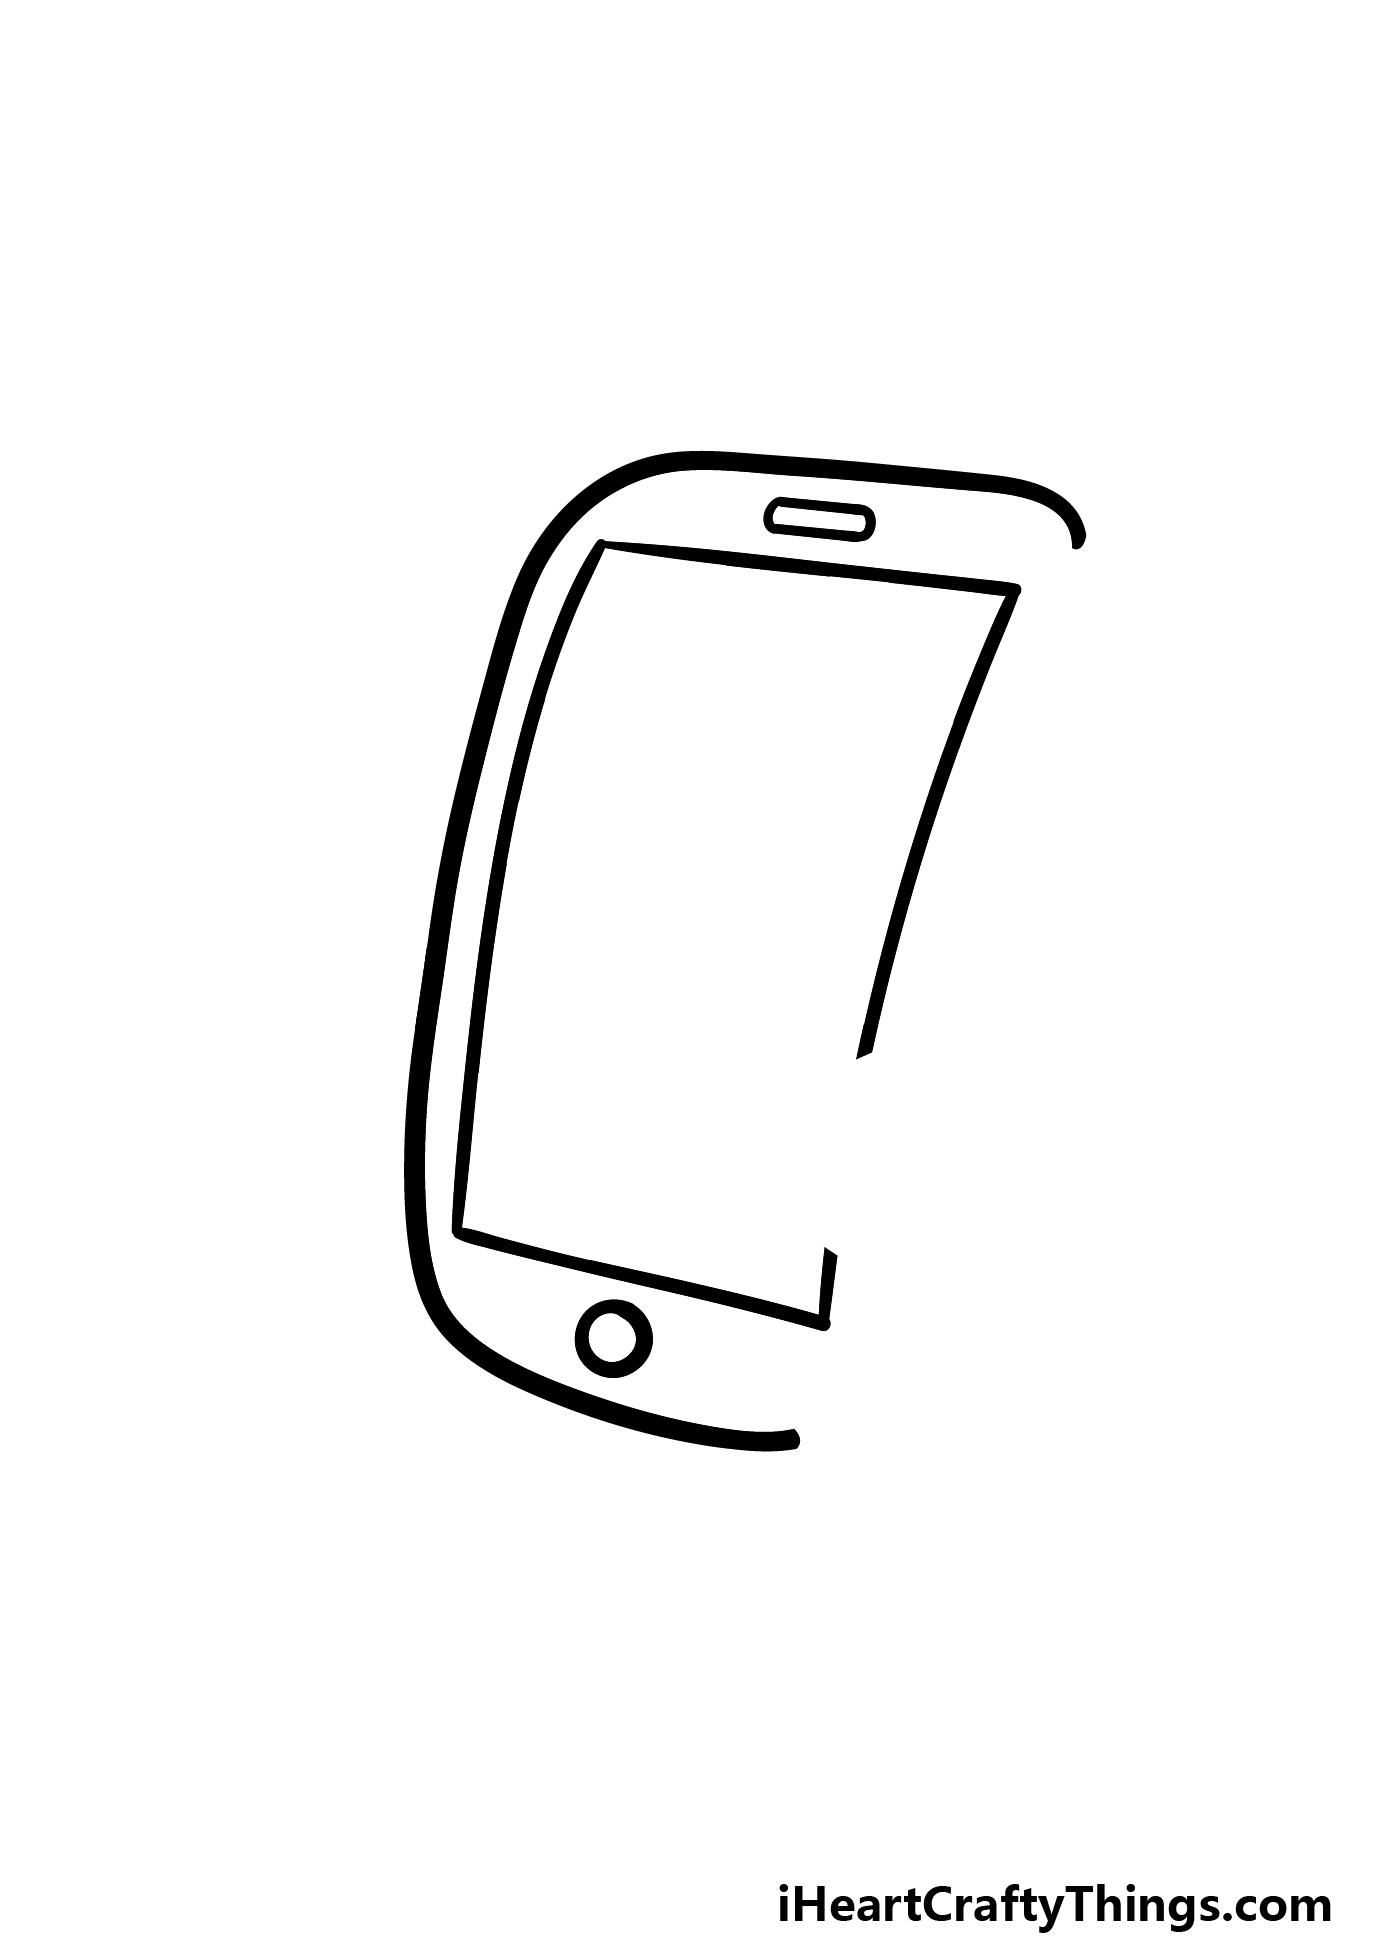
Step 3 – Draw the side of the phone

In this third step of the guide, you will be drawing the right-hand side of the phone. We will be adding some more mostly straight lines that have a very slight curve to them in this step.
These lines will also help to show that the body of the phone has depth to it. As you can see in the reference image, we will add some more gaps in the lines here, but now they will be more rounded.
This will be because some limbs will be added there in future steps.
Step 4 – Now, draw some facial details for this cartoon phone
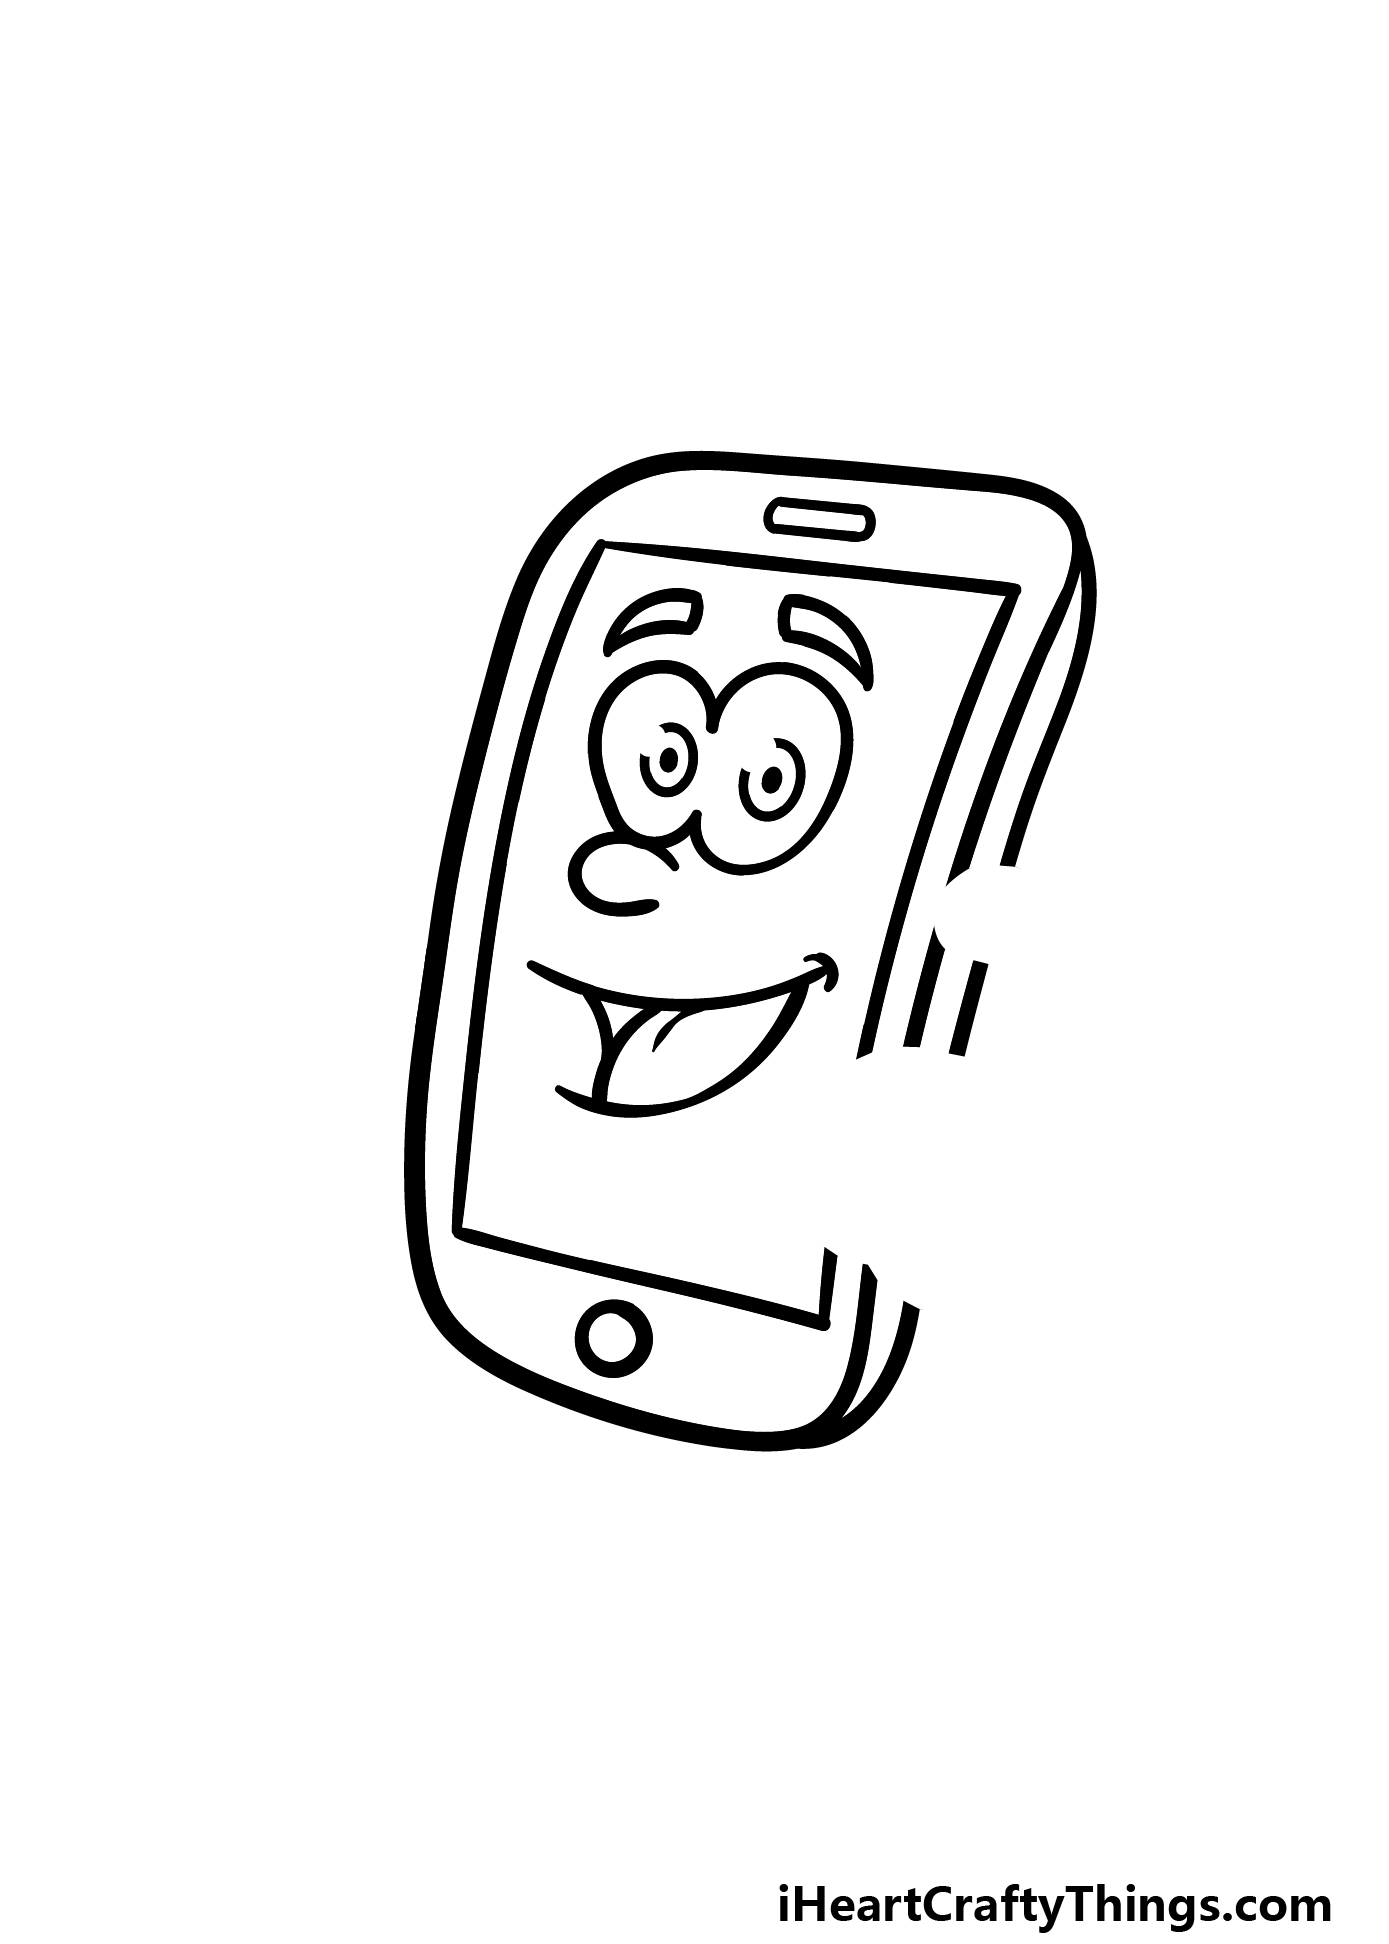
This phone is going to have a funny cartoon face, and we shall start adding it in this step of our guide!
The eyes will be drawn as two large rounded shapes connected to one another, and then each one will have more rounded shapes within for the pupils.
For some other facial details, we will add some curved eyebrows and then a rounded nose under the eyes. Finally, we will add a smiling mouth between the nose, and then we can proceed.
Step 5 – Draw an arm for the phone
Now we will start filling in some of those spaces we left on the side of the phone in this step of our guide on how to draw a cartoon phone.
The arm will be fairly short and curved, and then there will be a cartoon glove fist at the end of it.
The arm will fill the smaller space that was left higher up on the phone, and the other space will be filled by the fist.
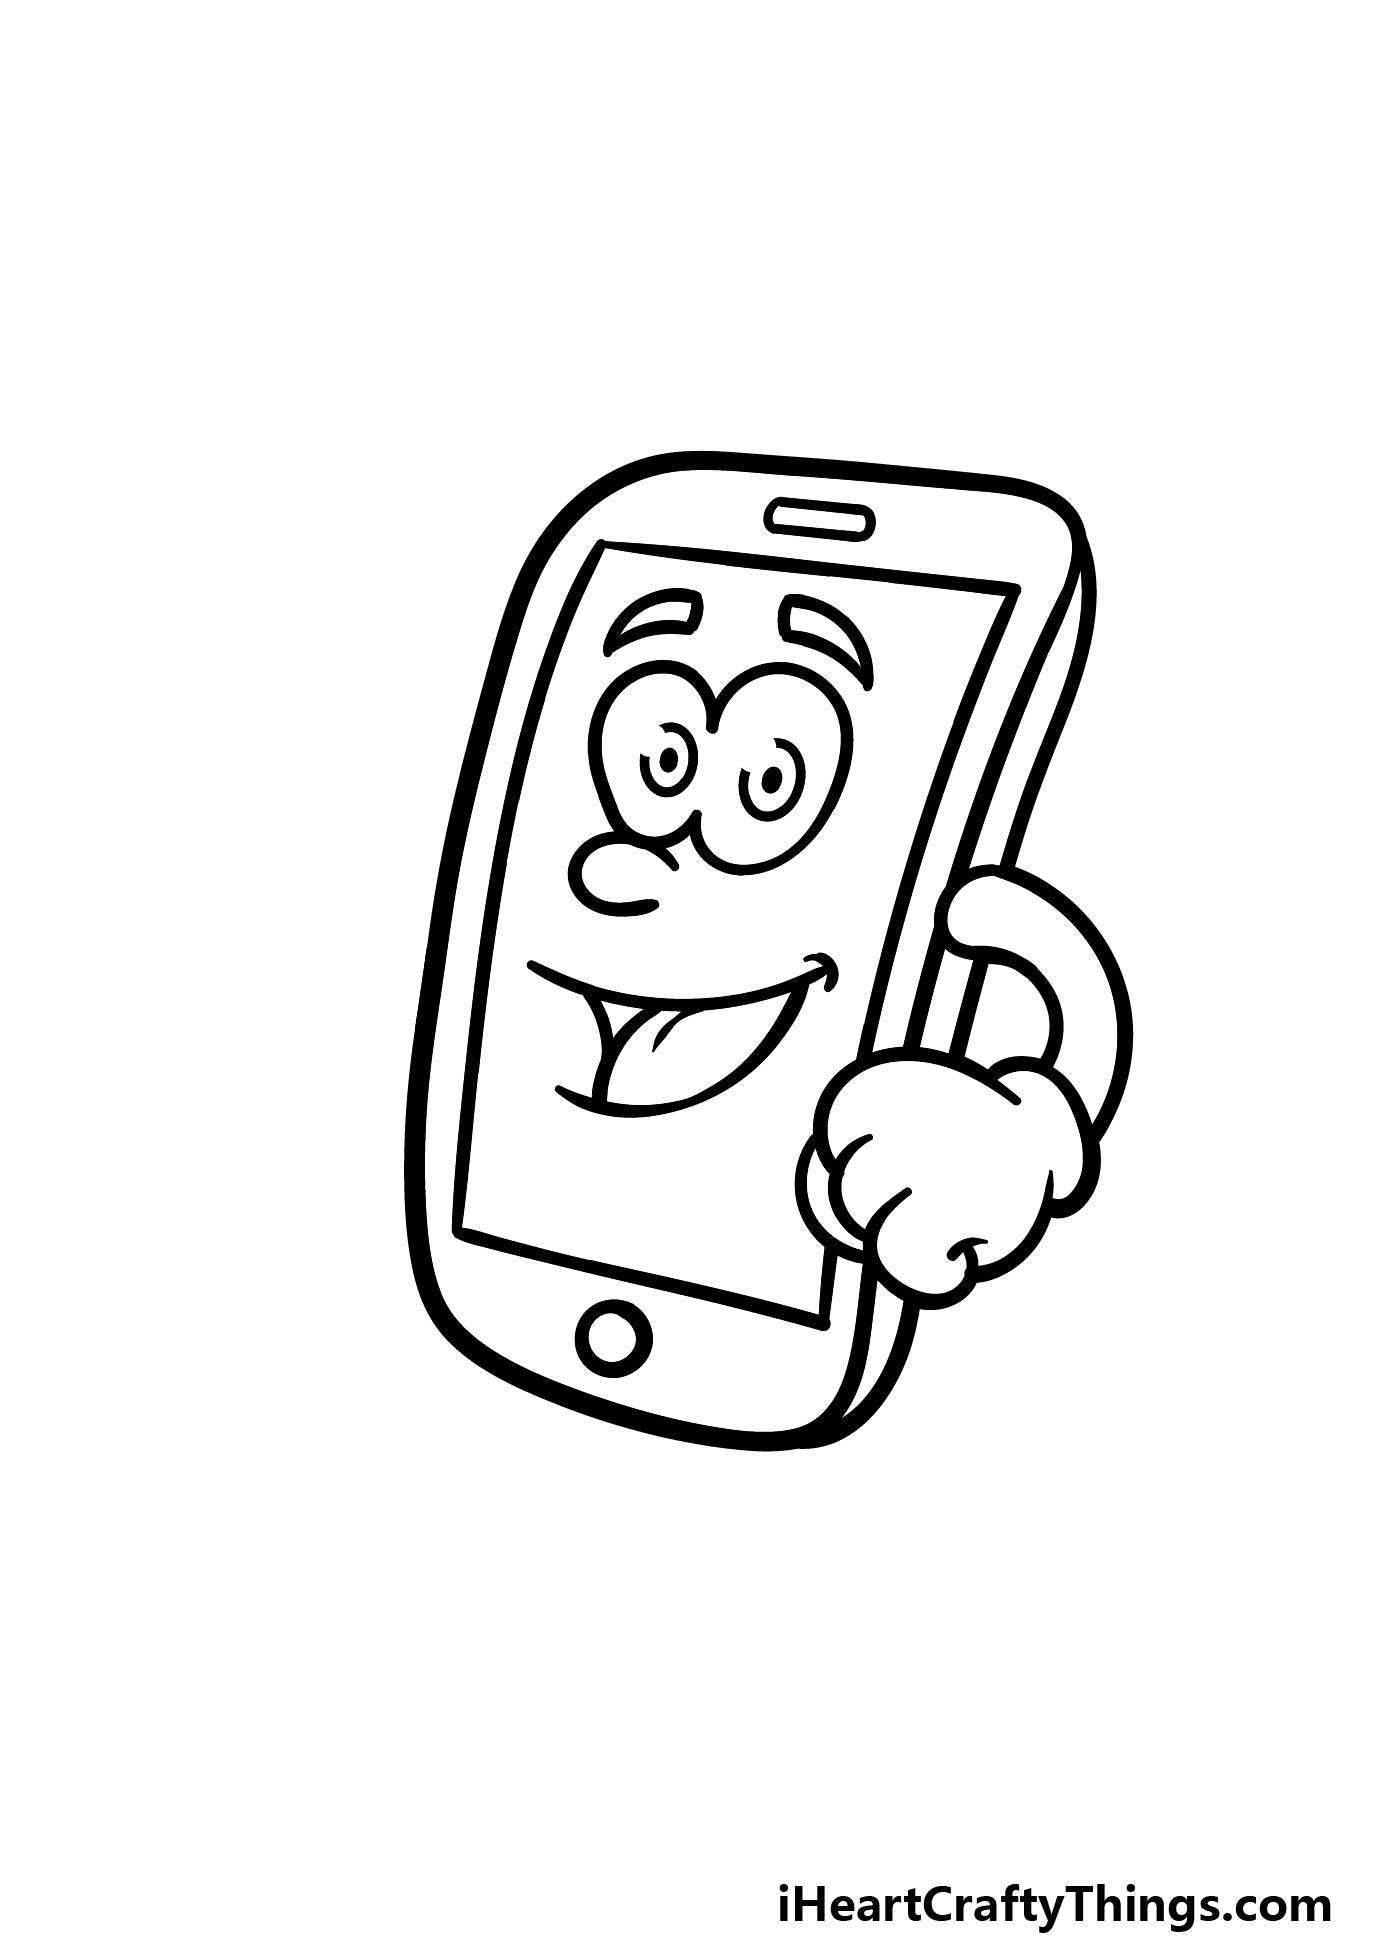
Step 6 – Now, add another arm and some final details

Before we reach the final step of this cartoon phone drawing, we will first add another arm to the body. Like the other arm, this one will be short and curved, only this time it will curve upwards.
Then, we will add another gloved hand, this time in a thumbs up pose, onto the end of this arm.
Once you have added this arm, you will be able to add any final details and extra elements that you would like for the picture.
Can you think of any background details or other objects that would suit this cartoon phone? We can’t wait to see what you do to finish off this image!
Step 7 – Finish off your drawing with some color

This is the final step of this guide on how to draw a cartoon phone, and in it we shall finish off with some colors.
This is a step where you have free reign to use any colors you like, and there are infinite possibilities! In our example, we showed you a few ideas to get you started.
These include several shades of blues for the screen, and the different shades help to make the screen look shiny.
Then, we used various shades of grey for the body and arms. We finished off with some bright greens for the eyes.
You could definitely use similar colors for your own version, but don’t be shy about going for any other colors you like!
4 More Ways To Make Your Cartoon Phone Drawing Unique
You won’t need to phone a friend with these tips for your cartoon phone sketch!
In real life, a phone will often be used with other accessories and gadgets. These could be added to your drawing of a cartoon phone!
A few examples would be a pair of headphones or maybe a pair of speakers. You could look at the various gadgets you would use with a phone and then add them here.
These gadgets could even be turned into cartoon characters as this phone was! What are some accessories you could add?
This cartoon phone has a face on it, but if you wanted to personalize it then you could remove the face and add something else on the screen. For instance, you could start with the icons of your favorite apps.
Or, maybe you would like to portray a picture you would look at on a phone screen. If you wish to stick to the cartoon look of the phone, then you could add a different facial expression or design.
What do you think could be on this screen?
We spoke about adding some other objects to this cartoon phone drawing, but you could also add a human character! There are lots of poses that you could create if you wanted to do this.
The human could be holding the phone and talking as they go on a walk. The person could be drawn in a simple cartoon style, much as this phone was drawn in.
Who would you base the human character on?
The whole point of a mobile phone is that it can be taken anywhere you could want to go. For that reason, you would have many options for background settings for this cartoon phone sketch.
This would be especially great if you decided to add a human using the phone as we suggested in the previous step. Either way, you could show off where you think this cartoon phone would be hanging out.
What location would you use for a background?
Your Cartoon Phone Drawing is Complete!
You did a fantastic job on all 7 steps of this guide on how to draw a cartoon phone!
We hope that the steps in this guide helped to show you just how fun and easy this design can be when you know what to do.
Then, you can keep it going by adding your own flair to the image. We mentioned drawing a background as one idea, and there are so many fun ideas you could choose as settings.
Changing up the colors and art mediums you use is another way to have some creative fun, so how will you finish off this phone?
If you had a fun time with this guide, be sure to check out the many drawing guides and other activities we have for you on our website. We have more on the way soon, so stay tuned!
We would love to see your awesome cartoon phone drawing, so please share it on our Facebook and Pinterest pages for us to see when it’s done!