There are loads of fun activities to enjoy in the great outdoors! One of the best ways to experience all of these fun activities is to go on a camping trip to really complete the experience.
Camping is a relaxing and tranquil way to get away from it all and get in touch with nature, and there are many different locations that you can set up a tent and relax.
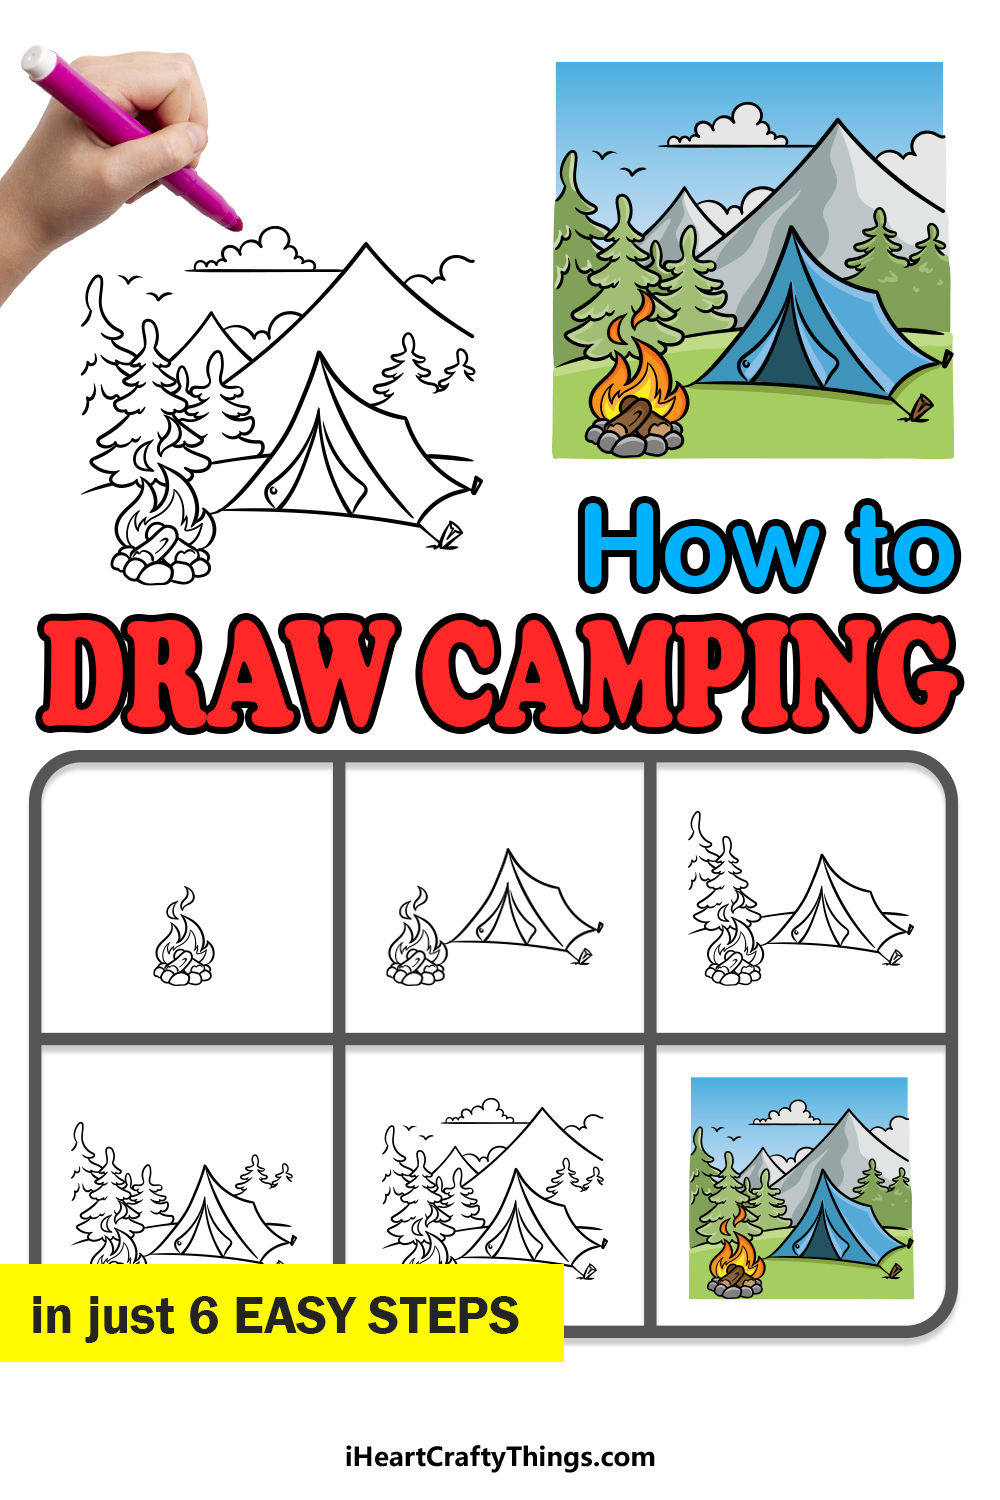
Learning how to draw camping is a great way to imagine the perfect camping spot, and that’s what we’re here to do now!
If you would like to envision the perfect camping spot, you’re definitely in the right place.
We hope you have a great time working on our step-by-step guide on how to draw a tent in 6 steps!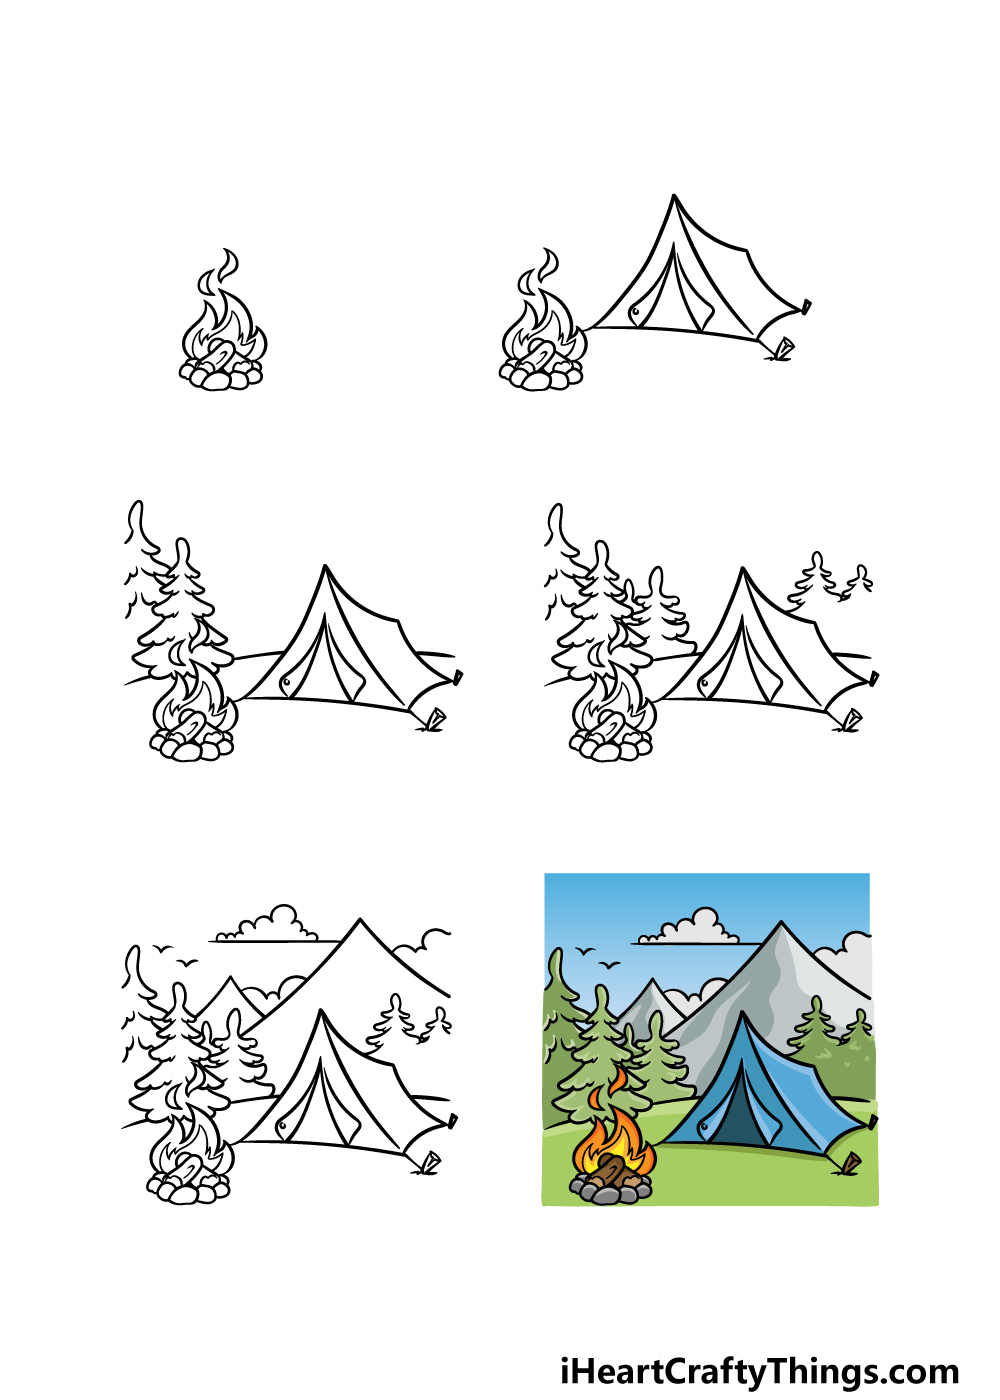
How to Draw Camping – Let’s Get Started!
Step 1
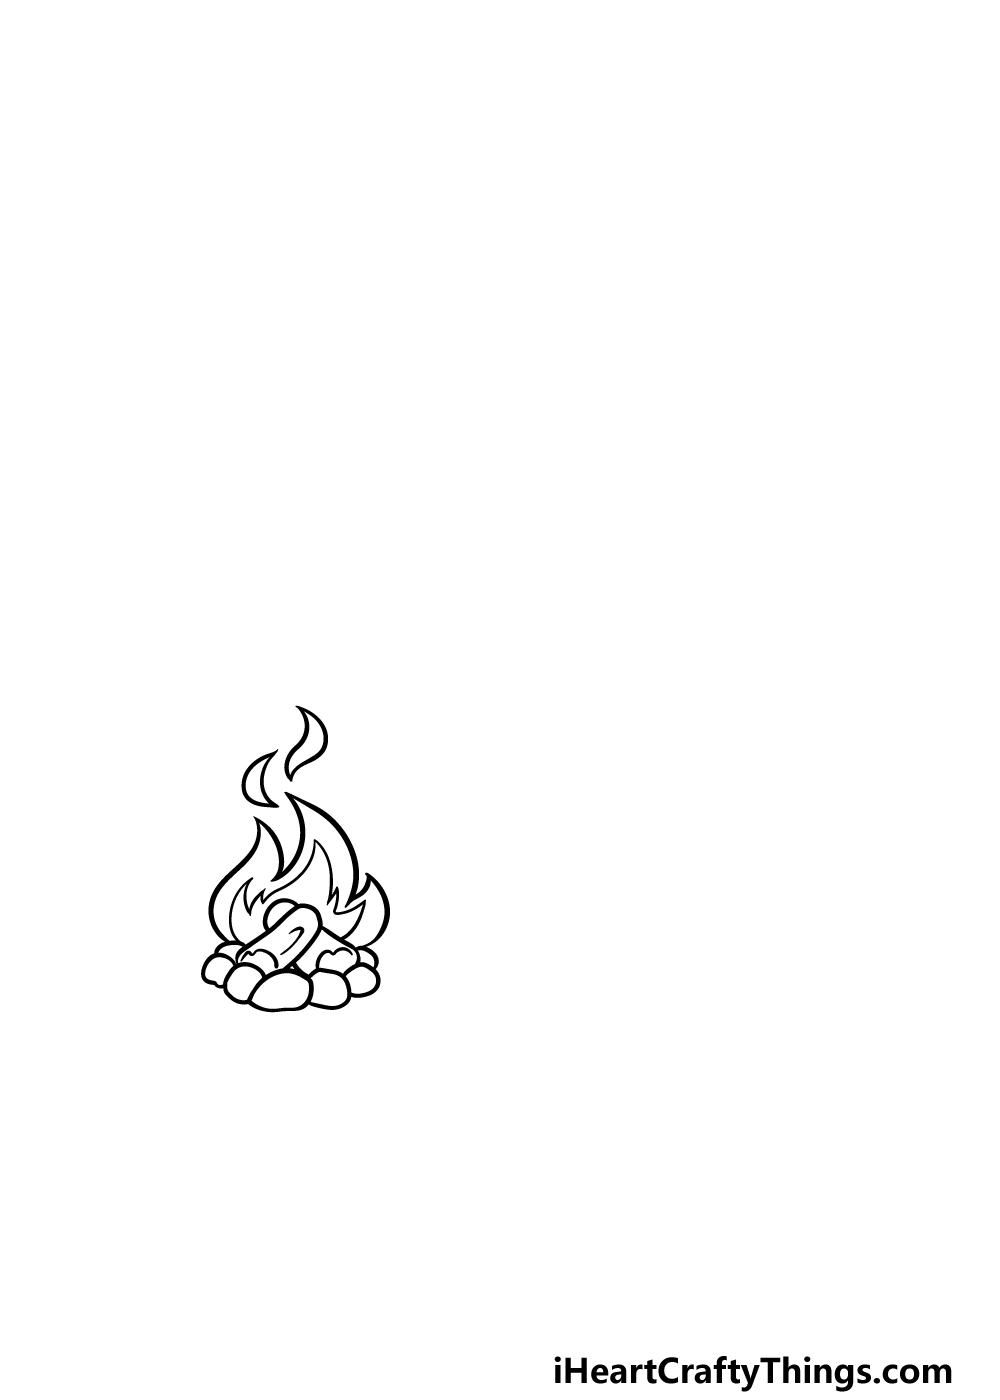
When setting up a campsite, one of the first things you may want to do is get a nice fire going. This is the best way to ward off the evening chills as well as scaring away bears, wolves and other wild creatures.
That’s why we shall start this guide on how to draw camping by drawing a campfire next to the tent that you will be drawing shortly.
You can start this by drawing some small, rounded shapes for the base of stones for the campfire.
Then, once you have drawn these stones you can draw two longer rounded shapes above them for the wood of the fire.
Then it’s just a matter of drawing the fire itself. You can do this with some curved lines that have sharp pointy ends, and then draw another of these shapes within the first one.
Finish off by drawing two wavy shapes above the fire, as shown in the reference image.
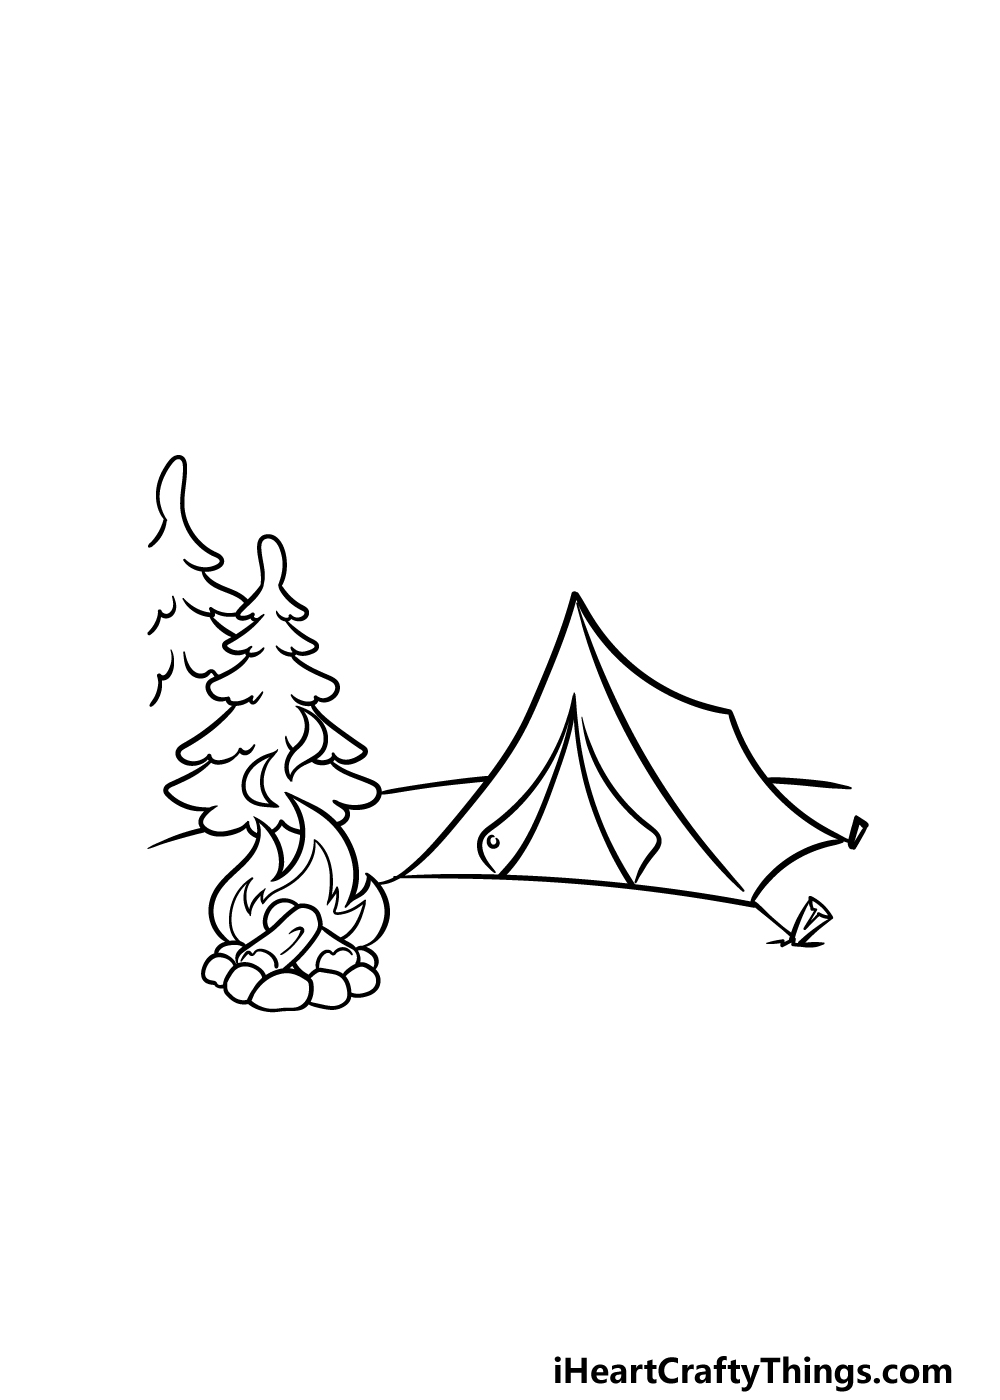
Step 2 – Now, draw a tent for the campsite
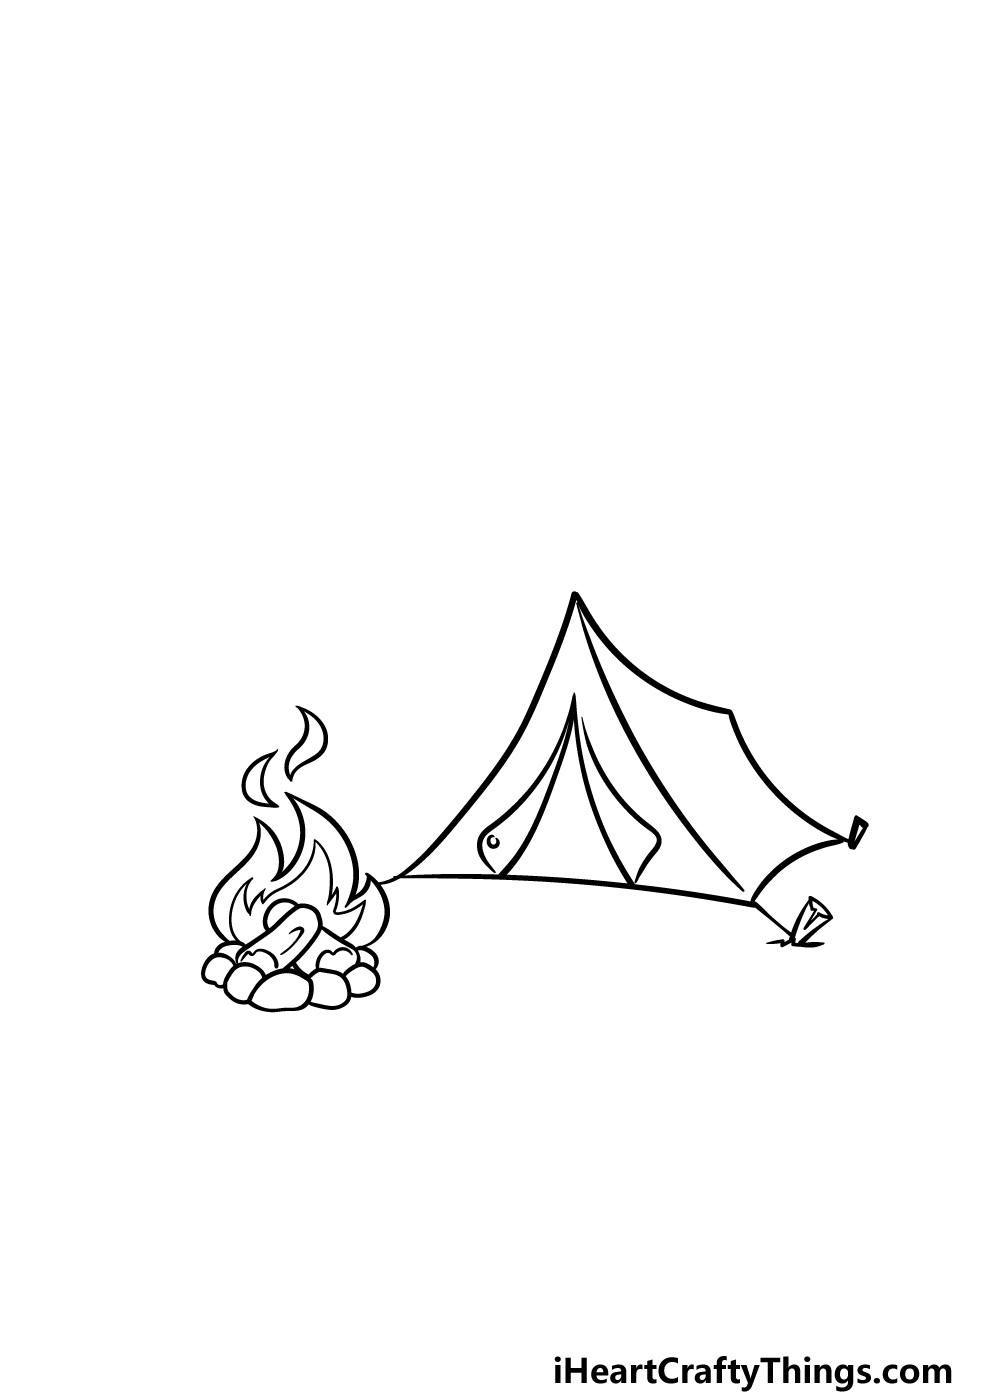
Now that you have your campfire, it’s time to draw a tent for this camping drawing. To start this, we will begin by drawing a triangular shape for the front of the tent.
This triangular shape will have some curved lines for the sides of it, and this will show that it is made of fabric.
Then, you can draw some more curved lines for the sides of it. Finally, draw one more rounded triangular shape with some flaps coming off of it for the opening of the tent.
Then you’ll be ready for step 3!
Step 3 – Next, draw the start of the background for this campsite
You have the fire and the tent drawn, and for this third step of our guide on how to draw camping we will focus on the background setting for the image.
In this picture, we will be portraying this campsite in a mountainous forest setting.
To begin this, start by drawing a couple of pine trees to the left of the image. These trees will be drawn in several sections, and each section will be made up of some rounded shapes connecting to one another.
Also, each tree will start with a small section on top, and these sections will get larger as you move down the tree.
Once you have drawn these trees, simply add a curved line across the image that will go behind the trees and the tent.
Step 4 – Now, draw some more trees
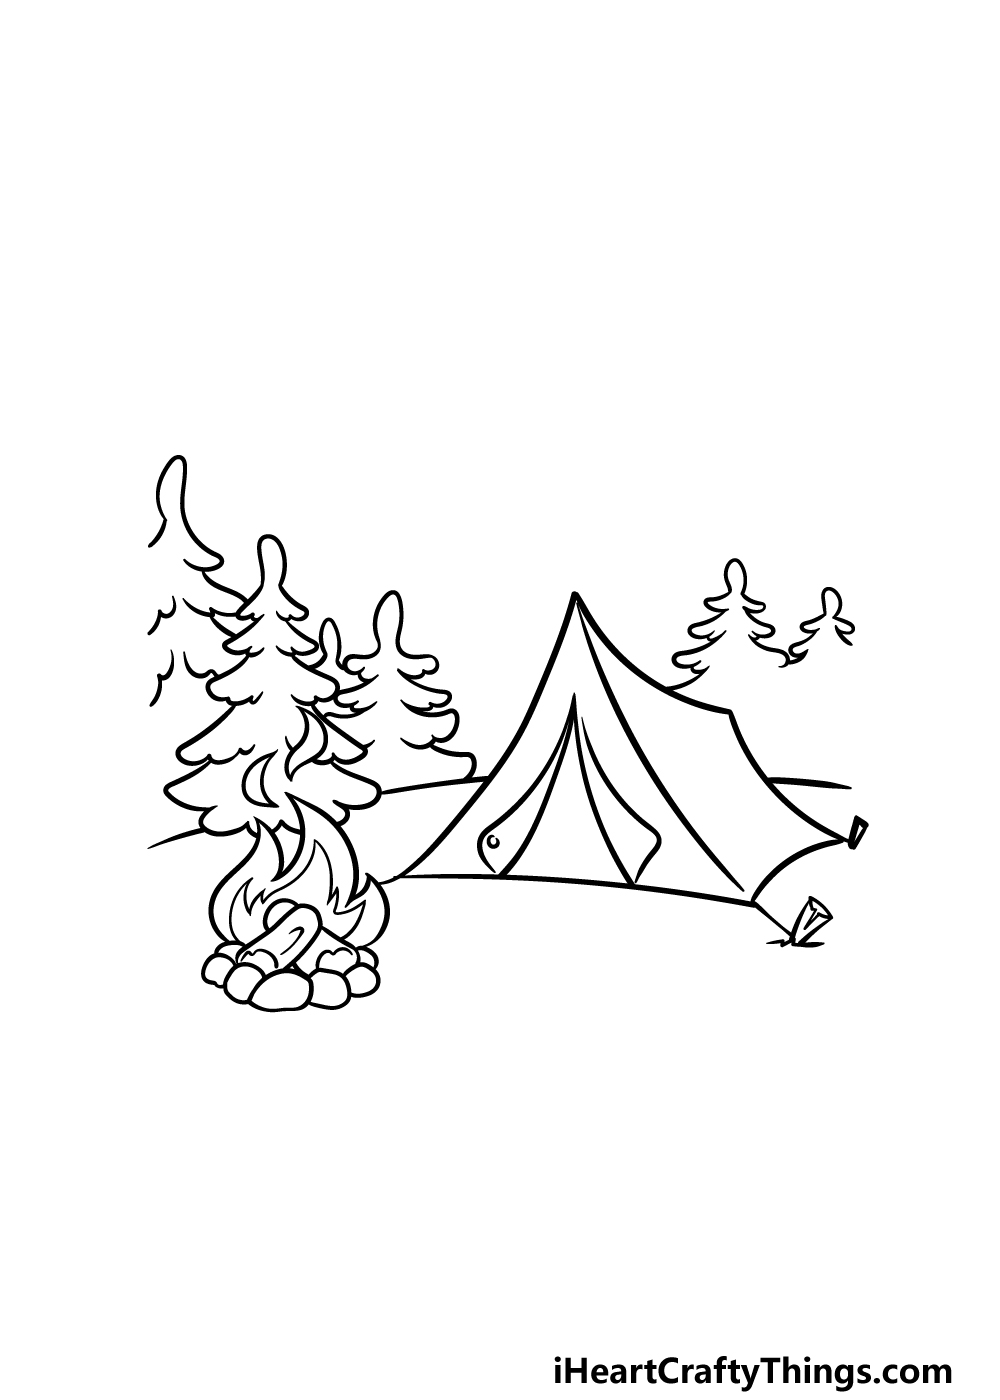
We will be adding some more trees to the background of your camping drawing in this fourth step.
These trees will be a bit further away, so they will be drawn a bit smaller than the previous ones. You can start by drawing two more trees next to the first ones that you drew.
These trees will be drawn in essentially the same way that you used to draw the first ones. Once these trees are drawn, you can then add two more on the right-hand side.
Then you will be ready to draw some final details in the next step!
Step 5 – Add some final details to your camping drawing
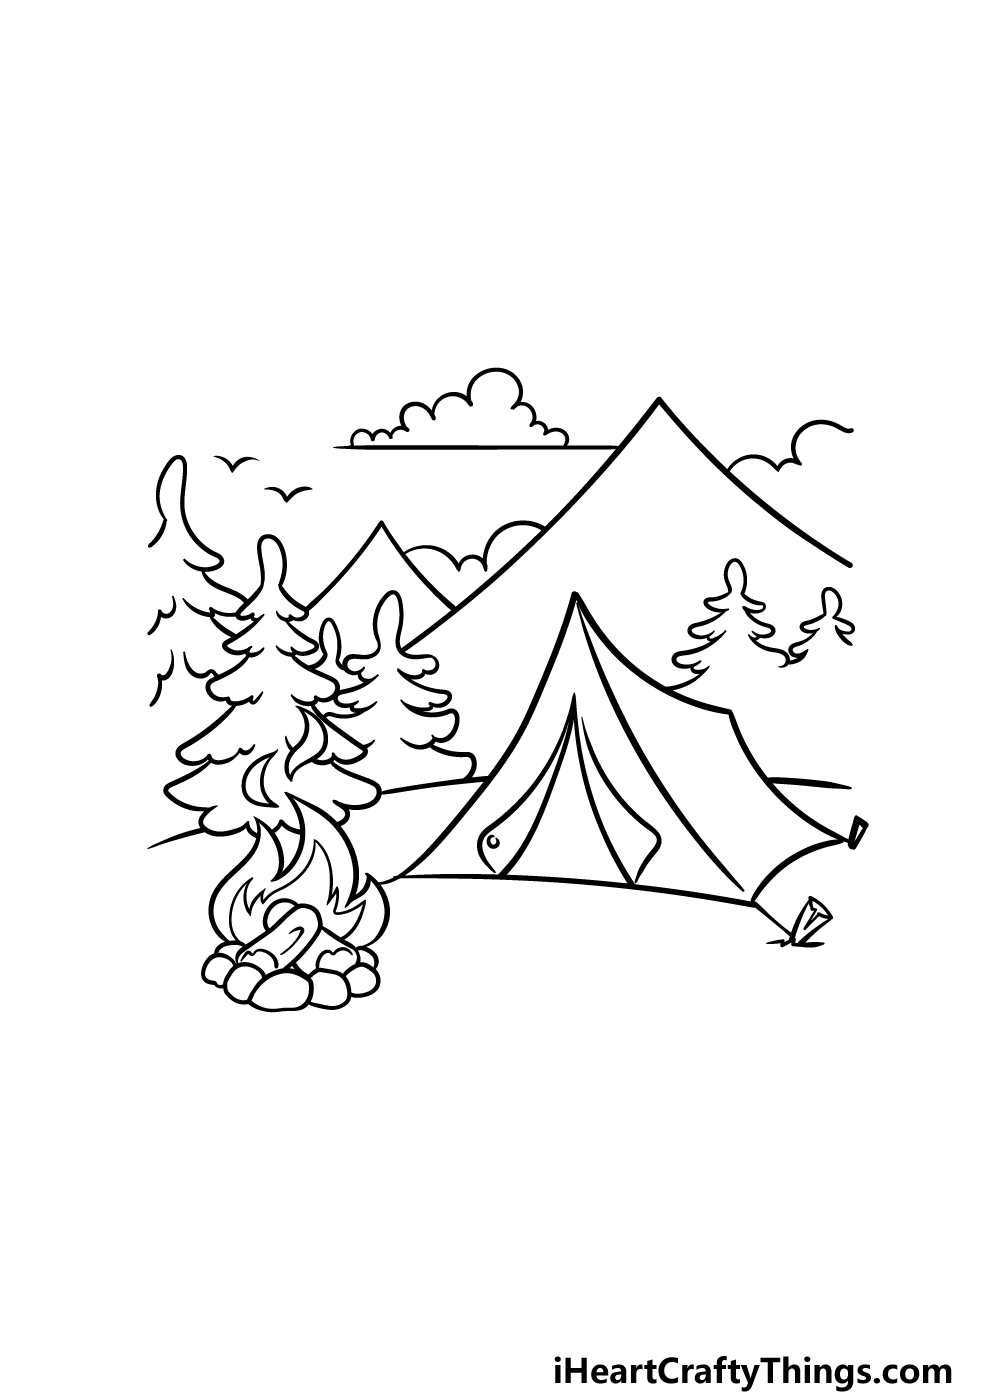
Now it’s time to finish off this picture by adding some more details to the background. To kick off this fifth step of our guide on how to draw camping, we will be drawing some mountains.
The first mountain will be drawn as a large, pointy triangular shape above the campsite, and the sides will be slightly curved.
Once this mountain is drawn, you can then add a smaller, similarly shaped mountain to the left side of it.
We have just a few final details to add now, so you can finish off by drawing some fluffy clouds and bird silhouettes in the sky beside these mountains. Once these are drawn, you’ll be ready for the final step!
Before you move on, can you think of any other details or camping gear objects to add to this picture?
Step 6 – Finish off your camping drawing with some color
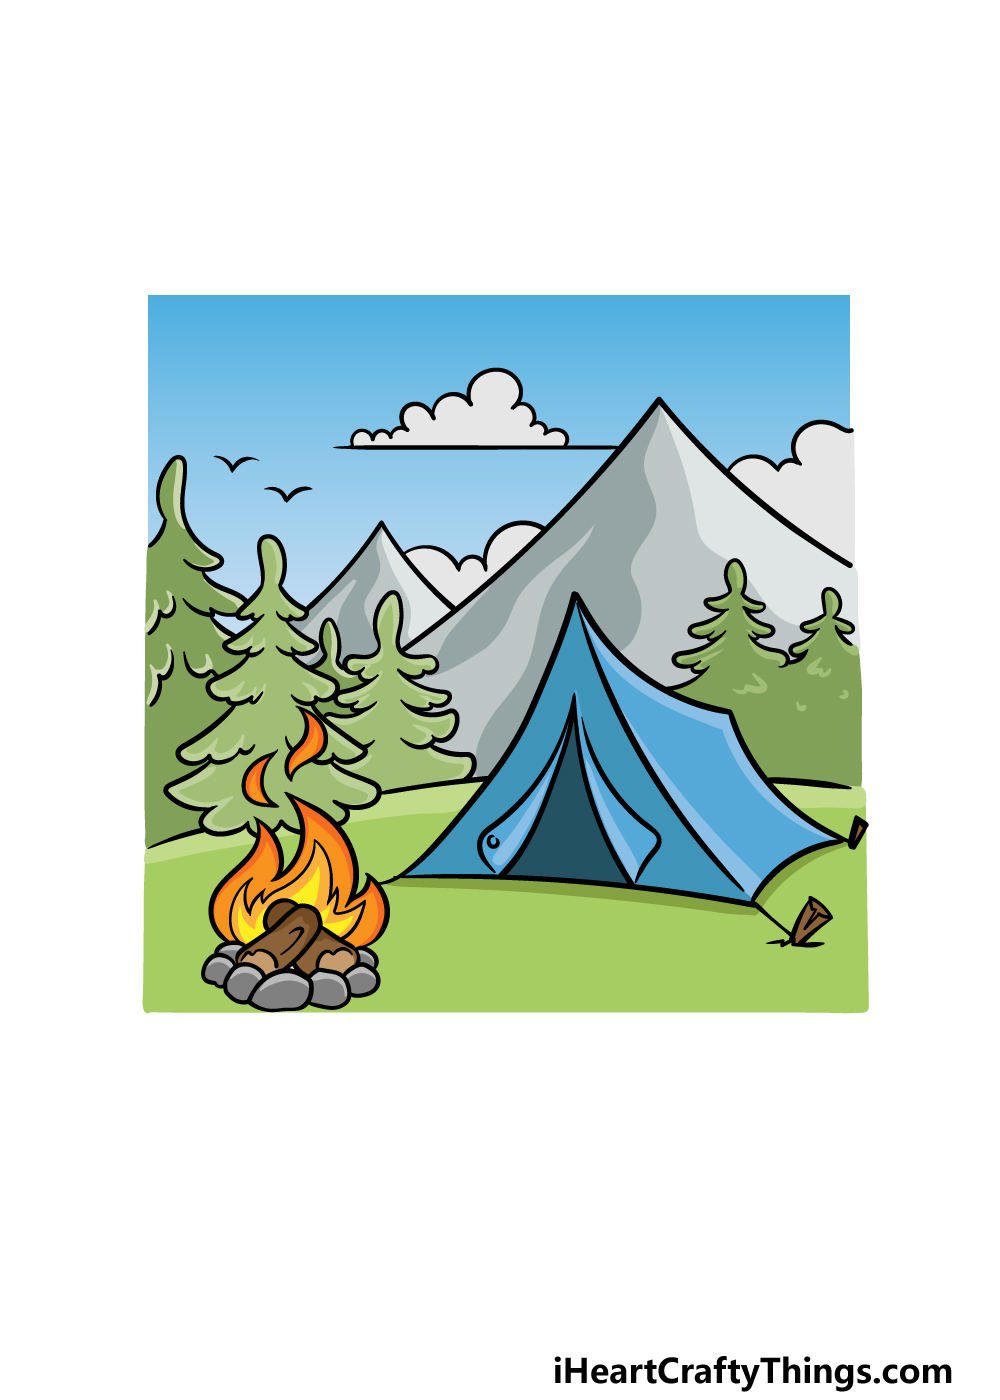
We will be finishing off this camping drawing by adding some color in this final step. We used some lovely greens for the ground and trees, and then we used some bright blues for the tent and sky.
For the mountains, we used various shades of greys, and by varying the shades we created some texture for the mountain.
There are also lots of great art mediums you could use to color this drawing in.
We would recommend using some watercolors for a scene like this, but anything you use will bring something uniquely great to the picture.
How will you color this image?
3 More tips to make your camping drawing easy!
Camp out with some tips on making your camping sketch even easier!
We tried to include loads of fun details in our example for this drawing of camping. Even though they are done in a cartoony style, this level of detail can be intimidating to take on.
You could tone down some of the details for your own version to make it more manageable. This would depend on what you’re okay sacrificing and what you’re finding hardest to draw.
For example, you may want to focus on the tent and the campfire. In that case, you could remove the mountains and the trees.
What else could you change or remove to make this a bit easier on yourself?
If you want to make your camping drawing a bit more realistic or if you want an added reference for your image, you could look up some pictures to help you.
The odds of finding a photo that matches our example are slim, so you may have to break it up a bit. For example, you could find separate photos of mountains, trees and a tent.
Then, you could use these photos to draw each individual element. These could not only help to make our design easier to draw, but they could also help you to change the design to make it more unique.
Finally, we always like to recommend using a pencil when planning your drawing. We would certainly recommend one for this camping sketch!
When you start drawing with a pen, it puts a lot of pressure on you to get it right straight away. When using a pencil, you can do rougher sketches to prepare and try our different details.
A pencil can also be used to break down the image into basic shapes that can then have layers of details added over them. The more layers you add, the more details you can add!
Then, when the drawing is looking as you want it, you can use that pen we mentioned and start drawing the final lines.
Your Camping Drawing is Complete!
That will conclude this guide on how to draw camping! We hope that this tutorial was as fun and relaxing as enjoying a lovely day camping outdoors.
When you have finished this guide and completed the drawing, it will be up to you to add some final details and elements to it.
We mentioned how you can add some of your own details and additions along with some color and medium choices, so how will you personalize the picture?
We also have some great drawing guides for you to enjoy on our website! We have more on the way, so be sure to keep checking in.
Once your camping drawing is all done, we would love to take a look! Please share it on our Facebook and Pinterest pages for us to enjoy.