Plants and flowers are commonly featured in paintings, drawings and other artwork.
Certain examples of these plants and flowers are more common than others to be featured, and bushes are usually not one of them.
That is a pity, as bushes can have a lot of beauty to them, and learning how to draw a bush can be just as fulfilling as drawing one of its flashier plant cousins!
In this tutorial, we will be aiming to show you that this is the case as you learn how to draw one.
We hope that you enjoy this step-by-step guide on how to draw a bush that we have prepared for you!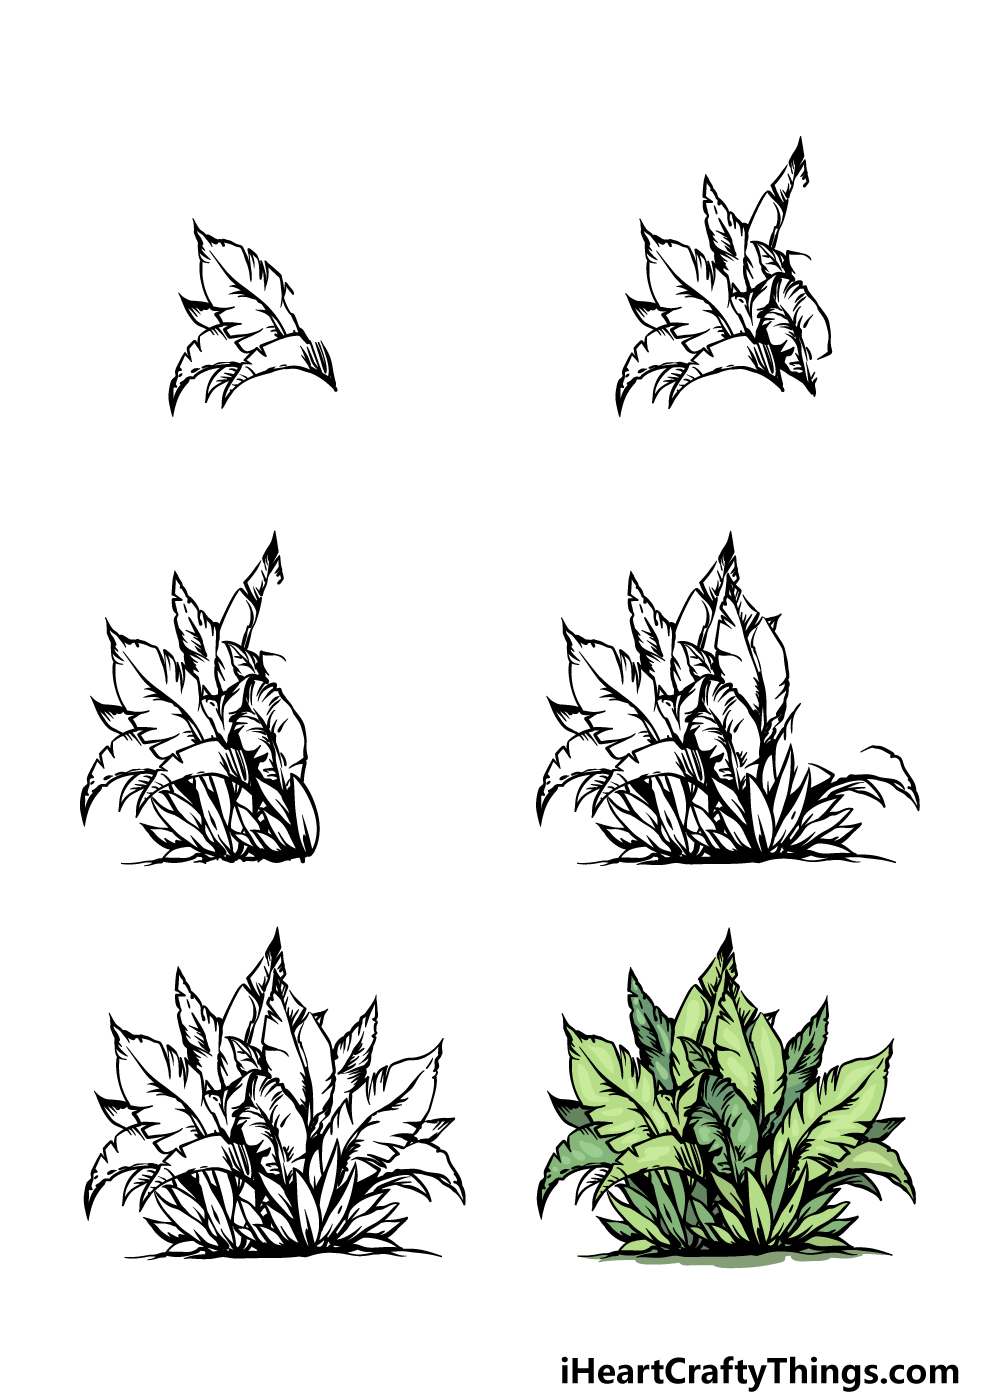
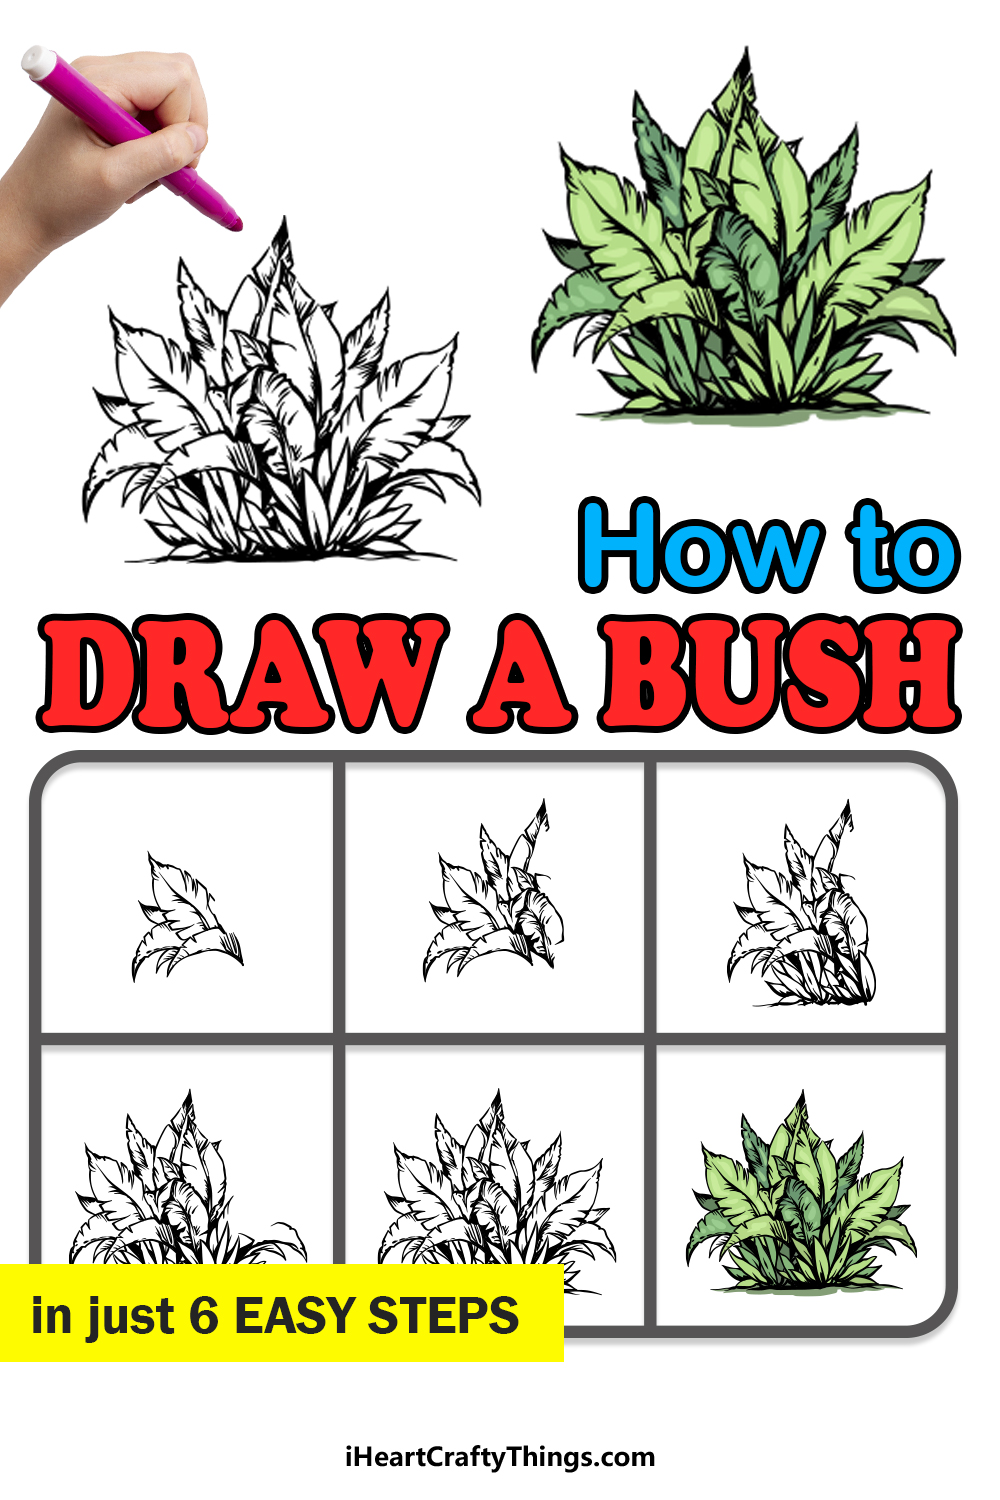
How to Draw A Bush – Let’s Get Started!
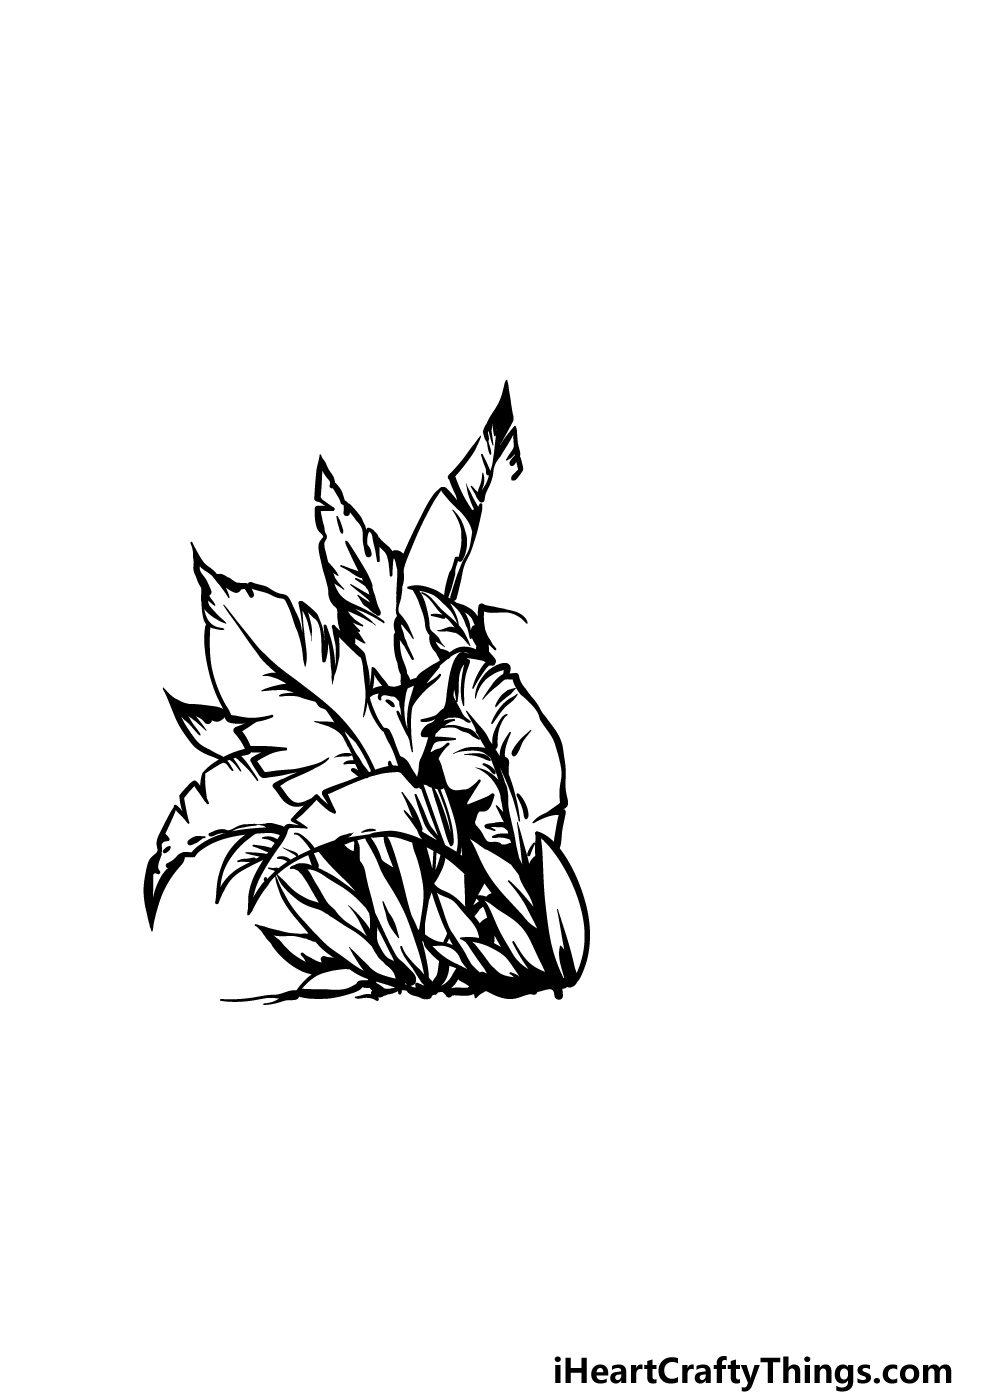
Step 1
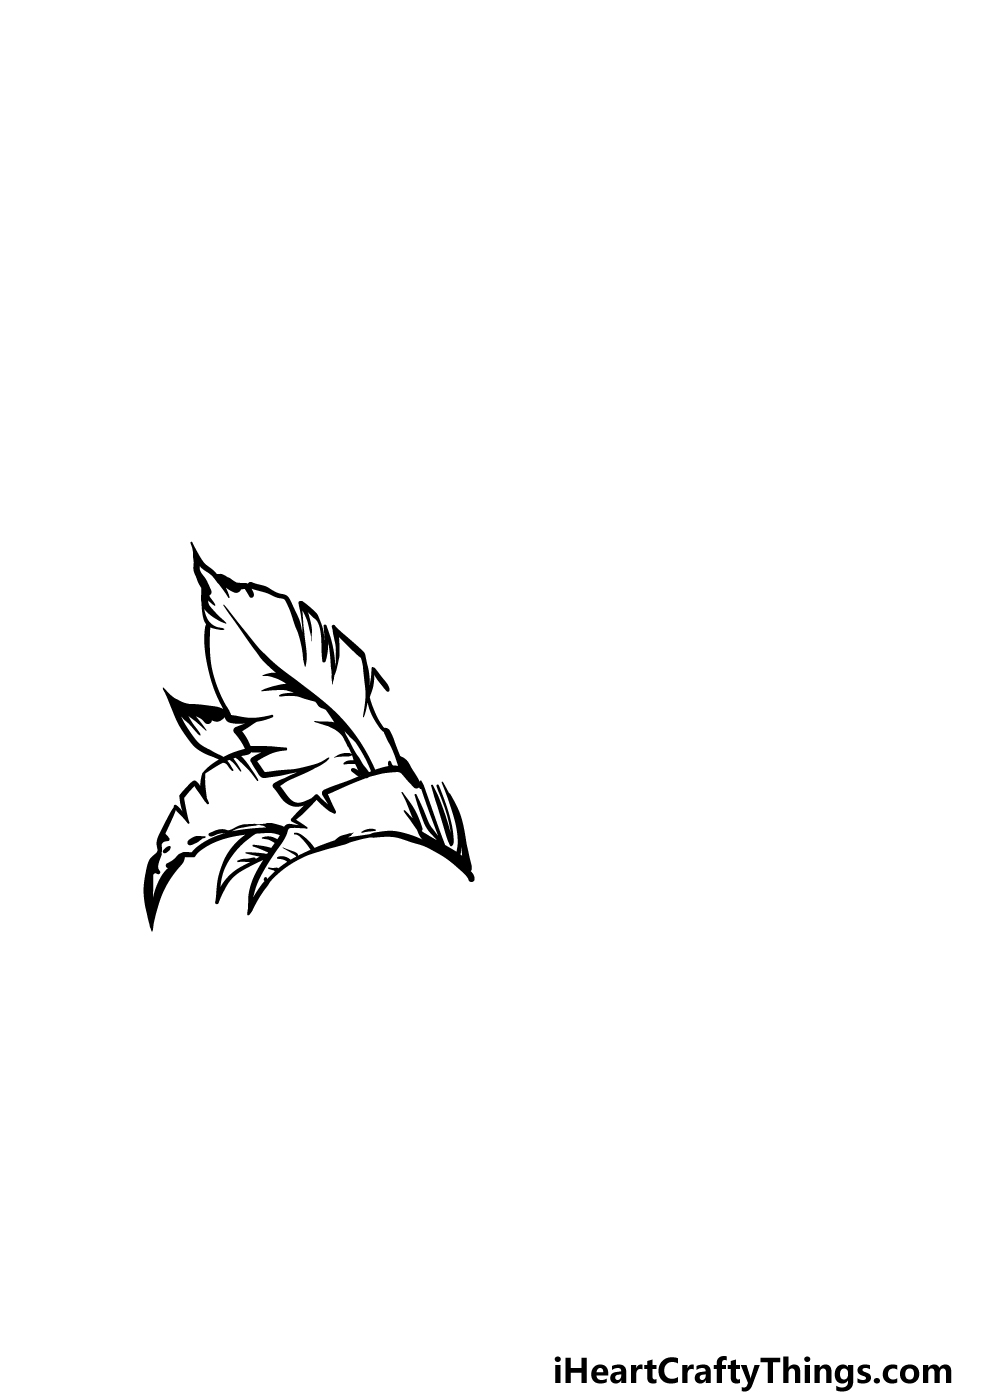
In this guide on how to draw a bush, we will be drawing one that has a lot of different leaves on it.
This will help to give the bush a lot more volume and will help to make the image even more interesting to look at.
Looking at the final image we are working towards, it may look like it will be complicated to draw all of these leaves, but that is why we have broken it down into smaller steps.
To draw these leaves, we will be using some curved lines for their outlines. In these curved liens, there will be sharp indents in them to give each leaf a rough look.
The leaves that we are drawing in this step are quite large, and they will also have some vein detail on them, as shown in the reference picture.
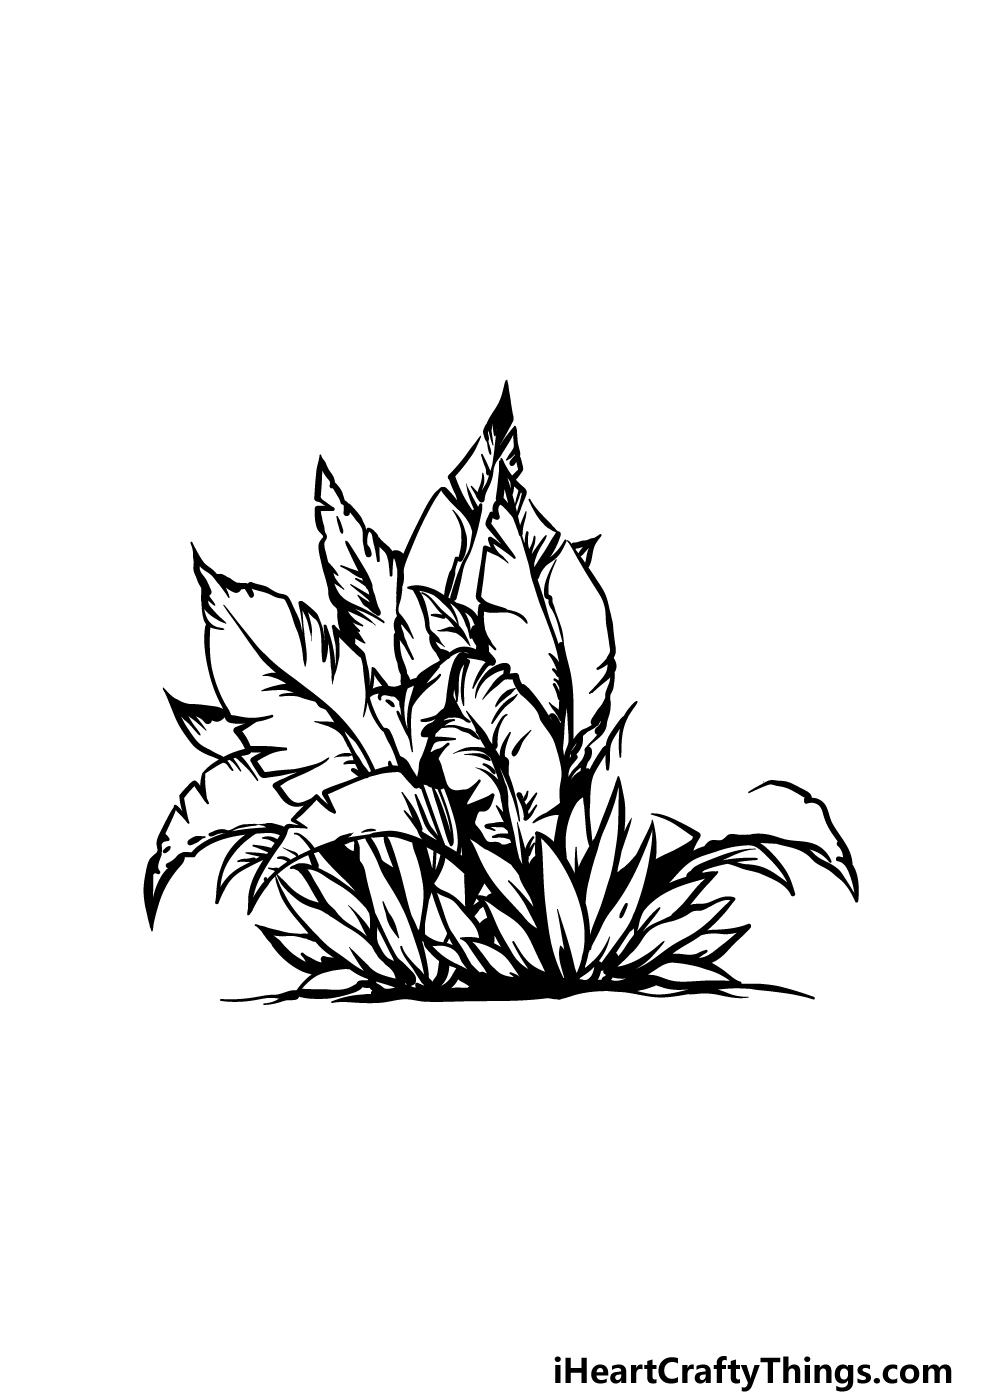
Step 2 – Next, draw some more leaves for the bush
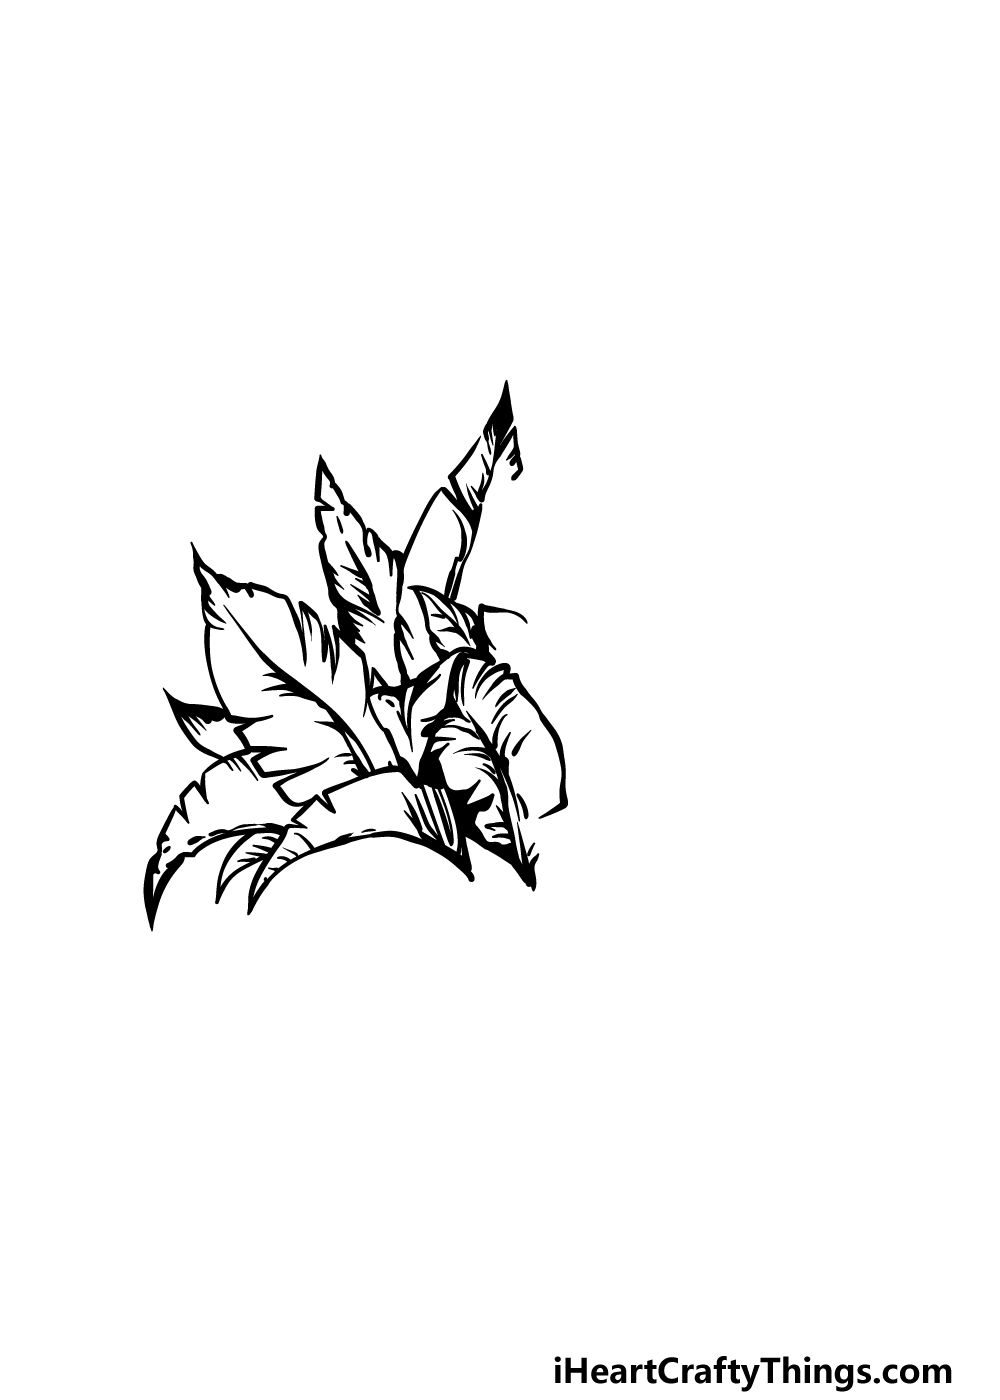
We drew the first of the leaves for this bush drawing in the previous step, and in this next one we shall draw some more leaves for the central area.
We will be using a very similar method that you used for the previous leaves that you drew to create these new ones, except they will be a little thinner.
The previous ones bent over a little bit, but these ones will stick up straight in the air.
Otherwise they will have the same kind of outline with similar detailing to the last ones. Once these leaves are drawn you will be ready for the next step!
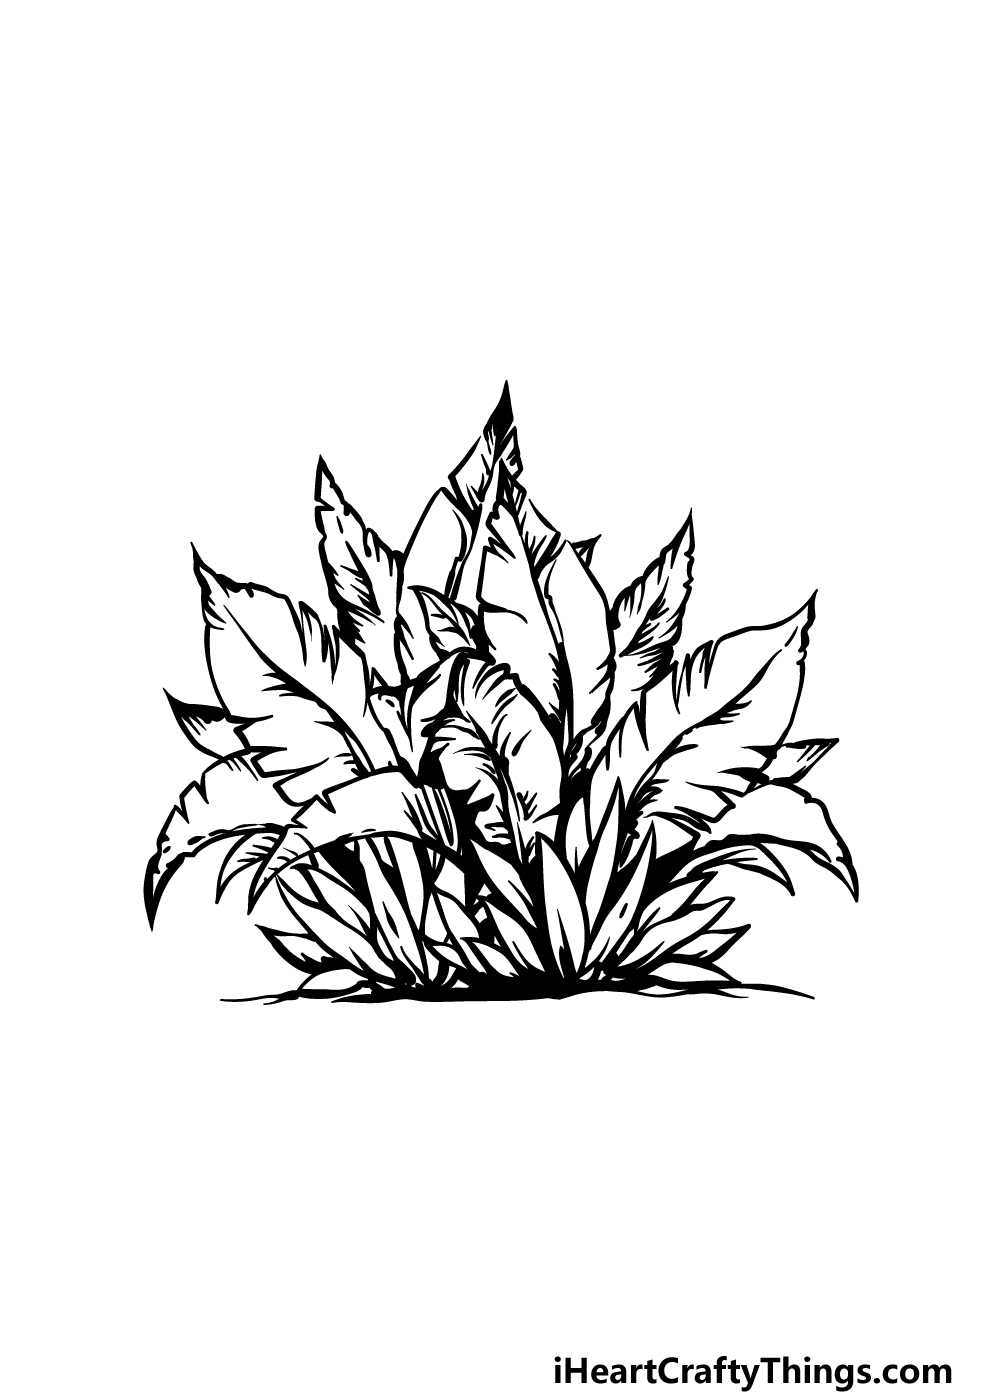
Step 3 – Draw some smaller leaves for the bush
So far in this guide on how to draw a bush, we have been mostly drawing some pretty large leaves for it. In this step, we will instead be drawing some smaller ones.
These leaves will form the base of the bush, and they will be drawn with some rounded lines that culminate in sharp points on top.
The outline for these smaller leaves will be a lot smoother than the bigger leaves, and we won’t be putting those sharp indents in them.
There will still be a space left on the right-hand side of the base, but we will be filling that space in soon enough!
Step 4 – Now, draw some more of the leaves
We’re starting to reach the final stages of your bush drawing now! In this fourth part of the guide, we will be adding leaves to both the larger upper section as well as the smaller ones at the base.
In doing this, we will be drawing one more full leaf for the upper section with the start of some outlines for more that we will finish in the next step.
Then, we will finish off the leafy base by drawing another clump of leaves to the right of the ones that you have drawn already.
Once these leaves are all drawn, we will then be ready to finish off the final leaves and details in the next part.
Step 5 – Add some final details to your bush drawing
Now you’re ready to finish off the picture before you color it in for the final step of our guide on how to draw a bush.
To do this, we will be drawing a few more of the large leaves that you have been creating for the upper portion of the bush.
Once these final leaves are drawn and detailed, you will then be ready to add some of your own details and touches before moving on!
There is a lot that you could do to take this drawing even further, and drawing a background for it would be a great idea.
If you drew a background, you could create a lovely garden setting and add some flowers, plants and maybe even small animals like rabbits.
This is just one of many approaches that you could go for, and you should be sure to have fun creating the perfect scene for your artwork!
Step 6 – Finish off your bush drawing with some color
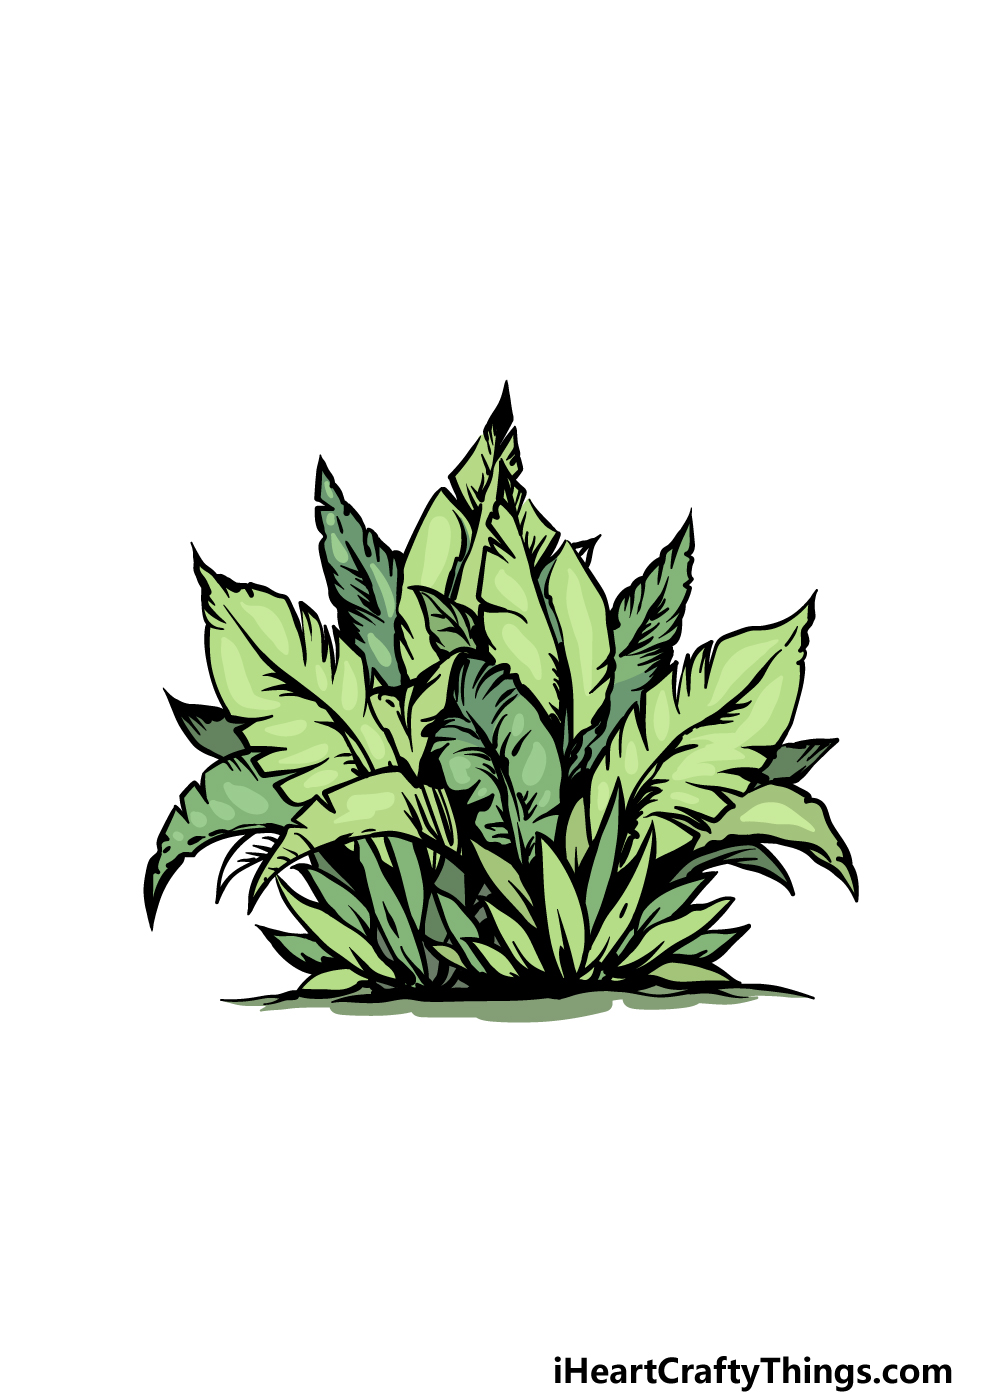
For the final step of your bush drawing, you will be finishing it off with some amazing colors. As you may imagine for a bush, we used a lot of green in our reference image.
Even if using primarily one color, you can still create some dynamic textures by using as many shades as you can to color in.
You could try to match the colors that we used for our example, but you could also use any colors and shades that you may prefer instead!
For images dealing with plants and nature, watercolors are often a great choice as an art medium, as they create a nice soft look.
Anything you use will look great, so definitely go for your favorite colors and art tools!
3 More tips to make your bush drawing easy!
Find out how to make this easy to draw bush even easier with these 3 tips!
This bush drawing we created in this guide shows a pretty standard type of bush. There are many different kinds that you could easily turn it into, however!
There are a few reasons why you may want to give this a go. For one, you may simply prefer the look of a different specific type of bush.
Another reason would be that the other type of bush you choose may be simpler to draw. Unless you know of some bush variations off the top of your head, you could look up some online.
You could just use an image search, but you could also look at websites for gardening stores. Just be sure to not accidentally buy a real bush!
We used a lot of cool details for this drawing of a bush. These details look really good, but they also make it a lot harder to draw.
You could not only change and remove some of these details but also entirely change the style of the drawing.
For instance, if you like to draw in a simple cartoon style, you could alter this design to suit that style.
This is just one example of a drawing style that you could use to adapt the drawing, however. It all depends on the drawing styles that you find easiest to work with!
Another way you could make this bush drawing easy to do would be by incorporating it into a larger scene. With the design as it is now, the focus is entirely on the bush itself.
That opens up all of the details and shapes to scrutiny, but if there are more details around it then the bush doesn’t have to be as perfect.
There are loads of details you could easily add to the scene! You could add different kinds of plants, trees or maybe even some animals.
It would also result in a drawing that is even more fun to look at and admire!
Your Bush Drawing is Complete!
Even though a bush may not be as distinctive as something like a rose or a sunflower, there is still a lot of beauty to them!
We really hope that you enjoyed drawing one in this guide on how to draw a bush so that you can appreciate that humble beauty as well.
Seeing as you have finished this guide, we will be looking forward to seeing what additional details, elements and color choices you go for to finish it!
Don’t forget to keep checking out our website, as we have tons of guides there for you, with more on the way.
We would be thrilled to see how your bush drawing turns out, so please share it on our Facebook and Pinterest pages for us to enjoy!