The letter M is the 13th letter of the alphabet, but that doesn’t mean it’s an unlucky letter! In fact, it is one that we use quite a lot every day, and it’s kind of fun to write.
Making an M sound is also pretty easy, so it’s one of the first noises many people will make as babies. The letter M is easy to write, but what about creating a bubble letter M?
That is what we are here to learn in this guide, as we will show you how to make a really fun version of this letter. We will also cover some fun ways to color it and take it to the next level.
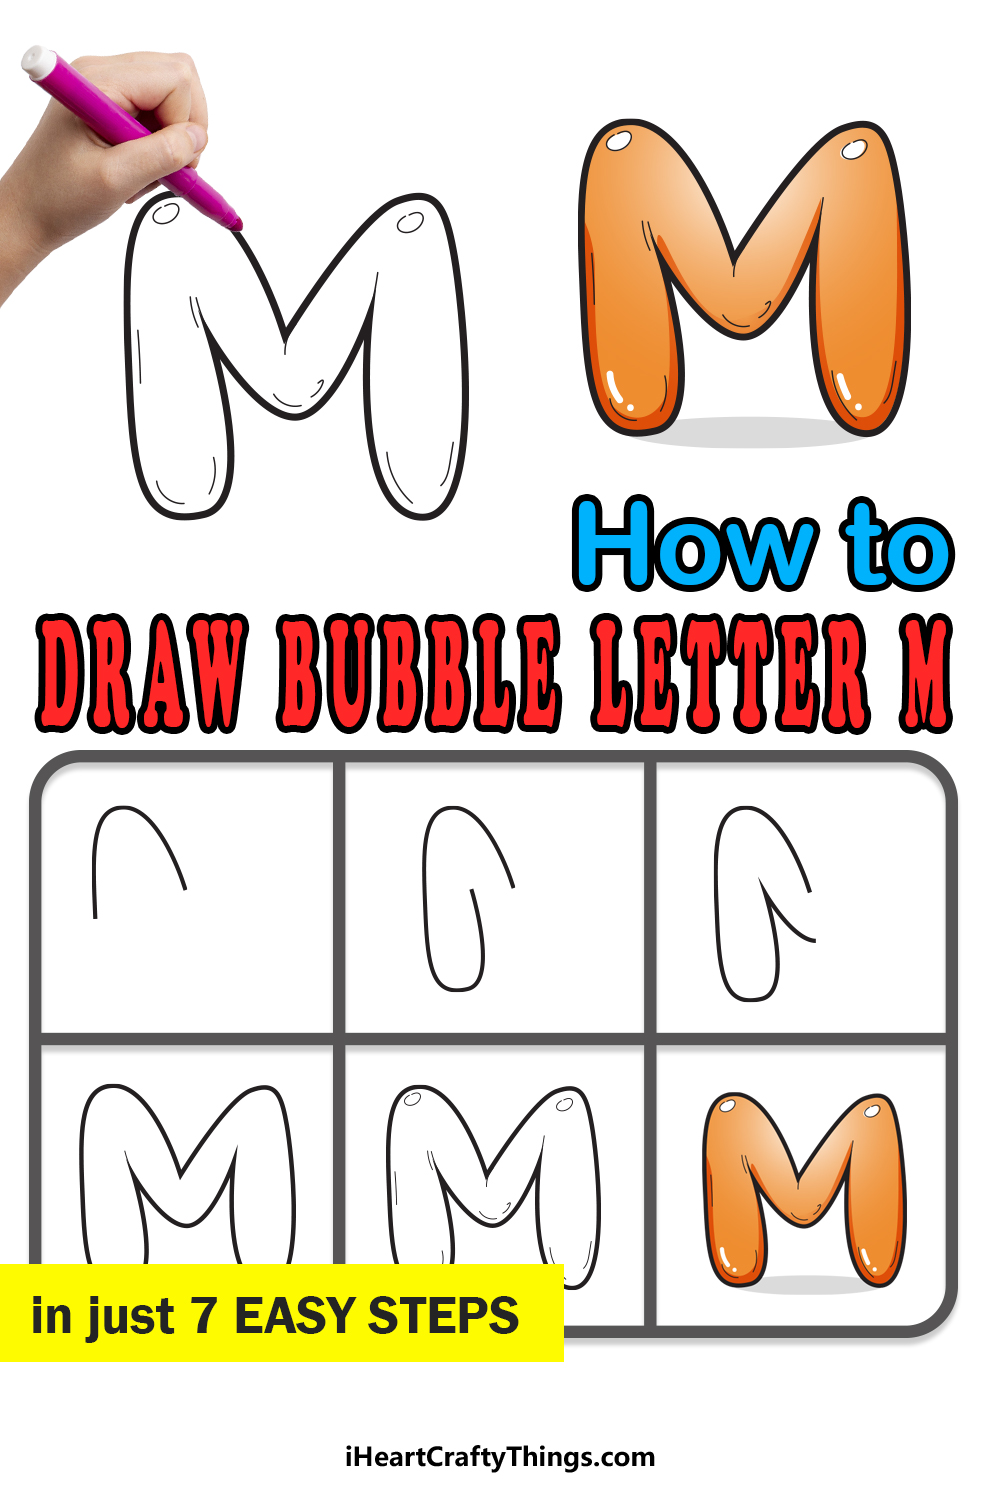
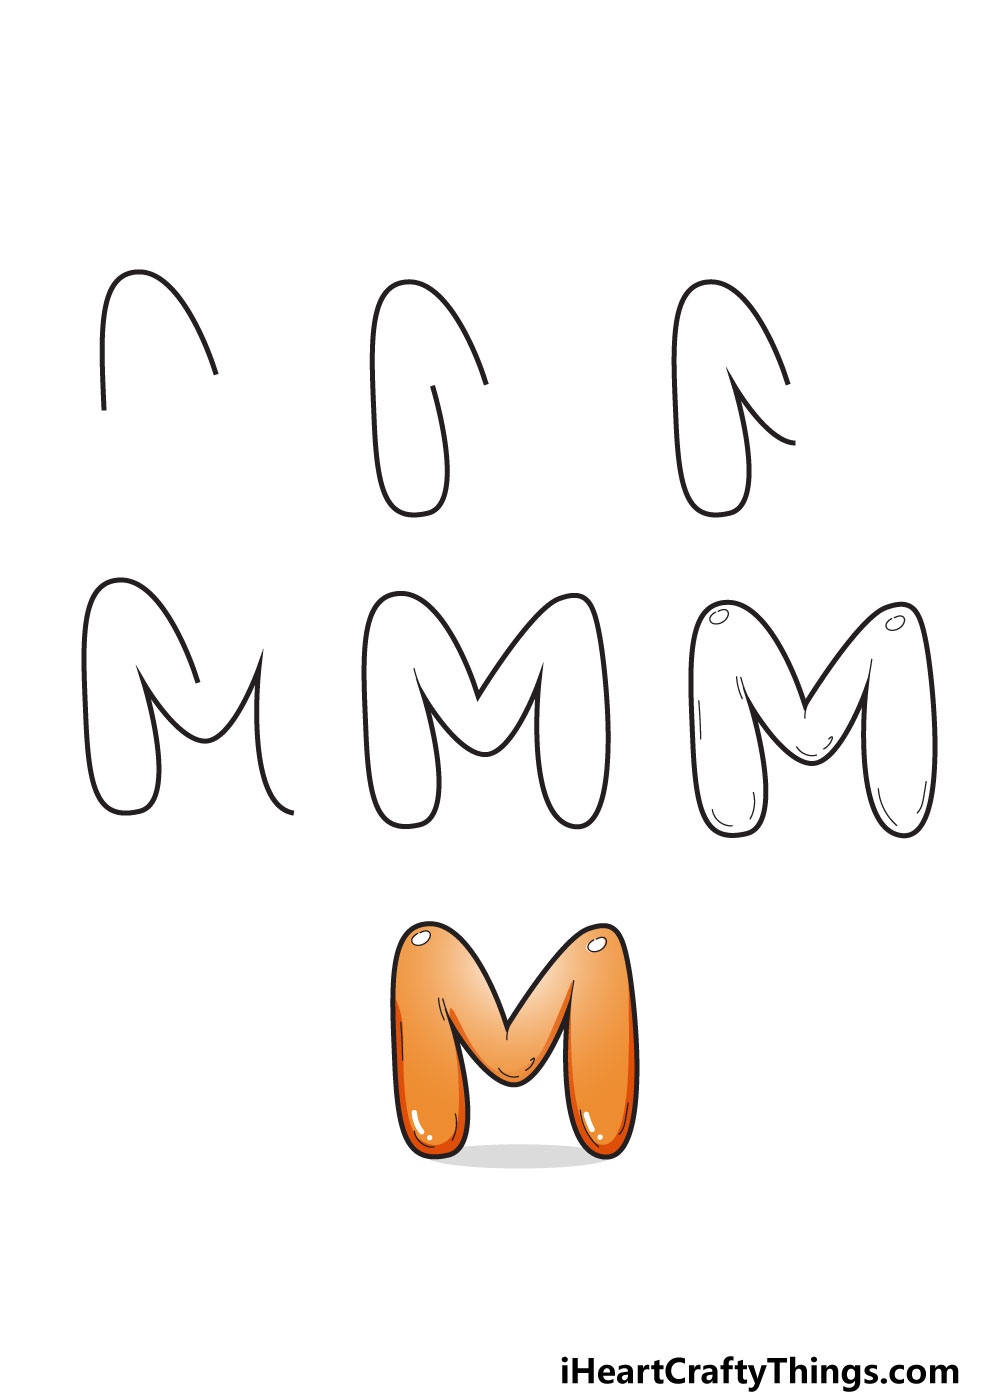
We hope you’re ready to begin, as we are about to embark on the first of 7 steps that will show you how to create this fun drawing!
Let’s Get Started
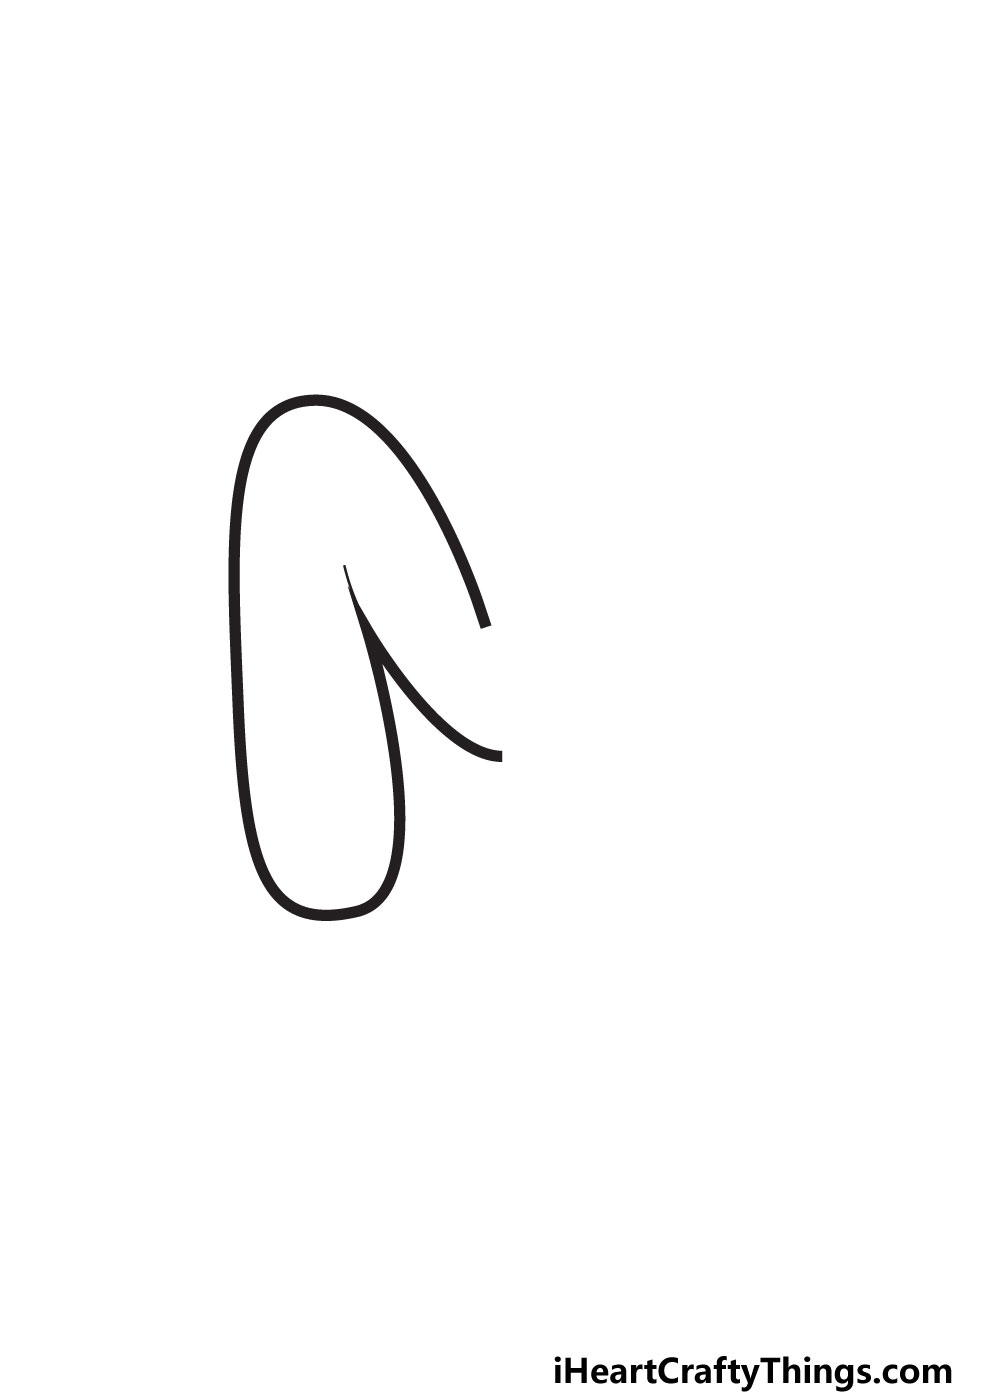
STEP 1:
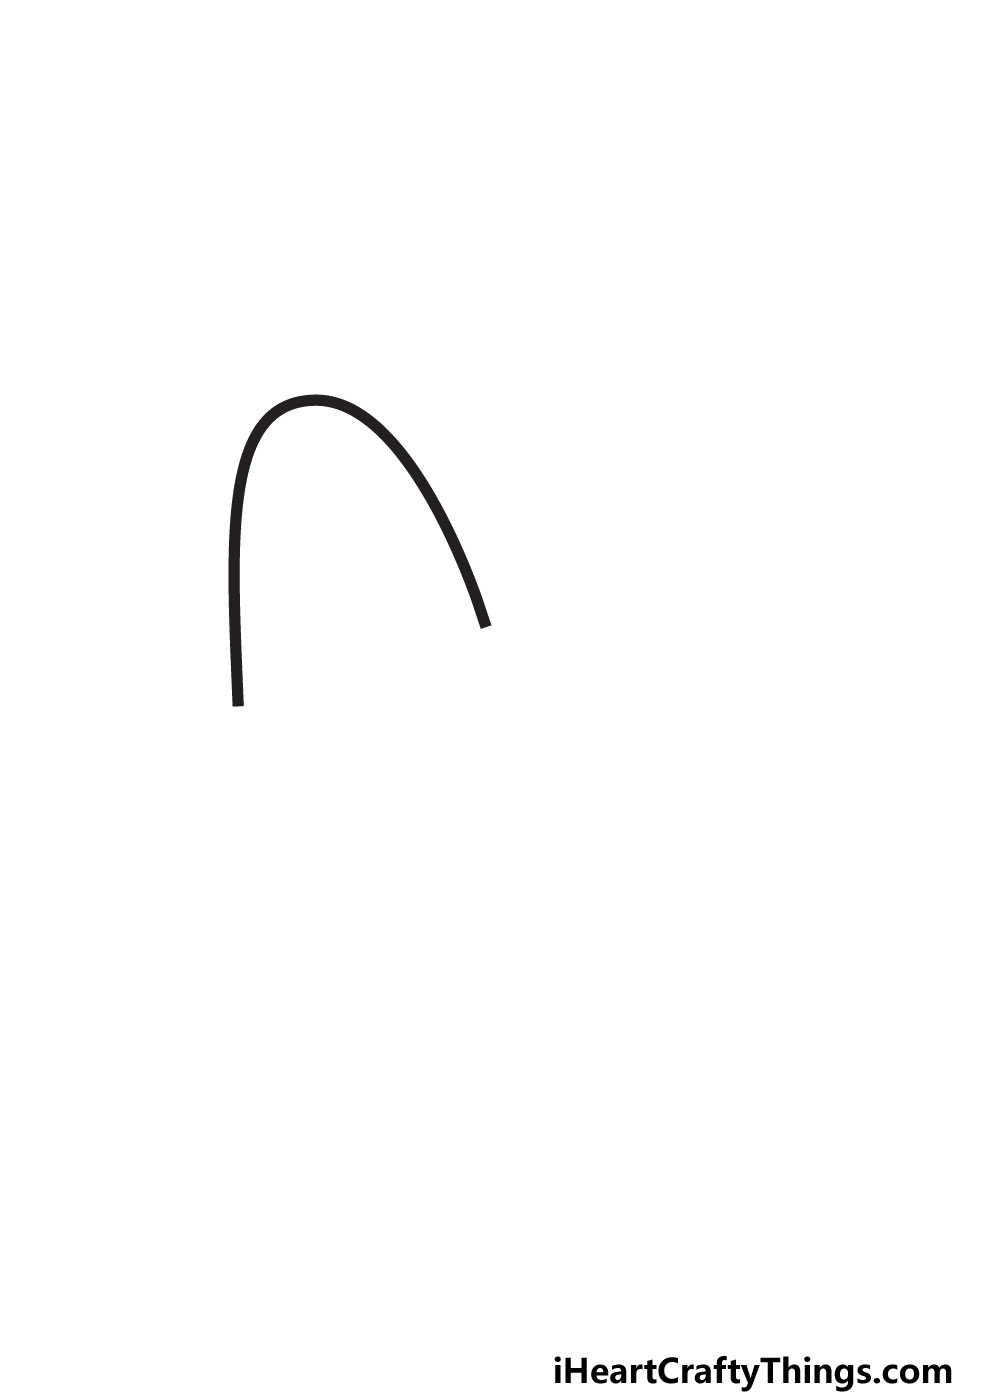
Writing the letter M is pretty easy, but it gets more challenging when we try to turn it into a bubble letter. That’s why we will break it down into smaller steps to make it more manageable.
For now, we will start with the arch on the left hand side of the letter. To draw this, we will simply draw a curved line.
The reference image we provided will show you how this should look, but it’s pretty simple. Because the letter M has so many angles, we would recommend drawing a guide.
To do this, take a pencil and lightly draw a regular letter M which is the size you want this drawing to be. Then you can draw the lines of this guide around that pencil M.
When you’re ready, we can begin step 2 of this guide!
STEP 2:
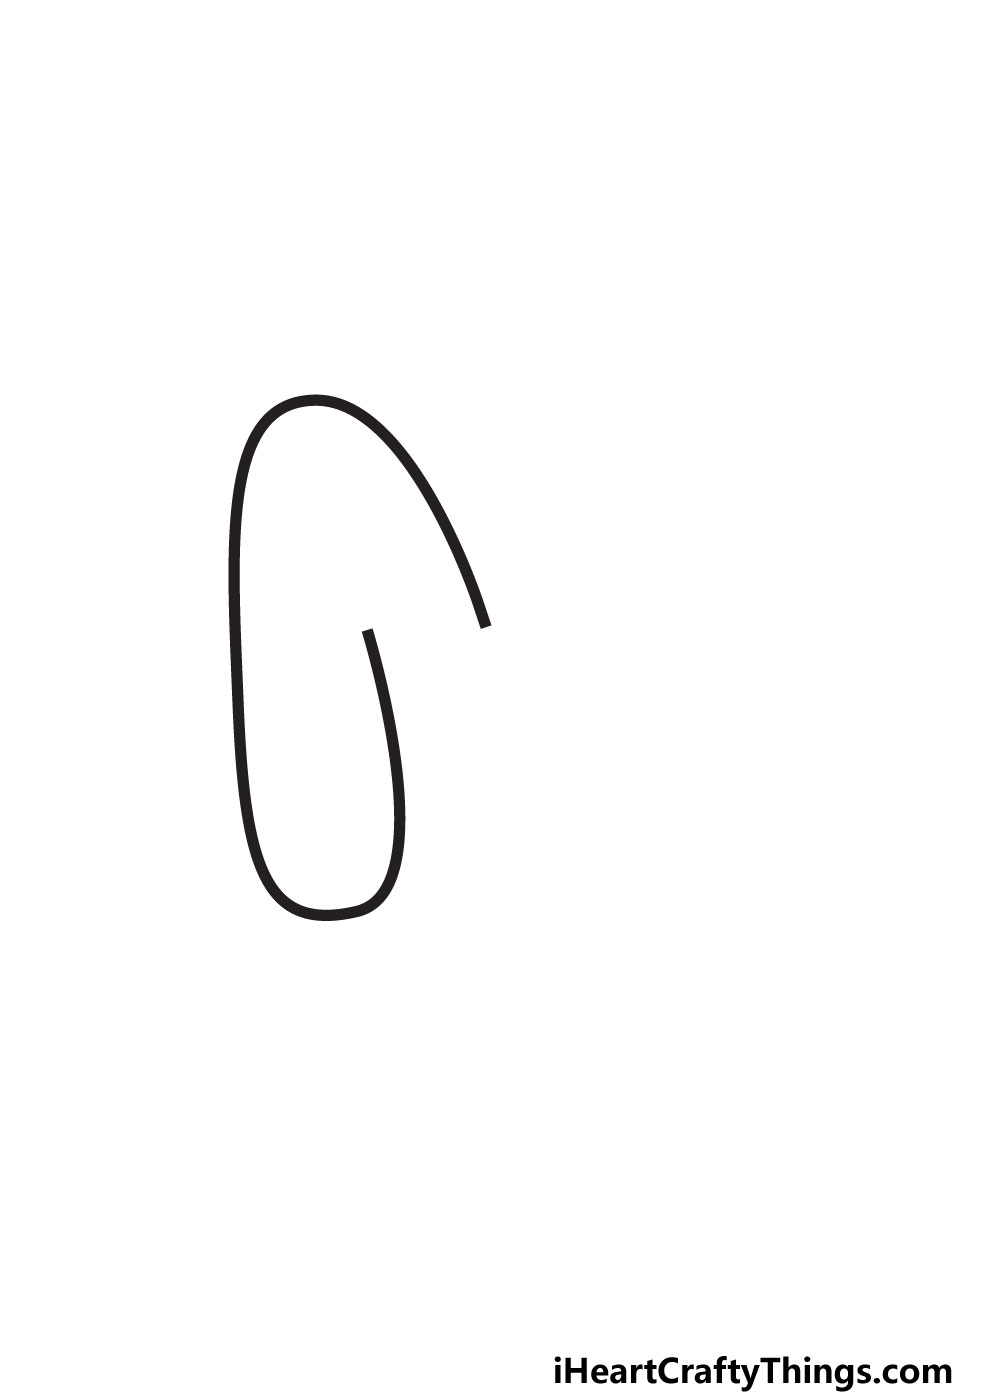
Next, we will be drawing the left leg of the letter M. This leg will extend down from the top of the arch that you drew in the first step.
It will take the form of a vertical, straight shape. We will be making the line very curved to create that bubble-like effect we’re going for.
Once it’s drawn, you will see that it looks a bit like a slightly unfolded paper clip. Try to follow the reference image we provided as closely as possible, as it might be hard to visualize right now.
Then we can move on to step 3 to continue this design.
STEP 3:
You’ll notice your bubble letter M starting to take shape with this next line! If you took our suggestion of drawing the M with a pencil, then you will see where this design is going.
In this third step, we will once again be keeping things nice and simple. All you need to do now is add a simple, slightly curved line.
This curved line will extend down and out from the inner center point of the shape you have drawn in the first two steps. The reference image will show you where to place this line.
That’s all there is to it for this step of your bubble letter M, so we can now take on step 4 of the guide.
STEP 4:
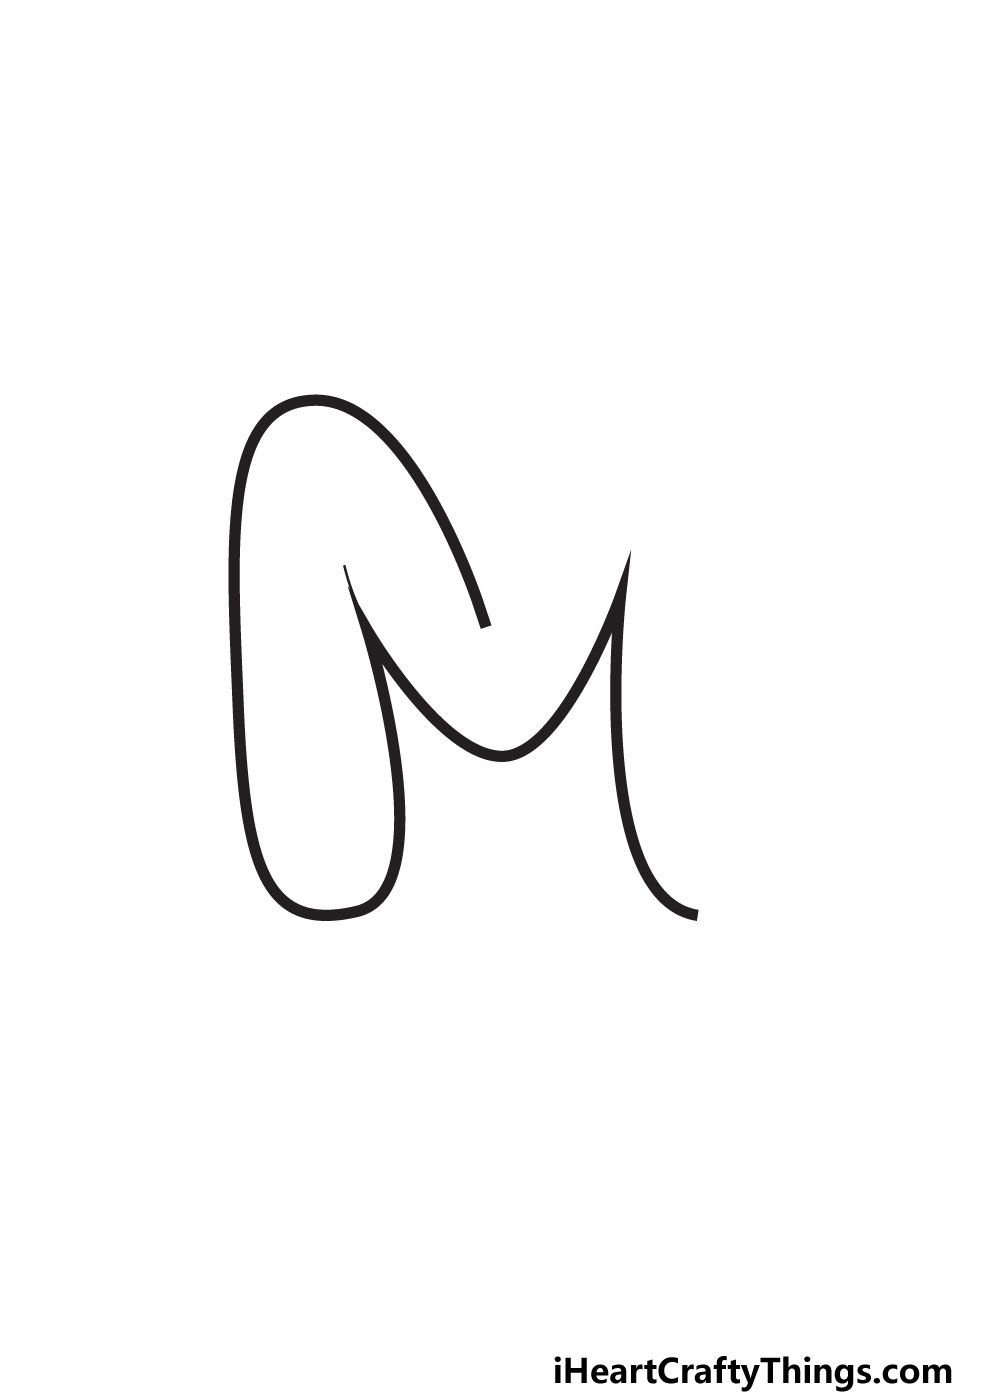
Step 4 will be a direct continuation of the line you started in the previous step. We would actually recommend doing this next line in two strokes.
For the first stroke, carefully extend the line you drew in the last step upward in a gentle curve. You can then lift your pen from the page as we prepare for the next stroke.
This next one will start at the top of the line and then arch downward in another gentle slope. It will have a very slight curve to the right, as shown in our reference image.
In the next step, we will finish off the complete outline of this M before we start to add some final details, so we shall do that when you’re happy with how these lines are looking.
STEP 5:
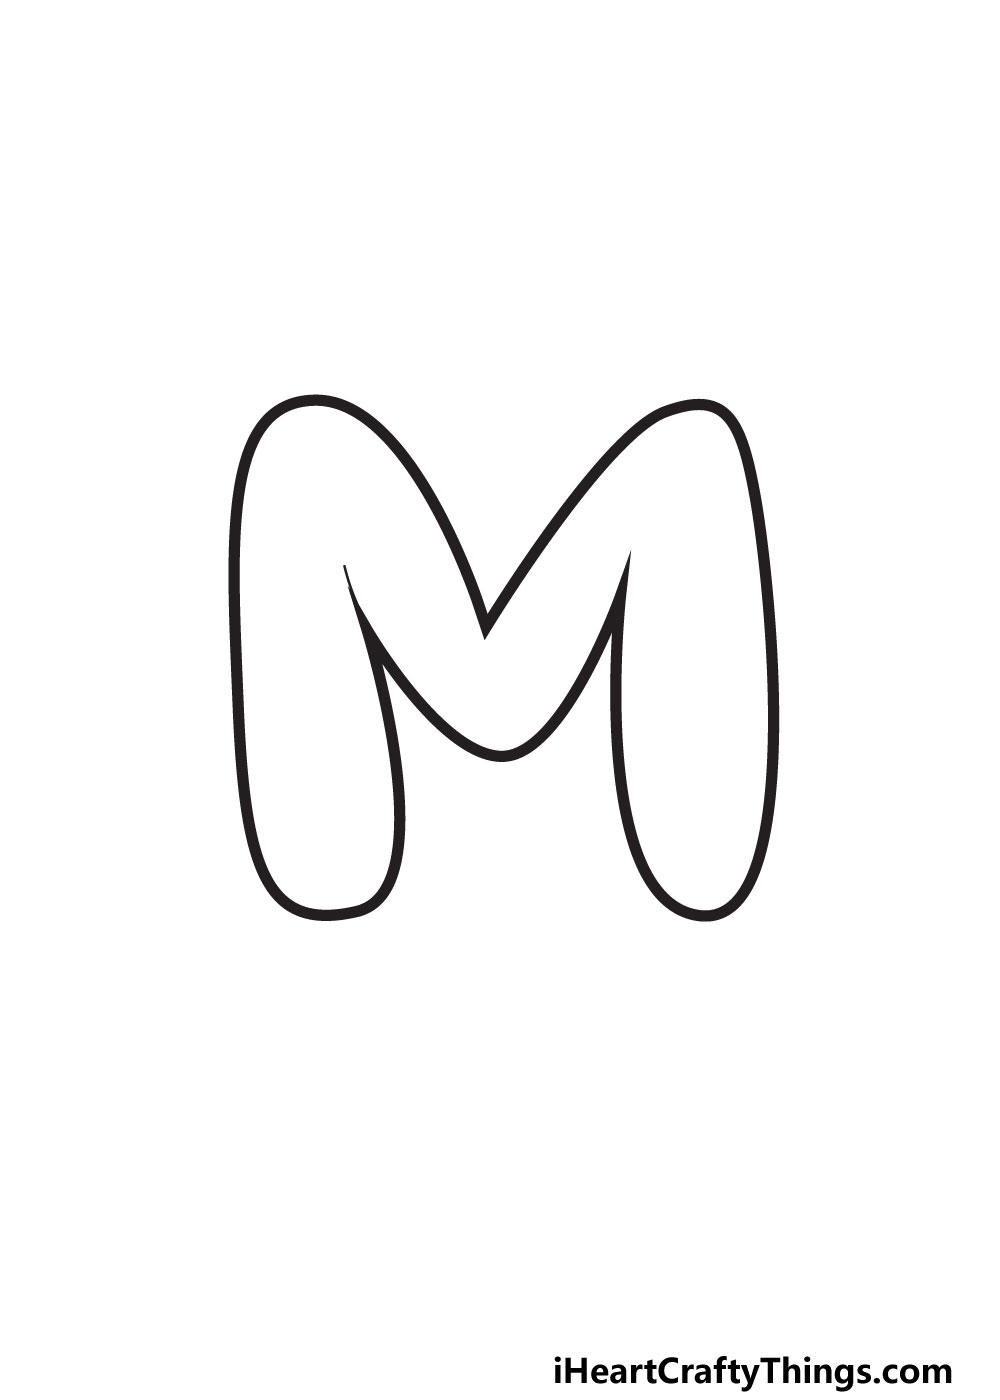
As we mentioned in the previous step, this one will be all about finishing off the outline of this letter.
That means that we will be drawing a lot in this step, but we will go slowly.
For this next line, we would recommend starting at the dip in the center of the M that you drew in a previous step. This new line will slope up gently.
At the top, it will then curve down gradually, creating a mirror image of the left side of the image. Then, you will keep going until you curve over at the base.
The line will meet the other line at the bottom where that one ended, leaving you with a complete M shape.
There are more details we will add, but you can see what the final shape will be! If you chose to draw the M out in pencil earlier, you can erase these lines now as they won’t be needed.
The next step will be about adding some details to make this design look like a bubble, so we won’t need the guides anymore.
With all that said, let’s get started on those final details!
STEP 6:
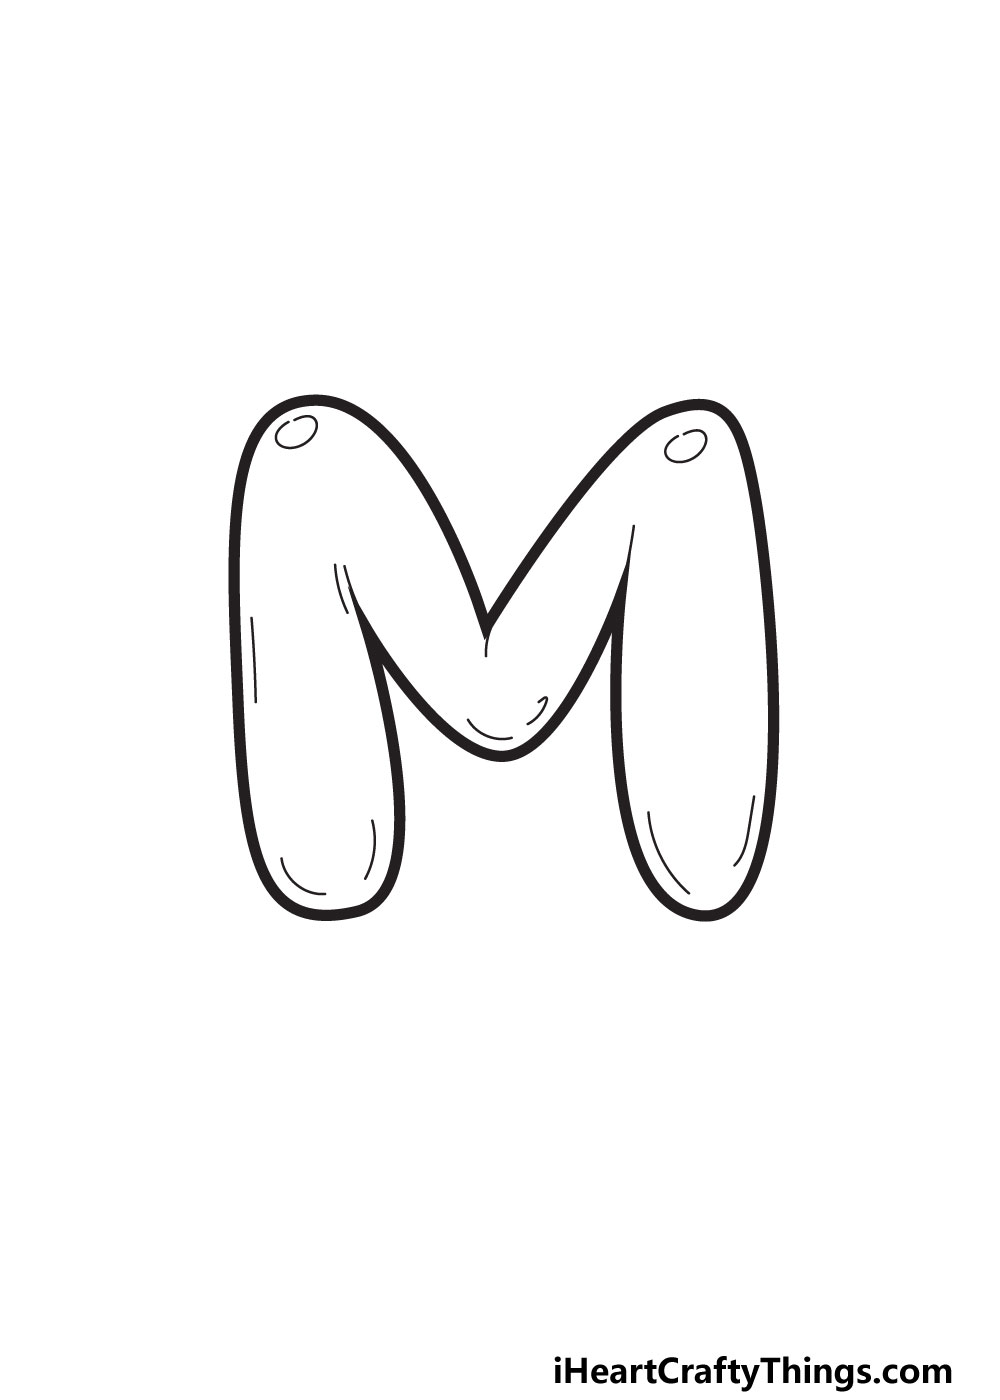
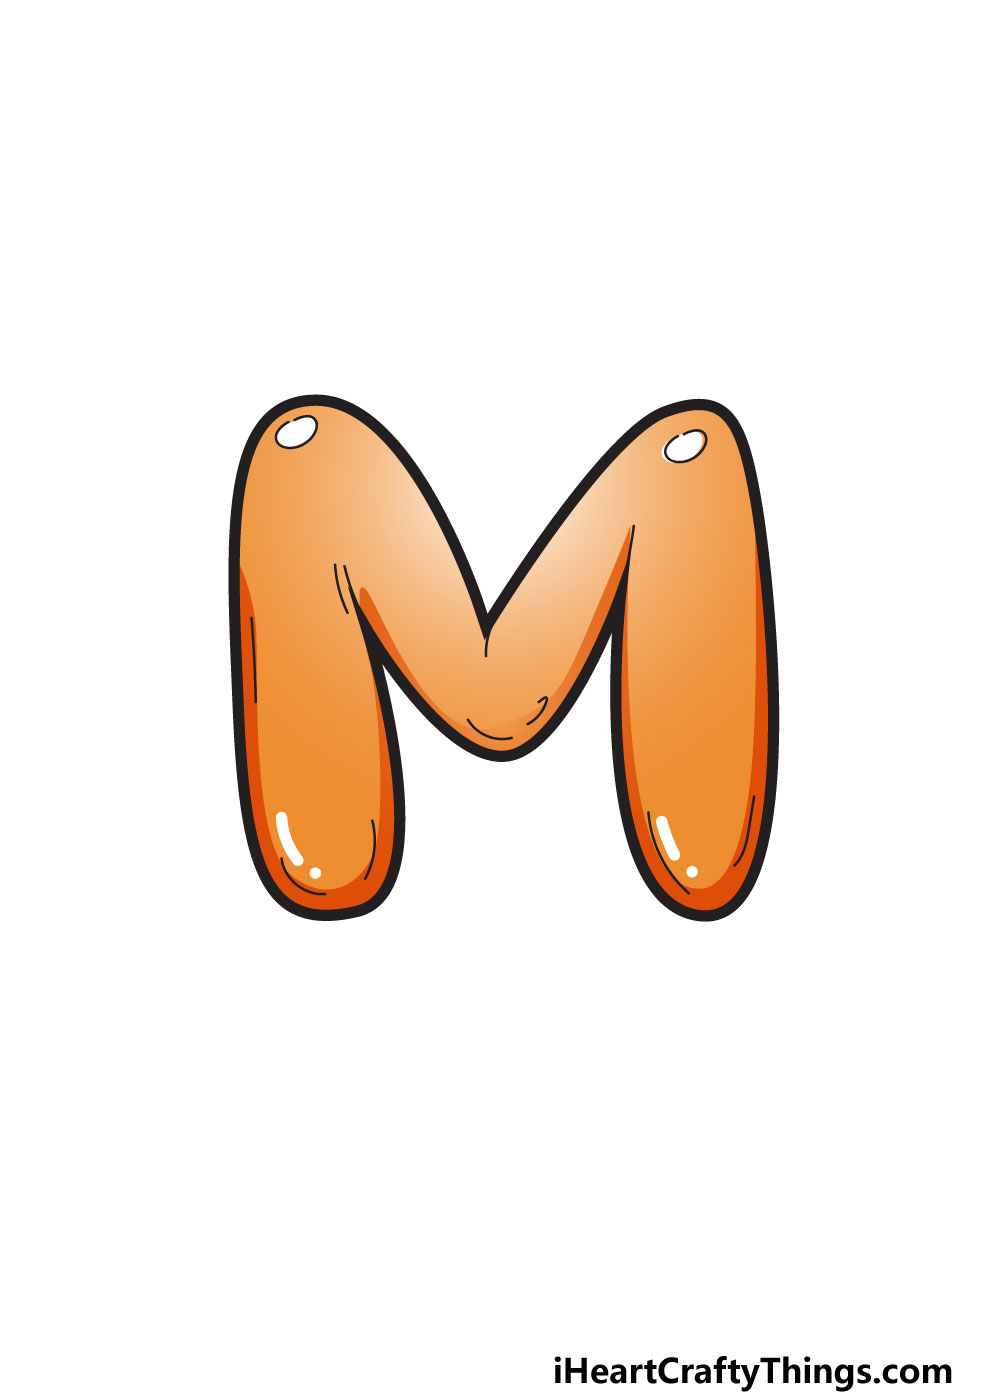
Your letter M is looking great so far, but it looks a bit flat on the page right now. This guide is all about creating a bubble letter M, and we will do that with some simple details.
First, we will use some rounded shapes for the light reflecting on the letter. These will go at the two highest points of the design.
You could place them elsewhere on the M if you want to, but try to keep them on the same side to keep the light source consistent.
Finally, we will give the balloon some volume with some curved lines. To draw these lines, we recommend using a drawing tool with a thinner tip than the one you’ve been using.
These will go on the inner outline edges of the M, and will help to make it look less flat and like it has more volume.
Once these lines are added, you’re ready to add some color! You don’t have to move on just yet, though. There are other ways to finish off this design.
One would be to draw some fun patterns and shapes on the letter. For instance, maybe the letter could be covered in spots or stars!
You can really get creative with this, and we will also go over some ideas you can try after the final step.
STEP 7:
You’ve reached the final step of what was a slightly trickier letter to draw, and now you’re ready to have some fun with color!
The best part is that now you can show off any of your favorite colors. For now, we will stick to the colors we used in our example, but you can use anything you like.
We decided to go for a light orange color scheme to make the drawing look nice and warm. The colors are darker the further they are from the two light points.
Closer to these points, we used lighter shades to create the effect of reflecting light. These are the colors we chose, but now you can choose any colors you love!
You don’t need to stick to just one color, as you could make this M a rainbow of colors. Why not try out some fun new art tools and crafts as well?
My Final Tips To Make Your Bubble Letter M Drawing Even Better!
You may think your drawing journey is over, but it doesn’t need to be! There is still plenty of fun to be had with this design, so now we will cover some ideas you can try.
With these bubble letters, we always think it’s fun to incorporate words that start with the letter. There are so many that start with M that you could use!
For a few ideas, there are words like milkshake, milk, macaroni or mat. There are many more, but we will stick with ‘milkshake’ for now.
You could write the rest of the word after the M you have created. Then, you could show off what your dream milkshake would look like by drawing it next to the M!
Another way to make it even more special would be by using the M to create someone’s name. So if you know someone with a name like Matt or Michelle, you can write the rest of their name in fun bubble letters.
These are a few ideas to try, but be sure to let your creativity flow and show off what you can do as you bring your own personality and style to this drawing!