The Boondocks is one of the most influential, beloved and also controversial adult animated shows ever created.
Since its debut in 2005, the show has amassed a lot of fans that can’t get enough of the unique characters, quirky humor and biting satire that tackles many issues.
For fans of the show, it can be lots of fun to learn how to draw Boondocks so that they can create some fan art.
This is the guide to be on if you are one of those many fans!
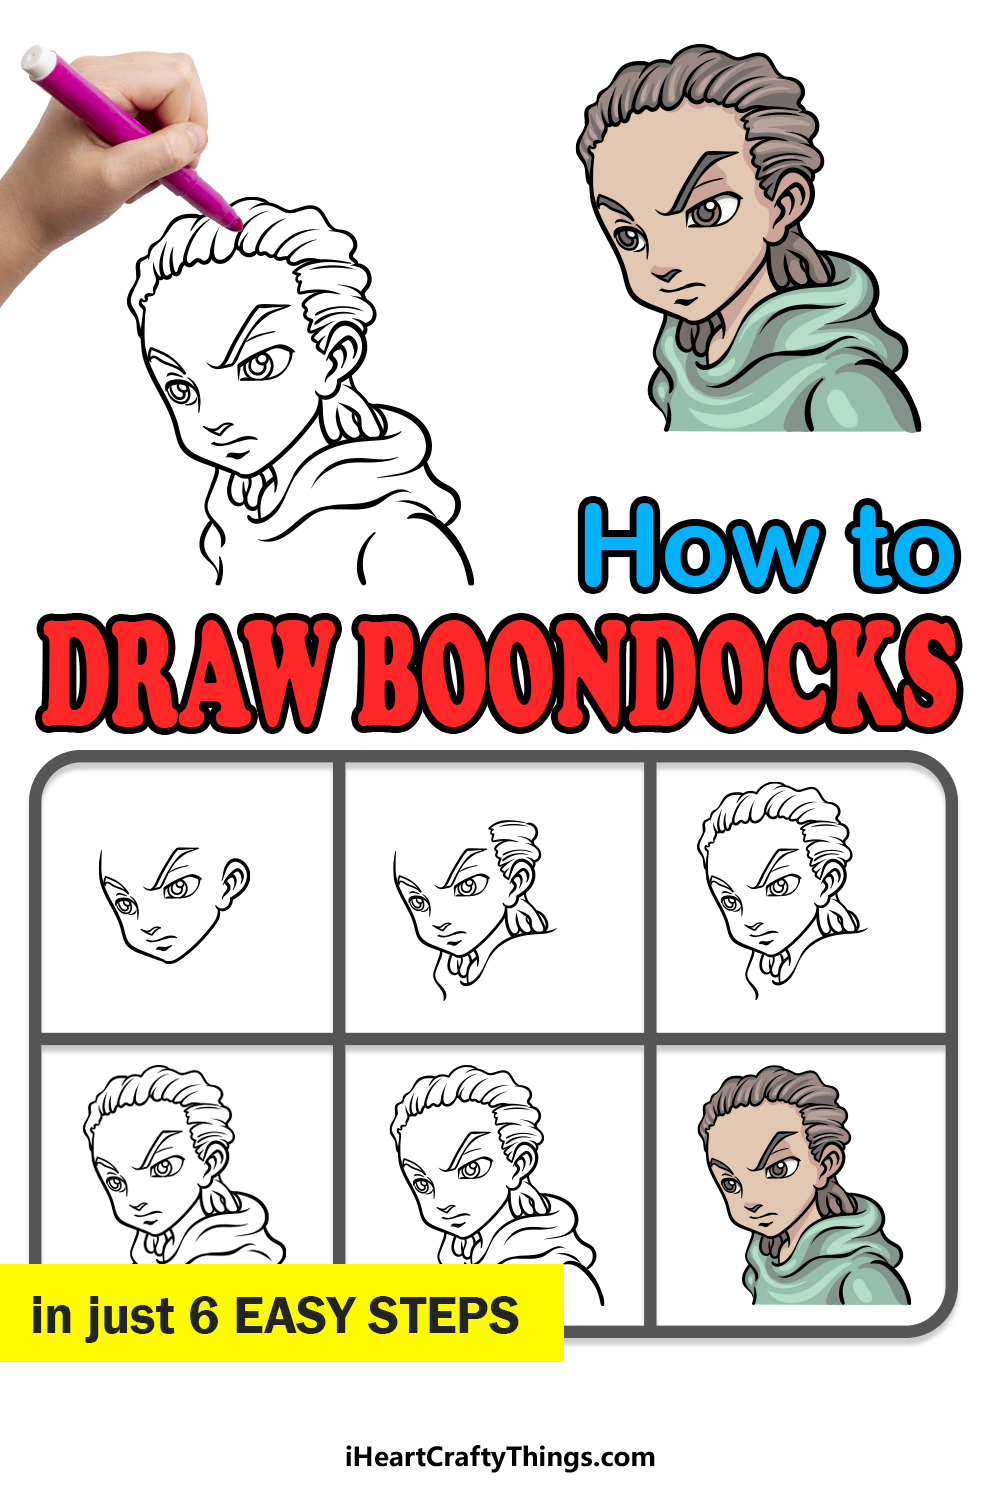
This step-by-step guide on how to draw Boondocks in just 6 steps will show you how to recreate this iconic character.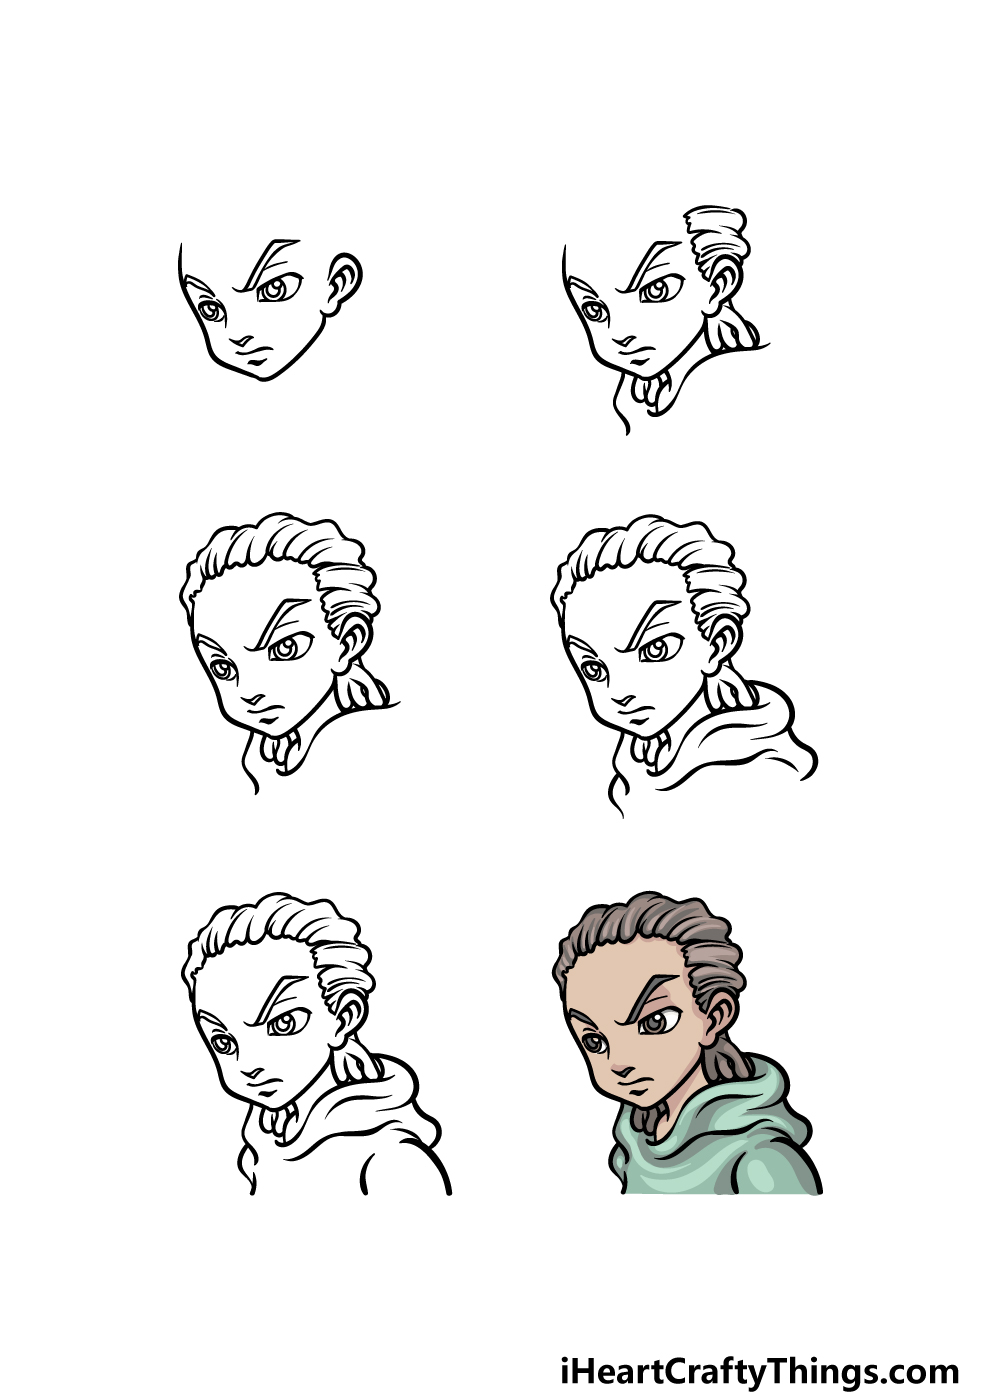
How to Draw Boondocks – Let’s Get Started!
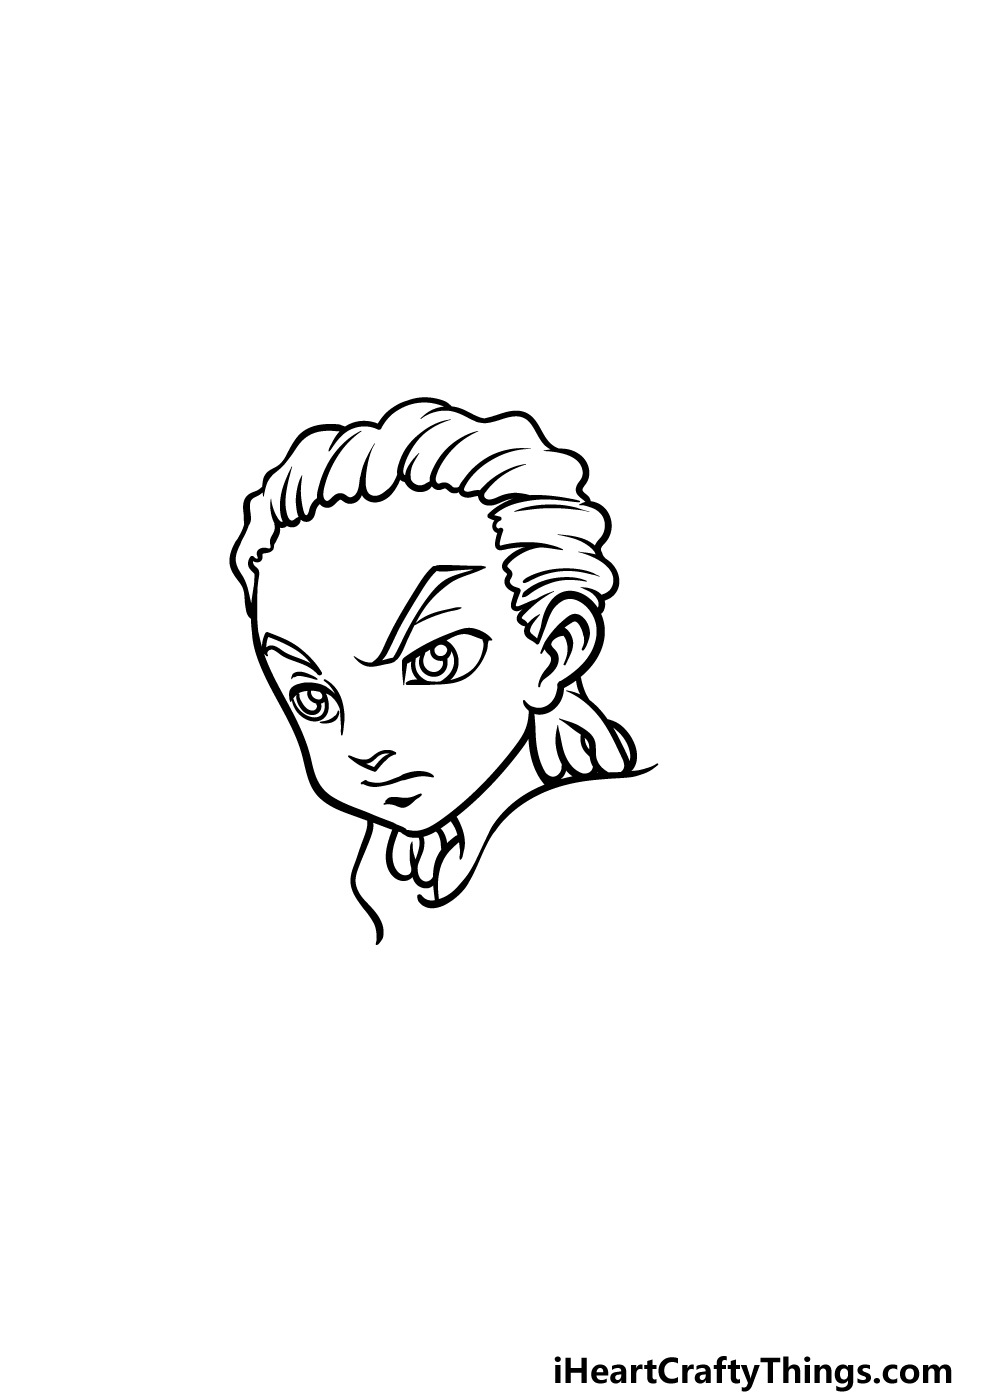
Step 1
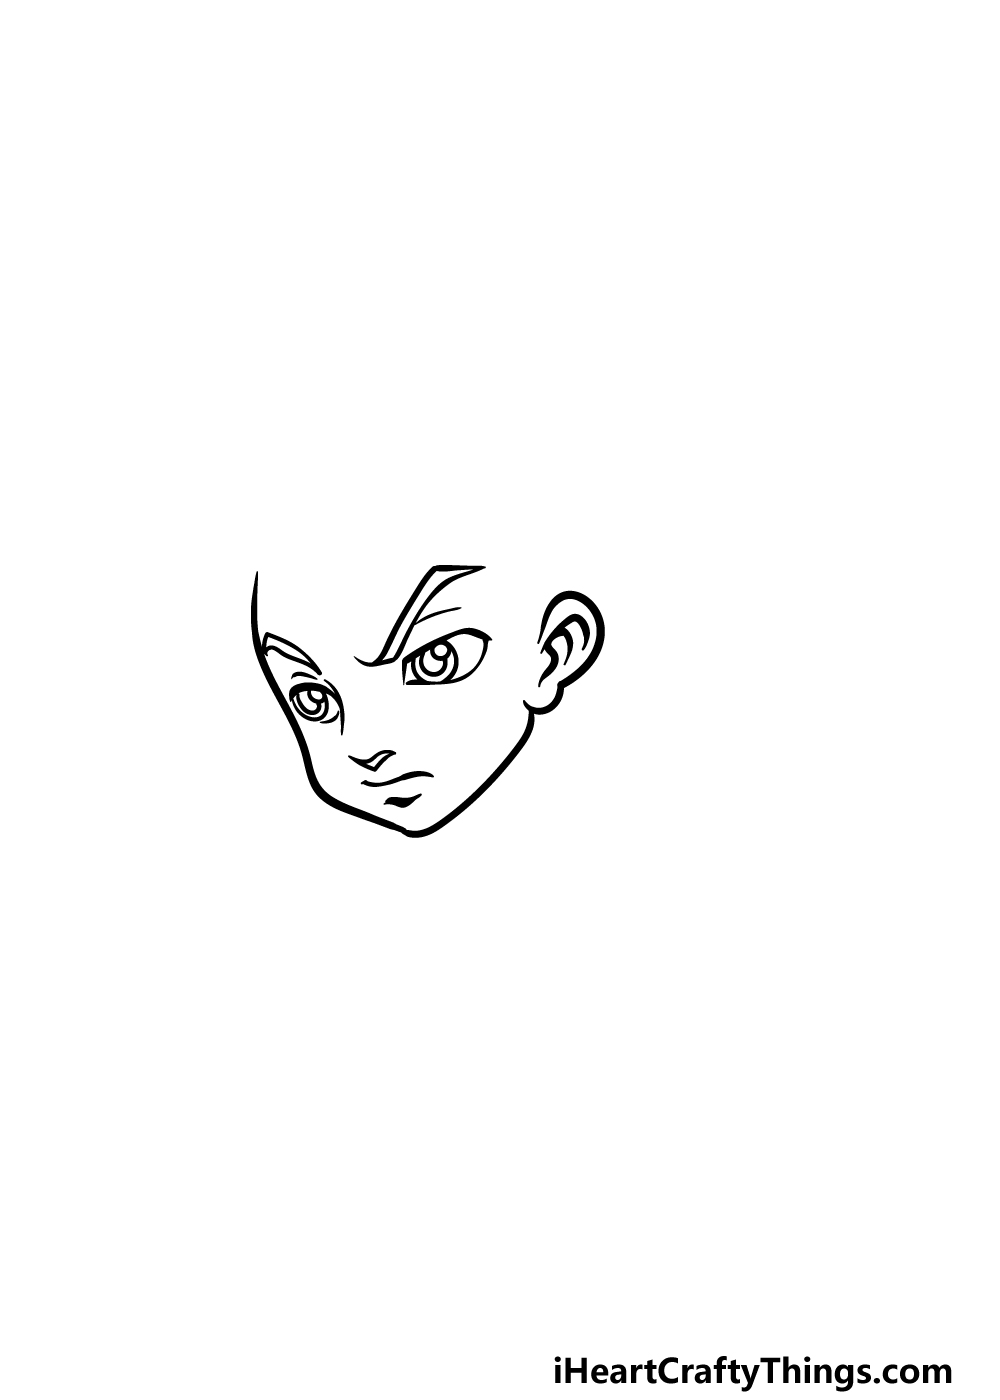
In this guide on how to draw Boondocks, we will be focusing on one of the main characters, Riley Freeman.
To begin his design, we will start by drawing his face. The visual style of the show takes inspiration from anime, and that is worth keeping in mind as we draw the features.
We will start with the outline for his face, which we will draw with some curved lines. Once you have drawn that, we will then add his eyes.
These eyes especially fall into that anime-inspired style that we mentioned earlier, and that means that they will be fairly large with straighter, more angular tops with their bases rounded.
The pupils of the eyes will also be fairly large, and you can draw these as a few circles within other ones.
His eyebrows will be quite large and angular, and they are positioned to give Riley a serious and intense expression.
Then you can finish off by using some sharp lines for his nose and then finishing off his expression with a line for his mouth. The final aspect we will be drawing is his ear, which will be drawn with some curved lines.
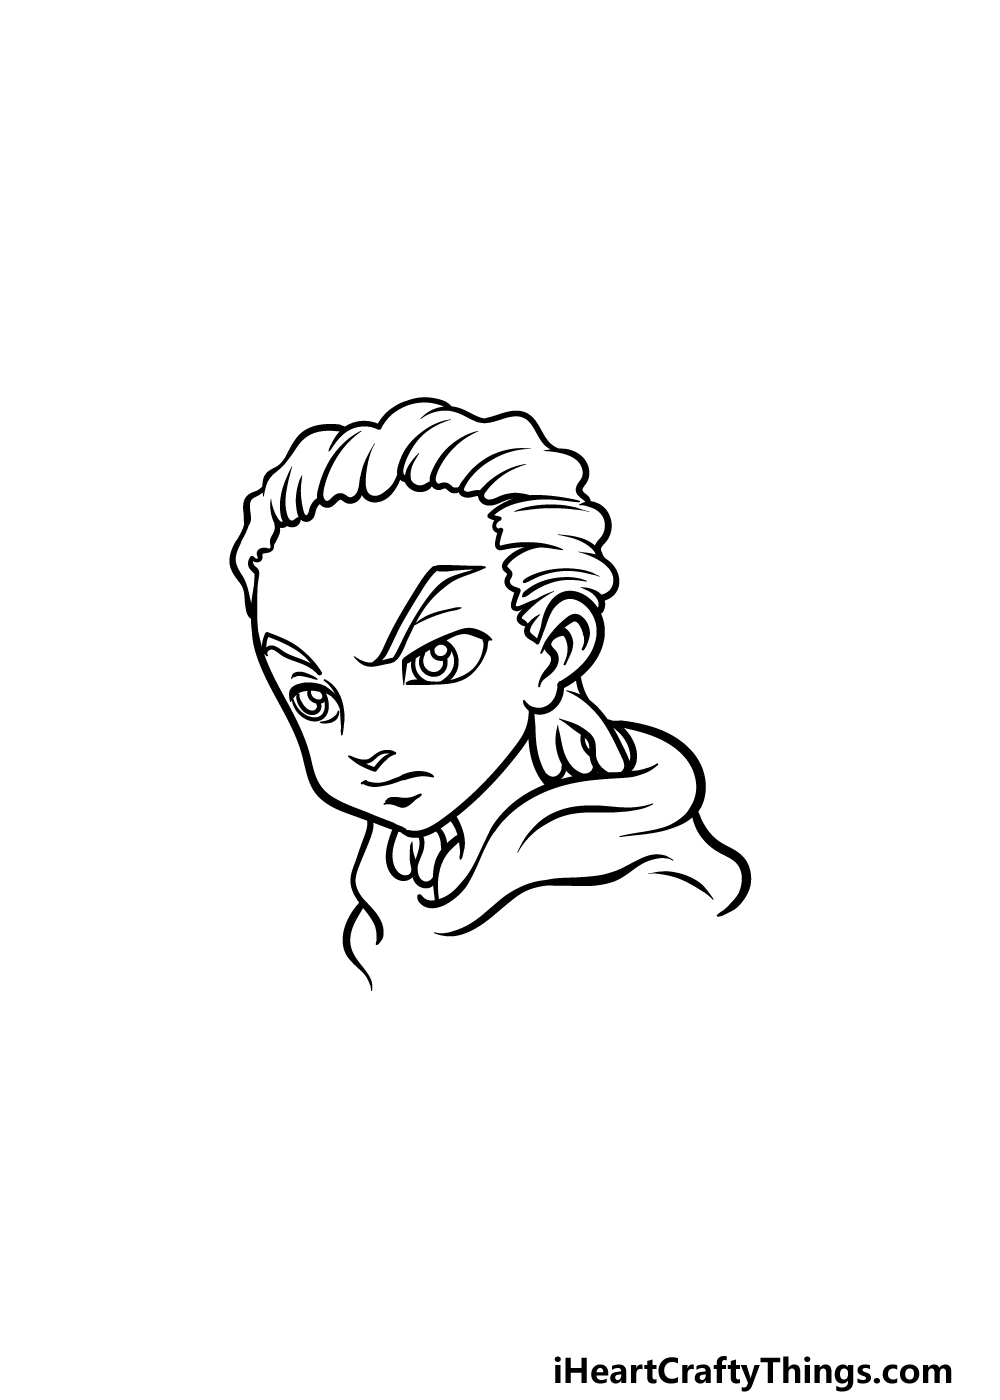
Step 2 – Next, draw some of his hair and his hoodie
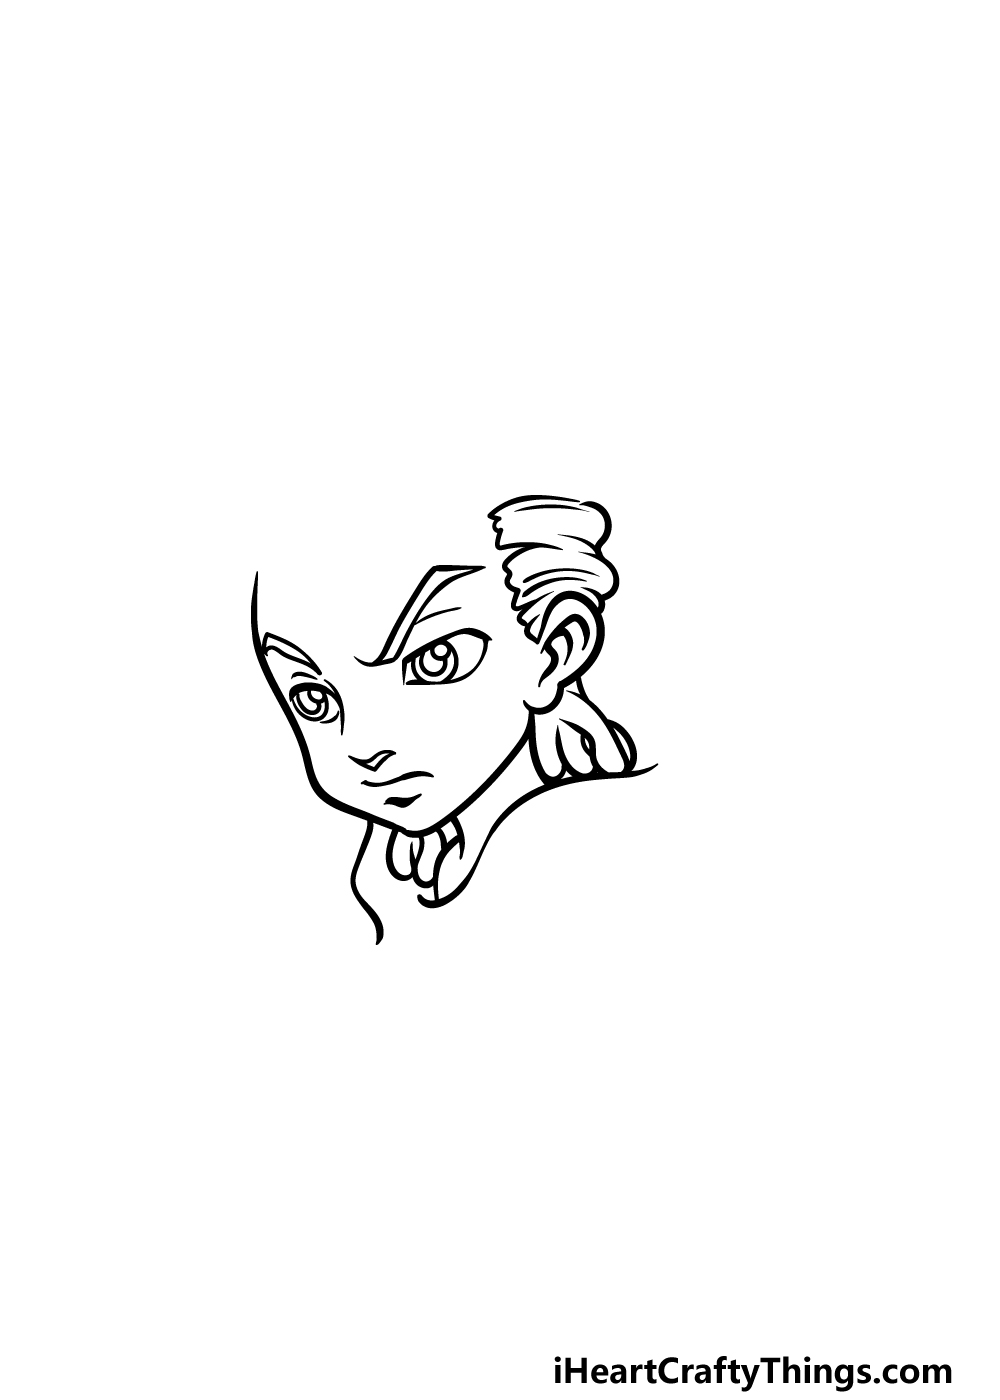
For this second part of your Boondocks drawing, we will be drawing the start of his hair and his hoodie.
For the side of his hair we will be drawing some sharply curved lines that will be rounded on the outer edge but have straighter lines on the inner one.
We will also be drawing some thin, rounded shapes for the hair strands hanging from the back of his head. Then, we will be using a wavy line for the top of his hoodie that he is wearing, and we can finish that off later.
Step 3 – Add the top of his hair
We will be adding the rest of his hairstyle in this third step of our guide on how to draw Boondocks.
This section of his hair will look rather similar to the side section that you drew in the previous step.
That means that it will be bumpy and more rounded on the outer edge and more angular on the inner edge.
That’s all that we will be doing in this step, so once you’re happy with how his hairstyle looks then we can move on to step 4!
Step 4 – Now, draw some more of his hoodie
For this and the next step of your Boondocks drawing, we will be finishing off the hoodie that he is wearing along with adding some final touches.
For the top of the hoodie, we will be using some rounded lines for the outer edges along with some curvy lines in the interior.
These rounded, curved lines will help to give the hoodie a look of being made of fabric.
Step 5 – Finish off your Boondocks drawing
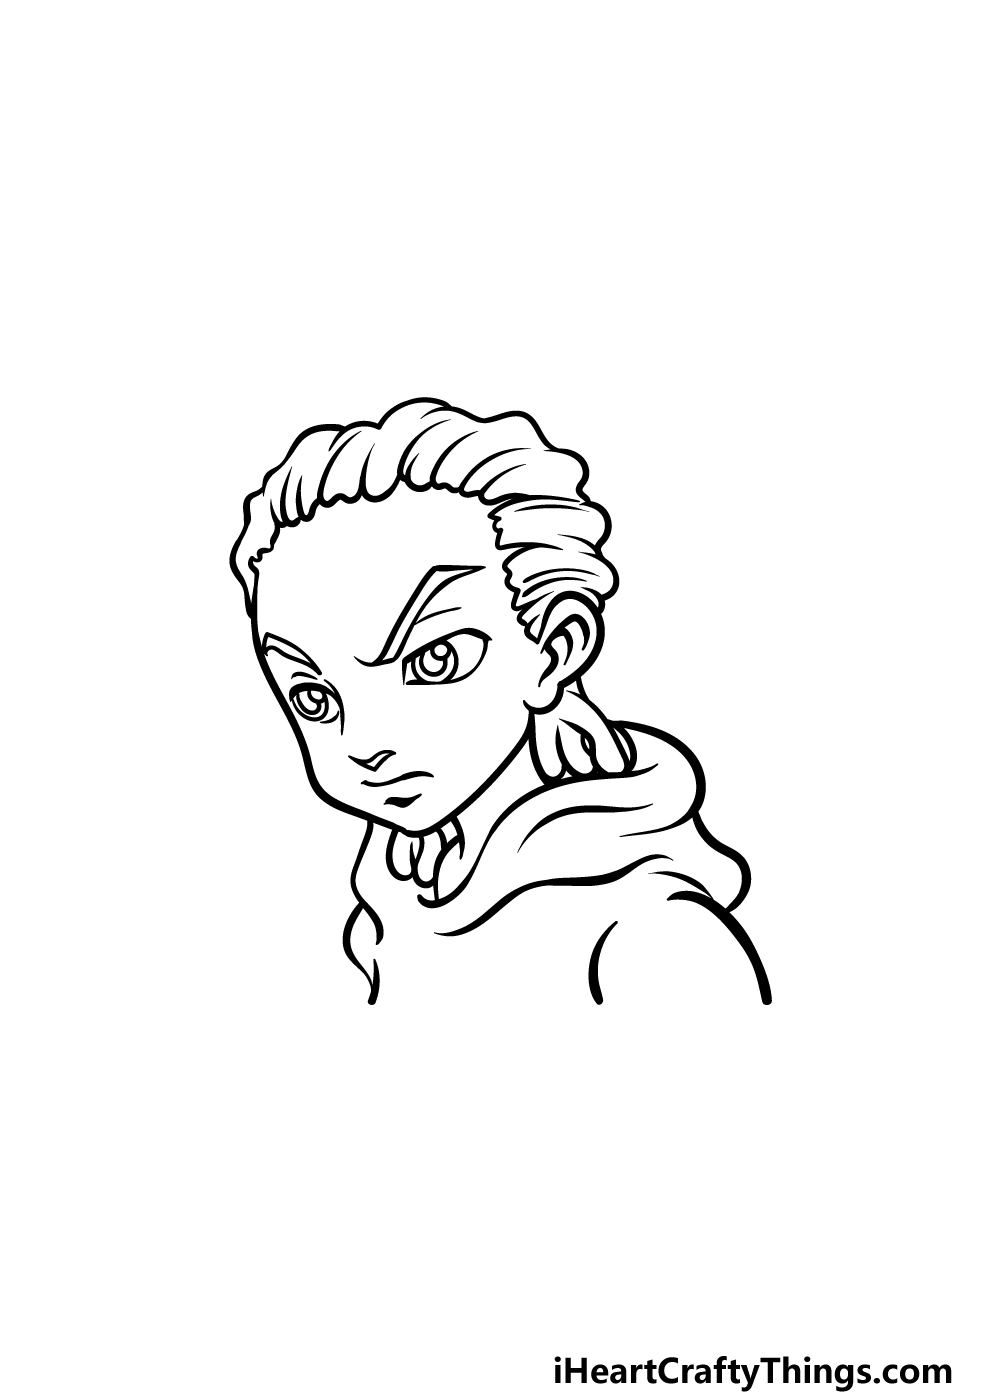
This fifth part of our guide on how to draw Boondocks will be all about finishing off the final details so that you will be ready to add some color in the final part.
For our final details, we used some more rounded lines for the top of the shoulder of his hoodie.
Once you have added these lines, you have finished all of the details in this guide! Before you move on to the final step, this is your chance to add some details and final touches of your own as well.
You could draw some more of his arms and body for one idea, but there are also some other additions you could go for.
It would be fun to look up some images of his brother Huey, his grandfather or other characters from the show to go alongside Riley.
These are just some of the ideas that you could go for, but what else can you think of to finish it off?
Step 6 – Finish off your Boondocks drawing with some color
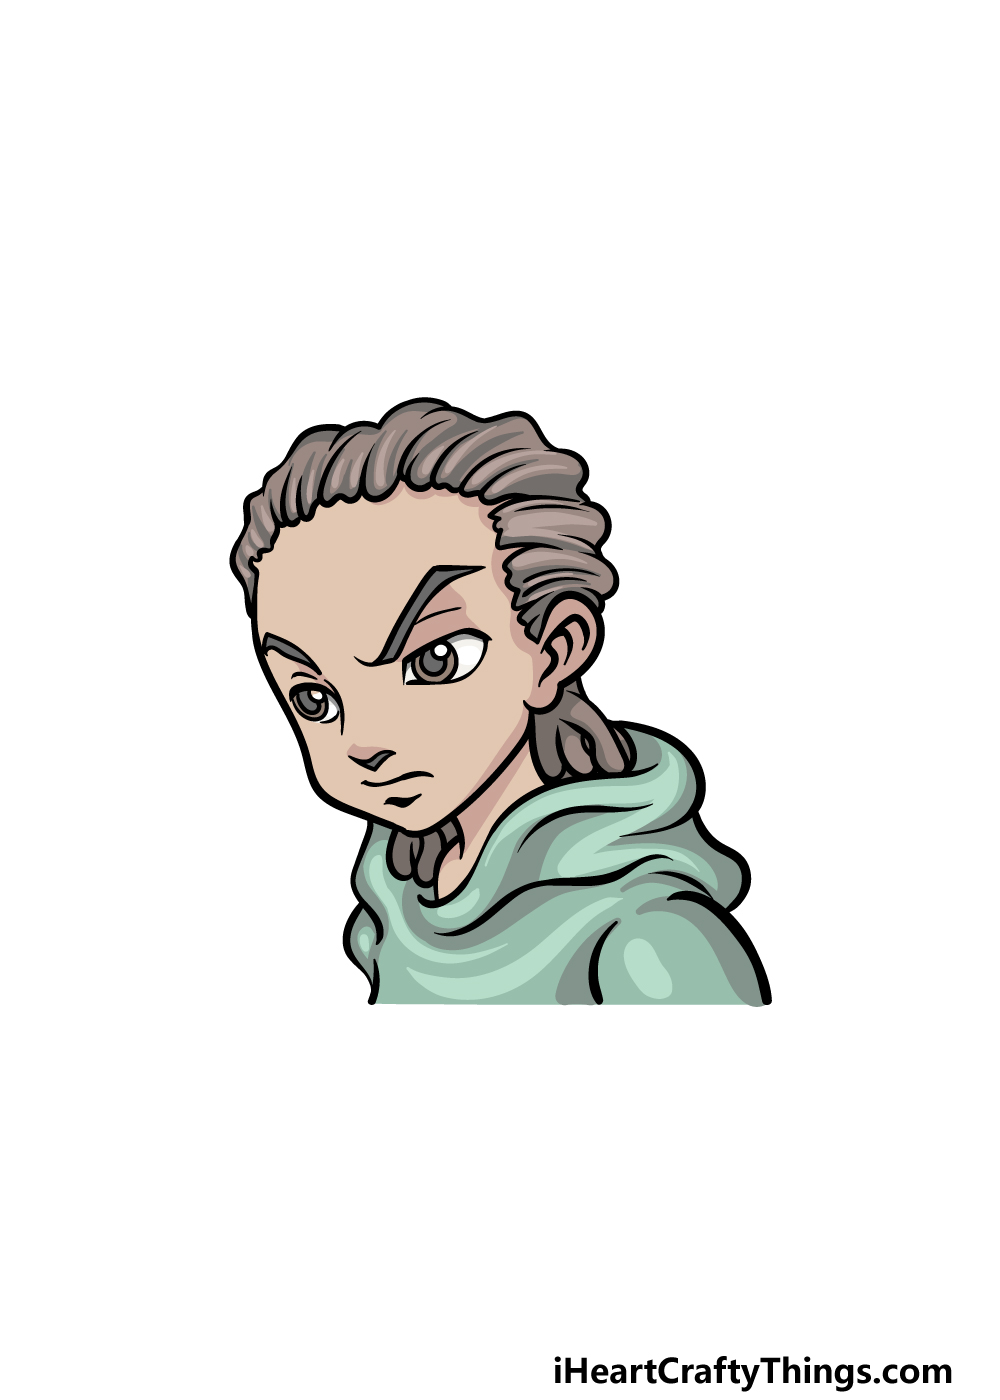
For the final part of your Boondocks drawing, we will be finishing off this character with some color.
For our image, we used some more muted shades for the colors to give it a bit more of a subdued look.
We also went with a shade of green for the hoodie that he is wearing. These colors are just a suggestion, and as you finish it off you can pick your own favorite colors to bring it to life!
Once you know which colors you would like to use, you can then pick the art mediums and tools that you will use to achieve them!
There are brighter mediums such as colored markers and acrylics or lighter ones like watercolors and colored pencils.
It all depends on the mood and the feel that you want for it, so let your creativity flow as you finish it off!
Do this to take your Boondocks drawing to the next level
Make your Boondocks sketch even more awesome with these fun tips we have!
This drawing of Boondocks shows the head and shoulders of Riley, one of the main characters of the show. You could add to this depiction by drawing some more of him.
How much you add would depend on your own preferences! You could draw the entire rest of his body or maybe just include his arms.
If you wanted to do this, then you could use the show or images online to help you as you draw. How much of Riley would you like to add for this picture?
Riley is just one of many memorable characters from the show, and you could add any others to the image. The first and most obvious choice would be his brother Huey.
That is not the only character you could add, and you could add any of your favorites. Which characters of the show would you like to add to hang out with Riley?
Once you have decided who you would or would not like to add to your Boondocks drawing, you could also add a background. The show is famous for its detailed backgrounds, so it would be fun to add.
Adding a background would also be a fun way to recreate some of your favorite moments from the show.
You could even pause the show and use it to help you as you add a background setting to your artwork.
What location from the show would you like to add?
If you decide to keep the focus on Riley, there are some ways that you can customize his design.
For example, you could change the nature of this Boondocks sketch by changing his facial expression.
He could look happier or maybe even angrier than he does in the example image. If you add some more to his body, then you could also put him in some different clothes.
Once again, you could use the show as inspiration if you want to give him a different look!
Your Boondocks Drawing is Complete!
We hope that this guide on how to draw Boondocks made it fun and easy for you to recreate this famous character!
Finishing this guide is just a part of the fun, as you can also keep it going by adding your own details, elements and color choices.
There really is a lot that you can do to personalize your artwork. We will be very interested to see how you finish off this picture!
We also have some great guides featuring other classic characters and other subjects on our website. We upload new ones often, so be sure to keep checking in!
Once your Boondocks drawing is finished, we would love to see it! You can share your creative artwork on our Facebook and Pinterest pages for us to enjoy.