In the animal kingdom, there is a seemingly infinite variety of different birds to admire.
Each bird is interesting and beautiful for its own reasons, but some manage to stand out despite all of this incredible variety.
The bluebird is one example that you could look to, for while this bird is small and unassuming, it is still popular due to its beautiful blue coloring.
It has become a favorite of bird watchers and enthusiasts, and many people also like to learn how to draw a bluebird so they can create some pretty artworks.
If you’re one of the people that love this little bird, then this will be the tutorial for you!
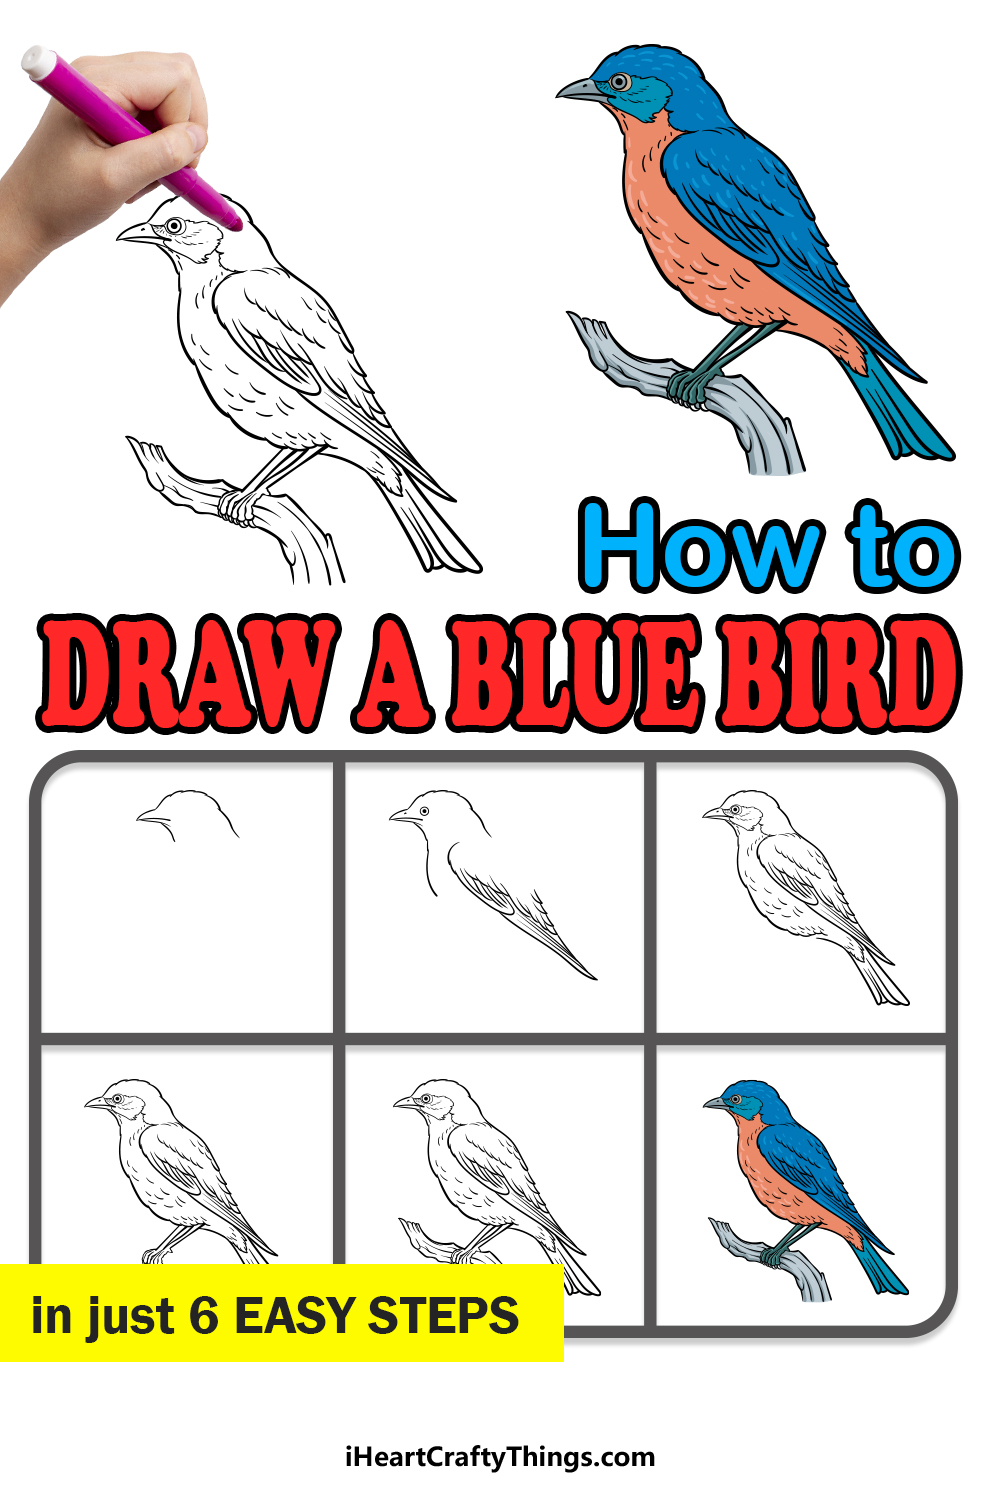
Our step-by-step guide on how to draw a bluebird will show you how you can recreate this adorable bird.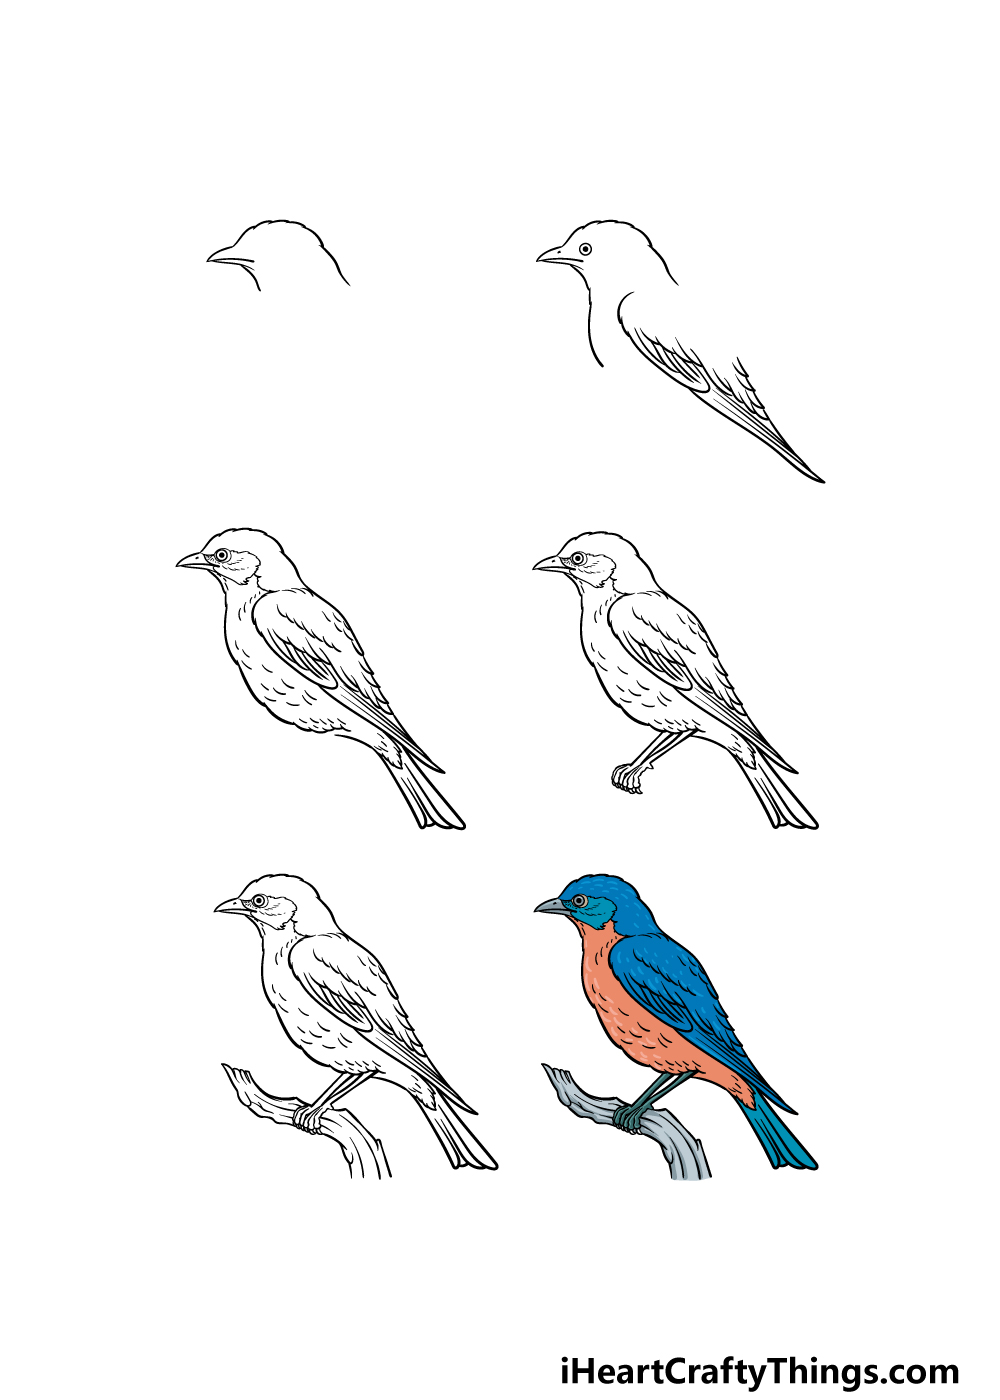
How to Draw A Bluebird – Let’s Get Started!
Step 1
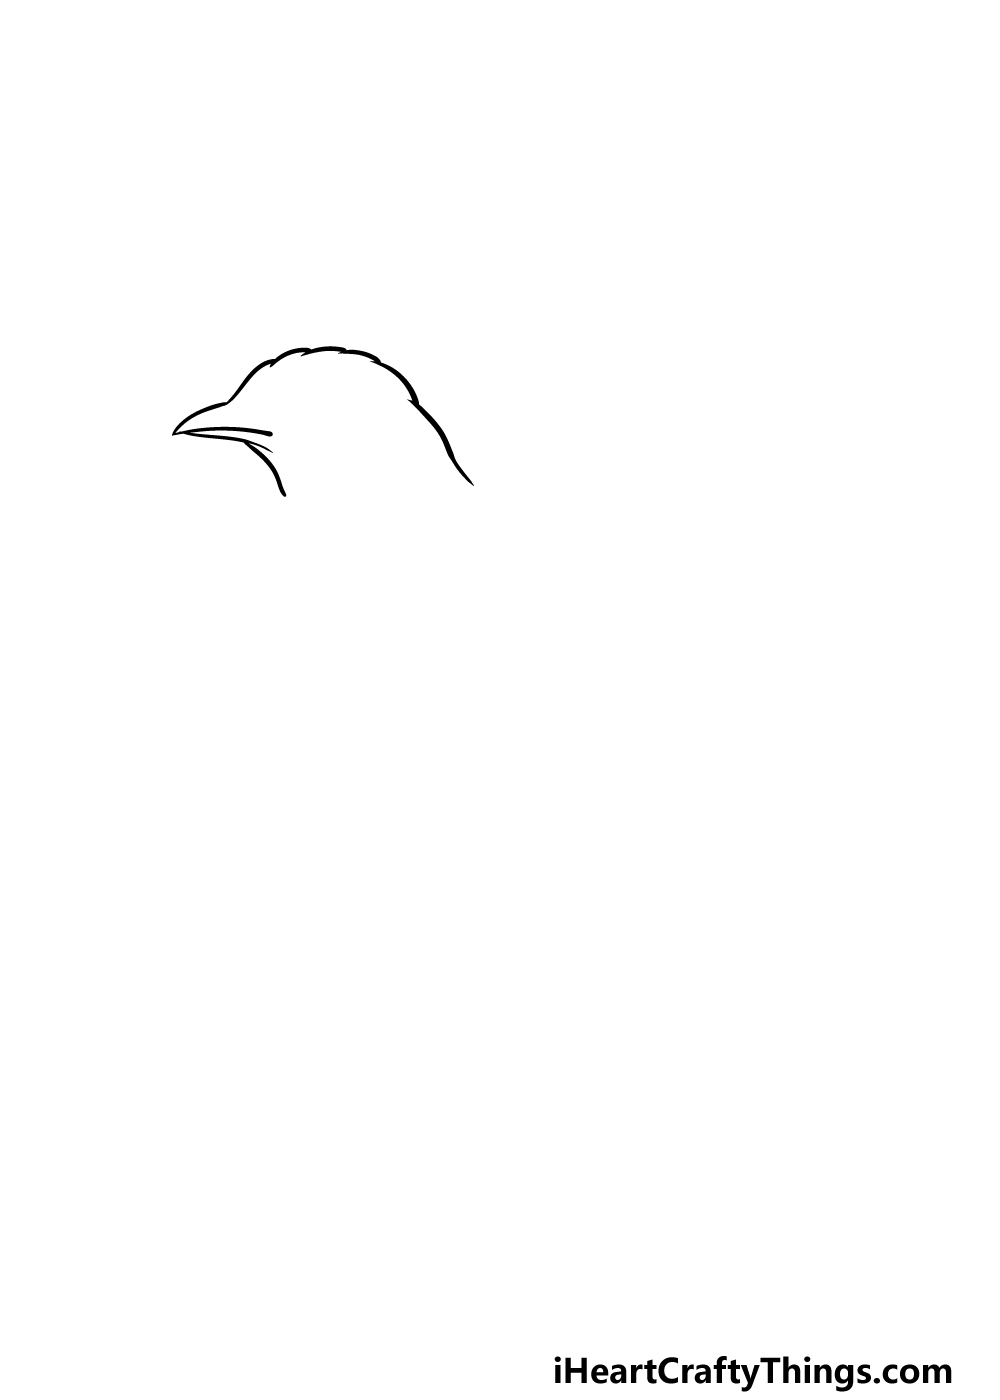
We will get this guide on how to draw a bluebird started by drawing the beginning of the outline for the head.
First, use some curved lines with a rounded tip at the end to create the small, thin beak. Then, extend a smooth curved line down from the beak.
For the top of the head, you can then use a more jagged curved line. This line will be used as it will make the top of the head look a bit more feathery.
Once this head outline is complete, you will be ready to move on to the second step of the guide!
Step 2 – Now, draw the eye and wing for your bluebird drawing
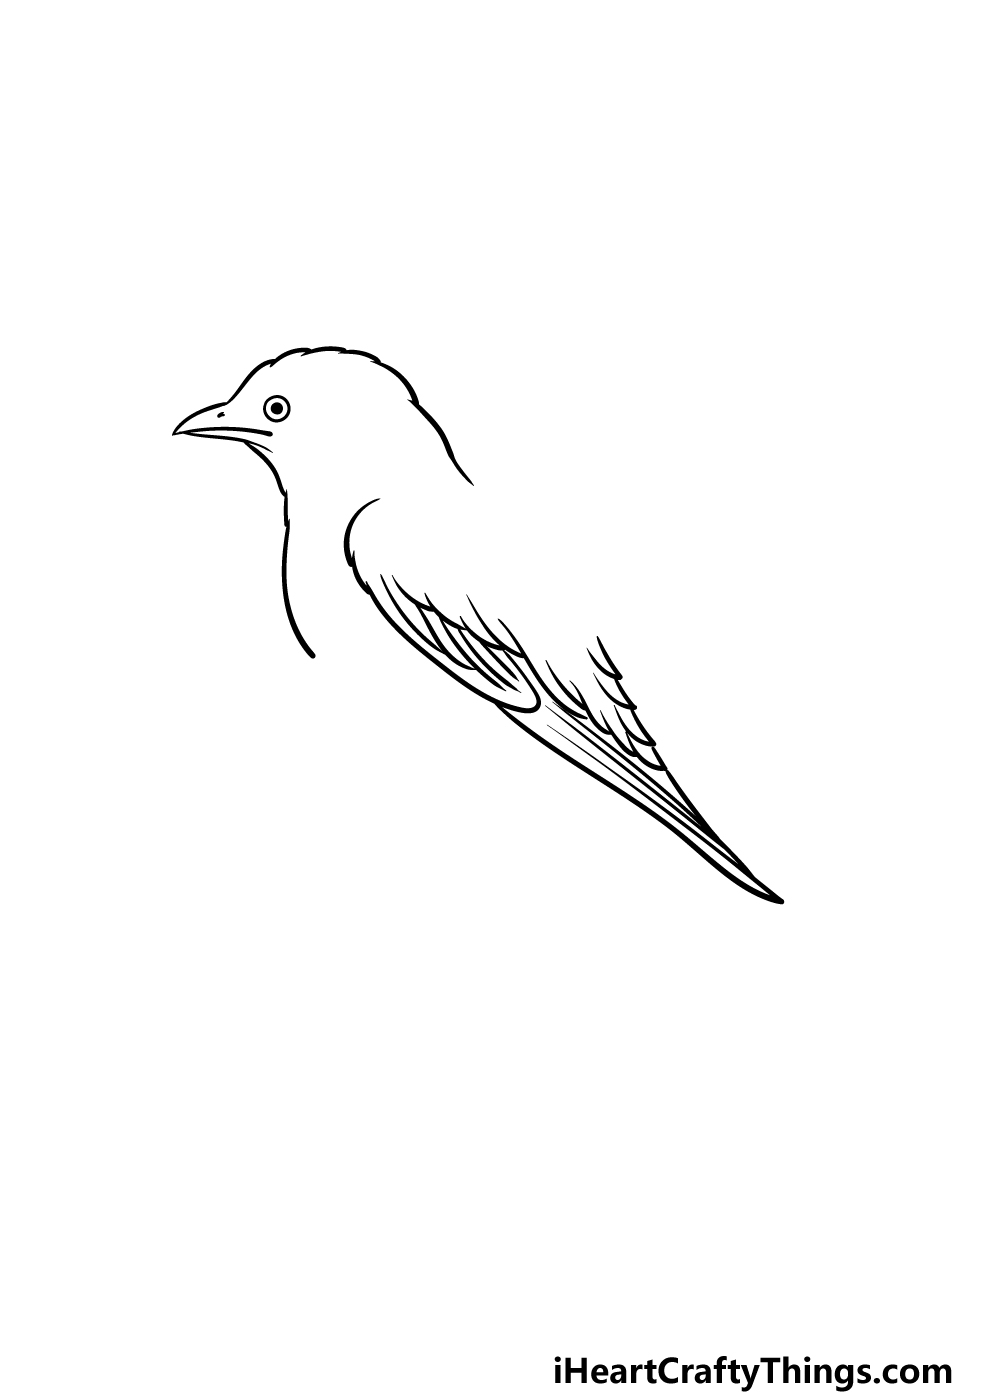
This second step of your bluebird drawing will see you adding the eye along with the start of the wing for the bird.
The eye is pretty simple, and you can draw it using a small circle with a black dot in the center. Then, you can draw the outline for the wing.
This outline will be drawn using a combination of smooth, curved lines and some more jagged lines like the one you used for the top of the head.
The wing will get thinner as you move down to the tip of it, and then you can use some more curved lines to draw the individual feathers onto the wing.
There will be an empty space near the top of the wing, but we will fill that in shortly!
Step 3 – Draw the top of the wing and add some details
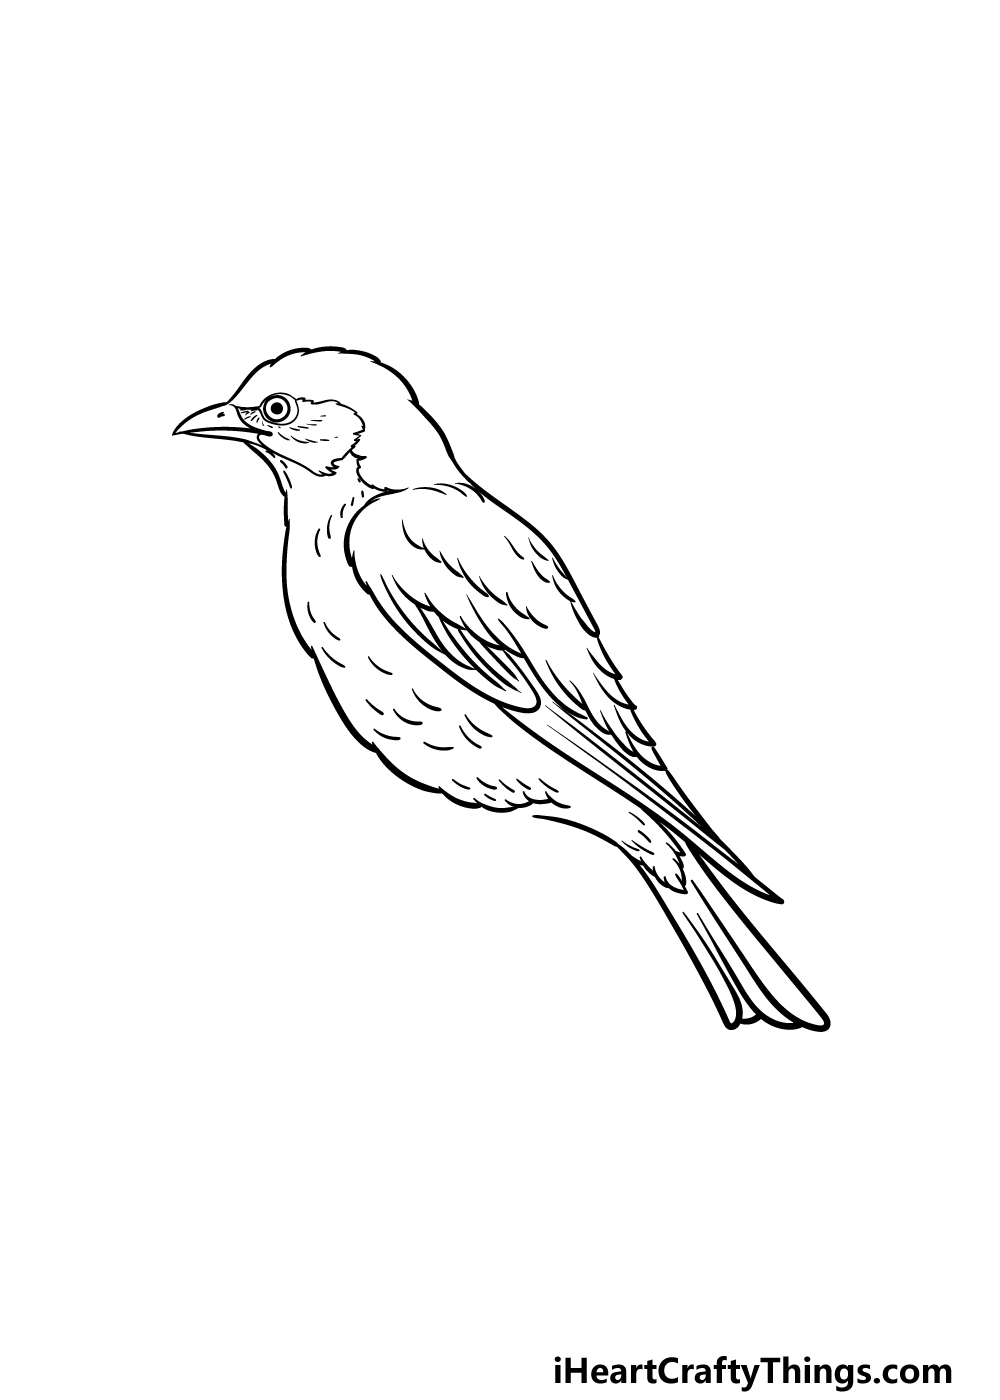
We mentioned that we would be finishing off the top of the wing, and that is exactly what we shall be doing in this step of our guide on how to draw a bluebird.
Use another curved line to create the top line of the wing to finish off the outline as a whole. Then, add lots of smaller curved lines inside of the outline to give a more feathery texture to it.
Then, draw a section around the eyes on the face of the bird to start the facial details. You can then use a bumpy line for the belly of the bird and add some smaller curved lines inside of this outline.
The final thing we will be doing will be to add the tail. This will be made up of several individual feathers that fan outwards a bit.
Then you’re ready for step 4!
Step 4 – Next, draw the legs for the bluebird
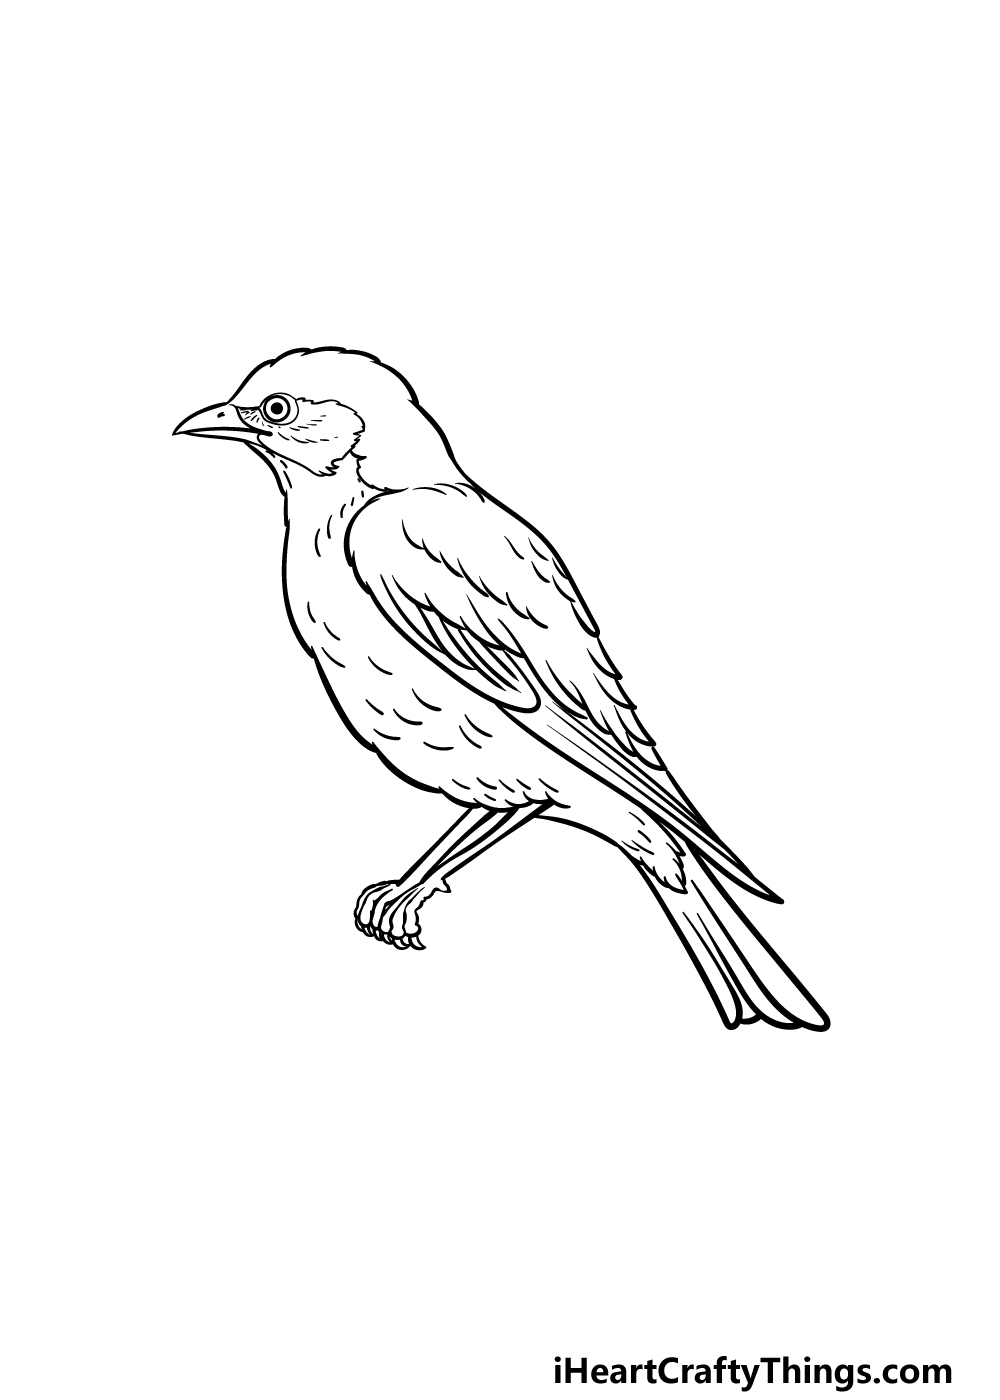
You’re doing a great job on this bluebird drawing so far! This fourth step of the guide will see you adding the legs for this little bird. Like many small birds, the bluebird has thin, dainty legs.
The legs are very thin and straight, and they will end in some small, curled little feet.
It may look like this bluebird is floating in thin air right now, but we will draw the branch it is sitting on along with some final details in the next step.
Step 5 – Add the final details to your bluebird drawing
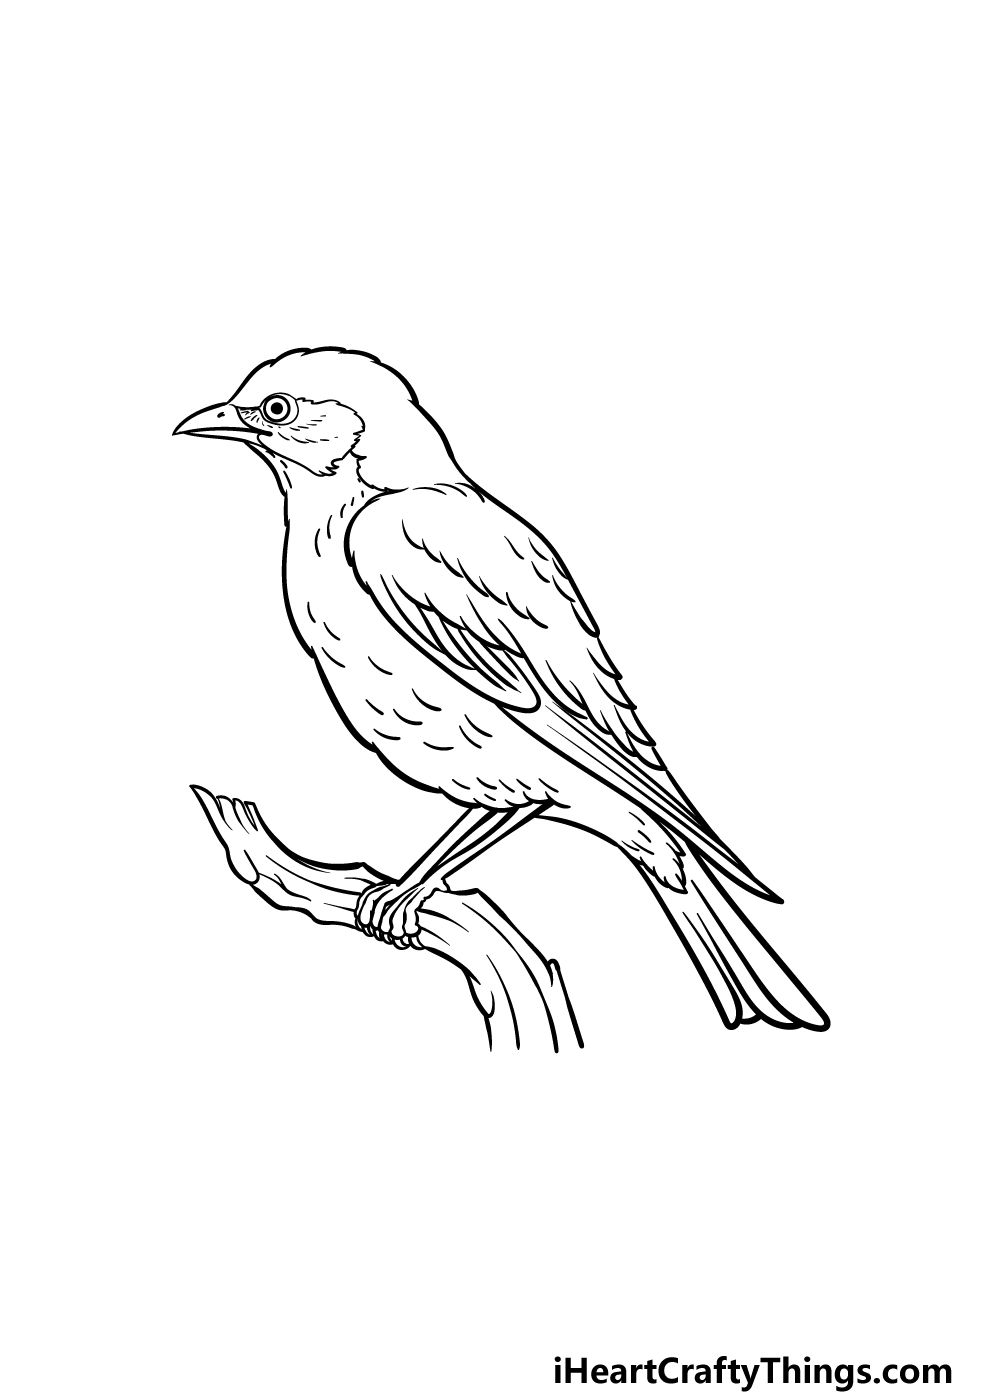
This fifth step of our guide on how to draw a bluebird will see you finishing off the drawing so that you will be ready for some coloring fun.
In the previous part, we mentioned that we would be drawing the branch it is sitting on in this step, and that’s exactly what we shall be doing!
The branch will be quite curved and rounded, and while to us it would probably be very thin, it will look fairly thick compared to this little bluebird.
Once the outline is drawn, you can also add some curved line details to it to give it a more textured appearance.
When you have drawn this branch, feel free to also add any extra details of your own that you would like?
What background setting do you think would suit this bluebird?
Step 6 – Finish off your bluebird drawing with color
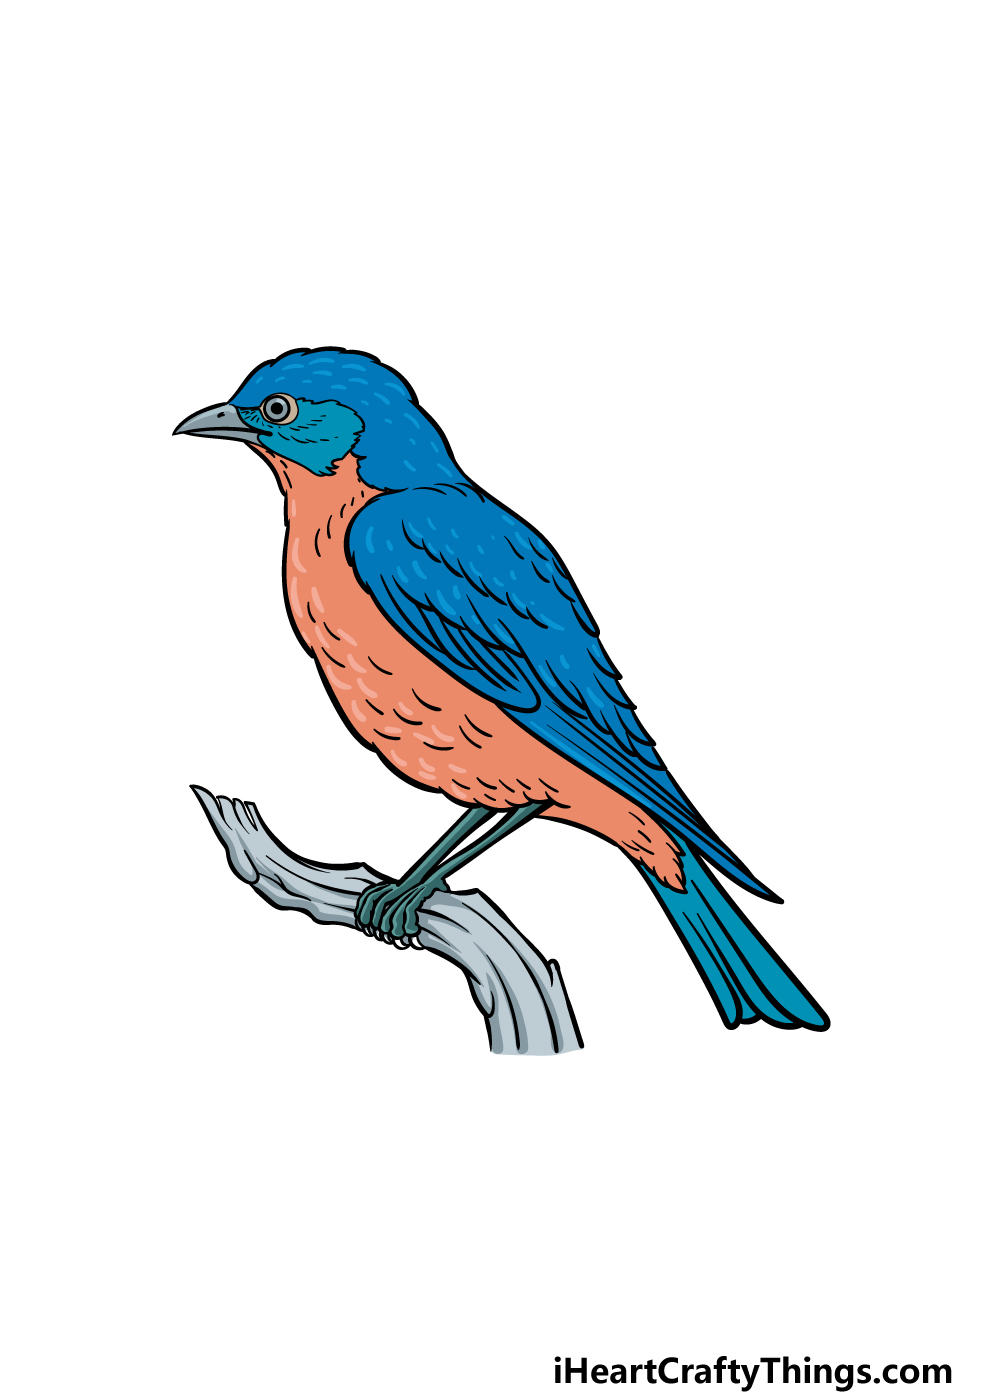
You have arrived at the final part of this bluebird drawing, and in it we shall finish it off with some colors. In our reference picture, we went with some realistic colors for the little bluebird.
As you may expect, we incorporated shades of blues for the outer wings and feathers of the bird.
Then, for the belly we used some shades of orange and then went for some darker greens for the legs.
We then finished off with some light greys for the branch it’s sitting on, but you should feel free to use any colors you would prefer for it!
Then, when your colors are chosen you can decide on the art mediums you will use for the colors. What will you choose to finish off this image?
4 More Ways To Make Your Bluebird Drawing Unique
Enjoy these extra tips we have for making your bluebird sketch even better!
This wonderful drawing of a bluebird shows one of these beautiful birds in a relaxed pose. If you wanted to change things up a bit, you could do so by altering the pose of this bluebird.
One way of doing this would be by showing the bluebird with its wings raised, as if it were about to take flight. Or, you could go one step further and show the bluebird flying through the air.
What are some other poses you could create for this bird?
Next, you could give this bluebird some company by adding a second bluebird. This could be as simple or complex as you want it to be.
For example, you could mirror the images of our guide and have a second bluebird facing the first one.
Or you could incorporate our suggestion from the first tip and have the second bluebird in a brand-new pose.
How would you incorporate a second bluebird into this scene?
Adding a second bluebird is one way of populating this picture, but there are many other creatures you could add to this bluebird drawing as well.
First, there are tons of other birds you could add. You could look up some images of similar birds to add to the picture if you want to do this.
Or, you could add other small animals such as squirrels or chipmunks, to name a few. There are so many ways to add life to this picture, so what are some creatures you could add?
Finally, it would be lovely to finish off this bluebird sketch with a background once you have changed and added everything you want to. The background could take on many different forms!
If you need some inspiration, you could find a nice spot in your own yard or maybe a park you like to visit. Otherwise, you could design your own idyllic location for a wonderful background to your artwork.
Where would you like to set this picture?
Your Bluebird Drawing is Complete!
All 6 steps of this guide on how to draw a bluebird have been completed, and you have an incredible drawing to show for it!
We hope that the steps in this guide made it fun and easy for you to recreate this adorable little bird.
Now you can finish off your artwork by creating some new background details, detail additions or color choices of your own.
Then, on our website you can find some incredible new drawing guides to enjoy! We upload new ones often, so you’ll want to check in often.
Please also be sure to share your bluebird drawing on our Facebook and Pinterest pages. This is the best way to show off your creativity, and we can’t wait to see how it turned out!