The Guardians of the Galaxy were quite an obscure comic book superhero group until recently. That all changed with the 2014 film adaptation that propelled this ragtag group into superstardom.
One of the most beloved characters from the team is the living tree Groot, despite the fact that all he can say is his name!
In the second film, we got to see Groot as a baby, and this would prove to make him even more popular.
With so many fans, many of them like to learn how to draw Baby Groot to make their own artworks.
If you are a fan of this lovable tree, then you’re in the right place!
Our step-by-step guide on how to draw Baby Groot in 7 steps will show you how to recreate this character.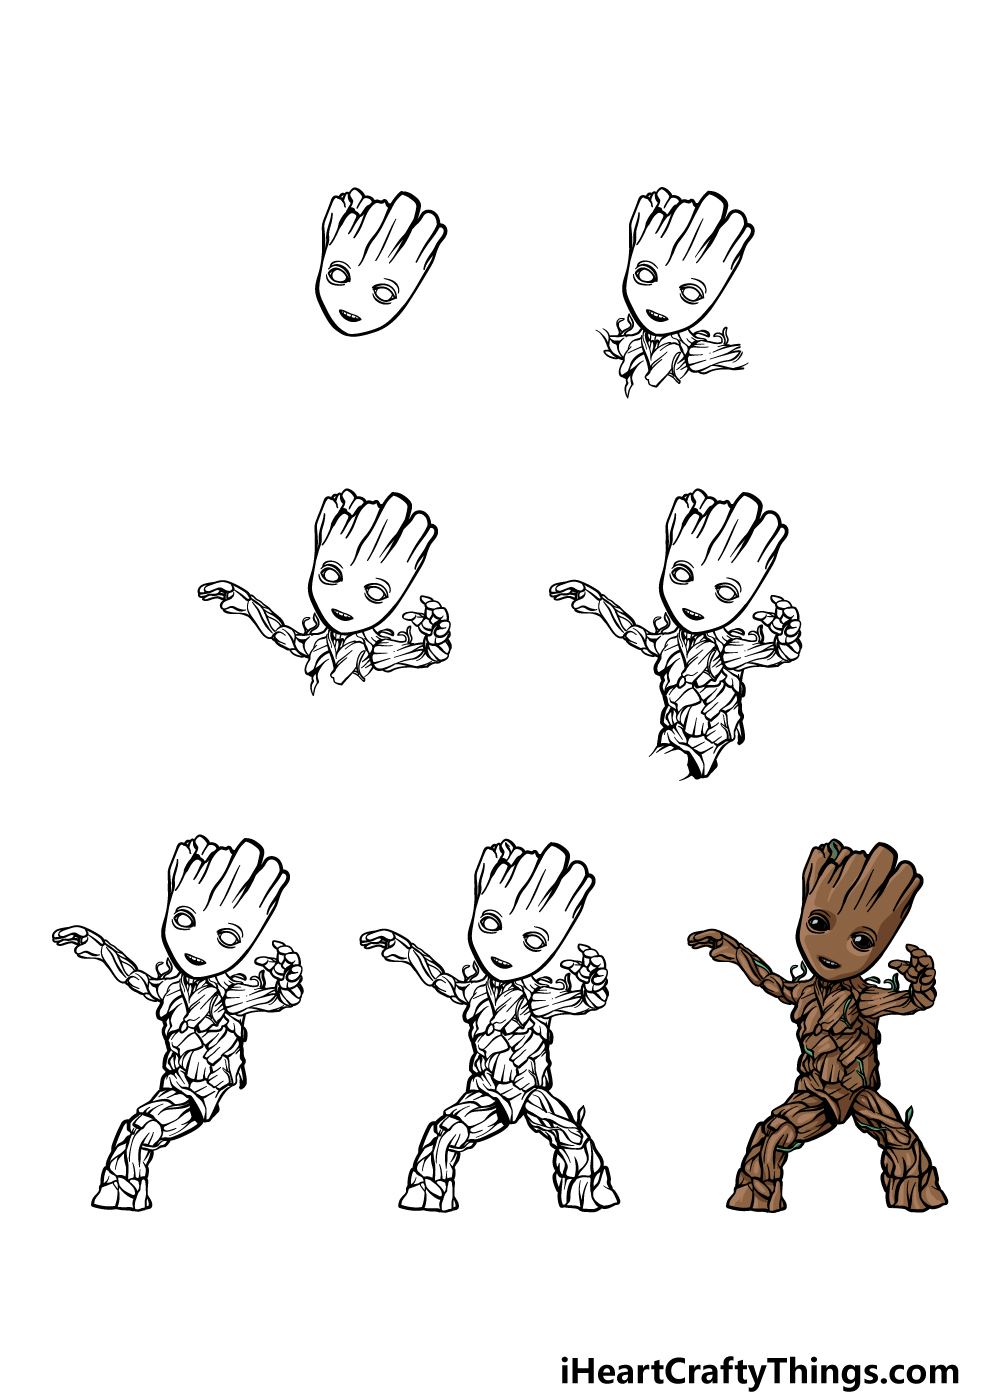
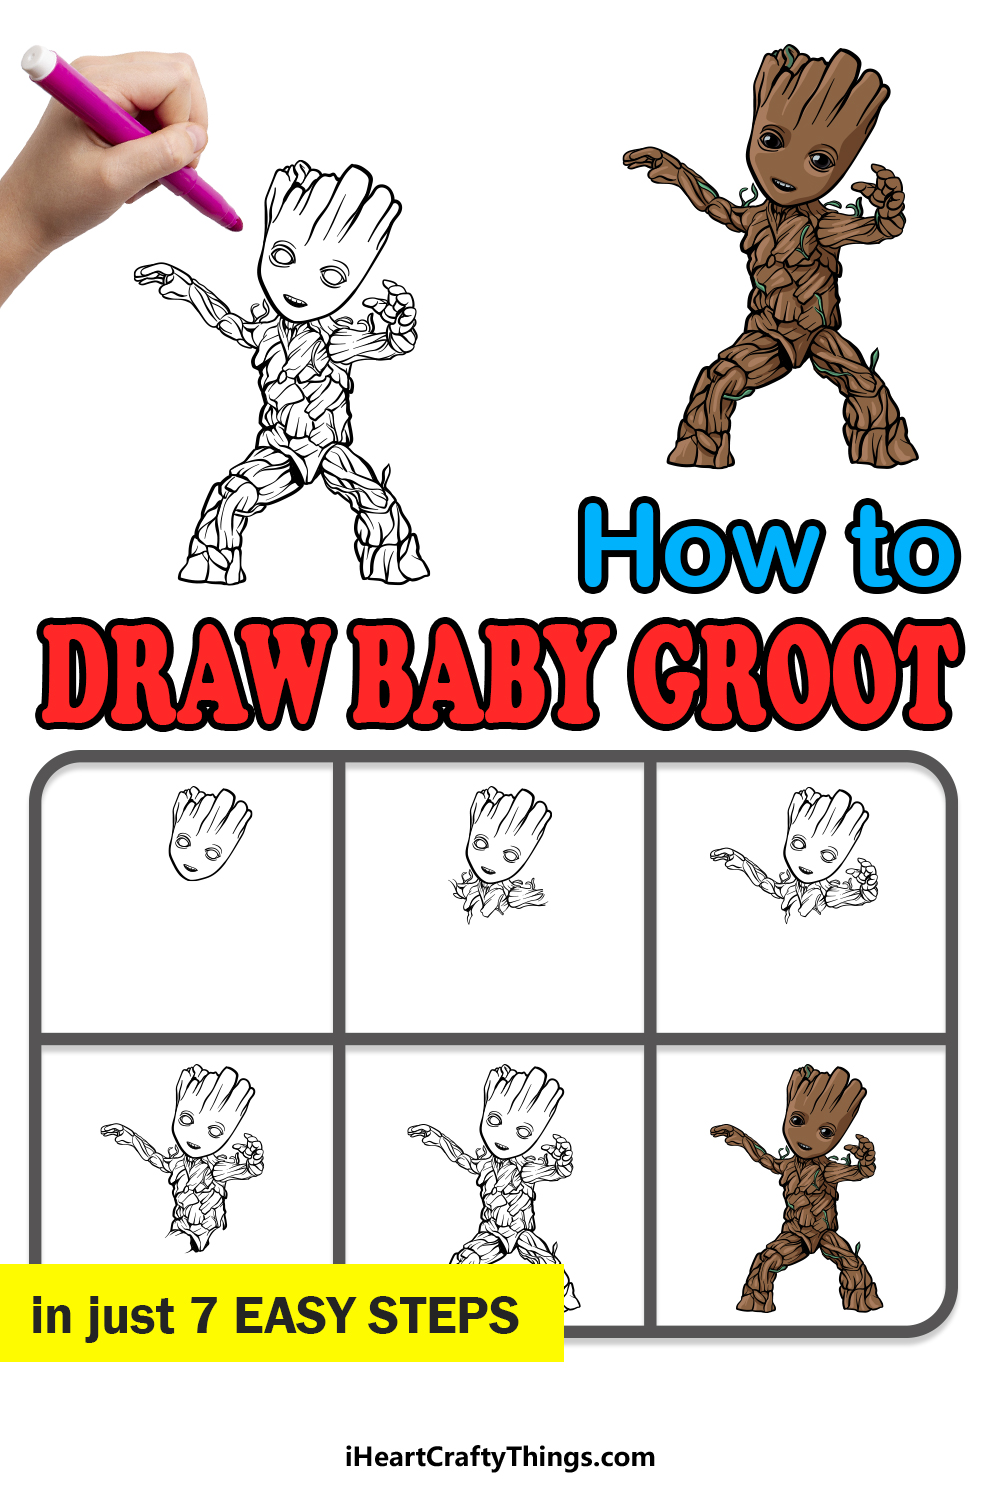
How to Draw Baby Groot – Let’s Get Started!
Step 1
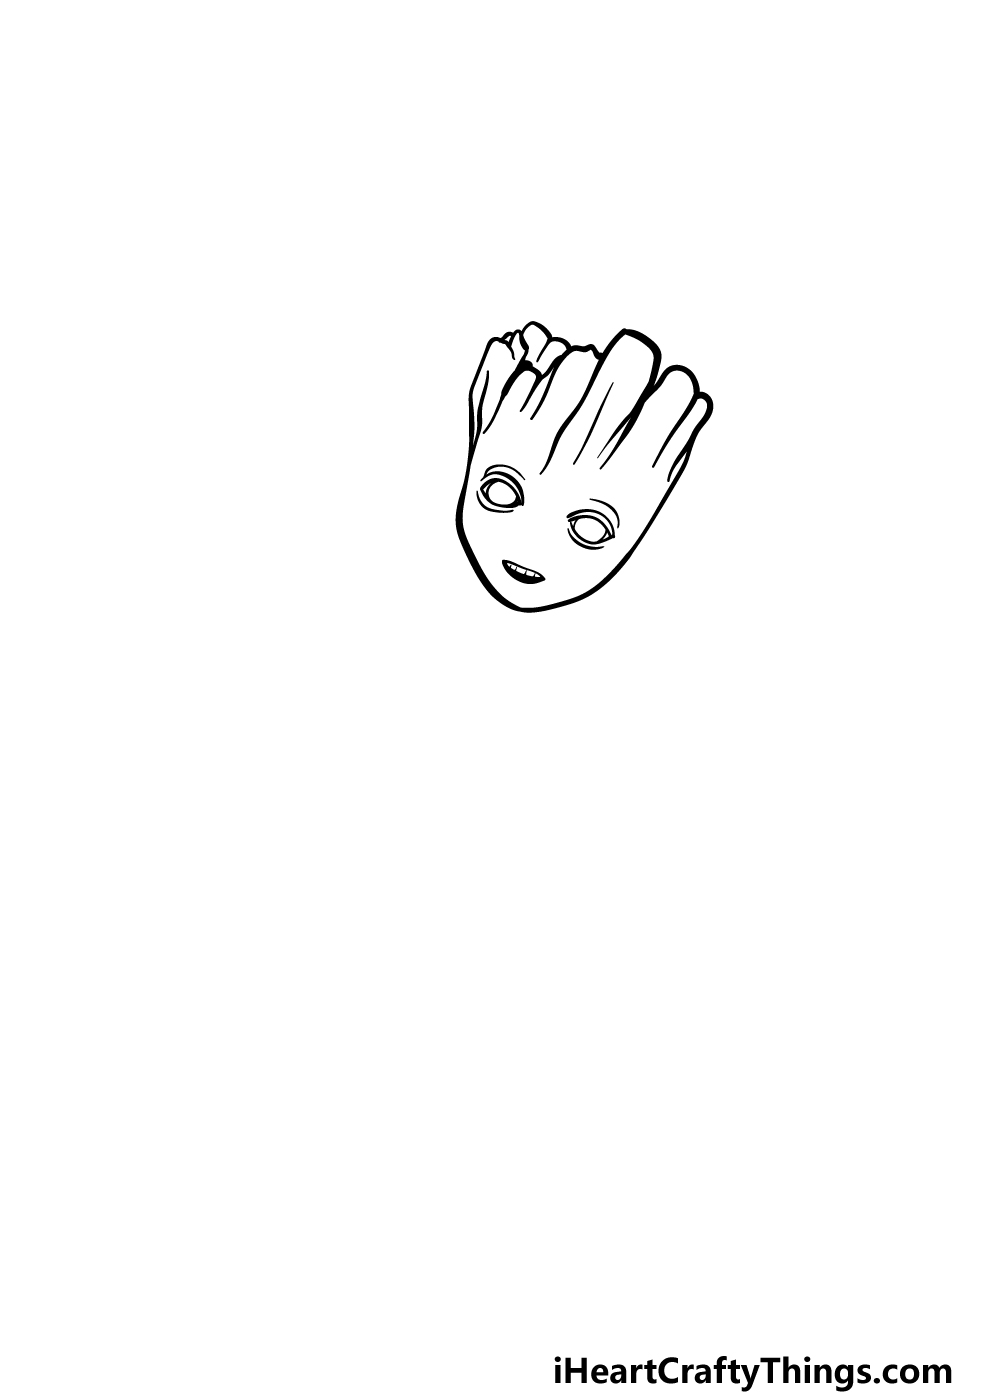
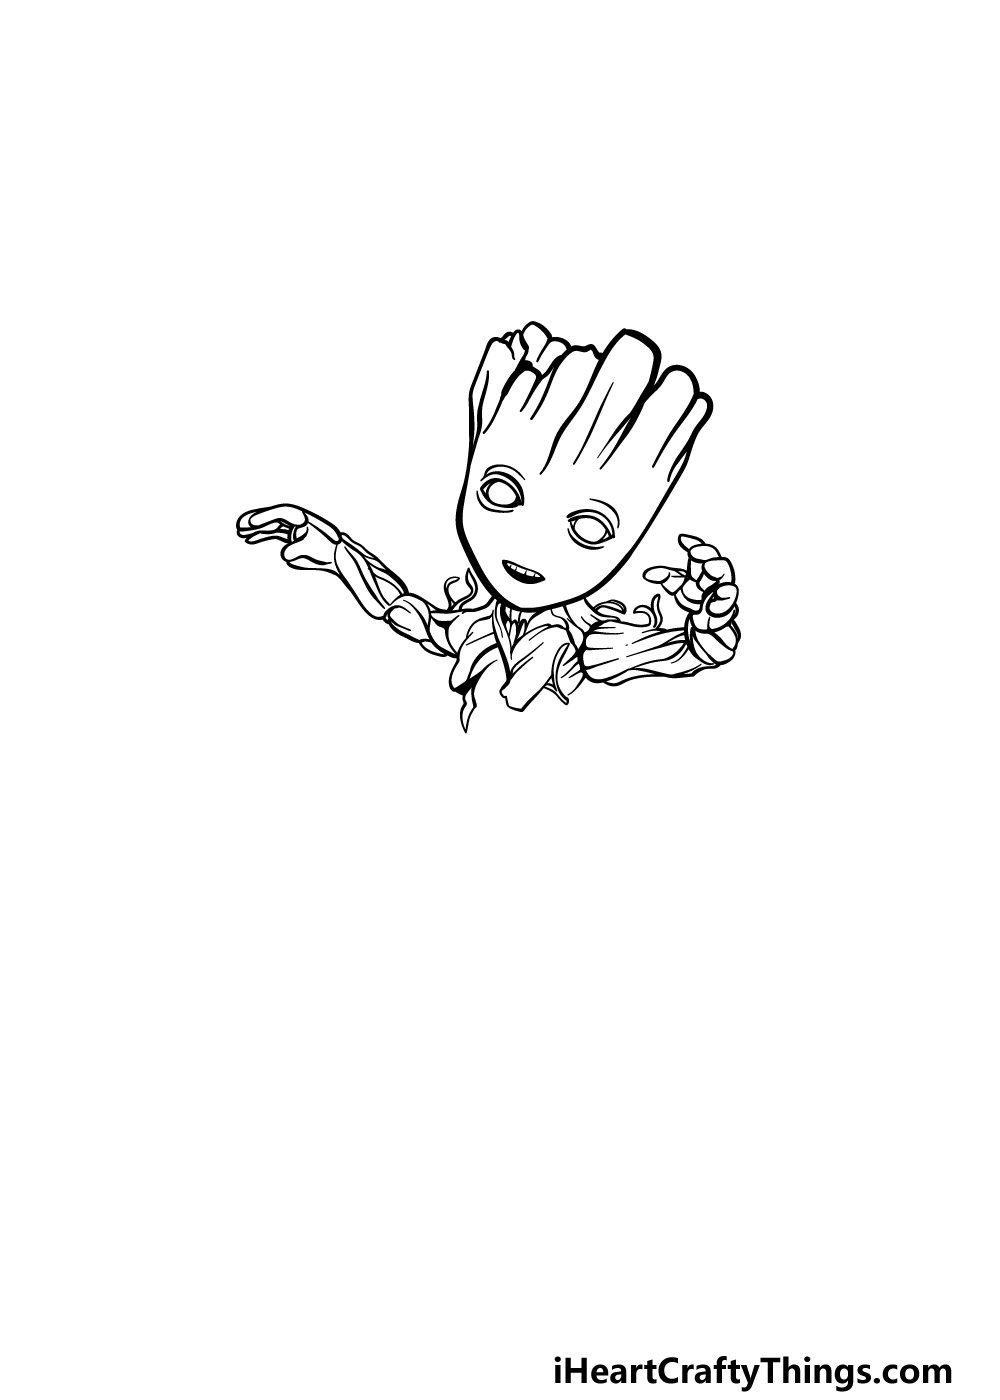
For the first step of our guide on how to draw Baby Groot, we will be starting with his head and face. Starting with the head outline, use a curved line for the bottom half of his face.
This will lead to the top half, and that top of his head will be drawn with some irregular squared shapes to give him a wooden look.
The lines for these shapes on top of his head will extend quite far down into his face.
Then, draw two fairly flat, round shapes for his eyes and add some line details around them. You can finish off with a small shape with teeth in it for his mouth, and then it’s on to step 2.
Step 2 – Next, start drawing his arms
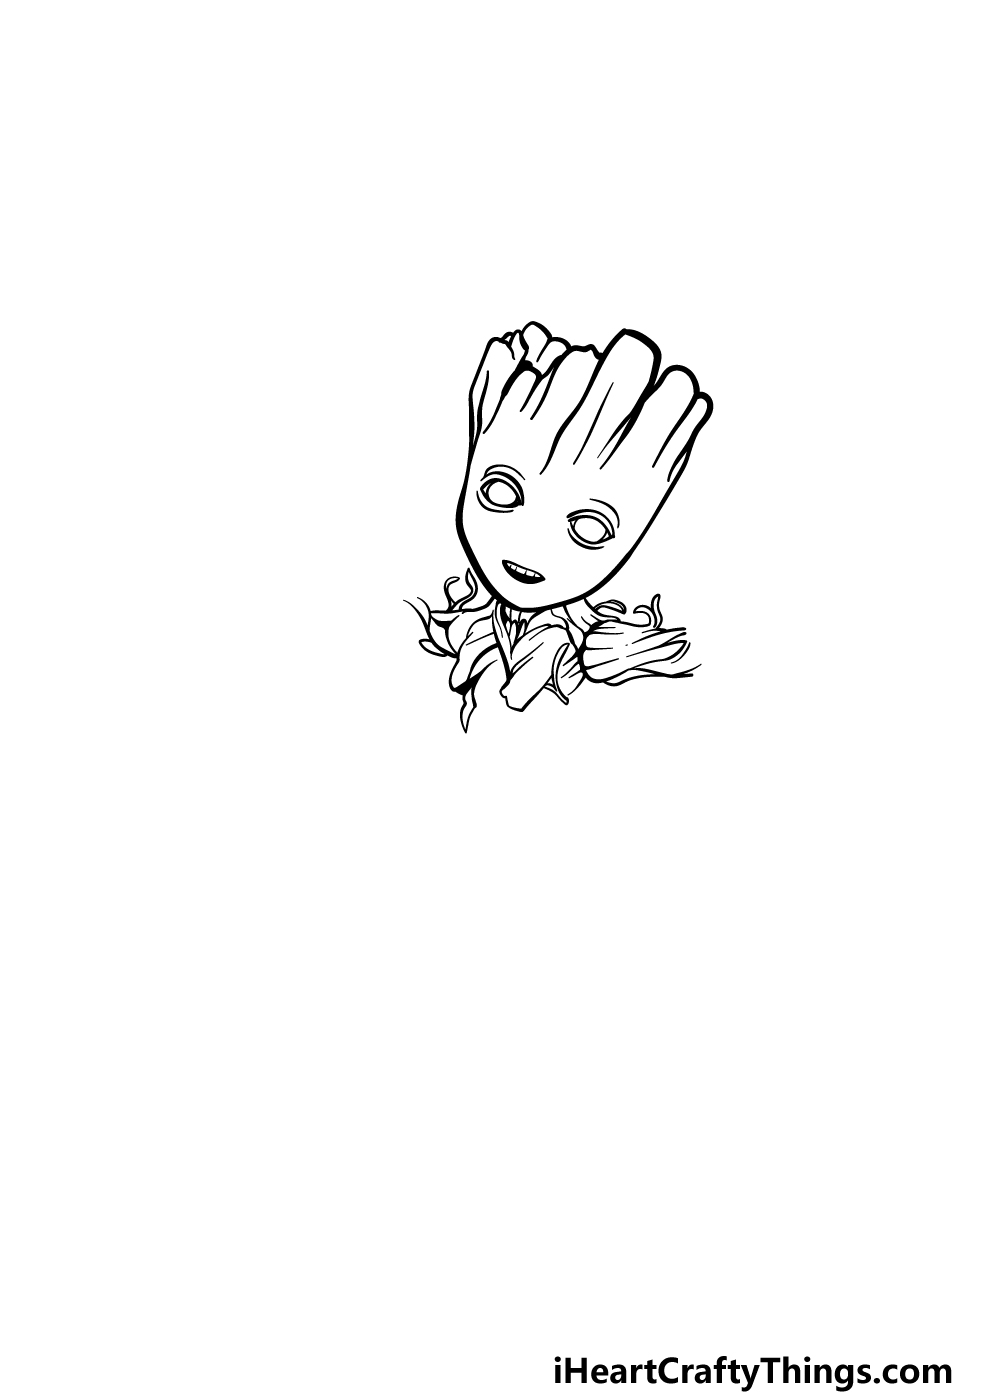
We will be working on drawing the start of his arms in this second part of your Baby Groot drawing.
Much like the top of his head, we will be using lots of irregular shapes connecting to one another for his arms and chest. They will also have a lot of line detailing to further illustrate this wooden effect.
You can also add some thin vines throughout his body to take it even further. Then you’ll be ready for step 3!
Step 3 – Finish off his arms in this step
Now we can finish off his arms in this step of our guide on how to draw Baby Groot. To do this, we will be drawing more sections for his arms as well as his hands at the ends of them.
These sections will all be drawn in the same way that you did the rest of his head and body, and the reference image will guide you in how to position them.
Step 4 – Now, draw the rest of his body
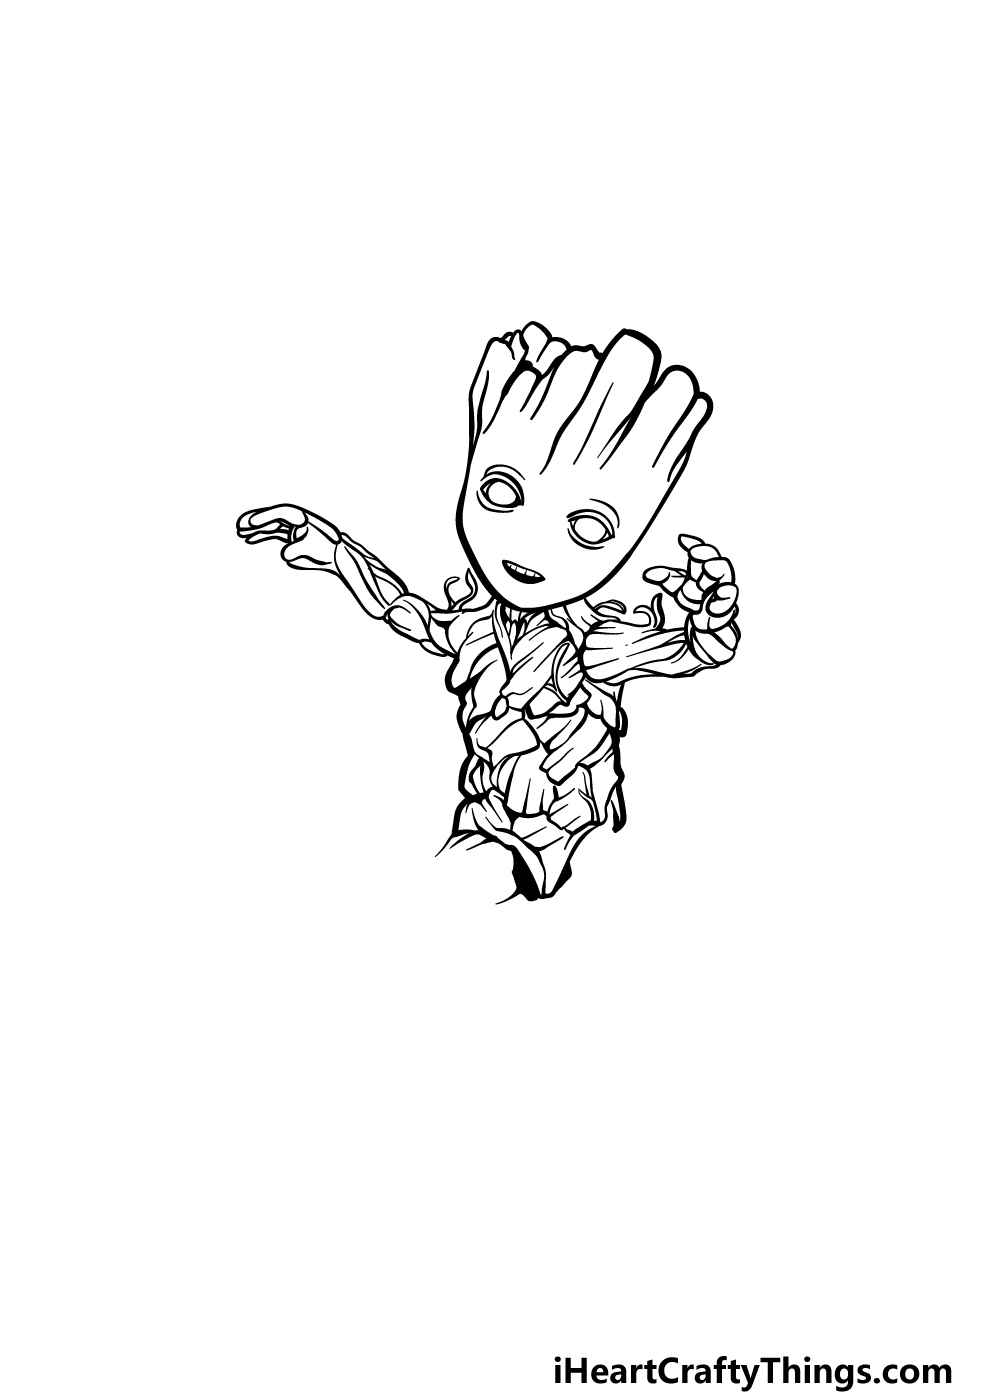
You’re making great progress in this Baby Groot drawing so far! For this part, we will be drawing the rest of his body. His body will look like it’s made of multiple smaller wooden “scales.”
You can draw several of these smaller shapes connecting to one another, and as a whole they will form the shape of his body.
Be sure to leave some spaces at the bottom of his body, as we will be adding his legs to those spaces soon.
Step 5 – Draw the first leg for Baby Groot
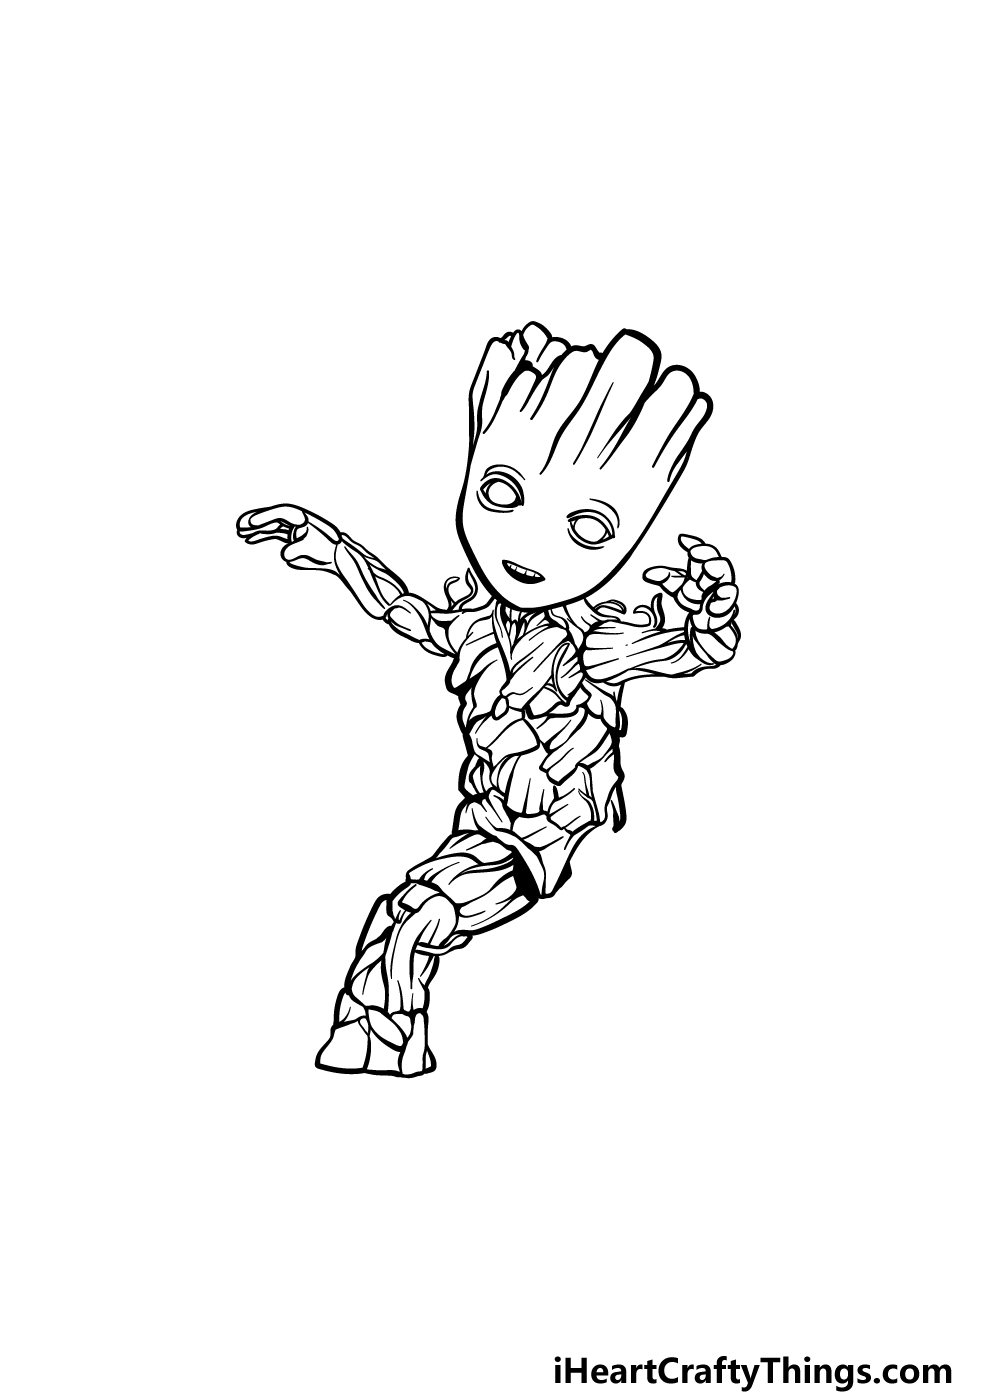
This and the following step of our guide on how to draw Baby Groot will be focused on finishing off his legs.
For the first leg, we will draw it using some more of those “scale” shapes connecting to one another in a similar fashion to how you drew his body in the last step.
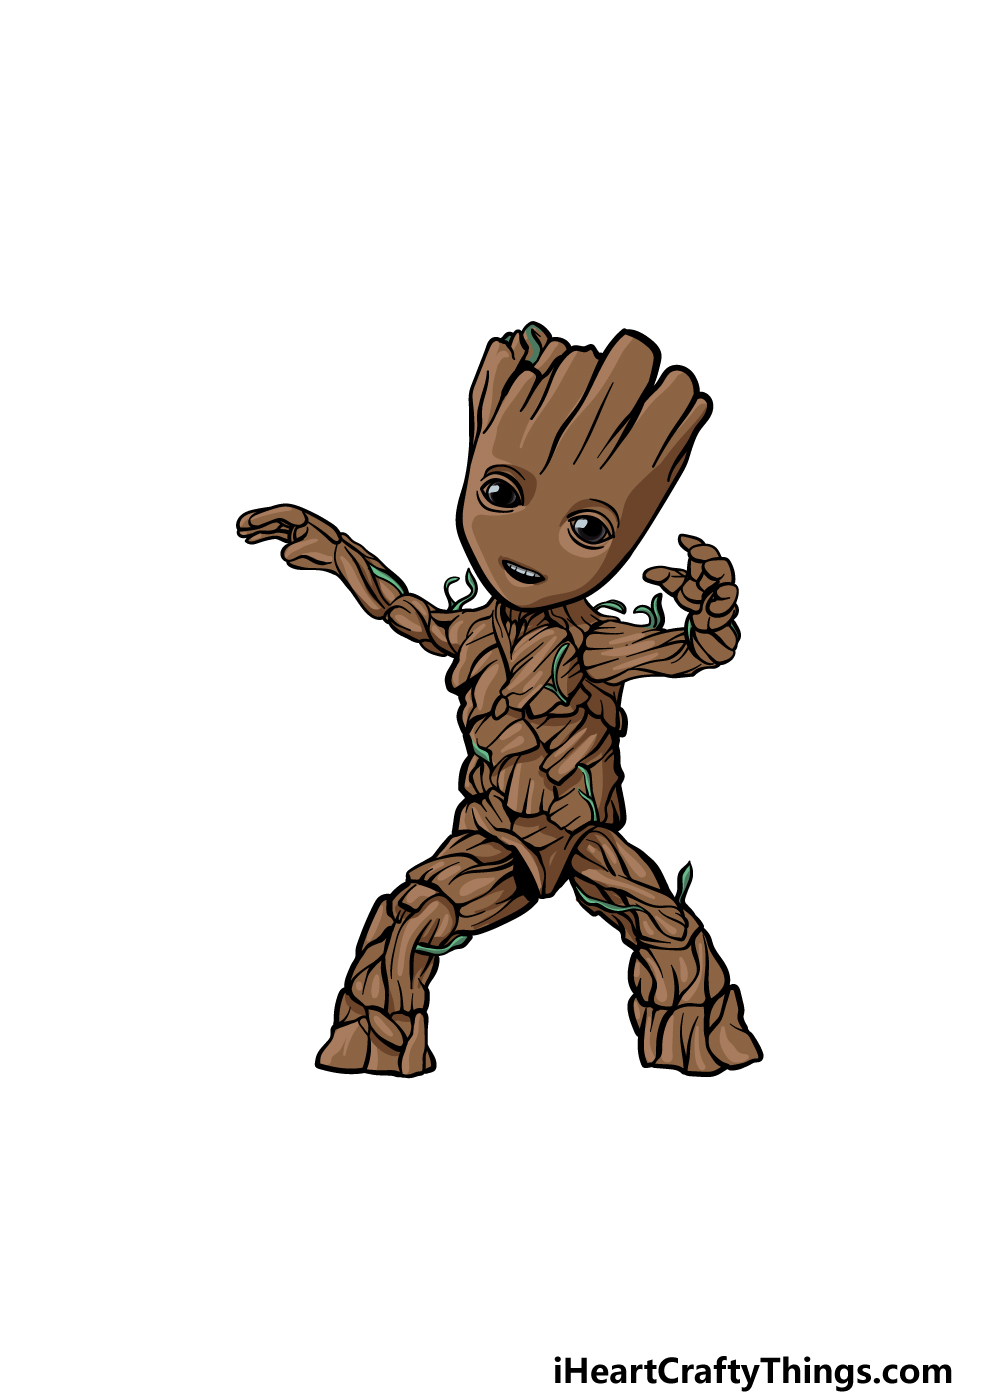
Baby Groot is often seen dancing, and we will be representing him doing a dance with how we position his legs.
As you can see in the reference image, the leg on the left will be slightly bent. In the next step, we will draw the next leg along with some final details.
Step 6 – Finish off your Baby Groot drawing
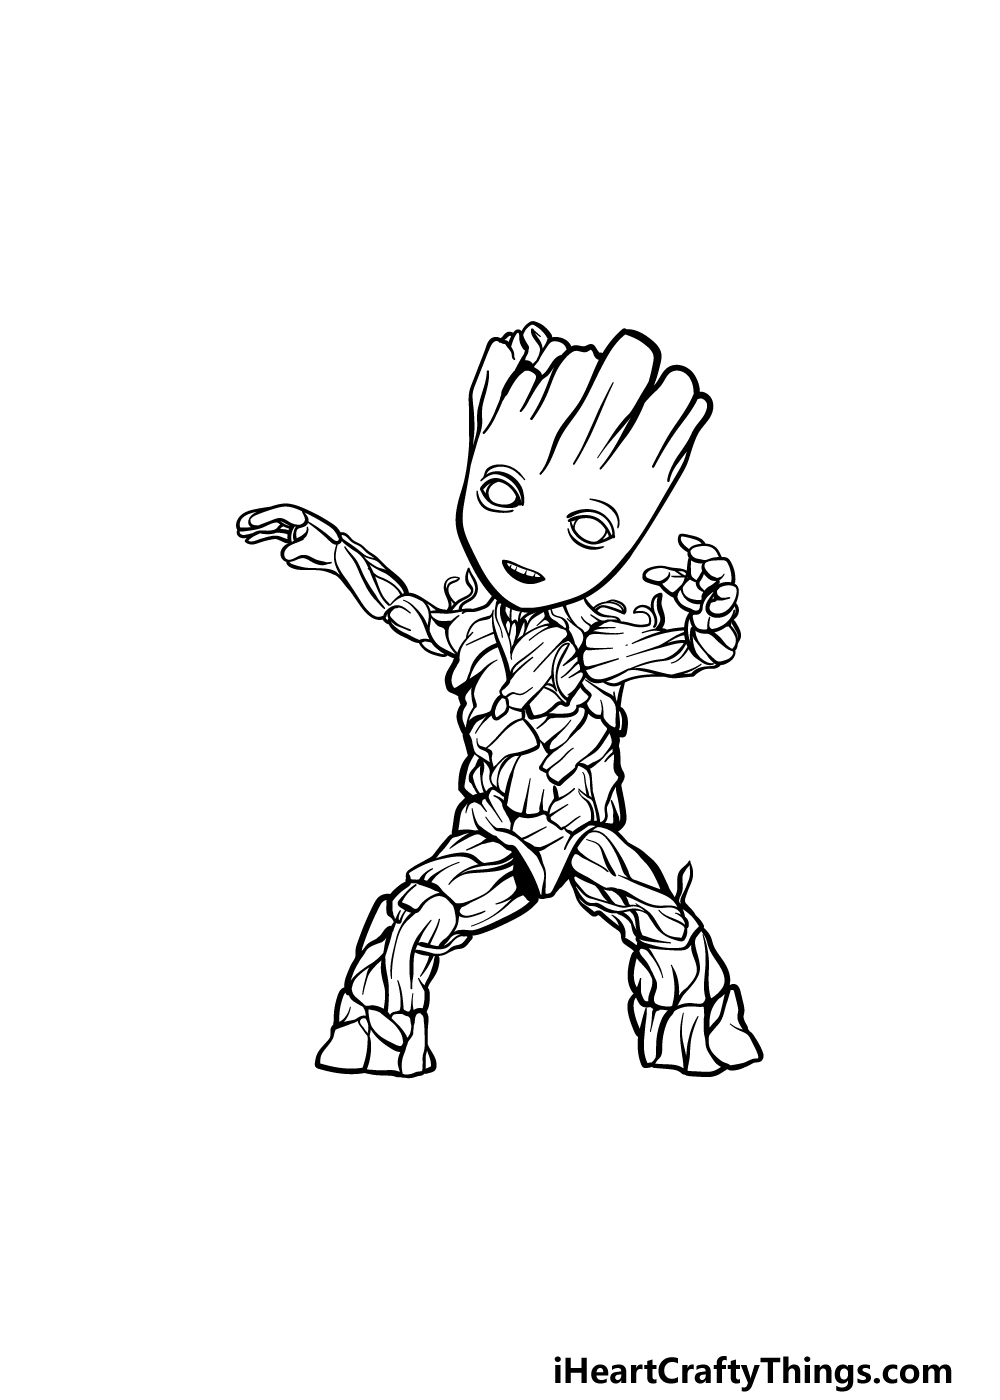
Now it’s time to finish off the final details and elements of your Baby Groot drawing in this step. First, we will be drawing the second leg for him.
This leg will look very similar to the one that you just drew, and it will also be bent outward so that he looks like he’s dancing. Then your picture is complete! You could also add some fun extra details of your own.
Groot is usually alongside his friend Rocket Raccoon, so maybe you could look up some pictures of that character and draw him beside his wooden pal.
What fun touches and details can you think of to finish this off?
Step 7 – Finish off your Baby Groot drawing with some color
In this final step of our guide on how to draw Baby Groot, we will be finishing him off with some color.
As you may imagine, we used a lot of brown to highlight his wooden appearance from the films and comics. We also added some touches of green throughout the image for some of the little sprouts and vines found all over him.
These are the colors that we chose, but you could also use some different shades and variations to suit your taste!
Playing around with art mediums is also a great way to experiment with the shades that you want.
There are more painterly mediums like acrylics and watercolors or others like colored pens and pencils that you could try out. Be sure to have fun as you finish off this image with your creativity!
4 More Ways To Make Your Baby Groot Drawing Unique
Dance with joy as we look at some ways to make your Baby Groot sketch even better!
If there’s one thing we know about Baby Groot, it’s that he loves to dance. This is shown in this drawing of Baby Groot as he shows off some moves.
He looks great here, but once you have the hang of this design you could show him pulling off some other favorite dance moves!
There are so many to choose from, so you should definitely start with some favorites you have.
What are some fancy moves he could pull off in order to make this drawing even cooler?
You can’t dance without some music, so you could show what Baby Groot is grooving to by adding some lyrics and music notes to this image.
Once again, you could pick from your favorites by picking a line or two from one of your favorite songs you like to dance to.
Maybe you could even draw a radio to show how he is listening to his music.
Which songs and lyrics would you choose to add to the background?
Once you have settled on the pose and music for your Baby Groot drawing, you could show where he is dancing by drawing a background. You would have so many fun settings to choose from!
These could come from the various movies Baby Groot has been in, or you could create a whole new setting for him to dance in.
Don’t be shy to get creative and have him in some wacky and creative environments!
Dancing is even more fun when done with friends, so you could add some pals to this Baby Groot sketch! The first choice would be his best friend, Rocket Raccoon.
You could also add characters like Star-Lord, Gamorra or Drax to fill out the Guardians roster. Or, you may like to include other characters from the Marvel universe to make this a real party!
Which characters would you like to see rocking out with Baby Groot in your artwork?
Your Baby Groot Drawing is Complete!
As we mentioned in the introduction, this character has achieved immense popularity in recent years. We hope that you had a lot of fun recreating him in this guide on how to draw Baby Groot!
There were lots of details to draw in this guide, but that’s why we tried to make it easier by breaking it down into smaller parts that make them easier to tackle.
Then it’s just up to you to finish off the final details, touches, colors and medium choices to put your own spin on it!
Then you’ll want to visit our website, as we have tons of amazing guides there for you, with more coming out all the time.
We would love to see your Baby Groot drawing when it’s done, so please share your artwork on our Facebook and Pinterest pages!