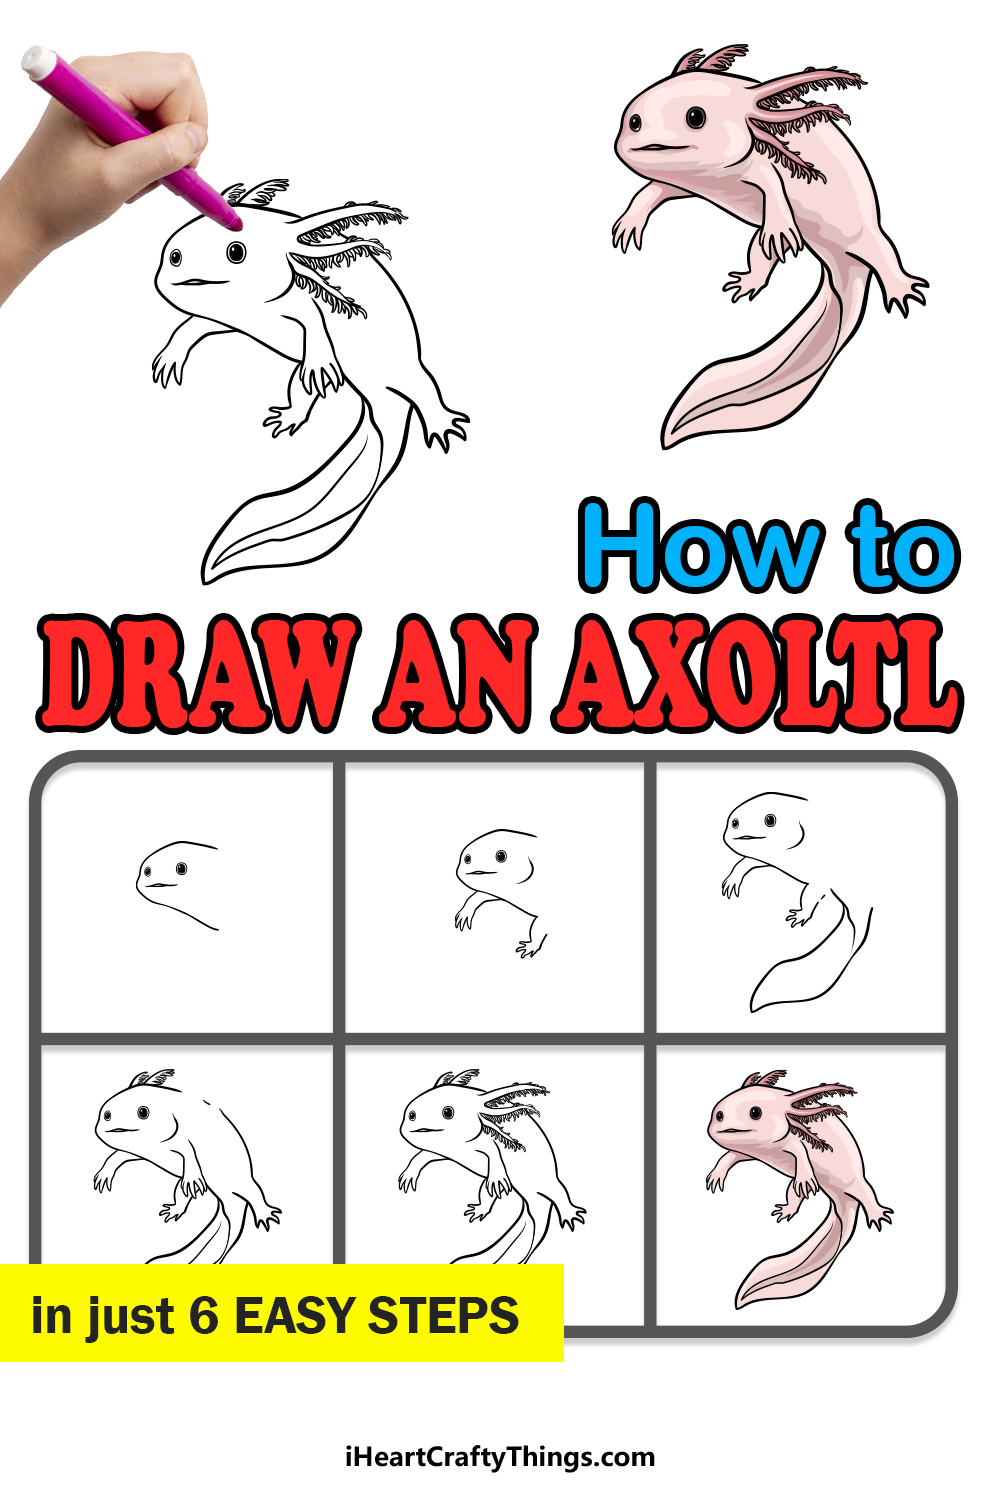
It may have a name that’s hard to spell, but learning how to draw an axolotl doesn’t have to be difficult! These steps for kids will make it much simpler to recreate this extraordinary creature.
If you ask me, the axolotl is one of the strangest looking creatures on the planet. They look like little aliens with their frog-like bodies and fins protruding from their heads.
Despite this bizarre appearance, they somehow manage to be incredibly cute. There is immense fascination with these creatures, and it’s easy to see why so many would like to draw them.
Their distinctive look can make this a tall order though, and that’s why I made this guide! If you love this creature as much as me, then you can follow along as I break down the easiest way to recreate this little guy.
Let’s begin and see how it’s done!
Watch This Guide To See How To Make Your Axolotl Drawing
How to Draw An Axolotl – Let’s Get Started!
Step 1
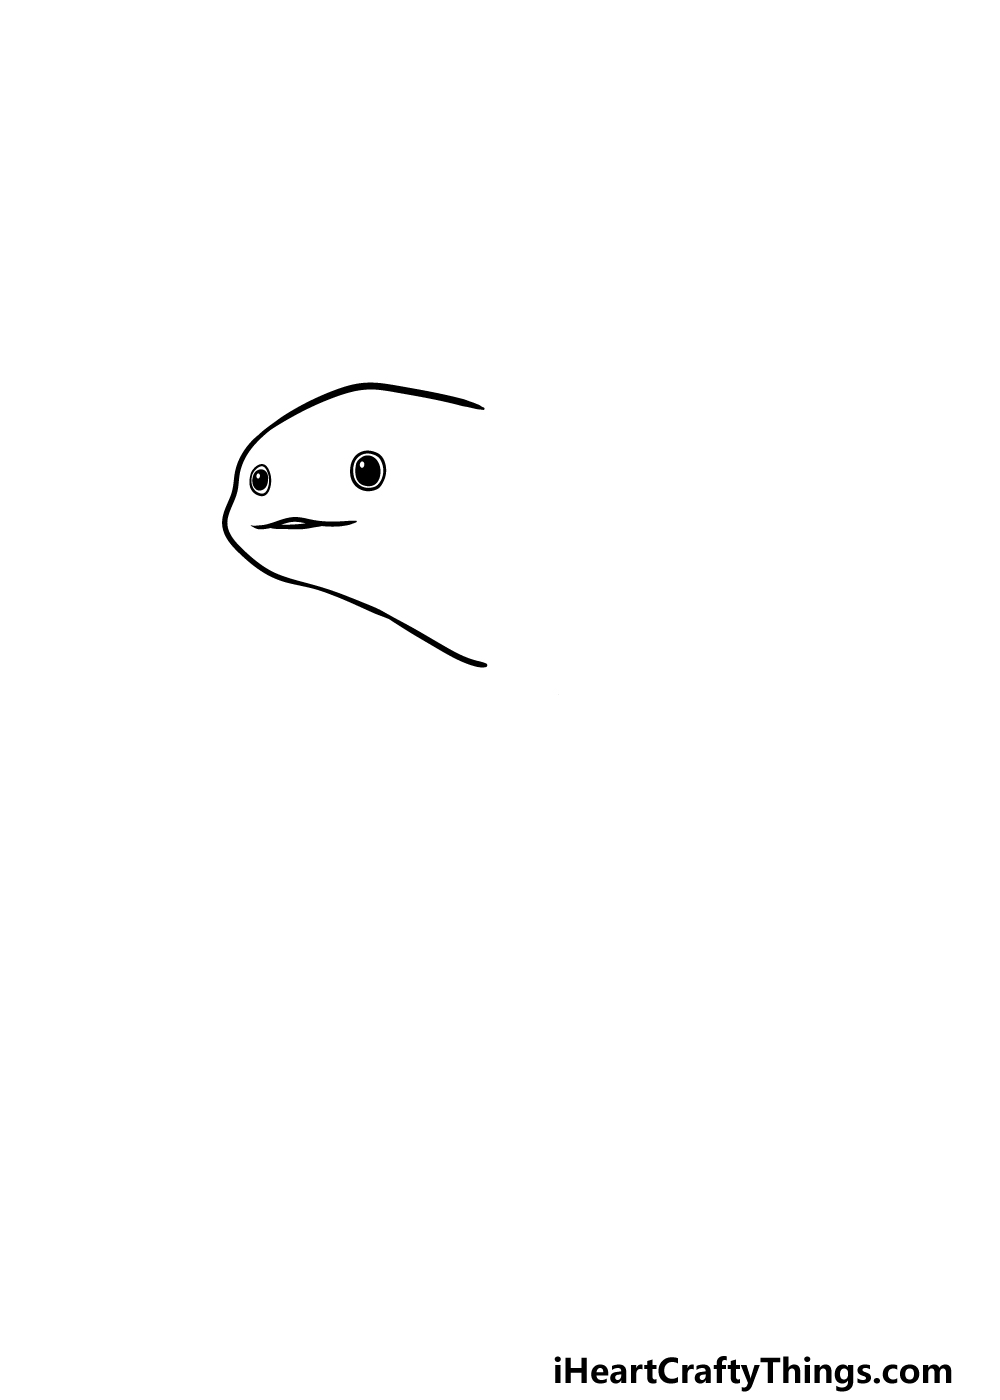
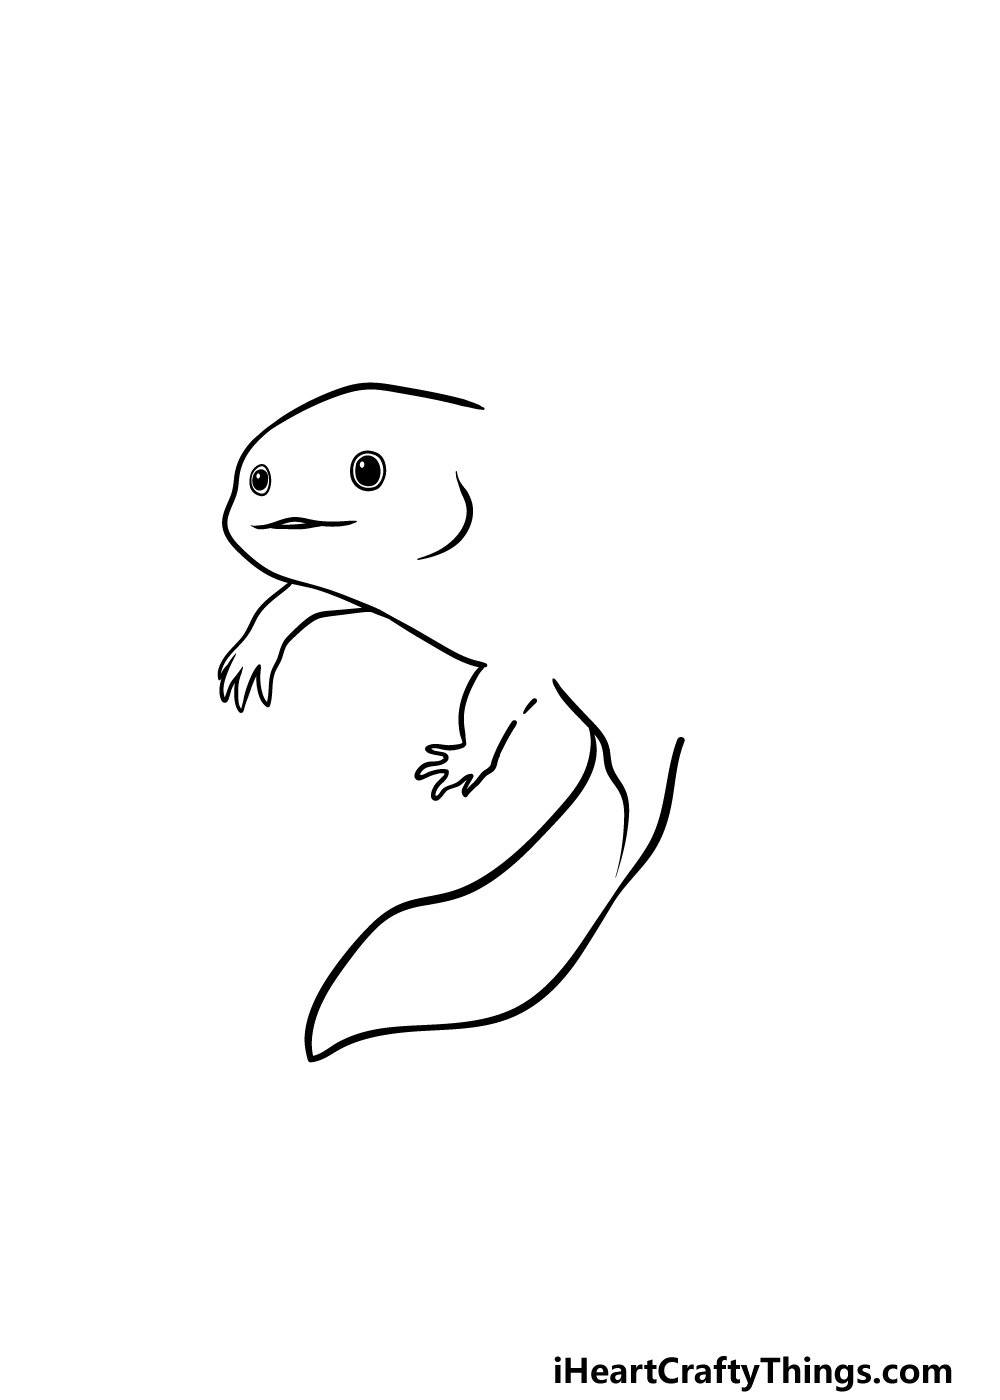
In this first step of our guide on how to draw an axolotl, we will be starting with the head and face of the animal. First, start off with two small, solid black oval shapes.
These will form the large pupils of the eyes, and you can then surround them with a circular outline.
Then, we will be using a curved line for the top of the mouth, with another smaller line for the base of the mouth.
Once you have drawn that, you can then begin on the outline for the head, which you can draw with a curved line.
The head of the axolotl is quite squat and thick, and it is attached to an almost nonexistent neck. Once you have these aspects completed you can move on to step 2!
Step 2 – Next, draw the front legs and gills
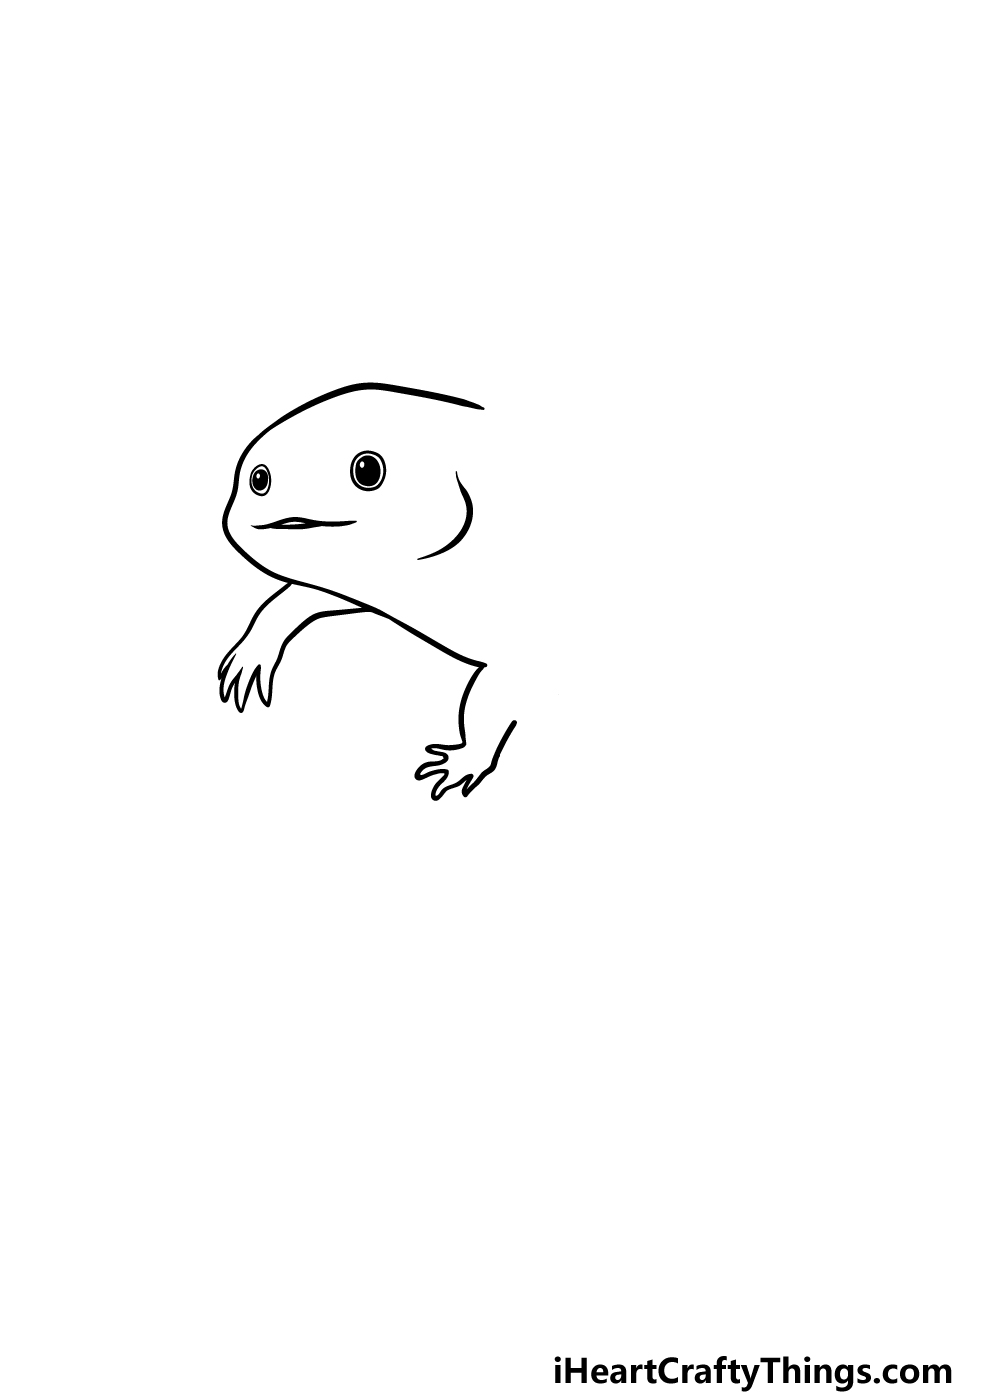
For this second part of your axolotl drawing, we will be adding the front legs to the animal. The legs are fairly short with pointy, webbed toes.
They will also be positioned quite limply at the side to make it look like it is floating in water.
Once you have drawn the legs as they appear in the reference picture, you can add a curved line for the gill on the side of the body.
Step 3 – Draw the large tail for the axolotl
The axolotl has a large, thick tail that it uses to propel itself through the water. We will be drawing this tail for this third part of our guide on how to draw an axolotl.
First, use a smaller curved line for the base of the tail where it will attach to the body. Then, use another longer curved and slightly wavy line for the tail, and draw a point at the end of it.
Step 4 – Draw the other leg and start the body
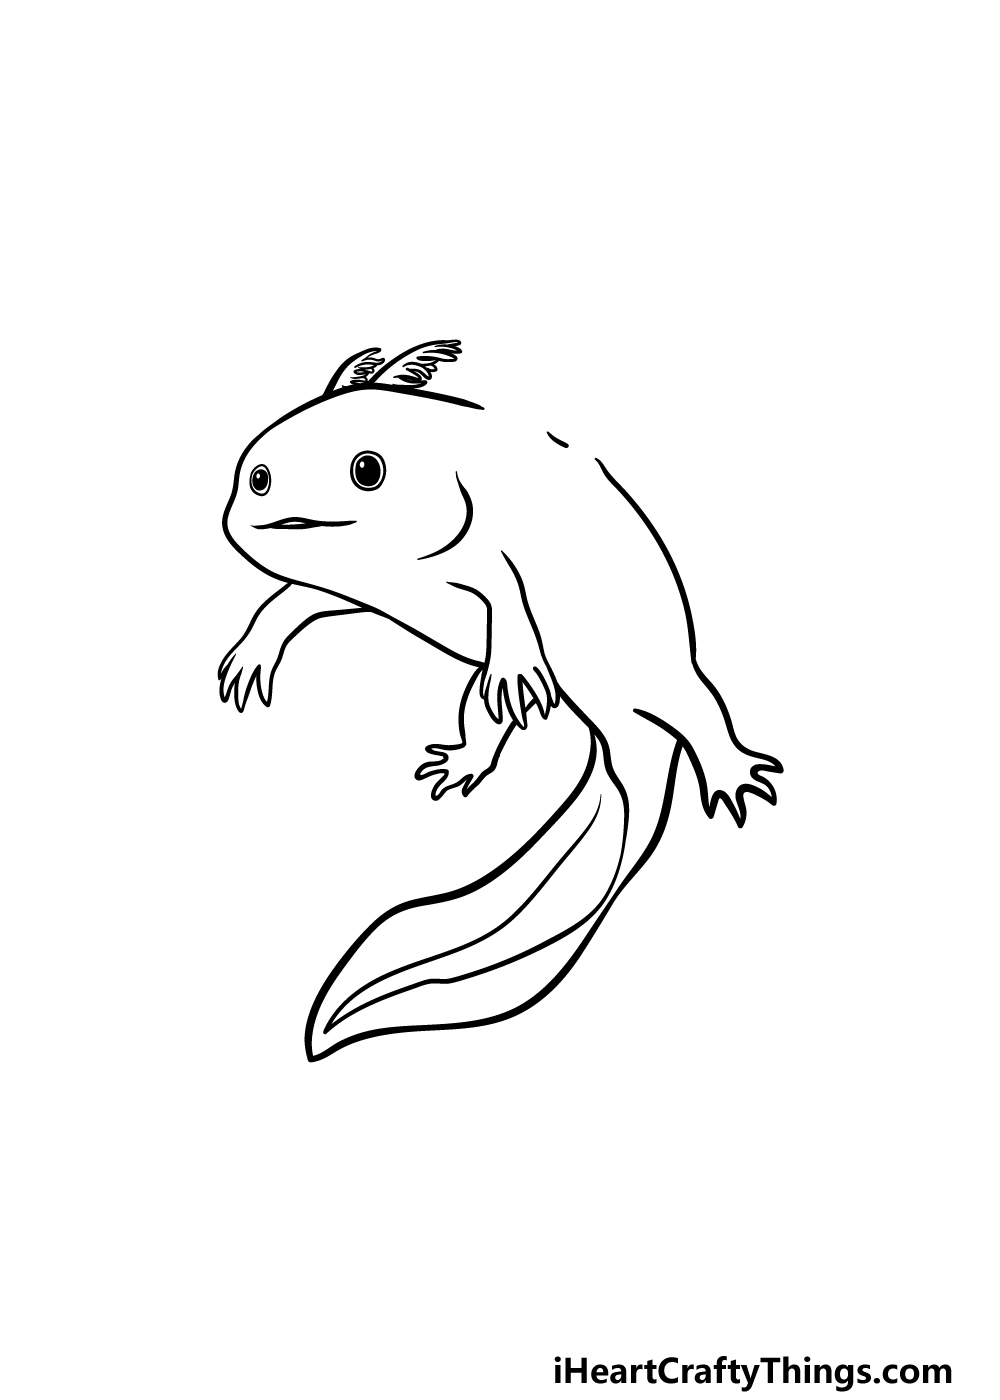
We will be adding quite a lot to the axolotl drawing in this fourth step, so let’s take it nice and slowly!
First, draw another leg for the front of the axolotl. This leg will look very similar to the other front leg, and will fill in the space left near the base of the body and the back leg.
Then, you can draw another shorter back leg for the axolotl, and then extend a curved line up from it for the back of the animal.
Finally, add some more curved lines with smaller shapes extending from it for the first fins on top of the head.
In the next step we will be adding some final details to finish off before you start coloring!
Step 5 – Finish off your axolotl drawing
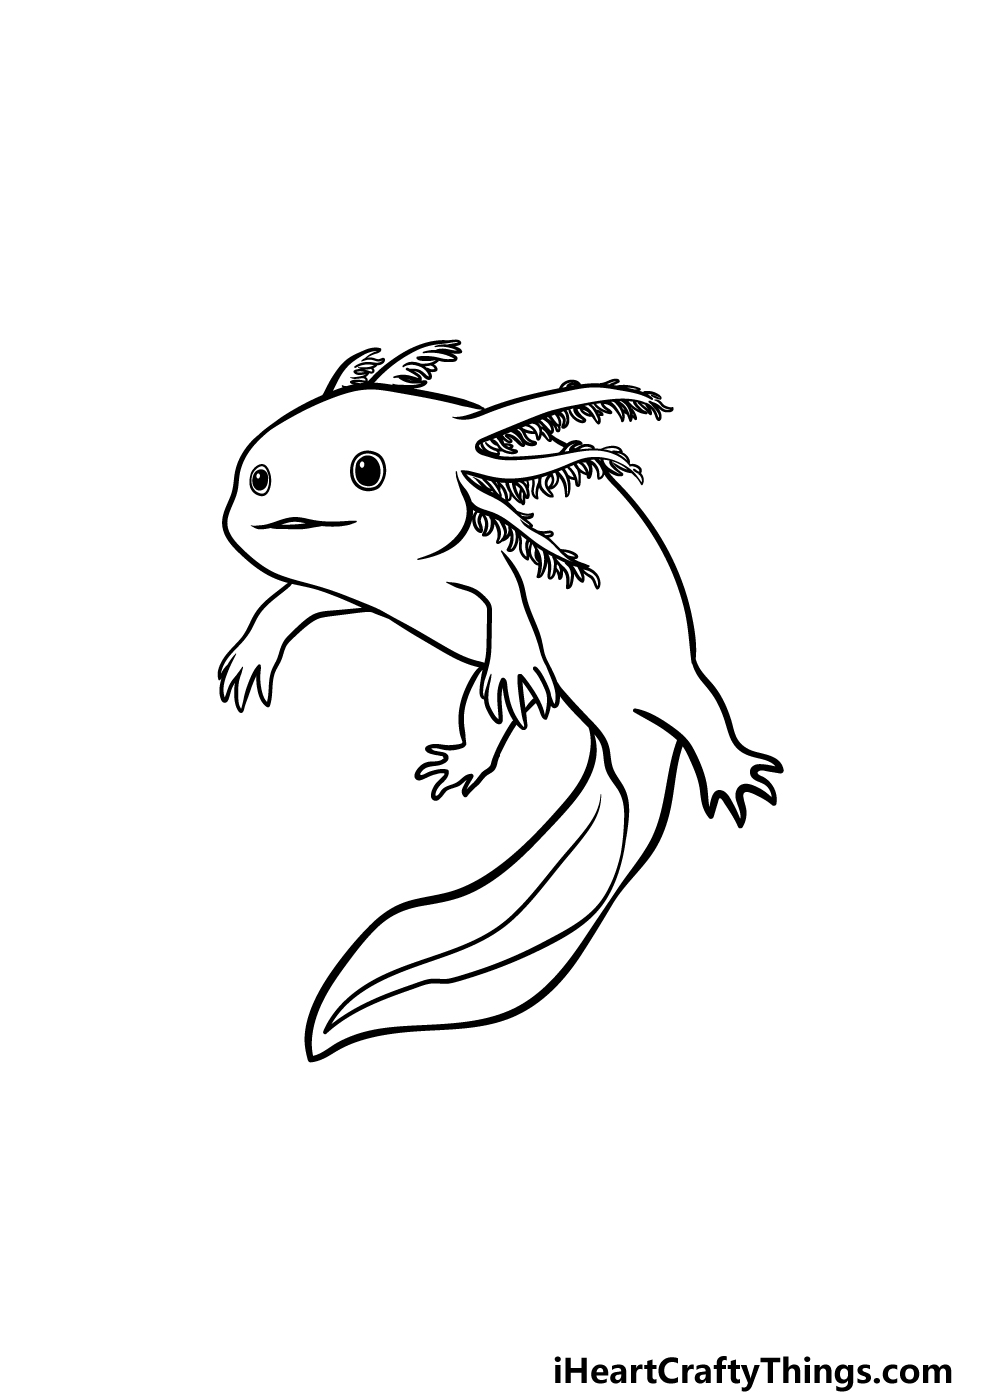
This step of our guide on how to draw an axolotl will see you finishing it off with some final details.
One of the most distinguishing features of the axolotl is the multitude of unusual fins that poke off the head and body, and you have already drawn a few of these protrusions in this guide.
We will draw the rest along with some final details and touches in this step.
There are some spaces left in the head and upper back of the axolotl, and we will be filling up these species with some tendril-like fins.
As with the previous examples of these fins, they will be drawn with some curved liens with lots of little rounded shapes poking off of them.
Once these are drawn, you have completed all of the details in this guide! Before you move on to the final step, you could also add some details and elements of your own to finish it off.
You could draw a background to show the environment that the axolotl is swimming in, and this would be a great chance to draw some more of your favorite aquatic creatures alongside it!
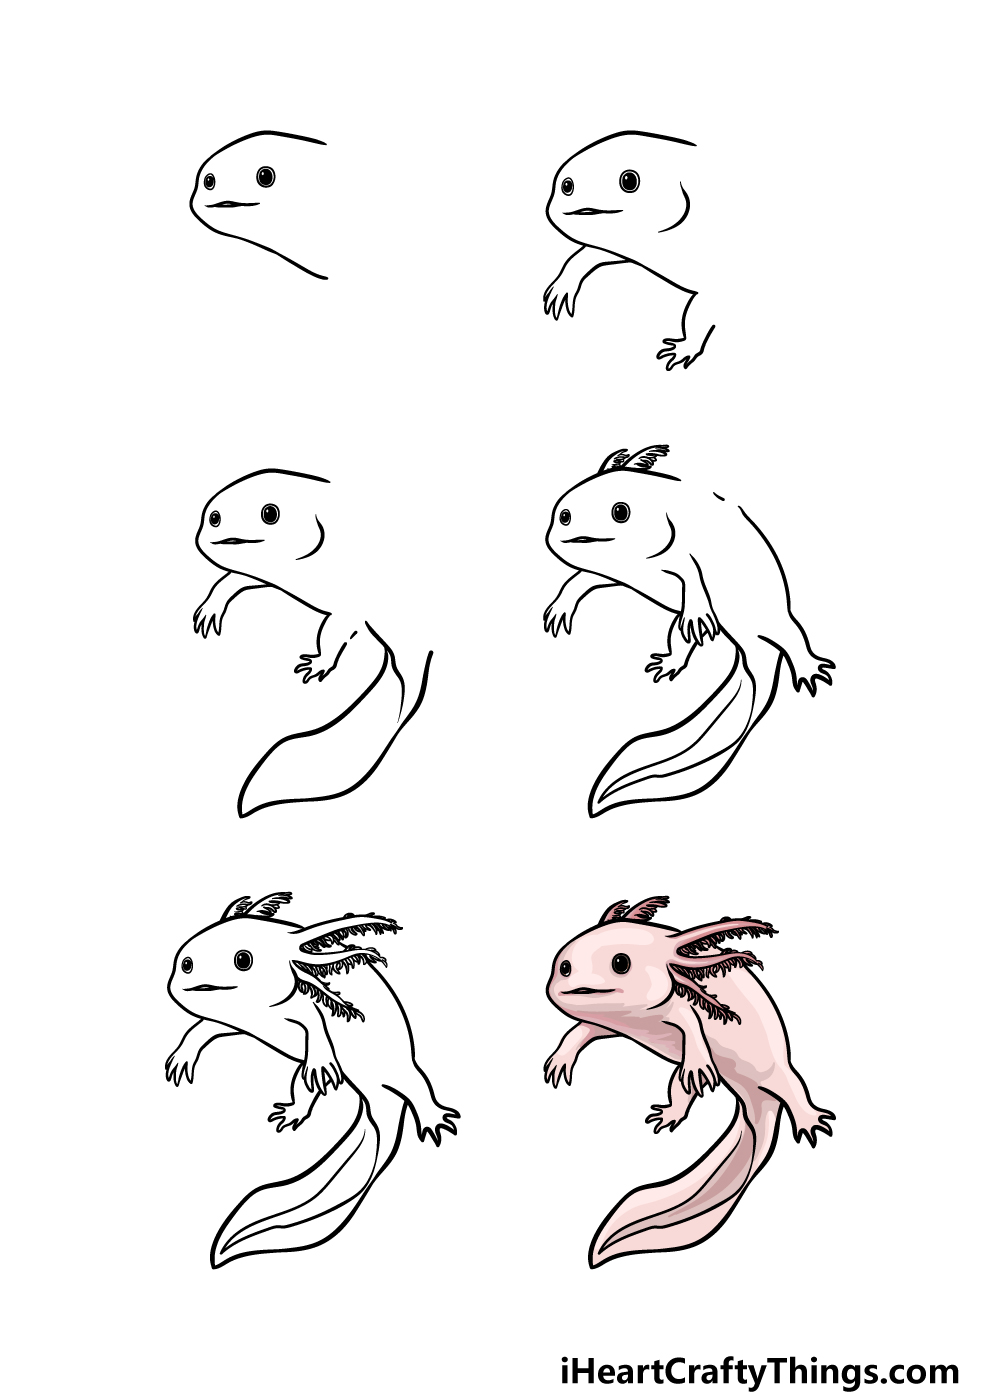
Step 6 – Finish off your axolotl drawing with some color
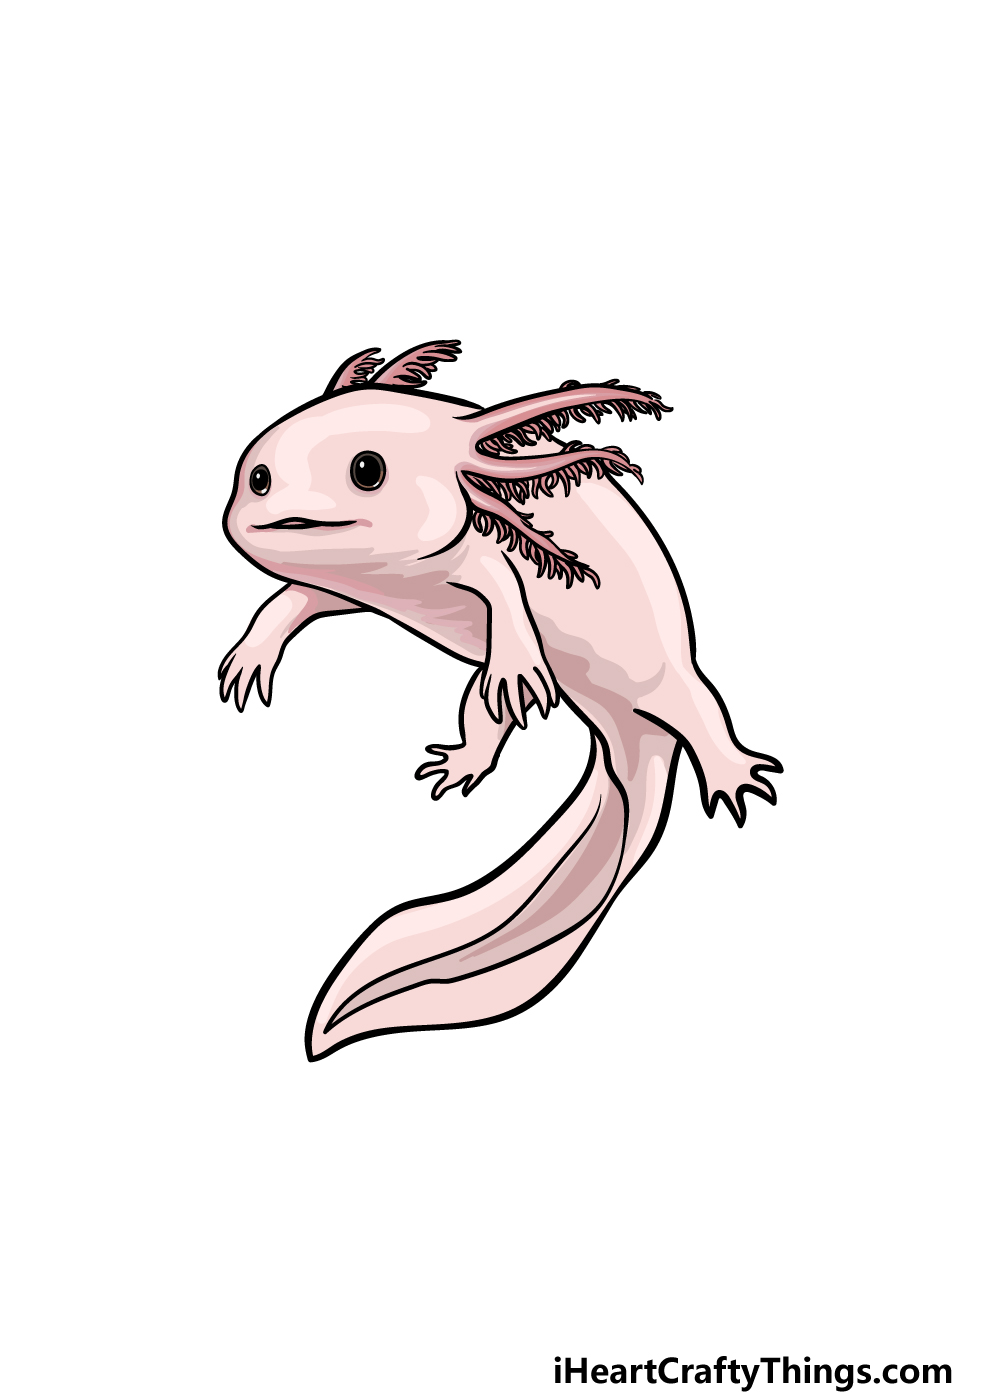
We will be finishing off your axolotl drawing in this final step of our guide. The axolotl can come in many different, incredible color combinations and shades, so this gives you a lot of freedom with how you can color in your own drawing.
In our reference image, we went with a lovely soft pink color for it, but this is just one option that you could go for.
You could make it as colorful or subdued as you like, and once you have decided on the colors it’s just a matter of deciding which art mediums you will use to achieve the colors.
You could use ones like acrylic paints or colored pens for brighter shades, while colored pencils and watercolor paints would be great for more subdued, subtle colors. Which approach will you take for this drawing?
Here’s how you can make your axolotl drawing even better…
Make this extraordinary animal look even better with these helpful tips!
For this axolotl drawing, we tried to keep it looking simple and realistic. Despite this, once you have finished the design you can add some extra details.
These could be markings on its body, some lines on its skin or maybe some more antennae on its head.
You could even go for a more stylistic look and cover it in some fun patterns and other designs! What would you like to add to this cute axolotl?
Another way that you could make this axolotl look even better would be to draw a background setting for it to be a part of.
These animals are amphibious, so you have a few options of how you could portray it. It could be crawling around in the mud, or maybe it could be swimming in some beautiful blue water!
You could also go for a more abstract and creative setting if you prefer. It’s up to you, and anything you choose will look amazing.
Next, you could make this axolotl sketch even better by adding some friends for it to interact with. These could include some more axolotls, or you could draw some fish, frogs or other creatures.
If you created a background scene as we suggested in the previous step, then they could all be a part of this background. There are so many fun scenes and settings you could create for this!
When you are happy with how this drawing of an axolotl looks, you can then decide on the colors you will use.
We showed you a realistic light pink for this example, but you could use any colors you like. They come in different colors in real life, so you have options even if you want to stay realistic.
Or you could use some bright and vibrant colors to bring it to life. Whether you use bright markers or some muted watercolors and colored pencils, we know it will look amazing!
We look forward to seeing what you choose.
Your Axolotl Drawing is Complete!
You have completed all six steps of our guide on how to draw an axolotl, and you have completed an incredible drawing at the end of it!
We aimed to make it so that drawing this incredible creature would be fun and easy for you to do, and hopefully we achieved this goal for you.
Don’t forget that you can also add some details and elements of your own to put your own personal touch on this picture. What do you think you will add to finish off your picture?
When you are ready for more drawing fun, there are some amazing guides for you to enjoy on our website. We upload new ones often as well, so be sure to check in frequently to never miss out!
Once your axolotl drawing is complete, you can let us see your artwork by sharing it on our Facebook and Pinterest pages!