While anime can come in many different styles, it tends to show us an exaggerated version of reality. This can be done in the way that characters dress and in how they look.
Often, anime characters will also have incredible hairstyles that defy the laws of physics. It may not be super realistic, but it certainly looks really cool and interesting!
Because these hairstyles can be so unique, it can also be a real challenge to learn how to draw anime girls hair.
While it’s certainly not the easiest thing to do, it can be made much easier when you know what to do!
That’s exactly what we’re here to do, as this guide will show you how to draw a really cool anime girl hairstyle.
Then, you could change it and customize it to recreate your favorite anime girl hairstyle or make a new one of your own design.
There is a lot of fun to be had in this guide, so grab your favorite drawing and coloring tools and let’s get started with the first step of the guide!
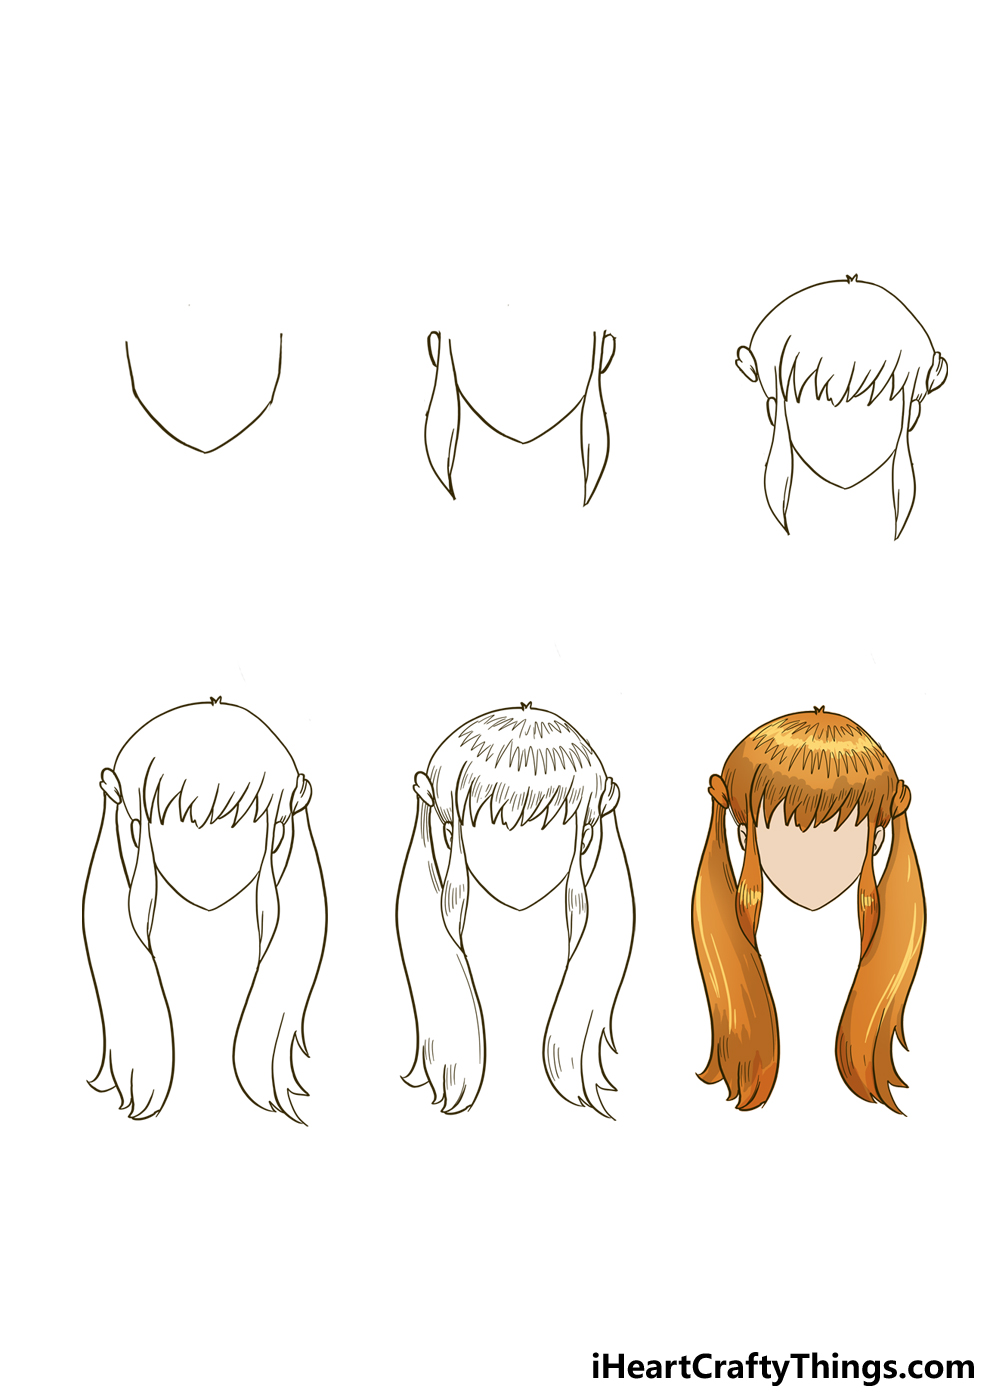
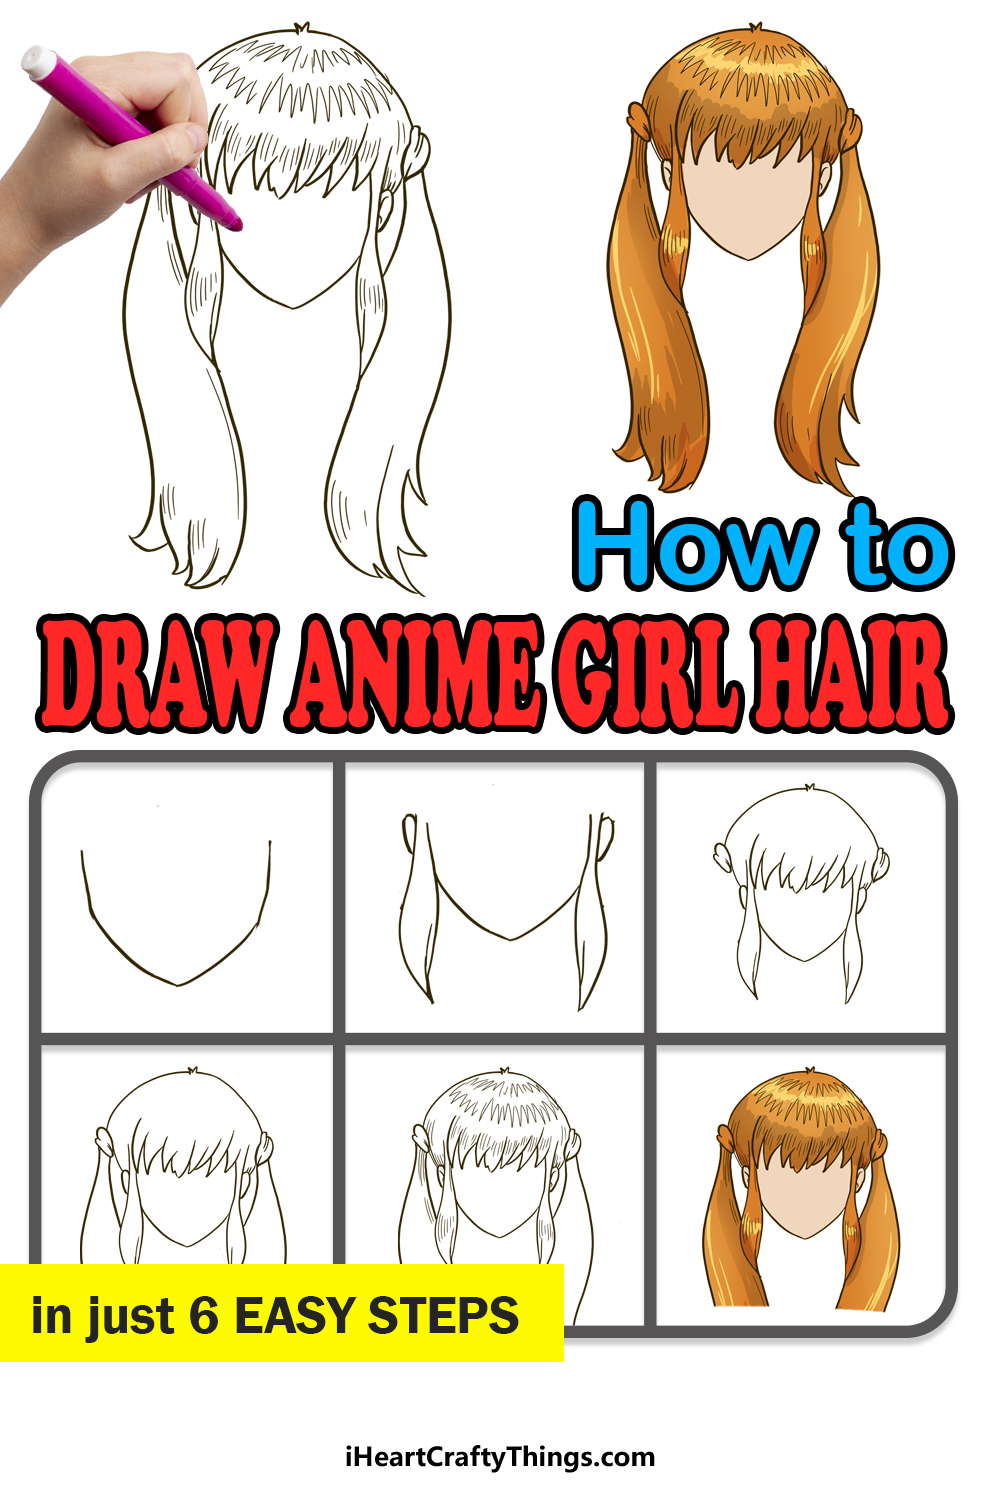
How to Draw Anime Girls Hair – Let’s get Started!
Step 1
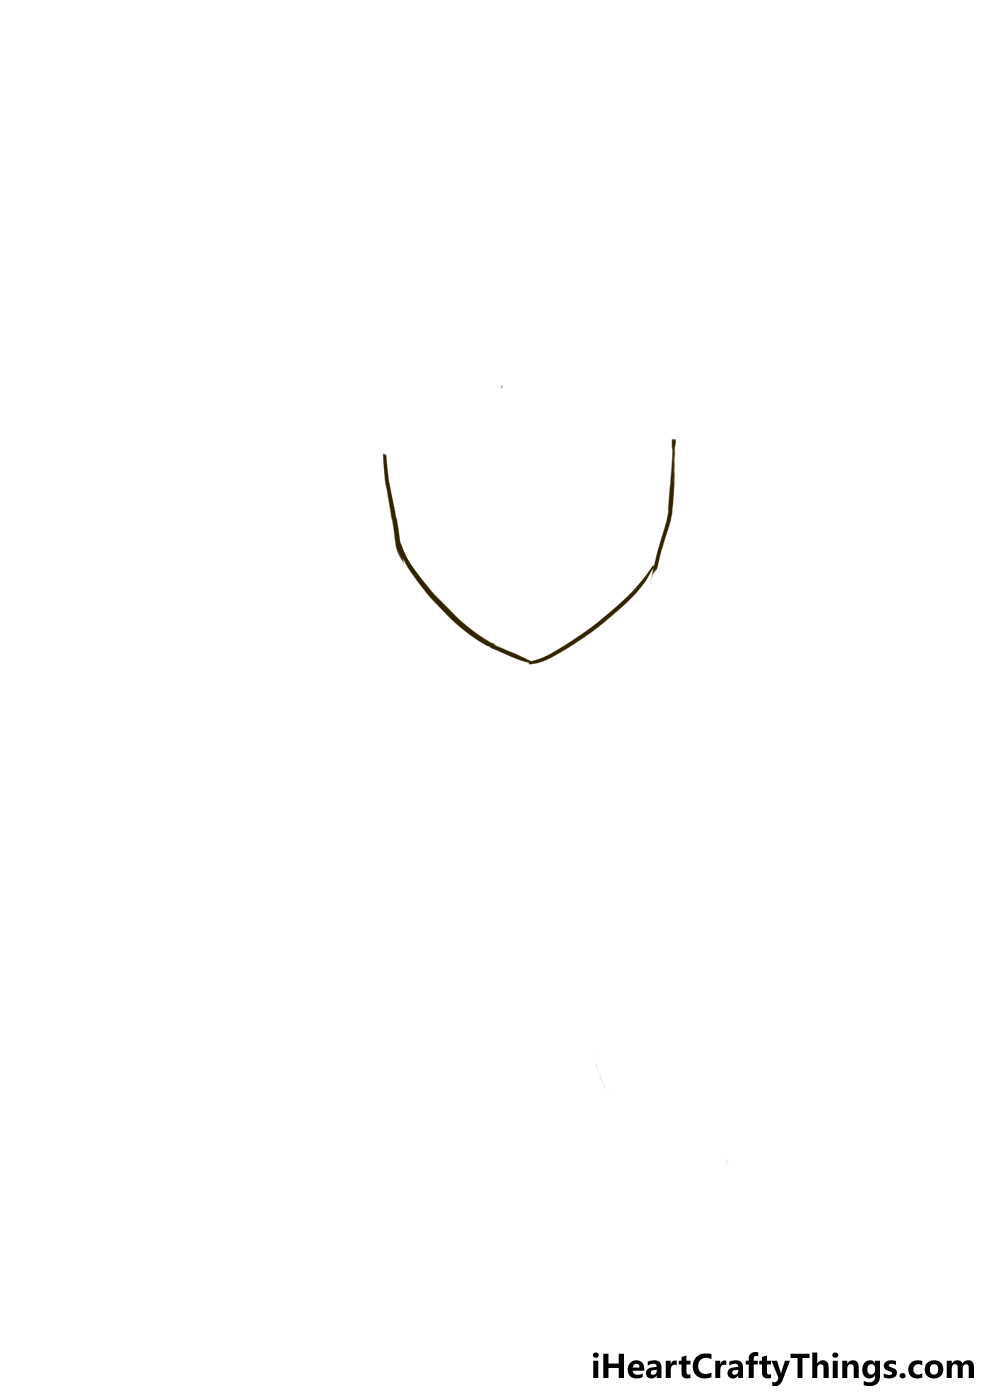
The first step of creating this anime girls hair drawing will not involve drawing the hair at all, but rather the outline of the face.
The focus of the drawing will not be on the face, but the outline will help regardless.
Before you begin, you can make things much easier on yourself by using a pencil to prepare the shape of the face. As you will see in the reference image, the head has a squared jaw with a pointy chin.
You can keep this in mind as you draw a rough head shape, and then you could add a rounded portion for the top of the head, even though we won’t see that beneath the hair later.
This is just to give you an idea of how the hair will relate to the head later on in the guide. Now, you can draw the actual start of the face outline with your pen or with a darker pencil.
As we mentioned before, the jaw on the sides of the face will be quite straight and angular, and there will be a pointy chin at the base of the face.
That’s all there is to it for now, and next we will start drawing the hair itself.
Step 2: Draw the start of the hair and ears
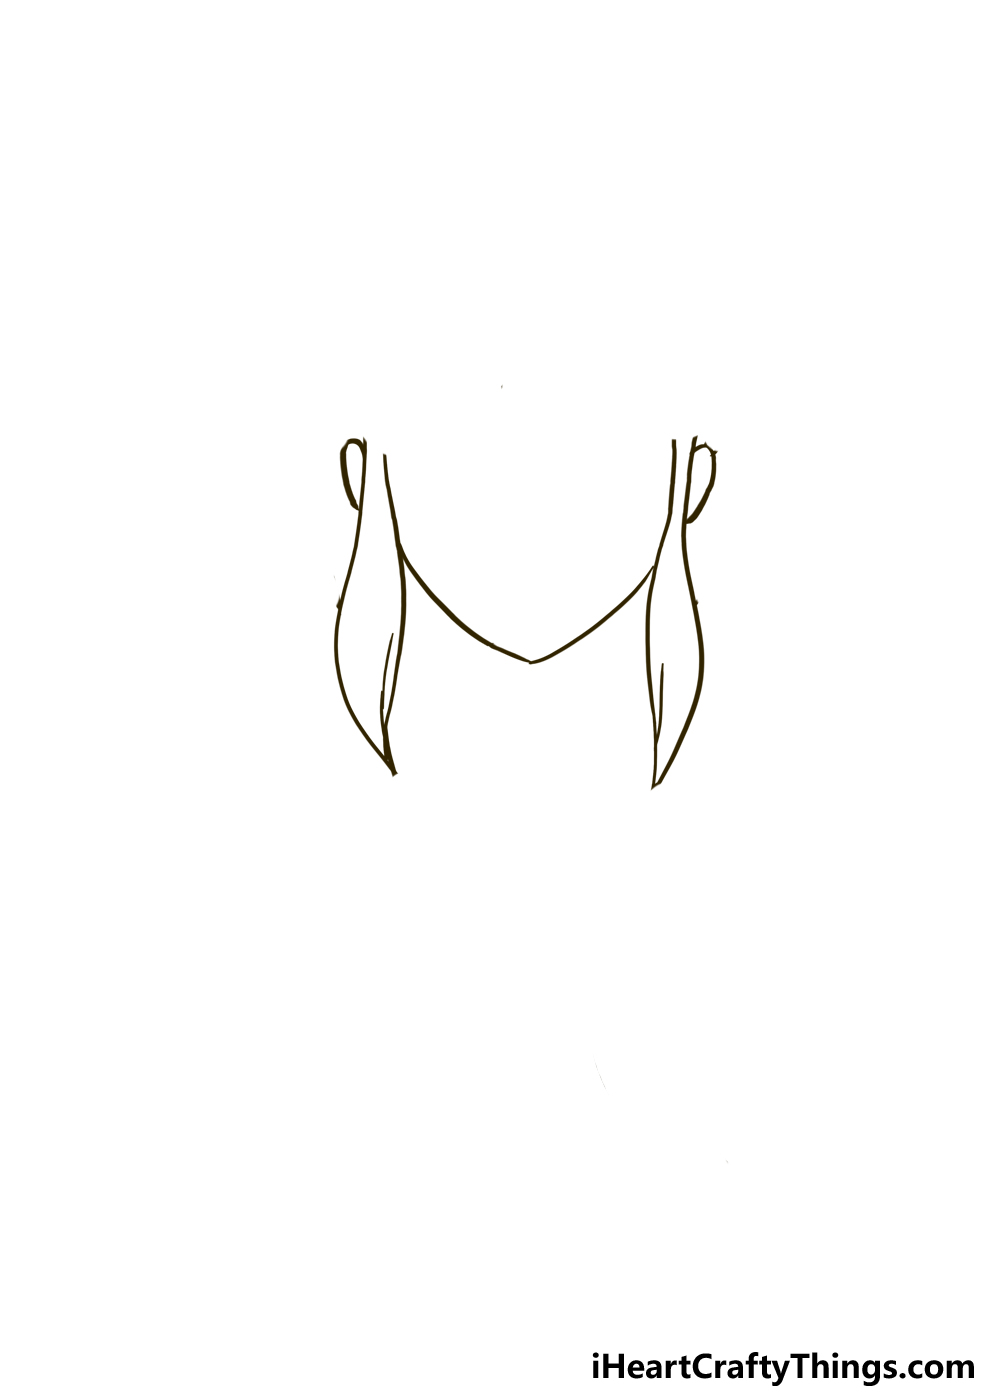
Now we’re ready to start drawing the hair itself. This hairstyle has a few different elements to it, and in this step we will be drawing two thick strands coming down on either side of the head.
Start by drawing a fairly wavy line on the inner edge of each side of her head. This line will extend down from the actual lines of her jaw that you drew in the first step.
Next, we will start another line at the center of each strand that ends in a pointy tip at the base of each strand.
The pointy tips will extend up again in another wavy line to form the outer portion of each strand.
If it sounds complicated at all, the reference images will help to make it clearer! The outer edges of each strand will extend just a tiny bit higher than where the jawline ended in the first step.
That will do it for these strands of hair, but we‘re not quite done yet. The last thing we need to do in this step is to add the ears of the character.
Simply add a small rounded shape attached to the hair strands on each side to add the ears and then we’re done! Now we can move on to step 3 and keep building this anime hairstyle.
Step 3: Add the top part of her hair and her fringe
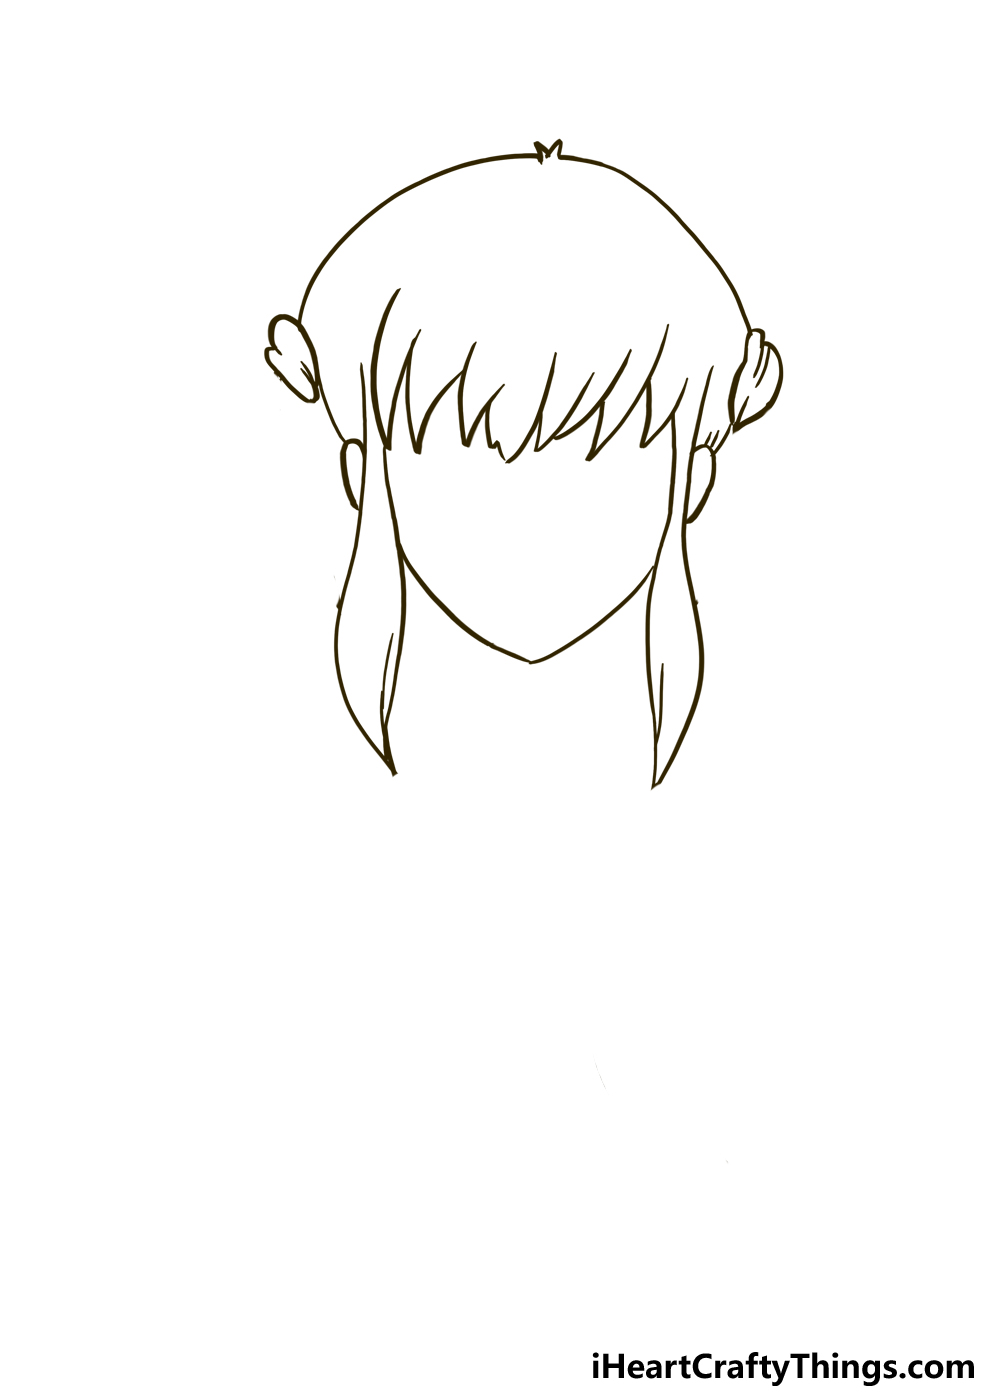
We’re adding a lot in this next step, so let’s take it nice and slow! This step will be a lot easier if you decided to draw the rough shape of the head as we suggested in the first step.
That will make this drawing of anime girls hair much easier, as it will help to ensure that everything is in proportion. First, extend a curved line up from each ear, as shown in the reference image.
Keep each line extending up gradually to form the top of her hairstyle. These lines will meet at the center where you can add two small little jagged shapes.
Next, we will add a small rounded shape at the outer edge of each side of her head. These shapes will be the bases of the ponytails that we will be drawing in the next few steps.
As you will see in our reference image, these aren’t perfectly identical to one another, and this helps to make them look just a little bit more realistic.
There are also some smaller detail lines drawn on each of these rounded shapes. Then, we will draw the fringe for this character.
You will notice that the fringe is very jagged and pointy, which is a common style for anime hair. You can draw each spiky portion using some simple curved lines that connect to one another as shown in the reference picture.
These spikes don’t have to look identical to how ours did, and you can play around with it a bit. Then, it’s time for step 4, so let’s proceed.
Step 4: Now draw the outline for the ponytails
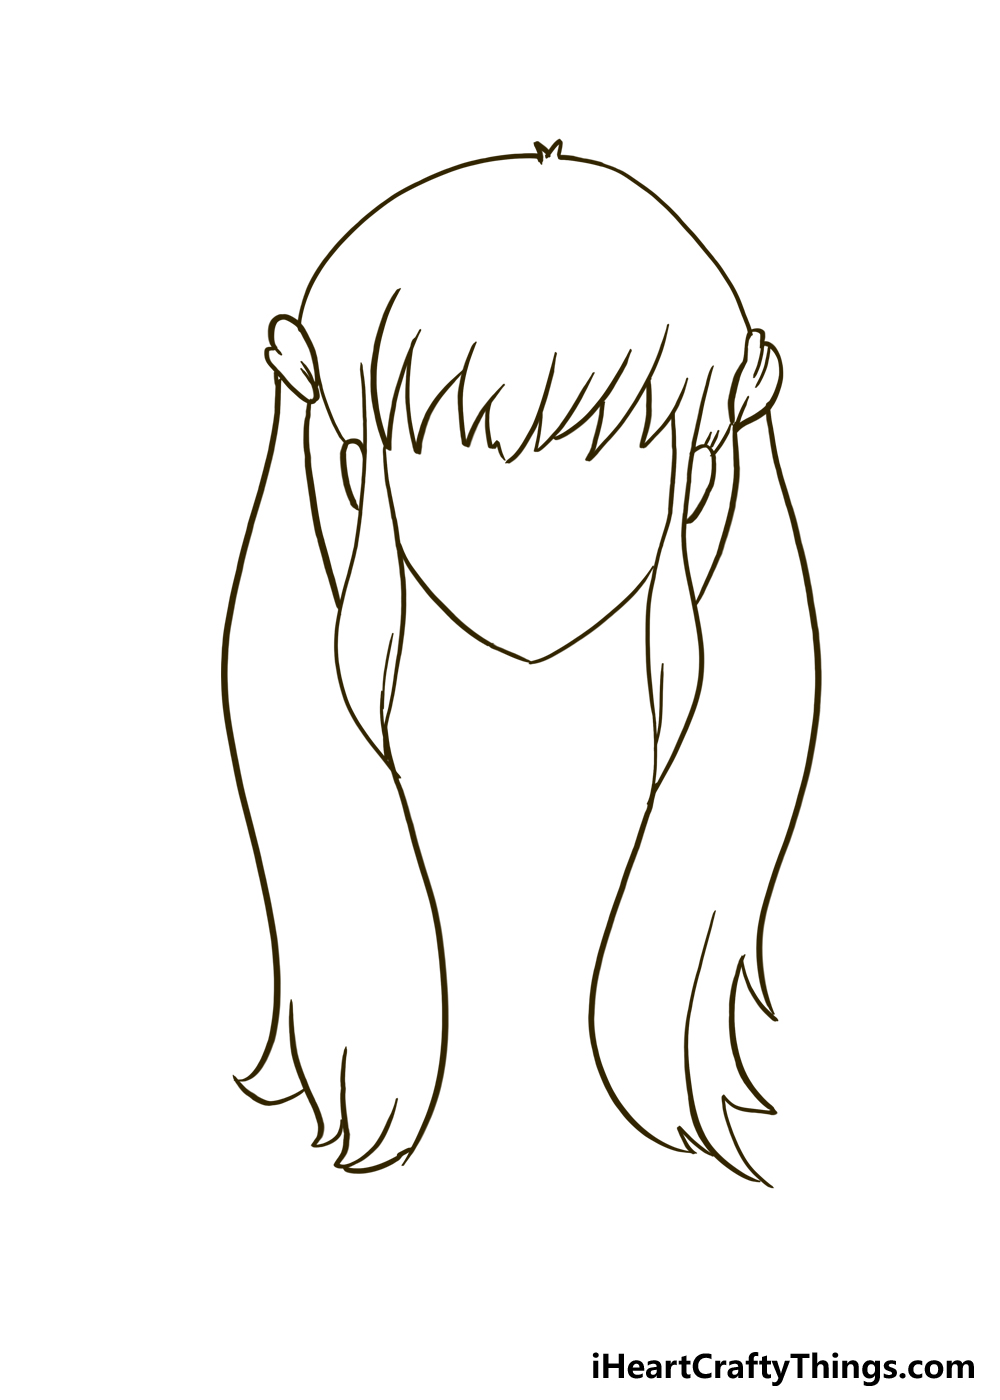
This hairstyle that we are drawing has some pretty impressive ponytails, one on each side of the head.
These are quite a distinctive part of the hairstyle, and they are inspired by the famous Sailor Moon hairstyle.
Each ponytail will extend down from the rounded portions we drew on the side of her hair in the previous step.
The ponytails will start fairly thin at the base and then get thicker as they extend down.
The sides will be quite wavy, and will each end in a fairly thick portion. At the base of each ponytail, you will add some more of those pointy shapes that we added in the fringe earlier.
Once again, these don’t need to match how ours look exactly. You can play around with them and maybe make them flatter or even pointier depending on what you prefer!
We also won’t be needing the pencil lines you may have drawn to plan out the head shape earlier, so you can go ahead and erase those if you went for that suggestion.
Just be cautious as you erase these, as there are a few ways it can go wrong. For example, if you don’t wait for the pen ink to dry completely then you could smudge the ink.
Or, if you used a darker pencil for the final lines instead of a pen, you could accidentally erase parts of the final drawing that you don’t mean to.
As long as you’re careful, it should be okay! When you’re ready, we can then move on and add some final touches to the hairstyle to prepare you for some coloring fun in the final step of this guide.
Step 5: Draw the final details of the hairstyle
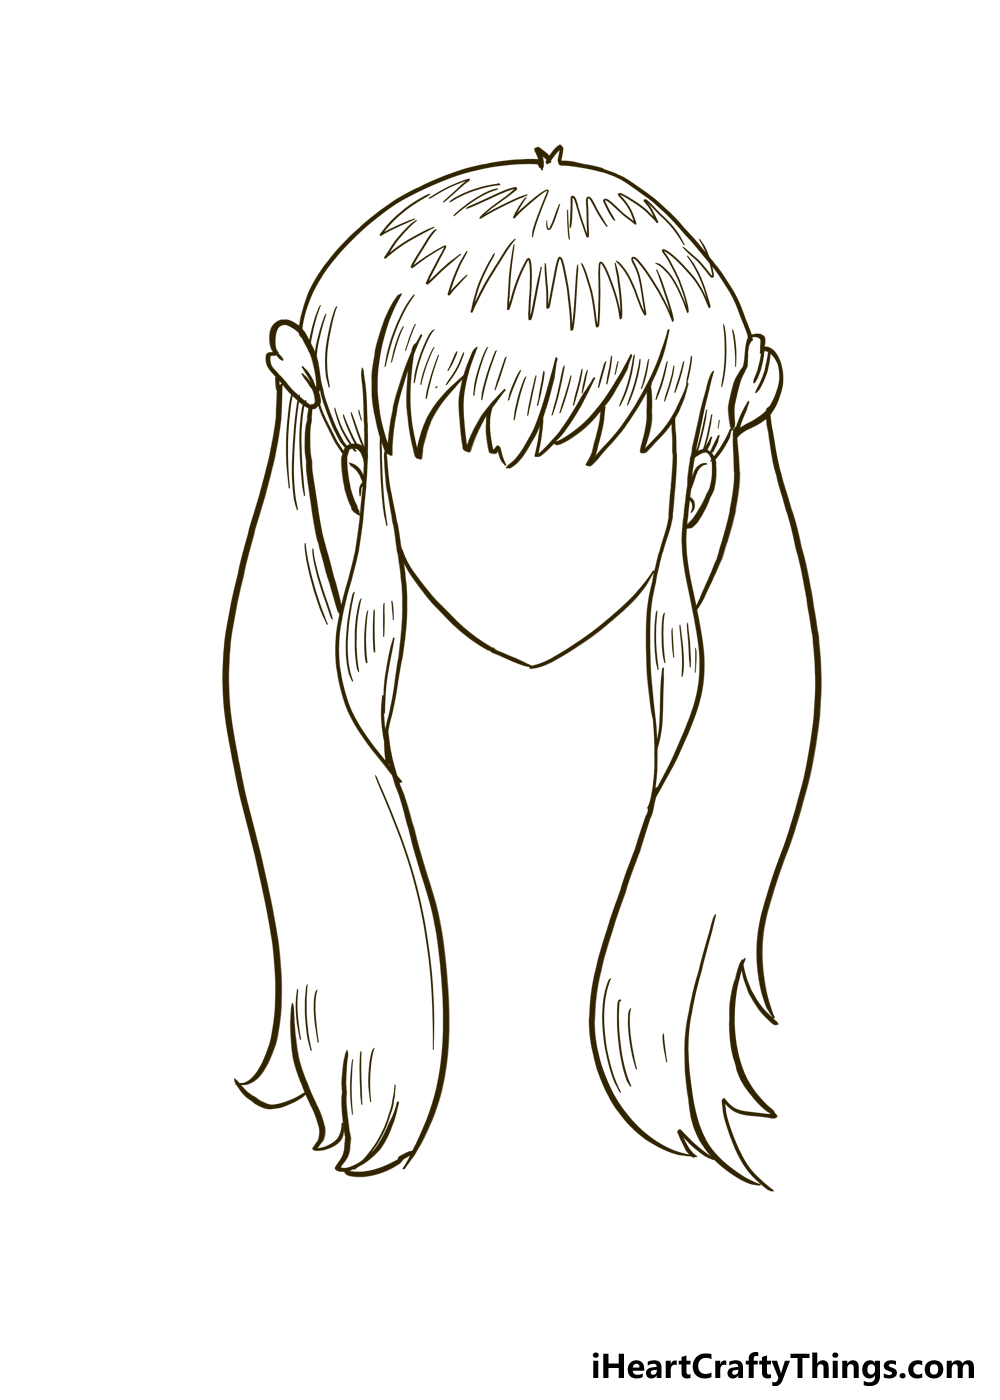
This hairstyle is looking amazing so far, but right now it is looking a bit flat and lifeless. No need to worry, however, as we will fix that soon enough.
In this step, we will add lots of simple yet effective line details to bring this hairstyle to life. Let’s start with some of the simpler details.
First, add a series of thin, wavy lines to the strands coming down from her ears. Next, we will draw some similar line details throughout the large ponytails coming down from the sides of her head.
In our design, we kept these fairly limited, staying mostly to the sides and base of each ponytail. As always, you could customize this aspect a bit as you please, adding more of these lines or less if you like.
Then, we will finish off with some line details on the interior of the hair. First, add a series of smaller, thin lines along the pointy edges of her fringe.
Next, you can draw two layers of sharply pointy shapes on the interior of her hairstyle, as shown in our example.
These details may have looked quite complex at first, but when you break it down it can be easier than you think!
Before the final step, be sure to add any final details that you may like for the drawing. For example, you may want to draw a face for your character!
You could take it even further and draw a full body and background if you want to make it as complete as possible. Then, we will be ready for some colors in the final step of the guide.
Step 6: Now, finish off with some color
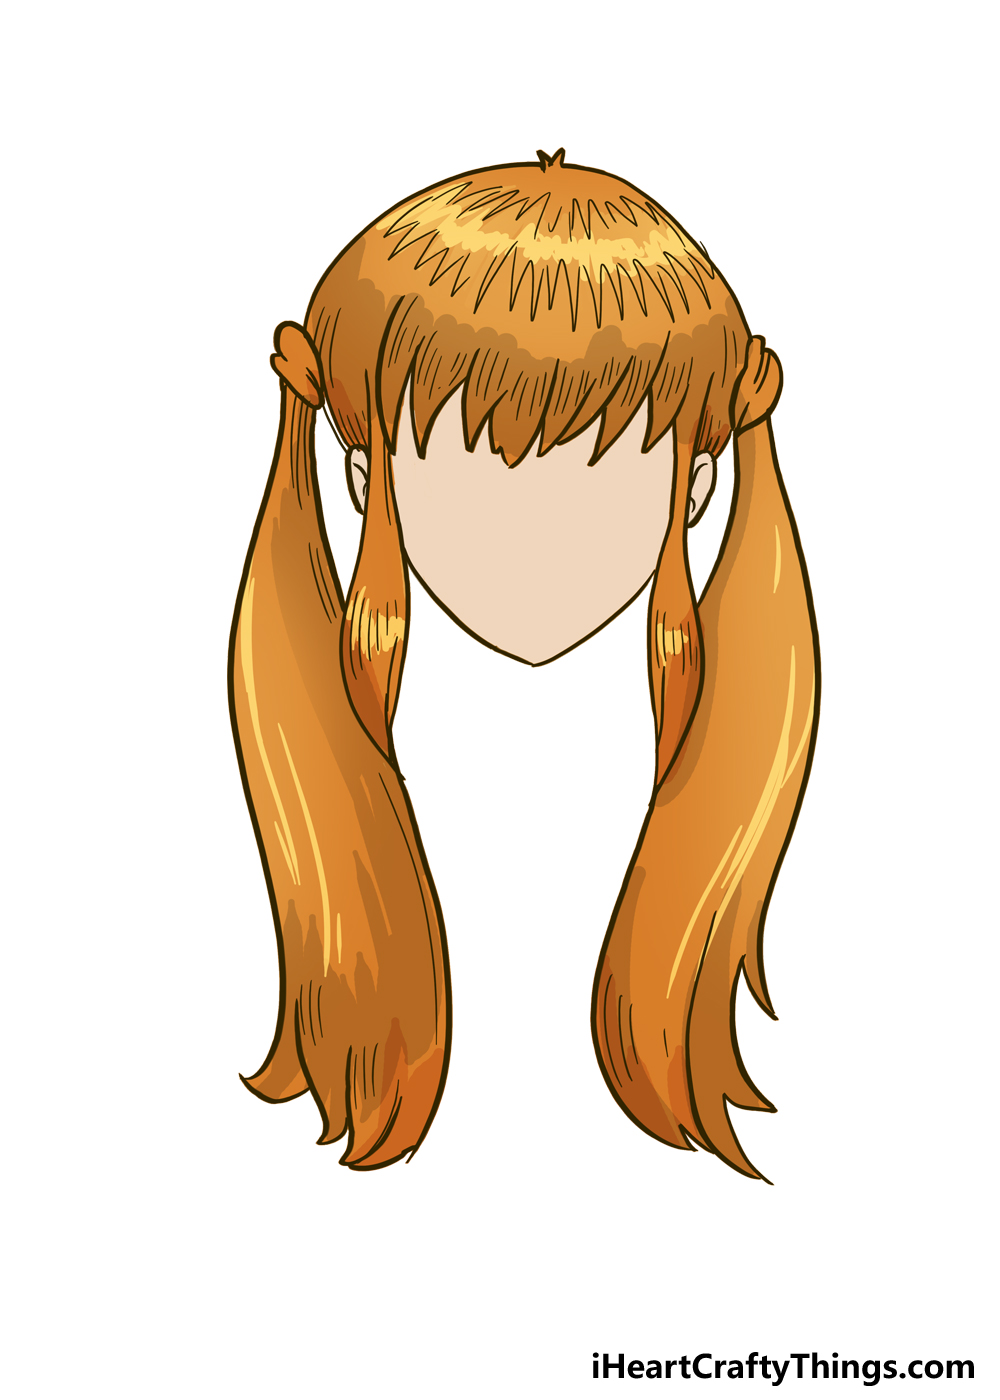
Now it’s time to kick back and relax with some coloring fun for this anime girls hair drawing. When you first look at the color scheme we chose, it may seem rather simple!
We went with a brown color scheme for our example, but we incorporated a lot of different shades and variations of the colors to add some highlights and shading.
If you like the way this looks, you can try and replicate it as it looks in our example. Otherwise, we also encourage you to try out some of your own ideas!
When it comes to anime hair, you will see pretty much any colors you can imagine. That means you have a wide palette available to you as you color.
Not only can you use any of your favorite colors, but you can also incorporate many different art tools and mediums as well. If you want the colors to look bright and vibrant, then colored pens or markers could be a good bet.
To replicate the style of classic anime, you could use watercolor or acrylic paint. It can also be fun to mix different mediums together!
For example, you could use a lighter watercolor for most of the hair and then use pens for the highlights to make them stand out. This is just one example of how you could color your creation!
Be sure to have fun and experiment with colors and mediums and see what happens. Whatever you choose, we know it will look amazing!
Bonus: Here Are Some More Ideas For Your Anime Girls Hair Drawing
This guide on how to draw anime girls hair showed you how you can recreate a classic anime girl’s hair style. Now that you have completed the guide, you may be wondering how else you can build on this drawing.
There are a few ways to do this, some of which include changing the existing drawing while others could focus on a brand new one.
For now, let’s focus on the original drawing. You could keep the drawing more or less the same but create some additions of your own.
You will see that we left the face if this anime character blank, and this opens up all sorts of options. Adding a face to the drawing would immediately give it even more personality.
You could base this face on an existing anime character you’re a fan of, or you could go for an entirely unique facial design. Perhaps it could be based on someone you know, or you could try your hand at creating your own unique face.
If you would like to create your own unique version of this drawing, you could also change the hairstyle of the drawing. This could also be a great way to create multiple versions of the drawing.
Once again, you could either refer to existing people or even use anime characters that already exist as your inspiration. Of course, creating your own hairstyles is always an option!
If you can’t narrow down your ideas to one drawing, then you could make a few different sketches and attempts at the drawing. This way, you can try out all of your ideas to find what works for you!
What are some other hairstyles you could create for this drawing?
Your Anime Girls Hair Drawing is Complete!
You did an amazing job on all six steps of this guide on how to draw anime girls hair! Anime hairstyles can be quite complex, and this one was no different.
However, we hope that by breaking it down into smaller steps that you found it to be easier than you may have thought. Now that you have mastered this guide, you’re ready to take it in whole new directions.
You could make variations on this hairstyle by changing a few small details or by changing up the colors a bit instead. These are more subtle ways, but you can go even further with it.
One way would be to take what you learned in this guide and use it to create entirely unique hairstyles.
There are a few ways that you could do this, and one would be to use your favorite existing anime hairstyle as inspiration.
Or, you could create your own anime hairstyle based on a real-life hairstyle or from your own imagination!
When your artwork is done, feel free to share it to our Facebook and Pinterest pages so we can se how it turned out.